| View previous topic :: View next topic |
| Author |
Message |
mo


Joined: 27 Aug 2009
Posts: 8979
Location: Australia
Expire: 2016-07-30
|
 Posted: Mon Sep 05, 2011 9:09 am Post subject: Exposure for shadows and normal light in a landscape Posted: Mon Sep 05, 2011 9:09 am Post subject: Exposure for shadows and normal light in a landscape |
 |
|
mo wrote:
Hi All
I have been continually frustrated by my lack of skill in exposing certain landscapes correctly.
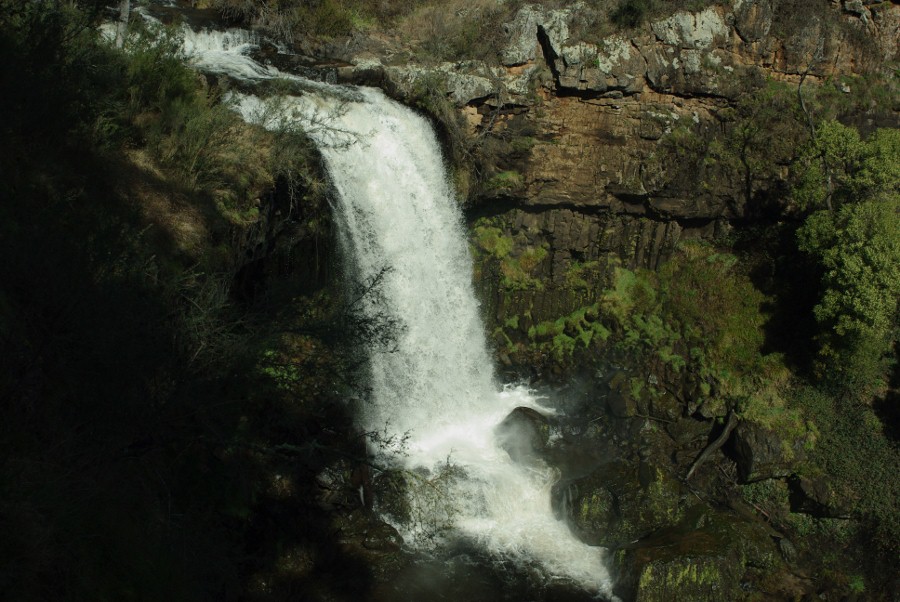
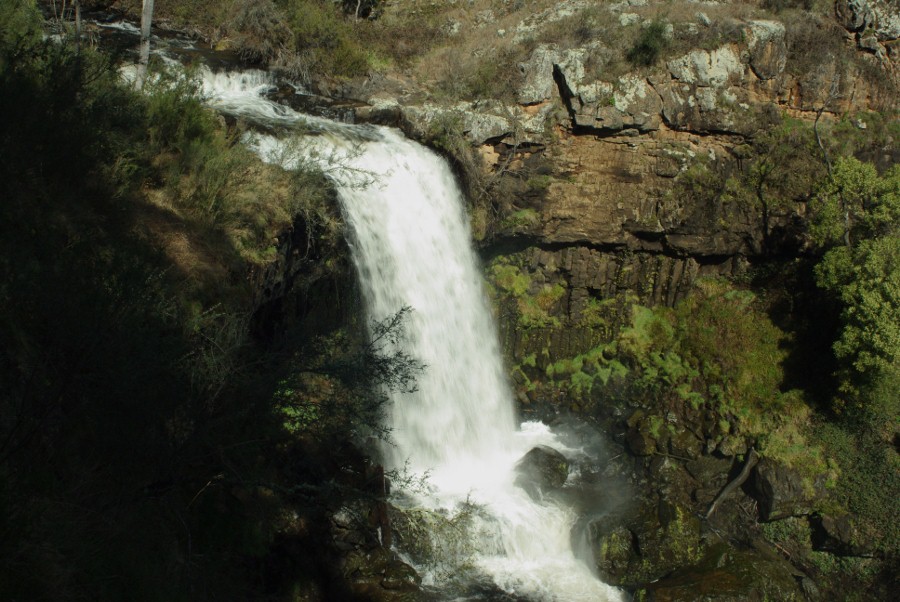
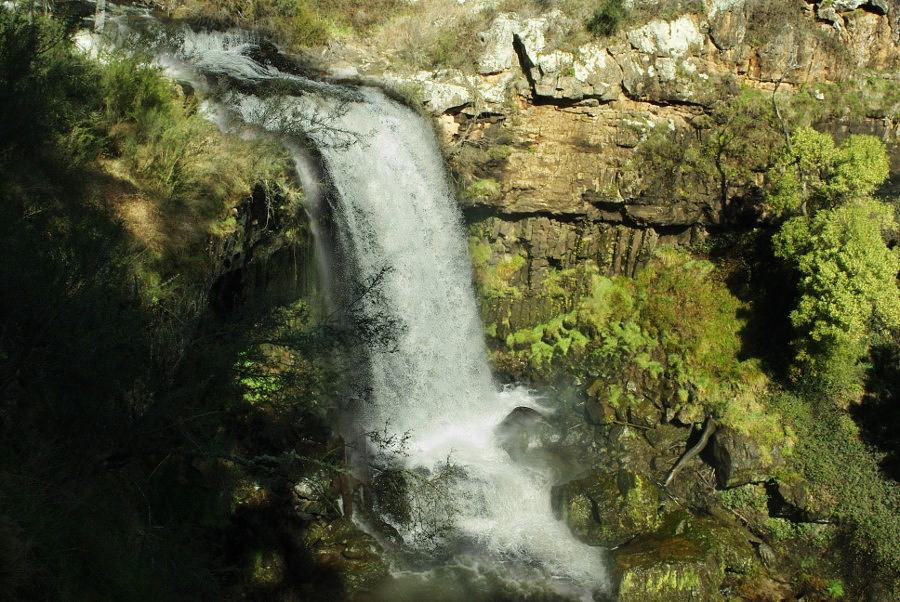
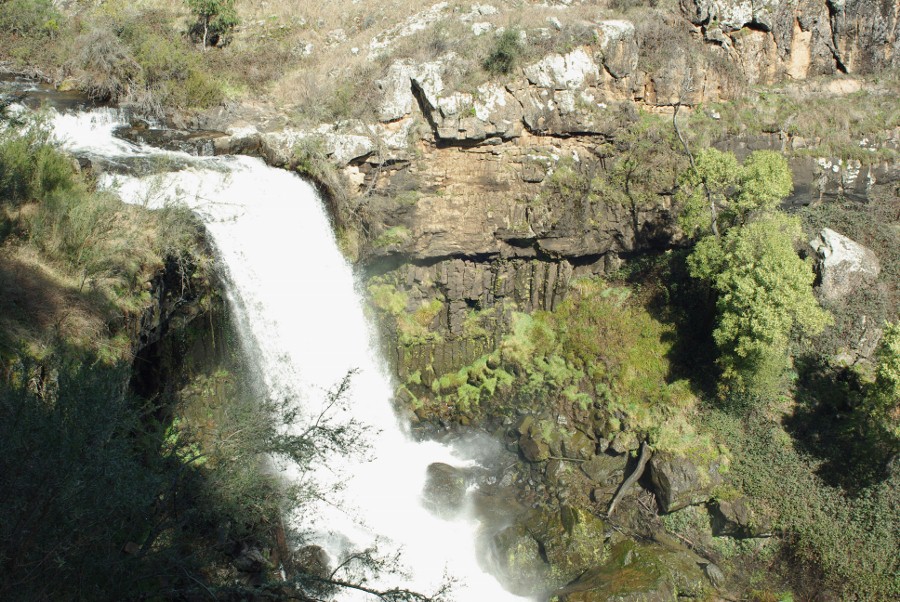
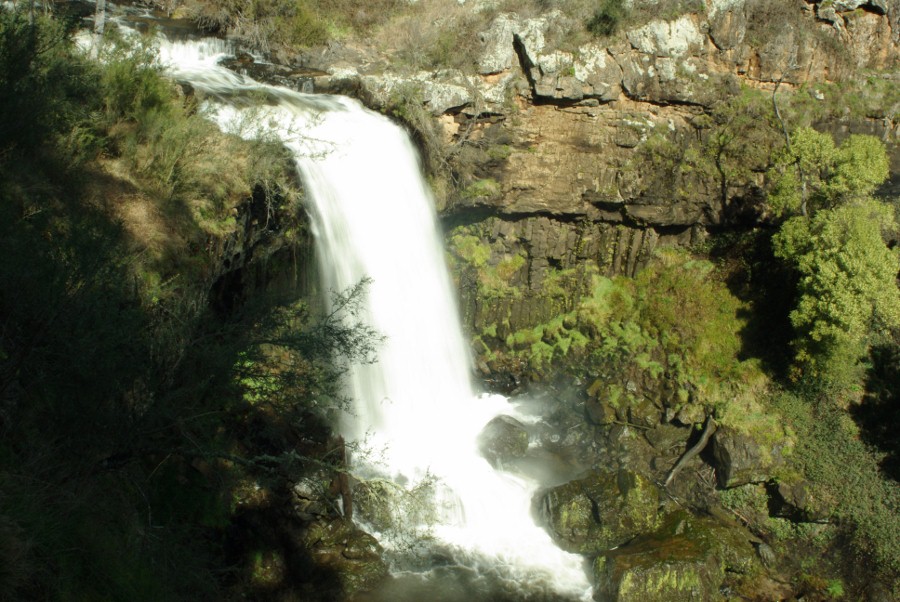
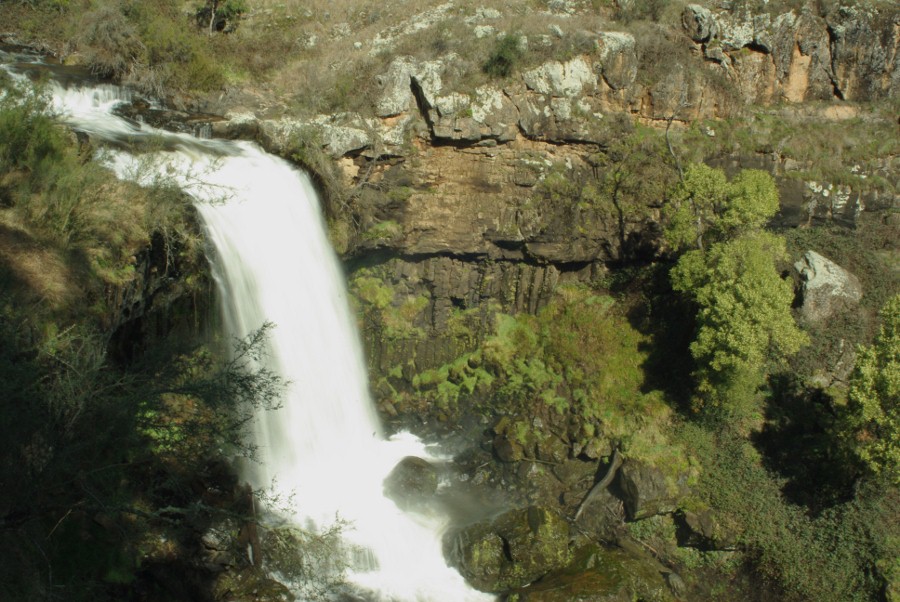
For this latest struggle it was an waterfall in a valley and a half in shadow and half in light situation. What is the best way to expose for a water fall,even when I had a half decent image (my opinion) I still had the water fall over exposed and blown out to a white non detailed mess.
I find it hard to say what the problem is so here are some images taken that may help to you understand what I am saying.
I tried exposing for the shadow,I tried with and without the CPL filter....but I did not get a perfect image that I really liked. 
I have PP'd some of these to try and bring out shadow detail.
#1These are from the Tamron2.5/28
#2
#3

#4
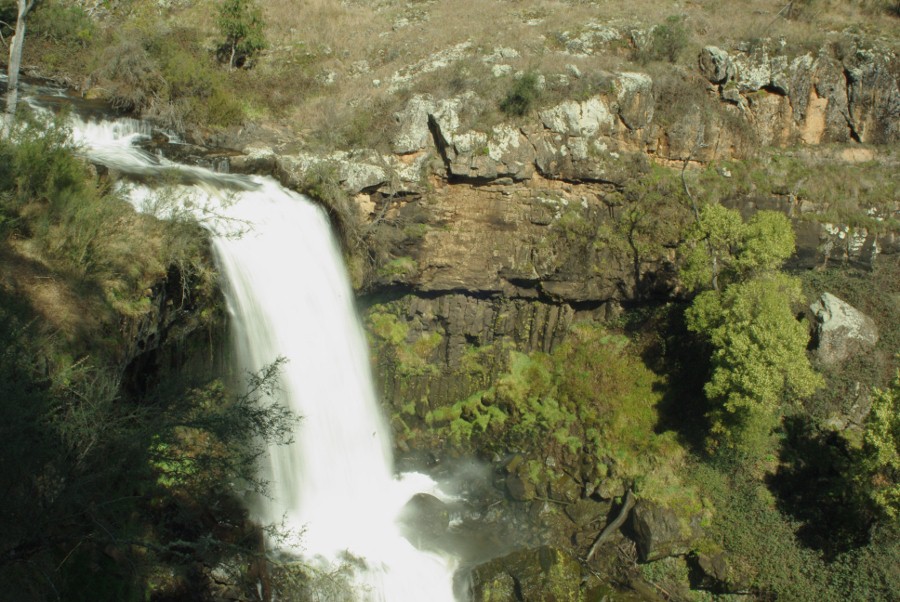
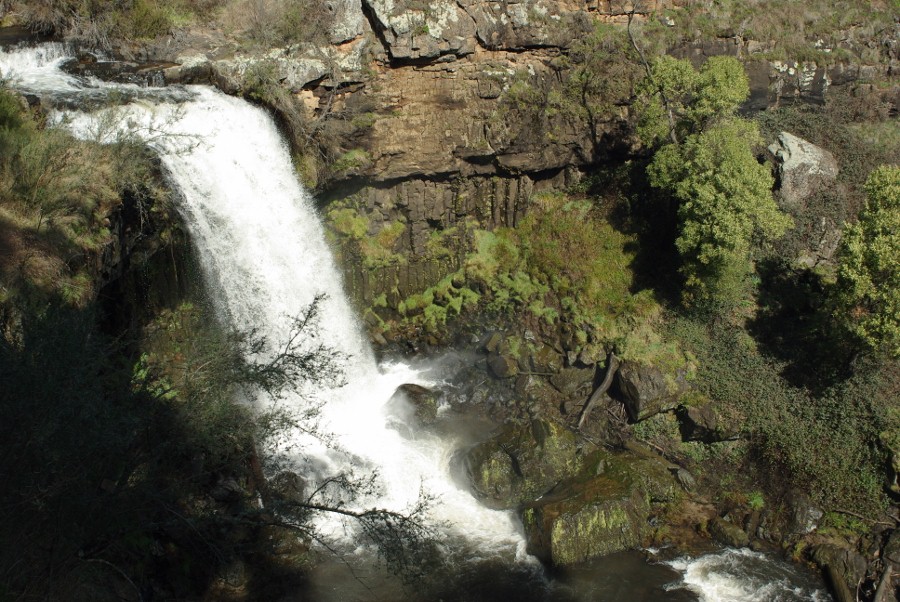
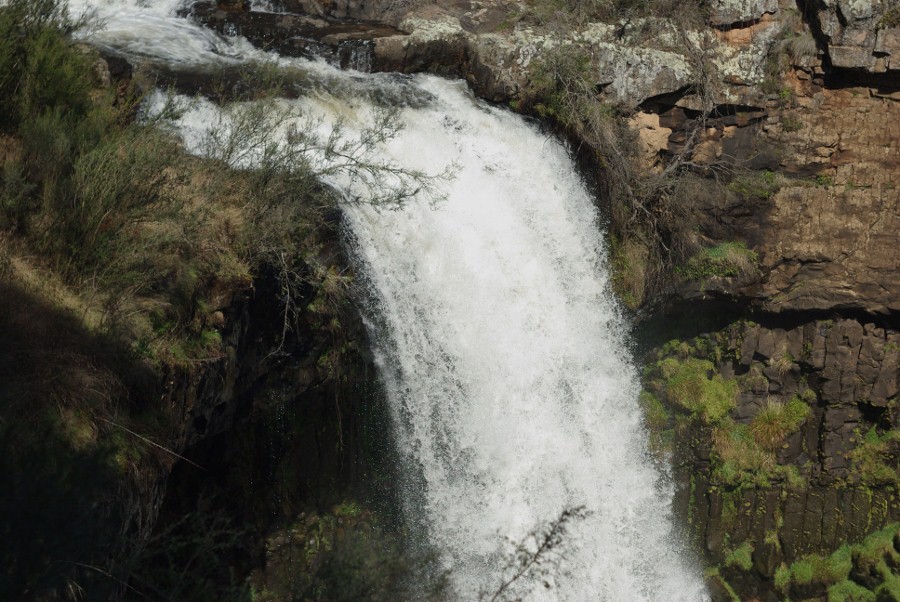
#5 This is the best one but if I increase the brightness for the shadow I blow out the waterfall detail.

#6
#7

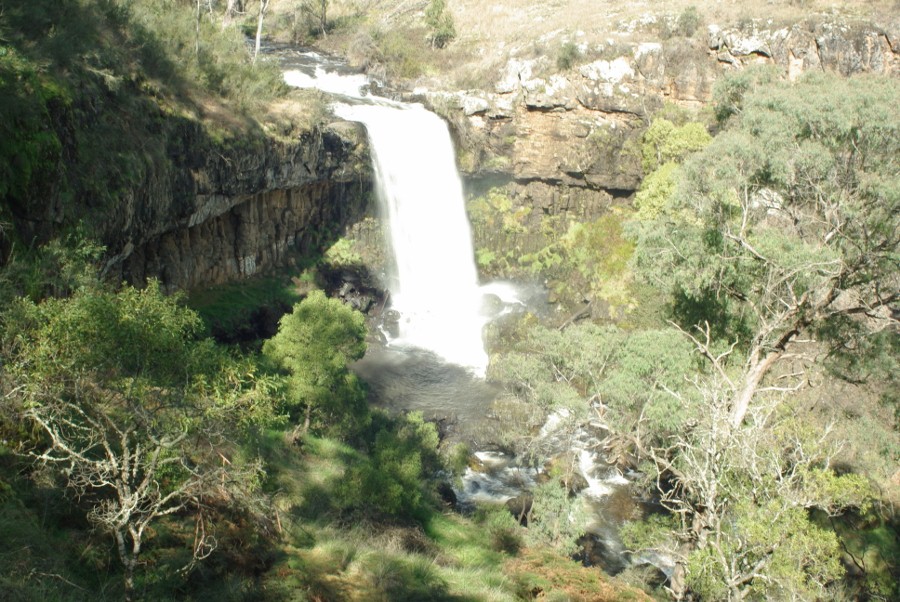
#8This shows the whole area

_________________
Moira, Moderator 
Fuji XE-1,Pentax K-01,Panasonic G1,Panasonic G5,Pentax MX
Ricoh Singlex TLS,KR-5,KR-5Super,XR-10
Lenses
Auto Rikenon's 55/1.4, 1.8, 2.8... 50/1.7 Takumar 2/58 Preset Takumar 2.8/105 Auto Takumar 2.2/55, 3.5/35 Super Takumar 1.8/55...Macro Takumar F4/50... CZJ Biotar ALU M42 2/58 CZJ Tessar ALU M42 2.8/50
CZJ DDR Flektogon Zebra M42 2.8/35 CZJ Pancolar M42 2/50 CZJ Pancolar Exakta 2/50
Auto Mamiya/Sekor 1.8/55 ...Auto Mamiya/Sekor 2/50 Auto Mamiya/Sekor 2.8/50 Auto Mamiya/Sekor 200/3.5 Tamron SP500/8 Tamron SP350/5.6 Tamron SP90/2.5
Primoplan 1.9/58 Primagon 4.5/35 Telemegor 5.5/150 Angenieux 3.5/28 Angenieux 3,5/135 Y 2
Canon FL 58/1.2,Canon FL85/1.8,Canon FL 100/3.5,Canon SSC 2.8/100 ,Konica AR 100/2.8, Nikkor P 105/2.5
|
|
| Back to top |
|
 |
Orio

Joined: 24 Feb 2007
Posts: 29545
Location: West Emilia
Expire: 2012-12-04
|
| Posted: Mon Sep 05, 2011 9:26 am Post subject: |
|
|
Orio wrote:
There are situations that exceed the dynamic range of any camera, and especially of digital cameras.
A possibility is to use multiple layering or HDRI techniques, that allow you to mix parts taken from different photos taken with different exposures. There are HDRI software that allow to automate the process. I find the results of these often too unreal for my satisfaction. I prefer the manual way by layering different takes in photoshop and manually masking parts.
Of course you need a tripod and a remote. A bracketing function in your camera can be handy but you can also bracket manually.
The equivalent of this in traditional photography is "burning" and "dodging" when chemically printing your B&W negatives.
If instead you want to do it only in "one go", you need to select what is more important in your photograph. If the waterfall is the most important part, then you have to expose for the waterfall, making sure that only the brightest spots in it end up white. This may reveal to be tricky even with a spot hand meter. I always suggest in this case to either meter on a 18% grey cardboard places in the same lighting situation as your main subject, or even better, measure the light incidentally, i.e. point your hand meter towards the light source (the sun, in this case) with the protection on.
Even in this case I suggest to bracket three exposures, one on the exact value of the incident light, and other two takes half stop less and more than incident light value. You can then evaluate visually what you like better.
_________________
Orio, Administrator
T*
NE CEDE MALIS AUDENTIOR ITO
Ferrania film is reborn! http://www.filmferrania.it/
Support the Ornano film chemicals company and help them survive!
http://forum.mflenses.com/ornano-chemical-products-t55525.html |
|
| Back to top |
|
|
mo
Joined: 27 Aug 2009
Posts: 8979
Location: Australia
Expire: 2016-07-30
|
| Posted: Mon Sep 05, 2011 9:36 am Post subject: |
|
|
mo wrote:
Thank you Orio,I do not have the funds for HDR software or the PC to run it so not an option at the moment... .I am grateful for your reply though as it has given me a few things to work on and try.This waterfall is about 2hrs drive away so I can go back and try again. 
I guess the waterfall would be the focal point and most important exposure point for me.
_________________
Moira, Moderator
Fuji XE-1,Pentax K-01,Panasonic G1,Panasonic G5,Pentax MX
Ricoh Singlex TLS,KR-5,KR-5Super,XR-10
Lenses
Auto Rikenon's 55/1.4, 1.8, 2.8... 50/1.7 Takumar 2/58 Preset Takumar 2.8/105 Auto Takumar 2.2/55, 3.5/35 Super Takumar 1.8/55...Macro Takumar F4/50... CZJ Biotar ALU M42 2/58 CZJ Tessar ALU M42 2.8/50
CZJ DDR Flektogon Zebra M42 2.8/35 CZJ Pancolar M42 2/50 CZJ Pancolar Exakta 2/50
Auto Mamiya/Sekor 1.8/55 ...Auto Mamiya/Sekor 2/50 Auto Mamiya/Sekor 2.8/50 Auto Mamiya/Sekor 200/3.5 Tamron SP500/8 Tamron SP350/5.6 Tamron SP90/2.5
Primoplan 1.9/58 Primagon 4.5/35 Telemegor 5.5/150 Angenieux 3.5/28 Angenieux 3,5/135 Y 2
Canon FL 58/1.2,Canon FL85/1.8,Canon FL 100/3.5,Canon SSC 2.8/100 ,Konica AR 100/2.8, Nikkor P 105/2.5
|
|
| Back to top |
|
|
std


Joined: 09 Feb 2010
Posts: 1826
Location: Bulgaria
|
| Posted: Mon Sep 05, 2011 10:22 am Post subject: |
|
|
std wrote:
I think the first one looks best (at least on my poor laptop screen)
It may be good if you can try different lightning conditions (or a different angle) - the strong light of the mid day sun is too harsh. Tripod and RAW are must - you can play in the raw developer later.
Btw there are free or open source HDR programs ( just google 'free hdr software')
_________________
Stefan
My lens list:
SLR MD: Rokkor 1,7/50 Exakta: Kilfitt-Makro-Kilar E 3.5/4cm; CZJ 2/50 Pancolar;M42: CZJ 2.8/50 Tessar; Mir-1B 2.8/37; Jupiter-9 2/85 T-mount: Tamron 5.9/200; Tamron 6.9/300; Tamron 7.5/400 C-mount: Cosmicar 1.8/50 Y/S: Sun 3.5/38-90, Sun 4/70-210 RF Contax RF: Jupiter-8 2/50; Contax G:CZ 2,8/21 Biogon T; CZ 2,8/28 Biogon T; CZ 2/35 Planar T; CZ 2/45 Planar T; CZ 2,8/90 Sonnar T |
|
| Back to top |
|
|
mastazeko

Joined: 14 Mar 2011
Posts: 128
Location: Domžale, Slovenia
|
| Posted: Mon Sep 05, 2011 12:00 pm Post subject: |
|
|
mastazeko wrote:
I think best to use here is exposure blending with masks in this situation.
_________________
Bostjan
Camera: Nikon D7000
Lenses:
Nikon: 24/2.8, Series-E 28/2.8, 50/1.4 AI, 80-200/4.5 AI
Helios:81H 50/2
Tokina:SD 70-210/4-5,6 Macro
|
|
| Back to top |
|
|
Himself
Joined: 01 Mar 2007
Posts: 3242
Location: Montreal
Expire: 2013-05-30
|
| Posted: Mon Sep 05, 2011 12:19 pm Post subject: |
|
|
Himself wrote:
If you go back, shoot from the base of the fall - if possible - and wait for the afternoon hours, 1-2 hours before sunset.
You'll never get a proper exposure in midday for a fall that huge unless it's entirely shadowed by something else.
_________________
Moderator Himself |
|
| Back to top |
|
|
visualopsins

Joined: 05 Mar 2009
Posts: 10966
Location: California
Expire: 2025-04-11
|
| Posted: Mon Sep 05, 2011 12:45 pm Post subject: |
|
|
visualopsins wrote:
At a different time of day the lighting range will be more manageable...and more dramatic! 
_________________
☮☮☮☮☮☮☮☮☮☮☮☮☮☮☮☮☮☮☮☮☮☮☮☮☮☮☮☮☮☮☮☮ like attracts like! ☮☮☮☮☮☮☮☮☮☮☮☮☮☮☮☮☮☮☮☮☮☮☮☮☮☮☮☮☮☮☮☮
Cameras: Sony ILCE-7RM2, Spotmatics II, F, and ESII, Nikon P4
Lenses:
M42 Asahi Optical Co., Takumar 1:4 f=35mm, 1:2 f=58mm (Sonnar), 1:2.4 f=58mm (Heliar), 1:2.2 f=55mm (Gaussian), 1:2.8 f=105mm (Model I), 1:2.8/105 (Model II), 1:5.6/200, Tele-Takumar 1:5.6/200, 1:6.3/300, Macro-Takumar 1:4/50, Auto-Takumar 1:2.3 f=35, 1:1.8 f=55mm, 1:2.2 f=55mm, Super-TAKUMAR 1:3.5/28 (fat), 1:2/35 (Fat), 1:1.4/50 (8-element), Super-Multi-Coated Fisheye-TAKUMAR 1:4/17, Super-Multi-Coated TAKUMAR 1:4.5/20, 1:3.5/24, 1:3.5/28, 1:2/35, 1:3.5/35, 1:1.8/85, 1:1.9/85 1:2.8/105, 1:3.5/135, 1:2.5/135 (II), 1:4/150, 1:4/200, 1:4/300, 1:4.5/500, Super-Multi-Coated Macro-TAKUMAR 1:4/50, 1:4/100, Super-Multi-Coated Bellows-TAKUMAR 1:4/100, SMC TAKUMAR 1:1.4/50, 1:1.8/55
M42 Carl Zeiss Jena Flektogon 2.4/35
Contax Carl Zeiss Vario-Sonnar T* 28-70mm F3.5-4.5
Pentax K-mount SMC PENTAX-A ZOOM 1:3.5 35~105mm, SMC PENTAX ZOOM 1:4 45~125mm
Nikon Micro-NIKKOR-P-C Auto 1:3.5 f=55mm, NIKKOR-P Auto 105mm f/2.5 Pre-AI (Sonnar), Micro-NIKKOR 105mm 1:4 AI, NIKKOR AI-S 35-135mm f/3,5-4,5
Tamron SP 17mm f/3.5 (51B), Tamron SP 17mm f/3.5 (151B), SP 500mm f/8 (55BB), SP 70-210mm f/3.5 (19AH)
Vivitar 100mm 1:2.8 MC 1:1 Macro Telephoto (Kiron)
|
|
| Back to top |
|
|
greg

Joined: 21 Mar 2009
Posts: 683
Expire: 2012-12-03
|
| Posted: Mon Sep 05, 2011 12:53 pm Post subject: |
|
|
greg wrote:
I started out with FDRTools Basic which is freeware. I have added a link below to a website where several others including FDRTools Basic are reviewed. I can recommend the software itself, but I have never downloaded from this website.
FDRBasic does a fine job getting you familiar with the terminology of HDR rendering and actually producing decent image results.
http://www.techsupportalert.com/best-free-high-dynamic-range-hdr-software.htm |
|
| Back to top |
|
|
fuzzywuzzy

Joined: 18 Dec 2010
Posts: 1258
Location: Down East, Canada, eh?
Expire: 2013-11-30
|
| Posted: Mon Sep 05, 2011 1:08 pm Post subject: |
|
|
fuzzywuzzy wrote:
I think the first rule of waterfalls is "hope for a cloudy day". 
There's a guy attempting to photograph all the waterfalls in New Brunswick (Canada). His descriptions sometimes apologize for the quality of the photo because it was taken on a sunny day.
http://waterfallsnewbrunswick.ca/
Shooting water at dawn/dusk also gets rid of the reflections, and makes it easy to get long exposures of smooth silky flowing water... tripod required of course.
I'm not a fan of garish in-your-face HDR, but it is possible to gently use these tools to get sensible results.
Here's a list of "fantastic" HDR pictures. I dislike most of them but the inside of the cathedral HDR is a "normal looking" shot from a difficult lighting situation.
http://www.smashingmagazine.com/2008/03/10/35-fantastic-hdr-pictures/
I plan to dabble in HDR a bit this winter, imagine taking that same shot but with snow on the ground.
_________________
I welcome C&C, editing my pics and reposting them on the forum is fine.
NEX-F3
~~~~~~~~~
CZJ Sonnar 135/4, Biotar 58/2, Pancolar 50/2, Tessar 50/2.8, Flek 35/2.8, Flek 25/4
Super Takumar 135/2.5, 135/3.5, 100/4 bellows, 50/1.4, 28/3.5
Helios 58/2, 3M-5A 500/8, Mir 20M
Vivitar Series 1 70-210 - - - - - - - - Nikkor 200/4
Rikenon 28/2.8 - - - - - - - - Zeiss 50/1.7 Planar
PB 50/2.4, 135/2.8
Yashica 50/1.9, 28/2.8, 135/2.8
Hexanon 28/3.5, 50/1.4 |
|
| Back to top |
|
|
greg
Joined: 21 Mar 2009
Posts: 683
Expire: 2012-12-03
|
| Posted: Mon Sep 05, 2011 2:24 pm Post subject: |
|
|
greg wrote:
HDR should result in an image that makes the viewer wonder "how was that done to capture all the details - low/mid/highlights" rather then look at it and say "that looks like a cartoon". The preceding is my own opinion.
I am entitled my own wrong opinion, the same as you are. |
|
| Back to top |
|
|
poilu
Joined: 26 Aug 2007
Posts: 10472
Location: Greece
Expire: 2019-08-29
|
| Posted: Mon Sep 05, 2011 3:56 pm Post subject: |
|
|
poilu wrote:
try a film camera, you will certainly get better pics than those flat digital samples
_________________
T* |
|
| Back to top |
|
|
martinsmith99

Joined: 31 Aug 2008
Posts: 6950
Location: S Glos, UK
Expire: 2013-11-18
|
| Posted: Mon Sep 05, 2011 5:48 pm Post subject: |
|
|
martinsmith99 wrote:
I believe that HDR software is the work of Satan. Actually, used sensibly, it can giv good results.
I would not try and shoot this in the light that you have. ND grads can help, but this is a bit of a tricky one to align.
Two exposures; one for highlights and one for shadows and combined using a layer mask and sof brush would look better.
_________________
Casual attendance these days |
|
| Back to top |
|
|
peterqd

Joined: 28 Feb 2007
Posts: 7448
Location: near High Wycombe, UK
Expire: 2014-01-04
|
| Posted: Mon Sep 05, 2011 7:20 pm Post subject: |
|
|
peterqd wrote:
Moira, I tried doing what Orio suggested - using two layers and masking out the under- and over-exposed sections. It's not possible with these pics though, because they are all taken from slightly different positions. You need to use a tripod and clamp the camera tight so that it doesn't move. Then any picture can be perfectly aligned with the others.
This isn't the complete answer by any means, but I wonder if you have a polarised filter? This would decrease the sun's reflections on the water quite a lot and allow you to open up a little for the shadows.
_________________
Peter - Moderator |
|
| Back to top |
|
|
Excalibur

Joined: 19 Jul 2009
Posts: 5017
Location: UK
Expire: 2014-04-21
|
| Posted: Mon Sep 05, 2011 7:26 pm Post subject: |
|
|
Excalibur wrote:
Would doing a pano help  anyway it's worth a try. anyway it's worth a try.
_________________
Canon A1, AV1, T70 & T90, EOS 300 and EOS300v, Chinon CE and CP-7M. Contax 139, Fuji STX-2, Konica Autoreflex TC, FS-1, FT-1, Minolta X-700, X-300, XD-11, SRT101b, Nikon EM, FM, F4, F90X, Olympus OM2, Pentax S3, Spotmatic, Pentax ME super, Praktica TL 5B, & BC1, , Ricoh KR10super, Yashica T5D, Bronica Etrs, Mamiya RB67 pro AND drum roll:- a Sony Nex 3
.........past gear Tele Rolleiflex and Rollei SL66.
Many lenses from good to excellent. |
|
| Back to top |
|
|
mastazeko
Joined: 14 Mar 2011
Posts: 128
Location: Domžale, Slovenia
|
| Posted: Mon Sep 05, 2011 9:49 pm Post subject: |
|
|
mastazeko wrote:
Here's exposure blending with two shots. A quick 1 minute mask job so with tripod shots and more precise masking, this could work. Best advice though is to shoot during better light conditions

_________________
Bostjan
Camera: Nikon D7000
Lenses:
Nikon: 24/2.8, Series-E 28/2.8, 50/1.4 AI, 80-200/4.5 AI
Helios:81H 50/2
Tokina:SD 70-210/4-5,6 Macro
|
|
| Back to top |
|
|
mo
Joined: 27 Aug 2009
Posts: 8979
Location: Australia
Expire: 2016-07-30
|
| Posted: Mon Sep 05, 2011 10:11 pm Post subject: |
|
|
mo wrote:
Thanks to all for your input and links to HDR freeware! I have enough suggestions from you all to have another trip to these falls....at a different time of day.
mastazeko...thanks for showing me what can be done.
_________________
Moira, Moderator
Fuji XE-1,Pentax K-01,Panasonic G1,Panasonic G5,Pentax MX
Ricoh Singlex TLS,KR-5,KR-5Super,XR-10
Lenses
Auto Rikenon's 55/1.4, 1.8, 2.8... 50/1.7 Takumar 2/58 Preset Takumar 2.8/105 Auto Takumar 2.2/55, 3.5/35 Super Takumar 1.8/55...Macro Takumar F4/50... CZJ Biotar ALU M42 2/58 CZJ Tessar ALU M42 2.8/50
CZJ DDR Flektogon Zebra M42 2.8/35 CZJ Pancolar M42 2/50 CZJ Pancolar Exakta 2/50
Auto Mamiya/Sekor 1.8/55 ...Auto Mamiya/Sekor 2/50 Auto Mamiya/Sekor 2.8/50 Auto Mamiya/Sekor 200/3.5 Tamron SP500/8 Tamron SP350/5.6 Tamron SP90/2.5
Primoplan 1.9/58 Primagon 4.5/35 Telemegor 5.5/150 Angenieux 3.5/28 Angenieux 3,5/135 Y 2
Canon FL 58/1.2,Canon FL85/1.8,Canon FL 100/3.5,Canon SSC 2.8/100 ,Konica AR 100/2.8, Nikkor P 105/2.5
|
|
| Back to top |
|
|
Scheimpflug

Joined: 06 Feb 2010
Posts: 1888
Location: New Zealand / USA
Expire: 2011-11-18
|
| Posted: Tue Sep 06, 2011 5:58 pm Post subject: |
|
|
Scheimpflug wrote:
Also keep in mind that you need to use a fast shutter speed to freeze motion. You could have a perfect exposure of the waterfall, but still have it look like cotton candy (without any discernible detail) if the shutter speed is too slow.
_________________
Sigma DP1, Nikon D40 (hers ), Polaroid x530, Pentax P30t, Pentax P50, (P30t/P50 K-A to Nikon F body mount conversion)
Nikon: 18-55/3.5-5.6 "G ED II DX" (F) Soligor: 28/2.8 (FL->F converted), 135/3.5 (F), 3x TC (F, modified) Kalimar: 28-85/3.5 (F)
Vivitar: 70-210/2.8-4.0 Version 3 (F), Tele 500/6.3 Preset (F), 19/3.8 (F) Minolta: 300/5.6 (SR/MC/MD pending F conversion)
Tamron: 28/2.8 (Adaptall) Panagor: 28/2.5 (FD) Aetna: 300/5.6 (F) Osawa: MC 28/2.8 (F)
Vintage Lenses: Dallmeyer: 1940s A.M. 14in 356mm f4 (ULF->M42) 1930s Adon Telephoto Taylor, Taylor & Hobson: 1880s Rapid Rectilinear 8 1/2 x 6 1/2 11.31in f/8 (LF->?)
Parts Lenses: Nikon 35-135/3.5-4.5 (F), Sigma 70-210/4.5 (F), Nikon 50/1.8 Series E (F) |
|
| Back to top |
|
|
David
Joined: 13 Apr 2011
Posts: 1869
Location: Denver, Colorado
Expire: 2013-01-25
|
| Posted: Tue Sep 06, 2011 7:04 pm Post subject: |
|
|
David wrote:
Hey, Mo,
Does the 200D have in-camera HDR? I know my K-7 does, but I don't know the 200D's functions well. If so, that could help. I use in-camera HDR when I have extreme contrasts outside of a single-shot's range. I'll post some photos when I get home if I have them still.
As has been suggested, different times of day might help. Also, a different lens. Another option may be, if you have them, some ND filters. If you're interested in a soft-water effect, that's certainly the way to go. If you want to freeze-frame the water, then you'll have more limited options.
Have you ever been to Aviary.com? It's a free, on-line host of photo editing tools and other programs. Photoscape is a free photo editor that also has some capabilities. For instance, Photoscape has a backlight function that redistributes image lighting to correct for backlighting issues. It has the added bonus of neutralizing harsh shadows. That may be a solution.
_________________
http://www.youtube.com/user/hancockDavidM |
|
| Back to top |
|
|
mo
Joined: 27 Aug 2009
Posts: 8979
Location: Australia
Expire: 2016-07-30
|
| Posted: Tue Sep 06, 2011 10:31 pm Post subject: |
|
|
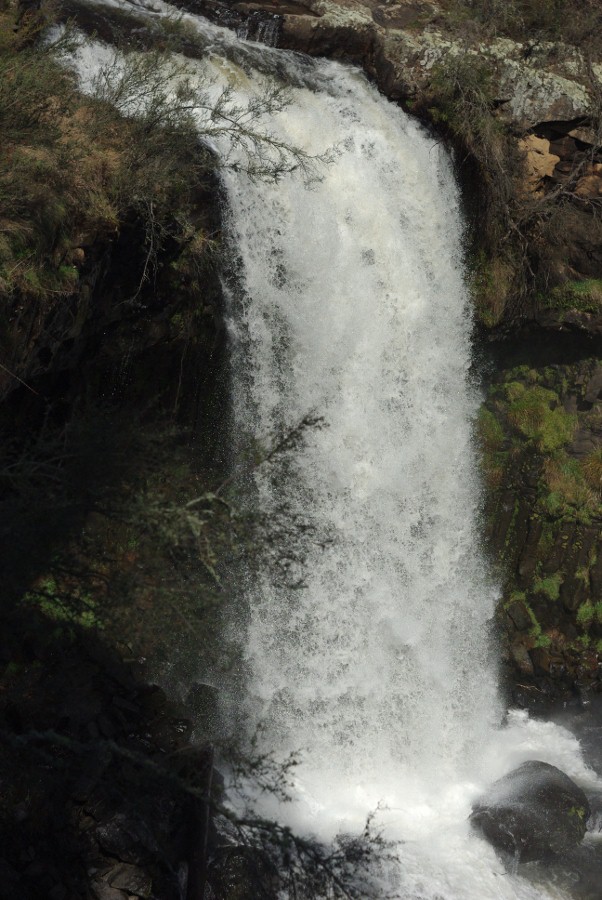
mo wrote:
Thanks Scheimp
David, I don't think the K200d has HDR,I know it has filters...I will check the book.
These are some images from the biotar 2/58 that I took with me.Easier to focus on the waterfall but it does not give you the whole picture.I will check out the website...I always struggle with backlight. I do however want to try using Photographic techniques first and discover what works and what doesn't.

_________________
Moira, Moderator
Fuji XE-1,Pentax K-01,Panasonic G1,Panasonic G5,Pentax MX
Ricoh Singlex TLS,KR-5,KR-5Super,XR-10
Lenses
Auto Rikenon's 55/1.4, 1.8, 2.8... 50/1.7 Takumar 2/58 Preset Takumar 2.8/105 Auto Takumar 2.2/55, 3.5/35 Super Takumar 1.8/55...Macro Takumar F4/50... CZJ Biotar ALU M42 2/58 CZJ Tessar ALU M42 2.8/50
CZJ DDR Flektogon Zebra M42 2.8/35 CZJ Pancolar M42 2/50 CZJ Pancolar Exakta 2/50
Auto Mamiya/Sekor 1.8/55 ...Auto Mamiya/Sekor 2/50 Auto Mamiya/Sekor 2.8/50 Auto Mamiya/Sekor 200/3.5 Tamron SP500/8 Tamron SP350/5.6 Tamron SP90/2.5
Primoplan 1.9/58 Primagon 4.5/35 Telemegor 5.5/150 Angenieux 3.5/28 Angenieux 3,5/135 Y 2
Canon FL 58/1.2,Canon FL85/1.8,Canon FL 100/3.5,Canon SSC 2.8/100 ,Konica AR 100/2.8, Nikkor P 105/2.5
|
|
| Back to top |
|
|
peterqd
Joined: 28 Feb 2007
Posts: 7448
Location: near High Wycombe, UK
Expire: 2014-01-04
|
| Posted: Tue Sep 06, 2011 10:38 pm Post subject: |
|
|
peterqd wrote:
It's a magnificent waterfall whatever way you photograph it!
_________________
Peter - Moderator |
|
| Back to top |
|
|
mo
Joined: 27 Aug 2009
Posts: 8979
Location: Australia
Expire: 2016-07-30
|
| Posted: Tue Sep 06, 2011 10:43 pm Post subject: |
|
|
mo wrote:
Thanks Peter, It ran dry during the drought years ,as you can see the drought is over...
It is a worthy subject to practice on...just takes awhile to get there!
_________________
Moira, Moderator
Fuji XE-1,Pentax K-01,Panasonic G1,Panasonic G5,Pentax MX
Ricoh Singlex TLS,KR-5,KR-5Super,XR-10
Lenses
Auto Rikenon's 55/1.4, 1.8, 2.8... 50/1.7 Takumar 2/58 Preset Takumar 2.8/105 Auto Takumar 2.2/55, 3.5/35 Super Takumar 1.8/55...Macro Takumar F4/50... CZJ Biotar ALU M42 2/58 CZJ Tessar ALU M42 2.8/50
CZJ DDR Flektogon Zebra M42 2.8/35 CZJ Pancolar M42 2/50 CZJ Pancolar Exakta 2/50
Auto Mamiya/Sekor 1.8/55 ...Auto Mamiya/Sekor 2/50 Auto Mamiya/Sekor 2.8/50 Auto Mamiya/Sekor 200/3.5 Tamron SP500/8 Tamron SP350/5.6 Tamron SP90/2.5
Primoplan 1.9/58 Primagon 4.5/35 Telemegor 5.5/150 Angenieux 3.5/28 Angenieux 3,5/135 Y 2
Canon FL 58/1.2,Canon FL85/1.8,Canon FL 100/3.5,Canon SSC 2.8/100 ,Konica AR 100/2.8, Nikkor P 105/2.5
|
|
| Back to top |
|
|
|
|