| View previous topic :: View next topic |
| Author |
Message |
Scheimpflug


Joined: 06 Feb 2010
Posts: 1888
Location: New Zealand / USA
Expire: 2011-11-18
|
 Posted: Wed Jun 09, 2010 3:02 am Post subject: Pentax P30t - Broken advance lever Posted: Wed Jun 09, 2010 3:02 am Post subject: Pentax P30t - Broken advance lever |
 |
|
Scheimpflug wrote:
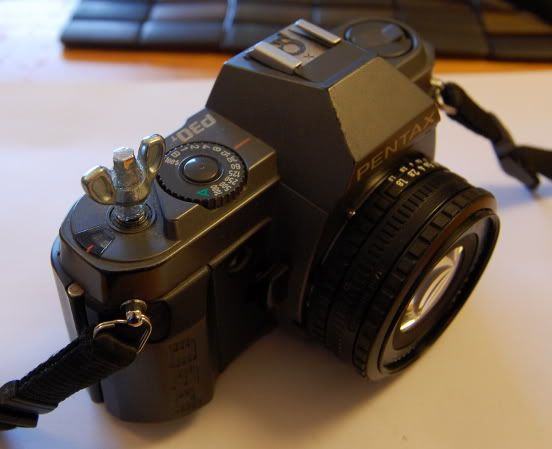
So I dropped into our local thrift store a few weeks back, and something caught my eye behind the counter. Could it be? A SLR? (It has been ages since I have seen anything other than 80's era plastic fixed-lens cameras).
I inspected it the best I could (dead batteries = no functionality, but it looked decent), and NZ $15 later (~US $10), I was the proud (?) owner of a Pentax P30t, a Takumar-A-Zoom 28-80mm f/3.5-4.5 lens, and a roll of Kodak Max 400. 
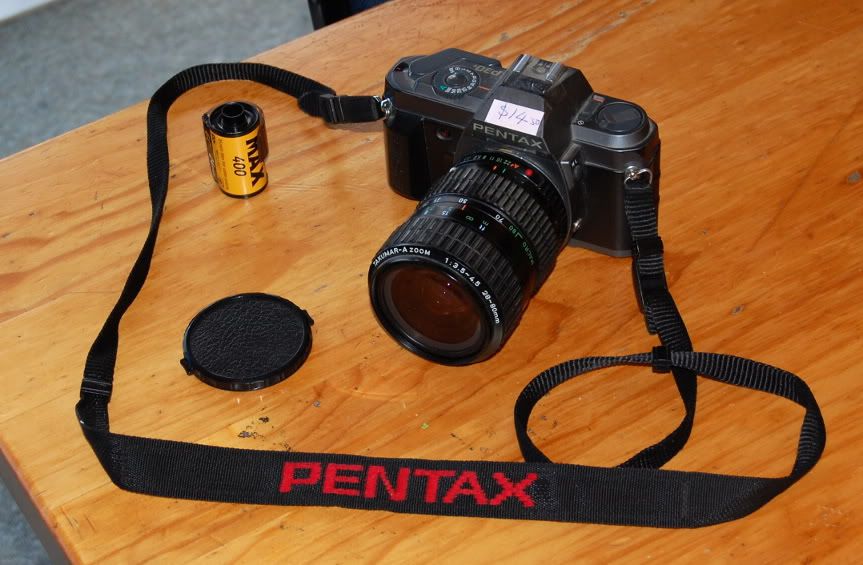
I brought it home and cleaned out the battery compartment, where the old batteries had been leaking. Fortunately, the green gunk from the old batteries was in a crystallized form that literally fell off cleanly when poked at with a toothpick, so I didn't have any corrosion or serious cleanup to deal with. NZ $3.50 in new batteries, and the meter was working and the shutter snapped! .... once. 
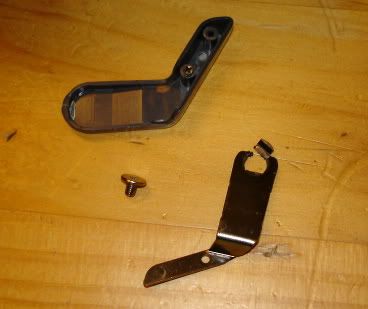
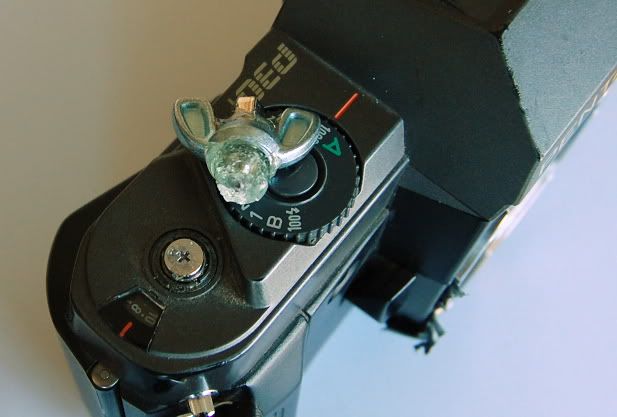
It turns out that the reason it was donated was because the advance lever is broken. It was a weak design, and someone pushed on it too hard and broke the end where it attaches to the camera. 
I searched for repair parts, but I can't find any on the internet. The P30t seems to have a street value of around US $30, so perhaps this model just isn't worth the time for anyone to part out?
I attempted to bend the broken part back into shape, but it is obvious that the metal is very fatigued, and the stresses have deformed the shape of the opening. It certainly will not hold up to regular use.
... But then I made a discovery. The screw holding the lever to the camera has reverse threads, so turning anti-clockwise tightens the screw. This is also the same direction as the lever needs to turn to advance the film! So, even with the broken lever, it is possible to advance the film (and wind the shutter) with a screwdriver!
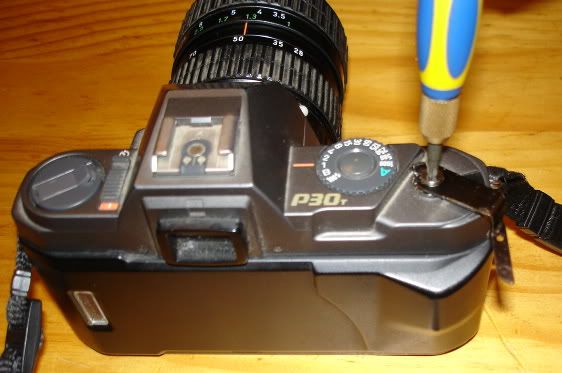
Obviously this is a bit cumbersome for regular use... but I am now considering purchasing a cheap "precision screwdriver set", and epoxying a screwdriver bit, the lever, and the screw all together.

This would in theory bind the lever to the tiny screwhead via the bit. It's a kludge, that is for sure, but it seems to be the only real way to save an otherwise working camera from the rubbish bin. It also has the disadvantage that if it doesn't work, there is no going back as the screw could no longer be unscrewed.
So, before I try that, does anyone have any other repair suggestions? Or perhaps a place that would sell a replacement advance lever?
Thanks. 
_________________
Sigma DP1, Nikon D40 (hers  ), Polaroid x530, Pentax P30t, Pentax P50, (P30t/P50 K-A to Nikon F body mount conversion) ), Polaroid x530, Pentax P30t, Pentax P50, (P30t/P50 K-A to Nikon F body mount conversion)
Nikon: 18-55/3.5-5.6 "G ED II DX" (F) Soligor: 28/2.8 (FL->F converted), 135/3.5 (F), 3x TC (F, modified) Kalimar: 28-85/3.5 (F)
Vivitar: 70-210/2.8-4.0 Version 3 (F), Tele 500/6.3 Preset (F), 19/3.8 (F) Minolta: 300/5.6 (SR/MC/MD pending F conversion)
Tamron: 28/2.8 (Adaptall) Panagor: 28/2.5 (FD) Aetna: 300/5.6 (F) Osawa: MC 28/2.8 (F)
Vintage Lenses: Dallmeyer: 1940s A.M. 14in 356mm f4 (ULF->M42) 1930s Adon Telephoto Taylor, Taylor & Hobson: 1880s Rapid Rectilinear 8 1/2 x 6 1/2 11.31in f/8 (LF->?)
Parts Lenses: Nikon 35-135/3.5-4.5 (F), Sigma 70-210/4.5 (F), Nikon 50/1.8 Series E (F) |
|
| Back to top |
|
 |
kansalliskala


Joined: 19 Jul 2007
Posts: 5029
Location: Southern Finland countryside
Expire: 2016-12-30
|
| Posted: Wed Jun 09, 2010 7:05 am Post subject: |
|
|
kansalliskala wrote:
Try find a spanner that has the slot width the same as the original lever? Then it sticks to slightly awkward position but you can try to bend it. Don't buy too expensive, the cheaper the softer to bend .. 
Click here to see on Ebay
EDIT: something like this but smaller:
Click here to see on Ebay
_________________
MF: Kodak DCS SLR/c; Samsung NX10; OM-10; Canon T50
Zuiko 28/3.5, Distagon 35/2.8; Yashica ML 50/2;
Zuiko 50/1.4; S-M-C 120/2.8; Zuiko 135/3.5; 200/5;
Tamron AD1 135/2.8, Soligor 180/3.5; Tamron AD1 300/5.6
Tamron zooms: 01A, Z-210
Yashicaflex C; Київ 4 + Юпитер 8, 11; Polaroid 100; Olympus XA; Yashica T3
Museum stuff: Certo-Phot; Tele-Edixon 135; Polaris 90-190; Asahi Bellows; Ixus IIs
Projects: Agfa Isolette III (no shutter), Canon AE-1D (no sensor),
Nikon D80 (dead), The "Peace Camera"
AF: Canon, Tokina, Sigma Video: JVC GZ-MG275E |
|
| Back to top |
|
|
Scheimpflug
Joined: 06 Feb 2010
Posts: 1888
Location: New Zealand / USA
Expire: 2011-11-18
|
| Posted: Wed Jun 09, 2010 3:34 pm Post subject: |
|
|
Scheimpflug wrote:
Now that's an interesting idea!
Unfortunately, the orientation of the slot is 90-degrees rotated from the ideal, so the mini spanner would be facing out when at rest, and would have to rotate around the front of the camera when advancing!  I'm not sure if this is possible due to the shape of the plastic around the lever.... I'm not sure if this is possible due to the shape of the plastic around the lever....
Still a good idea though, I'll have to think about it. Thanks!
_________________
Sigma DP1, Nikon D40 (hers ), Polaroid x530, Pentax P30t, Pentax P50, (P30t/P50 K-A to Nikon F body mount conversion)
Nikon: 18-55/3.5-5.6 "G ED II DX" (F) Soligor: 28/2.8 (FL->F converted), 135/3.5 (F), 3x TC (F, modified) Kalimar: 28-85/3.5 (F)
Vivitar: 70-210/2.8-4.0 Version 3 (F), Tele 500/6.3 Preset (F), 19/3.8 (F) Minolta: 300/5.6 (SR/MC/MD pending F conversion)
Tamron: 28/2.8 (Adaptall) Panagor: 28/2.5 (FD) Aetna: 300/5.6 (F) Osawa: MC 28/2.8 (F)
Vintage Lenses: Dallmeyer: 1940s A.M. 14in 356mm f4 (ULF->M42) 1930s Adon Telephoto Taylor, Taylor & Hobson: 1880s Rapid Rectilinear 8 1/2 x 6 1/2 11.31in f/8 (LF->?)
Parts Lenses: Nikon 35-135/3.5-4.5 (F), Sigma 70-210/4.5 (F), Nikon 50/1.8 Series E (F) |
|
| Back to top |
|
|
Scheimpflug
Joined: 06 Feb 2010
Posts: 1888
Location: New Zealand / USA
Expire: 2011-11-18
|
| Posted: Tue Jul 20, 2010 6:01 am Post subject: |
|
|
Scheimpflug wrote:
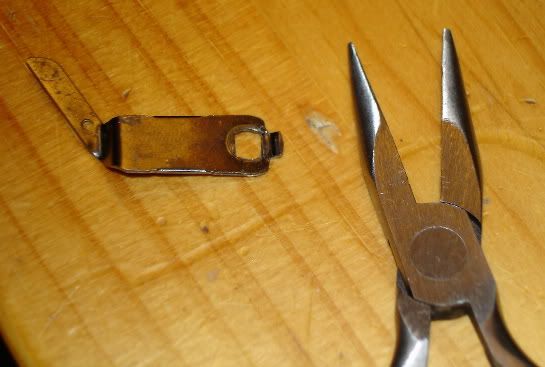
Ok, so I went with my first approach. In the end, I just couldn't find the parts, and it wouldn't have been worth it to buy & ship a whole second body just for parts.
I did change my plans a little bit though. Instead of epoxying the advance lever to the shaft, I instead epoxied a wing nut to the screw which previously held the advance lever on the shaft. The reason for this is that epoxying the advance lever would have been permanent - if it had worked, great, but if not, I never would have been able to remove it. Without being able to remove the lever, the top shell of the camera can't come off, so it essentially would have made the camera un-serviceable.
So first, I picked up a cheap mini-screwdriver with bits. I think I paid NZ $1.50 (~ US $1.06).
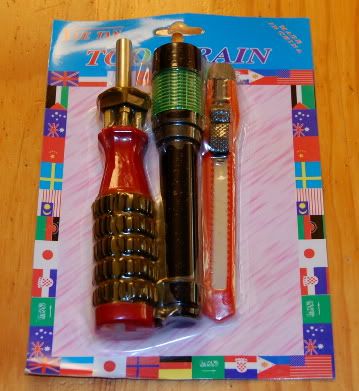
Did I mention it was cheap? Look at that Phillips bit on the left!
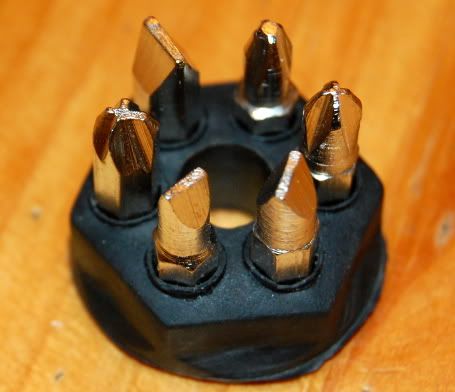
Next, I took the smallest Phillips bit, and filed the tip to a smaller shape with thinner blades that fit snugly into the tiny screwhead. This is the mechanical connection which will transfer the force - the epoxy is just to hold the pieces together. Here is the final result all glued together:
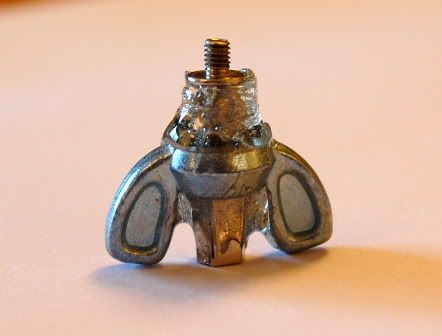
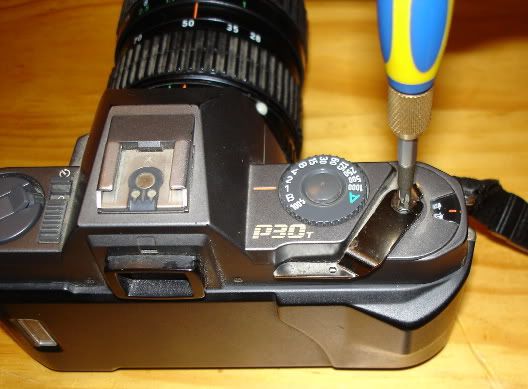
I had first tried a knob, but found that any knob I could find was too tall, and blocked access to the shutter button. So instead I went with the wing nut. With it oriented the way it is, you can just reach right past the side of it. The large ears actually make it pretty easy to turn as well - probably easier than a knob would have been. Here is the completed assembly on the camera:

If I was doing it again, I would get a slightly smaller wing nut, and cut down the rear of the bit to make it shorter. Otherwise, it seems sturdy enough, and is actually pretty easy to wind, aside from the fact that you can't do it with just a thumb anymore. Plus, if I ever do come across the replacement parts, this assembly just unscrews, so it should be pretty easy to return it to factory condition.
_________________
Sigma DP1, Nikon D40 (hers ), Polaroid x530, Pentax P30t, Pentax P50, (P30t/P50 K-A to Nikon F body mount conversion)
Nikon: 18-55/3.5-5.6 "G ED II DX" (F) Soligor: 28/2.8 (FL->F converted), 135/3.5 (F), 3x TC (F, modified) Kalimar: 28-85/3.5 (F)
Vivitar: 70-210/2.8-4.0 Version 3 (F), Tele 500/6.3 Preset (F), 19/3.8 (F) Minolta: 300/5.6 (SR/MC/MD pending F conversion)
Tamron: 28/2.8 (Adaptall) Panagor: 28/2.5 (FD) Aetna: 300/5.6 (F) Osawa: MC 28/2.8 (F)
Vintage Lenses: Dallmeyer: 1940s A.M. 14in 356mm f4 (ULF->M42) 1930s Adon Telephoto Taylor, Taylor & Hobson: 1880s Rapid Rectilinear 8 1/2 x 6 1/2 11.31in f/8 (LF->?)
Parts Lenses: Nikon 35-135/3.5-4.5 (F), Sigma 70-210/4.5 (F), Nikon 50/1.8 Series E (F) |
|
| Back to top |
|
|
mo

Joined: 27 Aug 2009
Posts: 8979
Location: Australia
Expire: 2016-07-30
|
| Posted: Tue Jul 20, 2010 7:55 am Post subject: |
|
|
mo wrote:
I reckon it looks kinda cool ...the personal touch!  You could say it's your own personal camera radar... You could say it's your own personal camera radar...  Is that the squashed Nikon lens? Is that the squashed Nikon lens?
_________________
Moira, Moderator 
Fuji XE-1,Pentax K-01,Panasonic G1,Panasonic G5,Pentax MX
Ricoh Singlex TLS,KR-5,KR-5Super,XR-10
Lenses
Auto Rikenon's 55/1.4, 1.8, 2.8... 50/1.7 Takumar 2/58 Preset Takumar 2.8/105 Auto Takumar 2.2/55, 3.5/35 Super Takumar 1.8/55...Macro Takumar F4/50... CZJ Biotar ALU M42 2/58 CZJ Tessar ALU M42 2.8/50
CZJ DDR Flektogon Zebra M42 2.8/35 CZJ Pancolar M42 2/50 CZJ Pancolar Exakta 2/50
Auto Mamiya/Sekor 1.8/55 ...Auto Mamiya/Sekor 2/50 Auto Mamiya/Sekor 2.8/50 Auto Mamiya/Sekor 200/3.5 Tamron SP500/8 Tamron SP350/5.6 Tamron SP90/2.5
Primoplan 1.9/58 Primagon 4.5/35 Telemegor 5.5/150 Angenieux 3.5/28 Angenieux 3,5/135 Y 2
Canon FL 58/1.2,Canon FL85/1.8,Canon FL 100/3.5,Canon SSC 2.8/100 ,Konica AR 100/2.8, Nikkor P 105/2.5
|
|
| Back to top |
|
|
visualopsins

Joined: 05 Mar 2009
Posts: 10698
Location: California
Expire: 2025-04-11
|
| Posted: Tue Jul 20, 2010 8:47 am Post subject: |
|
|
visualopsins wrote:
Nicely done!
"Wing nut" always makes me laugh Does anybody know what those nuts with a ring are called? (no, not "ring nut") One of those would, besides being too tall to comfortably reach the shutter button, make the camera look like a miniature old radio direction finder, used for radio navigation before GPS. I'm old enough to have used those as a teen(!). Used to be charts had frequencies and location of transmitters; first the receiver was tuned, then the RDF antenna which swiveled on a 'compass rose' was turned until radio signal strength nulled to find transmitter direction; two or more transmitter directions when plotted crossed at your position on the chart...useful when too far to see shore and when foggy...
_________________
☮☮☮☮☮☮☮☮☮☮☮☮☮☮☮☮☮☮☮☮☮☮☮☮☮☮☮☮☮☮☮☮ like attracts like! ☮☮☮☮☮☮☮☮☮☮☮☮☮☮☮☮☮☮☮☮☮☮☮☮☮☮☮☮☮☮☮☮
Cameras: Sony ILCE-7RM2, Spotmatics II, F, and ESII, Nikon P4
Lenses:
M42 Asahi Optical Co., Takumar 1:4 f=35mm, 1:2 f=58mm (Sonnar), 1:2.4 f=58mm (Heliar), 1:2.2 f=55mm (Gaussian), 1:2.8 f=105mm (Model I), 1:2.8/105 (Model II), 1:5.6/200, Tele-Takumar 1:5.6/200, 1:6.3/300, Macro-Takumar 1:4/50, Auto-Takumar 1:2.3 f=35, 1:1.8 f=55mm, 1:2.2 f=55mm, Super-TAKUMAR 1:3.5/28 (fat), 1:2/35 (Fat), 1:1.4/50 (8-element), Super-Multi-Coated Fisheye-TAKUMAR 1:4/17, Super-Multi-Coated TAKUMAR 1:4.5/20, 1:3.5/24, 1:3.5/28, 1:2/35, 1:3.5/35, 1:1.8/85, 1:1.9/85 1:2.8/105, 1:3.5/135, 1:2.5/135 (II), 1:4/150, 1:4/200, 1:4/300, 1:4.5/500, Super-Multi-Coated Macro-TAKUMAR 1:4/50, 1:4/100, Super-Multi-Coated Bellows-TAKUMAR 1:4/100, SMC TAKUMAR 1:1.4/50, 1:1.8/55
M42 Carl Zeiss Jena Flektogon 2.4/35
Contax Carl Zeiss Vario-Sonnar T* 28-70mm F3.5-4.5
Pentax K-mount SMC PENTAX-A ZOOM 1:3.5 35~105mm, SMC PENTAX ZOOM 1:4 45~125mm
Nikon Micro-NIKKOR-P-C Auto 1:3.5 f=55mm, NIKKOR-P Auto 105mm f/2.5 Pre-AI (Sonnar), Micro-NIKKOR 105mm 1:4 AI, NIKKOR AI-S 35-135mm f/3,5-4,5
Tamron SP 17mm f/3.5 (51B), Tamron SP 17mm f/3.5 (151B), SP 500mm f/8 (55BB), SP 70-210mm f/3.5 (19AH)
Vivitar 100mm 1:2.8 MC 1:1 Macro Telephoto (Kiron)
|
|
| Back to top |
|
|
Scheimpflug
Joined: 06 Feb 2010
Posts: 1888
Location: New Zealand / USA
Expire: 2011-11-18
|
| Posted: Tue Jul 20, 2010 8:56 am Post subject: |
|
|
Scheimpflug wrote:
Haha, yeah, I suppose I should have also picked up a brass wing nut instead of this one out of my drawer. To give it a little zing while keeping with the vintage feel.  Oh well. Oh well.
Yep, that's your lens! Still just as smashed.. but I actually got it back together after the repair attempt! It still technically works, I suppose, you just can't focus and it is a permanent tilt lens.
_________________
Sigma DP1, Nikon D40 (hers ), Polaroid x530, Pentax P30t, Pentax P50, (P30t/P50 K-A to Nikon F body mount conversion)
Nikon: 18-55/3.5-5.6 "G ED II DX" (F) Soligor: 28/2.8 (FL->F converted), 135/3.5 (F), 3x TC (F, modified) Kalimar: 28-85/3.5 (F)
Vivitar: 70-210/2.8-4.0 Version 3 (F), Tele 500/6.3 Preset (F), 19/3.8 (F) Minolta: 300/5.6 (SR/MC/MD pending F conversion)
Tamron: 28/2.8 (Adaptall) Panagor: 28/2.5 (FD) Aetna: 300/5.6 (F) Osawa: MC 28/2.8 (F)
Vintage Lenses: Dallmeyer: 1940s A.M. 14in 356mm f4 (ULF->M42) 1930s Adon Telephoto Taylor, Taylor & Hobson: 1880s Rapid Rectilinear 8 1/2 x 6 1/2 11.31in f/8 (LF->?)
Parts Lenses: Nikon 35-135/3.5-4.5 (F), Sigma 70-210/4.5 (F), Nikon 50/1.8 Series E (F) |
|
| Back to top |
|
|
martyn_bannister

Joined: 23 May 2010
Posts: 1151
|
| Posted: Tue Jul 20, 2010 10:20 am Post subject: Re: Pentax P30t - Broken advance lever |
|
|
martyn_bannister wrote:
| Scheimpflug wrote: |
So, before I try that, does anyone have any other repair suggestions? Or perhaps a place that would sell a replacement advance lever?
Thanks. |
hiya, personally, I wouldn't trust putting all the forces on the holding screw. If the head doesn't chew then the shaft is sure to break and getting a replacement left hand thread screw is going to be painful.
Have you thought about hand crafting a whole replacement lever from scratch? A few hours hours with a hacksaw and a file might pay dividends? |
|
| Back to top |
|
|
Scheimpflug
Joined: 06 Feb 2010
Posts: 1888
Location: New Zealand / USA
Expire: 2011-11-18
|
| Posted: Tue Jul 20, 2010 10:47 am Post subject: |
|
|
Scheimpflug wrote:
Thanks for the concerns. I had thought about making a replacement lever, but that hole with the squared off sides, combined with the tight tolerance against the top plastic housing on the camera, had me stumped.
How would you go about it? 
I suppose if this breaks, I would probably bite the bullet and find another Pentax body at auction. Much less work than sourcing another left-handed screw... potentially cheaper too.
In the mean time, I'll try to be gentle with it...
_________________
Sigma DP1, Nikon D40 (hers ), Polaroid x530, Pentax P30t, Pentax P50, (P30t/P50 K-A to Nikon F body mount conversion)
Nikon: 18-55/3.5-5.6 "G ED II DX" (F) Soligor: 28/2.8 (FL->F converted), 135/3.5 (F), 3x TC (F, modified) Kalimar: 28-85/3.5 (F)
Vivitar: 70-210/2.8-4.0 Version 3 (F), Tele 500/6.3 Preset (F), 19/3.8 (F) Minolta: 300/5.6 (SR/MC/MD pending F conversion)
Tamron: 28/2.8 (Adaptall) Panagor: 28/2.5 (FD) Aetna: 300/5.6 (F) Osawa: MC 28/2.8 (F)
Vintage Lenses: Dallmeyer: 1940s A.M. 14in 356mm f4 (ULF->M42) 1930s Adon Telephoto Taylor, Taylor & Hobson: 1880s Rapid Rectilinear 8 1/2 x 6 1/2 11.31in f/8 (LF->?)
Parts Lenses: Nikon 35-135/3.5-4.5 (F), Sigma 70-210/4.5 (F), Nikon 50/1.8 Series E (F) |
|
| Back to top |
|
|
martyn_bannister
Joined: 23 May 2010
Posts: 1151
|
| Posted: Thu Jul 22, 2010 7:08 pm Post subject: |
|
|
martyn_bannister wrote:
| Scheimpflug wrote: |
Thanks for the concerns. I had thought about making a replacement lever, but that hole with the squared off sides, combined with the tight tolerance against the top plastic housing on the camera, had me stumped.
How would you go about it? |
That sort of thing is always a hand filing job, but you'd be surprised how much material you can take out with a small file
I'd fashion a rough shape first. I only seen photos of the original, but it might be possible to make a new blank made from steel, aluminium or even brass, hand cut with hacksaw and file.
The hole with the squared off sides is best done by drilling the largest hole you can without encroaching on the shape and then finishing off with the hand file again.
Might take a few hours, but then you can be really proud of the finished product!
Another possibility is to silver solder the broken portion back (soft solder is probably no good as it will be probably be too...... soft ) or somehow repair the original lever by making a fair surface and silver soldering a portion back. I have repaired clock gears which have been missing teeth by cutting out a portion, soldering in a new bit and filing new teeth. Time consuming, but perfectly possible. To silver solder you need to heat it up to red heat though. The secret with this sort of repair is to make the material take the stress, not the solder. This might involve making a bit like the bit broken out, but shaping it so that it is wider towards the hole and narrow towards the outside, a bit like the key-stone in an arch.
Send me the broken bits and I'll see what I can do |
|
| Back to top |
|
|
Scheimpflug
Joined: 06 Feb 2010
Posts: 1888
Location: New Zealand / USA
Expire: 2011-11-18
|
| Posted: Fri Jul 23, 2010 7:19 am Post subject: |
|
|
Scheimpflug wrote:
Haha. Ok, well, that experiment didn't last too long.
As you can see by the counter, I made it through 8 shots before it broke free. Was anyone taking bets? It separated right at the screw head - the epoxy gave free on about 3/4 of the screwhead, with about 1/4 of the screw still having a small amount of epoxy stuck to it. I had roughened the surface of the screwhead and cleaned it with alcohol, so apparently it was just too much force on too small of an area.
| martyn_bannister wrote: |
That sort of thing is always a hand filing job, but you'd be surprised how much material you can take out with a small file
I'd fashion a rough shape first. I only seen photos of the original, but it might be possible to make a new blank made from steel, aluminium or even brass, hand cut with hacksaw and file.
The hole with the squared off sides is best done by drilling the largest hole you can without encroaching on the shape and then finishing off with the hand file again.
Might take a few hours, but then you can be really proud of the finished product!
Another possibility is to silver solder the broken portion back (soft solder is probably no good as it will be probably be too...... soft ) or somehow repair the original lever by making a fair surface and silver soldering a portion back. I have repaired clock gears which have been missing teeth by cutting out a portion, soldering in a new bit and filing new teeth. Time consuming, but perfectly possible. To silver solder you need to heat it up to red heat though. The secret with this sort of repair is to make the material take the stress, not the solder. This might involve making a bit like the bit broken out, but shaping it so that it is wider towards the hole and narrow towards the outside, a bit like the key-stone in an arch.
Send me the broken bits and I'll see what I can do |
Funny you should mention that... I actually did try to solder the original lever, before I epoxied the screw. I failed miserably. 
I've never done any "structural" soldering before (just electrical), so I used one of those small butane pencil torches and some acid core "silver bearing metal work" solder. I was easily able to get the piece to be glowing hot, but I couldn't get the solder to stick? It would just bead up and drip right off of the surface, not flow into the joints. The solder lists its melting point at 430F/221C, and I'm certain that the torch (and the metal surface) were significantly above that temp. I also tried cleaning it up and soldering it at a lower temperature (torch further away, metal not glowing), with the same result.
Do you have any advice? I'm completely new to this sort of metal work, so feel free to assume that I don't know anything.
_________________
Sigma DP1, Nikon D40 (hers ), Polaroid x530, Pentax P30t, Pentax P50, (P30t/P50 K-A to Nikon F body mount conversion)
Nikon: 18-55/3.5-5.6 "G ED II DX" (F) Soligor: 28/2.8 (FL->F converted), 135/3.5 (F), 3x TC (F, modified) Kalimar: 28-85/3.5 (F)
Vivitar: 70-210/2.8-4.0 Version 3 (F), Tele 500/6.3 Preset (F), 19/3.8 (F) Minolta: 300/5.6 (SR/MC/MD pending F conversion)
Tamron: 28/2.8 (Adaptall) Panagor: 28/2.5 (FD) Aetna: 300/5.6 (F) Osawa: MC 28/2.8 (F)
Vintage Lenses: Dallmeyer: 1940s A.M. 14in 356mm f4 (ULF->M42) 1930s Adon Telephoto Taylor, Taylor & Hobson: 1880s Rapid Rectilinear 8 1/2 x 6 1/2 11.31in f/8 (LF->?)
Parts Lenses: Nikon 35-135/3.5-4.5 (F), Sigma 70-210/4.5 (F), Nikon 50/1.8 Series E (F) |
|
| Back to top |
|
|
martyn_bannister
Joined: 23 May 2010
Posts: 1151
|
| Posted: Fri Jul 23, 2010 9:46 am Post subject: |
|
|
martyn_bannister wrote:
| Scheimpflug wrote: |
I actually did try to solder the original lever, before I epoxied the screw. I failed miserably.
I've never done any "structural" soldering before (just electrical), so I used one of those small butane pencil torches and some acid core "silver bearing metal work" solder. I was easily able to get the piece to be glowing hot, but I couldn't get the solder to stick? It would just bead up and drip right off of the surface, not flow into the joints. The solder lists its melting point at 430F/221C, and I'm certain that the torch (and the metal surface) were significantly above that temp. I also tried cleaning it up and soldering it at a lower temperature (torch further away, metal not glowing), with the same result.
Do you have any advice? I'm completely new to this sort of metal work, so feel free to assume that I don't know anything. |
If the melting point of the solder is 221C then I class it as a "soft" solder. What I call "silver soldering" is an ancient (like me ) term more properly known as brazing http://www.richard-whitehouse.co.uk/Soldering%20notes.pdf which happens at MUCH higher temperatures - around 800C and above.
What follows is not necessarily accurate, just the way I see and do.
In all soldering, cleanliness of the metal is absolutely vital. If the solder will not adhere to the metal it is almost certainly dirty, either through not being cleaned properly in the first place, contaminated by the flame itself, or from oxidising due to overheating. For soft soldering, the metal is only at around 2 times boiling temp of water when soldering. It must first be cleaned to bare metal using emery paper/file etc and then protected from the air and dirt with a flux. Soft solder can be bought in the form of wire, with the flux as a gel in the centre of the wire, or you can apply the flux separately before heating (i prefer the latter). You should be able to apply a thin coat of solder to each part that you want to join separately (called "tinning") and then just fit the parts together and heat until the solder on each part joins. When finished, always clean off any excess flux, since it is usually acidic.
To tin a part, clean it to bare metal. Don't touch the cleaned surface with the fingers. Coat with flux. If using solder "wire", heat the metal gently (preferably NOT directly on the cleaned bit), remove the flame and touch the solder to the cleaned area. Keep heating the metal (not the solder) and keep touching the solder to it until the tip of the wire starts to melt. This is when the metal is just about hot enough. Heat a little more and the solder should "run" all over the cleaned area.
Tin each part and then apply more flux to both, fit them together and heat the two. No need for more solder at this stage. When they are hot enough, the two tinned layers will fuse. Job done.
Because soft solder is so weak, the joint must be shaped so that the parts stay together and will withstand the forces without solder. The solder just acts like a very weak glue.
If you were brazing, the procedure is almost identical, except the materials and temperatures are different. Brazing is carried out at red heat. The brazing solder is much stronger and can be used to take the forces i.e. the parts do not have to "dovetail" together to take the load, the solder can do it.
Hope this is clear and helps somewhat. Have fun! |
|
| Back to top |
|
|
luisalegria

Joined: 07 Mar 2008
Posts: 6602
Location: San Francisco, USA
Expire: 2018-01-18
|
| Posted: Sat Jul 24, 2010 1:37 am Post subject: |
|
|
luisalegria wrote:
I would first try thick brass stock. You can probably forget about fitting it to the plastic, thats just for show anyway. A bench vise, biggish pliers, tin snips and a hefty flat file will give you the basic shape.
As Martyn said, its a hand filing job, but very doable.
The hole is the critical part. You will have to drill it out to a size just big enough for a fine triangle or square section file, and then its basically carving with a file, until it fits.
_________________
I like Pentax DSLR's, Exaktas, M42 bodies of all kinds, strange and cheap Japanese lenses, and am dabbling in medium format/Speed Graphic work. |
|
| Back to top |
|
|
Elkind
Joined: 27 Jan 2011
Posts: 3
Location: Russian Federation
|
| Posted: Fri Jan 28, 2011 7:03 am Post subject: |
|
|
Elkind wrote:
hi, everyone.
have you any photos of P30n under top cover of my camera's wire distribution is not equal to �service manual� (possible, not accurate service was in past), so, I have troubles with �diaphragm control block� and exposure values.
thanks a lot! |
|
| Back to top |
|
|
Scheimpflug
Joined: 06 Feb 2010
Posts: 1888
Location: New Zealand / USA
Expire: 2011-11-18
|
| Posted: Mon Jan 31, 2011 4:39 am Post subject: |
|
|
Scheimpflug wrote:
| Elkind wrote: |
hi, everyone.
have you any photos of P30n under top cover of my camera's wire distribution is not equal to �service manual� (possible, not accurate service was in past), so, I have troubles with �diaphragm control block� and exposure values.
thanks a lot! |
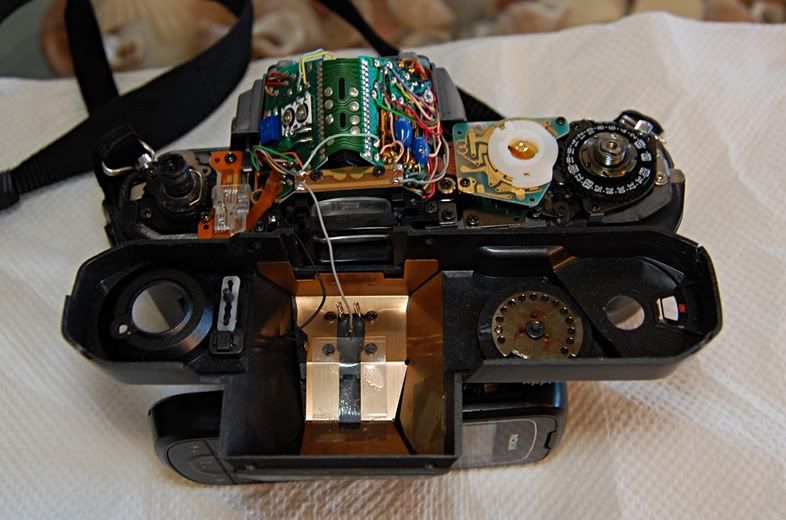
I think I only have this photo from under the top cover of the P30t... Does this show the part that you need, or is the diaphragm control block tucked in with the mirror box assembly on the front?
_________________
Sigma DP1, Nikon D40 (hers ), Polaroid x530, Pentax P30t, Pentax P50, (P30t/P50 K-A to Nikon F body mount conversion)
Nikon: 18-55/3.5-5.6 "G ED II DX" (F) Soligor: 28/2.8 (FL->F converted), 135/3.5 (F), 3x TC (F, modified) Kalimar: 28-85/3.5 (F)
Vivitar: 70-210/2.8-4.0 Version 3 (F), Tele 500/6.3 Preset (F), 19/3.8 (F) Minolta: 300/5.6 (SR/MC/MD pending F conversion)
Tamron: 28/2.8 (Adaptall) Panagor: 28/2.5 (FD) Aetna: 300/5.6 (F) Osawa: MC 28/2.8 (F)
Vintage Lenses: Dallmeyer: 1940s A.M. 14in 356mm f4 (ULF->M42) 1930s Adon Telephoto Taylor, Taylor & Hobson: 1880s Rapid Rectilinear 8 1/2 x 6 1/2 11.31in f/8 (LF->?)
Parts Lenses: Nikon 35-135/3.5-4.5 (F), Sigma 70-210/4.5 (F), Nikon 50/1.8 Series E (F) |
|
| Back to top |
|
|
Elkind
Joined: 27 Jan 2011
Posts: 3
Location: Russian Federation
|
| Posted: Mon Jan 31, 2011 12:52 pm Post subject: |
|
|
Elkind wrote:
| Scheimpflug wrote: |
I think I only have this photo from under the top cover of the P30t... Does this show the part that you need, or is the diaphragm control block tucked in with the mirror box assembly on the front?
|
Thanks a lot, picture is helpful, is it possible to make it a bit larger?
I had no sure about pink wire from aperture magnet and wires from diaphragm resistors.
My P30n shows ~4 f-stop less than need, and it's problem of diaphragm resistor. I put there this unit from Z-10 (3 contacts) and place third to �ground� � it seems near the real values. And other problem � �aperture magnet�, when shutter is opened, aperture lever(?) is locked in it's down position, but it must goes up, isn't it? And if disconnect it from board it works correct, but with no �A� lenses.
If you have a photo of right part of PC boar (camera back to me)? it's would be superb.
Sorry for my English .
UPD: Diaphragm resistor replased and work near correct. |
|
| Back to top |
|
|
Scheimpflug
Joined: 06 Feb 2010
Posts: 1888
Location: New Zealand / USA
Expire: 2011-11-18
|
| Posted: Tue Feb 01, 2011 2:52 am Post subject: |
|
|
Scheimpflug wrote:
| Elkind wrote: |
Thanks a lot, picture is helpful, is it possible to make it a bit larger?
I had no sure about pink wire from aperture magnet and wires from diaphragm resistors.
My P30n shows ~4 f-stop less than need, and it's problem of diaphragm resistor. I put there this unit from Z-10 (3 contacts) and place third to �ground� � it seems near the real values. And other problem � �aperture magnet�, when shutter is opened, aperture lever(?) is locked in it's down position, but it must goes up, isn't it? And if disconnect it from board it works correct, but with no �A� lenses.
If you have a photo of right part of PC boar (camera back to me)? it's would be superb.
Sorry for my English .
UPD: Diaphragm resistor replased and work near correct. |
Here is a 100% size crop... it isn't the best picture though...
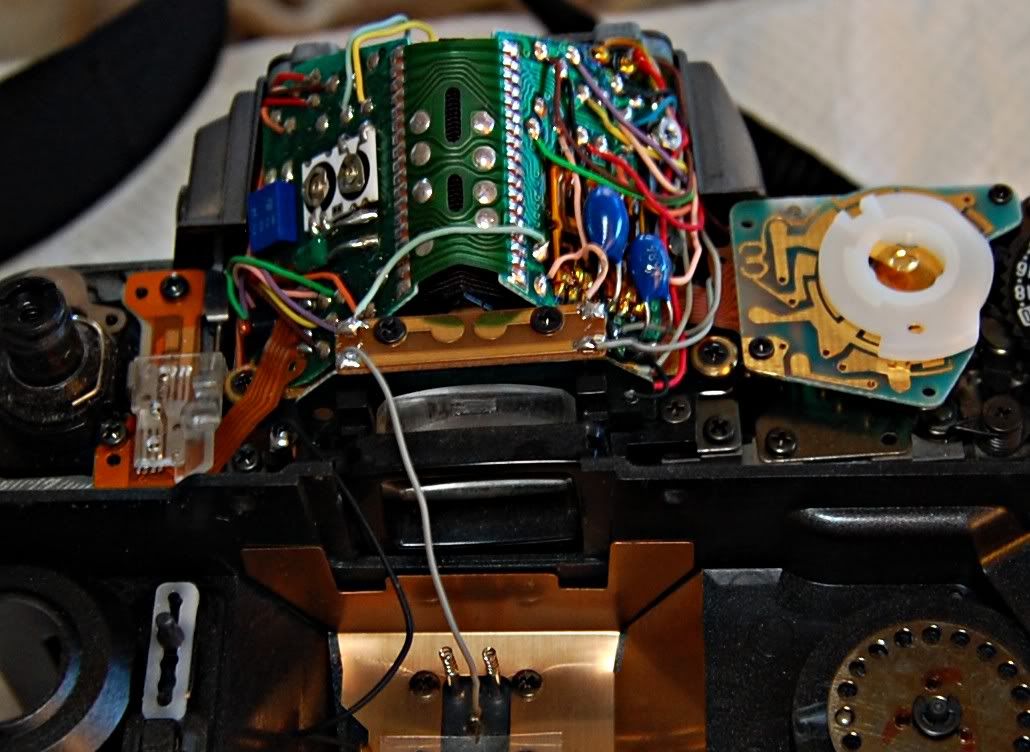
For the diaphragm resistor, I think there is an adjustment... Do you have the P30 service manual? If not, you can find it here:
http://pentax-manuals.com/manuals/service/servicemanuals.htm
The aperture value resistor calibration section is at the bottom of page 2. Page 12 also has a diagram (with wire colors) for the circuit board on the right side of the prism.
I almost wonder if the problem with the aperture magnet is related to the diaphragm resistor? If the camera thought the aperture ring was in a different position, it might be commanding the wrong thing to the aperture magnet...
_________________
Sigma DP1, Nikon D40 (hers ), Polaroid x530, Pentax P30t, Pentax P50, (P30t/P50 K-A to Nikon F body mount conversion)
Nikon: 18-55/3.5-5.6 "G ED II DX" (F) Soligor: 28/2.8 (FL->F converted), 135/3.5 (F), 3x TC (F, modified) Kalimar: 28-85/3.5 (F)
Vivitar: 70-210/2.8-4.0 Version 3 (F), Tele 500/6.3 Preset (F), 19/3.8 (F) Minolta: 300/5.6 (SR/MC/MD pending F conversion)
Tamron: 28/2.8 (Adaptall) Panagor: 28/2.5 (FD) Aetna: 300/5.6 (F) Osawa: MC 28/2.8 (F)
Vintage Lenses: Dallmeyer: 1940s A.M. 14in 356mm f4 (ULF->M42) 1930s Adon Telephoto Taylor, Taylor & Hobson: 1880s Rapid Rectilinear 8 1/2 x 6 1/2 11.31in f/8 (LF->?)
Parts Lenses: Nikon 35-135/3.5-4.5 (F), Sigma 70-210/4.5 (F), Nikon 50/1.8 Series E (F) |
|
| Back to top |
|
|
Elkind
Joined: 27 Jan 2011
Posts: 3
Location: Russian Federation
|
| Posted: Thu Feb 03, 2011 11:32 am Post subject: |
|
|
Elkind wrote:
| Scheimpflug wrote: |
For the diaphragm resistor, I think there is an adjustment... Do you have the P30 service manual? If not, you can find it here:
http://pentax-manuals.com/manuals/service/servicemanuals.htm
The aperture value resistor calibration section is at the bottom of page 2. Page 12 also has a diagram (with wire colors) for the circuit board on the right side of the prism.
I almost wonder if the problem with the aperture magnet is related to the diaphragm resistor? If the camera thought the aperture ring was in a different position, it might be commanding the wrong thing to the aperture magnet... |
Thanks for the help.
P30 manual was rather helpful, but I made a mistake paying no attention to the letter n in the camera name and I did no photo of wire distributions under top cover. My fault.
Diaphragm resistor was O.K., but photocell was not � I had to add wire directly from photocell (but not from back side of the photocell board, as in manual) to ground, now it's work fine.
Camera shoot, almost everything done, but I didn't find the way to make AV-mode work correct (I think some weak spring in aperture-magnet block is the problem), and self-timer do not work ).. |
|
| Back to top |
|
|
|
|


