| View previous topic :: View next topic |
| Author |
Message |
mo


Joined: 27 Aug 2009
Posts: 8979
Location: Australia
Expire: 2016-07-30
|
 Posted: Fri Jul 09, 2010 6:46 am Post subject: How do I bring out the detail in the shadow? Posted: Fri Jul 09, 2010 6:46 am Post subject: How do I bring out the detail in the shadow? |
 |
|
mo wrote:
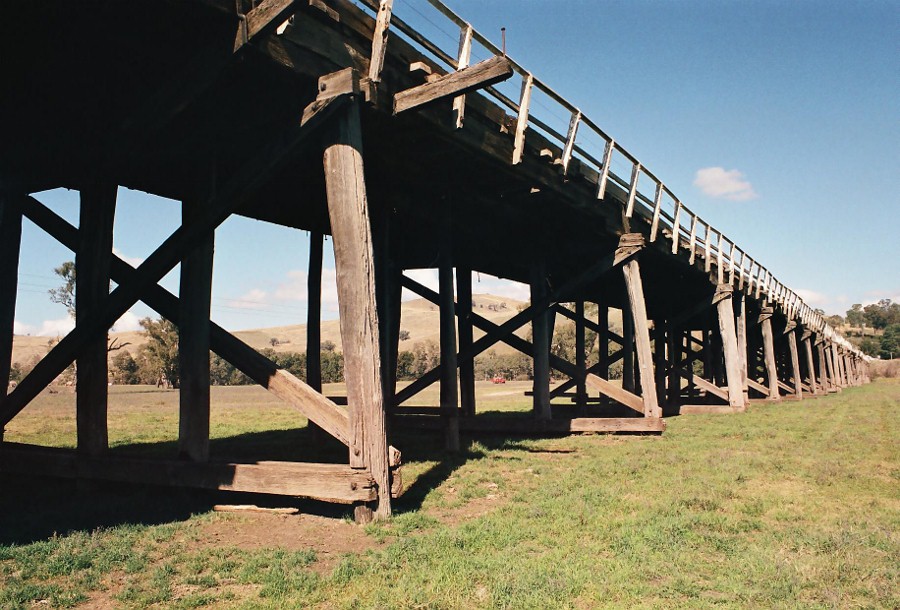
I am trying to put together a little series on some wooden bridges in my area,one rail and one road.They are being left to fall apart (there is a committee trying to save them but it all comes down to money) so I would like to capture some of their uniqueness.They have beautiful craftmanship and just are a joy/challege to photograph.I would appreciate some suggestions in
*How to photograph these structures.
*Lenses that would suit this type of structure photography.
*And the reason for this post how to bring out from the shadow the detail under the bridge.Is it as simple as setting the exposure for the shadow?

This would be with the T4 mount Soligor 2.8/28mm the widest angle I have at F16/500 on Fuji superia 400asa.
Thanks
_________________
Moira, Moderator 
Fuji XE-1,Pentax K-01,Panasonic G1,Panasonic G5,Pentax MX
Ricoh Singlex TLS,KR-5,KR-5Super,XR-10
Lenses
Auto Rikenon's 55/1.4, 1.8, 2.8... 50/1.7 Takumar 2/58 Preset Takumar 2.8/105 Auto Takumar 2.2/55, 3.5/35 Super Takumar 1.8/55...Macro Takumar F4/50... CZJ Biotar ALU M42 2/58 CZJ Tessar ALU M42 2.8/50
CZJ DDR Flektogon Zebra M42 2.8/35 CZJ Pancolar M42 2/50 CZJ Pancolar Exakta 2/50
Auto Mamiya/Sekor 1.8/55 ...Auto Mamiya/Sekor 2/50 Auto Mamiya/Sekor 2.8/50 Auto Mamiya/Sekor 200/3.5 Tamron SP500/8 Tamron SP350/5.6 Tamron SP90/2.5
Primoplan 1.9/58 Primagon 4.5/35 Telemegor 5.5/150 Angenieux 3.5/28 Angenieux 3,5/135 Y 2
Canon FL 58/1.2,Canon FL85/1.8,Canon FL 100/3.5,Canon SSC 2.8/100 ,Konica AR 100/2.8, Nikkor P 105/2.5
|
|
| Back to top |
|
 |
Rolf

Joined: 02 May 2009
Posts: 4123
Location: NRW/Germany
Expire: 2015-12-26
|
| Posted: Fri Jul 09, 2010 6:57 am Post subject: |
|
|
Rolf wrote:
Hi Mo,
with film very very difficult to get this better. With digital no problem due to raw and/or HDR shots.
With film perhaps better to try the expose for the shadows - but then you will have an overexposion for the rest of the image.
Best solution is to try it on another time, where light and shadows are not so harsh.
Lens is ok to show the dimension.

_________________
Rolf |
|
| Back to top |
|
|
mo
Joined: 27 Aug 2009
Posts: 8979
Location: Australia
Expire: 2016-07-30
|
| Posted: Fri Jul 09, 2010 7:06 am Post subject: |
|
|
mo wrote:
Thanks Rolf...I think this was mid afternoon light.I am bidding on a K100D super at the moment 
_________________
Moira, Moderator
Fuji XE-1,Pentax K-01,Panasonic G1,Panasonic G5,Pentax MX
Ricoh Singlex TLS,KR-5,KR-5Super,XR-10
Lenses
Auto Rikenon's 55/1.4, 1.8, 2.8... 50/1.7 Takumar 2/58 Preset Takumar 2.8/105 Auto Takumar 2.2/55, 3.5/35 Super Takumar 1.8/55...Macro Takumar F4/50... CZJ Biotar ALU M42 2/58 CZJ Tessar ALU M42 2.8/50
CZJ DDR Flektogon Zebra M42 2.8/35 CZJ Pancolar M42 2/50 CZJ Pancolar Exakta 2/50
Auto Mamiya/Sekor 1.8/55 ...Auto Mamiya/Sekor 2/50 Auto Mamiya/Sekor 2.8/50 Auto Mamiya/Sekor 200/3.5 Tamron SP500/8 Tamron SP350/5.6 Tamron SP90/2.5
Primoplan 1.9/58 Primagon 4.5/35 Telemegor 5.5/150 Angenieux 3.5/28 Angenieux 3,5/135 Y 2
Canon FL 58/1.2,Canon FL85/1.8,Canon FL 100/3.5,Canon SSC 2.8/100 ,Konica AR 100/2.8, Nikkor P 105/2.5
|
|
| Back to top |
|
|
Excalibur

Joined: 19 Jul 2009
Posts: 5017
Location: UK
Expire: 2014-04-21
|
| Posted: Fri Jul 09, 2010 7:43 am Post subject: |
|
|
Excalibur wrote:
***How do I bring out the detail in the shadow?***
Very difficult..in the old days you would expose for the shadows and in the darkroom hold a card over the projected area of the shot i.e the shadows (between the projector lens to the print paper) to allow for the correct exposure for the burnt out highlights......I suppose there is some way of doing it now in Photoshop.
_________________
Canon A1, AV1, T70 & T90, EOS 300 and EOS300v, Chinon CE and CP-7M. Contax 139, Fuji STX-2, Konica Autoreflex TC, FS-1, FT-1, Minolta X-700, X-300, XD-11, SRT101b, Nikon EM, FM, F4, F90X, Olympus OM2, Pentax S3, Spotmatic, Pentax ME super, Praktica TL 5B, & BC1, , Ricoh KR10super, Yashica T5D, Bronica Etrs, Mamiya RB67 pro AND drum roll:- a Sony Nex 3
.........past gear Tele Rolleiflex and Rollei SL66.
Many lenses from good to excellent. |
|
| Back to top |
|
|
Orio

Joined: 24 Feb 2007
Posts: 29545
Location: West Emilia
Expire: 2012-12-04
|
| Posted: Fri Jul 09, 2010 8:11 am Post subject: |
|
|
Orio wrote:
hi Mo, a couple of advices:
1- use a low contrast colour negative film such as the Kodak Portra
2- photograph, if possible, in an overcast day. You will have more contrast with the sky, but you do not mind the sky. The contast on the objects will be much lower, and that is what you need. The absence of hard shadows will make your task easier
3- use a tripod and a remote command. Attach to your camera a flash with diffuser using a cord. Get closer to the foreground of the bridge, holding the flash in one hand and the remote in another. Point the flash to the darker parts under the bridge and use it as a fill light. You don't really need that ALL the underside of the bridge is lit. Often, to have some detail visible in the foreground is enough for the viewer to imaginate the rest
4- if your camera can take multiple exposures, and you are feeling adventurous, you can even try the painting light technique: determine the total exposure time, divide it by the number of photographs that you want to take (do it counting the number of stops on the times wheel), for instance if your reading says that you need to take a f/8 1/125 photo, you will need to take four exposures at f/8 1/30. This will set your base exposure for the photo, then at each take you will go with a torch and light a different part of the shadows at every take. You will need a collaborator that shoots the release cable for you unless you have a very long cord or an infrared remote
5- by no way you are limited to digital if you want to make a HDRI photo. if you have the software for HDRI, you just have to place your tripod and camera, take the base reading, then bracket seven times: that is, the base reading shot, plus 3 shots underexposure at interval of one stop, and 3 shots overexposure at intervals of one stop. Be careful not to touch the camera and always use a remote cable, and if possible set your mirror to be lifted (this is useful for the painting light technique as well).
Use a slide film for this taks. Why slide? Because unless you scan your negatives yourself, film labs tend to mess with the exposure of your negatives when printing, making your effort useless.
So at home, scan your slides using always the same scan manual setting (i.e. do not correct exposure in scanning software). Then compose your shots in the HDRI software.
Hope this helps
Orio
P.S. with regards of which lens to use, it depends of course from the distance and what you want to shoot of the bridge. I personally would take one "total" shot from as distant as needed to photograph the whole bridge. Then I would take a series of partial shots that show parts of the bridge closer from different angles to enhance different aspects of the architecture and making.
_________________
Orio, Administrator
T*
NE CEDE MALIS AUDENTIOR ITO
Ferrania film is reborn! http://www.filmferrania.it/
Support the Ornano film chemicals company and help them survive!
http://forum.mflenses.com/ornano-chemical-products-t55525.html |
|
| Back to top |
|
|
Nesster

Joined: 24 Apr 2008
Posts: 5883
Location: NJ, USA
Expire: 2014-02-20
|
| Posted: Fri Jul 09, 2010 11:10 am Post subject: |
|
|
Nesster wrote:
+2 on all the advice above: for this kind of subject, early morning / evening are your friends, as are cloudy days. With negative film just bracket your shots.
Lens? typical advice is for a wide angle, and if you have space to back away, a short tele can give you a nice compressed effect. For convenience a zoom. ...  in other words, any lens can work in other words, any lens can work
_________________
-Jussi
Camera photos
Print Photographica
|
|
| Back to top |
|
|
Scheimpflug


Joined: 06 Feb 2010
Posts: 1888
Location: New Zealand / USA
Expire: 2011-11-18
|
| Posted: Fri Jul 09, 2010 11:36 am Post subject: |
|
|
Scheimpflug wrote:
Everyone above is giving great advice, but instead of spending all day bracketing and processing, how about keeping things simple and shooting it as filtered black and white? 
An orange or an orange-red filter should cut the intensity of the sky noticeably and also darken the green tones a bit, two of your brightest areas, while letting more of the brown tones (the bridge & shadows) through. You still wouldn't want to expose for the shadows, but with the filtered B&W you could afford to push up the exposure a bit without blowing the highlights. 
Keep in mind that depending on how you metered the first shot, you may not even have to make any adjustments or compensations if you re-shoot it with B&W film and a filter. Since the sky & grass will appear darker through the filter, the camera meter will read less light, and recommend a slower shutter speed. So if you set the exposure to match the meter, you effectively end up with the right "adjusted" exposure anyway, without even thinking about it.
_________________
Sigma DP1, Nikon D40 (hers ), Polaroid x530, Pentax P30t, Pentax P50, (P30t/P50 K-A to Nikon F body mount conversion)
Nikon: 18-55/3.5-5.6 "G ED II DX" (F) Soligor: 28/2.8 (FL->F converted), 135/3.5 (F), 3x TC (F, modified) Kalimar: 28-85/3.5 (F)
Vivitar: 70-210/2.8-4.0 Version 3 (F), Tele 500/6.3 Preset (F), 19/3.8 (F) Minolta: 300/5.6 (SR/MC/MD pending F conversion)
Tamron: 28/2.8 (Adaptall) Panagor: 28/2.5 (FD) Aetna: 300/5.6 (F) Osawa: MC 28/2.8 (F)
Vintage Lenses: Dallmeyer: 1940s A.M. 14in 356mm f4 (ULF->M42) 1930s Adon Telephoto Taylor, Taylor & Hobson: 1880s Rapid Rectilinear 8 1/2 x 6 1/2 11.31in f/8 (LF->?)
Parts Lenses: Nikon 35-135/3.5-4.5 (F), Sigma 70-210/4.5 (F), Nikon 50/1.8 Series E (F) |
|
| Back to top |
|
|
mo
Joined: 27 Aug 2009
Posts: 8979
Location: Australia
Expire: 2016-07-30
|
| Posted: Fri Jul 09, 2010 11:53 am Post subject: |
|
|
mo wrote:
I am overwhelmed with the advice given...thank you all so much.I never thought an overcast day would be recommended and being in winter over here easy to come by! I don't have much of the technical gear suggested by Orio but I will see what I can manage with what I do have.What you have suggested in point number 4 does sound like fun!
Scheimpflug.I did not think of B&W ! I will look out for those orange filters.
I have some ideas now and will post back when I have some results.
Thanks again
_________________
Moira, Moderator
Fuji XE-1,Pentax K-01,Panasonic G1,Panasonic G5,Pentax MX
Ricoh Singlex TLS,KR-5,KR-5Super,XR-10
Lenses
Auto Rikenon's 55/1.4, 1.8, 2.8... 50/1.7 Takumar 2/58 Preset Takumar 2.8/105 Auto Takumar 2.2/55, 3.5/35 Super Takumar 1.8/55...Macro Takumar F4/50... CZJ Biotar ALU M42 2/58 CZJ Tessar ALU M42 2.8/50
CZJ DDR Flektogon Zebra M42 2.8/35 CZJ Pancolar M42 2/50 CZJ Pancolar Exakta 2/50
Auto Mamiya/Sekor 1.8/55 ...Auto Mamiya/Sekor 2/50 Auto Mamiya/Sekor 2.8/50 Auto Mamiya/Sekor 200/3.5 Tamron SP500/8 Tamron SP350/5.6 Tamron SP90/2.5
Primoplan 1.9/58 Primagon 4.5/35 Telemegor 5.5/150 Angenieux 3.5/28 Angenieux 3,5/135 Y 2
Canon FL 58/1.2,Canon FL85/1.8,Canon FL 100/3.5,Canon SSC 2.8/100 ,Konica AR 100/2.8, Nikkor P 105/2.5
|
|
| Back to top |
|
|
Attila

Joined: 24 Feb 2007
Posts: 57865
Location: Hungary
Expire: 2025-11-18
|
| Posted: Fri Jul 09, 2010 12:08 pm Post subject: Re: How do I bring out the detail in the shadow? |
|
|
Attila wrote:
| mo wrote: |
I am trying to put together a little series on some wooden bridges in my area,one rail and one road.They are being left to fall apart (there is a committee trying to save them but it all comes down to money) so I would like to capture some of their uniqueness.They have beautiful craftmanship and just are a joy/challege to photograph.I would appreciate some suggestions in
*How to photograph these structures.
*Lenses that would suit this type of structure photography.
*And the reason for this post how to bring out from the shadow the detail under the bridge.Is it as simple as setting the exposure for the shadow?
This would be with the T4 mount Soligor 2.8/28mm the widest angle I have at F16/500 on Fuji superia 400asa.
Thanks |
Graduated gray filter can help it is protect sky from over exposure and allow to make right exposition on shadows.
_________________
-------------------------------
Items on sale on Ebay
Sony NEX-7 Carl Zeiss Planar 85mm f1.4, Minolta MD 35mm f1.8, Konica 135mm f2.5, Minolta MD 50mm f1.2, Minolta MD 250mm f5.6, Carl Zeiss Sonnar 180mm f2.8
|
|
| Back to top |
|
|
Orio
Joined: 24 Feb 2007
Posts: 29545
Location: West Emilia
Expire: 2012-12-04
|
| Posted: Fri Jul 09, 2010 12:09 pm Post subject: |
|
|
Orio wrote:
Keep in mind that black and white film has less latitude than colour negative film
(that is why I suggested colour negative)
_________________
Orio, Administrator
T*
NE CEDE MALIS AUDENTIOR ITO
Ferrania film is reborn! http://www.filmferrania.it/
Support the Ornano film chemicals company and help them survive!
http://forum.mflenses.com/ornano-chemical-products-t55525.html |
|
| Back to top |
|
|
visualopsins

Joined: 05 Mar 2009
Posts: 10759
Location: California
Expire: 2025-04-11
|
| Posted: Fri Jul 09, 2010 12:27 pm Post subject: |
|
|
visualopsins wrote:
Definitely early and late day light is more dramatic and manageable. Early or late enough the underside may be illuminated!
A polarizing filter will reduce sky brightness by some stops, so overall brightness dynamic range is reduced.
_________________
☮☮☮☮☮☮☮☮☮☮☮☮☮☮☮☮☮☮☮☮☮☮☮☮☮☮☮☮☮☮☮☮ like attracts like! ☮☮☮☮☮☮☮☮☮☮☮☮☮☮☮☮☮☮☮☮☮☮☮☮☮☮☮☮☮☮☮☮
Cameras: Sony ILCE-7RM2, Spotmatics II, F, and ESII, Nikon P4
Lenses:
M42 Asahi Optical Co., Takumar 1:4 f=35mm, 1:2 f=58mm (Sonnar), 1:2.4 f=58mm (Heliar), 1:2.2 f=55mm (Gaussian), 1:2.8 f=105mm (Model I), 1:2.8/105 (Model II), 1:5.6/200, Tele-Takumar 1:5.6/200, 1:6.3/300, Macro-Takumar 1:4/50, Auto-Takumar 1:2.3 f=35, 1:1.8 f=55mm, 1:2.2 f=55mm, Super-TAKUMAR 1:3.5/28 (fat), 1:2/35 (Fat), 1:1.4/50 (8-element), Super-Multi-Coated Fisheye-TAKUMAR 1:4/17, Super-Multi-Coated TAKUMAR 1:4.5/20, 1:3.5/24, 1:3.5/28, 1:2/35, 1:3.5/35, 1:1.8/85, 1:1.9/85 1:2.8/105, 1:3.5/135, 1:2.5/135 (II), 1:4/150, 1:4/200, 1:4/300, 1:4.5/500, Super-Multi-Coated Macro-TAKUMAR 1:4/50, 1:4/100, Super-Multi-Coated Bellows-TAKUMAR 1:4/100, SMC TAKUMAR 1:1.4/50, 1:1.8/55
M42 Carl Zeiss Jena Flektogon 2.4/35
Contax Carl Zeiss Vario-Sonnar T* 28-70mm F3.5-4.5
Pentax K-mount SMC PENTAX-A ZOOM 1:3.5 35~105mm, SMC PENTAX ZOOM 1:4 45~125mm
Nikon Micro-NIKKOR-P-C Auto 1:3.5 f=55mm, NIKKOR-P Auto 105mm f/2.5 Pre-AI (Sonnar), Micro-NIKKOR 105mm 1:4 AI, NIKKOR AI-S 35-135mm f/3,5-4,5
Tamron SP 17mm f/3.5 (51B), Tamron SP 17mm f/3.5 (151B), SP 500mm f/8 (55BB), SP 70-210mm f/3.5 (19AH)
Vivitar 100mm 1:2.8 MC 1:1 Macro Telephoto (Kiron)
|
|
| Back to top |
|
|
Scheimpflug
Joined: 06 Feb 2010
Posts: 1888
Location: New Zealand / USA
Expire: 2011-11-18
|
| Posted: Fri Jul 09, 2010 1:52 pm Post subject: |
|
|
Scheimpflug wrote:
| Orio wrote: |
Keep in mind that black and white film has less latitude than colour negative film
(that is why I suggested colour negative) |
Good to know. In that case, I think that you could still get the same effect by using standard colour film with the colour lens filters, and converting the resulting odd-coloured scans to greyscale in post processing. Since the issue here is over/under exposure in selective colours, the lens filtering will still be beneficial in ways that can't be achieved with post processing of a standard unfiltered shot.
For what it is worth, how do the C41 B&W films compare to colour or traditional B&W films in terms of exposure latitude?
_________________
Sigma DP1, Nikon D40 (hers ), Polaroid x530, Pentax P30t, Pentax P50, (P30t/P50 K-A to Nikon F body mount conversion)
Nikon: 18-55/3.5-5.6 "G ED II DX" (F) Soligor: 28/2.8 (FL->F converted), 135/3.5 (F), 3x TC (F, modified) Kalimar: 28-85/3.5 (F)
Vivitar: 70-210/2.8-4.0 Version 3 (F), Tele 500/6.3 Preset (F), 19/3.8 (F) Minolta: 300/5.6 (SR/MC/MD pending F conversion)
Tamron: 28/2.8 (Adaptall) Panagor: 28/2.5 (FD) Aetna: 300/5.6 (F) Osawa: MC 28/2.8 (F)
Vintage Lenses: Dallmeyer: 1940s A.M. 14in 356mm f4 (ULF->M42) 1930s Adon Telephoto Taylor, Taylor & Hobson: 1880s Rapid Rectilinear 8 1/2 x 6 1/2 11.31in f/8 (LF->?)
Parts Lenses: Nikon 35-135/3.5-4.5 (F), Sigma 70-210/4.5 (F), Nikon 50/1.8 Series E (F) |
|
| Back to top |
|
|
bbshooter
Joined: 13 Feb 2010
Posts: 48
Location: Pennsylvania, USA
|
| Posted: Fri Jul 09, 2010 2:22 pm Post subject: |
|
|
bbshooter wrote:
Great advice Orio, but I do have to raise one question.You said "divide it by the number of photographs that you want to take (do it counting the number of stops on the times wheel), for instance if your reading says that you need to take a f/8 1/125 photo, you will need to take four exposures at f/8 1/30. This will set your base exposure for the photo"
Wouldn't the shutter speed be 1/1000 at f8 with four exposures to arrive at the single exposure value of 1/125 at f8? This would force Mo to shoot at what ever her highest sync speed will allow (I am assuming this is not a leaf shutter camera). If her max sync speed is 1/60 I think what she would have to do is shoot four exposures at 1/60 @f32 with fill flash to get the equivalent of 1/60 @f11 (1/125 @ f8 ).
Unless you are puposely over exposing for shadow detail. Even so 1/30 @ f8 would be 2 stops over exposed for each exposure.
_________________
kowa 6 w 55,85,150, Bronica ertsi w 50, 75,150
Canon t90, A1,AE1,Tlb w 20,28,28-85, 35-105,85 1.8, 135 2.0,135 2.5, 70-210, 100 macro, Digital rebel 300d,G3, rebel G, adaptall 300 2.8, 80-210 103A, 28-80 sp, 90 2.5 sp, Nikon D300,D200,D100,6006, w 80-200 2.8, sigma 15-30,Tamron 28-105 2.8, 85 2 ai, 85 1.8af,50 1.8 E, 50 1.8 af, 35 1.8 af-s, Vivitar ser 1 200 f3,tamron 28-200 xr, Sigma 70-300dl af
minolta hi matic 7s,minolta xg9 w md50 1.7,28-85,135 2.8,58 1.4,osawa 35-70, Pentax k1000,Pz10,ZX5,ZX 10 w 28 viv,50 2 smc,135 2.5 tak,50 1.4 super tak,85-205 soligor,28-70 tokina,sigma 28-80af,70-210 uc 2 af, Miranda sensomat w 50 1.8, Konica Autoreflex w 50 1.8, Rolliflex sl35m w 50 1.8 planar, Kodak Retina IIIC, Yashica Lynx 14 E IC,Lynx 5000,Yashica D, mamiya 500 dtl w 50 2,voightlander vito II auto, Kodak reflex II tlr,Olympus stylus infinity
AGFA Isolette III,Chinon cs-4 |
|
| Back to top |
|
|
visualopsins
Joined: 05 Mar 2009
Posts: 10759
Location: California
Expire: 2025-04-11
|
| Posted: Fri Jul 09, 2010 2:59 pm Post subject: |
|
|
visualopsins wrote:
I am also interested in exposure latitude of films. There is latitude in both exposure and in processing. Is latitude in processing greater? Is it better to expose more or less, and compensate in processing? I'm thinking b&w film exposure only seems to have less latitude, that the goal is the maximum range of tones between black and white only obtained by using maximum exposure latitude, leaving less (or no?) latitude for processing compensation. The questions are how much more latitude does processing have than exposure, are results better with slightly over- or under-exposure and processing compensation, and how does this vary among b&w, color, and slide films?
_________________
☮☮☮☮☮☮☮☮☮☮☮☮☮☮☮☮☮☮☮☮☮☮☮☮☮☮☮☮☮☮☮☮ like attracts like! ☮☮☮☮☮☮☮☮☮☮☮☮☮☮☮☮☮☮☮☮☮☮☮☮☮☮☮☮☮☮☮☮
Cameras: Sony ILCE-7RM2, Spotmatics II, F, and ESII, Nikon P4
Lenses:
M42 Asahi Optical Co., Takumar 1:4 f=35mm, 1:2 f=58mm (Sonnar), 1:2.4 f=58mm (Heliar), 1:2.2 f=55mm (Gaussian), 1:2.8 f=105mm (Model I), 1:2.8/105 (Model II), 1:5.6/200, Tele-Takumar 1:5.6/200, 1:6.3/300, Macro-Takumar 1:4/50, Auto-Takumar 1:2.3 f=35, 1:1.8 f=55mm, 1:2.2 f=55mm, Super-TAKUMAR 1:3.5/28 (fat), 1:2/35 (Fat), 1:1.4/50 (8-element), Super-Multi-Coated Fisheye-TAKUMAR 1:4/17, Super-Multi-Coated TAKUMAR 1:4.5/20, 1:3.5/24, 1:3.5/28, 1:2/35, 1:3.5/35, 1:1.8/85, 1:1.9/85 1:2.8/105, 1:3.5/135, 1:2.5/135 (II), 1:4/150, 1:4/200, 1:4/300, 1:4.5/500, Super-Multi-Coated Macro-TAKUMAR 1:4/50, 1:4/100, Super-Multi-Coated Bellows-TAKUMAR 1:4/100, SMC TAKUMAR 1:1.4/50, 1:1.8/55
M42 Carl Zeiss Jena Flektogon 2.4/35
Contax Carl Zeiss Vario-Sonnar T* 28-70mm F3.5-4.5
Pentax K-mount SMC PENTAX-A ZOOM 1:3.5 35~105mm, SMC PENTAX ZOOM 1:4 45~125mm
Nikon Micro-NIKKOR-P-C Auto 1:3.5 f=55mm, NIKKOR-P Auto 105mm f/2.5 Pre-AI (Sonnar), Micro-NIKKOR 105mm 1:4 AI, NIKKOR AI-S 35-135mm f/3,5-4,5
Tamron SP 17mm f/3.5 (51B), Tamron SP 17mm f/3.5 (151B), SP 500mm f/8 (55BB), SP 70-210mm f/3.5 (19AH)
Vivitar 100mm 1:2.8 MC 1:1 Macro Telephoto (Kiron)
|
|
| Back to top |
|
|
Orio
Joined: 24 Feb 2007
Posts: 29545
Location: West Emilia
Expire: 2012-12-04
|
| Posted: Fri Jul 09, 2010 3:51 pm Post subject: |
|
|
Orio wrote:
| bbshooter wrote: |
Great advice Orio, but I do have to raise one question.You said "divide it by the number of photographs that you want to take (do it counting the number of stops on the times wheel), for instance if your reading says that you need to take a f/8 1/125 photo, you will need to take four exposures at f/8 1/30. This will set your base exposure for the photo"
Wouldn't the shutter speed be 1/1000 at f8 with four exposures to arrive at the single exposure value of 1/125 at f8? |
it would be 1/500
Sorry I made the opposite calculation 
_________________
Orio, Administrator
T*
NE CEDE MALIS AUDENTIOR ITO
Ferrania film is reborn! http://www.filmferrania.it/
Support the Ornano film chemicals company and help them survive!
http://forum.mflenses.com/ornano-chemical-products-t55525.html |
|
| Back to top |
|
|
Orio
Joined: 24 Feb 2007
Posts: 29545
Location: West Emilia
Expire: 2012-12-04
|
| Posted: Fri Jul 09, 2010 3:53 pm Post subject: |
|
|
Orio wrote:
| Scheimpflug wrote: |
For what it is worth, how do the C41 B&W films compare to colour or traditional B&W films in terms of exposure latitude? |
I don't know, sorry.
_________________
Orio, Administrator
T*
NE CEDE MALIS AUDENTIOR ITO
Ferrania film is reborn! http://www.filmferrania.it/
Support the Ornano film chemicals company and help them survive!
http://forum.mflenses.com/ornano-chemical-products-t55525.html |
|
| Back to top |
|
|
Orio
Joined: 24 Feb 2007
Posts: 29545
Location: West Emilia
Expire: 2012-12-04
|
| Posted: Fri Jul 09, 2010 3:55 pm Post subject: |
|
|
Orio wrote:
| siriusdogstar wrote: |
| I am also interested in exposure latitude of films. There is latitude in both exposure and in processing. Is latitude in processing greater? Is it better to expose more or less, and compensate in processing? I'm thinking b&w film exposure only seems to have less latitude, that the goal is the maximum range of tones between black and white only obtained by using maximum exposure latitude, leaving less (or no?) latitude for processing compensation. The questions are how much more latitude does processing have than exposure, are results better with slightly over- or under-exposure and processing compensation, and how does this vary among b&w, color, and slide films? |
I don't know the technical details, sorry. I only know that BW film has lesser latitude especially towards the dark tones, i.e. while you can salvage a heavily underexposed colour negative to a certain extent, a heavily underexposed BW negative is lost.
_________________
Orio, Administrator
T*
NE CEDE MALIS AUDENTIOR ITO
Ferrania film is reborn! http://www.filmferrania.it/
Support the Ornano film chemicals company and help them survive!
http://forum.mflenses.com/ornano-chemical-products-t55525.html |
|
| Back to top |
|
|
bbshooter
Joined: 13 Feb 2010
Posts: 48
Location: Pennsylvania, USA
|
| Posted: Fri Jul 09, 2010 4:23 pm Post subject: |
|
|
bbshooter wrote:
Another alternative would be to have the negatives professionally scanned
and manipulate them the same way that you would manipulate a digital file from a digital camera. But that would require a computer and software
like Photoshop, Elements or GIMP. I am not sure what resourses are available to you Mo.
_________________
kowa 6 w 55,85,150, Bronica ertsi w 50, 75,150
Canon t90, A1,AE1,Tlb w 20,28,28-85, 35-105,85 1.8, 135 2.0,135 2.5, 70-210, 100 macro, Digital rebel 300d,G3, rebel G, adaptall 300 2.8, 80-210 103A, 28-80 sp, 90 2.5 sp, Nikon D300,D200,D100,6006, w 80-200 2.8, sigma 15-30,Tamron 28-105 2.8, 85 2 ai, 85 1.8af,50 1.8 E, 50 1.8 af, 35 1.8 af-s, Vivitar ser 1 200 f3,tamron 28-200 xr, Sigma 70-300dl af
minolta hi matic 7s,minolta xg9 w md50 1.7,28-85,135 2.8,58 1.4,osawa 35-70, Pentax k1000,Pz10,ZX5,ZX 10 w 28 viv,50 2 smc,135 2.5 tak,50 1.4 super tak,85-205 soligor,28-70 tokina,sigma 28-80af,70-210 uc 2 af, Miranda sensomat w 50 1.8, Konica Autoreflex w 50 1.8, Rolliflex sl35m w 50 1.8 planar, Kodak Retina IIIC, Yashica Lynx 14 E IC,Lynx 5000,Yashica D, mamiya 500 dtl w 50 2,voightlander vito II auto, Kodak reflex II tlr,Olympus stylus infinity
AGFA Isolette III,Chinon cs-4 |
|
| Back to top |
|
|
Rolf
Joined: 02 May 2009
Posts: 4123
Location: NRW/Germany
Expire: 2015-12-26
|
| Posted: Fri Jul 09, 2010 5:41 pm Post subject: |
|
|
Rolf wrote:
One thing I have forgotten this morning Mo.
You can try a slide fim instead of a colour film. Slide films have a larger dynamic range.
_________________
Rolf |
|
| Back to top |
|
|
Carlsson

Joined: 26 Jul 2008
Posts: 793
Location: Portugal
|
| Posted: Fri Jul 09, 2010 8:59 pm Post subject: |
|
|
Carlsson wrote:
| Rolf wrote: |
One thing I have forgotten this morning Mo.
You can try a slide fim instead of a colour film. Slide films have a larger dynamic range.
|
Sorry, but this is not true, slides have the smallest latitude.
_________________
Contax III, Zeiss Ikon ZM, Contax AX, EOS 5D, R-D1
https://mariaeero.com/contax/ |
|
| Back to top |
|
|
Rolf
Joined: 02 May 2009
Posts: 4123
Location: NRW/Germany
Expire: 2015-12-26
|
| Posted: Fri Jul 09, 2010 9:24 pm Post subject: |
|
|
Rolf wrote:
Yes, colour film approx. 11 and slides aprox. 6-7.
Slide film has a larger contrast range
_________________
Rolf |
|
| Back to top |
|
|
mo
Joined: 27 Aug 2009
Posts: 8979
Location: Australia
Expire: 2016-07-30
|
| Posted: Sat Jul 10, 2010 1:03 am Post subject: |
|
|
mo wrote:
Interesting reading guys.
I would be using my Ricoh kr10.... I only have Expired kodak Gold asa100,A generic colour asa100 film and a choice of asa 400 fuji films. I have access to Kodak B&W 400asa film.For slide film or any other I would have to look further a field to get some.
If I go to these bridges in early morning during winter I would encounter heavy fog...another challenge although I am sure there would be some nice photo opportunities!
I have a few shots other than this one taken at the same time and they were a lot better...I think it depended on which side of the bridge I stood on and sun position.
Keep the discussion going as I am picking up some handy hints.
_________________
Moira, Moderator
Fuji XE-1,Pentax K-01,Panasonic G1,Panasonic G5,Pentax MX
Ricoh Singlex TLS,KR-5,KR-5Super,XR-10
Lenses
Auto Rikenon's 55/1.4, 1.8, 2.8... 50/1.7 Takumar 2/58 Preset Takumar 2.8/105 Auto Takumar 2.2/55, 3.5/35 Super Takumar 1.8/55...Macro Takumar F4/50... CZJ Biotar ALU M42 2/58 CZJ Tessar ALU M42 2.8/50
CZJ DDR Flektogon Zebra M42 2.8/35 CZJ Pancolar M42 2/50 CZJ Pancolar Exakta 2/50
Auto Mamiya/Sekor 1.8/55 ...Auto Mamiya/Sekor 2/50 Auto Mamiya/Sekor 2.8/50 Auto Mamiya/Sekor 200/3.5 Tamron SP500/8 Tamron SP350/5.6 Tamron SP90/2.5
Primoplan 1.9/58 Primagon 4.5/35 Telemegor 5.5/150 Angenieux 3.5/28 Angenieux 3,5/135 Y 2
Canon FL 58/1.2,Canon FL85/1.8,Canon FL 100/3.5,Canon SSC 2.8/100 ,Konica AR 100/2.8, Nikkor P 105/2.5
|
|
| Back to top |
|
|
visualopsins
Joined: 05 Mar 2009
Posts: 10759
Location: California
Expire: 2025-04-11
|
| Posted: Sat Jul 10, 2010 1:57 am Post subject: |
|
|
visualopsins wrote:
Scout the location! Check for best angles, note orientation of bridge and path of the Sun, go there to photograph when lighting cooperates best. I'm thinking Sun behind slightly to one side, and maybe the bridge can block the Sun, use a meter-square piece of white foam board to reflect some Sunlight underneath.
_________________
☮☮☮☮☮☮☮☮☮☮☮☮☮☮☮☮☮☮☮☮☮☮☮☮☮☮☮☮☮☮☮☮ like attracts like! ☮☮☮☮☮☮☮☮☮☮☮☮☮☮☮☮☮☮☮☮☮☮☮☮☮☮☮☮☮☮☮☮
Cameras: Sony ILCE-7RM2, Spotmatics II, F, and ESII, Nikon P4
Lenses:
M42 Asahi Optical Co., Takumar 1:4 f=35mm, 1:2 f=58mm (Sonnar), 1:2.4 f=58mm (Heliar), 1:2.2 f=55mm (Gaussian), 1:2.8 f=105mm (Model I), 1:2.8/105 (Model II), 1:5.6/200, Tele-Takumar 1:5.6/200, 1:6.3/300, Macro-Takumar 1:4/50, Auto-Takumar 1:2.3 f=35, 1:1.8 f=55mm, 1:2.2 f=55mm, Super-TAKUMAR 1:3.5/28 (fat), 1:2/35 (Fat), 1:1.4/50 (8-element), Super-Multi-Coated Fisheye-TAKUMAR 1:4/17, Super-Multi-Coated TAKUMAR 1:4.5/20, 1:3.5/24, 1:3.5/28, 1:2/35, 1:3.5/35, 1:1.8/85, 1:1.9/85 1:2.8/105, 1:3.5/135, 1:2.5/135 (II), 1:4/150, 1:4/200, 1:4/300, 1:4.5/500, Super-Multi-Coated Macro-TAKUMAR 1:4/50, 1:4/100, Super-Multi-Coated Bellows-TAKUMAR 1:4/100, SMC TAKUMAR 1:1.4/50, 1:1.8/55
M42 Carl Zeiss Jena Flektogon 2.4/35
Contax Carl Zeiss Vario-Sonnar T* 28-70mm F3.5-4.5
Pentax K-mount SMC PENTAX-A ZOOM 1:3.5 35~105mm, SMC PENTAX ZOOM 1:4 45~125mm
Nikon Micro-NIKKOR-P-C Auto 1:3.5 f=55mm, NIKKOR-P Auto 105mm f/2.5 Pre-AI (Sonnar), Micro-NIKKOR 105mm 1:4 AI, NIKKOR AI-S 35-135mm f/3,5-4,5
Tamron SP 17mm f/3.5 (51B), Tamron SP 17mm f/3.5 (151B), SP 500mm f/8 (55BB), SP 70-210mm f/3.5 (19AH)
Vivitar 100mm 1:2.8 MC 1:1 Macro Telephoto (Kiron)
|
|
| Back to top |
|
|
|
|