| View previous topic :: View next topic |
| Author |
Message |
Plokko

Joined: 27 Nov 2009
Posts: 39
Location: Italy
|
 Posted: Fri Apr 09, 2010 8:28 pm Post subject: Tair-3 (300/4.5 part of the photosniper) repair guide Posted: Fri Apr 09, 2010 8:28 pm Post subject: Tair-3 (300/4.5 part of the photosniper) repair guide |
 |
|
Plokko wrote:
I've translated my guide for you,sorry if i dind't put too much effort on the translation;please if you want to make corrections or you speech italian simply follow this link!
http://www.minoltasonyclub.it/cms/forum/viewtopic.php?t=19442
When i received my photosniler i wasn't aware that the tair-3 had problems to the diaphragm
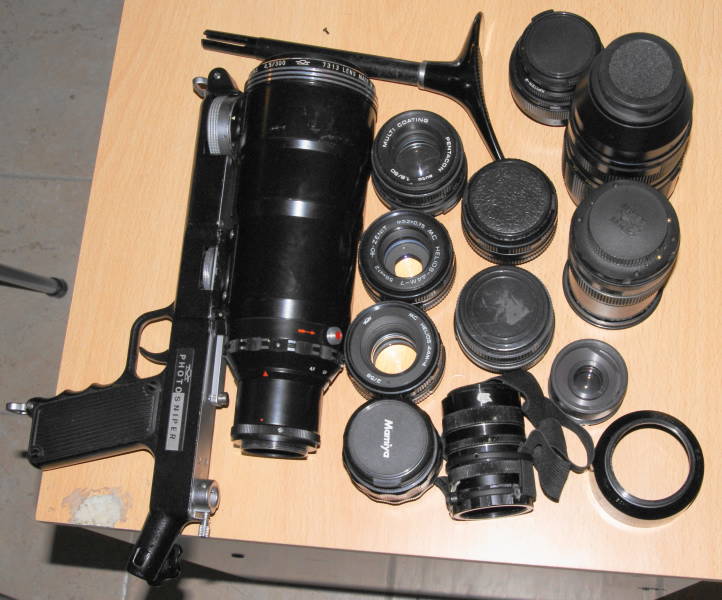
I didn't find any guide on the web about this lens so i decided to make my own.
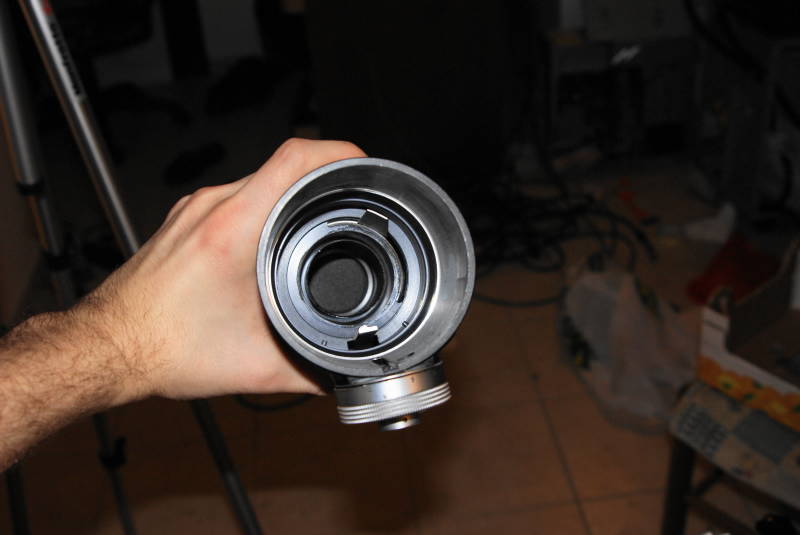
First of all remove the primary lens block by pushing in the aperture lever(13)

Then(keeping down the lever)simply focus after 3m and the block should come out of it's rail.

Because the piece of the lens are many there's a legend on how i call them in this guide
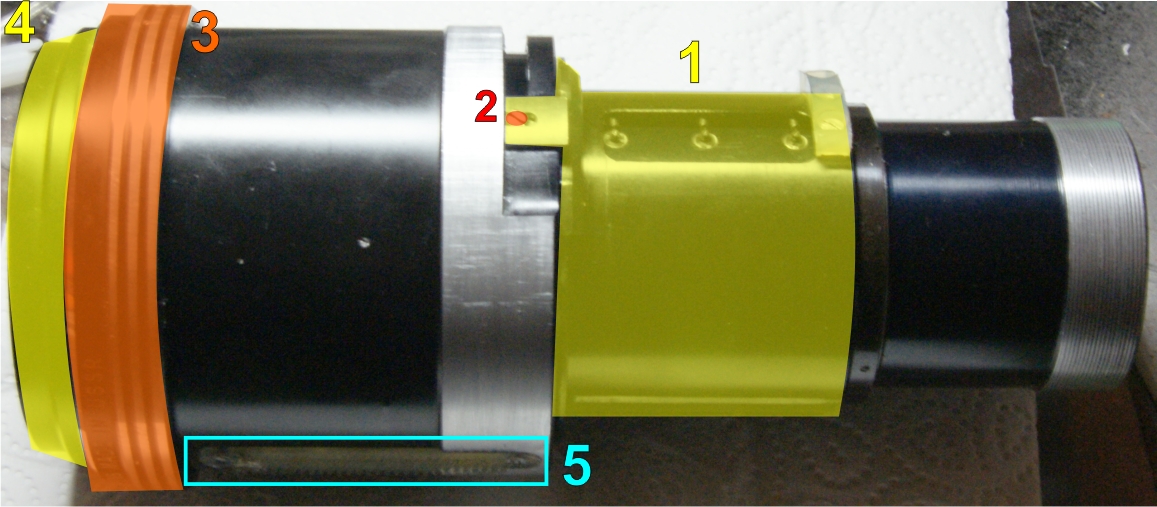
1) Spring block
2) Diaphragm spring screw
3) Infinity lock
4) Primary block
5) Focus rail
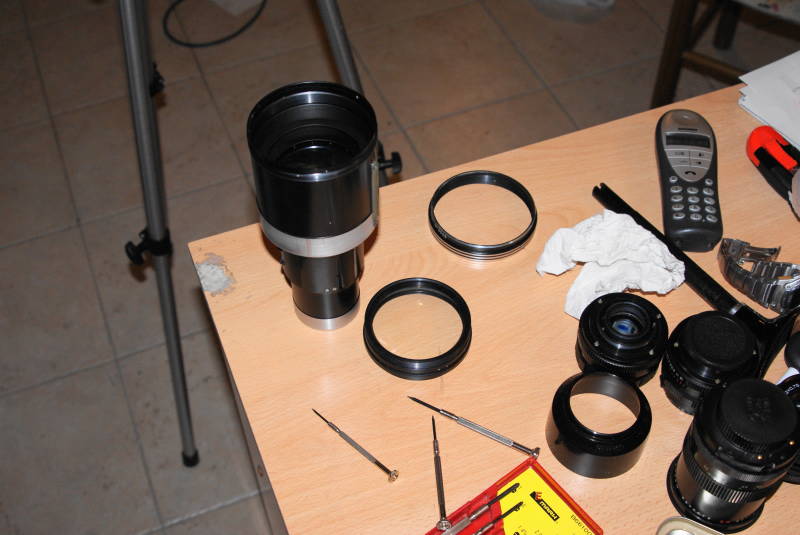
Now we'll start unscrewing the Diaphragm spring screw to detach it.
Now we can start removing the primary lens,to do so we need to remove the infinity lock first.
Simply unscrew the 3 micro-screw(1) to loose it and then rotate it to remove (2).
After that remove the other miniscrew on the primary block(3).

Now remove the primary lens from its place by rotating it.
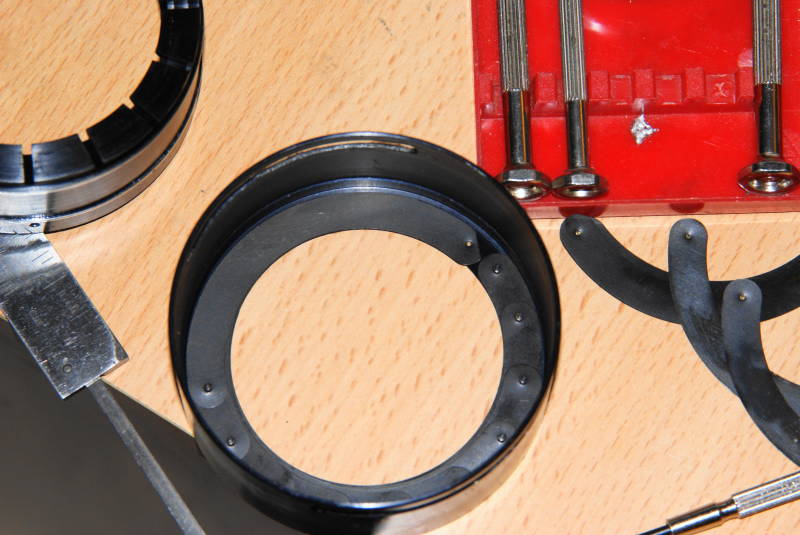
now we can see the diaphragm block and two antireflection rings holded in place by a screwed ring.
If you had removed all the microscrews you should remove them after the unscrewing of the ring,REMEMBER to mind the order of the antireflection rings!
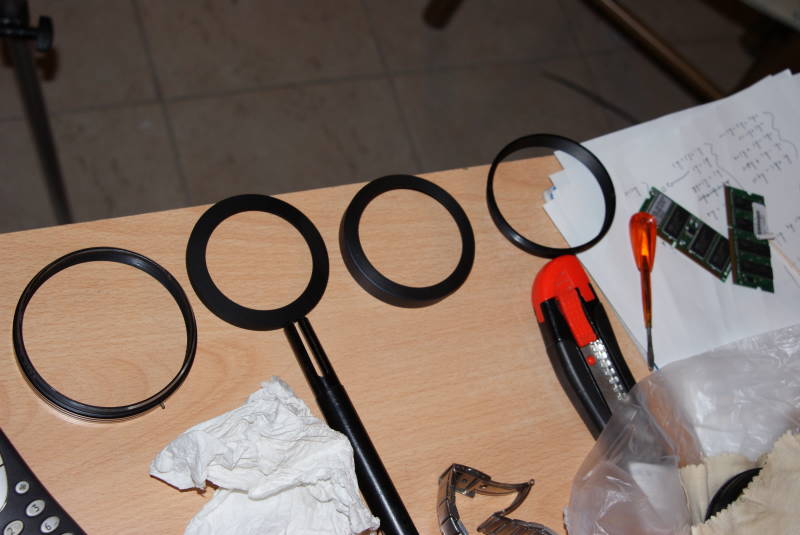
(from right to left the first is the ring holdin the antireflection rings,then the external antireflection rings and the third is the infinity lock.)
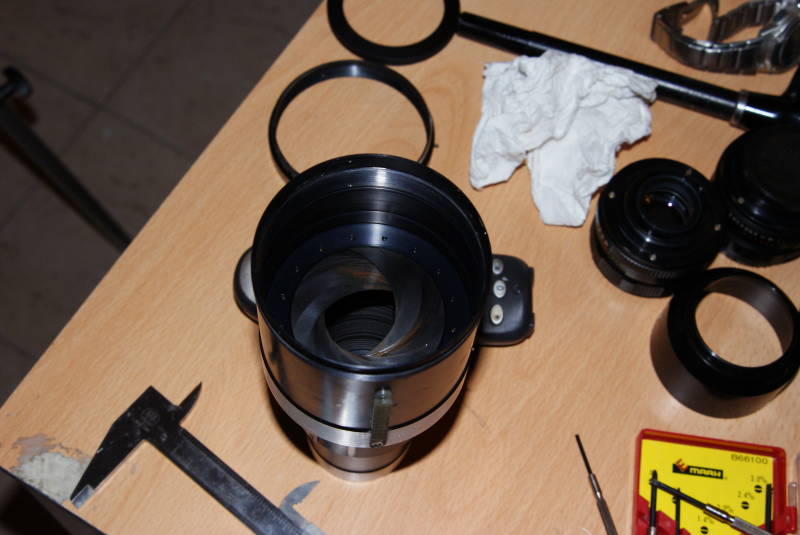
Now we can star removing the diaphragm block by slowing pushing it out of its place.

Now we can open the diaphragm block by unscrewing the last screw left on it.
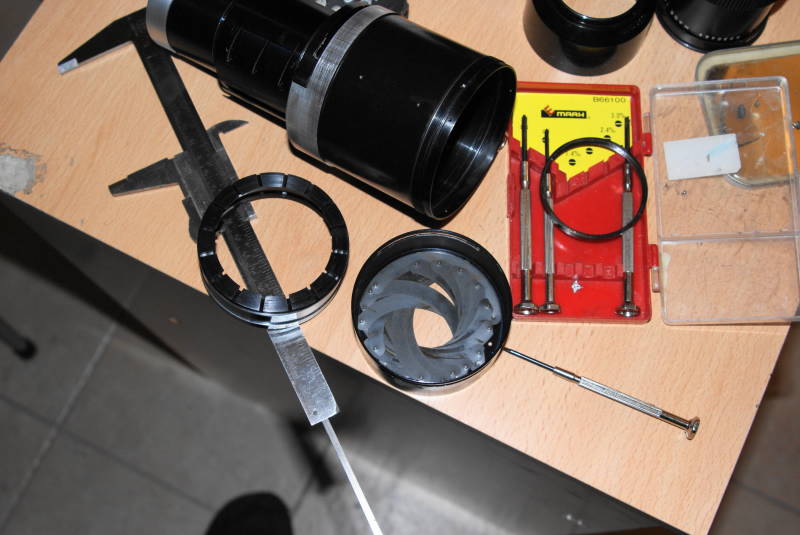
I cleaned all the blades from oil traces
Now we must reassemble all the blades on the external ring,it's not an hard job IF you know how to place them.
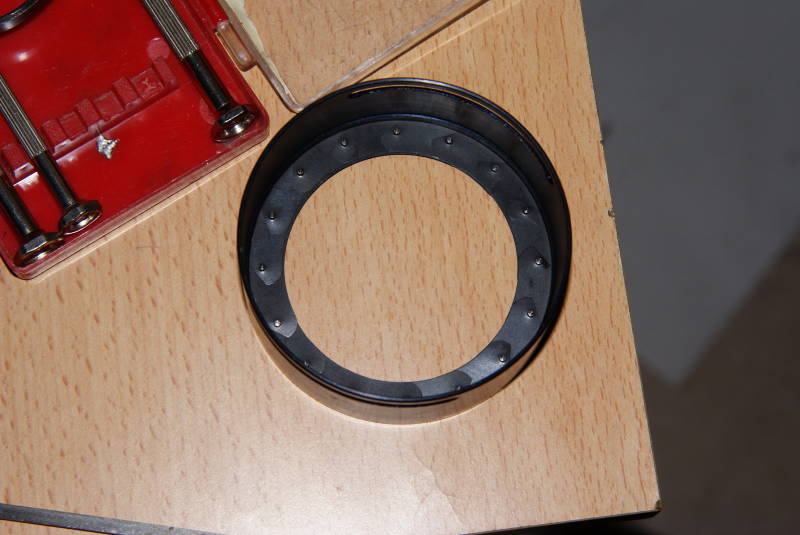
We'll start by placing all the blades counterclockwise;NOTE THE MARK ON THE BLADES,in the photo below i placed them INCORRECTLY(but i didn't make another photo)
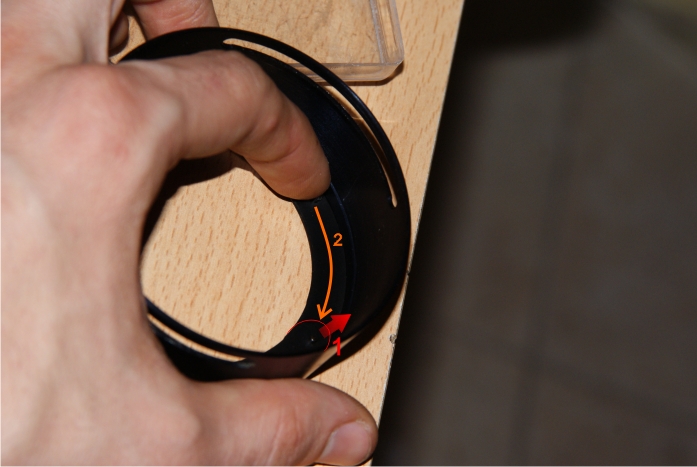
To place the last five blades(who's hole is covered by the other)you need to push up the last blade(1) and then slide the insered blade to the fist empty hole(2).
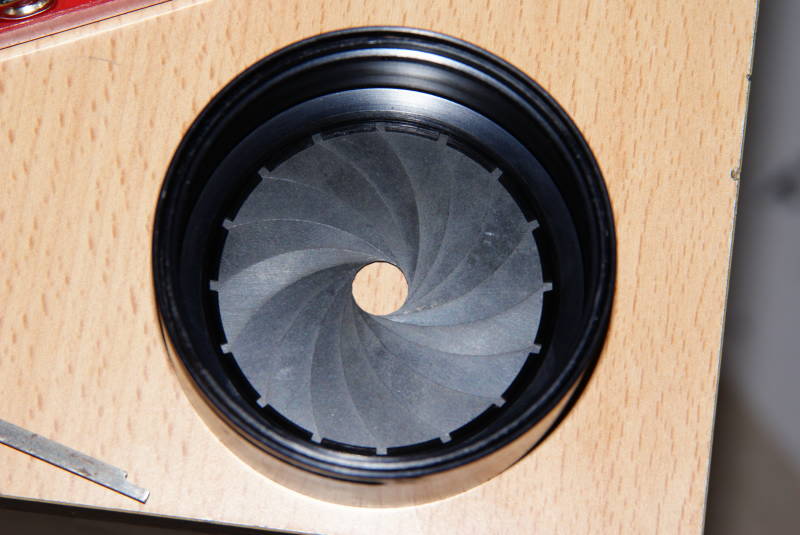
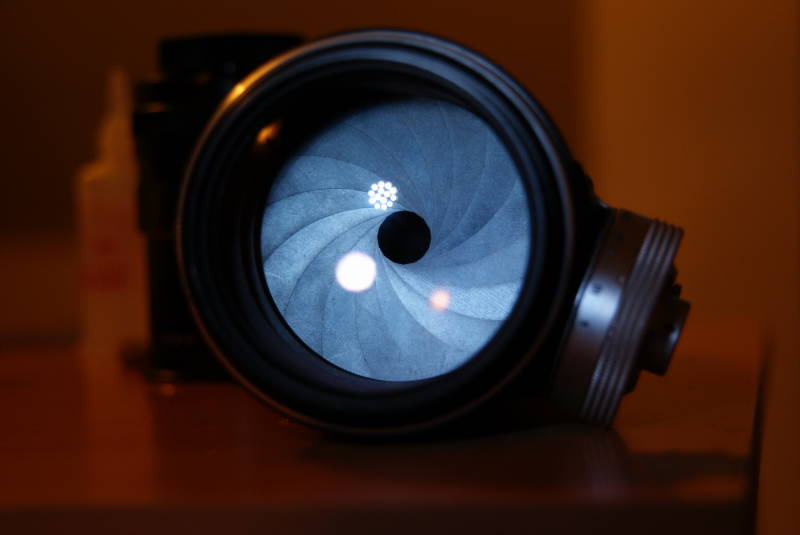
Now the diaphragm should be completed(this photo shows a CORRECT diaphragm blade placing)
Now we can start to remount the other part of the diaphragm block in place,screw it's screw and try if it works well.
Now we can remount the diaphragm block in place,push it GENTLY to avoid moving the diaphragm blades out of place.
If you make some errors and some blades goes out simply take the block out and repeat the placing as before.

It's important that the hole of the diaphragm spring screw is facing the right part of the main barrel;to correct it's position you can simply rotate it gently with a screwdriver.
Done so the hard work is done,star by screwing back in palce the diaphragm spring screw (without fix it,for now,to the spring block,this will avoid the diaphragm to get loose) and then screw back the micro-screws holding the diaphragm block.
Then we'll start remounting the antireflection rings with the ring holding them and then the primary element.
Done so you can screw all the micro-screw on the primary block and then mount back the infinity lock and it's screws.
Finally,after repositioning the diaphragm spring screw back in it's original place,we can reinser the main block in the lens barrel,to do so simply put it to F22 and then push the main block on the barrel holding down the diaphragm lever.
Now the lens should be fully mounted and in perfect order!
_________________
Sony α200 | cosina 19/35 3.5/4.5 | minolta 28-105 3.5/4.5 RS | 100-200 4.5
m42: photosniper(tair-3 300/4.5) | jupiter 21M 200/4 | pentacon electric 135/2.8 | Jupiter 9 | Auto takumar 50/1.4 | 2xPentacon 50/1.8 | Helios-44m-x| macro tubes | novoflex autobellows
volna-3 (kiev 80/2.8 )
http://www.flickr.com/photos/plokko/sets/ |
|
| Back to top |
|
 |
Plokko
Joined: 27 Nov 2009
Posts: 39
Location: Italy
|
| Posted: Fri Apr 09, 2010 8:30 pm Post subject: |
|
|
Plokko wrote:
I also fixxed the rail simply by unscrewing it and inverting it(the right part was damaged,now on the other side it won't affect the lens functionallity). 
This was my first lens repair! 
_________________
Sony α200 | cosina 19/35 3.5/4.5 | minolta 28-105 3.5/4.5 RS | 100-200 4.5
m42: photosniper(tair-3 300/4.5) | jupiter 21M 200/4 | pentacon electric 135/2.8 | Jupiter 9 | Auto takumar 50/1.4 | 2xPentacon 50/1.8 | Helios-44m-x| macro tubes | novoflex autobellows
volna-3 (kiev 80/2.8 )
http://www.flickr.com/photos/plokko/sets/ |
|
| Back to top |
|
|
Attila


Joined: 24 Feb 2007
Posts: 57865
Location: Hungary
Expire: 2025-11-18
|
| Posted: Fri Apr 09, 2010 8:42 pm Post subject: |
|
|
Attila wrote:
Many thanks for your detailed guide!
_________________
-------------------------------
Items on sale on Ebay
Sony NEX-7 Carl Zeiss Planar 85mm f1.4, Minolta MD 35mm f1.8, Konica 135mm f2.5, Minolta MD 50mm f1.2, Minolta MD 250mm f5.6, Carl Zeiss Sonnar 180mm f2.8
|
|
| Back to top |
|
|
Poolhall

Joined: 25 Feb 2008
Posts: 1296
|
| Posted: Fri Apr 09, 2010 9:12 pm Post subject: |
|
|
Poolhall wrote:
Excellent guide well done |
|
| Back to top |
|
|
adriano210
Joined: 09 Apr 2010
Posts: 6
Location: DUBLIN
|
| Posted: Fri Apr 09, 2010 10:33 pm Post subject: |
|
|
adriano210 wrote:
nice - is a one off my Favorit lens
_________________
k20+grip,k200+grip,olek410,K1000,P30,MZ6,OM10,Pro.A:P16-45f4,S400,S70-300APODG,
S28-200f3,5-5,6,P100macrof3,5,S28-80f3,5-5,6,
S28-105f2,8-4,F50f1,7,P135f2,5,P50f2,Z50f3,5
A28f2,8,H44k4f2,F85f1,4,T300f4,5,cZ50f2,8,pcon135f2,8(15blades) |
|
| Back to top |
|
|
Scheimpflug

Joined: 06 Feb 2010
Posts: 1888
Location: New Zealand / USA
Expire: 2011-11-18
|
| Posted: Fri Apr 09, 2010 11:05 pm Post subject: |
|
|
Scheimpflug wrote:
Another excellent guide! Thank you for taking the time to document this procedure! 
_________________
Sigma DP1, Nikon D40 (hers ), Polaroid x530, Pentax P30t, Pentax P50, (P30t/P50 K-A to Nikon F body mount conversion)
Nikon: 18-55/3.5-5.6 "G ED II DX" (F) Soligor: 28/2.8 (FL->F converted), 135/3.5 (F), 3x TC (F, modified) Kalimar: 28-85/3.5 (F)
Vivitar: 70-210/2.8-4.0 Version 3 (F), Tele 500/6.3 Preset (F), 19/3.8 (F) Minolta: 300/5.6 (SR/MC/MD pending F conversion)
Tamron: 28/2.8 (Adaptall) Panagor: 28/2.5 (FD) Aetna: 300/5.6 (F) Osawa: MC 28/2.8 (F)
Vintage Lenses: Dallmeyer: 1940s A.M. 14in 356mm f4 (ULF->M42) 1930s Adon Telephoto Taylor, Taylor & Hobson: 1880s Rapid Rectilinear 8 1/2 x 6 1/2 11.31in f/8 (LF->?)
Parts Lenses: Nikon 35-135/3.5-4.5 (F), Sigma 70-210/4.5 (F), Nikon 50/1.8 Series E (F) |
|
| Back to top |
|
|
Plokko
Joined: 27 Nov 2009
Posts: 39
Location: Italy
|
| Posted: Sat Apr 10, 2010 10:29 am Post subject: |
|
|
Plokko wrote:
Thanks!
maybe i should also create a guide for my photosniper digital conversion(added an af button and take photos when you pull the trigger,i created also a standard tripod mount conversion to mount bellows or other lens,also AF lenses!!!)for sony,done without even scratching it.
_________________
Sony α200 | cosina 19/35 3.5/4.5 | minolta 28-105 3.5/4.5 RS | 100-200 4.5
m42: photosniper(tair-3 300/4.5) | jupiter 21M 200/4 | pentacon electric 135/2.8 | Jupiter 9 | Auto takumar 50/1.4 | 2xPentacon 50/1.8 | Helios-44m-x| macro tubes | novoflex autobellows
volna-3 (kiev 80/2.8 )
http://www.flickr.com/photos/plokko/sets/ |
|
| Back to top |
|
|
WolverineX

Joined: 19 Apr 2009
Posts: 1693
Location: Zagreb , Croatia , Europe
|
| Posted: Sat Mar 17, 2012 10:47 pm Post subject: |
|
|
WolverineX wrote:
i think this should be a sticky, because of the guide how to re-assemble aperture blades that can be helpful for any lens as it did help me repair aperture blades of my Primotar.
_________________
my tools:Oly E-M5 + 45mm/1.8 + Oly E-520 + 12-60 + 14-42 + 70-300 + Sigma 105mm + FL-50R + EC20 + SRF-11 ring flash
http://forum.mflenses.com/wolverinex-testing-my-lenses-series-link-list-t39524.html |
|
| Back to top |
|
|
Attila
Joined: 24 Feb 2007
Posts: 57865
Location: Hungary
Expire: 2025-11-18
|
| Posted: Sun Mar 18, 2012 12:08 am Post subject: |
|
|
Attila wrote:
Many thanks!!!
_________________
-------------------------------
Items on sale on Ebay
Sony NEX-7 Carl Zeiss Planar 85mm f1.4, Minolta MD 35mm f1.8, Konica 135mm f2.5, Minolta MD 50mm f1.2, Minolta MD 250mm f5.6, Carl Zeiss Sonnar 180mm f2.8
|
|
| Back to top |
|
|
Happysnapper65
Joined: 28 Jun 2012
Posts: 2
Location: Northampton
|
| Posted: Tue Jul 03, 2012 12:02 pm Post subject: |
|
|
Happysnapper65 wrote:
A few tips on converting for Digital would be good, I am planning on doing this and any help would be good.
Dave |
|
| Back to top |
|
|
WolverineX
Joined: 19 Apr 2009
Posts: 1693
Location: Zagreb , Croatia , Europe
|
| Posted: Wed Jul 11, 2012 8:25 am Post subject: |
|
|
WolverineX wrote:
| Happysnapper65 wrote: |
A few tips on converting for Digital would be good, I am planning on doing this and any help would be good.
Dave |
if you are talking about this lens (tair-3) then you only need an appropriate adapter. because this is m42 lens (i think) it can fit on pretty much any digital camera
_________________
my tools:Oly E-M5 + 45mm/1.8 + Oly E-520 + 12-60 + 14-42 + 70-300 + Sigma 105mm + FL-50R + EC20 + SRF-11 ring flash
http://forum.mflenses.com/wolverinex-testing-my-lenses-series-link-list-t39524.html |
|
| Back to top |
|
|
Jethro Tull

Joined: 31 Dec 2010
Posts: 68
Location: SCOTLAND
|
| Posted: Sat Sep 15, 2012 7:34 pm Post subject: Excellent guide |
|
|
Jethro Tull wrote:
Excellent guide and a brave person tackling the photosniper! interesting to see how its built and explain why it weighs a ton lol
I have converted a few photosniper to electronic trigger (fitting it inside the stock) if you look on the Flickr Photosniper group i put instructions on how i did it.
Superb lenses and everyone should try a Tair 300mm on day the focusing is very quick and easy once you get used to it.
Cheers
Brian |
|
| Back to top |
|
|
SonicScot

Joined: 01 Dec 2011
Posts: 2697
Location: Scottish Highlands
|
| Posted: Sun Sep 16, 2012 4:20 pm Post subject: Re: Excellent guide |
|
|
SonicScot wrote:
| Jethro Tull wrote: |
Excellent guide and a brave person tackling the photosniper! interesting to see how its built and explain why it weighs a ton lol
I have converted a few photosniper to electronic trigger (fitting it inside the stock) if you look on the Flickr Photosniper group i put instructions on how i did it.
Superb lenses and everyone should try a Tair 300mm on day the focusing is very quick and easy once you get used to it.
Cheers
Brian |
I just had a look for that, Rowdy Rebel? Is that you? The conversion looks pretty simple and once I find a cheap sniper kit I'd love to convert it for my 7D. 
_________________
Gary
Currently active gear....
Sony a7
E-M1 Mkll
Rubinar 1000/10 + 2x matched extender
Tamron 500/8 55BB
Sigma 100-300/4
Vivitar Series 1.... 200/3, 70-210/3.5 (V1 by Kiron), 135/2.3, 105/2.5 macro, 90/2.5 macro (Bokina), 90-180/4.5 Flat Field Macro, 28-90mm f/2.8-3.5
Carl Zeiss.... 180/2.8, 135/3.5, 85/1.4, 35/2.4 Flektagon, 21/2.8 Distagon
Nikon.... 55/3.5 micro, 50/1.2
Elicar 90/2.5 V-HQ Macro
Zhongyi Speedmaster 85/1.2
Jupiter-9 85/2
Helios.... 58/2 44-3
Hartblei 45/3.5 Super-Rotator TS-PC
Zenitar 16/2.8 fisheye
Samyang 8/3.5 fisheye
Nodal Ninja 4, Neewer leveling tripod base
Flickr http://www.flickr.com/photos/gazsus/ Website http://garianphotography.co.uk/ |
|
| Back to top |
|
|
Jethro Tull
Joined: 31 Dec 2010
Posts: 68
Location: SCOTLAND
|
| Posted: Mon Sep 17, 2012 1:04 pm Post subject: aye that's me 8-) |
|
|
Jethro Tull wrote:
Aye that's me it is pretty easy to do and works great, i use it for wildlife/birds etc there's loads of shots on flickr that i took using the Tair/550d setup. It also works well with a 1.4x or 2x teleconverter and best iq at f8
cheers
Brian
ps the photosnipers do come up on ebay cheap now and again my most expensive one was £50.00 and cheapest was £25.00 complete kit, one of mine had quite a bit of fungus but it didn't seem to affect iq so left it alone. |
|
| Back to top |
|
|
SonicScot
Joined: 01 Dec 2011
Posts: 2697
Location: Scottish Highlands
|
| Posted: Mon Sep 17, 2012 1:12 pm Post subject: |
|
|
SonicScot wrote:
I'd really like to get the full kit and convert it, but meanwhile I'm not doing bad without it...

Ebony the Harris Hawk (explored) by Gaz Sutherland, on Flickr
_________________
Gary
Currently active gear....
Sony a7
E-M1 Mkll
Rubinar 1000/10 + 2x matched extender
Tamron 500/8 55BB
Sigma 100-300/4
Vivitar Series 1.... 200/3, 70-210/3.5 (V1 by Kiron), 135/2.3, 105/2.5 macro, 90/2.5 macro (Bokina), 90-180/4.5 Flat Field Macro, 28-90mm f/2.8-3.5
Carl Zeiss.... 180/2.8, 135/3.5, 85/1.4, 35/2.4 Flektagon, 21/2.8 Distagon
Nikon.... 55/3.5 micro, 50/1.2
Elicar 90/2.5 V-HQ Macro
Zhongyi Speedmaster 85/1.2
Jupiter-9 85/2
Helios.... 58/2 44-3
Hartblei 45/3.5 Super-Rotator TS-PC
Zenitar 16/2.8 fisheye
Samyang 8/3.5 fisheye
Nodal Ninja 4, Neewer leveling tripod base
Flickr http://www.flickr.com/photos/gazsus/ Website http://garianphotography.co.uk/ |
|
| Back to top |
|
|
Jethro Tull
Joined: 31 Dec 2010
Posts: 68
Location: SCOTLAND
|
| Posted: Mon Sep 17, 2012 10:56 pm Post subject: superb |
|
|
Jethro Tull wrote:
Wow! thats superb! amazing action shot |
|
| Back to top |
|
|
D1N0

Joined: 07 Aug 2012
Posts: 2531
|
| Posted: Wed May 01, 2013 2:48 pm Post subject: |
|
|
D1N0 wrote:
allready lost at step 1: first of all remove the primary lens block by pushing in the aperture lever(13) I push it, try to focus the lens out. But it just stops.
_________________
pentaxian |
|
| Back to top |
|
|
johndav
Joined: 29 May 2013
Posts: 2
Location: United Kingdom
|
| Posted: Wed May 29, 2013 6:16 pm Post subject: |
|
|
johndav wrote:
I was the same D1NO. There is a dome headed stop screw on the focussing knob which needs to be released (you don't need to remove it fully) |
|
| Back to top |
|
|
D1N0
Joined: 07 Aug 2012
Posts: 2531
|
| Posted: Wed May 29, 2013 8:58 pm Post subject: |
|
|
D1N0 wrote:
| johndav wrote: |
| I was the same D1NO. There is a dome headed stop screw on the focussing knob which needs to be released (you don't need to remove it fully) |
Already found out. Removed the entire thing though. Also had to drill out 2 out of three screws of the front lens 
_________________
pentaxian |
|
| Back to top |
|
|
johndav
Joined: 29 May 2013
Posts: 2
Location: United Kingdom
|
| Posted: Tue Jun 04, 2013 2:54 pm Post subject: |
|
|
johndav wrote:
Thanks for the tutorial - I would not have had the confidence to open this beast up otherwise |
|
| Back to top |
|
|
Christopher Lord
Joined: 12 Aug 2013
Posts: 1
|
| Posted: Mon Aug 12, 2013 11:07 pm Post subject: removing/replacing primary lens block |
|
|
Christopher Lord wrote:
This is great work, but one detail was wrong, at least for my model photosniper: depressing the aperture lever does not allow you to slide the primary lens block in and out. Maybe it's a different model, but although I did snap it out eventually I couldn't get it back in, and realised that the best thing is to remove the four big screws holding the focusing gear mechanism in place. This releases the plate and you can easily replace the lens assembly. Be careful when you replace it to make sure the lens is pushed fully in and that the infinity mark is set against the little triangle on the focusing wheel. That way the gear assembly will slot neatly into place. |
|
| Back to top |
|
|
groundlessfears
Joined: 14 Sep 2013
Posts: 11
Location: Lahore
|
| Posted: Sun Oct 06, 2013 7:54 am Post subject: |
|
|
groundlessfears wrote:
Nice Guide, but can anyone share Tair-3S Disassembly guide,? as its different from this lens. Thanks.
_________________
SmokeGrafix |
|
| Back to top |
|
|
Pepper
Joined: 05 Aug 2013
Posts: 16
|
| Posted: Sat Dec 14, 2013 12:47 am Post subject: coil cocking ring wont cock below 10 meters |
|
|
Pepper wrote:
Hi everyone, great repair guide btw
I just got this Tair 3 lens along with 500mm 3m/6a mirror and am very pleased with it...I have one issue though...
I dont mind preset aperture as I have quite a bit of lenses operating the same way but on this lens it operates kind of funny and I think it may have some sort of problem/fault.
If i got it right I have to set aperture ring to desired value, cock the ring with red button to achieve full aperture opening and when I push lever beneath the lens it recoils and goes to selected aperture value...right? Right!
Problem is I can do that only on distances from 10 meters to infinity. When the lens is set to anything lower than that (3-10 meters) I cant achieve recoil action as the red button ring does not click and it does not open aperture fully ... To clarify further ...when lens is set to 10 meters and further I can feel stifness and tension of the coil ring but set lower than 10 meters it feels kind of loose and kind of "skips" or starts coiling not from the moment when I start rotating it but somewhere in the middle of circle to the end where it should click and recoil.
So if I want full aperture openng at below 10 meters I have to set the lens to 10 meters and above and then cock the ring and then return lens to below 10 meters and shoot wide open.
I wonder if position of the lens barrel is influencing somehow and making it behave that way or coil is loose or whatnot ... I have the tools, I just dont want to reassemble it and make thins worse before checking with someone who has done it...
So any info would help
Cheers guys.
Thanks
Mark |
|
| Back to top |
|
|
lucca1x
Joined: 09 Feb 2014
Posts: 93
Location: Romania
|
| Posted: Wed Mar 12, 2014 11:35 am Post subject: |
|
|
lucca1x wrote:
Excellent guide. I have a new tair 3S or so I think. By the look of it it was never used. It was kept in a car garage for years, the grease separated and had oil on blades. I've followed this guide and the aperture works fine now. The problem is that the oil spread on the rear elements and I can't reach from the front in order to properly clean it. Does anybody know how to safely disassemble the rear block ?
Thanks ! |
|
| Back to top |
|
|
Grafomefos

Joined: 29 Mar 2013
Posts: 9
Location: Prague, Czech Republic
|
| Posted: Tue Mar 25, 2014 7:51 pm Post subject: |
|
|
Grafomefos wrote:
Hi everyone, I have a question about this lens. I bought one recently. After shooting some pictures with it I noticed that at F/4,5 the pictures are kind of foggy, blurry. They lack contrast and seem as if glowing. Do you have any experience with this. I dismantled the lens according to this tutorial and cleaned the glasses well - no signs of fungus, no scratches etc. I am also attaching some images to show the problem I have. Thanks for your help (both taken with F/4,5):


_________________
http://grafomefos.webnode.cz/fotogalerie/
MOG: Trioplan 50/2.9, Primoplan 58/1.9, Orestegor 200/4, Primotar 135/3.5
CZJ: Flektogon 35/2.4, Tessar 50/2.8
Pentacon 135/2.8, Pentacon 50/1.8
Helios 44M-4 58/2 |
|
| Back to top |
|
|
|
|


