| View previous topic :: View next topic |
| Author |
Message |
Scheimpflug


Joined: 06 Feb 2010
Posts: 1888
Location: New Zealand / USA
Expire: 2011-11-18
|
 Posted: Fri Jul 23, 2010 8:47 am Post subject: Posted: Fri Jul 23, 2010 8:47 am Post subject: |
 |
|
Scheimpflug wrote:
| peterqd wrote: |
| Sorry, I didn't make it clear. I can bid for the camera and if I win it I can take off the lever and just send you that. You pay the camera price plus postage for the lever only, if that's the only part you need. Actually, I'll pay the postage to you. |
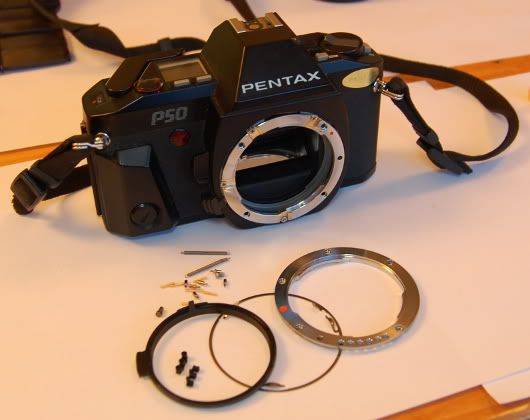
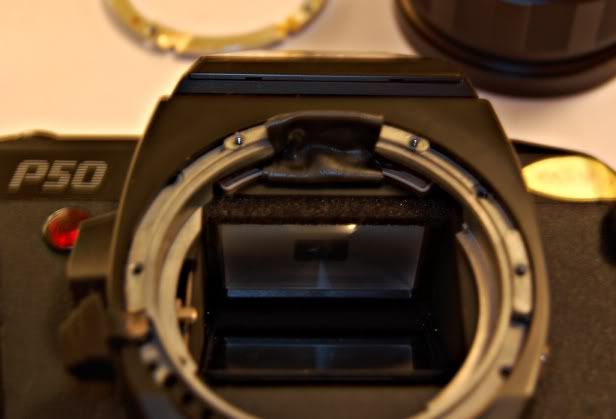
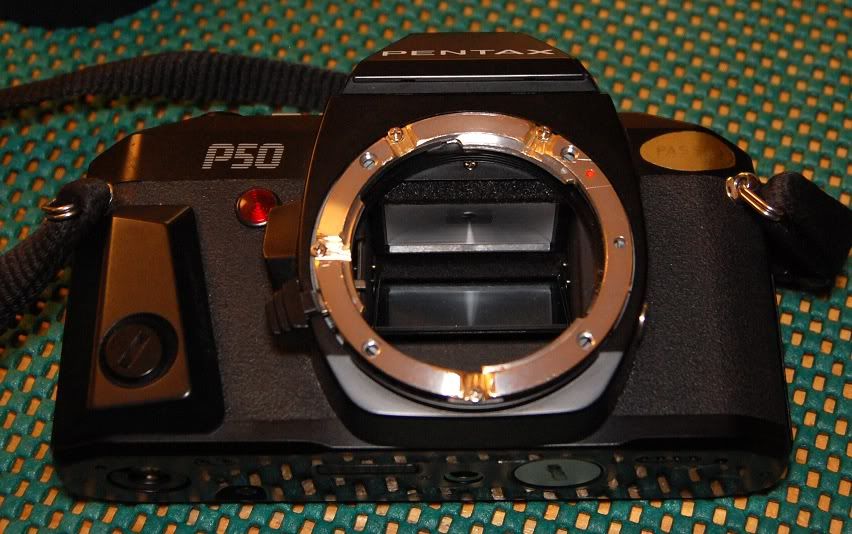
Thanks Peter, that is very generous!  But I think I will be OK for the time being, as another lovely Pentax has found its way to me. But I think I will be OK for the time being, as another lovely Pentax has found its way to me.  I caught this P50 on a local auction, made a bid, and literally two days later it was here! I caught this P50 on a local auction, made a bid, and literally two days later it was here!
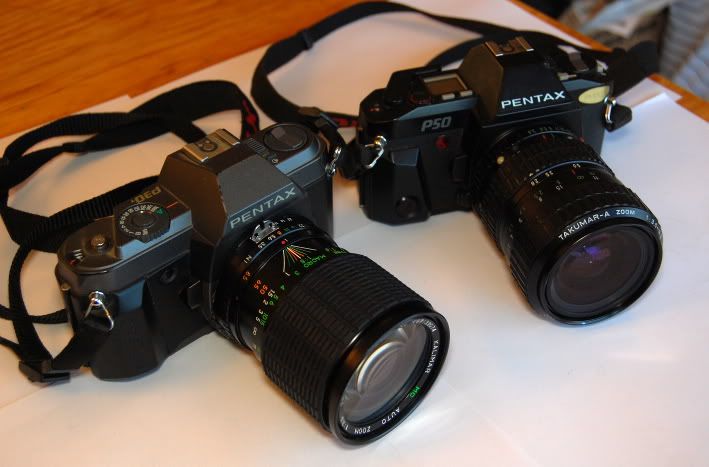
The P50 looks similar to the P30t, and most of the information on the web would lead you to believe that they are nearly identical aside from the P50's electronic Program operation. However, they are in fact substantially different.
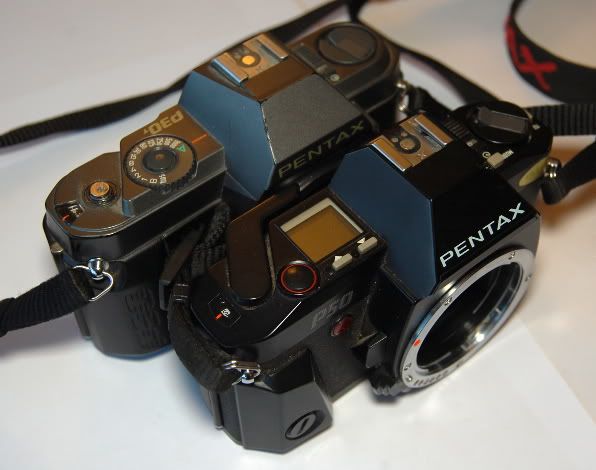
On top, the shell has slightly different styling, some of which is to accommodate the different controls. Both top shells are made of plastic.
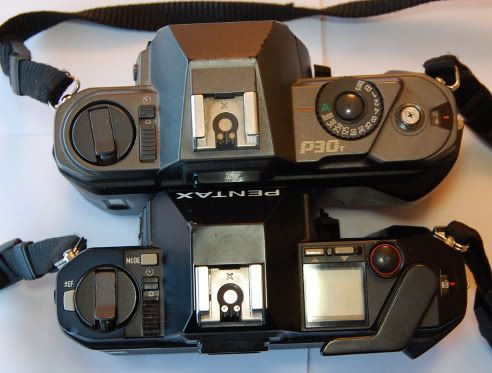
The P30t has an integrated rubber grip on both sides, while the P50 has a fixed plastic grip on the rear and a removable plastic grip on the front. The soft grip on the P30t is more comfortable, and the P30t also has a more ergonomic position for the shutter release.
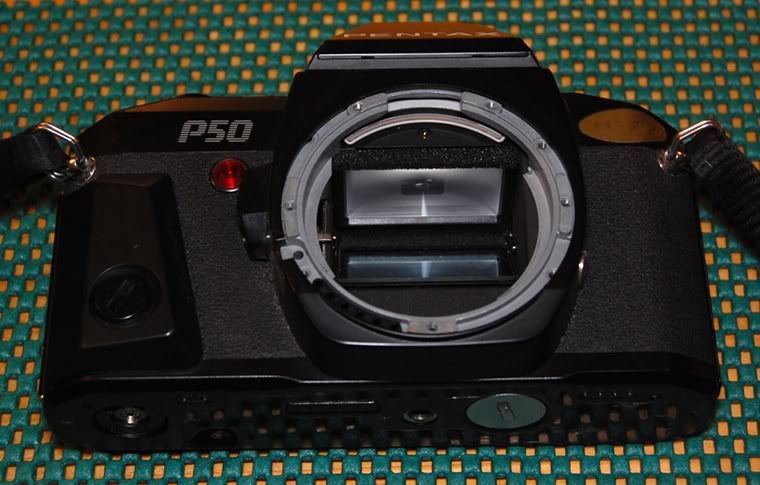
Underneath, more differences are apparent. Both the film door and the baseplate are plastic on the P30t, while both are metal on the P50. The P50 also has the electrical & mechanical connections to support a motor winder, which the P30t does not. Perhaps more telling, the P30t is stickered "ASSEMBLED IN CHINA", while the P50 is stamped "ASAHI OPT. CO. JAPAN". 

Additional differences are that the P50 supports exposure compensation, and has a horizontal split in the focusing prism instead of the diagonal split in the P30t.
So, what do I do now? Do I move the lever to the P30t, for the better ergonomics and lighter weight? Or do I move the lens mount to the P50, to take advantage of the extra features, better looks, and the "feel of quality" you get when you pick it up?
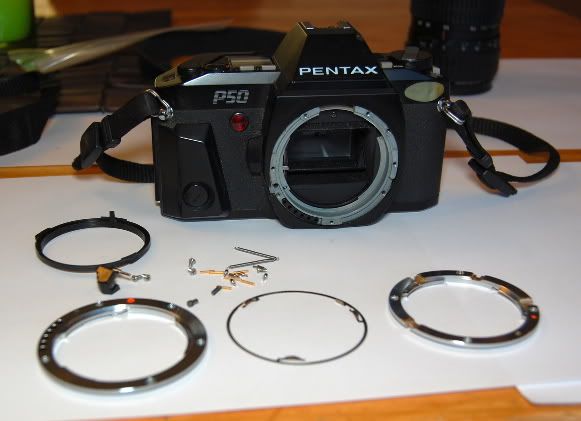
I couldn't resist. Off comes the mount! 
... and on goes the modified Nikon F mount from the P30t!
Ta-Da! The P50-F!

I don't have a picture, but as the final step, I re-assembled the P30t back to its original K-A mount. I had to double-check my pictures to make sure I got the electrical pins in the right order, but otherwise it went back together very easily. Someday I will fix the advance lever and bring this one back as a backup body.
_________________
Sigma DP1, Nikon D40 (hers  ), Polaroid x530, Pentax P30t, Pentax P50, (P30t/P50 K-A to Nikon F body mount conversion) ), Polaroid x530, Pentax P30t, Pentax P50, (P30t/P50 K-A to Nikon F body mount conversion)
Nikon: 18-55/3.5-5.6 "G ED II DX" (F) Soligor: 28/2.8 (FL->F converted), 135/3.5 (F), 3x TC (F, modified) Kalimar: 28-85/3.5 (F)
Vivitar: 70-210/2.8-4.0 Version 3 (F), Tele 500/6.3 Preset (F), 19/3.8 (F) Minolta: 300/5.6 (SR/MC/MD pending F conversion)
Tamron: 28/2.8 (Adaptall) Panagor: 28/2.5 (FD) Aetna: 300/5.6 (F) Osawa: MC 28/2.8 (F)
Vintage Lenses: Dallmeyer: 1940s A.M. 14in 356mm f4 (ULF->M42) 1930s Adon Telephoto Taylor, Taylor & Hobson: 1880s Rapid Rectilinear 8 1/2 x 6 1/2 11.31in f/8 (LF->?)
Parts Lenses: Nikon 35-135/3.5-4.5 (F), Sigma 70-210/4.5 (F), Nikon 50/1.8 Series E (F) |
|
| Back to top |
|
 |
Scheimpflug
Joined: 06 Feb 2010
Posts: 1888
Location: New Zealand / USA
Expire: 2011-11-18
|
| Posted: Sun Aug 29, 2010 6:07 am Post subject: |
|
|
Scheimpflug wrote:
Just a quick comment- I have edited my post above. I had initially thought that the top cover of the P50 was made of metal, based on how it had "dented" on one of the edges. After taking the top apart to repair the shutter button, however, I discovered that the cover was in fact made of plastic.
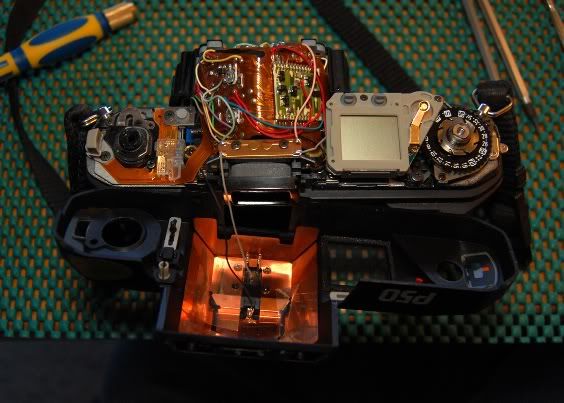
The full set of photos can be found in my shutter button repair guide:
http://forum.mflenses.com/how-to-pentax-p50-shutter-button-repair-guide-t31702.html
_________________
Sigma DP1, Nikon D40 (hers ), Polaroid x530, Pentax P30t, Pentax P50, (P30t/P50 K-A to Nikon F body mount conversion)
Nikon: 18-55/3.5-5.6 "G ED II DX" (F) Soligor: 28/2.8 (FL->F converted), 135/3.5 (F), 3x TC (F, modified) Kalimar: 28-85/3.5 (F)
Vivitar: 70-210/2.8-4.0 Version 3 (F), Tele 500/6.3 Preset (F), 19/3.8 (F) Minolta: 300/5.6 (SR/MC/MD pending F conversion)
Tamron: 28/2.8 (Adaptall) Panagor: 28/2.5 (FD) Aetna: 300/5.6 (F) Osawa: MC 28/2.8 (F)
Vintage Lenses: Dallmeyer: 1940s A.M. 14in 356mm f4 (ULF->M42) 1930s Adon Telephoto Taylor, Taylor & Hobson: 1880s Rapid Rectilinear 8 1/2 x 6 1/2 11.31in f/8 (LF->?)
Parts Lenses: Nikon 35-135/3.5-4.5 (F), Sigma 70-210/4.5 (F), Nikon 50/1.8 Series E (F) |
|
| Back to top |
|
|
Jesito


Joined: 24 Aug 2007
Posts: 5745
Location: Olivella, Catalonia, (Spain)
Expire: 2015-01-07
|
| Posted: Sun Aug 29, 2010 8:07 am Post subject: |
|
|
Jesito wrote:
Again an outstanding work, congrats!.
Thanks for sharing it, I'm delighted with your works 
Regards.
Jes.
_________________
Jesito, Moderator 
Jesito's backsack:
Zooms Sigma 70-300, Tamron 35-135 and 70-210 short, 70-210 long, 28-70 CF Macro, 35-70, 35-80, Vivitar 70-210 KA, Tamron 70-250.
Fixed Industar-50, , Tamron 24mm, Tamron 135mm, Sands Hunter 135mm, Pancolar 50mm, Volna-3, many Exakta lenses
DSLR SIGMA SD9 & SD14, EOS 5D, Sony A700 and NEXF3, Oly E-330, E-400, E-450, E-1
TLR/6x6/645 YashicaMat, Petri 6x45, Nettar, Franka Solida, Brilliant
SLR Minolta X300, Fuji STX II, Praktica VLC3, Pentax P30t, EXA500, EXA 1A, Spotmatic(2), Chinon CM-4S, Ricoh, Contax, Konica TC-X , Minolta 5000, 7000i, 3Sxi, EOS 500 and CX
Rangefinders Chinon 35EE, Konica C35 auto, Canonet 28, Yashica Lynx, FED-2, Yashica electro 35, Argus C3 & C4, Regula Cita III, Voigtlander Vitoret (many), Welta Welti-I, Kodak Signette 35, Zorki-4, Bessa-R & L, Minolta Weathermatic, olympus XA2
Compact Film Konica C35V, Voigtlander Vitorets, Canon Prima Super 105, Olympus XA2 and XA3
Compact Digital Olympus C-5050, Aiptek Slim 3000, Canon Powershot A540, Nikon 5200, SIGMA DP1s, Polaroid X530, IXUS55, Kodak 6490, Powershot G9 and G10
CSCCanon EOS-M, Samsung NX100 and NX210, Lumix G5, NEX-F3 |
|
| Back to top |
|
|
Lloydy

Joined: 02 Sep 2009
Posts: 7785
Location: Ironbridge. UK.
Expire: 2022-01-01
|
| Posted: Sun Aug 29, 2010 9:37 pm Post subject: |
|
|
Lloydy wrote:
Interesting....................
I've got a couple of Praktica's with the bayonet fitting that might be better off with my Pentax lenses. 
_________________
LENSES & CAMERAS FOR SALE.....
I have loads of stuff that I have to get rid of, if you see me commenting about something I have got and you want one, ask me.
My Flickr https://www.flickr.com/photos/mudplugga/
My ipernity -
http://www.ipernity.com/home/294337 |
|
| Back to top |
|
|
Scheimpflug
Joined: 06 Feb 2010
Posts: 1888
Location: New Zealand / USA
Expire: 2011-11-18
|
| Posted: Tue Aug 31, 2010 6:56 am Post subject: |
|
|
Scheimpflug wrote:
| Lloydy wrote: |
Interesting....................
I've got a couple of Praktica's with the bayonet fitting that might be better off with my Pentax lenses. |
Hey, if it lets you use a camera or lenses that would otherwise go unused, then it is worth a shot!
One of the best aspects of this conversion I did, was that with one exception (which I haven't mentioned yet since I'm behind  ), the conversion is fully reversible. When my P50 arrived, it took all of 15 minutes to put the original parts back on the P30t, and install my modified parts on the P50. Aside from some cosmetic issues, I could even re-assemble the teleconverter that donated the Nikon mount if I really wanted to. ), the conversion is fully reversible. When my P50 arrived, it took all of 15 minutes to put the original parts back on the P30t, and install my modified parts on the P50. Aside from some cosmetic issues, I could even re-assemble the teleconverter that donated the Nikon mount if I really wanted to.
That being said, if you are just after a K-mount film body, keep in mind that there are quite a few out there for very good prices. I only started this conversion because I couldn't find a suitable Nikon body locally (NZ) and within my price range. But with the prices and availability of Pentax bodies, plus considering the usage restrictions of the converted body (stop-down metering), it might not be worth the effort.
_________________
Sigma DP1, Nikon D40 (hers ), Polaroid x530, Pentax P30t, Pentax P50, (P30t/P50 K-A to Nikon F body mount conversion)
Nikon: 18-55/3.5-5.6 "G ED II DX" (F) Soligor: 28/2.8 (FL->F converted), 135/3.5 (F), 3x TC (F, modified) Kalimar: 28-85/3.5 (F)
Vivitar: 70-210/2.8-4.0 Version 3 (F), Tele 500/6.3 Preset (F), 19/3.8 (F) Minolta: 300/5.6 (SR/MC/MD pending F conversion)
Tamron: 28/2.8 (Adaptall) Panagor: 28/2.5 (FD) Aetna: 300/5.6 (F) Osawa: MC 28/2.8 (F)
Vintage Lenses: Dallmeyer: 1940s A.M. 14in 356mm f4 (ULF->M42) 1930s Adon Telephoto Taylor, Taylor & Hobson: 1880s Rapid Rectilinear 8 1/2 x 6 1/2 11.31in f/8 (LF->?)
Parts Lenses: Nikon 35-135/3.5-4.5 (F), Sigma 70-210/4.5 (F), Nikon 50/1.8 Series E (F) |
|
| Back to top |
|
|
Scheimpflug
Joined: 06 Feb 2010
Posts: 1888
Location: New Zealand / USA
Expire: 2011-11-18
|
| Posted: Tue Aug 31, 2010 9:17 am Post subject: |
|
|
Scheimpflug wrote:
Ok, time to bring this back up to speed.
Note that I tried some things that didn't work. So don't necessarily think of this as a how-to guide, but rather just as a running diary of what I've done.
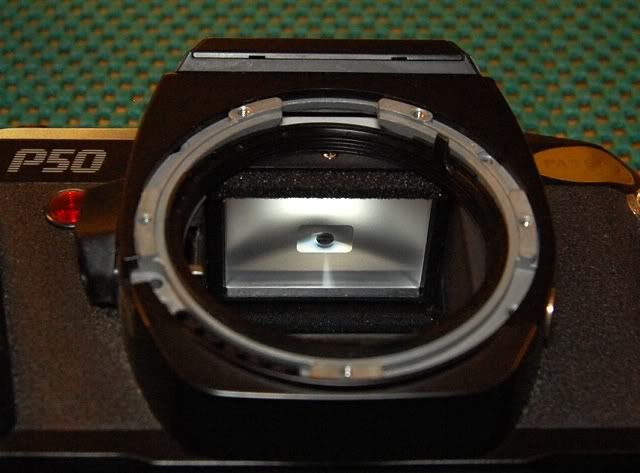
With the basic mount figured out, my next challenge was to solve the light leaks. In the P30*/P50, there is just one that we will have to address - a wide gap at the top of the mount casting, and a cavernous opening underneath it.
These empty spaces are provided for the assembly and operation of the diaphragm simulator. The diaphragm simulator is a system where the camera can read the aperture value from the lens via a lever, and apply this as an input to the metering circuit, all while leaving the lens aperture wide open to permit easier focusing. When you actually take the picture, the lens is stopped down to the value selected on the aperture ring.
With the spring-loaded sensing ring in place, we can see that this forms half of the light block (the sides). The original K-mount then sat down on top, against this plastic ring, and blocked the rest of the light.
Since I won't be using Pentax lenses on this camera anymore, and since the protruding lever interfered with the Nikon mount, I had removed this plastic ring. I scratched my head for quite some time figuring out how to fill this gap, and came upon a simple solution using black electrical tape.
What you see here is actually two pieces of tape. The first is a longer piece, cut to about 35mm or so in length. This piece was then rolled over itself backwards (sticky side out) to form a thin tube. The second piece was about double the length, and again rolled over itself to form a loop, sticky side out, however this time it was rolled lengthwise to form a short wide tube about the diameter of your pinky finger.
The first tube was then put into the second, and the second flattened so that you end up with a thin tube with two wide tabs coming out from the center, all sticky side out.
(My apologies for not having a picture at this step - I can make another one if anyone would like to see it.)
Now how this works - the length of the thin tube is cut such that it is a bit longer than the gap for the variable resistor portion of the diaphragm sensor - the big hole under the mount. Note that the gap is longer on one side than the other. You can then press the assembly into the gap, and it will form a banana shape, with the ends of the thin tube hitting the ends of the hole, ensuring that it won't fall out even if the tape doesn't hold.
Since the center part has two tabs on opposite ends, the bottom tab will be pressed against the variable resistor, effectively holding the top tab up against the mount. In the picture above it is sticking out from the gap slightly. When the mount is installed, it pushes this down, making a nice seal against the bottom of the mount plate.
So with just two pieces of tape, you get a nice light-tight seal of an odd shape, that will hold itself in place even if the sticky part of the tape fails, and is completely removable.
_________________
Sigma DP1, Nikon D40 (hers ), Polaroid x530, Pentax P30t, Pentax P50, (P30t/P50 K-A to Nikon F body mount conversion)
Nikon: 18-55/3.5-5.6 "G ED II DX" (F) Soligor: 28/2.8 (FL->F converted), 135/3.5 (F), 3x TC (F, modified) Kalimar: 28-85/3.5 (F)
Vivitar: 70-210/2.8-4.0 Version 3 (F), Tele 500/6.3 Preset (F), 19/3.8 (F) Minolta: 300/5.6 (SR/MC/MD pending F conversion)
Tamron: 28/2.8 (Adaptall) Panagor: 28/2.5 (FD) Aetna: 300/5.6 (F) Osawa: MC 28/2.8 (F)
Vintage Lenses: Dallmeyer: 1940s A.M. 14in 356mm f4 (ULF->M42) 1930s Adon Telephoto Taylor, Taylor & Hobson: 1880s Rapid Rectilinear 8 1/2 x 6 1/2 11.31in f/8 (LF->?)
Parts Lenses: Nikon 35-135/3.5-4.5 (F), Sigma 70-210/4.5 (F), Nikon 50/1.8 Series E (F) |
|
| Back to top |
|
|
Scheimpflug
Joined: 06 Feb 2010
Posts: 1888
Location: New Zealand / USA
Expire: 2011-11-18
|
| Posted: Fri Sep 03, 2010 5:46 am Post subject: |
|
|
Scheimpflug wrote:
| Scheimpflug wrote: |
| Note that I tried some things that didn't work. So don't necessarily think of this as a how-to guide, but rather just as a running diary of what I've done. |
... and continuing on that thought, here are the results of the first roll of film through the cameras. I split the roll 50/50, taking the first half with the P30t (up until my homemade wind knob broke!), and the second half with the P50, both with the converted Nikon mount. Note that this was the Kodak Max 400 film that came from the thrift store without a box or container, so I have no idea if it was expired or how it had been stored.
I only had these developed and scanned, as the local lab costs are quite high (NZ $25 / US $18 / �14 for 24exp develop+scan+prints, or NZ $15 for 24exp develop+scan). When I first looked at the negatives in the clear/matte sleeves, I couldn't see anything and assumed that the film had been bad.  It was only once I transferred the photos from the CD that I realized that there were actually images on the negatives. It was only once I transferred the photos from the CD that I realized that there were actually images on the negatives.
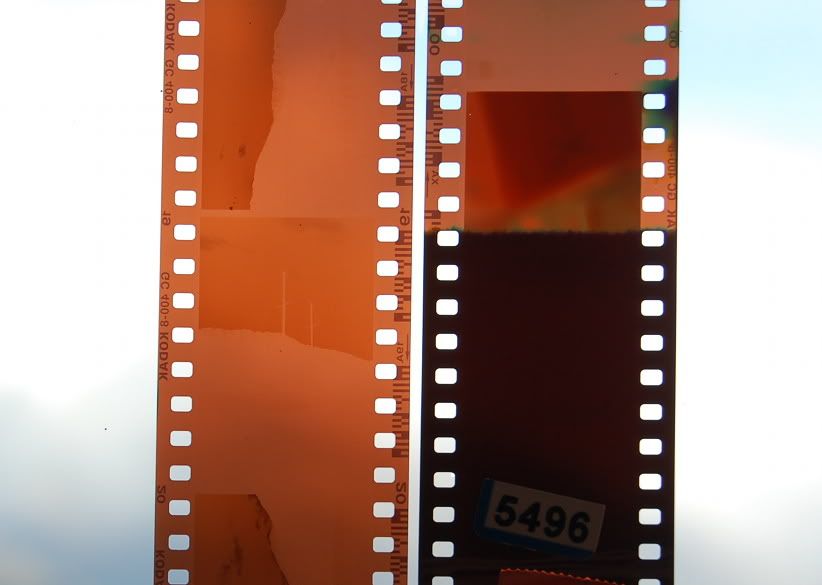
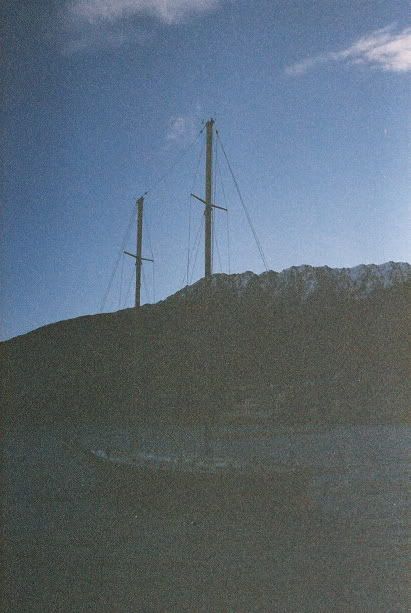
As you can see, the negatives are extremely "thin"... The image above shows a typical image, alongside the leader which we can safely assume was fully exposed. Since the leader is dark, we know that the film was OK, and that the developing was OK, which leaves just one variable that was wrong - my exposures. 
The majority of the photos were shot exactly at the indicated meter reading, although sometimes I metered for the sky, and sometimes I metered for the shadows. So some images are significantly worse than this sailboat, and some are a bit better. At least four were so bad that the lab machine didn't even scan them.
Here is the best one from the roll. The local lab did a shockingly good scan, as you can see much more detail in the JPG files than you can see on the negatives. I'm going to have to go back and ask them what kind of equipment they use, and let them know how pleased I was with the results. This one took quite a bit of post processing to get it to this, but considering how poorly it was shot, I'm pretty happy with it.

Note that this was one of the P30t shots - all of which turned out slightly better than the P50 shots, but still significantly underexposed. Also, a great deal of the noise has gone away when it was reduced in size, so the full-size version doesn't quite look as good.
I'm out of time for now... the reason and the solution for the metering problem will have to wait for a future post.
_________________
Sigma DP1, Nikon D40 (hers ), Polaroid x530, Pentax P30t, Pentax P50, (P30t/P50 K-A to Nikon F body mount conversion)
Nikon: 18-55/3.5-5.6 "G ED II DX" (F) Soligor: 28/2.8 (FL->F converted), 135/3.5 (F), 3x TC (F, modified) Kalimar: 28-85/3.5 (F)
Vivitar: 70-210/2.8-4.0 Version 3 (F), Tele 500/6.3 Preset (F), 19/3.8 (F) Minolta: 300/5.6 (SR/MC/MD pending F conversion)
Tamron: 28/2.8 (Adaptall) Panagor: 28/2.5 (FD) Aetna: 300/5.6 (F) Osawa: MC 28/2.8 (F)
Vintage Lenses: Dallmeyer: 1940s A.M. 14in 356mm f4 (ULF->M42) 1930s Adon Telephoto Taylor, Taylor & Hobson: 1880s Rapid Rectilinear 8 1/2 x 6 1/2 11.31in f/8 (LF->?)
Parts Lenses: Nikon 35-135/3.5-4.5 (F), Sigma 70-210/4.5 (F), Nikon 50/1.8 Series E (F) |
|
| Back to top |
|
|
Scheimpflug
Joined: 06 Feb 2010
Posts: 1888
Location: New Zealand / USA
Expire: 2011-11-18
|
| Posted: Wed Sep 15, 2010 1:23 pm Post subject: |
|
|
Scheimpflug wrote:
Ok, so continuing the catch-up, the cause of my metering problem was actually my fault.
I had assumed that if the aperture sensing portion of the diaphragm simulator was removed, that the camera would meter as if the lens was left wide open. The camera logic wouldn't be applying any "corrections" for stopping down, and since the lens wasn't mechanically linked, it wouldn't be stopping down for the shot. I could just use the standard stop-down metering technique of opening it up to focus, and then closing it down to meter & take the shot. It should have worked.
However, what I found was that the meter read just a bit differently with the sensing ring removed versus having the lens wide open. It was puzzling at first, but I ended up concluding that the difference was an offset to a curve, so the exposure was somewhat close at one end of the exposure scale, but way off at the other.
The solution was to put the aperture sensing ring back in, and then align it to the position that told the camera "wide open". But remember, I had removed it because it interfered with the Nikon mount... so, here folks is my very first "destructive" (non-reversible) modification.
The removable piece of the diaphragm simulator system:
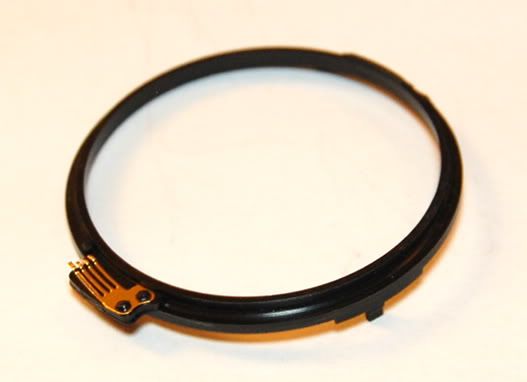
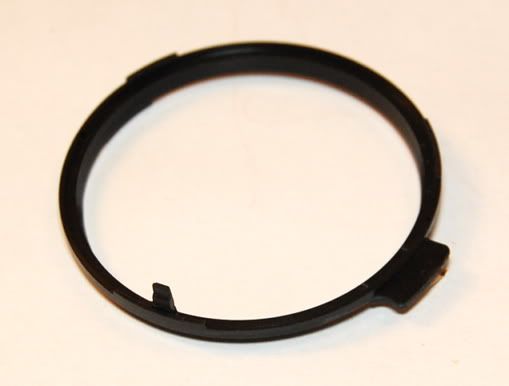
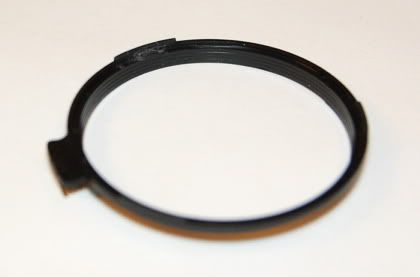
... and the same piece with the lens aperture ring sensing peg clipped and filed down:
The next step was to place the ring back in the camera, but omitting the springs which had originally pulled it against the stops. This left the ring free to be positioned to any rotation that was necessary. To come up with a good reading, I used the kit zoom lens on my P30t (a Takumar-A-Zoom 28-80mm f/3.5-4.5) and my 28/2.8 Soligor on the "P50-F", adjusting the aperture sensing ring rotation until I got the two meters to agree throughout the f/4 through f/16 range. I should note that the appropriate spot was not at the end of the ring's travel... but just a bit away from one of the ends.
Once I had the meters agreeing, I fashioned another tape light seal from a sticky-side-out loop of electrical tape. This light seal now does double-duty, and also holds the aperture sensing ring in position. The ring is not really going to move without the tape, but the tape gives you a bit of extra insurance that it won't accidentally get turned when changing lenses.
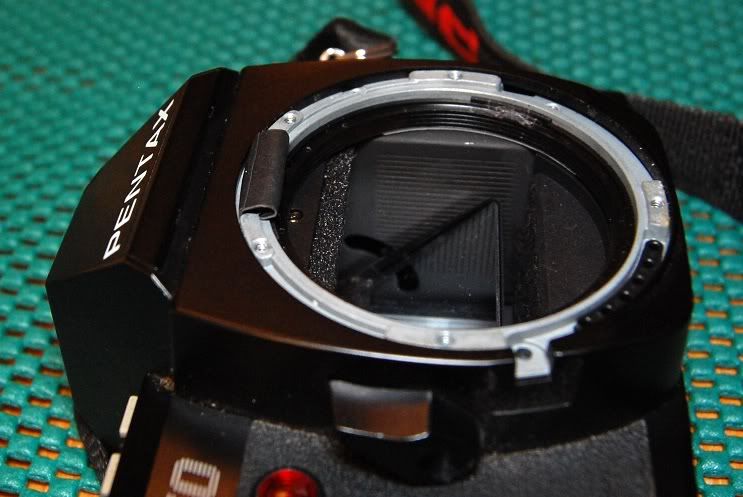
With the lens mount now back in place, we can see the black plastic ring around the inside:
And of course, the final step is to re-check for light leaks. This photo is somewhat "staged", with the lights on so that I can show you the setup. But what I have found works well is to get a very bright LED keychain, and then mount an extension tube in the camera mount and shine the light down inside the tube at every angle you can. You can then turn the room lights off and look around the mount from the outside, and see where any light comes through.
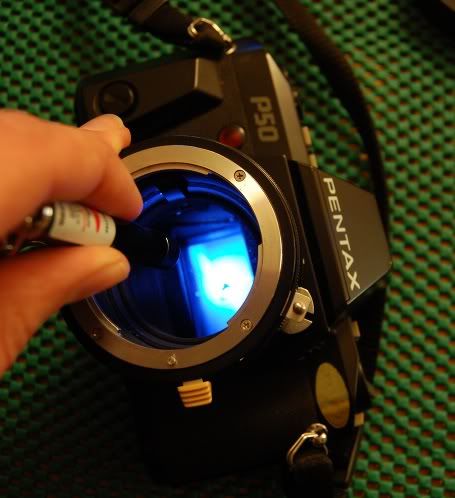
No light leaks, so we're good to go!
_________________
Sigma DP1, Nikon D40 (hers ), Polaroid x530, Pentax P30t, Pentax P50, (P30t/P50 K-A to Nikon F body mount conversion)
Nikon: 18-55/3.5-5.6 "G ED II DX" (F) Soligor: 28/2.8 (FL->F converted), 135/3.5 (F), 3x TC (F, modified) Kalimar: 28-85/3.5 (F)
Vivitar: 70-210/2.8-4.0 Version 3 (F), Tele 500/6.3 Preset (F), 19/3.8 (F) Minolta: 300/5.6 (SR/MC/MD pending F conversion)
Tamron: 28/2.8 (Adaptall) Panagor: 28/2.5 (FD) Aetna: 300/5.6 (F) Osawa: MC 28/2.8 (F)
Vintage Lenses: Dallmeyer: 1940s A.M. 14in 356mm f4 (ULF->M42) 1930s Adon Telephoto Taylor, Taylor & Hobson: 1880s Rapid Rectilinear 8 1/2 x 6 1/2 11.31in f/8 (LF->?)
Parts Lenses: Nikon 35-135/3.5-4.5 (F), Sigma 70-210/4.5 (F), Nikon 50/1.8 Series E (F) |
|
| Back to top |
|
|
rkdmagic
Joined: 10 Dec 2011
Posts: 1
|
| Posted: Sat Dec 10, 2011 5:18 am Post subject: |
|
|
rkdmagic wrote:
wow, very nice modification. I had the same idea but on K-mount lenses, not the camera.
I'd like to convert permanently (unscrew the F mount lens then put on K lens) K mount lens to use on Nikon camera. I know that I can get the adapter to try on that.
Any idea about this?
Andy |
|
| Back to top |
|
|
peterqd

Joined: 28 Feb 2007
Posts: 7448
Location: near High Wycombe, UK
Expire: 2014-01-04
|
| Posted: Sat Dec 10, 2011 8:32 am Post subject: |
|
|
peterqd wrote:
| rkdmagic wrote: |
wow, very nice modification. I had the same idea but on K-mount lenses, not the camera.
I'd like to convert permanently (unscrew the F mount lens then put on K lens) K mount lens to use on Nikon camera. I know that I can get the adapter to try on that.
Any idea about this?
Andy |
This way round it is much more complicated, not least because you would need to adapt every lens you want to use on the camera, and this involves a lot more work than you might imagine. Nikon cameras and lenses use a larger register (or back-focus) distance than Pentax - 46.5mm to 45.46mm. Therefore a straight change from K to F mount on a K lens would result in the lens being too far away from the film/sensor plane to achieve infinity focus. You would need to grind down the base surface under the lens mount by 1.04mm to bring the glass to the correct distance from the film (or alternatively sink the camera F mount further into the body).
_________________
Peter - Moderator |
|
| Back to top |
|
|
|
|


