| View previous topic :: View next topic |
| Author |
Message |
Farside


Joined: 01 Sep 2007
Posts: 6557
Location: Ireland
Expire: 2013-12-27
|
 Posted: Tue Jul 07, 2009 10:02 pm Post subject: Tri-chrome Posted: Tue Jul 07, 2009 10:02 pm Post subject: Tri-chrome |
 |
|
Farside wrote:
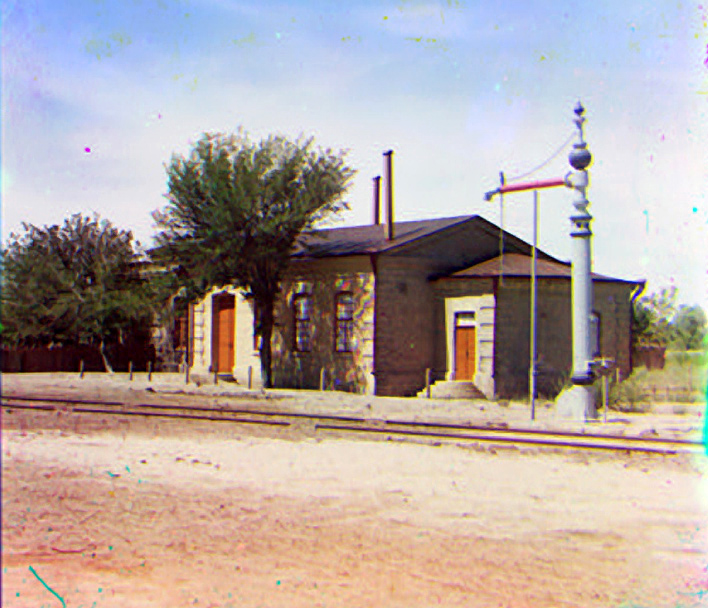
Following on from a short exchange between Nesster and myself, I downloaded a sample image from the Prokudin-Gorskii Collection http://www.loc.gov/exhibits/empire/, held by the Library of Congress, to practice on.
This one, 
This is the small set, the full size scans are freely available, but are 68mb, so I left them alone.
The technique in PS is simple.
1. Crop out each frame and rename it for the colours. In this P-G collection, he shot them as Blue, Green, Red, from the top down.
2. Create a new blank image, sized to easily accomodate the individual frames, to allow for movement during alignment.
3. Open each coloured monochrome in turn and import it into the relevant Channel of the new frame. Do this by using the Crop tool and Copy/Paste.
4. Align each image on top of the other, this is a bit time-consuming, and on this small one wasn't perfect.
5. Once they are in alignment, lock them, using the 'lock' padlock symbol on the RGB layer of the new image.
6. You can then carry out any other PP work on it you care to do and 'save as' anything you like.
This is the result of my messing around - took ages because I was farting about with layers and going up blind alleys.
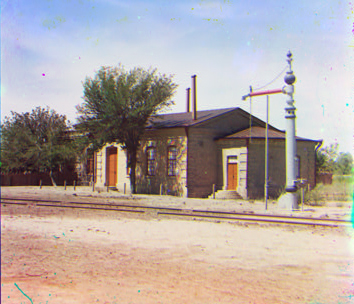
Upscaled with Genuine Fractals, you can more easily see the slight misalignment, but now I've practised a bit, the time to do it will be much shorter and better. Ignore the GF artifacts, they are inconsequential for the purposes of this illustration.

_________________
Dave - Moderator
Camera Fiend and Biograph Operator
If I wanted soot and whitewash I'd be a chimney sweep and house painter.
The Lenses of Farside (click)
BUY FRESH FOMAPAN TO HELP KEEP THE FACTORY ALIVE ---
Foma Campaign topic -
http://forum.mflenses.com/foma-campaign-t55443.html
FOMAPAN on forum -
http://www.mflenses.com/fs.php?sw=Fomapan
Webshop Norway
http://www.fomafoto.com/
Webshop Czech
https://fomaobchod.cz/inshop/scripts/shop.aspx?action=DoChangeLanguage&LangID=4
Last edited by Farside on Wed Jul 08, 2009 12:51 am; edited 1 time in total |
|
| Back to top |
|
 |
Orio

Joined: 24 Feb 2007
Posts: 29545
Location: West Emilia
Expire: 2012-12-04
|
| Posted: Wed Jul 08, 2009 12:37 am Post subject: |
|
|
Orio wrote:
Interesting !!
Aesthetically speaking, the photo reminds me of the early Autochromes (for those who don't know, autochrome was one of the first processes for colour photography, I think it used grains made out of potatoes)
_________________
Orio, Administrator
T*
NE CEDE MALIS AUDENTIOR ITO
Ferrania film is reborn! http://www.filmferrania.it/
Support the Ornano film chemicals company and help them survive!
http://forum.mflenses.com/ornano-chemical-products-t55525.html |
|
| Back to top |
|
|
Nesster

Joined: 24 Apr 2008
Posts: 5883
Location: NJ, USA
Expire: 2014-02-20
|
| Posted: Wed Jul 08, 2009 12:39 am Post subject: |
|
|
Nesster wrote:
Remarkable, well done!
_________________
-Jussi
Camera photos
Print Photographica
|
|
| Back to top |
|
|
Xpres


Joined: 11 Dec 2007
Posts: 964
Location: UK
Expire: 2014-10-28
|
| Posted: Wed Jul 08, 2009 9:31 am Post subject: |
|
|
Xpres wrote:
Well done indeed. I wonder if you could use a 3D camera to create the negs? A little modification of an old Nimslo perhaps? Not sure about lining the results up though as they'd never quite match. Oh well just a thought.
_________________
Film... and sometimes SD14, 5D2 and some other suff! |
|
| Back to top |
|
|
Sevo
Joined: 22 Aug 2008
Posts: 1189
Location: Frankfurt, Germany
Expire: 2012-12-03
|
| Posted: Wed Jul 08, 2009 9:56 am Post subject: |
|
|
Sevo wrote:
3D cameras explicitly create a distance between the lenses - something which you positively do not want here. For b&w trichrome processes, a camera with beam splitters is used, e.g. http://www.camerapedia.org/wiki/Bermpohl_Naturfarbenkamera.
_________________
Sevo |
|
| Back to top |
|
|
Xpres
Joined: 11 Dec 2007
Posts: 964
Location: UK
Expire: 2014-10-28
|
| Posted: Wed Jul 08, 2009 10:05 am Post subject: |
|
|
Xpres wrote:
Mmmm.. A major modification then.. 
_________________
Film... and sometimes SD14, 5D2 and some other suff! |
|
| Back to top |
|
|
Farside
Joined: 01 Sep 2007
Posts: 6557
Location: Ireland
Expire: 2013-12-27
|
| Posted: Wed Jul 08, 2009 2:06 pm Post subject: |
|
|
Farside wrote:
I'd thought about that - I have drawer full of M42 cams and the lenses for 'em, like everybody here  , so a trio arrangement of cams suggested itself, but registration would be a problem - they'd be ok in the middle but the images would gradually get out of register moving away from the centre point. , so a trio arrangement of cams suggested itself, but registration would be a problem - they'd be ok in the middle but the images would gradually get out of register moving away from the centre point.
The neatest solution so far is one I have - a Sigma Filtermatic 24mm with three dial-in filters. Not quite RGB, but O, Y, Light Blue. Enough for experimentation.
If I get a Cokin frame and make a colour wheel, I will be able to change colours quickly.
_________________
Dave - Moderator
Camera Fiend and Biograph Operator
If I wanted soot and whitewash I'd be a chimney sweep and house painter.
The Lenses of Farside (click)
BUY FRESH FOMAPAN TO HELP KEEP THE FACTORY ALIVE ---
Foma Campaign topic -
http://forum.mflenses.com/foma-campaign-t55443.html
FOMAPAN on forum -
http://www.mflenses.com/fs.php?sw=Fomapan
Webshop Norway
http://www.fomafoto.com/
Webshop Czech
https://fomaobchod.cz/inshop/scripts/shop.aspx?action=DoChangeLanguage&LangID=4 |
|
| Back to top |
|
|
Nesster
Joined: 24 Apr 2008
Posts: 5883
Location: NJ, USA
Expire: 2014-02-20
|
| Posted: Wed Jul 08, 2009 2:37 pm Post subject: |
|
|
Nesster wrote:
of course, one may be a Purposeful Luddite: take a digital pic, do the B&W conversions, one per color channel, and there you are.
Using film - get the three required filters - Red, Green, Blue - and take three successive shots, one per. Of course this requires stationary subjects - and should make for some interesting clouds!
_________________
-Jussi
Camera photos
Print Photographica
|
|
| Back to top |
|
|
Laurence

Joined: 26 Mar 2007
Posts: 4809
Location: Western Washington State
Expire: 2016-06-19
|
| Posted: Wed Jul 08, 2009 5:14 pm Post subject: |
|
|
Laurence wrote:
What a nice result from experimentation! The colors really "meshed" together beautifully. Would love to see more as you refine the technique.
_________________
Assent, and you are sane;
Demur,—you ’re straightway dangerous,
And handled with a chain.
Emily Dickinson
Cameras and Lenses in Use:
Yashica Mat 124 w/ Yashinon 80/3.5,
CV Apo-Lanthar 90/3.5SL, (Thank you Klaus),
Pentax 645,
Flek 50,
Pentax-A 150
Pentax-A 120 Macro
Voigtlander Vitomatic I w/Color Skopar 50/2.8
Konica TC and zoom lenses (thanks Carsten)
Contax AX
Yashica ML 50/2
Yashica ML 35/2.8
Carl Zeiss Contax 50/1.4
Tamron Adaptall SP 17/3.5
Tamron Adaptall 28/2.5
Tamron Adaptall SP 300/2.8 LD (IF)
|
|
| Back to top |
|
|
Farside
Joined: 01 Sep 2007
Posts: 6557
Location: Ireland
Expire: 2013-12-27
|
| Posted: Thu Jul 09, 2009 12:19 pm Post subject: |
|
|
Farside wrote:
Now that's very interesting indeed, and Edmunds Scientific have beamsplitters for just a few bucks. http://scientificsonline.com/product.asp?pn=3043359&cmss=beam+splitter |
|
| Back to top |
|
|
Farside
Joined: 01 Sep 2007
Posts: 6557
Location: Ireland
Expire: 2013-12-27
|
| Posted: Thu Jul 16, 2009 3:55 pm Post subject: |
|
|
Farside wrote:
I also found this - very interesting.
http://www.butkus.org/chinon/devin/devin.htm
_________________
Dave - Moderator
Camera Fiend and Biograph Operator
If I wanted soot and whitewash I'd be a chimney sweep and house painter.
The Lenses of Farside (click)
BUY FRESH FOMAPAN TO HELP KEEP THE FACTORY ALIVE ---
Foma Campaign topic -
http://forum.mflenses.com/foma-campaign-t55443.html
FOMAPAN on forum -
http://www.mflenses.com/fs.php?sw=Fomapan
Webshop Norway
http://www.fomafoto.com/
Webshop Czech
https://fomaobchod.cz/inshop/scripts/shop.aspx?action=DoChangeLanguage&LangID=4 |
|
| Back to top |
|
|
Xpres
Joined: 11 Dec 2007
Posts: 964
Location: UK
Expire: 2014-10-28
|
| Posted: Thu Jul 16, 2009 5:28 pm Post subject: |
|
|
Xpres wrote:

Now where do you get one of those?
_________________
Film... and sometimes SD14, 5D2 and some other suff! |
|
| Back to top |
|
|
Katastrofo
Joined: 26 Feb 2007
Posts: 10405
Location: USA
Expire: 2013-11-19
|
| Posted: Thu Jul 16, 2009 6:09 pm Post subject: |
|
|
Katastrofo wrote:
I like the vintage look to this. |
|
| Back to top |
|
|
Farside
Joined: 01 Sep 2007
Posts: 6557
Location: Ireland
Expire: 2013-12-27
|
| Posted: Fri Jul 17, 2009 12:05 am Post subject: |
|
|
Farside wrote:
| Xpres wrote: |
Now where do you get one of those? |
Be a hoot to make one.
_________________
Dave - Moderator
Camera Fiend and Biograph Operator
If I wanted soot and whitewash I'd be a chimney sweep and house painter.
The Lenses of Farside (click)
BUY FRESH FOMAPAN TO HELP KEEP THE FACTORY ALIVE ---
Foma Campaign topic -
http://forum.mflenses.com/foma-campaign-t55443.html
FOMAPAN on forum -
http://www.mflenses.com/fs.php?sw=Fomapan
Webshop Norway
http://www.fomafoto.com/
Webshop Czech
https://fomaobchod.cz/inshop/scripts/shop.aspx?action=DoChangeLanguage&LangID=4 |
|
| Back to top |
|
|
Seele
Joined: 17 Apr 2009
Posts: 742
Location: Sydney Australia
|
| Posted: Fri Jul 31, 2009 5:55 pm Post subject: |
|
|
Seele wrote:
There had been a lot of those "one-shot" cameras over the years, they carried on being developed and used well after the advent of integral tripack colour films, especially by news photographers since they could make the colour separation plates much quicker than having to do the colour separations during the plate-making phase. A popular later camera for field use was the Curtiss, if memory serves, but Meopta (then Optikotechna) made one using 35mm film after that. |
|
| Back to top |
|
|
|
|
|
You cannot post new topics in this forum
You cannot reply to topics in this forum
You cannot edit your posts in this forum
You cannot delete your posts in this forum
You cannot vote in polls in this forum
|