| View previous topic :: View next topic |
| Author |
Message |
tobbsman


Joined: 25 Jul 2008
Posts: 2578
Location: Austria
|
 Posted: Fri Aug 07, 2009 9:00 pm Post subject: A Beginner's Guide to Panorama Stitching Posted: Fri Aug 07, 2009 9:00 pm Post subject: A Beginner's Guide to Panorama Stitching |
 |
|
tobbsman wrote:
Herewith I present a "Beginner's Guide to Panorama Stitching" exclusively for the MF-Lenses forum  
This guide is giving insight into the first steps of making stiched panorama photographs,giving tips and showing examples
for standard situations.
It gives basic information about the stiching process, photographing technique and the euipment which can be used.
I am not dealing in this guid with 360° panoramas, sorry this is not my style
An Advanced Guide to Panorama Stiching was released in May 2012:
http://forum.mflenses.com/new-2012-advanced-guide-to-panorama-stiching-t49676.html
English is not my native language - I am open for any language corrections (please PN)!
_______________________________________________
The Technique
Basics
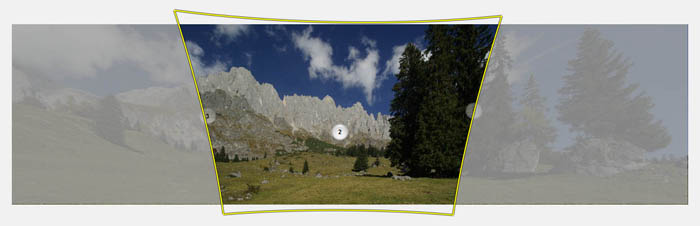
- take enough overlapping from frame to frame. 1/3rd is an good everage.
see here a example for correctly overlapping frames by shooting freehand:
- portrait or landscape format frames are both possible. Depends on the subject.
to begin with, shooting landscape format frames is more safe.
- shoot always in manual mode, camera and lens. Autofocus can easily destroy a single frame and so the whole panorama.
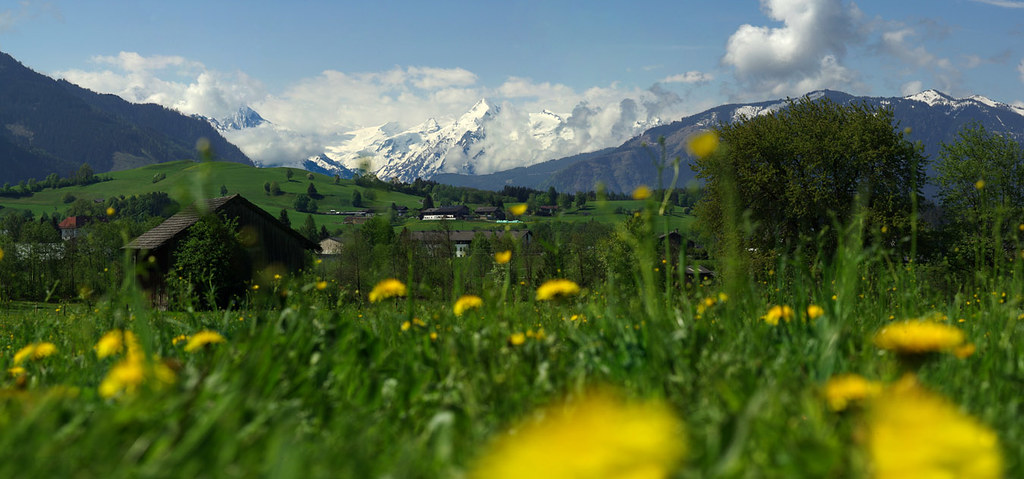
Choosing the right lens, aperture and shutter speed
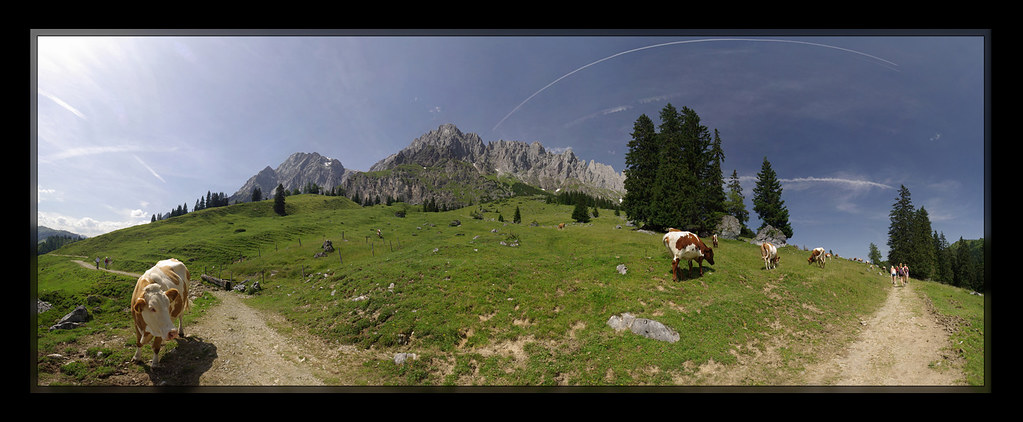
- with medium-scale scenerys begin with a 35mm, 28mm or 20mm lens. With landscapes a 28/35mm lens gives a very natural look to your panorama. Note! that my Pentax K10D has a crop sensor (1.5 magnification factor). Checkt the cropfactor of your camerasensor and relate to it.
Be aware that lenses from 10-20mm create huge distortions to you final result.
Later on one can experiment with those lenses for artistic reasons.
16mm - large-scale lanscape
(SMC DA* 16-50mm, Giglachseen, Austria )
20mm
(SMC A 20/2.8, Hochkönig, Salzburg)
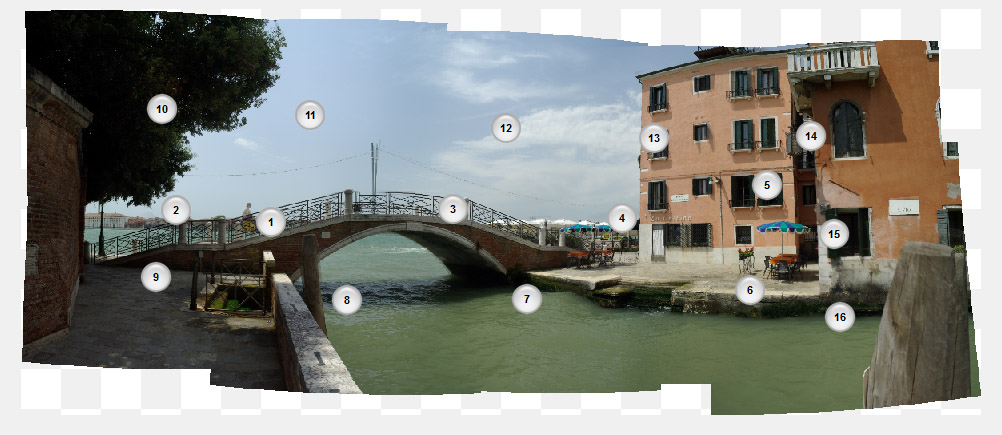
28mm
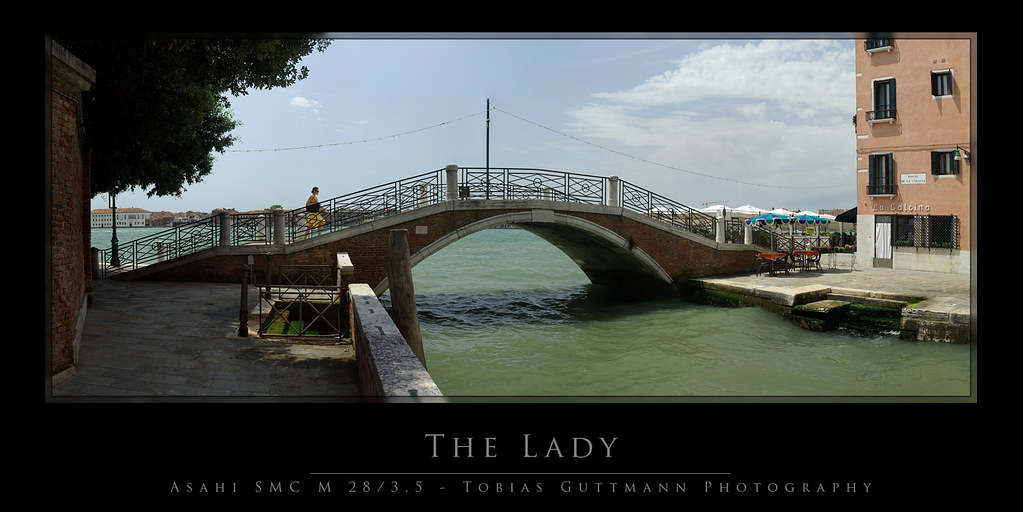
(SMC M 28/3.5, Venice, Italy)
35mm
(medium-scale landscape shot, C. Zeiss Flektogon 35mm 2.4 MC, Saalfelden, Salzburg)
50mm

(SMC A 50/1.2, Gerling, Salzburger Land)
85mm

(S.M.C. Takumar 85/1.8, Zeeland, The Netherlands)
- choose lenses with very high corner sharpness and and less barrel distortions! You don't want unsharp spots inside your final image and you don't want that it looks like a wave-form
- to begin with take a aperture between f8 and f11 (daylight, outdoor use) to get everything in your pano sharp. Watch that your shutter speed does not become slower than 1/160, to prevent camera shake. Go for 100% safety.
Remember! One single frame with camera shake destroys the whole panorama.
Try to shoot with higher ISO if the shutter becomes to slow --> With an
e.g. everage 25 frames panorama one does not notice much of a grain (when shot with e.g. ISO 400-500) when the whole panorama is scaled down to e.g. a 50Megapixel resolution.
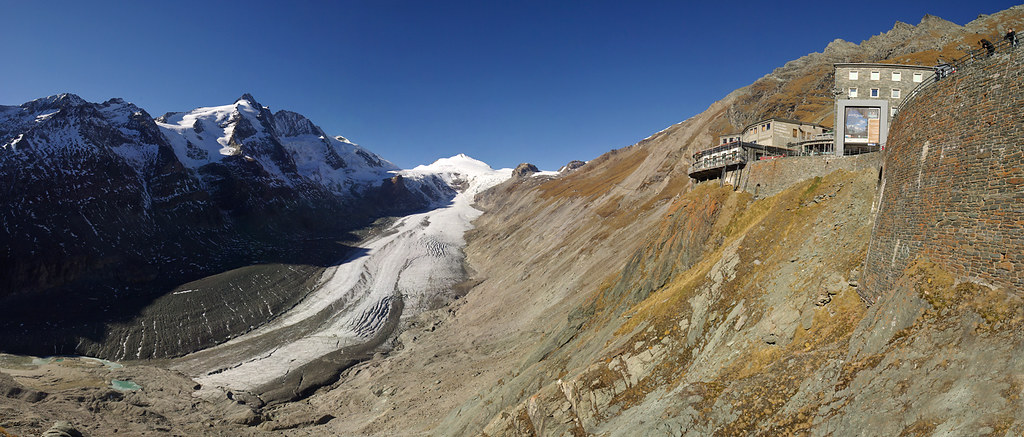
Here's an example of an large-scale panorama stiched from more than 30 frames which shot on a very high ISO with polarizer.

(SMC A 20/2.8, Hochkönig, Berchtesgadener Alpen, Salzburger Land)
- short or long lenses, all is possible. As used with analog panorama-cameras, all typ of lenses from super wide angel till telelenses are used by panorama photographs.
exaples why to take a long lens:
1)you want nicer bokeh
2)your subject is far away
(SMC A 100/2.8 Macro, Kitzsteinhorh, Nationalpark Hohe Tauern, Salzburger Land)
3)you want to make a large scale print and use stiching technics to gain megapixles (pseudo-panorama):
(SMC A 70-210/4, Fortress of Salzburg)
see here a 32 Megapixel Panorama
http://farm3.static.flickr.com/2231/2336651991_c67e098714_o.jpg
- make a metering on a light part (maybe not the lightest) of the panorama-scenery and use this as your shutter speed for all frames.
Capturing the frames
- a steady hand is needed or a tripod
- a nodal panoramahead (e.g. Nodal Ninja) for your tripod is not necessary at all!
- 99% of my panoramas are done freehand
- try to get a rhythm while capturing each frame, move your camera always the same distance to the next frame - don't worry, one get a feeling for the distances
- try to find signifficant points in your scenery and remember them; you'll need this points to relate on when you change to the second or third row of frames
- do not move your legs or your hips, turn with your upper body/shoulders around your spine. Remember! You do not have to immitate a nodal-point panoramahead
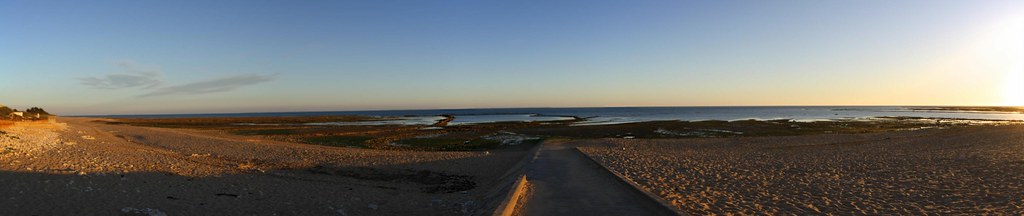
- the most difficult part is to make straight rows of frames. One tends to descend to the right !! (you could miss a lot of sky later at the top-right side of your pano). To prevent that, try to relate your rows on the horizon or on the siglifficalt poits in the scenery which you memorized.
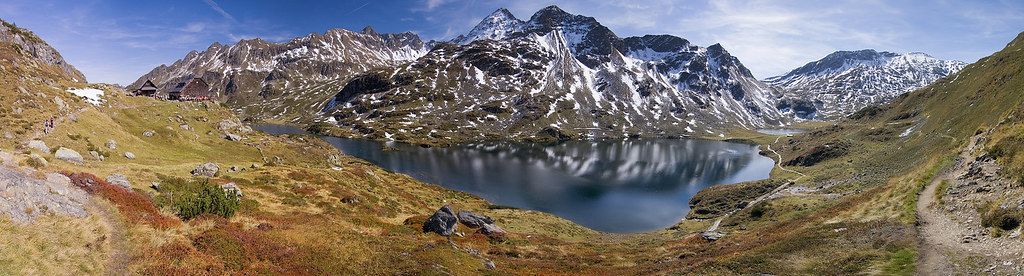
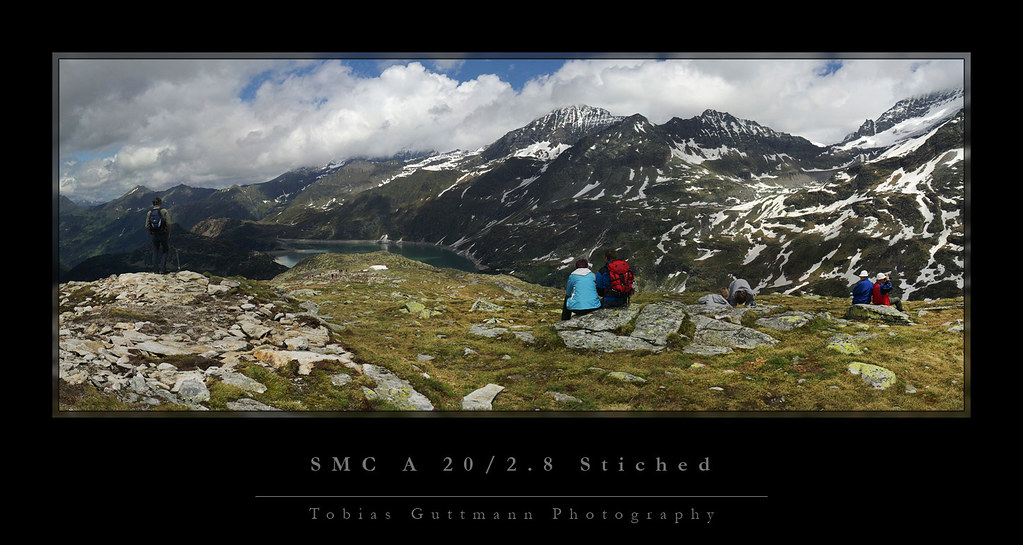
- mostly I use 3 rows of landscape format frames above each other

(SMC A 20/2.8, Hochkönig, Berchtesgadener Alpen, Salzburger Land)
- 2 rows of portrait frames can be very useful when one needs to shoot fast (see explaination later)
- sometimes panoramas with only 2-3 landscape or 3-6 portrait format frames can be enough
I use this a lot if I don't want or can't change to a wider lens
(SMC A 20/2.8, Hochkönig, Berchtesgadener Alpen, Salzburger Land)
- 4 rows example:

(SMC A 20/2.8, Umballfälle, East Tyrol, Austria)
- portrait format panoramas are of course possible as well
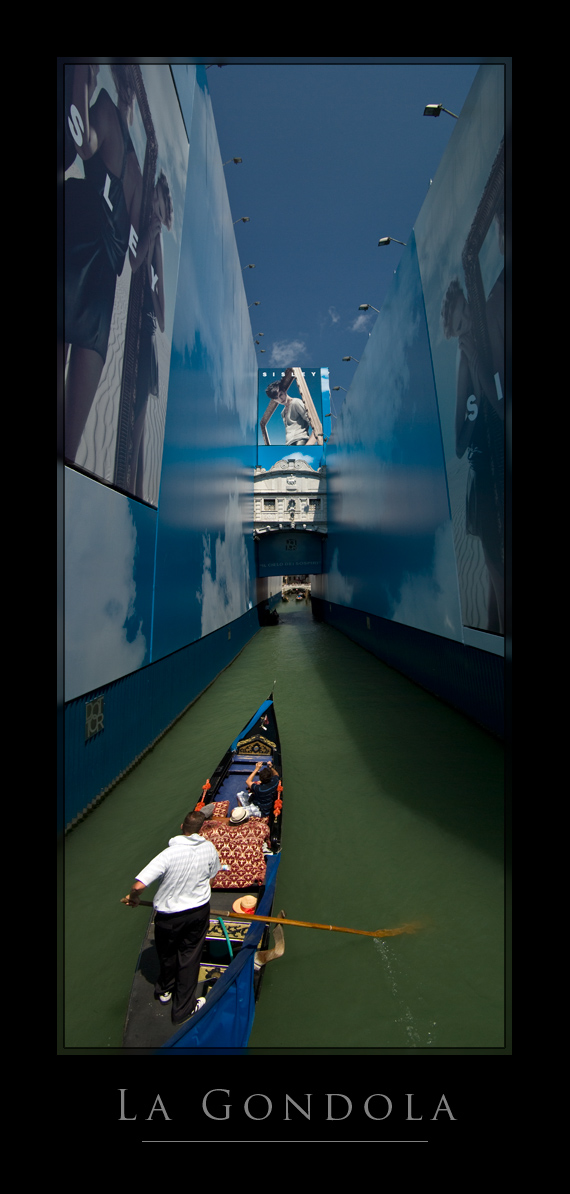
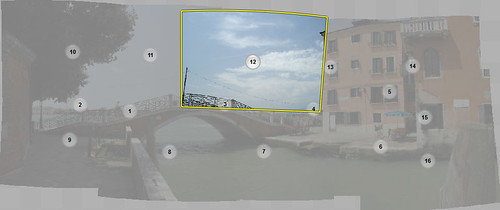
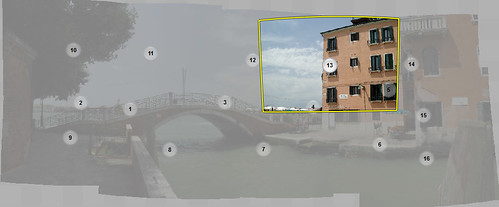
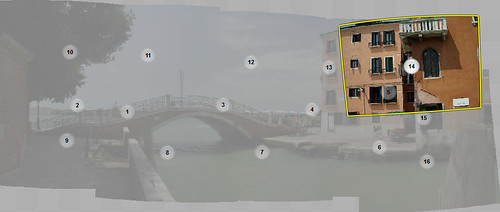
(SMC DA*16-50/2.8 on 16mm, Venice, Italy)
- your beginning frame is the main subject.
Try to get the main subject(s) (e.g. house, tree, person, car etc.) in one frame, then you build up the panorama around this frame
(see the result above)
- make a seperate shot with the subject in the middle of the frame ... this is VERY useful if there occur stiching errors and you
want to mount your subject later into the finished panorama
- shoot in RAW mode! If your metering was slightly off, you could later (using the batchmode of your RAW converter) correct all the frames to the exposure you want.
Special situations
moving objects
- be aware with moving objects:
- don't worry, your sticher can handle moving objects BUT those objects should not be cutted, they should be in one frame.
- too many moving objects can create "ghost-images" (e.g. birds), but can later on be corrected easily in PS.
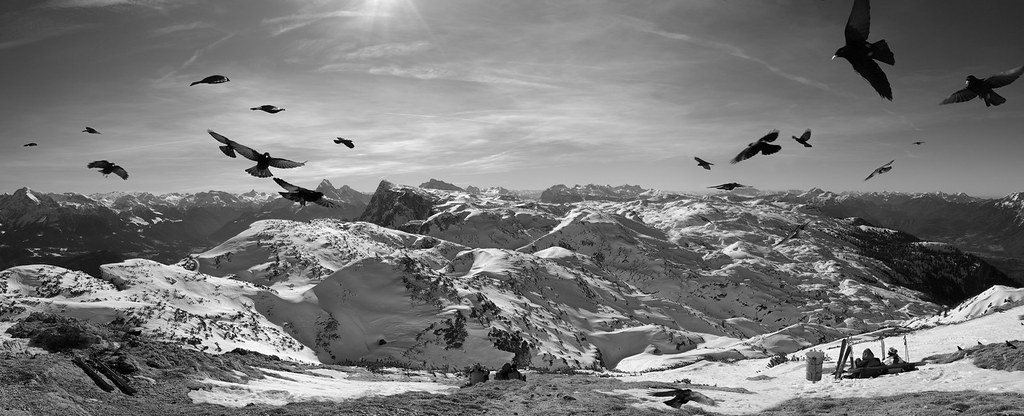
(SMC M 28/2.8, Untersberg, Salzburger Hochthron, Salzburger Land)
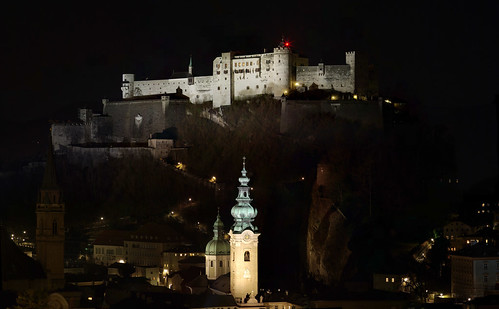
night situations
- take a tripod and do same as written above (capturing the frames).
- a steady tripod is needed, wind (shake) can easily destroy a single frame.
I had luck with my Manfrotto tripod, there was heavy wind on the top of this mountain ...
That is a kind of trick-shot; It's nearly day down in the image and night at the top of the photograph.
more about this kind of technics --> see in the advanced panorama guide which is coming soon)
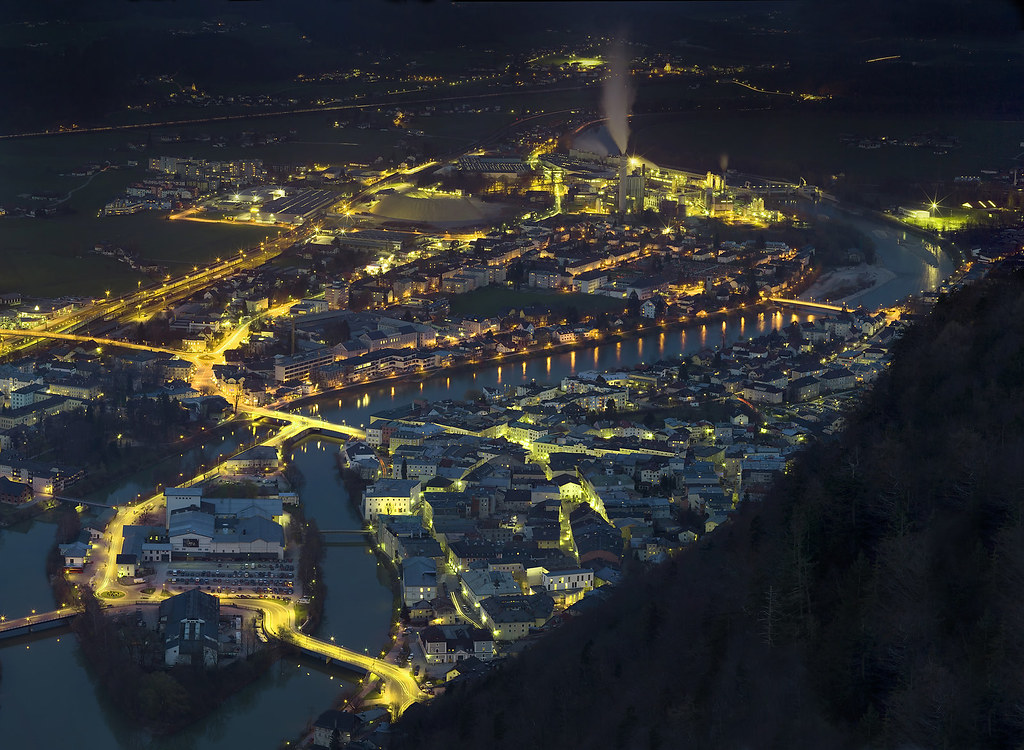
(SMC K 135/2.5, town of Hallein, Salzburger Land)
- use a cable shutter release
- when shooting in bulb mode, take a stop-watch with you to correctly expose each frame
- in some nightfall situations you need a calculator.
nightfall situation
- remember that it becomes darker and darker very fast while nightfall!
If you make e.g. a 25-frames panorama this is a crucial thing. So if the exposure for one frame takes e.g. 45 seconds at the beginning of nightfall, same exposure 20 minutes later can be 1:30min. This situations are quite tricky to shoot because you are doing everything in manual mode.
Shooting panoramas in the "blue hour" is a challenging thing:

(paper-factory "M-Real", Hallein, Salzburger Land)
- interesting night-technics are explaind in the Advanced Guide, which will come soon
- remember: clouds are moving fast ! If you want less blur in your clouds, shoot with wider apertures and higher ISO ratios to shoot your frames faster.
cloudes movements in a moonlight situation:
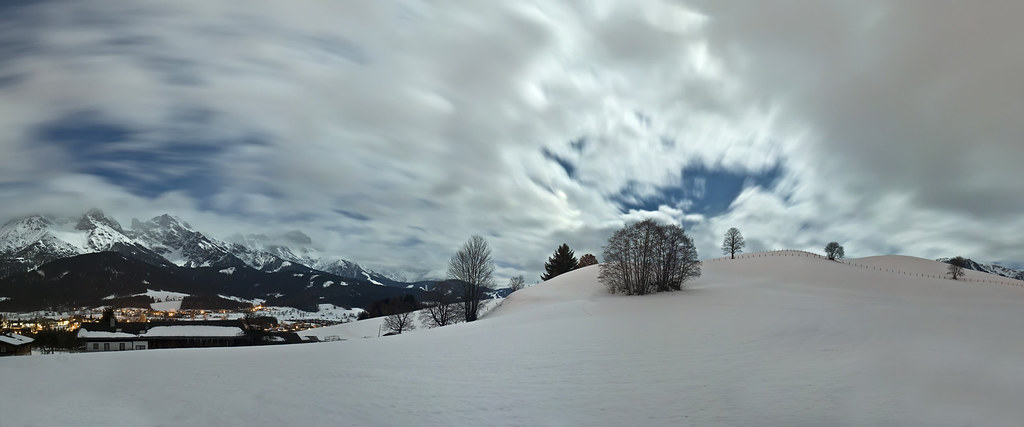
(SMC A 20/2.8, Saalfelden, Salzburger Land)
- don't worry, your stiching software can handle clouds movements very well.
Using Filters
- any filter which couses vignetting are dangerous for the panographer e.g. polarizer
- filters as ND-grads never use ! Your hands will not memorize the horizon of your ND gradient filter perfectly. Better make a gradient later in PS.
- ND grey filters can be used without problem
using the polarizer correctly:
- if you are shooting 20mm or wider you have to have a polarizer with a very thin THIN filter ring. That prevents vignetting which is upmoast dangerous to panorama shooting.
- never turn your polarizer to the position where it is most effective
(darkest sky/lightest highlights). Stay somwhere in the middle (again to prevent vignetting). it could end up (in the worst case) like that:
(SMC K 24/2.8, Zell am See, Austria)
- nerver turn you polarizer during the shooting process.
Panoramas taken with a circ. polarizer:
(SMC A 20/2.8, Hochkönig, Berchtesgadener Alpen, Salzburger Land)
(SMC A 20/2.8, Pasterze-Glazier, National Park "Hohe Tauern", Austria)
Subject/Motive
- any subject is possible
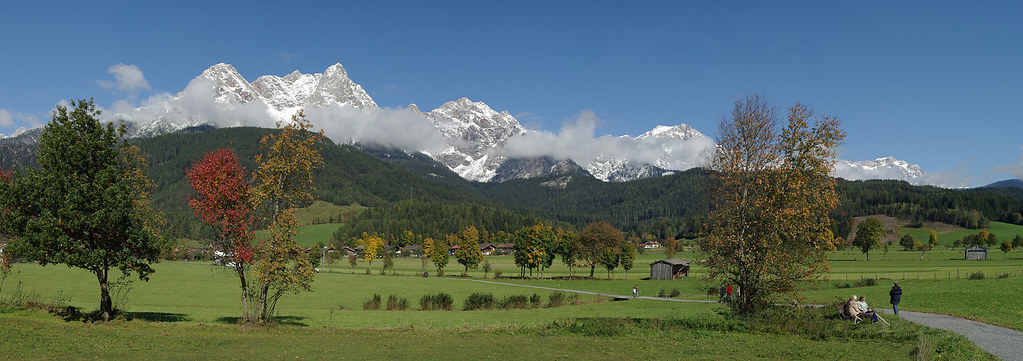
- medium-scale landscapes are good to begin with
- look for eyechatching motives inside the scenery

(SMC A 20/2.8, near Pasterze-Glazier, National Park "Hohe Tauern", Austria)
(SMC A 20/2.8, Weissensee/Gletscherwelt, National Park "Hohe Tauern", Austria)
- remember: proportions of distances will look very different in the stiched shot then what you expect.
e.g. a cow which is 50cm away from you can look as it is 20meters away
e.g. huge mountain grups can look like small hills, people look like ants
I was standing nerly under the windmill, which creates a very awkward distortion
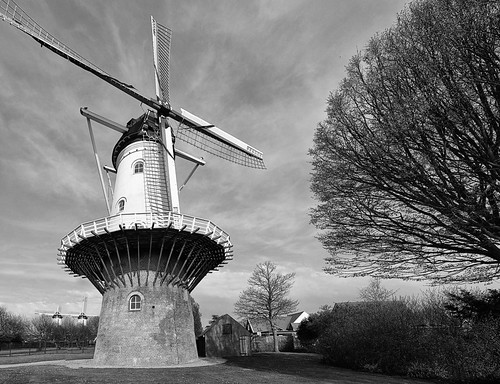
(SMC A 20/2.8, Zeeland, "Neeltje Jans", Holland)
a huge rainbow can look like a childrens toy:

(SMC A 20/2.8, Zeeland, "Neeltje Jans", Holland)
- with larg-scale shots try do bring a reference point in your shot (e.g. people, cars etc. something to relate proportions on)
watch my wife under the windmill
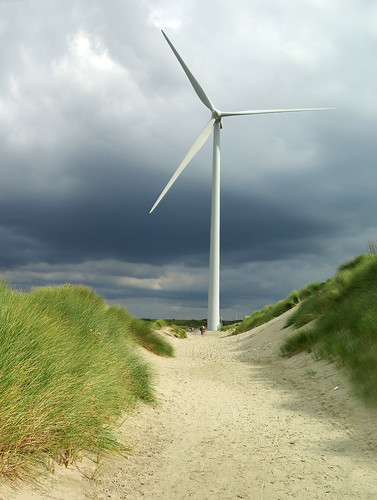
(SMC K 28/3.5, Zeeland, Wemeldinge, The Netherlands)
- a foreground subject gives an extra feeling of depth

(SMC A 20/2.8, Weissensee/Gletscherwelt, National Park "Hohe Tauern", Austria)
- first photograph the motive/subject then build the panorama around it
- Black & White works perfect on panoramas (watch my wife standing middle/right)
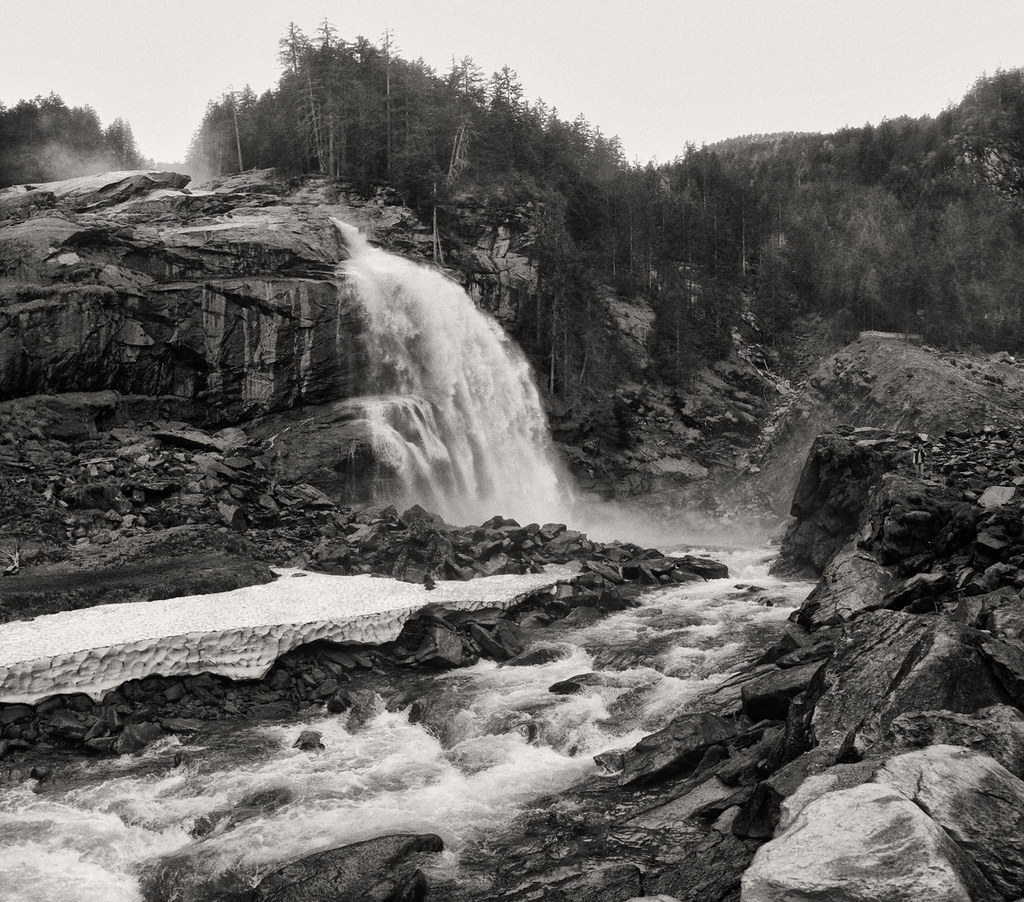
(SMC A 20/2.8, Krimmler Waterfalls, Nationalpark Hohe Tauer, Austria)
The Stiching Process
I will not do recomandations on a certain stiching software product. There's a lot of great software with mostly similar features ...
If you want fast stiching/rendering you need a fast CPU. 4 GB Ram is good, I worked years with only 2GB.
- load your photographs (RAW or jpg) into the sticher
- don't forget to set the lens' length, so the sticher can handle your files correctly (correct lens distortions etc.)
(If you use manual lenses the length of the lens is not stored in the EXIFs, so the stiching software can't derive it)
- disable "Auto level" and "auto color correction" (or similar)
- the "standard" detection mode is 99% enough to detect and stich your panoramas correctly
if your sticher has troubles with detecting, try to set it on "low detection" (or similar), often this helps
- the detection/stiching process takes in everage ~20-30 seconds for a 20frames panorama (depends on your computer power)
- in advanced modes one can define the projection modes of the frames: mostly sphereical/cylyndrical/planar
Play around with ot ALOT!
Example for spherical projection:
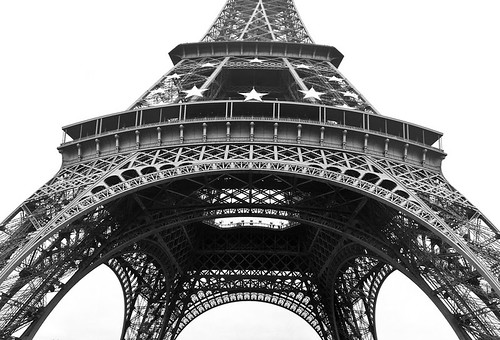
(C. Zeiss Jena Flektogon 20mm 2.8 MC, Paris, Tour Eiffel)
- after shortly editing in advanced mode, render the Panorama
- be aware: a 25frames Panorama has about 150Megapixel (with a 10MP camera).
- render in TIF mode
- activate 16bit TIF mode if you use RAW images, to get even better quality.
Rendering a 25frames(10MP) panorama takes about 5 minutes (Dual Core 2X2.4 Ghz).
Special Features - Stiching Software
(more of it will be in the 2nd part of this panorama guide.
- Just to explain one feature which I use a lot:
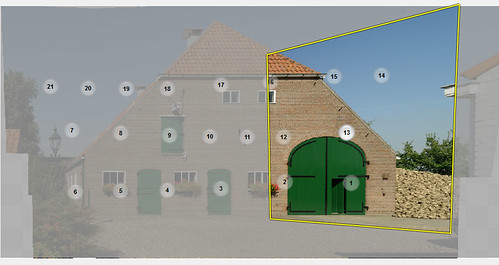
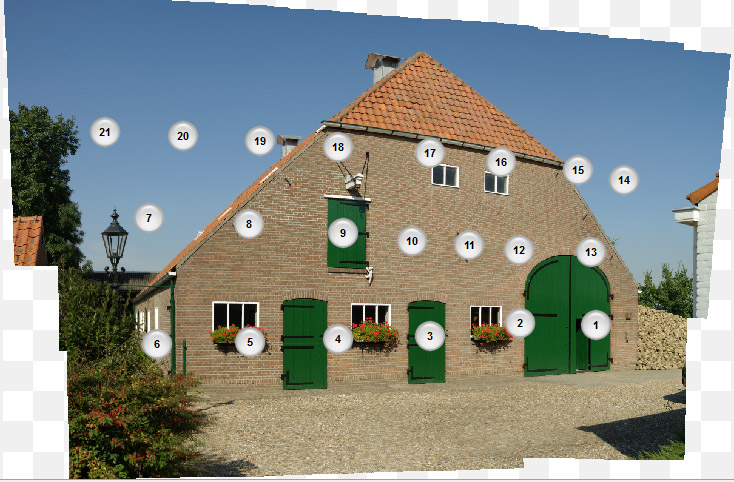
In "planar projection mode" (see above) one can immitate a T/S lens by manually correcting the horizontals and verticals. One can make architecture shots with a resolution which
a T/S lens never can produce. e.g. the architecture photograph beneath from 21 frames becomes a 150Megapixel output file.
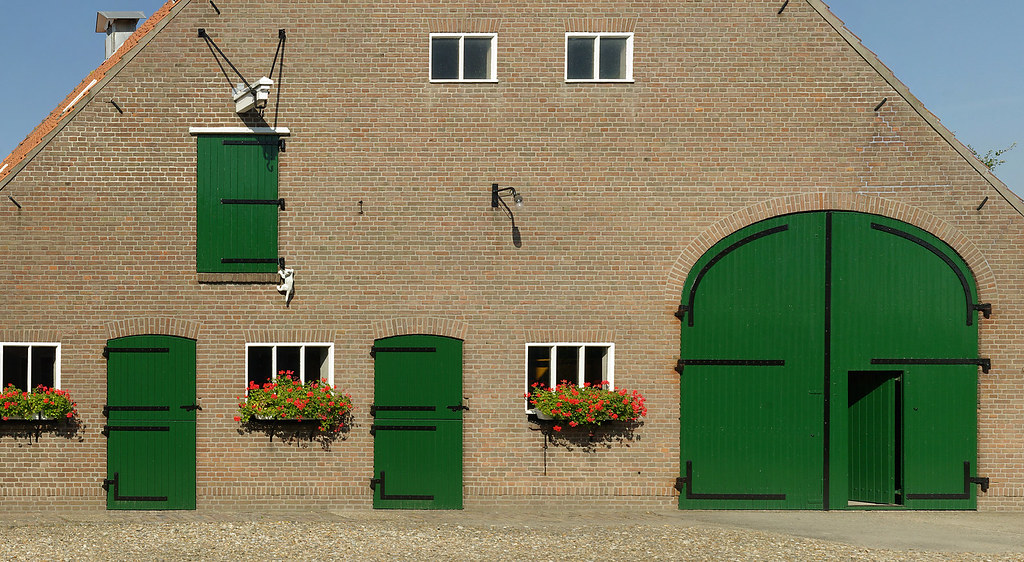
(SMC A 50/1.2, Overzande, Zeeland, The Netherlands)
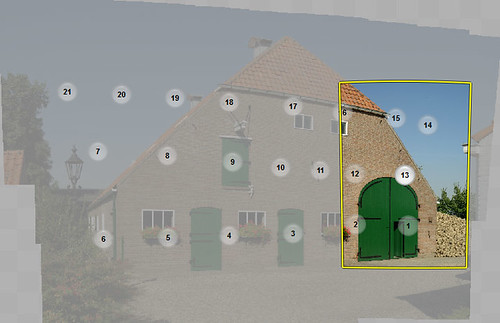
planar projection:
frame distortion planar projection:
that would be spherical projection:
frame distortion spherical projection:
another example of a T/S stiching:
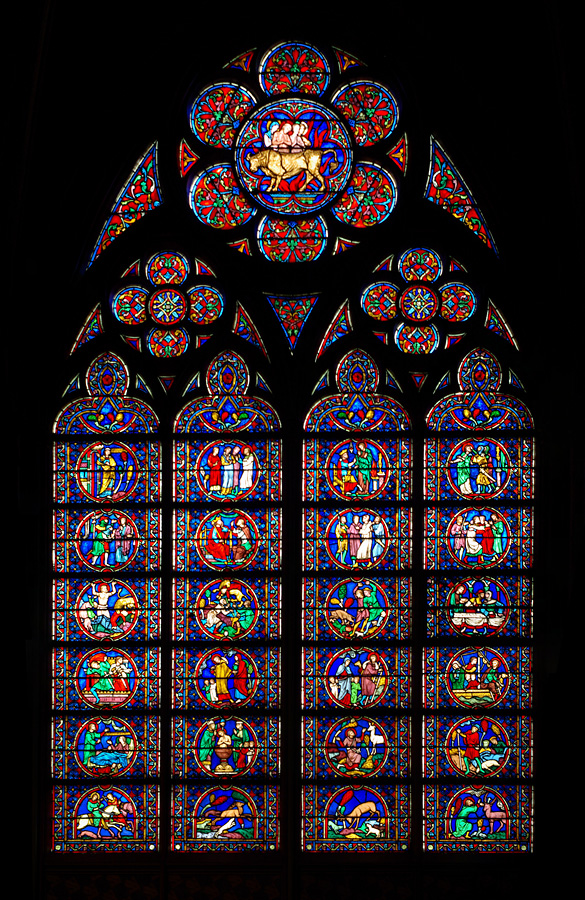
(C. Zeiss Flektogon 35mm 2.4 MC, church windowof Notre Dame, Paris, France)
_______________________________
Hope you enjoyed this Guide and got a litte insight in the panorama world.
You can read the "Advanced Guide to Panorama Stiching" since May 2012
here's the link.
http://forum.mflenses.com/new-2012-advanced-guide-to-panorama-stiching-t49676.html
_______________________________
Dozens of my panoramas can be viewd on my webpage:
[sorry that's old content, will be renewed soon! (2012) ]
http://www.vogelschreck.com
_______________________________
Any use of this texts and photograph content is prohibited by the author.
2009, Tobias Guttmann
_________________
Camera Pentax K10D, K20D, Super A
SMC K28 3.5, SMC K24 2.8, SMC K28/2, SMC K50/1.4,SMC A50/1.7, SMC M28/3.5, SMC A 50/1.7, SMC K135 2.5, SMC A50 1.2
SMC A35-105 3.5, SMC A70-210 4, SMC A20 2.8, SMC M28 2.8,K28/3.5 SMC A28 2.8, SMC A100 2.8 Macro, CZJ Flektogon 20 2.8 (MC), 35 2.4 (MC),S.M.C Takumar 85mm 1.8, Helios 44M-4, A.Schacht Travenar 90/2.8, C.Zeiss J. Sonnar 180/2.8
Check out my: 2012 New "Advanced Guide to Panorama Stiching" !
Check out my "Beginner's Guide to Panorama Stiching !
Visit my Asahi and Zeiss MF lens samples database !
Last edited by tobbsman on Sun May 13, 2012 7:50 am; edited 2 times in total |
|
| Back to top |
|
 |
Spotmatic

Joined: 18 Aug 2008
Posts: 4045
Location: Netherlands
|
| Posted: Fri Aug 07, 2009 9:07 pm Post subject: |
|
|
Spotmatic wrote:
1st reaction:
Wow, you made one of the best howto's I have ever seen.
2nd reaction:
Wow, I got an overdose of panoramas, and each one of them is the best I have ever seen.

_________________
Peter - Moderator
Pentax K-5 + Pentax 645 + Canon 5D + Bessa RF 10,5cm Heliar, and a 'little' bag full of MF lenses. The lens list is * here *.
My fast 80s: Asahi-Kogaku Takumar 83mm f/1.9 - Super-Takumar 85mm f/1.9 - FA 77mm f/1.8 Limited - Cyclop 85/1.5 (Helios-40 innards) - Komura 80mm f/1.8 - Meyer Görlitz Primoplan 7,5cm 1:1.9 - Carl Zeiss Jena 80mm f/1.8 Pancolar - Canon 85mm f/1.8 S.S.C. - Canon 85mm f/1.2 S.S.C. Aspherical |
|
| Back to top |
|
|
trifox

Joined: 14 May 2008
Posts: 3614
Location: UK
Expire: 2014-05-29
|
| Posted: Fri Aug 07, 2009 9:19 pm Post subject: |
|
|
trifox wrote:
Mr. Tobbsman!!
RESPECT x 100 !!!
..you are a master of Pano .!
Thanks!
tf
_________________
Flickr.com |
|
| Back to top |
|
|
Olivier

Joined: 18 Feb 2009
Posts: 5084
Location: France
Expire: 2015-08-06
|
| Posted: Fri Aug 07, 2009 9:22 pm Post subject: |
|
|
Olivier wrote:
Oh YES, I enjoyed a lot !!!
Thanks Tobias.
That's a Masterpiece.
_________________
Olivier - Moderator 
Dslr : Olympus Pen E-P2 - Fujifilm X-Pro2 - Canon 5D MkII.
SLr and MF lenses : for feedback and helping people, cameras and lenses I own : full list here http://forum.mflenses.com/viewtopic,p,1442740.html#1442740 |
|
| Back to top |
|
|
Jieffe


Joined: 04 Nov 2007
Posts: 754
Location: Belgium
|
| Posted: Fri Aug 07, 2009 9:47 pm Post subject: |
|
|
Jieffe wrote:
OMG ! This post must be a sticky !
Best howto I've seen, never said so much "wow's" on one post ...
THANK YOU ! |
|
| Back to top |
|
|
sichko

Joined: 20 Jun 2008
Posts: 2475
Location: South West UK
|
| Posted: Sat Aug 08, 2009 12:05 am Post subject: |
|
|
sichko wrote:
Many thanks for an excellent - and very generous - contribution.
_________________
John |
|
| Back to top |
|
|
Attila

Joined: 24 Feb 2007
Posts: 57865
Location: Hungary
Expire: 2025-11-18
|
| Posted: Sat Aug 08, 2009 12:12 am Post subject: |
|
|
Attila wrote:
MANY.MANY THANKS!!!!!
_________________
-------------------------------
Items on sale on Ebay
Sony NEX-7 Carl Zeiss Planar 85mm f1.4, Minolta MD 35mm f1.8, Konica 135mm f2.5, Minolta MD 50mm f1.2, Minolta MD 250mm f5.6, Carl Zeiss Sonnar 180mm f2.8
|
|
| Back to top |
|
|
Attila
Joined: 24 Feb 2007
Posts: 57865
Location: Hungary
Expire: 2025-11-18
|
| Posted: Sat Aug 08, 2009 12:15 am Post subject: |
|
|
Attila wrote:
| Spotmatic wrote: |
1st reaction:
Wow, you made one of the best howto's I have ever seen.
2nd reaction:
Wow, I got an overdose of panoramas, and each one of them is the best I have ever seen.
|
| Quote: |
| Wow, I got an overdose of panoramas, and each one of them is the best I have ever seen. |
YES.
_________________
-------------------------------
Items on sale on Ebay
Sony NEX-7 Carl Zeiss Planar 85mm f1.4, Minolta MD 35mm f1.8, Konica 135mm f2.5, Minolta MD 50mm f1.2, Minolta MD 250mm f5.6, Carl Zeiss Sonnar 180mm f2.8
|
|
| Back to top |
|
|
no-X

Joined: 19 Jul 2008
Posts: 2495
Location: Budejky, Czech Republic
|
| Posted: Sat Aug 08, 2009 8:28 am Post subject: |
|
|
no-X wrote:
tobbsman: simply 
_________________
(almost) complete list of Helios lenses |
|
| Back to top |
|
|
tobbsman
Joined: 25 Jul 2008
Posts: 2578
Location: Austria
|
| Posted: Sun Aug 09, 2009 7:38 am Post subject: |
|
|
tobbsman wrote:
Thank you all, too kind of you!
I am looking forward to see your Panoramas!
Film-panos from scans are of course possible as well, I did not mention that in the Guide.
Cheers
Tobias
_________________
Camera Pentax K10D, K20D, Super A
SMC K28 3.5, SMC K24 2.8, SMC K28/2, SMC K50/1.4,SMC A50/1.7, SMC M28/3.5, SMC A 50/1.7, SMC K135 2.5, SMC A50 1.2
SMC A35-105 3.5, SMC A70-210 4, SMC A20 2.8, SMC M28 2.8,K28/3.5 SMC A28 2.8, SMC A100 2.8 Macro, CZJ Flektogon 20 2.8 (MC), 35 2.4 (MC),S.M.C Takumar 85mm 1.8, Helios 44M-4, A.Schacht Travenar 90/2.8, C.Zeiss J. Sonnar 180/2.8
Check out my: 2012 New "Advanced Guide to Panorama Stiching" !
Check out my "Beginner's Guide to Panorama Stiching !
Visit my Asahi and Zeiss MF lens samples database ! |
|
| Back to top |
|
|
Gurdie

Joined: 29 Jul 2008
Posts: 997
Location: Finland
Expire: 2013-02-20
|
| Posted: Sun Aug 09, 2009 7:52 am Post subject: |
|
|
Gurdie wrote:
Thank you very much. I have only tried some simple 3-4 frame panos with Hugin software, but your examples are mouth-watering.
I wish you could comment on the different panorama software you have tried.
_________________
Markku
Give me two hours a day of activity, and I'll take the other twenty-two in dreams.
― Salvador Dali
----------------------------------------- |
|
| Back to top |
|
|
tobbsman
Joined: 25 Jul 2008
Posts: 2578
Location: Austria
|
| Posted: Sun Aug 09, 2009 8:10 am Post subject: |
|
|
tobbsman wrote:
| Quote: |
| I wish you could comment on the different panorama software you have tried. |
I understand very good, but this would take some pages to explain/compare difference, advantege etc. of different stiching software products.
Here's a summary to bring my personal experiences/votings in one sentence:
CS4 is good for panos, Hugin even better, PTGui is fantastic, AutopanoPro1.4 is a masterpiece of a software (there is a new version out, I've to buy it) 
Cheers
Tobias
_________________
Camera Pentax K10D, K20D, Super A
SMC K28 3.5, SMC K24 2.8, SMC K28/2, SMC K50/1.4,SMC A50/1.7, SMC M28/3.5, SMC A 50/1.7, SMC K135 2.5, SMC A50 1.2
SMC A35-105 3.5, SMC A70-210 4, SMC A20 2.8, SMC M28 2.8,K28/3.5 SMC A28 2.8, SMC A100 2.8 Macro, CZJ Flektogon 20 2.8 (MC), 35 2.4 (MC),S.M.C Takumar 85mm 1.8, Helios 44M-4, A.Schacht Travenar 90/2.8, C.Zeiss J. Sonnar 180/2.8
Check out my: 2012 New "Advanced Guide to Panorama Stiching" !
Check out my "Beginner's Guide to Panorama Stiching !
Visit my Asahi and Zeiss MF lens samples database ! |
|
| Back to top |
|
|
dakoo

Joined: 08 Mar 2008
Posts: 603
|
| Posted: Sat Aug 29, 2009 8:41 pm Post subject: |
|
|
dakoo wrote:
there is so much pano done these days. Your results are on the most good panos i have seen.
And that not just one, so many of them...
What a great howto...
_________________
Yashica ML 2.4/24, ML 2.4./28,
Zeiss Distagon 35/1.4, Planer 1.4/50, Planer 1.7/50,
SMC Tak 1.4/50,Tessar 2.8/50, Jupiter2/85
CZJ 4/135; Pentacon 4/200
Canon Tns 24/3.5
|
|
| Back to top |
|
|
kds315*

Joined: 12 Mar 2008
Posts: 16664
Location: Weinheim, Germany
Expire: 2021-03-09
|
| Posted: Sun Aug 30, 2009 12:04 am Post subject: |
|
|
kds315* wrote:
I'm EXTREMELY impressed!! Very generous to share your technique and excellent results!!
_________________
Klaus - Admin
"S'il vient a point, me souviendra" [Thomas Bohier (1460-1523)]
http://www.macrolenses.de for macro and special lens info
http://www.pbase.com/kds315/uv_photos for UV Images and lens/filter info
https://www.flickr.com/photos/kds315/albums my albums using various lenses
http://photographyoftheinvisibleworld.blogspot.com/ my UV BLOG
http://www.travelmeetsfood.com/blog Food + Travel BLOG
https://galeriafotografia.com Architecture + Drone photography
Currently most FAV lens(es):
X80QF f3.2/80mm
Hypergon f11/26mm
ELCAN UV f5.6/52mm
Zeiss UV-Planar f4/60mm
Zeiss UV-Planar f2/62mm
Lomo Уфар-12 f2.5/41mm
Lomo Зуфар-2 f4.0/350mm
Lomo ZIKAR-1A f1.2/100mm
Nikon UV Nikkor f4.5/105mm
Zeiss UV-Sonnar f4.3/105mm
CERCO UV-VIS-NIR f1.8/45mm
CERCO UV-VIS-NIR f4.1/94mm
CERCO UV-VIS-NIR f2.8/100mm
Steinheil Quarzobjektiv f1.8/50mm
Pentax Quartz Takumar f3.5/85mm
Carl Zeiss Jena UV-Objektiv f4/60mm
NYE OPTICAL Lyman-Alpha II f1.1/90mm
NYE OPTICAL Lyman-Alpha I f2.8/200mm
COASTAL OPTICS f4/60mm UV-VIS-IR Apo
COASTAL OPTICS f4.5/105mm UV-Micro-Apo
Pentax Ultra-Achromatic Takumar f4.5/85mm
Pentax Ultra-Achromatic Takumar f5.6/300mm
Rodenstock UV-Rodagon f5.6/60mm + 105mm + 150mm
|
|
| Back to top |
|
|
Mist


Joined: 28 Jul 2009
Posts: 134
Location: Toronto, Canada
|
| Posted: Sun Aug 30, 2009 3:31 am Post subject: |
|
|
Mist wrote:
Most awesome panoramas I've ever seen.
Thanks a lot for sharing! |
|
| Back to top |
|
|
Milanos
Joined: 04 Feb 2009
Posts: 110
Location: Vlašim
|
| Posted: Tue Sep 22, 2009 1:58 pm Post subject: |
|
|
Milanos wrote:
Gentlemen, I´m really upset now.
I try to safe some money every month to improve my photo gear and each month I have a list what I want to buy and what is the priority. The wide angle lens was somwhere in lower levels of priority-gram, but after seing this tutorial and the result, it is attacking the top of list.
Tobbias: Do You print these panos? what is the standart size? |
|
| Back to top |
|
|
tobbsman
Joined: 25 Jul 2008
Posts: 2578
Location: Austria
|
| Posted: Thu Sep 24, 2009 3:20 pm Post subject: |
|
|
tobbsman wrote:
@Milanos
I printed about 10 panos so far. From the ones shown in this thread I printed this one on fine-art paper:
It was about 25 shots with SMC K 135/2.5 so the resolution is about 160 megapixel. I printed on 1,20X1,20meters and mounted it on a Kapa Fix Light plate. I can recomand this KapaFix really a lot, it has a self-gluing surface which works perfect, one can cut the plates easily with a normal carpet-knife.
For the mounting process I recomand to do it at least with 2 people, 3 better.
Cheers
Tobias
_________________
Camera Pentax K10D, K20D, Super A
SMC K28 3.5, SMC K24 2.8, SMC K28/2, SMC K50/1.4,SMC A50/1.7, SMC M28/3.5, SMC A 50/1.7, SMC K135 2.5, SMC A50 1.2
SMC A35-105 3.5, SMC A70-210 4, SMC A20 2.8, SMC M28 2.8,K28/3.5 SMC A28 2.8, SMC A100 2.8 Macro, CZJ Flektogon 20 2.8 (MC), 35 2.4 (MC),S.M.C Takumar 85mm 1.8, Helios 44M-4, A.Schacht Travenar 90/2.8, C.Zeiss J. Sonnar 180/2.8
Check out my: 2012 New "Advanced Guide to Panorama Stiching" !
Check out my "Beginner's Guide to Panorama Stiching !
Visit my Asahi and Zeiss MF lens samples database ! |
|
| Back to top |
|
|
PaulC

Joined: 23 Dec 2008
Posts: 2318
|
| Posted: Sat Oct 17, 2009 5:38 pm Post subject: |
|
|
PaulC wrote:
I've only just noticed this. What a fantastic guide to something I've been struggling to get to grips with! It's an inspiration. Thanks.
_________________
View or buy my photos at:
http://shutterstock.com/g/paulcowan |
|
| Back to top |
|
|
cilinderman


Joined: 13 Dec 2008
Posts: 317
Location: Canillo, Andorra
|
| Posted: Sat Dec 05, 2009 11:27 pm Post subject: |
|
|
cilinderman wrote:
Superb guide! Thank you Tobias! You are the panoman!
_________________
5D & Fujica ST801|| Carl Zeiss Planar MM 50/1.7 (departed for resurrection) || Carl Zeiss Distagon 28/2.8 AEJ || Meyer Orestor "Pentacon" (relabeled) 135/2.8 || Carl Zeiss Jena 135/3.5 || Carl Zeiss Sonnar MM 85/2.8 || Carl Zeiss Flektogon MC "White" 35/2.4 || Olympus Zuiko OM MC 21/3.5 || Super Takumar 55/1.8 || Rollei Planar HFT 50/1.8 || "The three tenors" from Orio (Nikkor pre-AI 85/1.8, 135/3.5 & 105/2.5) |
|
| Back to top |
|
|
netuser
Joined: 13 Sep 2008
Posts: 8
|
| Posted: Sun Dec 13, 2009 8:22 pm Post subject: |
|
|
netuser wrote:
First of all, it's a great tutorial. Thanks
Now, don't know if I missed or it's not mentioned but what software did you use for the panos ? never tried but now seems I will and I would like to know which software to use.
Thanks
_________________
Just a newbie eager to learn ! |
|
| Back to top |
|
|
rpo83

Joined: 01 Jun 2009
Posts: 276
Location: Melbourne, Australia
|
| Posted: Sat Jul 17, 2010 1:18 pm Post subject: |
|
|
rpo83 wrote:
I am embarrassed to say i have just seen this thread for the first time.
Thanks very much Tobias, i have only recently started playing with panoramas, in the past i have always discounted them due to the wildly exaggerated examples i saw. I then started to realise how great they could be if done in moderation.
Your images are the perfect example of a perfect Panorama. I have only just finished my first shots a couple of days ago, and i am excited about refining my skills, your "how to" will be invaluable.
Interestingly, i have been enjoying using longer lenses for my panos, my first few have been using a Leica Elmarit R 135 on my 1.7 crop Sigma body. However looking at your examples using 20 - 50 mm lenses are very inspiring, i have a lot to learn. Thanks for this wonderful guide.
_________________
Cheers
Steve
Sigma SD10, Sigma SD14, Sigma SD14R, Sigma DP1s
Leica Lenses
Elmarit R 1:2.8/16mm, Elmarit R 1:2.8/28mm, Macro Elmarit R 1:2.8/60mm, Macro Elmar R 1:4/100 Bellows, APO Telyt R 1:3.4/180mm, Telyt R 1 :4/250mm, Vario Elmar R 1:4/35-70mm ROM, Vario Elmar R 1:4.5/75-200 Novoflex... Noflexar 1:38/200mm
M42... Carl Zeiss... Pancolar 1:1.8/80, Asahi Pentax... Super Takumar 1:3.5/35mm, S-M-C Takumar 1:1.4/50mm, Jupiter... 1:2/85mm, Pentacon... 1:2.8/135mm MC,
My Flickr Page
http://www.flickr.com/photos/rpo83/
High Res gallery on dpreview, click original
http://www.dpreview.com/Galleries/7079430607/photos |
|
| Back to top |
|
|
Transit

Joined: 20 Jun 2010
Posts: 52
Location: Wanganui
|
| Posted: Fri Aug 20, 2010 2:20 am Post subject: |
|
|
Transit wrote:
Fantastic tutorial !
Your shots have great sense of power and presence .
Thankyou.
Pete
_________________
Pentax K-1 K-01 Q7 some len |
|
| Back to top |
|
|
ylyad
Joined: 01 Jun 2010
Posts: 476
Location: Zentralschweiz
Expire: 2013-12-05
|
| Posted: Fri Aug 20, 2010 8:45 am Post subject: |
|
|
ylyad wrote:
woaw! Your images are fantastic, and the tutorial is great: clear, precise, meaningful.
I did some test shots this summer, but my first attempt with the software was not sasisfying (it didn't find correspondances properly). Reading this mad me want to try again
_________________
Camera: Fuji X-E2, Fuji X100T
MF: Canon nFD 50/1.4, Canon nFD 100/2.8, Tokina RMC 135/2.8
Tamron SP 24-48/3.5-3.8
http://www.flickr.com/derdide/
|
|
| Back to top |
|
|
ylyad
Joined: 01 Jun 2010
Posts: 476
Location: Zentralschweiz
Expire: 2013-12-05
|
| Posted: Mon Aug 30, 2010 2:18 pm Post subject: |
|
|
ylyad wrote:
Second try, with AutoStitch this time. Much better from stitching point of view. I admit, it's an AF lens: Sigma 20mm 1.8

_________________
Camera: Fuji X-E2, Fuji X100T
MF: Canon nFD 50/1.4, Canon nFD 100/2.8, Tokina RMC 135/2.8
Tamron SP 24-48/3.5-3.8
http://www.flickr.com/derdide/
|
|
| Back to top |
|
|
FernandoB12

Joined: 26 Apr 2009
Posts: 231
Location: Rio de Janeiro, Brasil
|
| Posted: Sun Nov 28, 2010 3:29 pm Post subject: |
|
|
FernandoB12 wrote:
Thank you so much!!!
_________________
Camera: Nikon D80 Canon 20D Pentax Spotmatic
Manual Lens: Nikkor 24mm f/2.8; Nikkor Ai 50mm f/1.4; Nikkor 50mm f/2.0; Nikkor Micro AI 55mm f/3.5; Nikkor H 85mm f/1.8; Nikkor P.C 105mm f/2.5; Nikkor Q 135mm f/2.8; Nikkor P 180mm f/2.8; Nikon Series E 75~150mm f/3.5;
SMC Takumar 50mm f/1.4; SMC Takumar 55mm f/1.8; Super Takumar 85mm f/1.9; Takumar S-M-C 120mm f/2.8; Takumar S-M-C 200mm f/4; Tele Takumar 300mm f/6.3
Vivitar Series 1 Macro 105mm 2.5
Helios M44-4 58mm f/2; Soligor 350mm f/5.6; Soligor 135mm f/2.8;
AF Lens: AF-S Nikkor 18-135mm f/3.5-5.6 G ED; AF Nikkor 70-210mm f/4-5.6; |
|
| Back to top |
|
|
|
|


