| View previous topic :: View next topic |
| Author |
Message |
tobbsman


Joined: 25 Jul 2008
Posts: 2578
Location: Austria
|
 Posted: Sat May 12, 2012 6:24 pm Post subject: !New 2012! Advanced Guide to Panorama Stiching Posted: Sat May 12, 2012 6:24 pm Post subject: !New 2012! Advanced Guide to Panorama Stiching |
 |
|
tobbsman wrote:
Advanced Guide to Panorama Stiching
by tobbsman
©Tobias Guttmann, 2012
You are reading the successor of MF-Lenses
"Beginner's Guide to Panorama Stiching"
http://forum.mflenses.com/a-beginners-guide-to-panorama-stitching-t19182.html
The Guide is dedicated to Attila who does a great job with running
and holding together this incredible forum, a huge source of MF
lenses knowledge 
It is written for those, who already made plenty of experiences
with panorama stiching, or those who are just interested in
broaden their knowledge concerning panorama stiching.
!! It deals with special situations and special techniques and
trick shots only !!
If there appear too many questions while reading through, I would
suggest working through the 1st part of this Guide before, to get
acquainted with the topic:
http://forum.mflenses.com/a-beginners-guide-to-panorama-stitching-t19182.html
As celebration of the 10.000th view of my
2009th "Beginner's Guide to Panorama Stiching"
I herewith release it's successor in 2012 
All Panoramas in this article are shot with MF-lenses.
As you can see, I am not a native English speaker. Although I hope
that I can provide this article with my poor English to an
international public. I am open for any language corrections!
The heart of this article are examples of panorama photographs which
are made in situation as they daily appear while shooting and which
cause troubles. After reading the article one should have an overview,
how to exactly deal with this special situation when they come
across in daily practice.
Loading this article could take some time due to
the large image content. It can take 1 to 2 two minutes till all
shots are loaded, depending on the speed of your internet connection.
BUT: it's worth waiting !
_____________________________
_____________________________
_____________________________
Advanced Techniques and Special Situation in Practice
CHAPTER I
Moving Objects
This chapter was already shortly treated in the Beginner's Guide.
Due to it's importance for daily practice I will make an overview of
situations which deal with moving objects.
Moving objects are not only moving people, cars, animals etc. ...
(see Guide nr.1) the more important ones (where one can struggle with) are:
- moving water (waves)
- ascending fog/clouds
- smoke
- clouds movements
- moving sunlight (e.g. sunset)
- shooting panos from moving vehicles B-) "restricted for masters
only" B-)
- fast changing light and though fast changing colors caused by
various circumstances
First of all it is important to understand how
the stiching software deals with moving objects. When you
have understood, it will be more predictable for you how the final
result will look and you can estimate WHICH moving objects will be shown,
which NOT or IF they anyway will be soon in the final rendering:
! In your stiching software you can choose for "remove ghost images"
(or something similar). This should be activated if you only want moving
objects which are "put" in the "middle" of
a frame to be rendered into the pano. Appears an moving object in an
overlapping area of two frames, this object will be removed out of the
final result:
____________________
1) Small Moving Objects (which fit easily inside one frame)
Example:
- you have a Swan swimming in a lake ...
- you most likely want to let it appear in the final result only
one time
what/how to do ?
- as first shot you take the swan in the perfect position as you want
to appear it in the
final result
- while you're shooting the whole scene (~1-2min.), the swan swims
around ...
So what you do is: when you arrive again at the swan several
shots later (on different position),
you just have to put it in an overlapping part of two frames ...
the magic is all done by the stiching software then and the "not wanted"
swan will be removed automatically from the overlapping part.
! Once one has understood that, it is easy to let things appear and
disappear inside a panorama scene.
the swans example in practice:
only in one frame I "put" the swan in the MIDDLE of the photograph, ...
all other appearances of the swan were removed, because I "put" them
in an overlapping part.
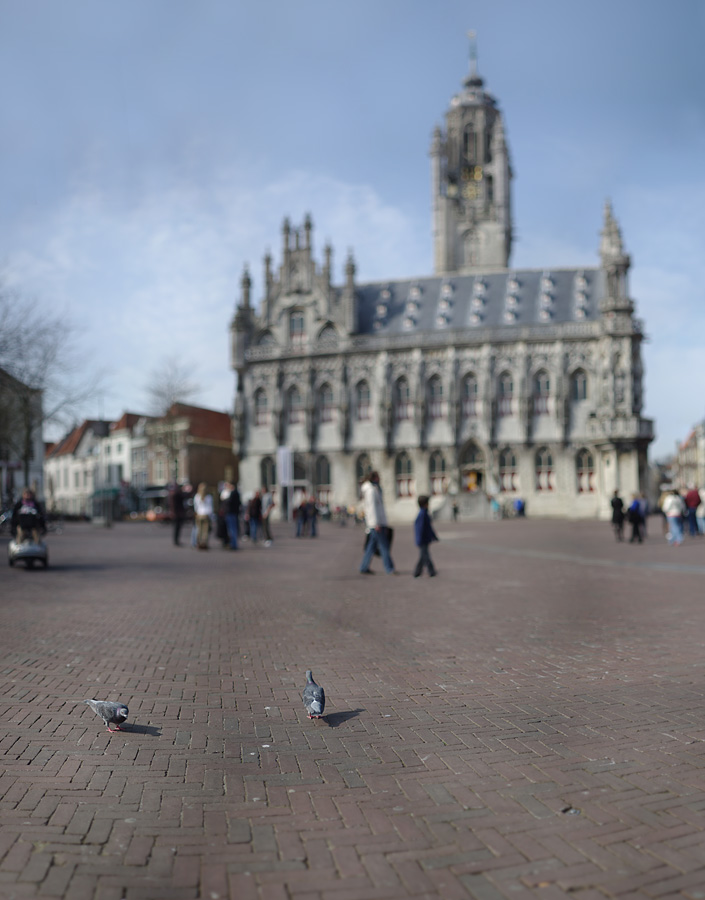
"Brilletjesdijk", Zeeland, Netherlands
If you DO NOT succeed with the overlapping areas and there appear ghost
images inside your final photograph, it can easily be removed with PS'
"Clone Stamp" or the original subject can be restored from the very first
shot that you made with the subject in the middle of the frame!
!Be aware: render your panorama with 100% size ... then you can just
"throw" (using PS) the very first frame with the perfect subject inside
the panorama in PS.
All you do is to use PSs' "align layers" function, ... or I use e.g.
the "transform - wrap" tool to manually align it to the stich. DONE.
MORE EXAMPLES:
- medium moving object where the sticher had obviously some troubles with:
Amsterdam, view from the "Scheepvaarts-Museum" towards the Old City
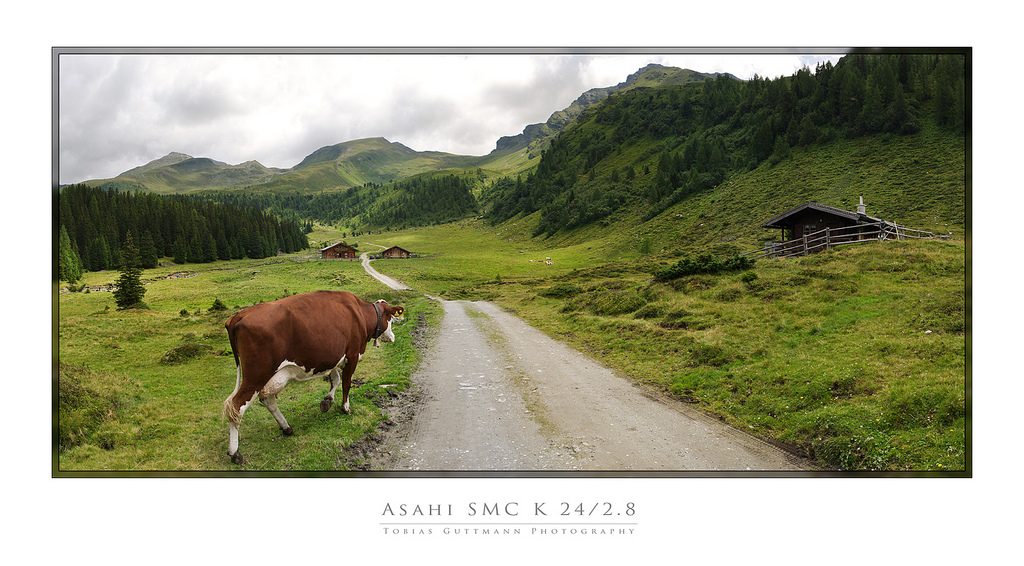
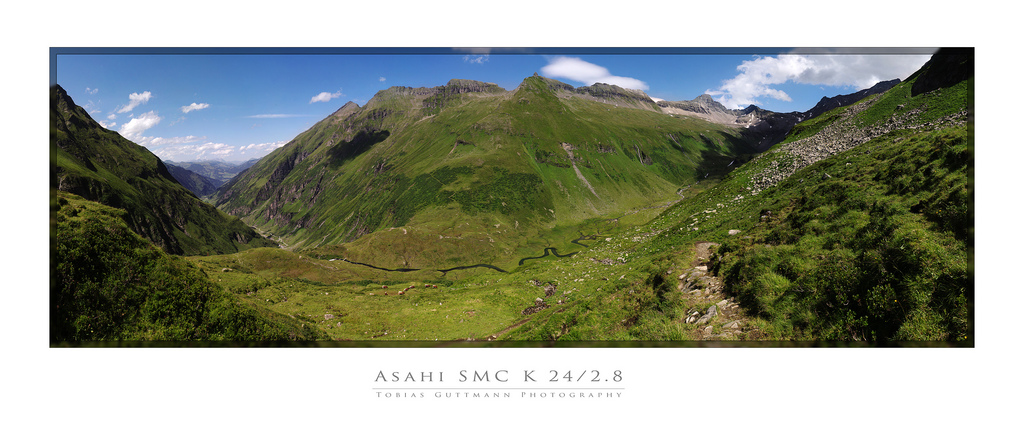
- example of an larger moving object which fits just inside one frame
because a wide lens was chosen:
"Kolm Saigurn" - Valley of Rauris, Neationalpark "Hohe Tauern", Austria
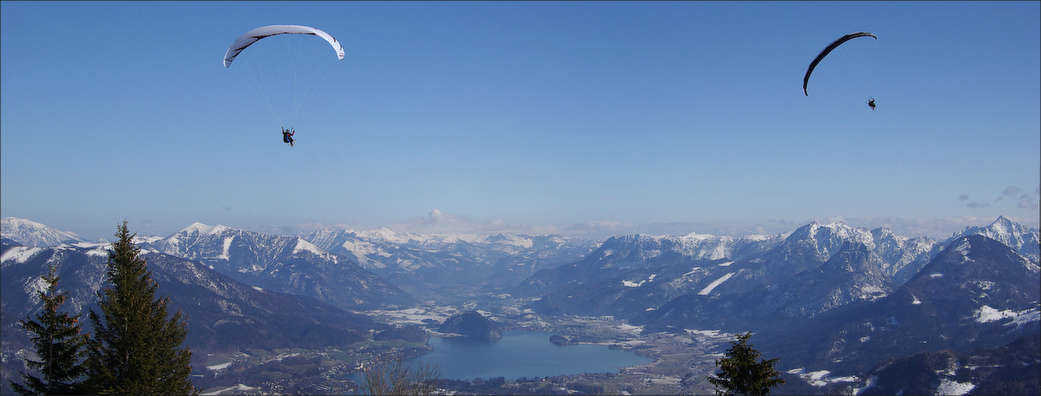
- example of several small moving object which are separated in the scene:
I took each of the para gliders in a single frame, then shot the whole
scene in a way that the "ghost" para gliders were in an overlapping part
and though were removed by the stiching software:
- Wolfgangsee, "Salzkammergut", Austria
- "Medelzkopf" - Weißsee, National Park "Hohe Tauern"
the small moving objects were put in the middle of one frame
- no problem for the software to render
- if one wants to avoid that "ghost images" are removed, disable the
function in your stiching program.
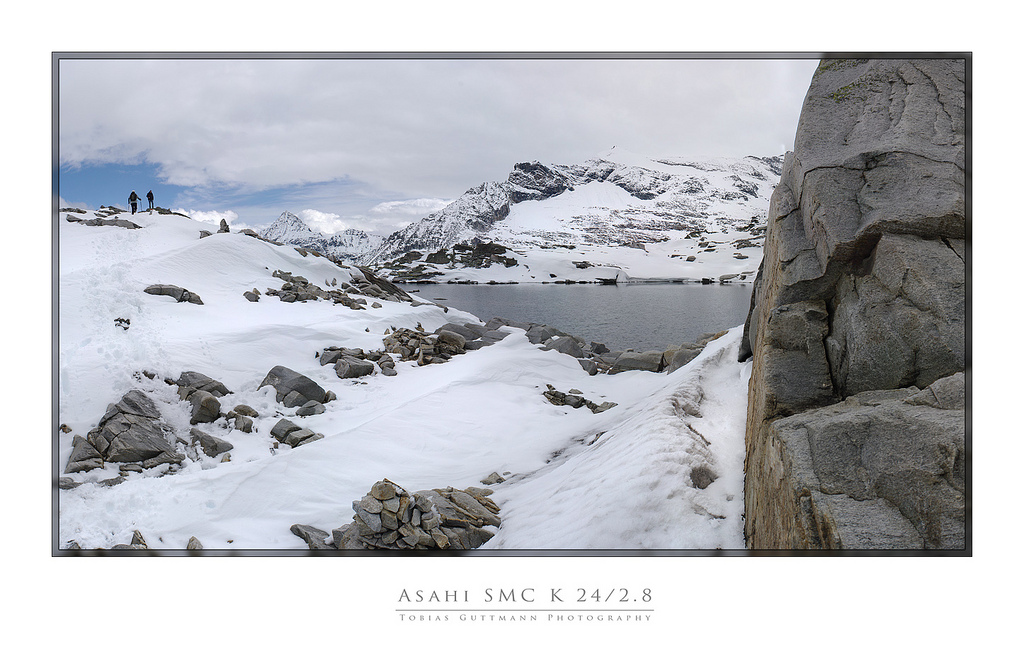
The very left and very right person were rendered into the panorama
because they were in the middle of the frames, the middle person was
easily put in with PS.
Kronreith, Maria Alm, Austria
- you can also choose for mounting the small moving object later
into the panorama with Photoshop, which is way more work, than
letting it do the stiching software:
Ramseiden, Pinzgau, Austria
_____________________
2) Larger moving Object
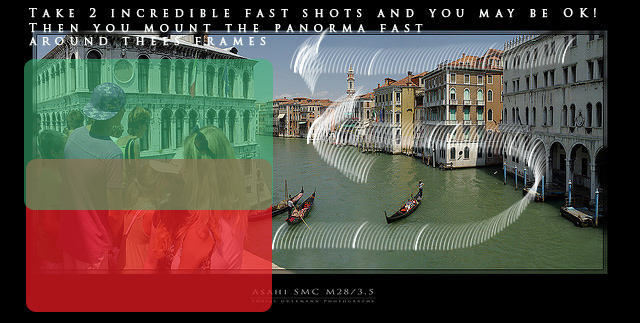
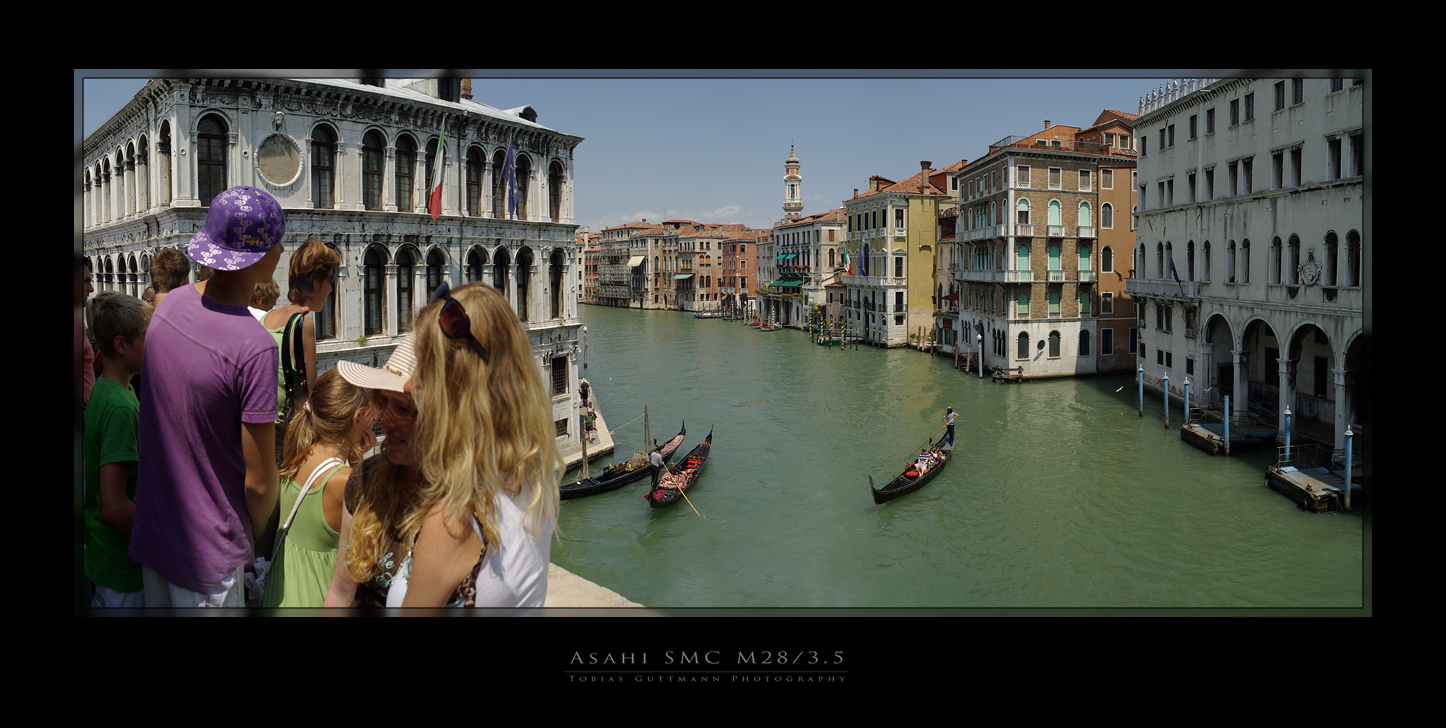
Large moving objects which fit not into one single frame (such as groups
of people) have to be treated with special care.
First concentrate on the part with the large moving object, shoot
as fast as possible.
- best is to do 2-3 versions of the same large object
because it's all about luck if the sticher can handle the frames
Here's an example where I had to deal with several moving objects
at the same time:
- large group of people
- gondolas
- water
View on Canale Grande from the famous bridge of "Rialto" in Venecia
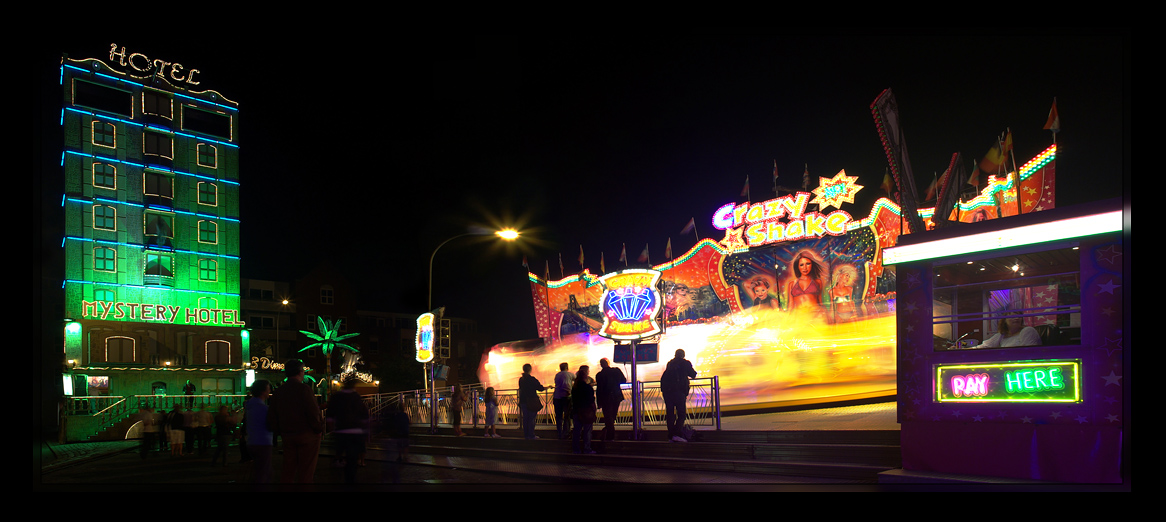
- large moving objects vs log shutter speeds
are usually not a problem to stich, just a tripod is needed
Kermis in Goes, Zeeland, Netherlands
_________________________
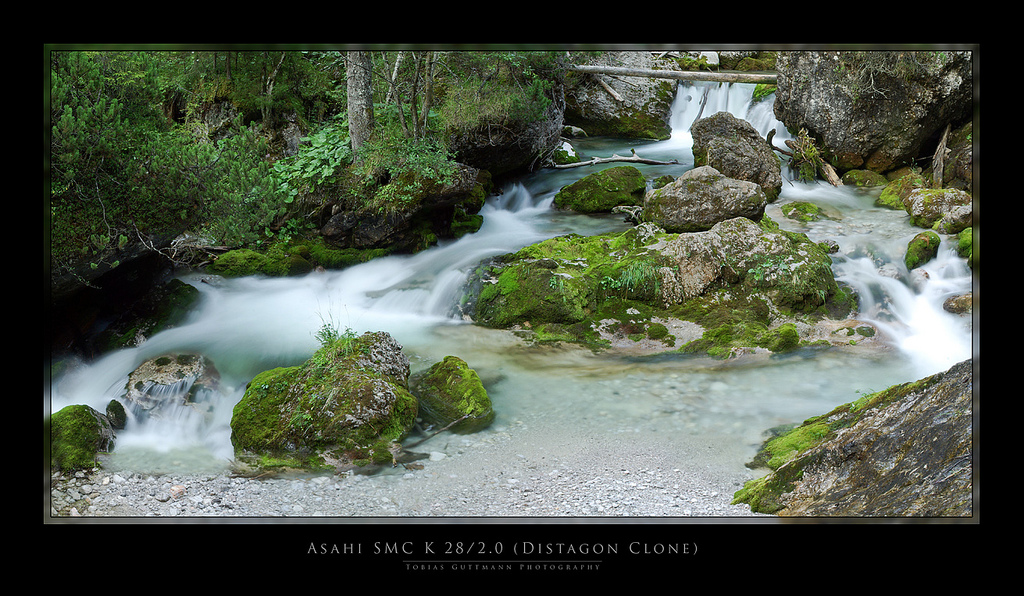
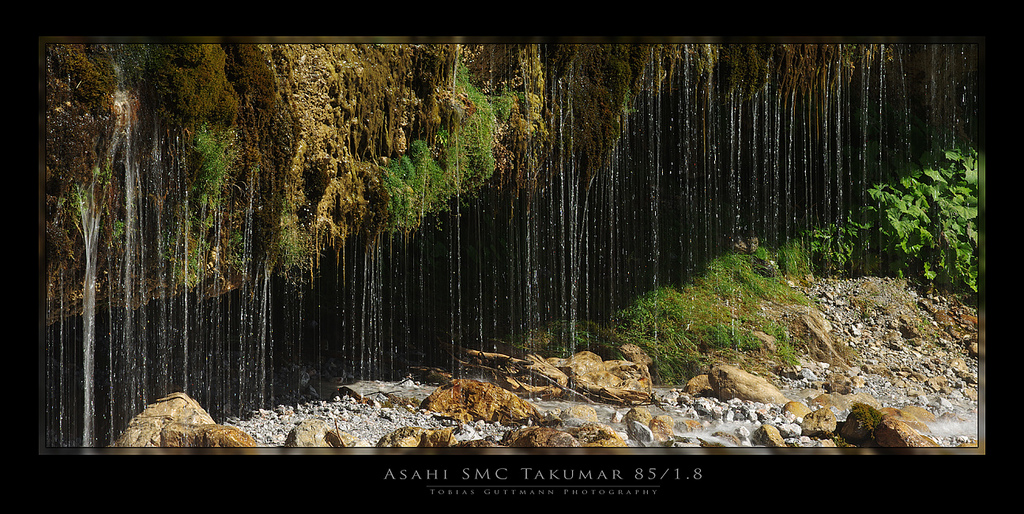
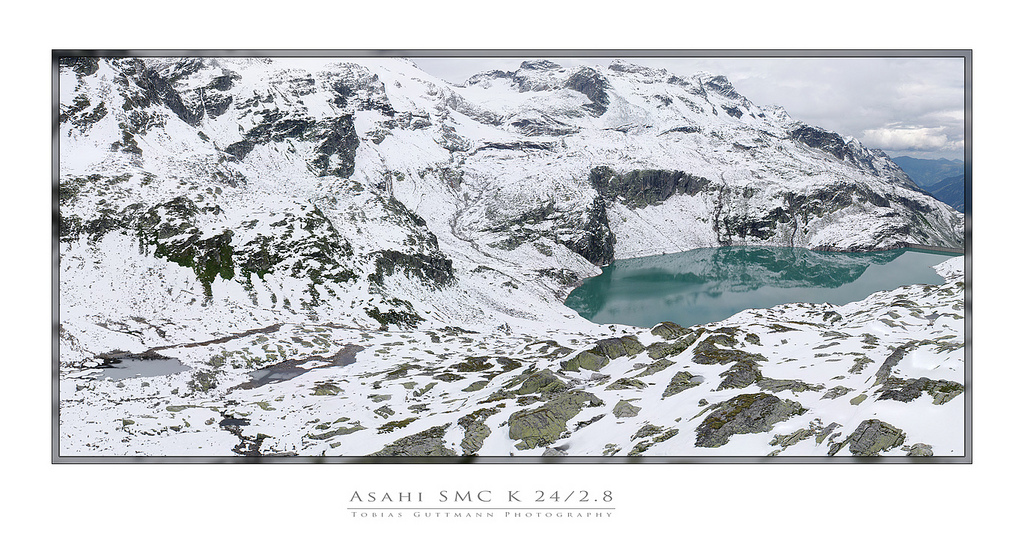
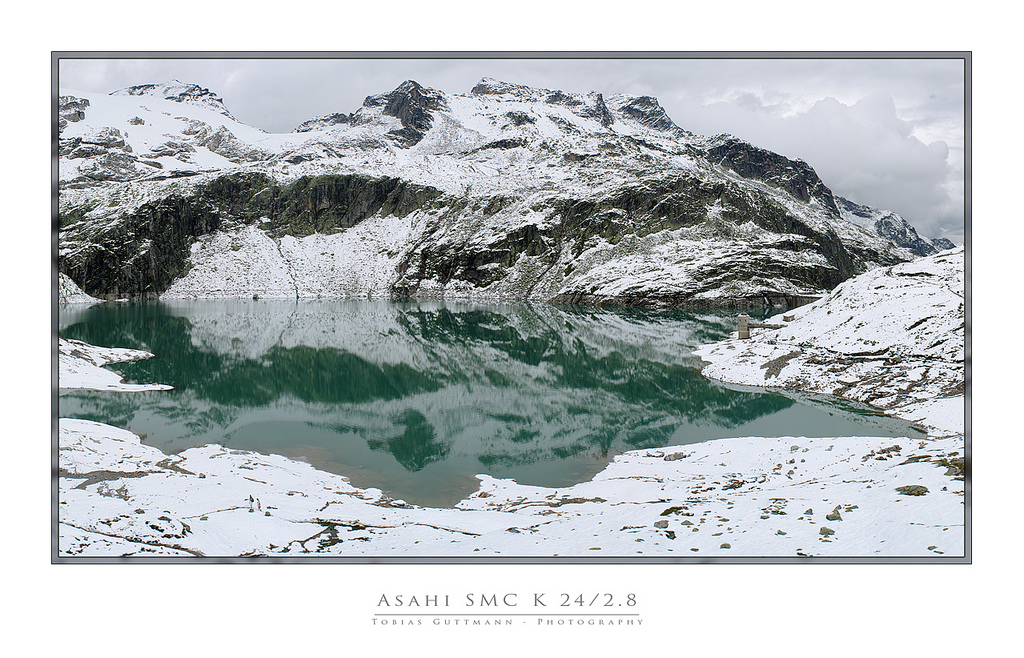
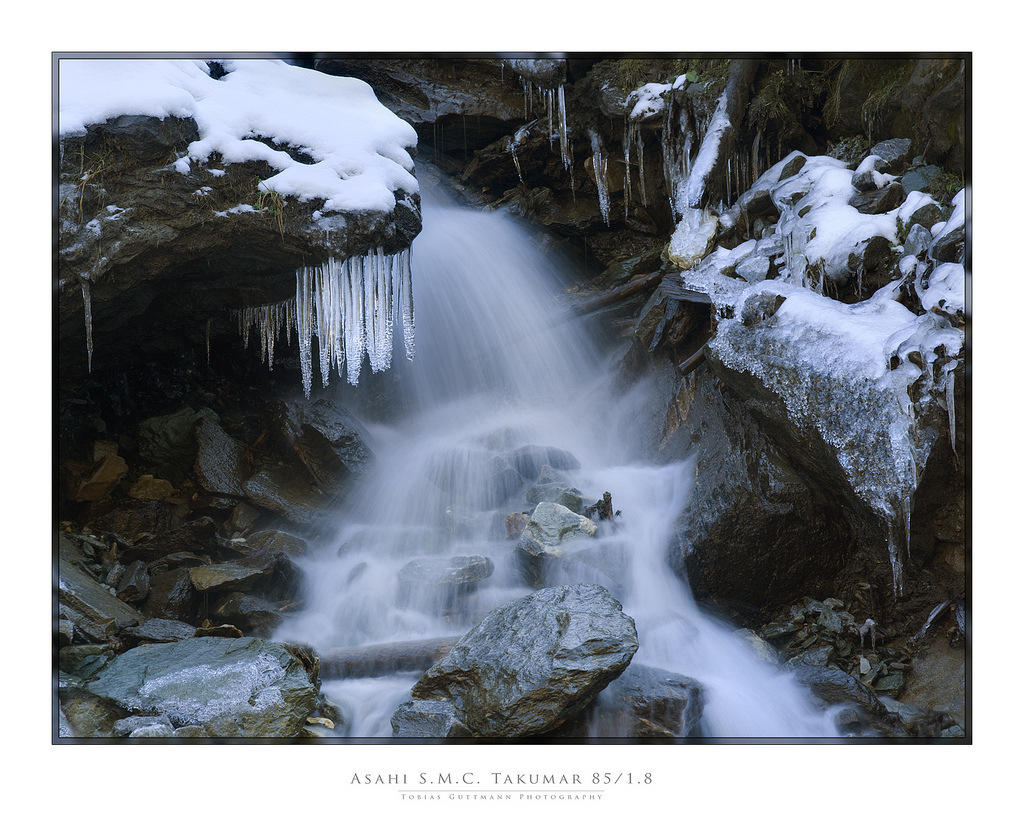
3) Moving Water and long Shutter Speeds (tripod use)
That's a simple topic.
All I can tell is that it works 100% - no special care needed,
just a tripod.
Due to the blur-effect in the water parts the sticher is not
confronted with wave-forms which could cause troubles:
here is an examples where the sticher did a perfect job:
"Stoissengraben" - near Saalfelden/Austria
___________________________
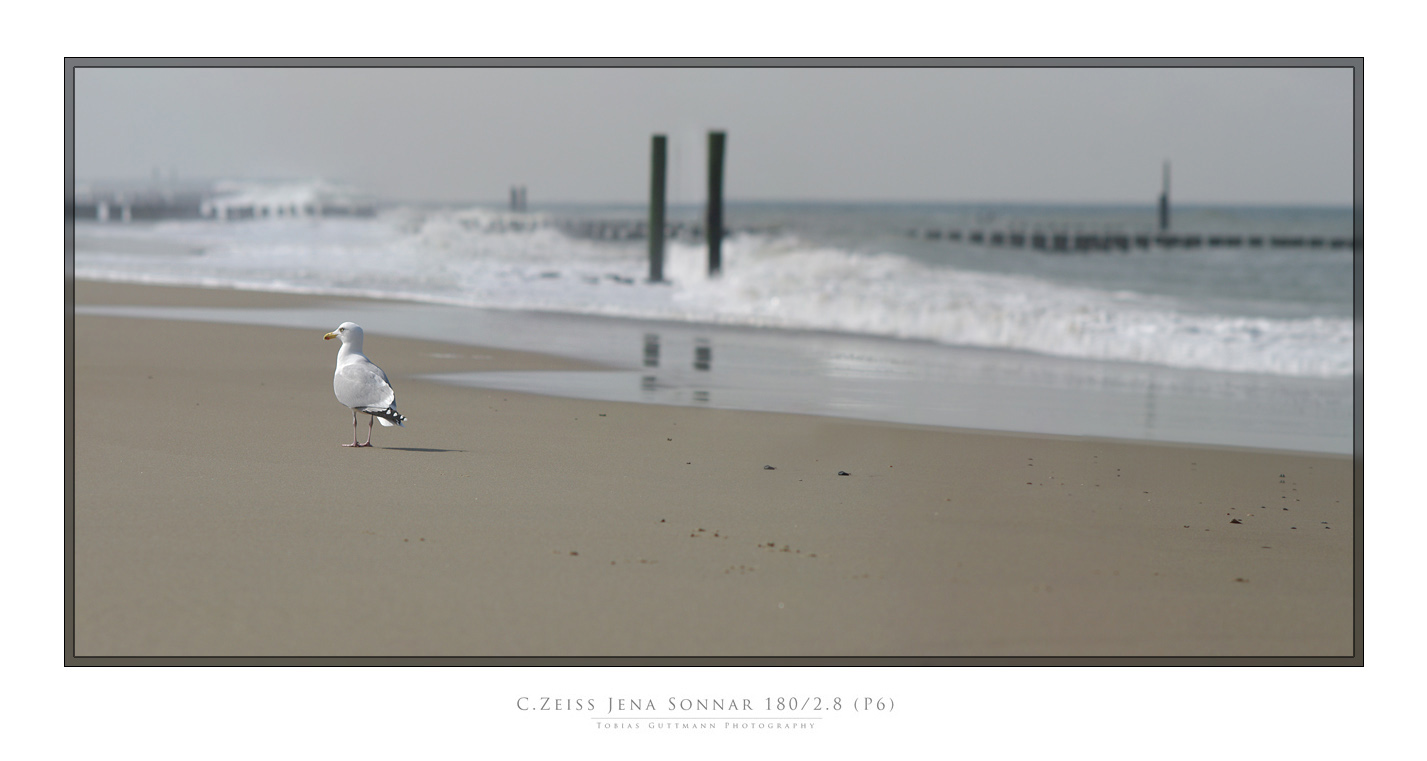
4) Moving Water and short Shutter Speeds
This is a totally different story, one of the
most difficult circumstances to come across with panorama stiching.
Example: you shoot at the seashore with lots of fast waves all around.
Waves change their appearance every millisecond.
How fast could you possibly be to shoot a panorama scene ?
The answer is obvious: you can't.
There is just one trick:
- you make the first shot, REMEMBER the exact place of the wave !!
- you move to the second frame
- you wait till there appears a wave which is uppermost
similar to the original wave
- you release the shutter just at the perfect moment,
when the wave is on same spot as the first shot.
etc. etc.
So you can cheat to the stiching program and let it believe
that it is the same wave where it's dealing with.
Here are some examples where the cheating worked out pretty well:
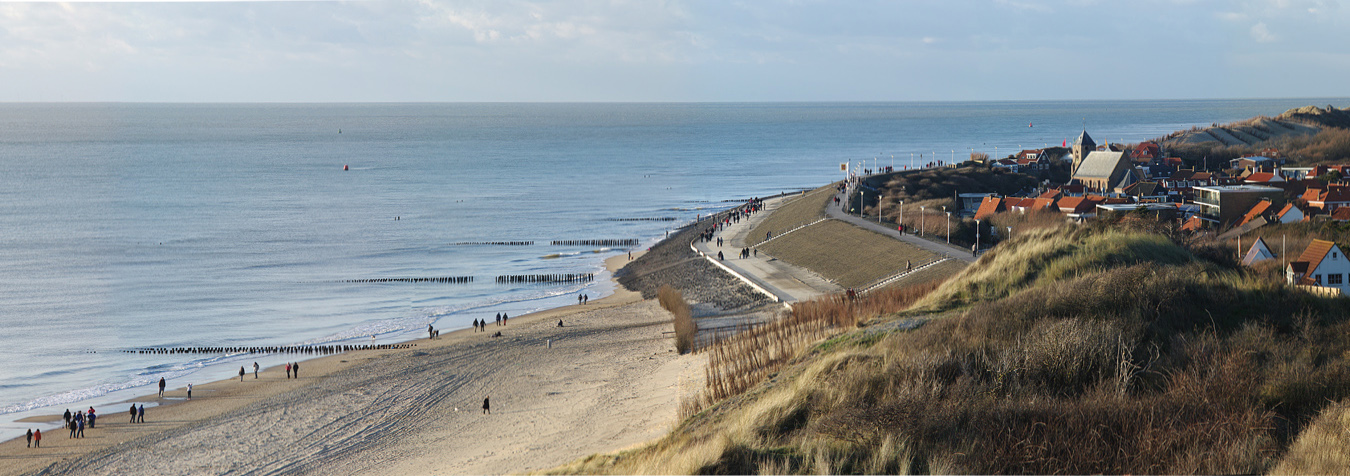
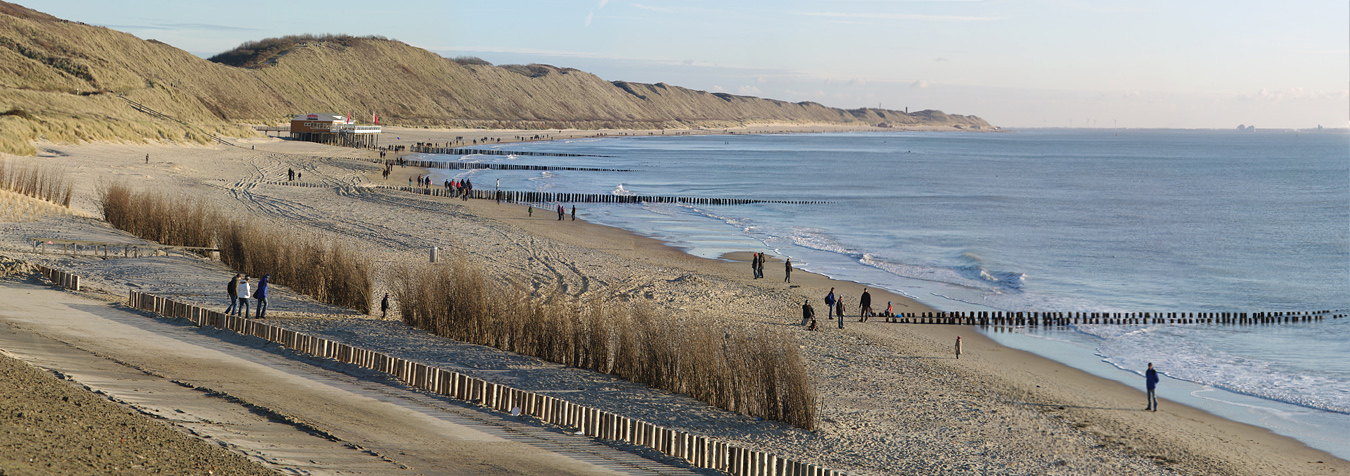
beach of Neeltje Jans, Netherlands
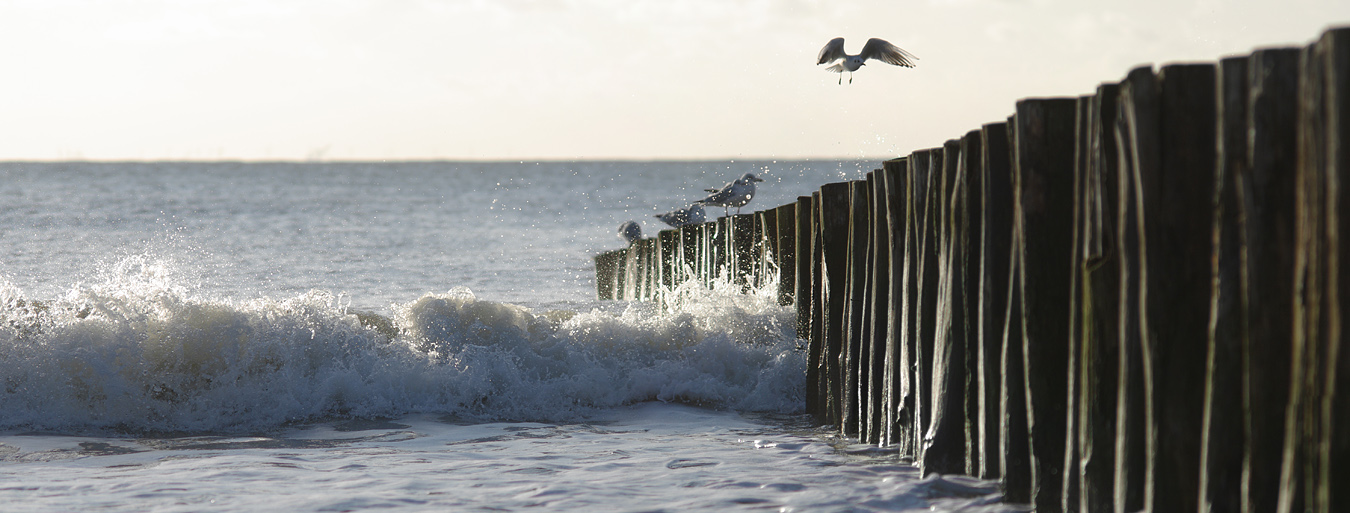
- another trick-shot with waves:
beach of Neeltje Jans, Netherlands
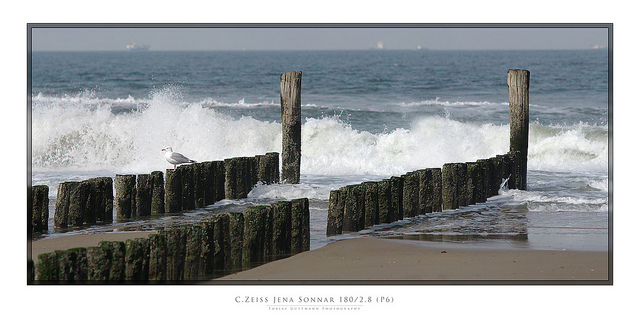
- and one with a long 180mm C.Zeiss lens:
more EXAMPLES from daily practice:
The further the waves are away, the easier it gets.
from some distance you'll be OK with just shooting the water parts
as fast as you can.
- Wide scenes with far away water movement are mostly "safe"
Just some minor stiching errors are visible with special attention:
Beach of Valkenisse, view on Westkapelle, zeeland, Netherland
same beach:

- Another tricky situation is, when moving objects are combined with
moving water, here is an example:
Jägersee, near the Tappenkarsee / Austria
- Predictable water movement is usual no problem for the stiching
engine
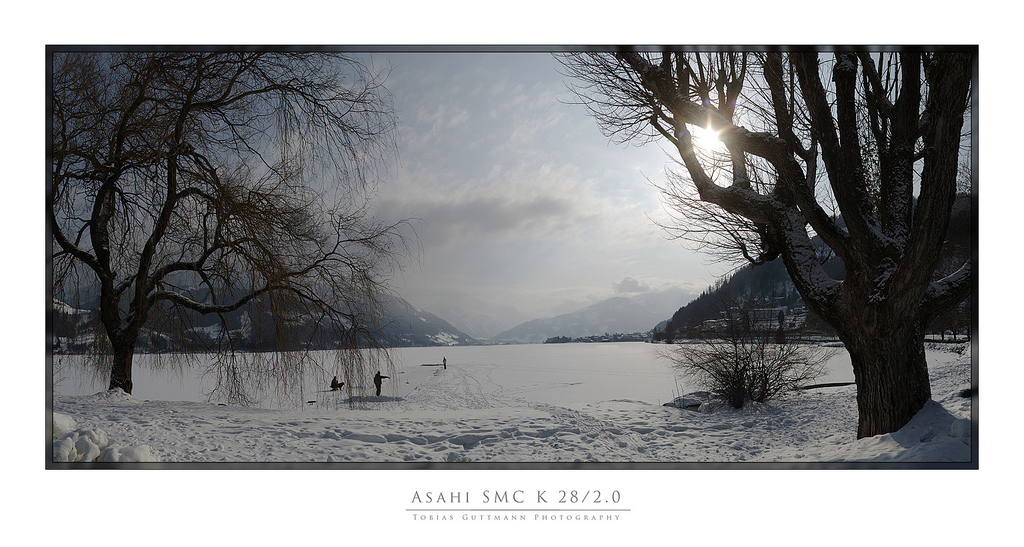
____________________
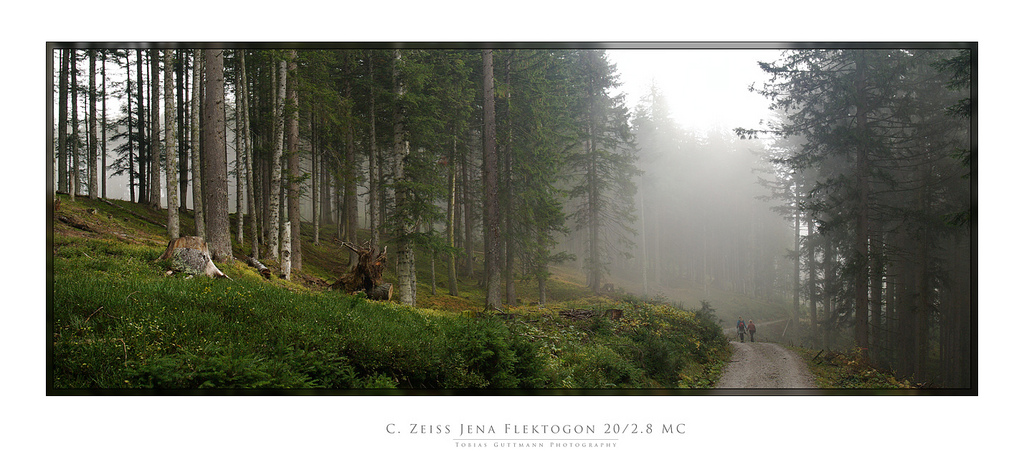
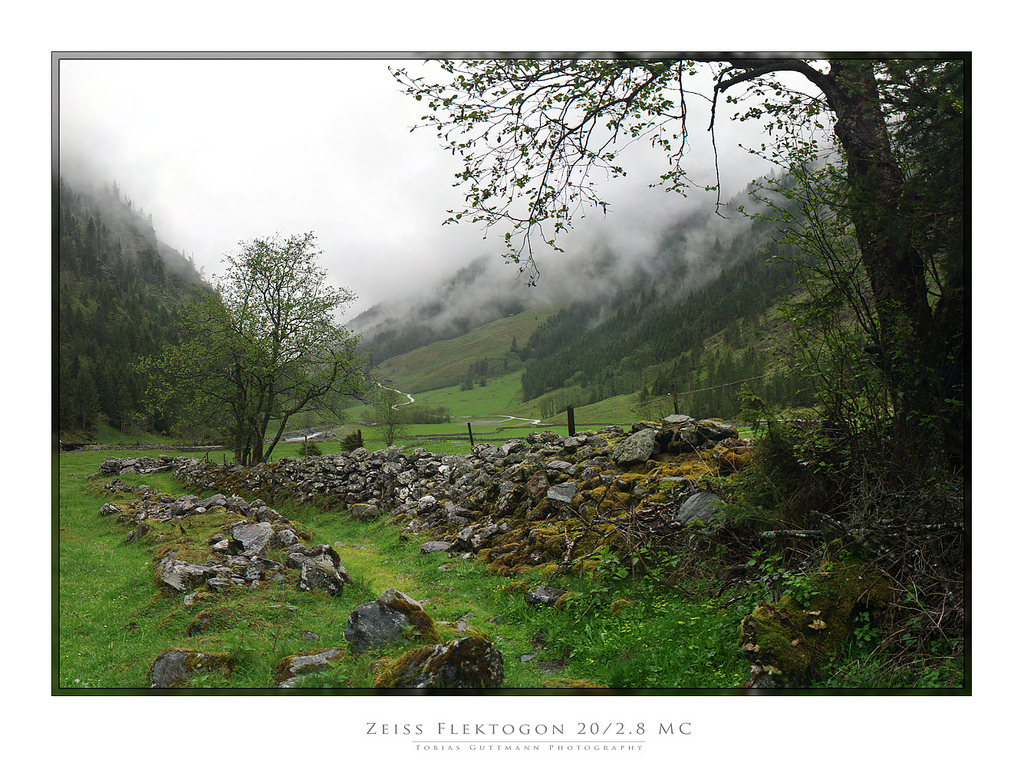
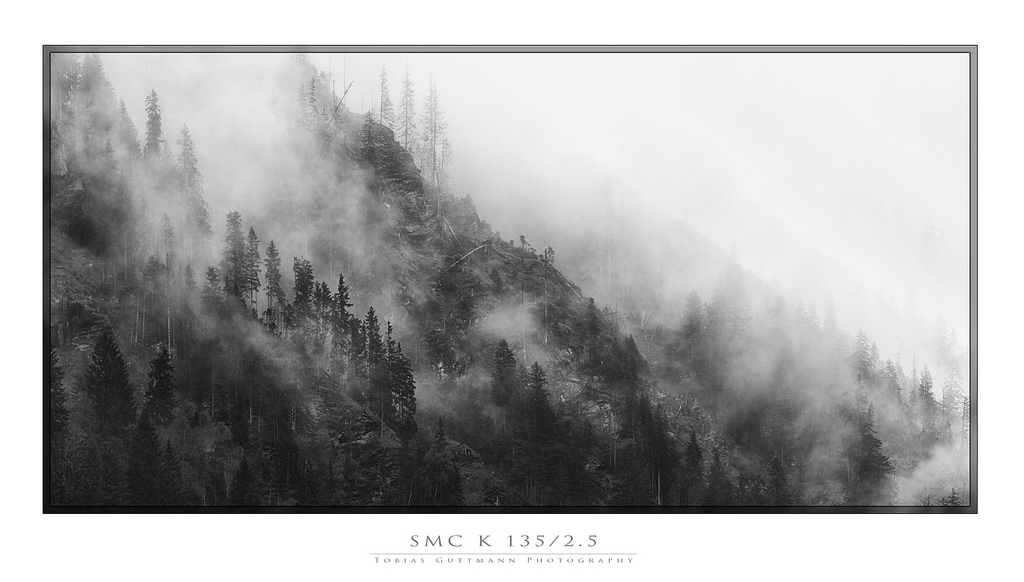
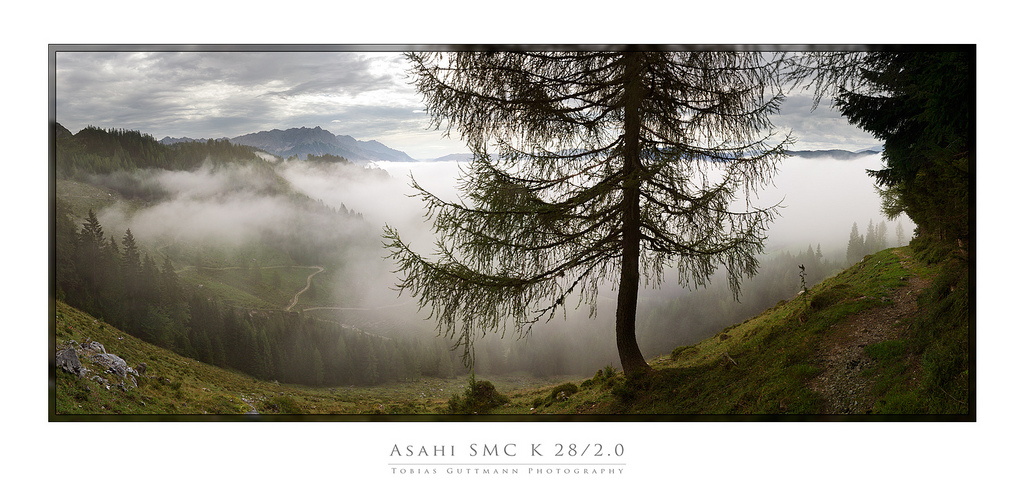
5) Fog
Mostly fog is moving fast, faster than clouds.
A scene with fog can look totally different one minute later.
It is obvious that this issue can cause troubles while taking
panorama shots. Troubles, because the stiching engine can't pick
control-points in the overlapping parts of the frames.
- In this situations take a very small shutter speed because
you have to shoot as fast as possible and camera shake (while moving to
the next frame) could destroy a frame and so the complete panorama.
- never take a tripod, it makes you acting too slow
- what exactly means "shooting fast" ?
if one practices a lot one can shoot 2 safe/steady frames per second
but getting towards ~750ms/frame is a good aim, when is it about shooting
fastly rising fog
- take the shortest lens that you carry with you
why? ... because you need less frames as you would need with a
longer lens, ... which means you will be effectively faster shooting
the complete scene
more EXAMPLES from daily practice:
- here is an example of "steady fog" - these situations are 100% "safe"
take as much time as you want for the shot:
Moosalm near Gries im Pinzgau, Austria
view on a protected mountain maple tree: "Naturdenkmal Bergahorn Moosalm"
this tree is several hundred years old and was protected and declared
as "nature monument" some years ago ...
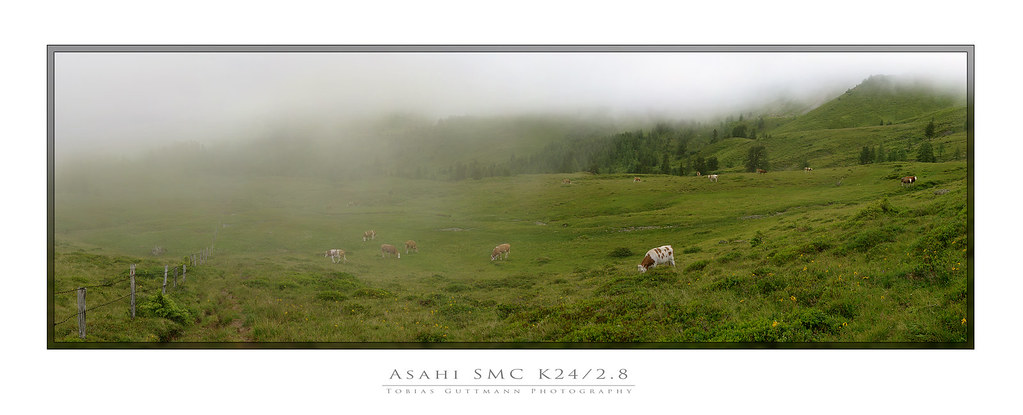
- rising fog: shoot fast
"Hintermoos" - Pinzgau, Austria
- fast rising fog: shoot the fog parts as fast as you can
Kronreith, Pinzgau, Austria
Filzmooshörndel, Pongau, Salzburger Land, Austria
- in the middle of fog
"Biberg", Saalfelden, Austria
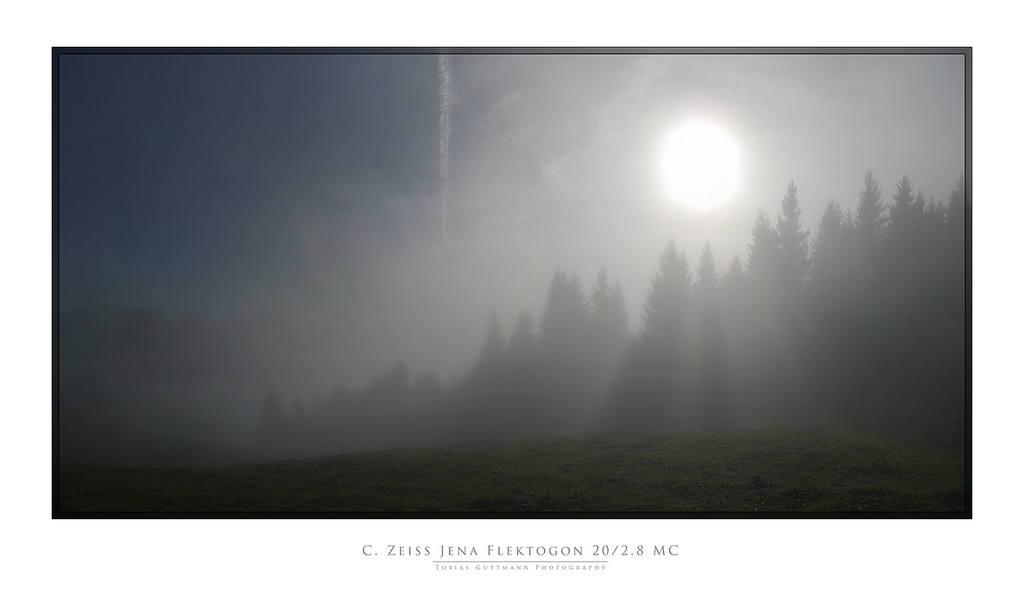
same situation as with fast rising fog: shoot as fast as possible, the
stunning scene could be gone in a minute
_____________________
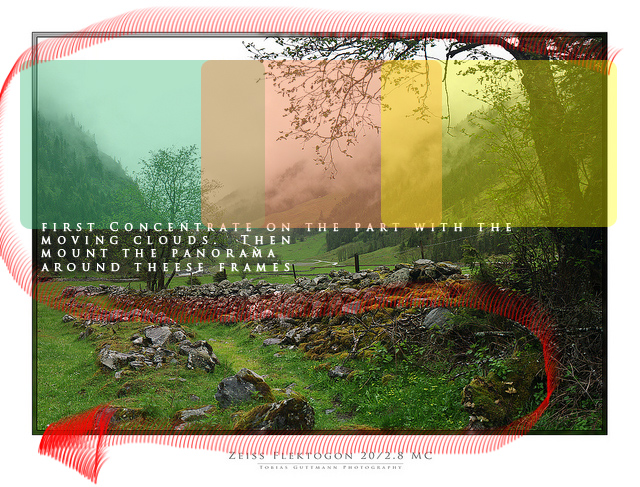
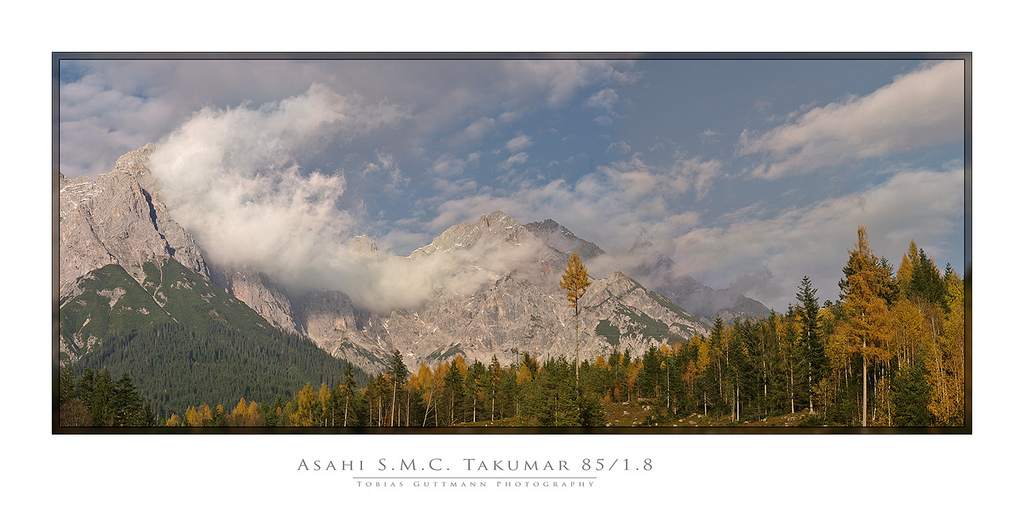
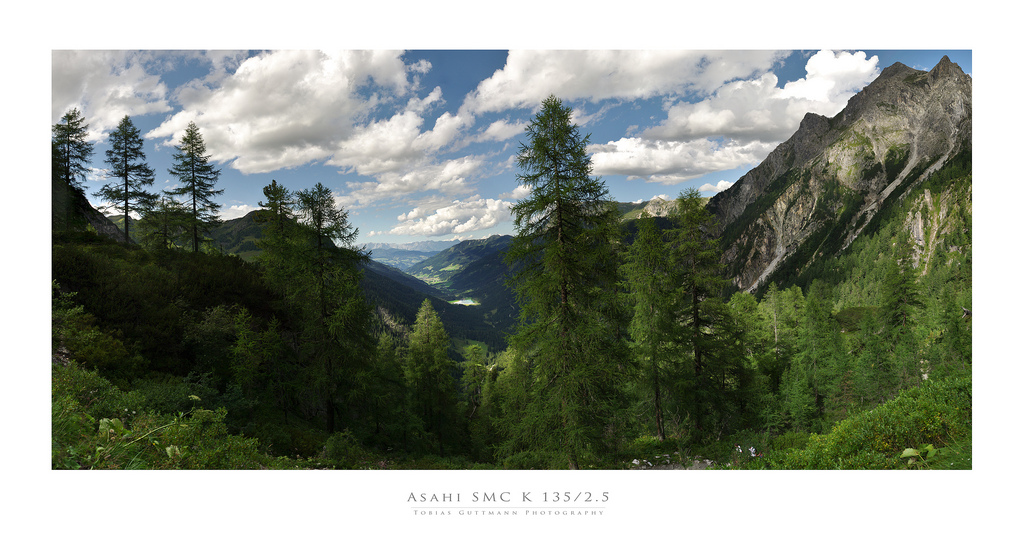
6) Moving Clouds
Clouds always move. Same as with fog, this situations causes troubles
when it is to detect the panorama with your stiching engine.
With daily practice there occur more safe and more "risky" situations.
It depends on the shape and on the velocity of the clouds movement and
on the distance between photographer and clouds.
What is safe?
- safe is when there's hardly any wind in the sky, though when clouds
are moving minimally and not changing their shape
- these "cheesy", postcard-type-shape clouds which are non-transparent
and high in the sky are always 100% safe
What is a "risky" situation?
- when clouds are low
- when clouds are transparent (cotton-wool-like thin clouds)
these appear often when there's heavy wind in the skys
- when clouds are moving fast and constantly changing shape
- rising clouds after rain, or early morning
If you detect a risky situation, how do you shoot?
- shoot fast (see above "fog")
- take a very short lens (see above "fog")
- avoid a tripod (see above "fog")
It is very important to take the frames in the right order:
If you take one horizontal row after each other, beginning each from
left to right, the (fast moving) cloud shape can become already a lot
different when you arrive to the next row.
So, take the frames in this way:
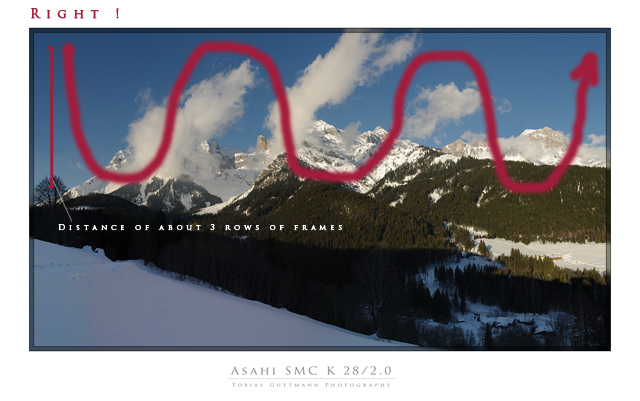
NOT this way:

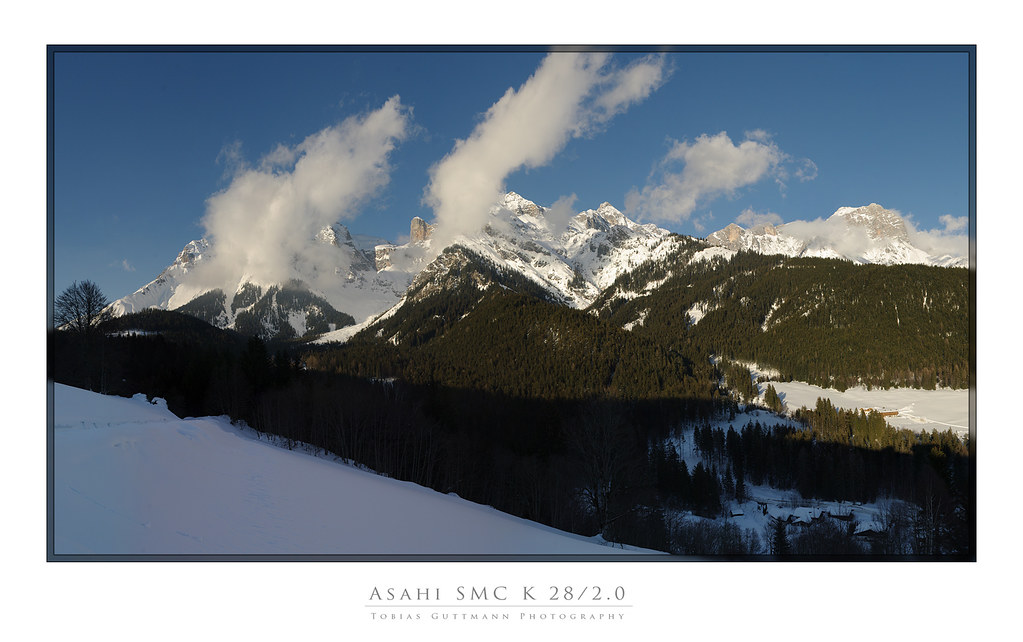
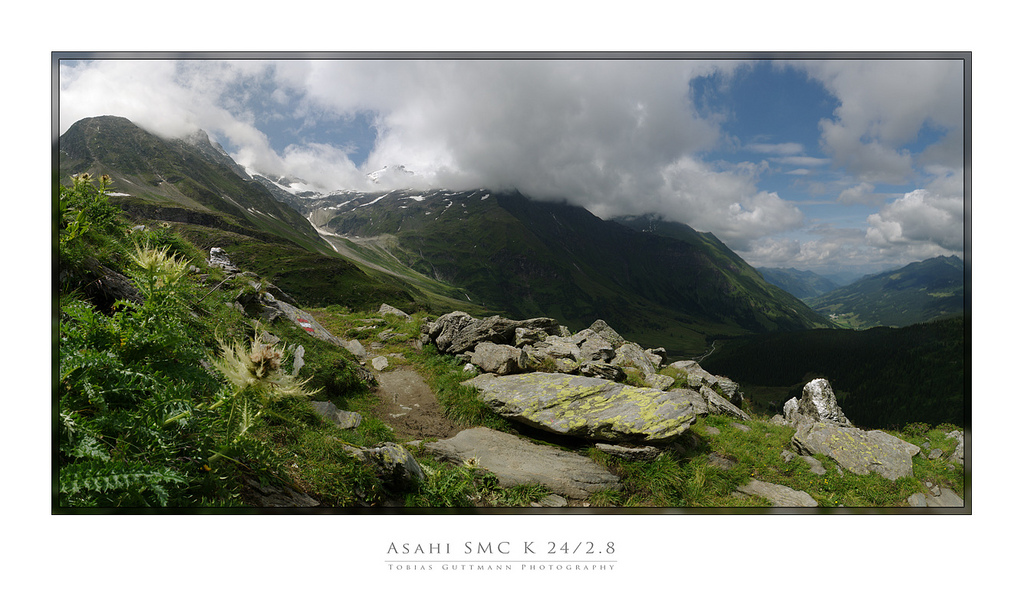
Breithorn, Steinernes Meer, Austria
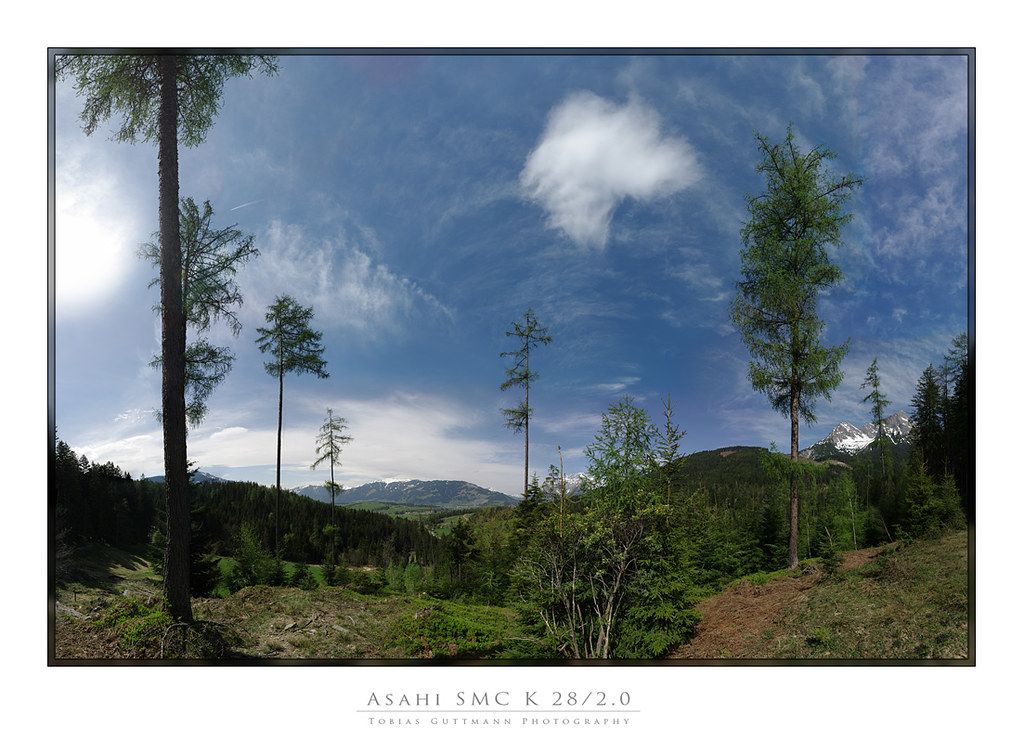
- slow moving clouds and small clouds area in your complete shot:
this situations are usually no problem for the sticher,
take some time for the shot if you want:
check the large version to check the IQ !
http://farm7.staticflickr.com/6127/5958557955_be89139745_o.jpg
- fast rising clouds just after rain situations:
be fast with shooting to avoid stiching problems!
Valley of Hollersbach, "Vorderes Hollersbachtal", "Hohe Tauern" Austria
same topic, just some minutes later but shot with a tele-lens:
- slow rising clouds: are quite "safe" take your time for the shot
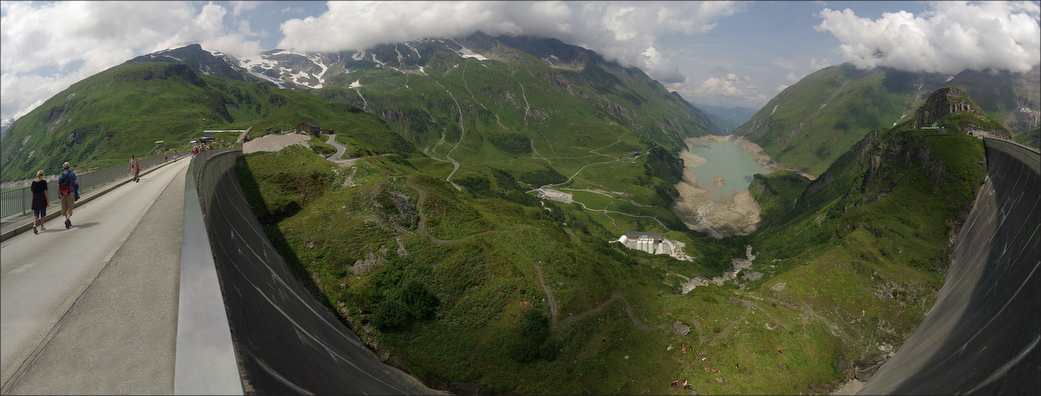
Lettenkaser, Leoganger Steinberge, Austria
- When shooting ultra-wide scenes it's best to photograph
the clouds-part of your scene first, afterwards you'll have plenty
of time for your upcoming dozens shots
Reservoir Dam "Mooserboden", National Park "Hohe Tauern" Austria
- Fast moving, far away clouds on windy days are tricky when you're
doing an ultra-wide shot and even more when the clouds area
occupies a big part in your panorama.
- example of constantly changing clouds caused by heavy wind
- fast moving clouds caused by change of weather situations:
"Breithorn", Steinernes Meer/Austria
- steady "cheesy"-type postcard-like clouds are "safe".
just take your time with the shot ...
view from the "Tappenkarsee" towards the Jägersee
______________________
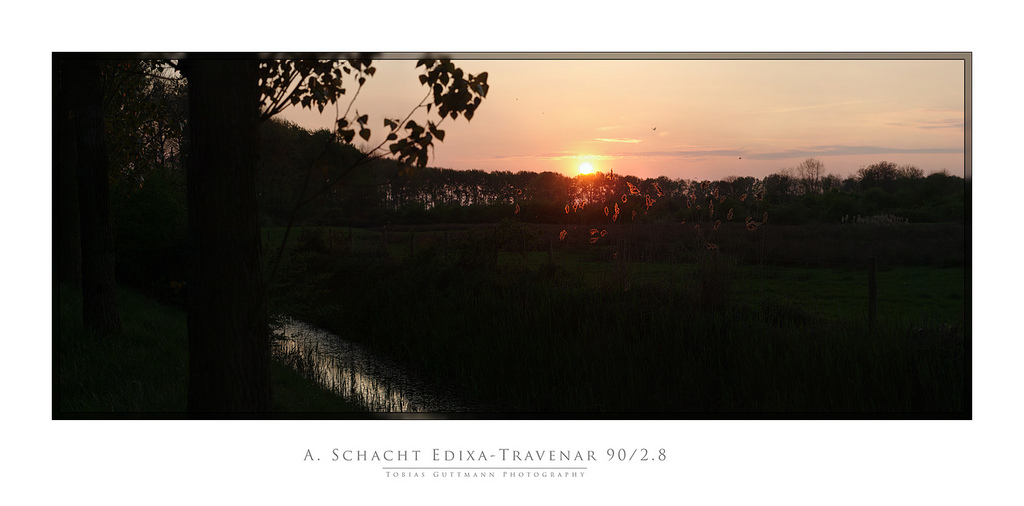
7) Fast changing Light Situations
There are several options for fast changing light
- A classic situation when it comes to panorama photography is,
when the sun is darkened up by a cloud while you're shooting.
Just imagine, your final rendering will be half in sunshine,
half dark. You will be very disappointed with the result.
How to preempt this: always check the sky if clouds are arriving
- another classic is a sunset
Just these minutes when the sun dives down the horizon
causes lots of light changes, concerning strength of the light and
color temperature
In this situations you have to shoot as fast as possible
(how? ...see Chapter "fog") to get a "natural looking" result
My Edixa Schacht Travenar 90mm/2.8 did wonderful to reproduce the
colors in this sunset-situation:
"Bos op de Dijk" - Zeeland, Netherlands
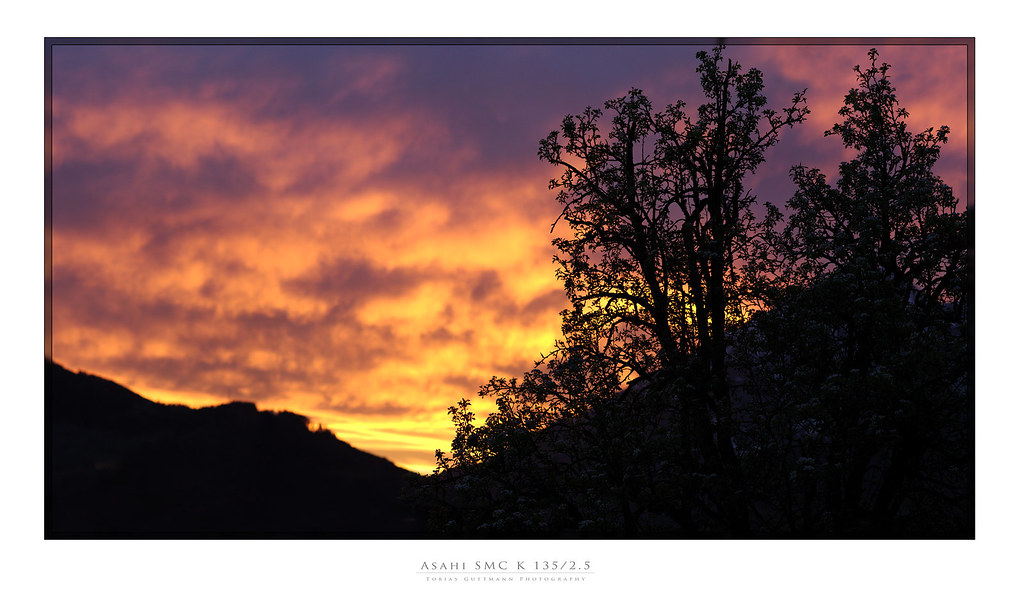
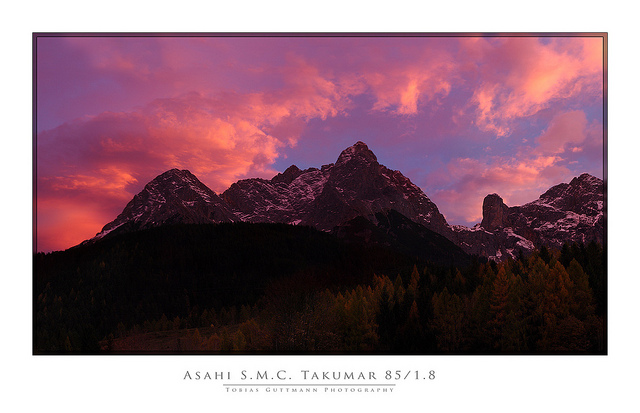
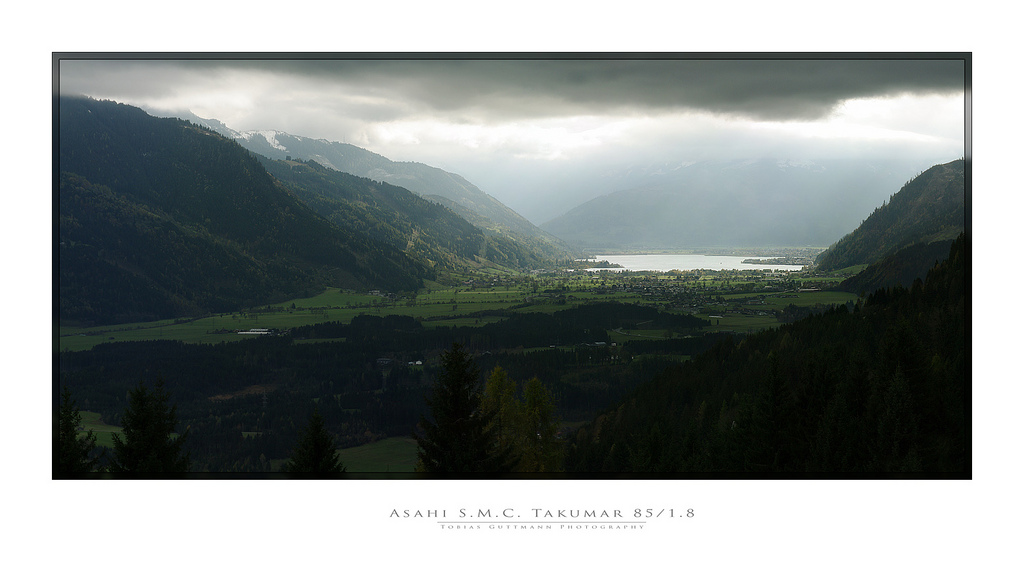
- even more difficult are the minutes when the sun is already down
but the clouds are still illuminated. These are the moments where
the sky gets "on fire". Color temperature changes every second.
In one minute the whole effect can be over.
So, be even faster as shooting sunsets
Also concentrate on the parts first, where most prominent color(-change)
appears.
tele lens example:
Leoganger Steinberge, Salzburger Land, Austria
wide lens example:
Zellersee near Zell am See, Austria
the sun was just down and color temperature was changing constantly:
I was forces to shot as fast as possible with the widest lens which I
had with me...
medium-tele lens example:
Steinernes Meer, Salzburger Land, Austria
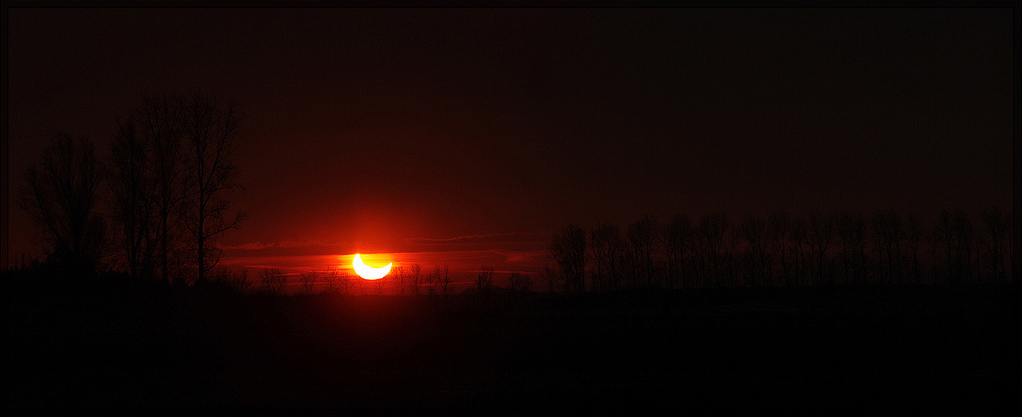
- Partial Eclipse of the sun
another example for a fast changing light situation.
Shoot your pano as fast as you possibly ever can, because you don't get
many more chances in you lifetime B---)
Partial Sun Eclipse, near Antwerpen, Belgium
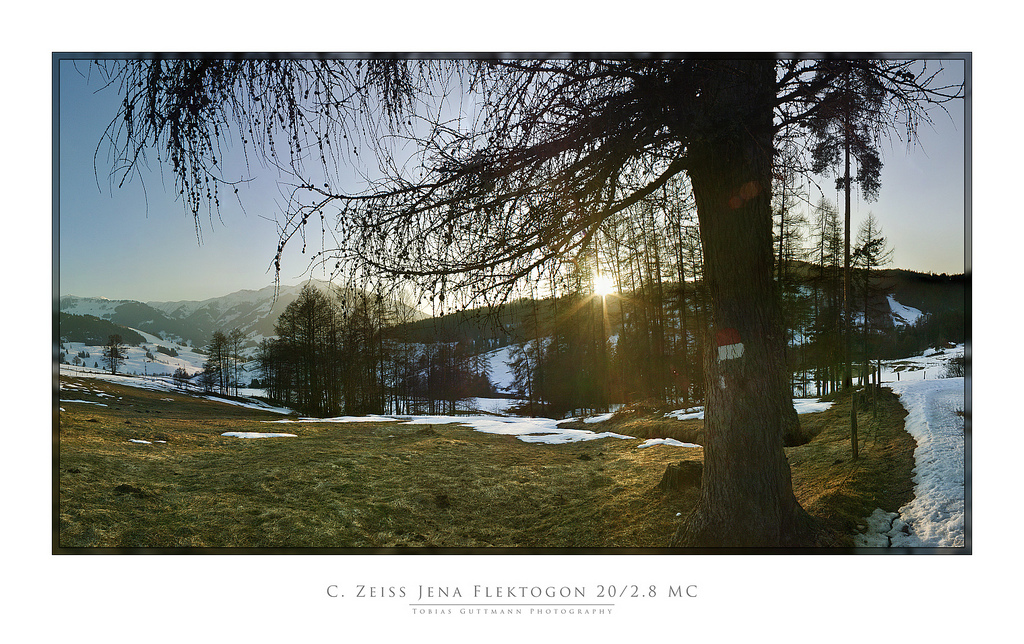
- "breaking sunlight"
shooting towards the sun while it hides partially behind an object
can cause fast changing light situations:
be careful, shoot fast and watch your lens-flare.
Already one frame with medium-strong lens-flare can destroy the Panorama
another example concerning the same issue
"Maria Alm", Pinzgau, Austria
- fast changing light situation due to sun breaking through clouds
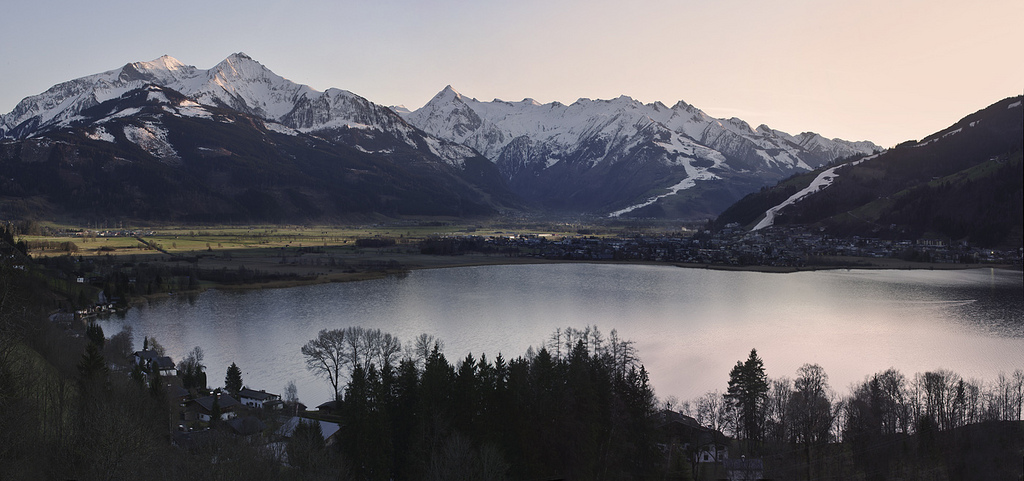
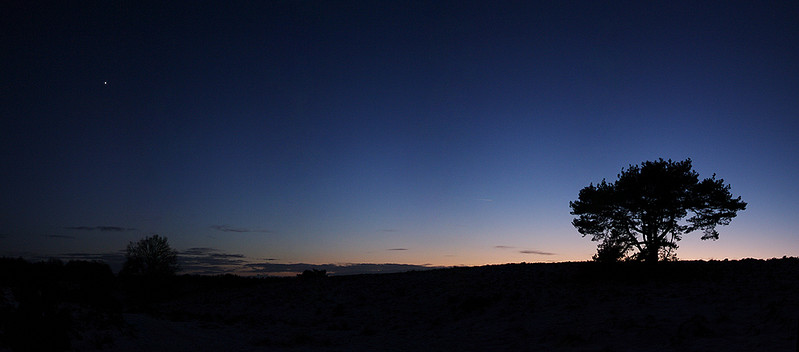
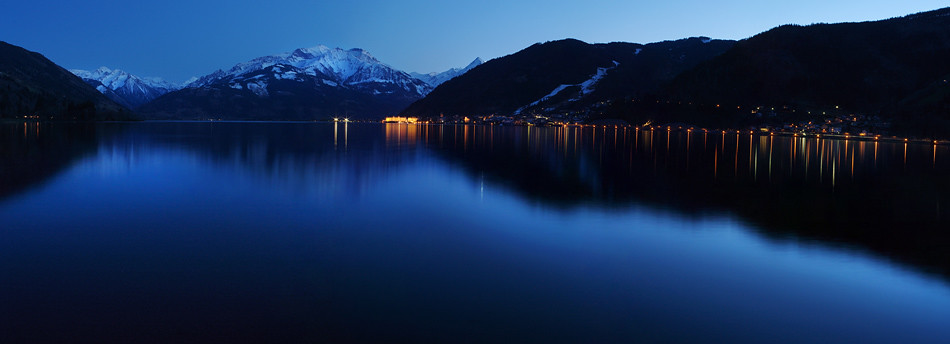
- "blue hour"
during the "blue hour" light strength and color temperature changes
relatively medium fast to slow. What I mean is, that
once it is all blue, it stays all blue for some while.
Not too much of a care is needed to gain good results while blue-hour
situation.
Care has to be token, when developing your RAW frames.
Auto-White balance is mostly way off when shooting in blue hour.
tripod use is not a must while blue hour, a high ISO value does the job.
without tripod
Nationalpark "De Veeluwen", Netherlands
with tripod
Zell am See and the Zellersee, Austria
__________________
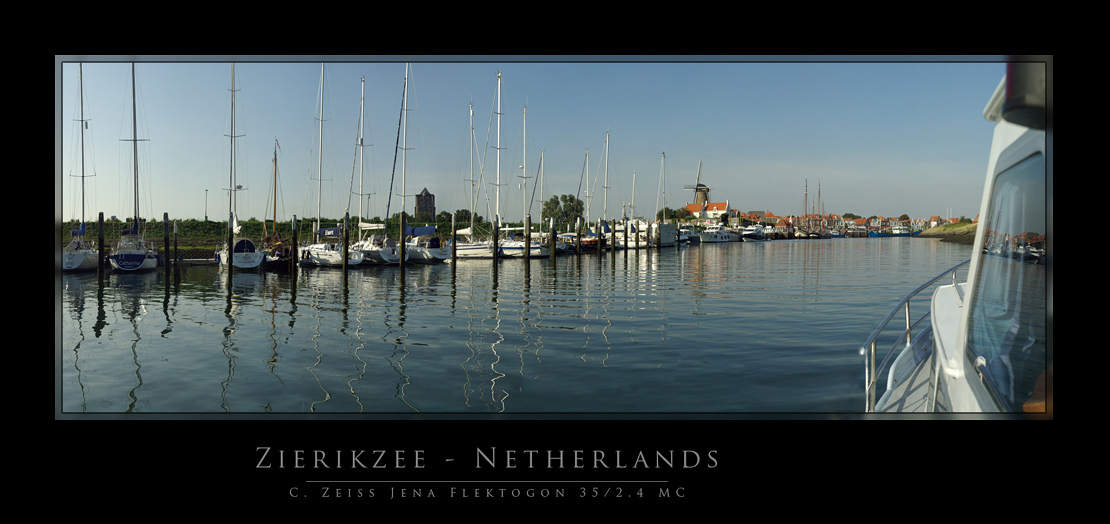
8 ) Shooting Panoramas from moving Vehicles
This situations are the trickiest and also come within a rule of
shooting as fast as possible.
- what exactly means "shooting fast as possible" ?
if one practices a lot one can shoot 2 safe/steady frames per second,
~500ms/frame though
This panoramas were taken while driving with a ski lift.
A short lens is a must in this circumstances:
Weißsee, National Park "Hohe Tauern"
An exaggeration would be:
Shooting panoramas from a moving vehicle including moving objects
(e.g. water, reflections) within the scene --> for FREAKS only
here's an example which was shot from a driving/shaking motor boat:
Zierikzee, Netherlands
_____________________________
_____________________________
CHAPTER II
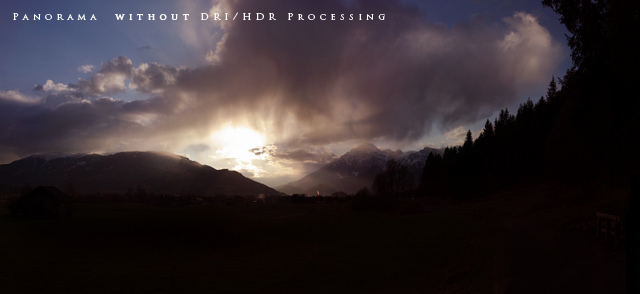
How to enlarge Dynamik Range with Panoramas ?
(be aware: I am NOT specialized in this HDR topic, because
I consider it to be not my "style". I speak
just from several experiences; please correct me if I am wrong)
1) Using DRI/HDR (for large/medium/small panoramas)
Common techniques like HDR and DRI can be used along panorama
stiching, although having in mind that it will cost plenty of time.
With HDR/DRI a tripod is a must, which is already a limitation
for daily use.
What it possible what not ?
Yes, possible:
succession:
- each frame of the panorama is shot with multiple shutter speeds
as you're used to with your DRI/HRD workflow
- then the multiple shutter-outcomes of each frame have to be
rendered to the final single DRI/HDR frame
- be aware: for each frame use 100% same program settings concerning
tone mapping etc.
- the output files are the frames of your panorama
- lode this HDR/DRI processed files in your stiching program
and render the panorama as usual, DONE.
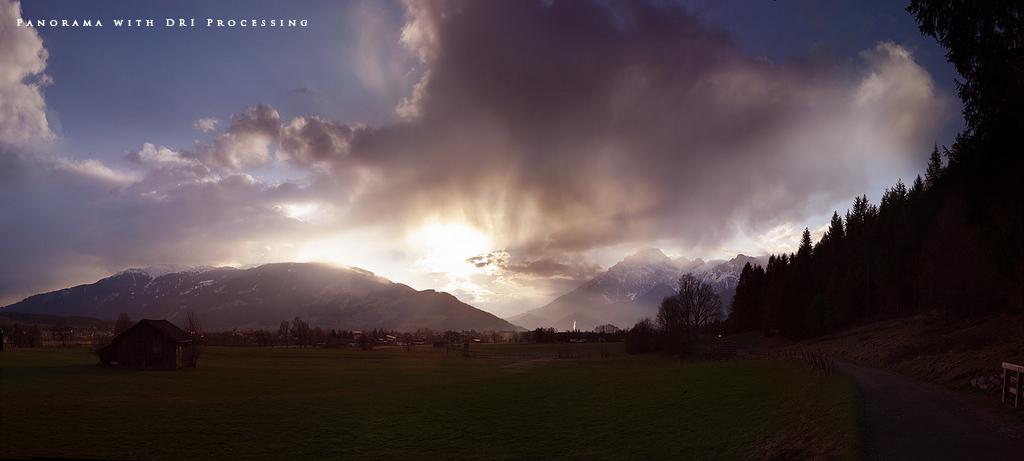
Two examples of exactly this use:
large scale DRI panorama
I rendered the shot twice:
Nr1 without, Nr2 With the DRI processing to check the difference
Saalfelden am Steinernen Meer, view towards the "Leoganger
Steinberge"
With DRI processing:
medium scale,light DRI stich
near Rauris, Nationalpark "Hohe Tauern", Austria
Leoganger Steinberge, Naturdenkmal "Birnbachloch"
What is NOT possible:
- HDR/DRI processing of several (rendered) full panoramas
(from same scene and used tripod) made with different shutter-speeds
Why ? Due to the the light differences caused by the various
shutter speeds the stiching program renders each panorama slightly
in another way concerning the different appearance of the control
points.
The panoramas would have to be aligned first, before DRI/HDR processing.
This causes often huge problems, especially with large panoramas.
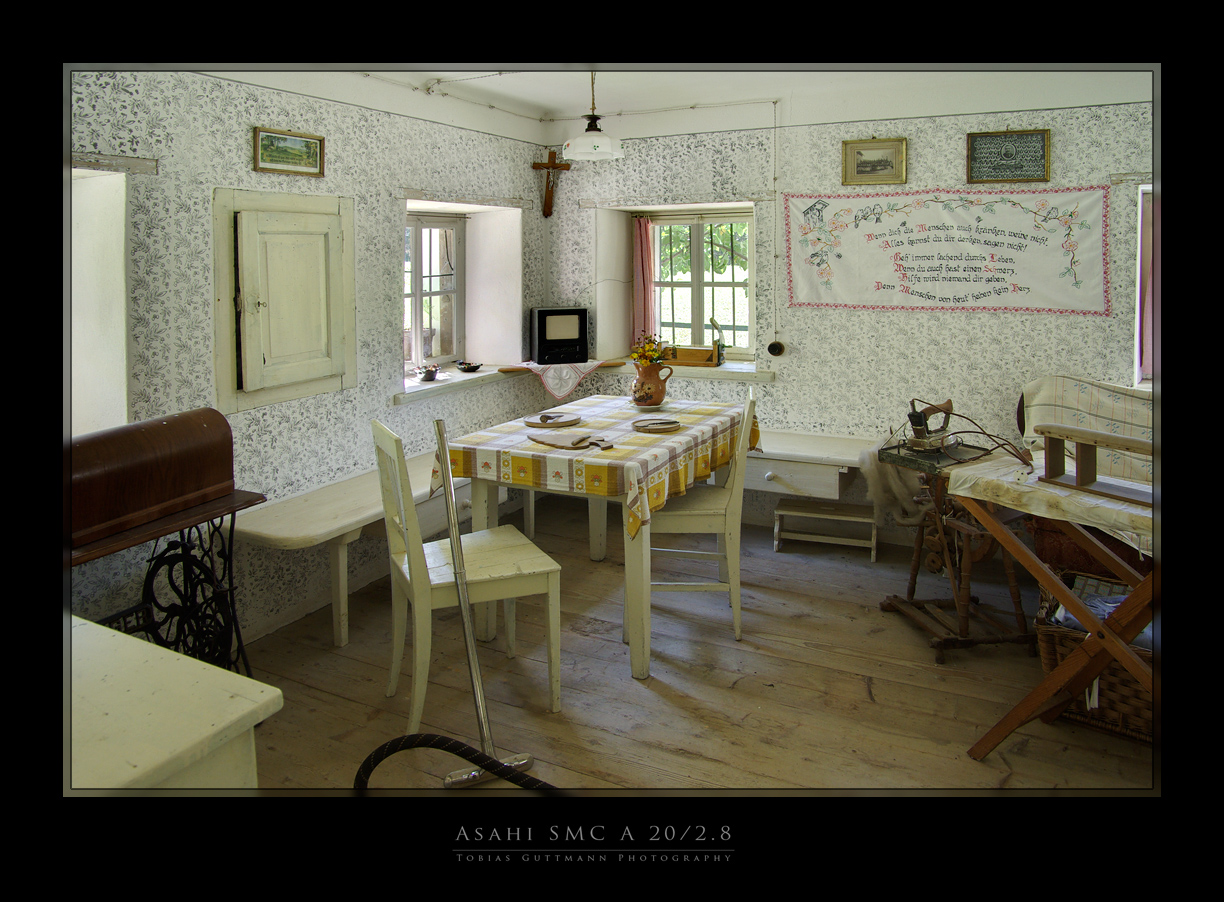
using stiching for situations when your lens isn't just wide enough
works well combined with HDR/DRI
following small scene is rendered from 4 panorama frames:
each of the frames was DRI/HDR processed from 4 various shutter shots
and later stiched together.
"Freilichtmuseum Großgmain", near Salzburg, Austria
small scale DRI stich
_______________________
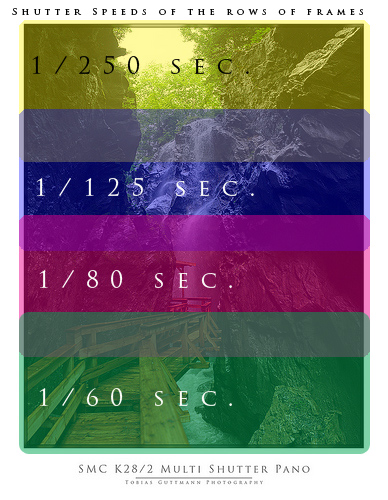
2) Shooting "Multi-Shutter-Panoramas"
Another way of gaining extended Dynamic Range is rendering (I call
it myself, (I haven't done research if other people do; as often my
guess is: yes ) "Multi-Shutter-Panoramas".
A tripod is NOT needed, which is perfect for daily use.
It works best if you have a gradient from light to dark color tones
in your scene.
It provides a similar effect as using a ND Grad Filter system.
How?
- the panorama has to have several rows of frames
4 rows are good to start with
- each row has different shutter speed (choose the
shutter speed so that one complete row will have perfect exposure)
- your stiching program renders the panorama together and blends
the different rows perfectly
- ! disable "auto color/level" correction in the preferences/rendering
menu of your software product
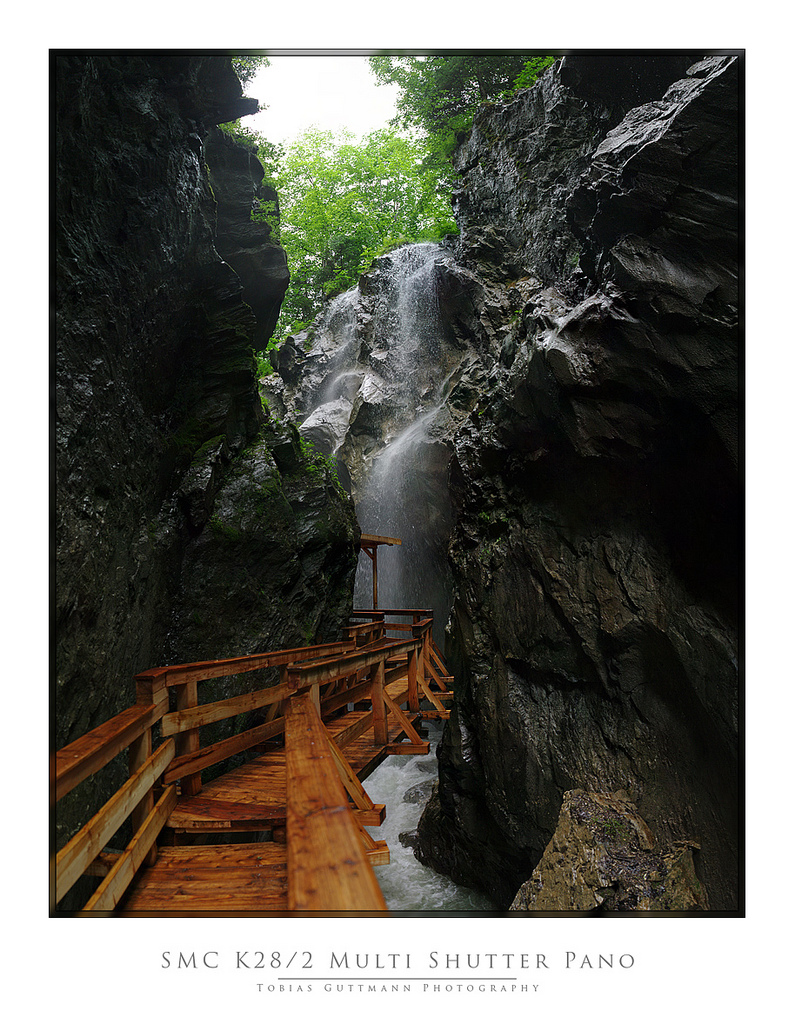
here's an self-explaining example of classic Multi-Shutter-Pano use:
"Seisenbergklamm", Pinzgau, Salzburger Land, AUSTRIA
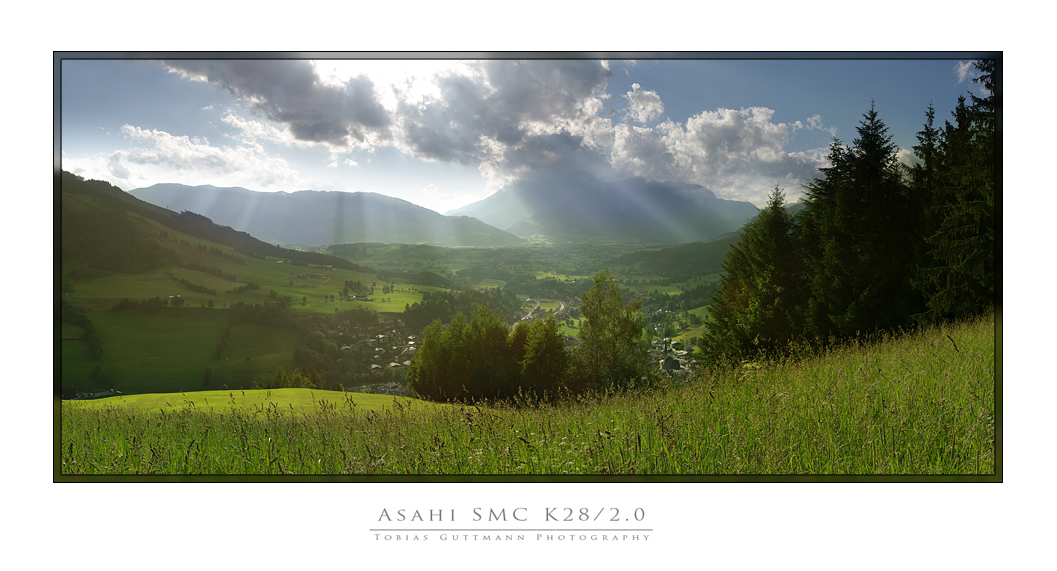
another classic example where a ND-grad filter would do just a
similar job for following situation:
one wants the sky AND foreground in perfect exposure:
Multi-Shutter-Pano from 3 rows
Maria Alm, Pinzgau, Austria
__________________________________
__________________________________
CHAPTER III
Special Techniques
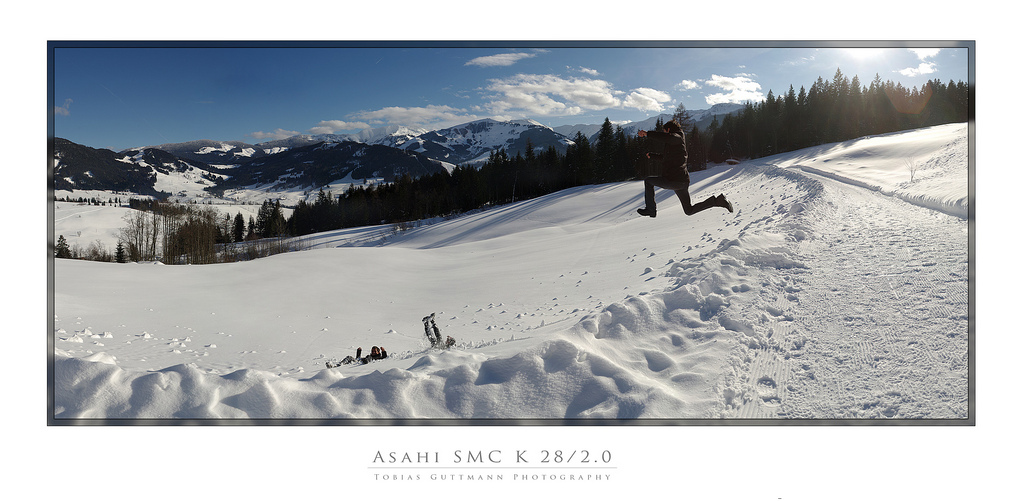
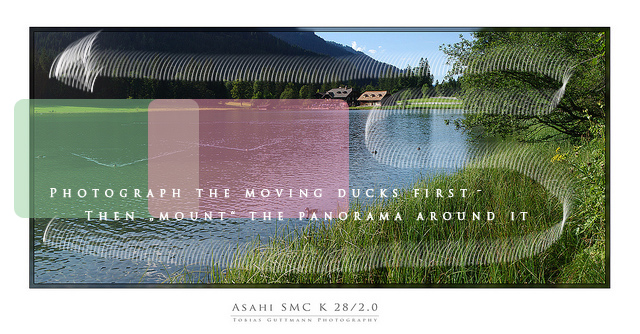
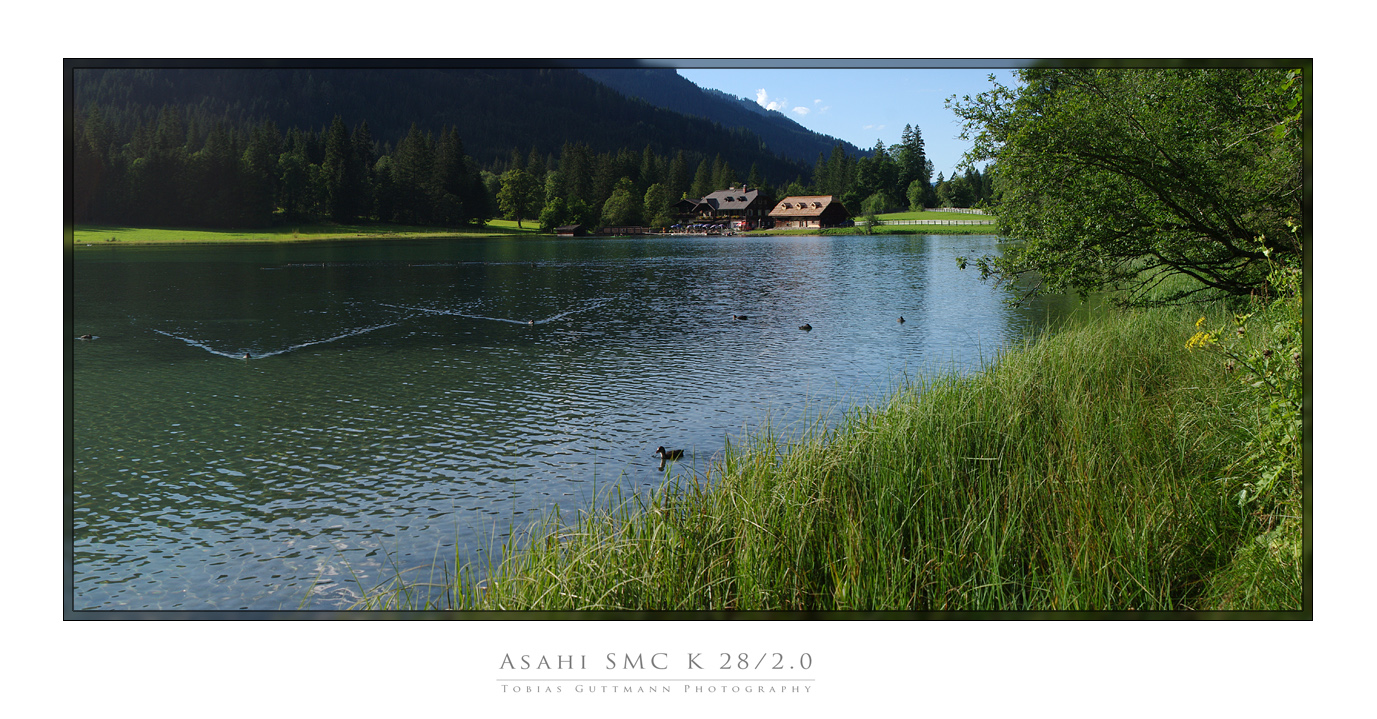
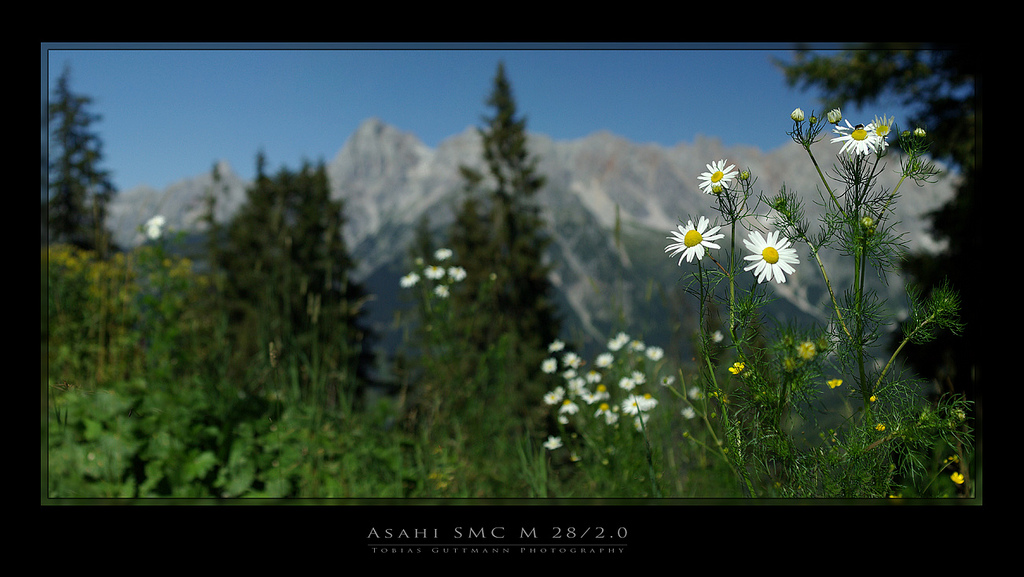
1) "Bokeh Stiching"
The main idea about this technique is:
- take a portrait lens with wide aperture
best on FF would be ~ 85mm/1.4 lens
on APS-C a 58mm will do
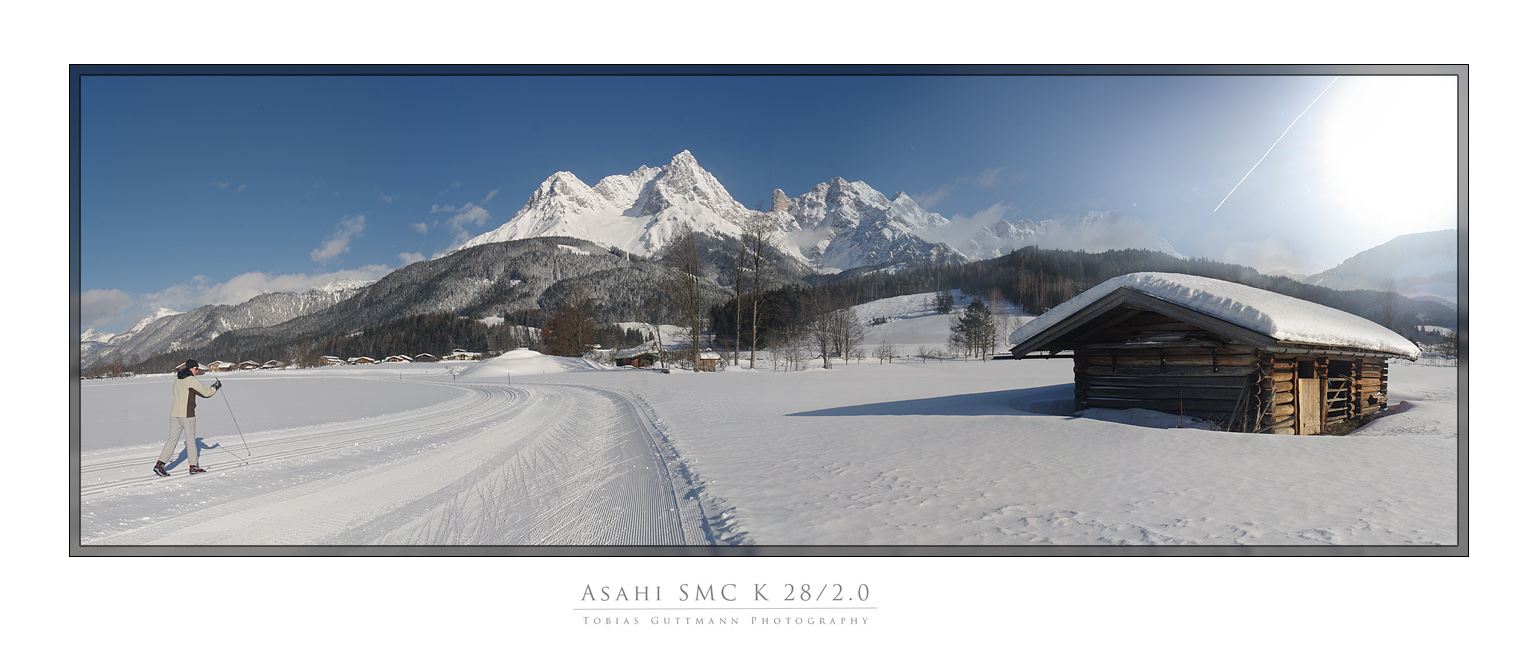
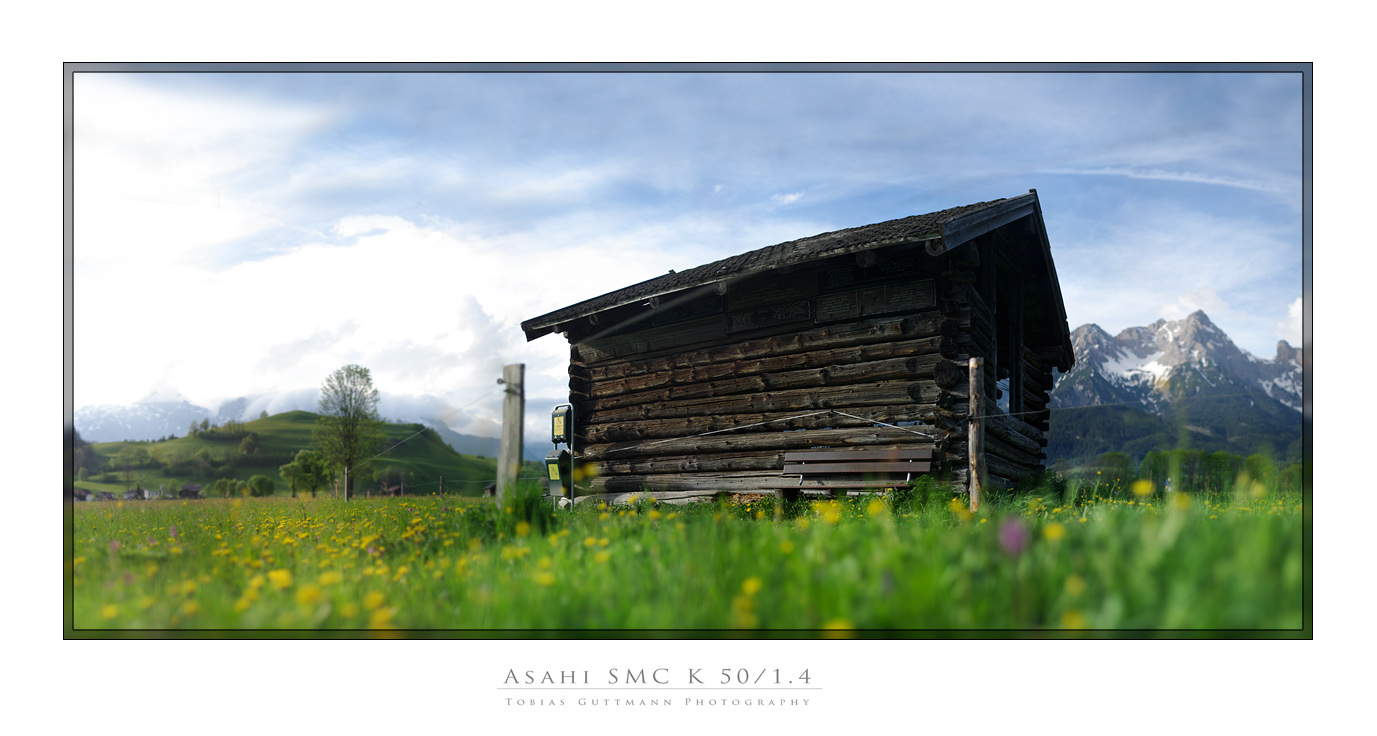
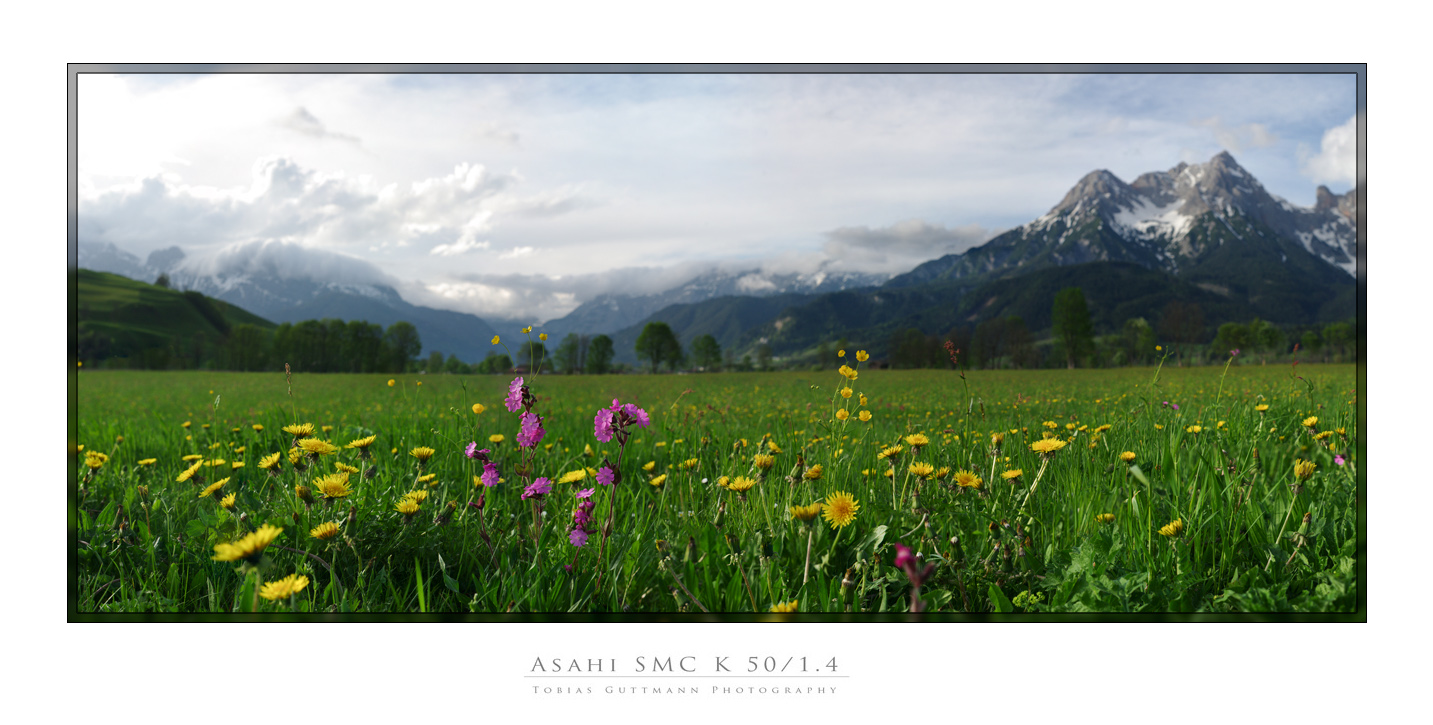
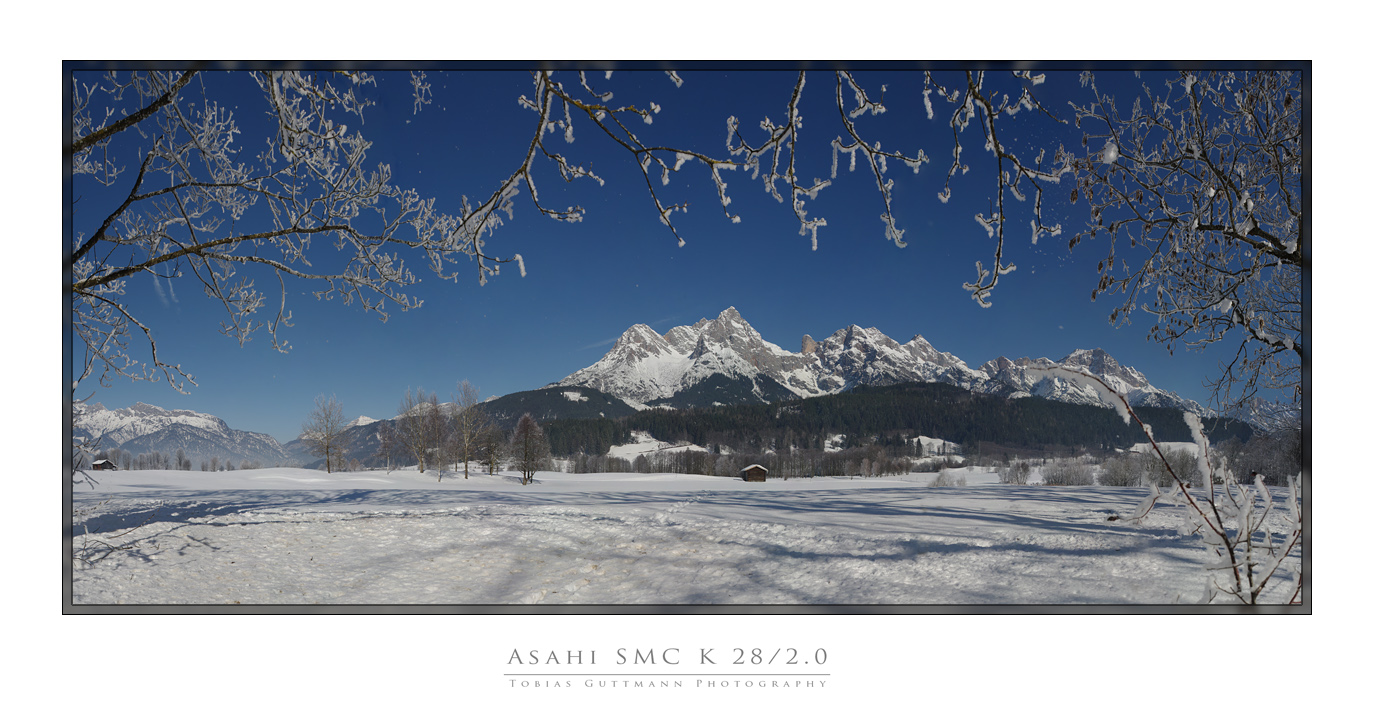
I take a slightly wider lens: SMC K 50/1.4
- set it to wide open aperture; assuming the lens is very sharp
wide open
- shoot a scene with preferable close subject
- take as many panorama frames as you want, preferable 60-150 to get
stunning effects
- tripod not essentially needed
The outcome will be an wide-angle shot with large Out-of-Focus
(Bokeh) areas which effect would not be able to achieve with "normal"
wide angle lenses.
Middelburg, Zeeland, Netherlands
~50 50mm frames
Apple Tree, stiched from 90 single shots

Middelburg, Zeeland, Netherlands
- This "Bokeh Stiching" technique can be also combined with panorama
photography in the classic means of it's genre
(especially concerning the panorama format):
Bsuch, Salfelden, Austria
Bsuch, Salfelden, Austria
Habour, Zellersee, Austria
Gerling, Pinzgau, Austria
- a short lens can be used for bokeh panoramas too, assuming it
can provide very-wide apertures as f2
Nationalpark "Hochkönig", Austria
sorry wrong lens description:
it's SMC "K" 28mm/2.0, which is Asahi's exact clone of
Carl Zeiss' famous "Hollywood" Distagon 28/2 lens design:
_____________________
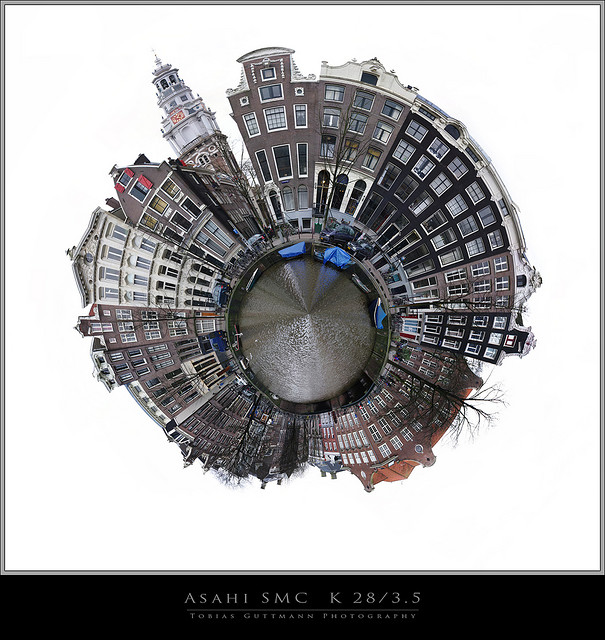
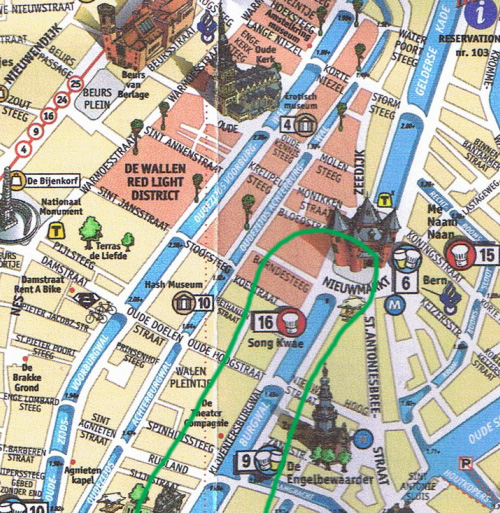
2) Mini-Planets
Stiched panoramas are very useful for rendering "Mini Planets".
- just be aware you have a constant blue or gray sky
- left and right of the pano should somehow coherate too in terms of
color, structure, topic etc ... as well as the bottom of the panorama.
... in this case it's a water-planet
It's quite funny to do once upon a time ...
Amsterdam "Red Light District": Kloveniersburghwal
______________________
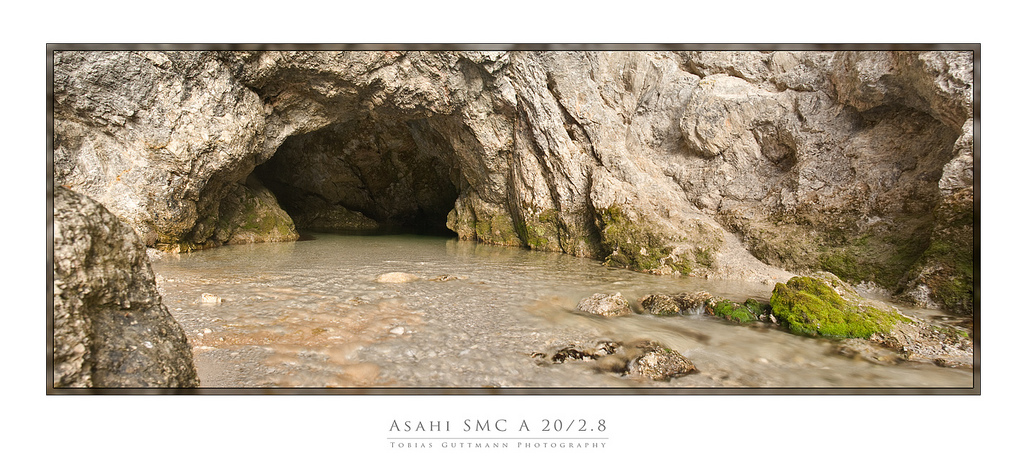
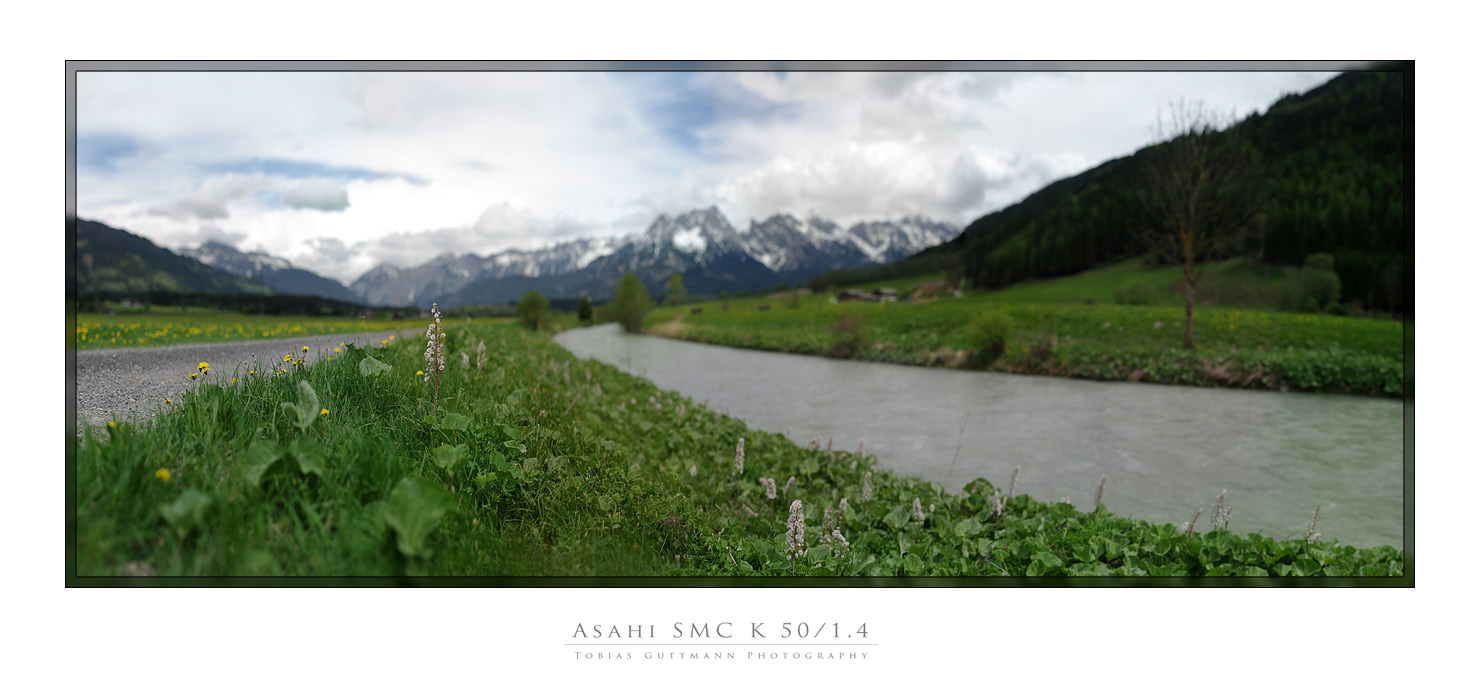
3) Dealing with very close and far Objects at the same Time
This is a main problem when shooting without tripod.
Why?
Because, when moving from one frame to the next, the background
behind the close object will slightly change position in your
viewfinder.
Why? Because when you shoot freehand you can't rotate the camera
via the nodal point, such as a panorama-head on a tripod would do.
Why does the use of a panorama head doesn't necessarily solve
the problem?
When you deal with outdoor-panorama photography, you deal with
outdoor conditions. Close objects like branches of trees, flowers,
grass, water etc. show movement.
Even the most accurate nodal-point-panorama-tripod-head can't do
anything against it and your stiched panorama will not be rendered
correctly.
Therefore you better trust your eyes and instincts: e.g. analyze
the wind/waves movement and release the shutter in the
perfect moment (see above: chapter "moving objects")
When there's absolutely no air-movement or if the close object is
steady by nature you could try to imitate the rotation of a nodal
p. panorama-head while shooting to get better
stiching results, however, this needs some practice.
! Be aware: blue sky or any other plain background behind the
close object are more forgiving than background with small structure:
Lettenkaster, Leoganger Steinberge, Pinzgau
"Steinernes Meer", Saalfelden, Austria
______________
______________
______________
Hope you enjoyed reading and got insight in some advanced stiching
techniques and hope to have inspired/encouraged some of you to try
it yourself!
Thanks in advance for commenting !
Cheers
Tobias
____________________________________________________
Any use of this texts and photograph content is prohibited by the author.
2012, Tobias Guttmann
_________________
Camera Pentax K10D, K20D, Super A
SMC K28 3.5, SMC K24 2.8, SMC K28/2, SMC K50/1.4,SMC A50/1.7, SMC M28/3.5, SMC A 50/1.7, SMC K135 2.5, SMC A50 1.2
SMC A35-105 3.5, SMC A70-210 4, SMC A20 2.8, SMC M28 2.8,K28/3.5 SMC A28 2.8, SMC A100 2.8 Macro, CZJ Flektogon 20 2.8 (MC), 35 2.4 (MC),S.M.C Takumar 85mm 1.8, Helios 44M-4, A.Schacht Travenar 90/2.8, C.Zeiss J. Sonnar 180/2.8
Check out my: 2012 New "Advanced Guide to Panorama Stiching" !
Check out my "Beginner's Guide to Panorama Stiching !
Visit my Asahi and Zeiss MF lens samples database ! |
|
| Back to top |
|
 |
NikonD


Joined: 29 Jul 2008
Posts: 1922
Location: Slovenija
|
| Posted: Sat May 12, 2012 6:46 pm Post subject: |
|
|
NikonD wrote:
Incredible guide!!! |
|
| Back to top |
|
|
Attila

Joined: 24 Feb 2007
Posts: 57865
Location: Hungary
Expire: 2025-11-18
|
| Posted: Sat May 12, 2012 6:52 pm Post subject: |
|
|
Attila wrote:
Many, many thanks!!!
_________________
-------------------------------
Items on sale on Ebay
Sony NEX-7 Carl Zeiss Planar 85mm f1.4, Minolta MD 35mm f1.8, Konica 135mm f2.5, Minolta MD 50mm f1.2, Minolta MD 250mm f5.6, Carl Zeiss Sonnar 180mm f2.8
|
|
| Back to top |
|
|
Nelson

Joined: 06 Jan 2008
Posts: 618
Location: close to Paris, France
|
| Posted: Sat May 12, 2012 6:55 pm Post subject: |
|
|
Nelson wrote:
WOUAWWWWWWWWWWWWW 
_________________
DSLR : EOS 350D, 300D, 7D, 5D
Pentacon 50 f1.8, 135 f2.8, 200 f4;
TAIR 3S
Helios 44/2
Meyer Optik Orestegor 200mm f4 Orestegor 300mm f4
Tamron 24mm f2.5 01B, 300mm f5.6 670Au, 75 250, 300mm f5.6 SP 54B, 500mm f8 SP 55B, SP 70 210 3.5, SP 60 300
my MF lenses
EF 50 1.8 I, EF 100macro f2.8, EF 70-200 F4 L is, EFS 17-55 f2.8 is, Sigma 10-20 EX, 18-50 2.8 EX, 300 f4 hsm, 400 5.6 hsm |
|
| Back to top |
|
|
BRunner
Joined: 29 Jul 2009
Posts: 705
Location: Czech Republic
|
| Posted: Sat May 12, 2012 6:56 pm Post subject: |
|
|
BRunner wrote:
| NikonD wrote: |
| Incredible guide!!! |
+1
Thank you!
_________________
.: APO-Maniac :. |
|
| Back to top |
|
|
Excalibur

Joined: 19 Jul 2009
Posts: 5017
Location: UK
Expire: 2014-04-21
|
| Posted: Sat May 12, 2012 6:59 pm Post subject: |
|
|
Excalibur wrote:
| NikonD wrote: |
| Incredible guide!!! |
+100...your name will be famous on the net 
_________________
Canon A1, AV1, T70 & T90, EOS 300 and EOS300v, Chinon CE and CP-7M. Contax 139, Fuji STX-2, Konica Autoreflex TC, FS-1, FT-1, Minolta X-700, X-300, XD-11, SRT101b, Nikon EM, FM, F4, F90X, Olympus OM2, Pentax S3, Spotmatic, Pentax ME super, Praktica TL 5B, & BC1, , Ricoh KR10super, Yashica T5D, Bronica Etrs, Mamiya RB67 pro AND drum roll:- a Sony Nex 3
.........past gear Tele Rolleiflex and Rollei SL66.
Many lenses from good to excellent. |
|
| Back to top |
|
|
DigiChromeEd

Joined: 29 Dec 2009
Posts: 3462
Location: Northern Ireland
|
| Posted: Sat May 12, 2012 7:50 pm Post subject: |
|
|
DigiChromeEd wrote:
Superb Tobias, thank you! 
_________________
"I've got a Nikon camera, I like to take a photograph" - Paul Simon |
|
| Back to top |
|
|
tobbsman
Joined: 25 Jul 2008
Posts: 2578
Location: Austria
|
| Posted: Sat May 12, 2012 9:30 pm Post subject: |
|
|
tobbsman wrote:
Thanks already for all your fast commenting !
Cheers
Tobias
_________________
Camera Pentax K10D, K20D, Super A
SMC K28 3.5, SMC K24 2.8, SMC K28/2, SMC K50/1.4,SMC A50/1.7, SMC M28/3.5, SMC A 50/1.7, SMC K135 2.5, SMC A50 1.2
SMC A35-105 3.5, SMC A70-210 4, SMC A20 2.8, SMC M28 2.8,K28/3.5 SMC A28 2.8, SMC A100 2.8 Macro, CZJ Flektogon 20 2.8 (MC), 35 2.4 (MC),S.M.C Takumar 85mm 1.8, Helios 44M-4, A.Schacht Travenar 90/2.8, C.Zeiss J. Sonnar 180/2.8
Check out my: 2012 New "Advanced Guide to Panorama Stiching" !
Check out my "Beginner's Guide to Panorama Stiching !
Visit my Asahi and Zeiss MF lens samples database ! |
|
| Back to top |
|
|
Nordentro

Joined: 24 Jun 2010
Posts: 4713
Location: Lillehammer, Norway
Expire: 2015-01-29
|
| Posted: Sat May 12, 2012 10:06 pm Post subject: |
|
|
Nordentro wrote:
Very well written article, stunning photos and inspiring content Tobias!
Congratz!
_________________
Lars | Manuellfokus.no |
|
| Back to top |
|
|
ilguercio

Joined: 08 Mar 2012
Posts: 414
Location: Southern Italy-Calabria!
|
| Posted: Sat May 12, 2012 11:03 pm Post subject: |
|
|
ilguercio wrote:
I'm still having problems with the stitching, i have tried different softwares and i was as steady and precise as i could but every shot has one or two frames that merge badly.
Thanks for the effort you put into explaining this tecnique to us and for the beautiful examples you provide.
|
|
| Back to top |
|
|
sichko

Joined: 20 Jun 2008
Posts: 2475
Location: South West UK
|
| Posted: Sat May 12, 2012 11:15 pm Post subject: |
|
|
sichko wrote:
Wonderful. Many thanks.
_________________
John |
|
| Back to top |
|
|
tobbsman
Joined: 25 Jul 2008
Posts: 2578
Location: Austria
|
| Posted: Sun May 13, 2012 7:38 am Post subject: |
|
|
tobbsman wrote:
| Quote: |
| I'm still having problems with the stitching, i have tried different softwares and i was as steady and precise as i could but every shot has one or two frames that merge badly. |
Hi, I can't give you answers or advises without seeing the problem.
Can you upload a small sample of the complete panorama with those stiching errors, to analyze !
Looking forward to see your results ...
Cheers
Tobias
_________________
Camera Pentax K10D, K20D, Super A
SMC K28 3.5, SMC K24 2.8, SMC K28/2, SMC K50/1.4,SMC A50/1.7, SMC M28/3.5, SMC A 50/1.7, SMC K135 2.5, SMC A50 1.2
SMC A35-105 3.5, SMC A70-210 4, SMC A20 2.8, SMC M28 2.8,K28/3.5 SMC A28 2.8, SMC A100 2.8 Macro, CZJ Flektogon 20 2.8 (MC), 35 2.4 (MC),S.M.C Takumar 85mm 1.8, Helios 44M-4, A.Schacht Travenar 90/2.8, C.Zeiss J. Sonnar 180/2.8
Check out my: 2012 New "Advanced Guide to Panorama Stiching" !
Check out my "Beginner's Guide to Panorama Stiching !
Visit my Asahi and Zeiss MF lens samples database ! |
|
| Back to top |
|
|
tobbsman
Joined: 25 Jul 2008
Posts: 2578
Location: Austria
|
| Posted: Sun May 13, 2012 1:11 pm Post subject: |
|
|
tobbsman wrote:
| Quote: |
| i have tried different softwares |
which software products exactly did you use ?
Cheers
Tobias
_________________
Camera Pentax K10D, K20D, Super A
SMC K28 3.5, SMC K24 2.8, SMC K28/2, SMC K50/1.4,SMC A50/1.7, SMC M28/3.5, SMC A 50/1.7, SMC K135 2.5, SMC A50 1.2
SMC A35-105 3.5, SMC A70-210 4, SMC A20 2.8, SMC M28 2.8,K28/3.5 SMC A28 2.8, SMC A100 2.8 Macro, CZJ Flektogon 20 2.8 (MC), 35 2.4 (MC),S.M.C Takumar 85mm 1.8, Helios 44M-4, A.Schacht Travenar 90/2.8, C.Zeiss J. Sonnar 180/2.8
Check out my: 2012 New "Advanced Guide to Panorama Stiching" !
Check out my "Beginner's Guide to Panorama Stiching !
Visit my Asahi and Zeiss MF lens samples database ! |
|
| Back to top |
|
|
ilguercio
Joined: 08 Mar 2012
Posts: 414
Location: Southern Italy-Calabria!
|
| Posted: Sun May 13, 2012 2:45 pm Post subject: |
|
|
ilguercio wrote:
I used both Hugin and Microsoft ICE.
AutoPano Giga costs a bit too much for my pockets |
|
| Back to top |
|
|
tobbsman
Joined: 25 Jul 2008
Posts: 2578
Location: Austria
|
| Posted: Tue May 15, 2012 7:34 am Post subject: |
|
|
tobbsman wrote:
| Quote: |
| I used both Hugin and Microsoft ICE. |
I have used Hugin 2 years ago a lot, the program is stiching very very well.
Guess it's more of a problem of shooting technique or lens ...
But to be sure just upload some samples with these stiching errors, to have a look at it and analyze ...
Cheers
Tobias
_________________
Camera Pentax K10D, K20D, Super A
SMC K28 3.5, SMC K24 2.8, SMC K28/2, SMC K50/1.4,SMC A50/1.7, SMC M28/3.5, SMC A 50/1.7, SMC K135 2.5, SMC A50 1.2
SMC A35-105 3.5, SMC A70-210 4, SMC A20 2.8, SMC M28 2.8,K28/3.5 SMC A28 2.8, SMC A100 2.8 Macro, CZJ Flektogon 20 2.8 (MC), 35 2.4 (MC),S.M.C Takumar 85mm 1.8, Helios 44M-4, A.Schacht Travenar 90/2.8, C.Zeiss J. Sonnar 180/2.8
Check out my: 2012 New "Advanced Guide to Panorama Stiching" !
Check out my "Beginner's Guide to Panorama Stiching !
Visit my Asahi and Zeiss MF lens samples database ! |
|
| Back to top |
|
|
SonicScot

Joined: 01 Dec 2011
Posts: 2697
Location: Scottish Highlands
|
| Posted: Tue May 15, 2012 9:27 am Post subject: |
|
|
SonicScot wrote:
Lots of clear information and a ton of brilliant examples.
Thank you for the work you've put into this, inspiring stuff indeed.
*applauding smilies*
_________________
Gary
Currently active gear....
Sony a7
E-M1 Mkll
Rubinar 1000/10 + 2x matched extender
Tamron 500/8 55BB
Sigma 100-300/4
Vivitar Series 1.... 200/3, 70-210/3.5 (V1 by Kiron), 135/2.3, 105/2.5 macro, 90/2.5 macro (Bokina), 90-180/4.5 Flat Field Macro, 28-90mm f/2.8-3.5
Carl Zeiss.... 180/2.8, 135/3.5, 85/1.4, 35/2.4 Flektagon, 21/2.8 Distagon
Nikon.... 55/3.5 micro, 50/1.2
Elicar 90/2.5 V-HQ Macro
Zhongyi Speedmaster 85/1.2
Jupiter-9 85/2
Helios.... 58/2 44-3
Hartblei 45/3.5 Super-Rotator TS-PC
Zenitar 16/2.8 fisheye
Samyang 8/3.5 fisheye
Nodal Ninja 4, Neewer leveling tripod base
Flickr http://www.flickr.com/photos/gazsus/ Website http://garianphotography.co.uk/ |
|
| Back to top |
|
|
Alternate Internet ID

Joined: 30 Mar 2011
Posts: 253
Location: UK
|
| Posted: Thu May 17, 2012 1:04 pm Post subject: |
|
|
Alternate Internet ID wrote:
I thought panoramas were a little bit dull until I read this.
Many thanks and congrats on some outstanding work.
_________________
“Most things in life are moments of pleasure and a lifetime of embarrassment; photography is a moment of embarrassment and a lifetime of pleasure.”
Tony Benn
--------------------------------------------------------------------------------------------------------------------------------
Sigma: Macro HSM 2.8-4/17-70mm
Sigma: 1.4/50mm EX DG HSM
Samsung: 3.5-5.6/20-50mm
Samsung: 2/30mm
CZJ: MC Flektogon 2.4/35mm
Tamron SP: 2.5/90mm
Helios 44M: 2/58mm
Canon FL: 1.4/50mm
|
|
| Back to top |
|
|
aspen

Joined: 15 Dec 2010
Posts: 307
Location: Maryland, USA
Expire: 2014-02-20
|
| Posted: Sat May 26, 2012 5:35 pm Post subject: |
|
|
aspen wrote:
Yes! Yes! Yes! *jumps up and down*
Thanks Tobias. This is one of the best tutorials I have ever seen! And you have saved me hours and hours of needless errors. I loved all of your shots, but the Bokke stitching really is exciting to me. Thank you very much. Yay!!!!!
_________________
Cameras; Sony Nex5n Lenses; Konica Hexanons; 21mm f2.8, 40mm f1,8, 50mm f1.4, 50mmf1.7,57mm f1.4, 100mm f2.8, 135mm f3.2, 200mm f4, MC Helios 77M-4 50mm f1.8, Jupiter 8 50 f2, Super Takumar 85mm f1.9, Vivitar Series 1 90mm f2.5 (Macro), Steinheil Munchen Culminar 85mm f2.8, Steinheil Munchen Exagon 35mm f2.8, Jupiter 37A 135mm, Astra Berlin 135mm f3.5, Angenieux 180mm f4 , Tair 3-PhS 300mm f4.5 |
|
| Back to top |
|
|
propellor


Joined: 29 Apr 2010
Posts: 205
Location: Amsterdam
|
| Posted: Sun May 27, 2012 11:10 am Post subject: |
|
|
propellor wrote:
Seeing what you do with pano's really got me. Incredible work and a great eye for composition.
I will most certainly study your tutorial and try my hand at it.
Many thanks.
_________________
Distagon 3.5/15, Distagon 4/18, Distagon 2.8/21, Distagon 2.8/25, Distagon 2/28, Distagon 1.4/35, Planar 1.4/50, Planar 1.4/85, Makro Planar 2.8/100, Planar 2/135, Vario Sonnar 3,3-4,0/28-85, Vario Sonnar 4,5-5,6/100-300, Canon 5DMkII |
|
| Back to top |
|
|
TijmenDal

Joined: 22 Sep 2011
Posts: 206
|
| Posted: Thu Jun 21, 2012 9:47 pm Post subject: |
|
|
TijmenDal wrote:
Great tutorial(s)!
Thanks a lot! I learned incredibly much. What I enjoyed particularly are your sample shots. Being a ski-teacher in Hinterglemm I've lived quite some time in Austria in the exact same region you have been photographing a lot (Saalfelden/Maria-Alm/Zell am See/Hohe Tauern) and on top of that, most of your non-Austrian images were taken in the Netherlands - where I originally come from.
Let me clear up one thing though: The Kloveniersburghwal is NOT in the Red light district. It's near it, but not in it The 'Kloveniers', as we call it, is where my University is at (Uni of Amsterdam). I'll be there tomorrow actually, haha.
_________________
//Tijmen
http://cargocollective.com/tijmendal |
|
| Back to top |
|
|
tobbsman
Joined: 25 Jul 2008
Posts: 2578
Location: Austria
|
| Posted: Sat Jun 23, 2012 12:43 pm Post subject: |
|
|
tobbsman wrote:
Thanks all for the commenting !
@TijmenDal
| Quote: |
Great tutorial(s)!
Thanks a lot! I learned incredibly much. What I enjoyed particularly are your sample shots. Being a ski-teacher in Hinterglemm I've lived quite some time in Austria in the exact same region you have been photographing a lot (Saalfelden/Maria-Alm/Zell am See/Hohe Tauern) and on top of that, most of your non-Austrian images were taken in the Netherlands - where I originally come from.
Let me clear up one thing though: The Kloveniersburghwal is NOT in the Red light district. It's near it, but not in it Wink The 'Kloveniers', as we call it, is where my University is at (Uni of Amsterdam). I'll be there tomorrow actually, haha. |
That's funny, you've been just some minutes away from my home then
Are you still ski-teaching there in the winter ?
| Quote: |
| , most of your non-Austrian images were taken in the Netherlands - where I originally come from. |
That's because I studied at the "Hogeschool voor de Kunsten" and lived 7 years in NL/Amsterdam, I geuss I
use the same "mensa" as you do now at the Kloveniersburgwal.
Concerning the Kloveniersburgwal, I would say it's matter of interpretation
However it ends up in the red-light-district ...
But you're very right this shot is taken some meters down to the south of the Nieuwe Markt
Groetjes
Tobias
_________________
Camera Pentax K10D, K20D, Super A
SMC K28 3.5, SMC K24 2.8, SMC K28/2, SMC K50/1.4,SMC A50/1.7, SMC M28/3.5, SMC A 50/1.7, SMC K135 2.5, SMC A50 1.2
SMC A35-105 3.5, SMC A70-210 4, SMC A20 2.8, SMC M28 2.8,K28/3.5 SMC A28 2.8, SMC A100 2.8 Macro, CZJ Flektogon 20 2.8 (MC), 35 2.4 (MC),S.M.C Takumar 85mm 1.8, Helios 44M-4, A.Schacht Travenar 90/2.8, C.Zeiss J. Sonnar 180/2.8
Check out my: 2012 New "Advanced Guide to Panorama Stiching" !
Check out my "Beginner's Guide to Panorama Stiching !
Visit my Asahi and Zeiss MF lens samples database ! |
|
| Back to top |
|
|
rmir
Joined: 08 Feb 2013
Posts: 2
|
| Posted: Sat Feb 09, 2013 1:07 am Post subject: |
|
|
rmir wrote:
Thank you very much Tobias for this inspiring and amazing tutorial!!! I have been reading it over and over again and trying to put your advice in practice for a project.
I wonder what size are your final landscape panos, for example the "Steinernes Meer", Saalfelden, Austria. I am trying to get a non-distorted landscape pano for using as a large print on a wall of 7mts long x 3 mts height aiming to simulate a virtual window. Using for example only 150dpi, I would need at least a picture of 41.339x17.717 pixels!! Moreover, I would like to have near and far objects in focus...
I have done several tests, but I haven't been able to solve high-resolution (stitching) + non-distortion(long focal distance) + depth DOF. So, I would really appreciate if you may have any insights for this gigapixel all-in-focus pano project.
Cheers,
Roberto |
|
| Back to top |
|
|
Orio

Joined: 24 Feb 2007
Posts: 29545
Location: West Emilia
Expire: 2012-12-04
|
| Posted: Sat Feb 09, 2013 1:11 am Post subject: |
|
|
Orio wrote:
Tobias is missing from the forum since August, Roberto. I tried to contact him privately but no replies yet.
So I would not expect a quick reply from him I'm afraid.
_________________
Orio, Administrator
T*
NE CEDE MALIS AUDENTIOR ITO
Ferrania film is reborn! http://www.filmferrania.it/
Support the Ornano film chemicals company and help them survive!
http://forum.mflenses.com/ornano-chemical-products-t55525.html |
|
| Back to top |
|
|
rmir
Joined: 08 Feb 2013
Posts: 2
|
| Posted: Sat Feb 09, 2013 2:30 pm Post subject: |
|
|
rmir wrote:
| Orio wrote: |
Tobias is missing from the forum since August, Roberto. I tried to contact him privately but no replies yet.
So I would not expect a quick reply from him I'm afraid. |
Thank you very much for the message Orio. It's a shame and I hope Tobias is missing only for some happy reasons! |
|
| Back to top |
|
|
ylyad
Joined: 01 Jun 2010
Posts: 476
Location: Zentralschweiz
Expire: 2013-12-05
|
| Posted: Sat Feb 09, 2013 6:00 pm Post subject: |
|
|
ylyad wrote:
| Orio wrote: |
Tobias is missing from the forum since August, Roberto. I tried to contact him privately but no replies yet.
So I would not expect a quick reply from him I'm afraid. |
Oh, I didn't know. Sorry to hear that, his work was inspiring and from what I've read here, he looks like a very nice guy. Hope everything is fine
_________________
Camera: Fuji X-E2, Fuji X100T
MF: Canon nFD 50/1.4, Canon nFD 100/2.8, Tokina RMC 135/2.8
Tamron SP 24-48/3.5-3.8
http://www.flickr.com/derdide/
|
|
| Back to top |
|
|
|
|


