| View previous topic :: View next topic |
| Author |
Message |
PaulC


Joined: 23 Dec 2008
Posts: 2318
|
 Posted: Mon May 24, 2010 5:10 pm Post subject: scanning advice Posted: Mon May 24, 2010 5:10 pm Post subject: scanning advice |
 |
|
PaulC wrote:
Can anybody tell me what I'm doing wrong with the Epson V500 to get these blotchy dark areas:
That's a 100% crop at 72dpi from a 2400lpi scan. The neg obviously has grain, not chromatic noise, so I'm not sure how it is getting in there or even if it is an inevitable product of the technology. If so, would a drum scanner also produce this sort of thing? Surely not.
_________________
View or buy my photos at:
http://shutterstock.com/g/paulcowan
Last edited by PaulC on Mon May 24, 2010 7:09 pm; edited 1 time in total |
|
| Back to top |
|
 |
martinsmith99


Joined: 31 Aug 2008
Posts: 6943
Location: S Glos, UK
Expire: 2013-11-18
|
| Posted: Mon May 24, 2010 6:30 pm Post subject: |
|
|
martinsmith99 wrote:
What are you scanning?
Can you run through your workflow and I'll see if I can spot anything obvious.
_________________
Casual attendance these days |
|
| Back to top |
|
|
PaulC
Joined: 23 Dec 2008
Posts: 2318
|
| Posted: Mon May 24, 2010 7:08 pm Post subject: |
|
|
PaulC wrote:
Colour neg on an Epson V500 with digital ICE on but sharpening, grain reduction etc. all off.
After the pre-scan I generally pull both sets of sliders out to the ends on both sides since the auto setting seems to chop huge quantities of information off. I then put them in slightly on both sides and adjust the midpoint slider. Next I usually go for the high contrast setting on curves and finally twitch the colour balance if need be and usually turn up the brightness and contrast a bit until it looks OK.
The crop is just from what I opened in PS. Of course, the file is coming out at a huge size (from a 6x6 neg) so for most people this wouldn't be a problem. Even printing at 300dpi would probably mask it pretty well. But I need 50MB files that will stand up to inspection by Alamy.
I can mask some of it with the old trick of Gaussian blur faded 100% by colour, which Alamy used to recommend, but I'm not sure the output is good enough (and one Alamy rejection gets every file from you in the pending queue kicked out, so it is to best not to get rejections).
_________________
View or buy my photos at:
http://shutterstock.com/g/paulcowan |
|
| Back to top |
|
|
martinsmith99
Joined: 31 Aug 2008
Posts: 6943
Location: S Glos, UK
Expire: 2013-11-18
|
| Posted: Mon May 24, 2010 7:23 pm Post subject: |
|
|
martinsmith99 wrote:
I tend to pull the black slider out fully and use the white slider to adjust the brightness. The curves I leave as these seem to boost contrast too much and add gran/noise. Any contrast tweaks are none in PS. Give it a go, it might help.
_________________
Casual attendance these days |
|
| Back to top |
|
|
PaulC
Joined: 23 Dec 2008
Posts: 2318
|
| Posted: Mon May 24, 2010 7:31 pm Post subject: |
|
|
PaulC wrote:
OK, thanks.
_________________
View or buy my photos at:
http://shutterstock.com/g/paulcowan |
|
| Back to top |
|
|
PaulC
Joined: 23 Dec 2008
Posts: 2318
|
| Posted: Mon May 24, 2010 8:50 pm Post subject: |
|
|
PaulC wrote:
I'm still getting blotches. Maybe the neg is too thin or too thick or something.
_________________
View or buy my photos at:
http://shutterstock.com/g/paulcowan |
|
| Back to top |
|
|
Nesster

Joined: 24 Apr 2008
Posts: 5883
Location: NJ, USA
Expire: 2014-02-20
|
| Posted: Mon May 24, 2010 8:55 pm Post subject: |
|
|
Nesster wrote:
1) try the same thing with ICE turned off - there's evidence ICE isn't artifact free
2) looks like it could be the remnants of dust of some sort, perhaps ICEd, and perhaps on the glass rather than the negative
3) is this consistent across different rolls? to rule out some developing related mishap on this one.
it took me a while to see the splotches, I had to look downwards on my work monitor to see anything at all 
_________________
-Jussi
Camera photos
Print Photographica
|
|
| Back to top |
|
|
PaulC
Joined: 23 Dec 2008
Posts: 2318
|
| Posted: Tue May 25, 2010 3:35 am Post subject: |
|
|
PaulC wrote:
Hi Jussi. It is in all shadow areas and without ICE on, too, so it can't be either dirt on the glass or ICE. It's interesting that you have trouble seeing it. Maybe my cheap monitor exaggerates it, because it screams at me and I also have problems with dark areas on my 5D Mk2 but not so much with the original 5D. I'll try recalibrating my screen.
_________________
View or buy my photos at:
http://shutterstock.com/g/paulcowan |
|
| Back to top |
|
|
visualopsins

Joined: 05 Mar 2009
Posts: 10759
Location: California
Expire: 2025-04-11
|
| Posted: Tue May 25, 2010 4:06 am Post subject: |
|
|
visualopsins wrote:
Just an thought: have you looked at the negative through a magnifying glass or low-power microscope () that will magnify the area to the same resolution you see on the monitor?
Another thought: try a different USB port?
More: try turning negative 90 degrees, check results for identical spots in same positions. although it doesn't look like anti-aliasing, perhaps curled negative and scanner auto-focusing could be cause? If so, ANR glass should help correct for both curling and any aliasing effects. |
|
| Back to top |
|
|
PaulC
Joined: 23 Dec 2008
Posts: 2318
|
| Posted: Tue May 25, 2010 5:01 am Post subject: |
|
|
PaulC wrote:
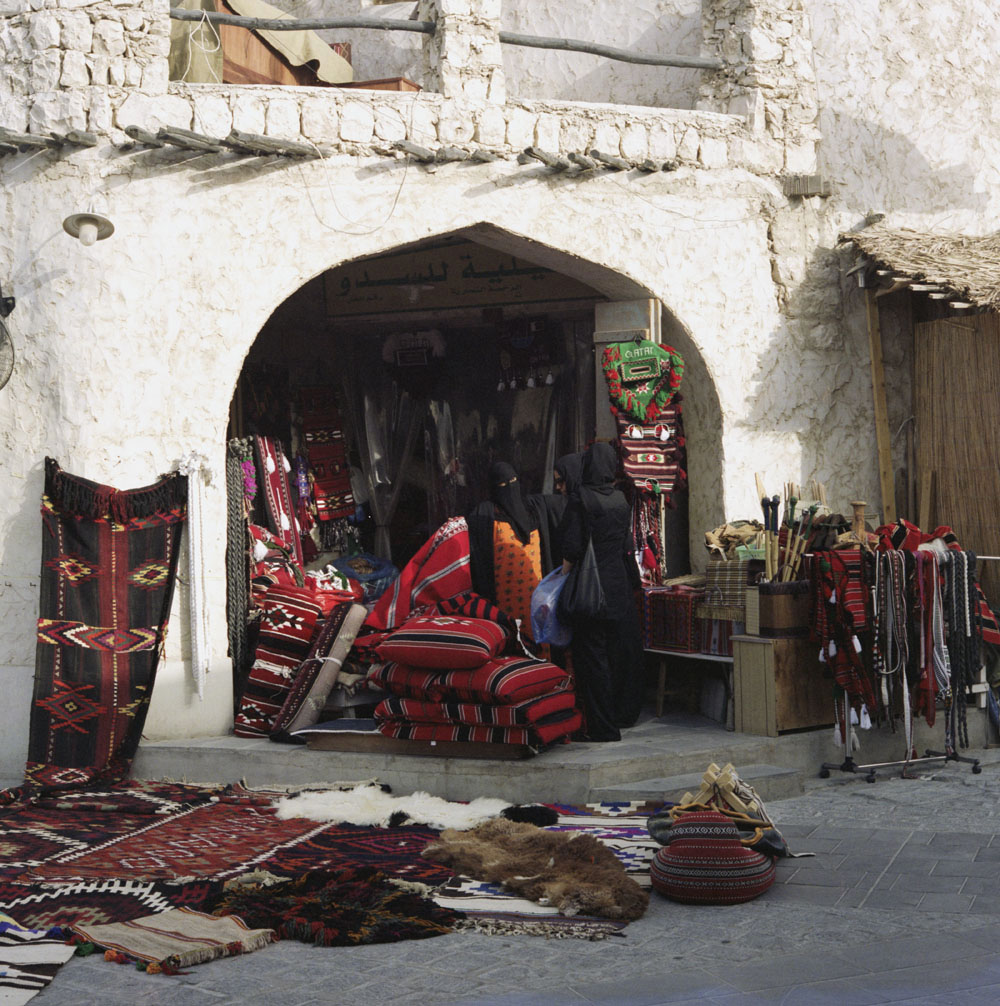
Maybe it's my contrast settings. If I put the output levels at about 10 and 245 instead of 0 and 255 it seems to clear the blotches. I'm not sure if the result looks a little too flat, though. This is one that I've corrected in this way - how does it look? Comments from designers or anyone with a professional-level, calibrated monitor would be especially welcome:

_________________
View or buy my photos at:
http://shutterstock.com/g/paulcowan |
|
| Back to top |
|
|
visualopsins
Joined: 05 Mar 2009
Posts: 10759
Location: California
Expire: 2025-04-11
|
| Posted: Tue May 25, 2010 5:10 am Post subject: |
|
|
visualopsins wrote:
Just checking: You have Professional version of Epson software and have adjusted histogram white & black points?
If so can these be restored to 255/0 in PP to fix contrast? |
|
| Back to top |
|
|
PaulC
Joined: 23 Dec 2008
Posts: 2318
|
| Posted: Tue May 25, 2010 5:38 am Post subject: |
|
|
PaulC wrote:
Errr .... I guess so. It says "professional mode". I've adjusted the white and black points in photoshop to get rid of the blocking. Should I be making a flatter scan and then be able to restore contrast in PS later on?
The way I've done it in this picture, as soon as I push up the contrast I start to get the blockiness again.
I'm afraid I'm not very technical, I tend to get by with trial and error.
_________________
View or buy my photos at:
http://shutterstock.com/g/paulcowan |
|
| Back to top |
|
|
visualopsins
Joined: 05 Mar 2009
Posts: 10759
Location: California
Expire: 2025-04-11
|
| Posted: Tue May 25, 2010 6:04 am Post subject: |
|
|
visualopsins wrote:
Sorry for the previous terse reply...
When the Epson Scan dialog pops up, select Professional Mode, then click on the Histogram icon, adjust black & white points to 10/245, scan, then use Photoshop Levels to adjust black & white points back to 0/255.
I'd also try Epson Scan setting only black point to 10 and leaving white at 255, scan, then Photoshop Levels to set black at 0. |
|
| Back to top |
|
|
PaulC
Joined: 23 Dec 2008
Posts: 2318
|
| Posted: Tue May 25, 2010 6:34 am Post subject: |
|
|
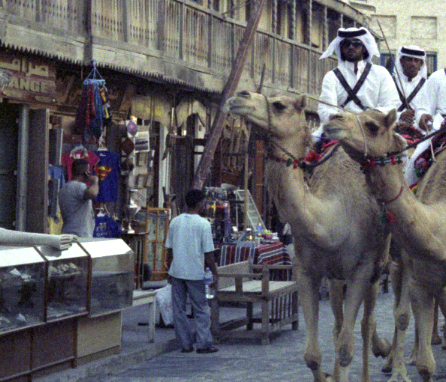
PaulC wrote:
This was written before your last post, I'll go and try your suggestion now ....
Here's another one. I scanned this with the sliders pulled open so that all the image information should be recorded, hoping to be able to sort it out in PS later. That does, indeed, prevent the blocking but the moment I try to increase the contrast in photoshop the blotches reappear.
Could it be that the contrast range is simply too high to be able to render dark areas properly? There is a strong contrast between the buildings in sunlight at the rear and the shadows inside the souq - the film is really doing a pretty remarkable job in keeping information in all of them.

_________________
View or buy my photos at:
http://shutterstock.com/g/paulcowan |
|
| Back to top |
|
|
martinsmith99
Joined: 31 Aug 2008
Posts: 6943
Location: S Glos, UK
Expire: 2013-11-18
|
| Posted: Tue May 25, 2010 11:54 am Post subject: |
|
|
martinsmith99 wrote:
What happens if your don't touch the sliders at all and scan it?
_________________
Casual attendance these days |
|
| Back to top |
|
|
martinsmith99
Joined: 31 Aug 2008
Posts: 6943
Location: S Glos, UK
Expire: 2013-11-18
|
| Posted: Tue May 25, 2010 11:55 am Post subject: |
|
|
martinsmith99 wrote:
Oh, and turn everything off including sharpening.
_________________
Casual attendance these days |
|
| Back to top |
|
|
PaulC
Joined: 23 Dec 2008
Posts: 2318
|
| Posted: Tue May 25, 2010 12:16 pm Post subject: |
|
|
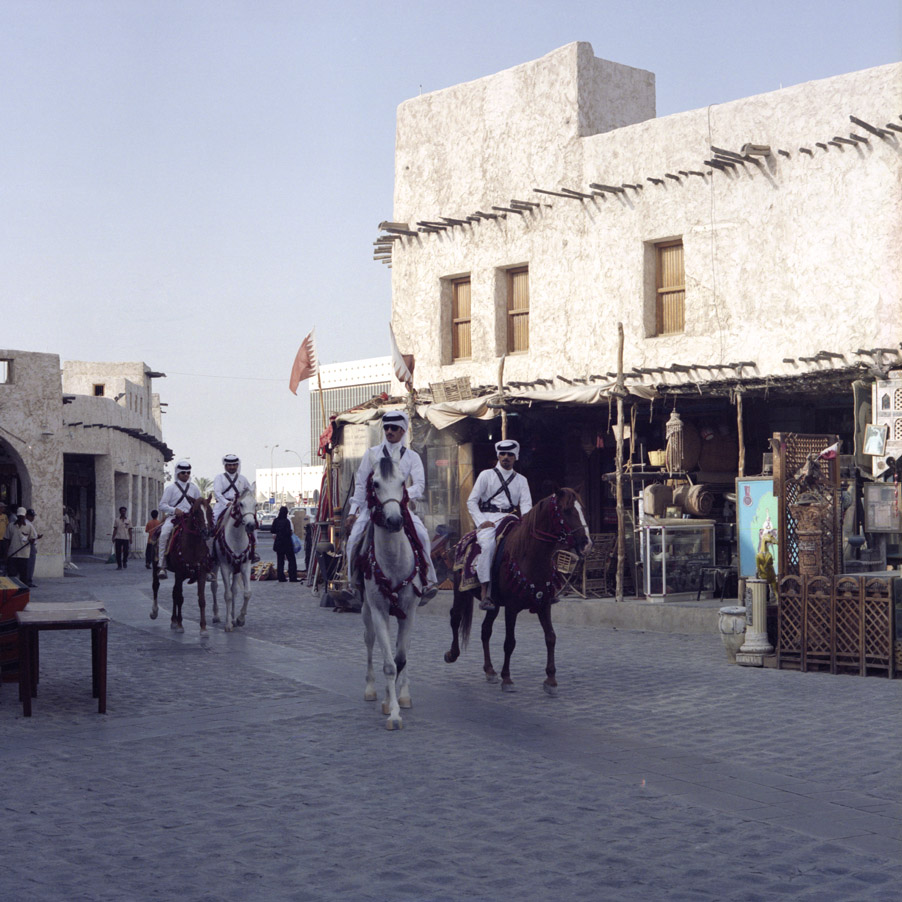
PaulC wrote:
If everything is off and I just scan what the machine chooses I get this (different image but the same problem). The auto scan doesn't block up the blacks but it is very flat.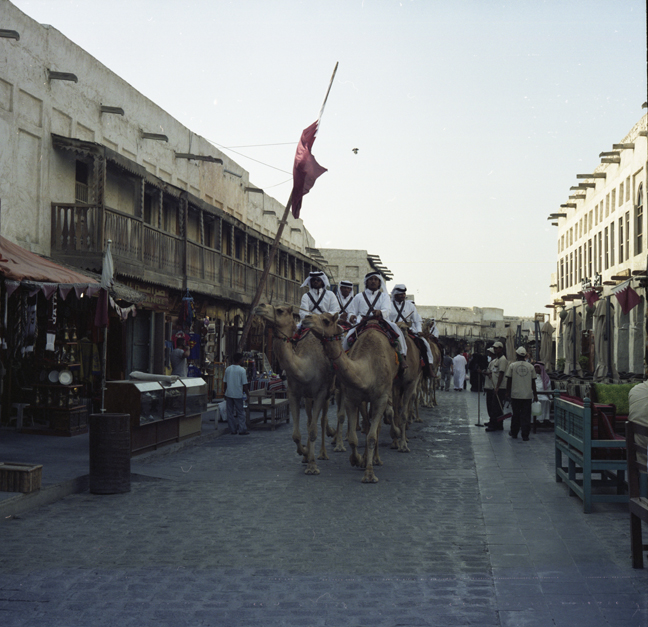
_________________
View or buy my photos at:
http://shutterstock.com/g/paulcowan
Last edited by PaulC on Tue May 25, 2010 12:34 pm; edited 2 times in total |
|
| Back to top |
|
|
PaulC
Joined: 23 Dec 2008
Posts: 2318
|
| Posted: Tue May 25, 2010 12:33 pm Post subject: |
|
|
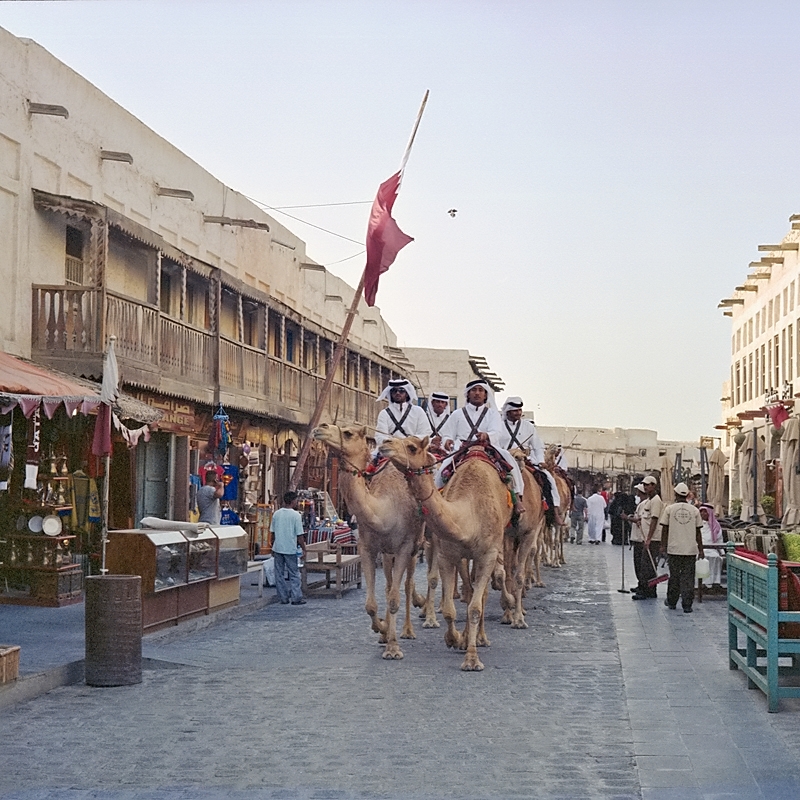
PaulC wrote:
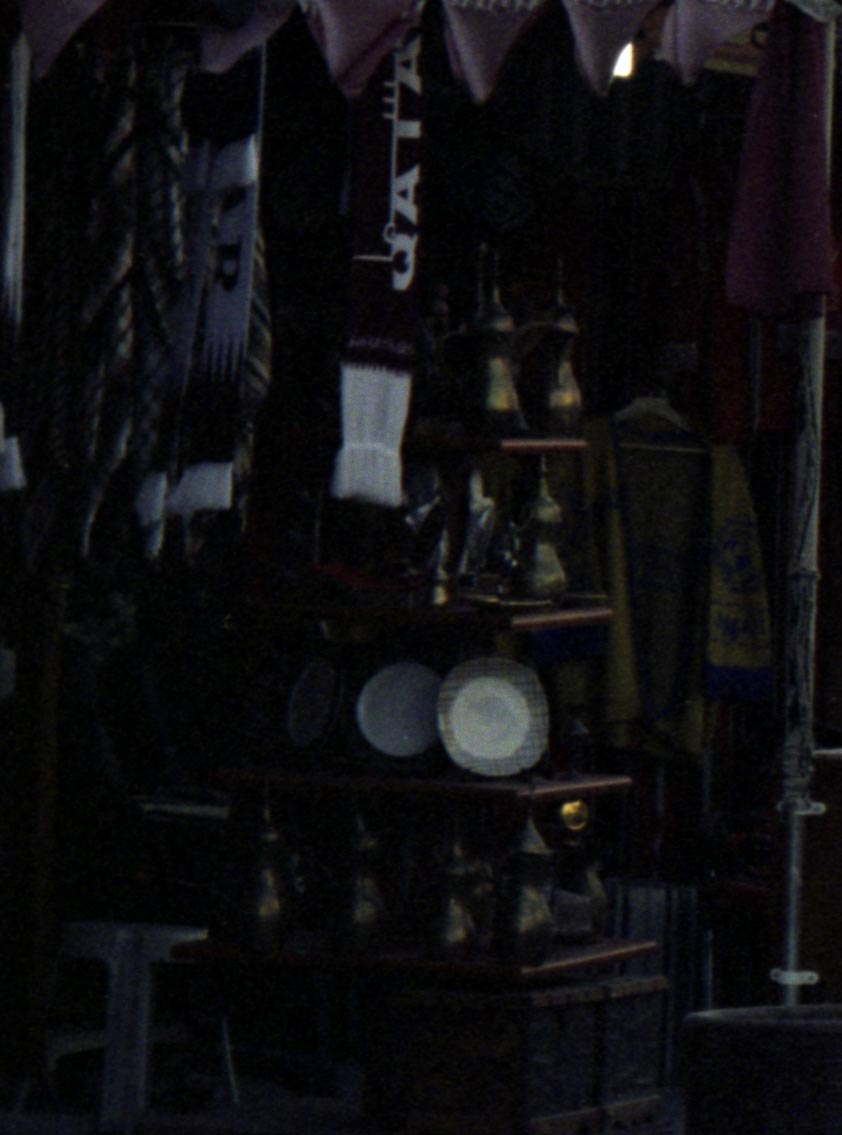
Earlier, with quite a bit of effort I managed to get this out of it (again without blocking up the shadows). This seems to be about as good as I can make it:

And here's a tight crop excluding the sky, just done fully auto. I thought maybe reducing the contrast range would help but the colour is still crap. Film or development problem, possibly?

But, of course, it is a daylight balanced film and this is in shade, I should take a warming filter with me next time (it's a whole different world from digital!). This scan can be adjusted easily to give a passable result without causing obvious problems.

So maybe the problem is (a) very high contrast range causing flattening; and (b) incorrect colour balance caused by shade.
_________________
View or buy my photos at:
http://shutterstock.com/g/paulcowan |
|
| Back to top |
|
|
visualopsins
Joined: 05 Mar 2009
Posts: 10759
Location: California
Expire: 2025-04-11
|
| Posted: Tue May 25, 2010 2:48 pm Post subject: |
|
|
visualopsins wrote:
Try the Photoshop Levels tool; the Auto correction should work fine here. I think you will be very pleasantly surprised!
More info: Using the Photoshop Levels Tool |
|
| Back to top |
|
|
Nesster
Joined: 24 Apr 2008
Posts: 5883
Location: NJ, USA
Expire: 2014-02-20
|
| Posted: Tue May 25, 2010 3:03 pm Post subject: |
|
|
Nesster wrote:
The shade stuff looks depressingly familiar to me, I struggle with it as well.
Sometimes I've taken to creating sandwiches, where one I attempt to balance and optimize for shade, the other for the highs. This is less than satisfactory. Also, messing with color curves can allow you to target the shadows for correction while leaving the rest fairly untouched. This too is a pain.
I think of this as the 'thickness' of negative color film, as I see the colors and shadows blocking up as opacity.
It is possible that something like VueScan does better with this - you can set the film base color as the absolute black, and then work from there. But VueScan is a pain to use - I find it a pain - and I haven't found a way to scan more than one image at a time to my satisfaction, and cropping is sometimes an adventure too. VueScan allows you to do multiple passes, specifically to get more shadow information in the scan. I have seen that it does work.
_________________
-Jussi
Camera photos
Print Photographica
|
|
| Back to top |
|
|
PaulC
Joined: 23 Dec 2008
Posts: 2318
|
| Posted: Tue May 25, 2010 3:06 pm Post subject: |
|
|
PaulC wrote:
Autolevels improves the main subject but in the shadows it puts me right back with the problem I started with.
Unfortunately, I don't have an ND filter here that will fit any of my P6 lenses, otherwise I would try again with that and see if narrowing the tonal range solved the problem
That's at 100% size, obviously.
_________________
View or buy my photos at:
http://shutterstock.com/g/paulcowan |
|
| Back to top |
|
|
marty
Joined: 09 Apr 2009
Posts: 767
Location: Italy
|
| Posted: Tue May 25, 2010 3:58 pm Post subject: |
|
|
marty wrote:
Hi, there.
Looks like the noise it's a contrast range problem. The shadows are probably beyond the capability of the scanner, if they're a bit darker they're going to have that sort of problem. If you have a capable sw you can try to work with a mask to raise contrast only in well lit areas, leaving alone the shadows. I do not think a regular ND filter would make a difference, it will just increase the exposure time. I'd try rating the film 1/3 or 1/2 of a stop slower (assuming a negative film), that would open up a bit the shadows possibly reducing the problem in the scan.
Concerning the bluish cast in the shadowed areas that's pretty normal, I agree on warming filter (81) that will correct the issue.
Cheers, M.-
_________________
Canon FD
Bodies: AT-1, A-1, T-90
Lenses: nFD 20mm f2.8, 24 f2.8, 28 f2.8, 35 f2, FD 50 f1.8 S.C., 85 f1.8, 100 f2.8, 135 f2.8, 200 f4, 300 f4
|
|
| Back to top |
|
|
PaulC
Joined: 23 Dec 2008
Posts: 2318
|
| Posted: Tue May 25, 2010 4:17 pm Post subject: |
|
|
PaulC wrote:
Thanks marty. I was thinking of a graduated ND (but I haven't got one the right size) to narrow the range between the sky and the shadows, then open up half a stop or so. Doing it without the ND will lose what is left of the sky. Still, at least I'm getting an understanding of the problem.
The best that seems possible with this sort of neg (if today's efforts are any guide) is to scan without blocking the shadows, adjust for saturation and contrast as gently as possible in PS allowing a little blocking to take place at that stage and then shift the output slider to 10 or 12 to turn the blocked areas back to grey. It's not perfect but the results seem better than other things I've tried.
I guess it might be possible to do some sort of HDR merger from separate scans, but I'm not sure. And, of course, there are clever masking tricks in PS if you're really good at that program.
_________________
View or buy my photos at:
http://shutterstock.com/g/paulcowan |
|
| Back to top |
|
|
Katastrofo
Joined: 26 Feb 2007
Posts: 10405
Location: USA
Expire: 2013-11-19
|
| Posted: Tue May 25, 2010 5:18 pm Post subject: |
|
|
Katastrofo wrote:
Here's my take on the one shot:

I ran the small file through Bibble, first, that makes a TIFF. Of course
working the original scan would yield much better results. |
|
| Back to top |
|
|
PaulC
Joined: 23 Dec 2008
Posts: 2318
|
| Posted: Tue May 25, 2010 8:25 pm Post subject: |
|
|
PaulC wrote:
I take it that's the one I'd already worked on.
Apart from bibbling it, what did you do to it?
_________________
View or buy my photos at:
http://shutterstock.com/g/paulcowan |
|
| Back to top |
|
|
|
|
|
You cannot post new topics in this forum
You cannot reply to topics in this forum
You cannot edit your posts in this forum
You cannot delete your posts in this forum
You cannot vote in polls in this forum
|