| View previous topic :: View next topic |
| Author |
Message |
csaba369

Joined: 08 Feb 2008
Posts: 172
Location: Hungary
|
 Posted: Thu Apr 30, 2009 2:55 pm Post subject: How to use my lightmeter? Posted: Thu Apr 30, 2009 2:55 pm Post subject: How to use my lightmeter? |
 |
|
csaba369 wrote:
Some days ago I bought a Lunasix 3, in 'mint' condition. Called Attila, what kind of battery can I use and where can I buy it. He told me about his test result - camera lightmeters works much better than handheld meters. Really? It's interesting, Profs always use handheld meters, where is the problem? Try to find something on the net, watched some tutor video etc. Then made a lot test, and became clearer something. Try to tell you everything, good ideas, correction welcome! And sorry for my english...
In the tests I used Lunasix 3 and a DSLR (350D later pana G1) with ISO 800 setting f/5.6, looking for the good shutter speed.
1. First adventure, flowers in a vase in a dark room, tungsten light. White, yellow, dark red etc.
Measured white flower, used that setting with DSLR, good result.
Measured yellow flower, a bit dark result.
Measured darker flower, totally bad result.
Hmm...where is the problem?
2. Second test
In the same room I found my black training shoes. Wow, let's see some really dark!
Yes, totally bad result.
3. Thinking a lot, then tried an interesting test. Really complex light scene. Two room separated with opened door. I'm standing in the luminous room, try to take a pic from the totally dark room with some white door frame. Let's see the DSLR:
A, very bright, not realistic room, totally burned out door-frame
B, Let's measure it with Lunasix. At first a reflected from the door-frame - don't remember exactly, let's say 9EV. And an incident in the dark room toward the camera, ~5EV. And now? The solution is in my hand. How much frame and how much room I want to be in the pic. Took a bit less than 7 EV and perfect! Better then DSLR!
Wait a minute please, will be continued...
_________________
A lot of MF lenses, Panasonic G1, EOS 300V, Zorki 4, Kiev 4, Pentacon Six etc.
Last edited by csaba369 on Thu Apr 30, 2009 2:58 pm; edited 1 time in total |
|
| Back to top |
|
 |
csaba369
Joined: 08 Feb 2008
Posts: 172
Location: Hungary
|
| Posted: Thu Apr 30, 2009 2:56 pm Post subject: |
|
|
csaba369 wrote:
Now I have to understand what happened! I know, DSLR makes center weighted (and other) methods, What is center weighted? I try to work out it. It's a grid, you know the max level, the min level and the average value. I don't want to write an algorithm, so enought to know, that if the center points lighter than others, no compensation needed, if darker, need more light. That happened in the 3rd test. My camera tried to get more light, but the door-frame was too few points for enough compensation. Everything was dark, except that few white points, so that dark room became the reference value.
Ok. And what shows me Lunasix? Nothing more, than the amount of reflected light from the subject (in reflected mode). My dark shoes has 8 EV. If I try to convert it to my camera, I say her that here is a subject, this is the black, do your job! But this is not true! It is not the top EV in that lightning ambience, so no reference point! Let's take a white paper, lay down to my shoes and measure it! Ok, I have the reference point, 10 EV. But no white subject in the scene, so let's say that my shoe will be that. The difference is 4 EV ( 10-8 ) so subtract with my shoe 2 EV... It is 6 EV, take pic, it was perfect! (No accurate values, don't remember, sorry) It is 6 EV, take pic, it was perfect! (No accurate values, don't remember, sorry)
So if I do this with my flowers on the first test, get better result. Not easy, but if you understand it - maybe better than me at this moment - you can use your light meter perfectly. The result can be better than center-weighted and other metering methods.
Ok, and what can I do for landscape? I don't know... What I know: you get an totally average value, but not balanced. If you have a lot dark with a few sky, or a lot sky with a small main subject - interesting scene. I haven't time now to test this, I have an idea only.
Take an incident metering about total, and a reflected from the face of my model. Similar then in the resolution of my second test. And for real landscape? What can I do with distant dark mountains and the sky???
Hope this wasn't too long and boring, thank you for reading.
_________________
A lot of MF lenses, Panasonic G1, EOS 300V, Zorki 4, Kiev 4, Pentacon Six etc.
Last edited by csaba369 on Thu Apr 30, 2009 3:02 pm; edited 2 times in total |
|
| Back to top |
|
|
Orio

Joined: 24 Feb 2007
Posts: 29545
Location: West Emilia
Expire: 2012-12-04
|
| Posted: Thu Apr 30, 2009 3:00 pm Post subject: |
|
|
Orio wrote:
Csaba,
I admit I did not read your whole messages (I am at work)
however:
- hand-held meters are powerful instruments, but they need to be used properly. Built-in camera meters of the cameras of today often have matrix metering systems that calculate averages for you even if you don't point them to the appropriate points in the scene. Thus they can give a good enough result in most situations. Hand meters (especially old ones) don't have that, so it is you who has to learn how to use them. When you learn how to use them, they will give you the best results.
I'll write more later, now I can't.
_________________
Orio, Administrator
T*
NE CEDE MALIS AUDENTIOR ITO
Ferrania film is reborn! http://www.filmferrania.it/
Support the Ornano film chemicals company and help them survive!
http://forum.mflenses.com/ornano-chemical-products-t55525.html |
|
| Back to top |
|
|
F16SUNSHINE


Joined: 20 Aug 2007
Posts: 5486
Location: Left Coast
Expire: 2011-11-18
|
| Posted: Thu Apr 30, 2009 3:26 pm Post subject: |
|
|
F16SUNSHINE wrote:
One of the things that is lost in Digital photography is the vernacular that was developed using the Zone system.
If any of you who are not familiar with the zone system and, are interested in how best to control a scenes highlights and shadows using your light meter (hand held, spot or in camera spot).
Check out a book by John Charles Woods "The Zone System Craftbook".
I would be happy to go into more detail but it is not such a short subject and I don't want to hijack the thread. Check out the book 
There are many other books on the subject.
I find this one is useful for both beginners and advanced Zone workers.
A lot of guys going back to film here. This may really help.
http://www.amazon.com/Zone-System-Craftbook-Comprehensive-Development/dp/0697131904/ref=sr_1_1?ie=UTF8&s=books&qid=1241105013&sr=8-1
_________________
Moderator |
|
| Back to top |
|
|
Nesster

Joined: 24 Apr 2008
Posts: 5883
Location: NJ, USA
Expire: 2014-02-20
|
| Posted: Thu Apr 30, 2009 3:26 pm Post subject: Re: How to use my lightmeter? |
|
|
Nesster wrote:
| csaba369 wrote: |
In the tests I used Lunasix 3 and a DSLR (350D later pana G1) with ISO 800 setting f/5.6, looking for the good shutter speed.
1. First adventure, flowers in a vase in a dark room, tungsten light. White, yellow, dark red etc.
Measured white flower, used that setting with DSLR, good result.
Measured yellow flower, a bit dark result.
Measured darker flower, totally bad result.
Hmm...where is the problem?
2. Second test
In the same room I found my black training shoes. Wow, let's see some really dark!
Yes, totally bad result. |
This is opposite of what I'd think should happen - the darker the flower the longer the exposure is what I'd expect! As the meter sees everything as a 18% gray card - anything brighter should bring down the overall exposure and vice versa.
OTH: meters have different sensitivities at different colors... as do digital sensors and film. My constant problem is with red flowers, others too: the scene itself is exposed ok but the flower is blown out. Too bright.
For landscapes, the book Understanding Exposure has a few tricks - some were new to me.
E.g. take a reading off grass lit the same way as the scene. That one I know... but then: take a reading of the north sky! Never heard of that! But it does work. Of course an adjustment may be needed if you want something dark to show lighter or vice versa. Oh, and if you are in similar lighting that your scene is in, an incident reading 'here' should = an incident reading 'there'...
_________________
-Jussi
Camera photos
Print Photographica
|
|
| Back to top |
|
|
Orio
Joined: 24 Feb 2007
Posts: 29545
Location: West Emilia
Expire: 2012-12-04
|
| Posted: Thu Apr 30, 2009 3:34 pm Post subject: |
|
|
Orio wrote:
| F16SUNSHINE wrote: |
A lot of guys going back to film here. This may really help. |
It will.
I have learned photography on a Super Ikonta folder and a Gossen hand meter.
That is the best school, when you learn that way, you can use any camera.
I always say, if I had a child, my first camera gift would be a manual film camera with no automation.
_________________
Orio, Administrator
T*
NE CEDE MALIS AUDENTIOR ITO
Ferrania film is reborn! http://www.filmferrania.it/
Support the Ornano film chemicals company and help them survive!
http://forum.mflenses.com/ornano-chemical-products-t55525.html |
|
| Back to top |
|
|
marty

Joined: 09 Apr 2009
Posts: 767
Location: Italy
|
| Posted: Thu Apr 30, 2009 4:36 pm Post subject: |
|
|
marty wrote:
Hi,
Let's try to give you some answers.
1. Center weighted method: the meter measures the entire frame area
emphasizing the center area (where the main subject is likely to be)
and diminishing toward the edges. Mathematically speaking the
meter is performing a weighted average.
2. Black subject: to give a clear explanation the concept of the
Zone System is useful. In a few words the entire gamma of tones
in a BW image is reduced to ten numbered in roman numerals and
these are called zones. The whole thing applies to color photos
too since each color can be assimilated to one zone. The zones
are so defined:
zone I pure black, no texture or detail
zone II near black, no detail. Darkest beginning of gradation.
zone III dark gray-black, possibility of slight texture
zone IV very dark gray, but good texture and detail can be seen.
zone V middle gray (18% gray)
zone VI rich mid-tone gray
zone VII bright light gray
zone VIII light gray-white, shows last texture (minimum) but no detail.
zone IX almost white, must be compared to white to tell difference, no detail or significant texture visible.
zone X pure white
The meters are set to read zone V and thus disregarding the
real tone of the subject they'll try to render it middle gray.
So as far as your main subject tone goes toward zone I (pure
black) or zone X (plain white) you have to compensate the
reading, underexposing in the first case, overexposing in the
second. The amount of compensation needed is one stop for each
zone away from middle gray (zone V). To well understand the
concept a reading about Zone System is advised.
3. Landscape: The concept of the Zone System is always involved.
The trick of the grass reading suggested by Nesster is usually
good as the light refelected by the grass is assimilated to
zone V and thus the meter will render it correct. Being this
correct the rest of the picture will fall in place.
In my opinion the concept of the Zone System (developed by Ansel Adams and Fred Archer) should be studied and understood well to get a good grip on the exposure matter. My explanation is by no means complete or exhaustive is just to point you in the right direction. After all so much has been written on the subject and with good reason.
Hope this helps (at least a bit).
Marty. |
|
| Back to top |
|
|
Orio
Joined: 24 Feb 2007
Posts: 29545
Location: West Emilia
Expire: 2012-12-04
|
| Posted: Thu Apr 30, 2009 5:05 pm Post subject: |
|
|
Orio wrote:
Two faster shortcuts if you don't want to deal with zone metering:
1) meter the incident light
2) meter the reflected light from a 18% gray card or from your hand (use back of hand if metering for negative and palm of hand if metering for slides). Of course your grey card or hand must be in the same place where the subject is, or in a comparable place.
What I do if I especially care for a photo, and want to be 100% sure, is to meter both incident and reflected. If you metered correctly the two values should be the same. If there is a difference, make an average of the two values.
_________________
Orio, Administrator
T*
NE CEDE MALIS AUDENTIOR ITO
Ferrania film is reborn! http://www.filmferrania.it/
Support the Ornano film chemicals company and help them survive!
http://forum.mflenses.com/ornano-chemical-products-t55525.html |
|
| Back to top |
|
|
hacksawbob

Joined: 28 Feb 2007
Posts: 1293
Location: LANCS UK
|
| Posted: Thu Apr 30, 2009 5:08 pm Post subject: |
|
|
hacksawbob wrote:
Zone system to DSLR, an interesting take on Ansel Adams work as it transfers to Digital,
http://super.nova.org/DPR/ZoneSystem/DigitalZoneSystem.pdf
_________________
LENS LIST |
|
| Back to top |
|
|
csaba369
Joined: 08 Feb 2008
Posts: 172
Location: Hungary
|
| Posted: Thu Apr 30, 2009 5:32 pm Post subject: |
|
|
csaba369 wrote:
Thank you for all, really...
_________________
A lot of MF lenses, Panasonic G1, EOS 300V, Zorki 4, Kiev 4, Pentacon Six etc. |
|
| Back to top |
|
|
LucisPictor

Joined: 26 Feb 2007
Posts: 17633
Location: Oberhessen, Germany / Maidstone ('95-'96)
Expire: 2013-12-03
|
| Posted: Thu Apr 30, 2009 5:55 pm Post subject: |
|
|
LucisPictor wrote:
Perhaps a silly question: Where did you push the white knob at the front of the LunaSix? Do you know that his little knob changes the metering method?
_________________
Personal forum activity on pause every now and again (due to job obligations)!
Carsten, former Moderator 
Things ON SALE
Carsten = "KAPCTEH" = "Karusutenu" | T-shirt?.........................My photos from Emilia: http://www.schouler.net/emilia/emilia2011.html
My gear: http://retrocameracs.wordpress.com/ausrustung/
Old list: http://forum.mflenses.com/viewtopic.php?t=65 (Not up-to-date, sorry!) | http://www.lucispictor.de | http://www.alensaweek.wordpress.com |
http://www.retrocamera.de |
|
| Back to top |
|
|
magnet-2009

Joined: 22 Apr 2009
Posts: 505
Location: Greece, Athens
|
| Posted: Thu Apr 30, 2009 9:33 pm Post subject: |
|
|
magnet-2009 wrote:
| Orio wrote: |
Two faster shortcuts if you don't want to deal with zone metering:
1) meter the incident light
2) meter the reflected light from a 18% gray card or from your hand (use back of hand if metering for negative and palm of hand if metering for slides). Of course your grey card or hand must be in the same place where the subject is, or in a comparable place.
What I do if I especially care for a photo, and want to be 100% sure, is to meter both incident and reflected. If you metered correctly the two values should be the same. If there is a difference, make an average of the two values. |
Metering the incident light we always have the right result [very very close].
I think that incident light metering and reflected light metering may give the same result or not and depends on the color of the subject. If the overal color of the photo is 18% average and the contrast is normal and not high, then we expect to have same results [using the different metering ways] If we deal with [ BLACK CATS or WHITE SNOW] then the results are always different.
We use an average value if we use a spot lightmeter and we have the zone system in mind.
With respect. 
_________________
My flickr___ My Wix___ RailPictures |
|
| Back to top |
|
|
magnet-2009
Joined: 22 Apr 2009
Posts: 505
Location: Greece, Athens
|
| Posted: Thu Apr 30, 2009 9:55 pm Post subject: |
|
|
magnet-2009 wrote:
| LucisPictor wrote: |
| Perhaps a silly question: Where did you push the white knob at the front of the LunaSix? Do you know that his little knob changes the metering method? |
Is there a white knob that you push it or a white spherical diffuser that slides to the right [uncovers an round window] and back [covers the window]?
If you mean the diffuser, then
when the window is covered then you meter the incident light.
when the window is uncovered then you meter the reflected light.
See at your manual the way you use the meter with the different metering ways.
When you meter the reflected you "shoot" the subject. When you meter the incident you "shoot" your camera. It's not so simple but it is a good general description.
Read the instructions, always is very helpful.
_________________
My flickr___ My Wix___ RailPictures |
|
| Back to top |
|
|
Orio
Joined: 24 Feb 2007
Posts: 29545
Location: West Emilia
Expire: 2012-12-04
|
| Posted: Thu Apr 30, 2009 11:16 pm Post subject: |
|
|
Orio wrote:
| magnet-2009 wrote: |
Metering the incident light we always have the right result [very very close].
|
It depends on what you consider "right".
In a situation like this:

metering only the incident light will not give a good looking result.
Trust me, I photograph manually since more than 20 years
_________________
Orio, Administrator
T*
NE CEDE MALIS AUDENTIOR ITO
Ferrania film is reborn! http://www.filmferrania.it/
Support the Ornano film chemicals company and help them survive!
http://forum.mflenses.com/ornano-chemical-products-t55525.html |
|
| Back to top |
|
|
bawang
Joined: 26 Mar 2008
Posts: 548
Location: Indiana, USA
|
| Posted: Fri May 01, 2009 12:55 am Post subject: |
|
|
bawang wrote:
Since getting the Zorki-4, I have been reading here and there about metering to a point I have also bought an iphone application to help me with it. But I think the best help is at the URL below. It has been posted before, here and elsewhere, Fred Parker's Ultimate Exposure Meter
http://www.fredparker.com/ultexp1.htm |
|
| Back to top |
|
|
magnet-2009
Joined: 22 Apr 2009
Posts: 505
Location: Greece, Athens
|
| Posted: Fri May 01, 2009 5:37 am Post subject: |
|
|
magnet-2009 wrote:
@Orio,
the example [photo] is very well chosen [high contrast]. In that situation, we have to consider many thinks depending on what media we use [negative, slides or the characteristics of the sensor]. The number of stops between burned high's [clouds in the photo] to black shadows [flowers at the bottom left corner in the photo] are not the same and depends on the media used.
I agree that 2 or 3 meterings in that situation is a must. But the results are not always positive. There are other technics for the high contrast situations, may be 2 or 3 shots [not only multimetering] etc etc............
I would appreciated, if you could describe how [with one shot] and the multimetering you solve problems like the example's photo. Do you find in all situations the solution using only the multimetering choice?
Hey, I trust you because you suffer from the same type of fever [mflenses].... 
_________________
My flickr___ My Wix___ RailPictures |
|
| Back to top |
|
|
A G Photography

Joined: 11 May 2008
Posts: 1480
Location: Bologna - Italy
|
| Posted: Fri May 01, 2009 6:59 am Post subject: |
|
|
A G Photography wrote:
It also depends what result you want to achieve in high contrast exposures. Since no film (or digital sensor) can reproduce the whole dynamic range properly you have to choose where to put zone V (or in simpler term where you put your hand and meter the incident light out from it).
_________________
Alessandro
My Photography Website
My Blog about Photography and Italian Cuisine
My Photostream on Flickr
--------------------------------------------------------
DSLR: Nikon d80, Olympus e410
SLR: Chinon CX, Fujica ST605n, Nikon f601, Pentacon FM, Pentax Spotmatic SPII, Praktica FX, Praktica FX2, Voigtlander VST1, Yashica FX-3, Zeiss Contaflex
RF: Altissa Altix, Zorki Ie, Kiev 4b
Medium Format: Pentacon Six TL, Zeiss Ikonta 520/2, Mockba 4, Voigtlander Bessa I, Agfa Isolette II, Agfa Isola
Large Format: Cambo SC 4x5, Rodenstock Sinaron 150/5.6, Rodenstock Rodagon 150/5.6, Schneider Kreuznach Symmar 180/5.6
Lenses
Nikkors: 28/3.5 AIS, 35/2, 50/1.8, 50/2 H, Micro 55/3.5, Micro 60/2.8, 85/1.8, 135/3.5 AI, 200/4 NAI, 18-55/3.5-5.6, 28-80/3.5-5.6, 55-200/4-5.6
CY: Distagon 28/2.8, Planar 50/1.4, Yashika 50/1.7, Sonnar 135/2.8
CZJ m42-Exakta: Flektogon 20/4, Flektogon 35/2.8, Tessar 40/4.5, Tessar 50/2.8, Pancolar 50/1.8, Pancolar 50/2, Biotar 58/2, Biotar 75/1.5, Tessar 80/2.8, Sonnar 135/3.5, Sonnar 135/4, Triotar 135/4
CZJ P6: Flektogon 50/4, Flektogon 65/2.8, Biometar 80/2.8, Biometar 120/2.8, Sonnar 180/2.8
Meyer-Pentacon: Orestegon 29/2.8, Pentacon 29/2.8, Lydith 30/3.5, Primagon 35/4.5, Helioplan 40/4.5, Domiplan 50/2.8, Primotar 50/3.5, Oreston 50/1.8, Primoplan 58/1.9, Orestor 100/2.8, Trioplan 100/2.8, Helioplan 135/4.5, Orestor 135/2.8, Pentacon 135/2.8, Primotar 135/3.5, Primotar 180/3.5, Telemegor 180/5.5, Orestegor 200/4, Pentacon 200/4, Orestegor 300/4, Telemegor 300/4.5, Telemegor 400/5.5
Schneider-Kreuznach: Curtagon 28/4, Curtagon 35/2.8, Xenon 50/1.9, Xenar 50/2.8, Tele Xenar 135/3.5, Tele Xenar 200/4
Russians: Arsat Zodiak 30/3.5, Mir-I 37/2.8, Volna-9 50/2.8, Industar-50 50/3.5, Industar-61 50/2.8, Helios 44 58/2, Helios 44-2 58/2, Helios 44-M-4 58/2, Volna-3 80/2.8, Helios 40 85/1.5, Jupiter 9 85/2, Jupiter 11 135/4
Others: Chinon-Tomioka 55/1.4, Helios 28/2.8, Isco Iscotar 50/2.8, Konica Hexanon 40/1.8, Ludwig Meritar 50/2.9, Schacht Travegon 35/3.5, Schacht Travenon 135/4.5, Sekor 55/1.8, Sigma MF 28/2.8, S-Takumar, 28/3.5, S-Takumar 50/1.4, S-Takumar 55/1.8, S-Takumar 55/2, Steinheil Quinar 135/2.8, Steinheil Culminar 135/4.5, Vivitar 135/2.8, Voigtlander Ultron 50/1.8, Yashica Yashinon DX 50/1.4, Zuiko MC Auto-W 28/2.8
|
|
| Back to top |
|
|
LucisPictor
Joined: 26 Feb 2007
Posts: 17633
Location: Oberhessen, Germany / Maidstone ('95-'96)
Expire: 2013-12-03
|
| Posted: Fri May 01, 2009 7:39 am Post subject: |
|
|
LucisPictor wrote:
| magnet-2009 wrote: |
| LucisPictor wrote: |
| Perhaps a silly question: Where did you push the white knob at the front of the LunaSix? Do you know that his little knob changes the metering method? |
Is there a white knob that you push it or a white spherical diffuser that slides to the right [uncovers an round window] and back [covers the window]?
If you mean the diffuser, then
when the window is covered then you meter the incident light.
when the window is uncovered then you meter the reflected light.
See at your manual the way you use the meter with the different metering ways.
When you meter the reflected you "shoot" the subject. When you meter the incident you "shoot" your camera. It's not so simple but it is a good general description.
Read the instructions, always is very helpful. |
Hello?
I know that!! I wasn't sure if you know that as well!
I mean you were asking about how to use it, right?
_________________
Personal forum activity on pause every now and again (due to job obligations)!
Carsten, former Moderator
Things ON SALE
Carsten = "KAPCTEH" = "Karusutenu" | T-shirt?.........................My photos from Emilia: http://www.schouler.net/emilia/emilia2011.html
My gear: http://retrocameracs.wordpress.com/ausrustung/
Old list: http://forum.mflenses.com/viewtopic.php?t=65 (Not up-to-date, sorry!) | http://www.lucispictor.de | http://www.alensaweek.wordpress.com |
http://www.retrocamera.de |
|
| Back to top |
|
|
magnet-2009
Joined: 22 Apr 2009
Posts: 505
Location: Greece, Athens
|
| Posted: Fri May 01, 2009 7:59 am Post subject: |
|
|
magnet-2009 wrote:
| LucisPictor wrote: |
Hello?
I know that!! I wasn't sure if you know that as well!
I mean you were asking about how to use it, right? |
Confused  , I read all the posts [carefully] again from the beginning. , I read all the posts [carefully] again from the beginning.
1. All of us know the subject well, all of us have the same think in mind, we use different ways to describe it.
2. Sorry LucisPictor, I thought that you asked the question [ I read your post too fast +early in the morning + too tired].
3. LucisPictor, I am not the member that began this thread [too tired???]....
_________________
My flickr___ My Wix___ RailPictures |
|
| Back to top |
|
|
Orio
Joined: 24 Feb 2007
Posts: 29545
Location: West Emilia
Expire: 2012-12-04
|
| Posted: Fri May 01, 2009 8:31 am Post subject: |
|
|
Orio wrote:
Alessandro put it correctly.
It depends if film, if slide, if digital....
What I would do normally in this case, if I wanted to be very precise, is three readings.
The goal is to make two meterings of a medium reflectivity area, one in the light (call it "reading 1") the other in the shade (call it "reading 2"). Finally, a third reading of incident light (call it "reading 3") will give me a comparison value.
This third step could also be avoided, but if I care about a photo, I do it, mainly to make sure that reading 1 is correct.
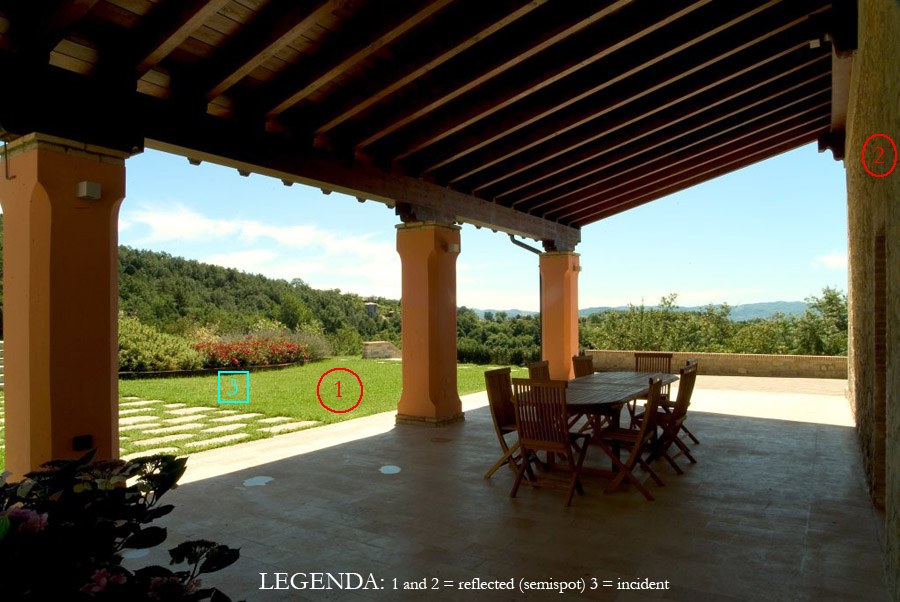
Some people also measure the reflected value of the sky. It is a bit risky to take it into consideration, unless you are very expert photographer, and I normally don't do reflected sky readings, especially in a situation like this one, because we have sun on top and blue sky, and so reading 1 will give me an acceptable limit for overexposure. With reading 1 the sky will be a bit overexposed, but in a strong sunlight scene like this one, I actually like it - it gives me the "flavour" of the summer.
To measure reflected value for 1 and 2, I normally use my hand (I am too lazy to carry around the grey card...  ) - but it's also possible to meter other areas with an average reflectivity. In this case, I individuated the grass, for the sunlight area, and the wall, for the shade area (the floor is too reflective). However I would always suggest to prefer metering the grey card or the hand. It will be more precise. ) - but it's also possible to meter other areas with an average reflectivity. In this case, I individuated the grass, for the sunlight area, and the wall, for the shade area (the floor is too reflective). However I would always suggest to prefer metering the grey card or the hand. It will be more precise.
For the reflective readings I normally use semispot (good light meters can restrain the area of reading, either on them selves or by the use of a physical tool to apply in front of the cell), because the normal reading field would be too large, and the spot, if very precise, can be influenced by a local event (small size reflection etc) while the semispot gives a more "weighted" response even if staying in a limited area
I then go to a point outside and meter the incident light to know what is the "normal value" is. Let's call this "reading 3". This gives me a comparison value that I can use to evaluate my average reading of 1 and 2.
If metering was done correctly, reading 1 would be very similar to reading 3. Reading 2 would be several stops below that value.
If I expose for reading 1, what I would obtain is a good landscape scene, with properly exposed vegetation and a bit overexposed sky, but the shade part would be very dark.
If I expose for reading 2, I would get a properly exposed shade part, and an almost unreadable landscape.
The average of 1 and 2 would give me, well, an average (doh!) result.
If I shoot digital, pure average would be good, because the camera capture also the two extremes, with which I could play in RAW processing (I always shoot RAW). However, given the way digital sensors work, I would make a test shot using pure average value, and verify it with the histogram. If histogram says I could use more space at the right, I would raise exposure until I reach far right without clipping. On the contrary, if pure average would clip highlights more than it does clip shadows, I would reduce value, because raw can recover better the shadows than it can recover the highlights.
In any case, with digital the best thing to do is always to use as much as possible space on the right, up to but not beyond the clipping point.
People who develops and prints B&W film by them selves, will have to take into account a lot of factors (what chemicals what paper what desired grain etc) so I skip that (also because I know little).
However the latitude of B&W film is so wide, that a pure average exposure would do ok, I guess. Then it will be the rest of the process to determine how to use such a negative.
If instead I shoot colour film, I would have to make my aesthetical choice hic et nunc (here and now) - and I am rarely satisfacted, aesthetically speaking, by a "perfect average" value.
As first thing, with colour film, we have to "reset" the average values.
For slide film, I would consider as average a point that is 1/2 stop closer to reading 1 than the absolute average.
For colour negative, I would do the opposite, and consider as average a point that is 1/2 stop closer to reading 2 than absolute average.
Having this done, like I said, I am rarely satisfacted by pure average, from an aesthetically point of view.
So what I would do with film, is to take two pictures, one at the average value (for safety...), and another one, more risked, that enhances what I like better in the scene.
In this case, I find the landscape rather boring, while the shade part, although not really exciting (we can say it's a boring picture overall), has some more interesting elements, like the geometrical lines of the chairs and roof. For this reason, I would take a second picture adding one stop exposure to the reset average (which, I remind, it +0.5 for negative film and -0.5 for slide film).
I guess this is it.
Of course, true zone system metering could be used, and it would probably give an even more precise result, but I don't think it would differ much from my result.
And of course, we could use fill flash... or light painting... or make multiple exposures and then use HDR editing... but all this goes beyond the purpose of this discussion
_________________
Orio, Administrator
T*
NE CEDE MALIS AUDENTIOR ITO
Ferrania film is reborn! http://www.filmferrania.it/
Support the Ornano film chemicals company and help them survive!
http://forum.mflenses.com/ornano-chemical-products-t55525.html |
|
| Back to top |
|
|
LucisPictor
Joined: 26 Feb 2007
Posts: 17633
Location: Oberhessen, Germany / Maidstone ('95-'96)
Expire: 2013-12-03
|
| Posted: Fri May 01, 2009 9:23 am Post subject: |
|
|
LucisPictor wrote:
| magnet-2009 wrote: |
...
3. LucisPictor, I am not the member that began this thread [too tired???].... |
It seems so.
_________________
Personal forum activity on pause every now and again (due to job obligations)!
Carsten, former Moderator
Things ON SALE
Carsten = "KAPCTEH" = "Karusutenu" | T-shirt?.........................My photos from Emilia: http://www.schouler.net/emilia/emilia2011.html
My gear: http://retrocameracs.wordpress.com/ausrustung/
Old list: http://forum.mflenses.com/viewtopic.php?t=65 (Not up-to-date, sorry!) | http://www.lucispictor.de | http://www.alensaweek.wordpress.com |
http://www.retrocamera.de |
|
| Back to top |
|
|
magnet-2009
Joined: 22 Apr 2009
Posts: 505
Location: Greece, Athens
|
| Posted: Fri May 01, 2009 9:55 am Post subject: |
|
|
magnet-2009 wrote:
@ orio perfect, I trust you.
I' ll try follow your way in high contrast situations.
I keep the important piece of information
B/W film: pure average
digital : pure average + checking of the histogram
slides : reset average= pure average - 0.5 stop [+ "aesthetic" bracketing]
negative: reset average= pure average + 0.5 stop [+ "aesthetic" bracketing]
_________________
My flickr___ My Wix___ RailPictures
Last edited by magnet-2009 on Fri May 01, 2009 10:08 am; edited 6 times in total |
|
| Back to top |
|
|
Orio
Joined: 24 Feb 2007
Posts: 29545
Location: West Emilia
Expire: 2012-12-04
|
| Posted: Fri May 01, 2009 9:58 am Post subject: |
|
|
Orio wrote:
| magnet-2009 wrote: |
I am confused though, there is something I can't get it, is ok the piece of information in bold or contrary? |
I don't understand Magnet, what information in bold?
_________________
Orio, Administrator
T*
NE CEDE MALIS AUDENTIOR ITO
Ferrania film is reborn! http://www.filmferrania.it/
Support the Ornano film chemicals company and help them survive!
http://forum.mflenses.com/ornano-chemical-products-t55525.html |
|
| Back to top |
|
|
magnet-2009
Joined: 22 Apr 2009
Posts: 505
Location: Greece, Athens
|
| Posted: Fri May 01, 2009 10:00 am Post subject: |
|
|
magnet-2009 wrote:
Sorry : EDIT IN PROGRESS
DONE!!!!!
_________________
My flickr___ My Wix___ RailPictures |
|
| Back to top |
|
|
Orio
Joined: 24 Feb 2007
Posts: 29545
Location: West Emilia
Expire: 2012-12-04
|
| Posted: Fri May 01, 2009 10:08 am Post subject: |
|
|
Orio wrote:
yes, you summarized it perfectly.
And I write too much
_________________
Orio, Administrator
T*
NE CEDE MALIS AUDENTIOR ITO
Ferrania film is reborn! http://www.filmferrania.it/
Support the Ornano film chemicals company and help them survive!
http://forum.mflenses.com/ornano-chemical-products-t55525.html |
|
| Back to top |
|
|
|
|


