| View previous topic :: View next topic |
| Author |
Message |
philslizzy


Joined: 07 Aug 2012
Posts: 4748
Location: Cheshire, England
|
 Posted: Sat Oct 04, 2014 12:40 pm Post subject: FotoSniper trigger modifcation updated 30 oct 14 Posted: Sat Oct 04, 2014 12:40 pm Post subject: FotoSniper trigger modifcation updated 30 oct 14 |
 |
|
philslizzy wrote:
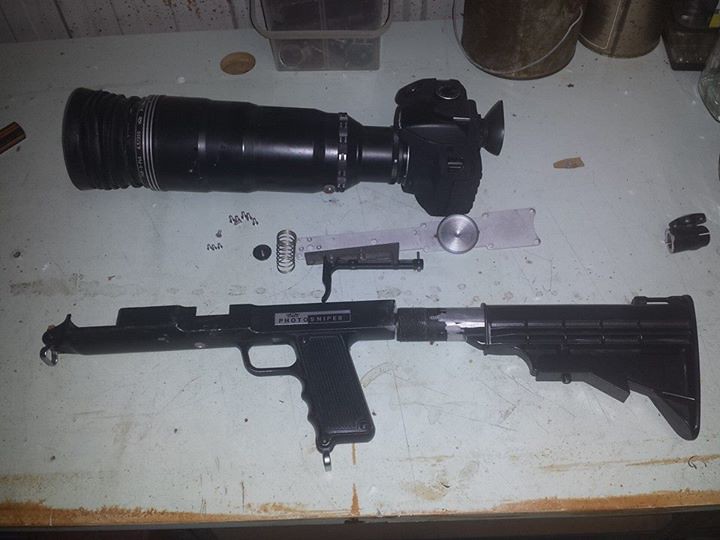
As mentioned in another topic I have now got a Fotosniper set with the Tair 3 300mm f4.5 lens. I am impressed with the lens build quality and I'm looking forwards to using it with my Sony A6000. I have ordered a remote lead for the Sony. Meanwhile I found my remote control for my Nikon D3200 which I've now modified to work with the trigger on the stock of the sniper.
The set as I got it.

The remote switch:

Remote switch opened. A very simple construction inside, the yellow is focus, the white is shutter and the red is common. The switch requires both white and yellow to be connected when they hit the red. I think most remotes will work in a similar fashion. I found where you can buy a selection of leads. There is a link at the end of this post.

I undid the eight large screws holding the top plate of the stock, the trigger assembly is attached to it. I could remove the camera 'spigot' from the inside. I've bagged this up and it now lives in a small empty space within the stock. The lens attachment is a simple spring affair.

I found a microswitch in my spares box, almost any will do as long as it fits inside the stock and you can get the trigger to activate it. This one was a tiny bit wide but I filed the plastic down on the sides and shortened the metal spring

Shorten the lead and bare the ends. Pass it through the hole that the original camera activator went through (I removed this and its in the bag with the spigot). Solder the wires to the switch, remembering to connect the white and yellow. And remember to connect them to the correct terminals!!

The switch I used fitted nicely under the trigger arm. I cut a small piece of plastic which I glued to the metal plate and glued the switch onto this (to prevent shorting) I then smothered the whole lot with hot glue. I suppose I should have put a cable tie round the wire on the inside to prevent it being pulled out. I may do that when I make my next mod.

As it looks on the outside. The glue is inelegant but it works!! I plan to put a 3.5mm jack socket somewhere so I can use the sniper on a variety of cameras with a different lead for each.

The finished article, the trigger movement is short, but that's because I use a tall microswitch, I will look for a shorter one while I'm waiting for the leads. But it works, and when it's on rapid frame advance it goes like a machine gun! Interestingly the screen on the back of the camera stays blank while its plugged in, probably because the focus connector is closed. A two part switch may stop this - if there is such a thing. The one in the original switch is too big otherwise I'd use it.

Cables for many cameras can be bought from seller ewin5may on ebay. Here is the Nikon D3200 version Click here to see on Ebay A 3.5mm stereo socket attached to the stock will allow you to use the modded sniper with any camera you can get a cable for. Or you could use a line socket so you don't have to cut a hole in it.

_________________
Hero in the 'messin-with-cameras-for-the-hell-of-it department'. Official.
Last edited by philslizzy on Thu Oct 30, 2014 9:25 pm; edited 1 time in total |
|
| Back to top |
|
 |
Lloydy

Joined: 02 Sep 2009
Posts: 7785
Location: Ironbridge. UK.
Expire: 2022-01-01
|
| Posted: Sat Oct 04, 2014 3:26 pm Post subject: |
|
|
Lloydy wrote:
Could you squeeze two switches in side by side ? If you could then with a stepped plunger on the trigger bar you could get focus on one switch and shutter on the other. I've seen smaller micro switches than that, so it should be easy to do.
_________________
LENSES & CAMERAS FOR SALE.....
I have loads of stuff that I have to get rid of, if you see me commenting about something I have got and you want one, ask me.
My Flickr https://www.flickr.com/photos/mudplugga/
My ipernity -
http://www.ipernity.com/home/294337 |
|
| Back to top |
|
|
philslizzy
Joined: 07 Aug 2012
Posts: 4748
Location: Cheshire, England
|
| Posted: Sat Oct 04, 2014 10:28 pm Post subject: |
|
|
philslizzy wrote:
| Lloydy wrote: |
| Could you squeeze two switches in side by side ? If you could then with a stepped plunger on the trigger bar you could get focus on one switch and shutter on the other. I've seen smaller micro switches than that, so it should be easy to do. |
Thanks Dave, I could get two in there, but a double pole single throw switch would do it. You don't actually need the focus function but the trigger won't work without it. With the DPST switch the focus and shutter would only be shorted when the trigger is pulled, the short would be at the common rather than before it as it is now.
I've ordered one, it looks a lot smaller so I'd get a longer pull on the trigger and more room for the 3.5mm socket which I plan to have.
I expect I'll have it all by the end of next week. I'll post more photos of my efforts.
Your loyal subject
Phil
_________________
Hero in the 'messin-with-cameras-for-the-hell-of-it department'. Official. |
|
| Back to top |
|
|
Lloydy
Joined: 02 Sep 2009
Posts: 7785
Location: Ironbridge. UK.
Expire: 2022-01-01
|
| Posted: Sat Oct 04, 2014 11:22 pm Post subject: |
|
|
Lloydy wrote:
For the K10 I made my own wired remote with two buttons, but of course the Tair has to be focused manually. But it would give focus comfirmaton - the green hexagon.
_________________
LENSES & CAMERAS FOR SALE.....
I have loads of stuff that I have to get rid of, if you see me commenting about something I have got and you want one, ask me.
My Flickr https://www.flickr.com/photos/mudplugga/
My ipernity -
http://www.ipernity.com/home/294337 |
|
| Back to top |
|
|
philslizzy
Joined: 07 Aug 2012
Posts: 4748
Location: Cheshire, England
|
| Posted: Sun Oct 05, 2014 10:51 am Post subject: |
|
|
philslizzy wrote:
| Lloydy wrote: |
| For the K10 I made my own wired remote with two buttons, but of course the Tair has to be focused manually. But it would give focus comfirmaton - the green hexagon. |
more info please. I didnt see a K10 lead
_________________
Hero in the 'messin-with-cameras-for-the-hell-of-it department'. Official. |
|
| Back to top |
|
|
Lloydy
Joined: 02 Sep 2009
Posts: 7785
Location: Ironbridge. UK.
Expire: 2022-01-01
|
| Posted: Sun Oct 05, 2014 10:05 pm Post subject: |
|
|
Lloydy wrote:
http://www.instructables.com/id/E39XW91POAEZ7C935Q/
Here's the instructions - I ignored the 'bulb' switch and just used two buttons.
And..........today I bought a Sniper kit  absolutely complete and very clean and tidy, just a few very minor marks from being taken in and out of the tin case. I tried the lens on the A6000 and it is superb. absolutely complete and very clean and tidy, just a few very minor marks from being taken in and out of the tin case. I tried the lens on the A6000 and it is superb.
I went to the camera fair and within a few minutes of it opening I saw the box on the floor under a table, pulled it out and the guy said "Thirty pounds for that mate" I wave twenty five at hime and walked away a happy man!  I shall sell my non sniper Tair 300 now, the focusing is so much easier with the knob on the sniper. I shall sell my non sniper Tair 300 now, the focusing is so much easier with the knob on the sniper.
_________________
LENSES & CAMERAS FOR SALE.....
I have loads of stuff that I have to get rid of, if you see me commenting about something I have got and you want one, ask me.
My Flickr https://www.flickr.com/photos/mudplugga/
My ipernity -
http://www.ipernity.com/home/294337 |
|
| Back to top |
|
|
philslizzy
Joined: 07 Aug 2012
Posts: 4748
Location: Cheshire, England
|
| Posted: Sun Oct 05, 2014 10:43 pm Post subject: |
|
|
philslizzy wrote:
| Lloydy wrote: |
http://www.instructables.com/id/E39XW91POAEZ7C935Q/
Here's the instructions - I ignored the 'bulb' switch and just used two buttons.
And..........today I bought a Sniper kit absolutely complete and very clean and tidy, just a few very minor marks from being taken in and out of the tin case. I tried the lens on the A6000 and it is superb.
I went to the camera fair and within a few minutes of it opening I saw the box on the floor under a table, pulled it out and the guy said "Thirty pounds for that mate" I wave twenty five at hime and walked away a happy man! I shall sell my non sniper Tair 300 now, the focusing is so much easier with the knob on the sniper. |
I've seen this instructible before, I assume then the Pentax has a 2.5mm socket for its remote. Thats easy to make.
I found when using the Tair 3 PhS without the stock, if you loosen the screws on the camera mount and turn the lens a bit anti-clockwise the focus knob is in a slightly better position. For me anyway.
I have had to buy a pack of 3 microswitches and 5 3.5mm sockets so I can let you have a pair if you want to mod your stock too. And one more pair too if anyone else fancies a go.
_________________
Hero in the 'messin-with-cameras-for-the-hell-of-it department'. Official. |
|
| Back to top |
|
|
Lloydy
Joined: 02 Sep 2009
Posts: 7785
Location: Ironbridge. UK.
Expire: 2022-01-01
|
| Posted: Sun Oct 05, 2014 11:52 pm Post subject: |
|
|
Lloydy wrote:
Dead easy Phil, I found a lead off something with a moulded 2.5 stereo plug and just soldered the cable to two buttons in a small case.
Are you going to have a short fly lead from the stock with a socket on it so you can use different plugs for each camera? I'd like to use the A6000 and the K10. So yes, if you get the stuff I'll buy the bits off you.
I used the Sniper Tair on a tripod today and had the focus knob on the top, so much easier than the regular Tair.
_________________
LENSES & CAMERAS FOR SALE.....
I have loads of stuff that I have to get rid of, if you see me commenting about something I have got and you want one, ask me.
My Flickr https://www.flickr.com/photos/mudplugga/
My ipernity -
http://www.ipernity.com/home/294337 |
|
| Back to top |
|
|
philslizzy
Joined: 07 Aug 2012
Posts: 4748
Location: Cheshire, England
|
| Posted: Mon Oct 06, 2014 9:28 am Post subject: |
|
|
philslizzy wrote:
My plan is to put the socket inside the stock poking out through the hole that the camera trigger pokes through. Where the cable is now. I may have to ream it a little wider which I reckon will be unnoticable, and better than making a new hole.
The cable I am buying has an angled plug so there ought to be room for it under a camera body. If I can't do that then yes a short flylead will do the job, then its off to Maplins for a 3.5mm line socket. I'll let you know.
The bits were pennies each, this is why I had to buy in 'bulk', it would cost more to send money or paypal than they cost.
Its great that the lens has that curious Russian t-mount, I can use it on anything! One PITA is my Minolta x700 is too big with the motor wind attached. and I'd love to use that camera above anything else for film.
_________________
Hero in the 'messin-with-cameras-for-the-hell-of-it department'. Official. |
|
| Back to top |
|
|
barralier
Joined: 30 Oct 2014
Posts: 1
|
| Posted: Thu Oct 30, 2014 12:56 pm Post subject: |
|
|
barralier wrote:
Nice work Phil.
You have more patience than I. I mounted the TAIR3 onto a Nikon D3200 and simply mounted an IR remote upside down above the trigger plunger on the shoulder stock. Press the trigger and the plunger pushes the button [insert hillbilly Bubba-fab emoticon here].
Here's a couple of pics of mine, and I'm watching this thread with interest since I initially played around with the same type of remote cable and switch as you've used and will probably go that way as a more permanent solution.

 |
|
| Back to top |
|
|
philslizzy
Joined: 07 Aug 2012
Posts: 4748
Location: Cheshire, England
|
| Posted: Thu Oct 30, 2014 9:24 pm Post subject: |
|
|
philslizzy wrote:
Hi Barralier, firstly welcome to the forum and thanks for your timely post. I have taken photos of the mosd
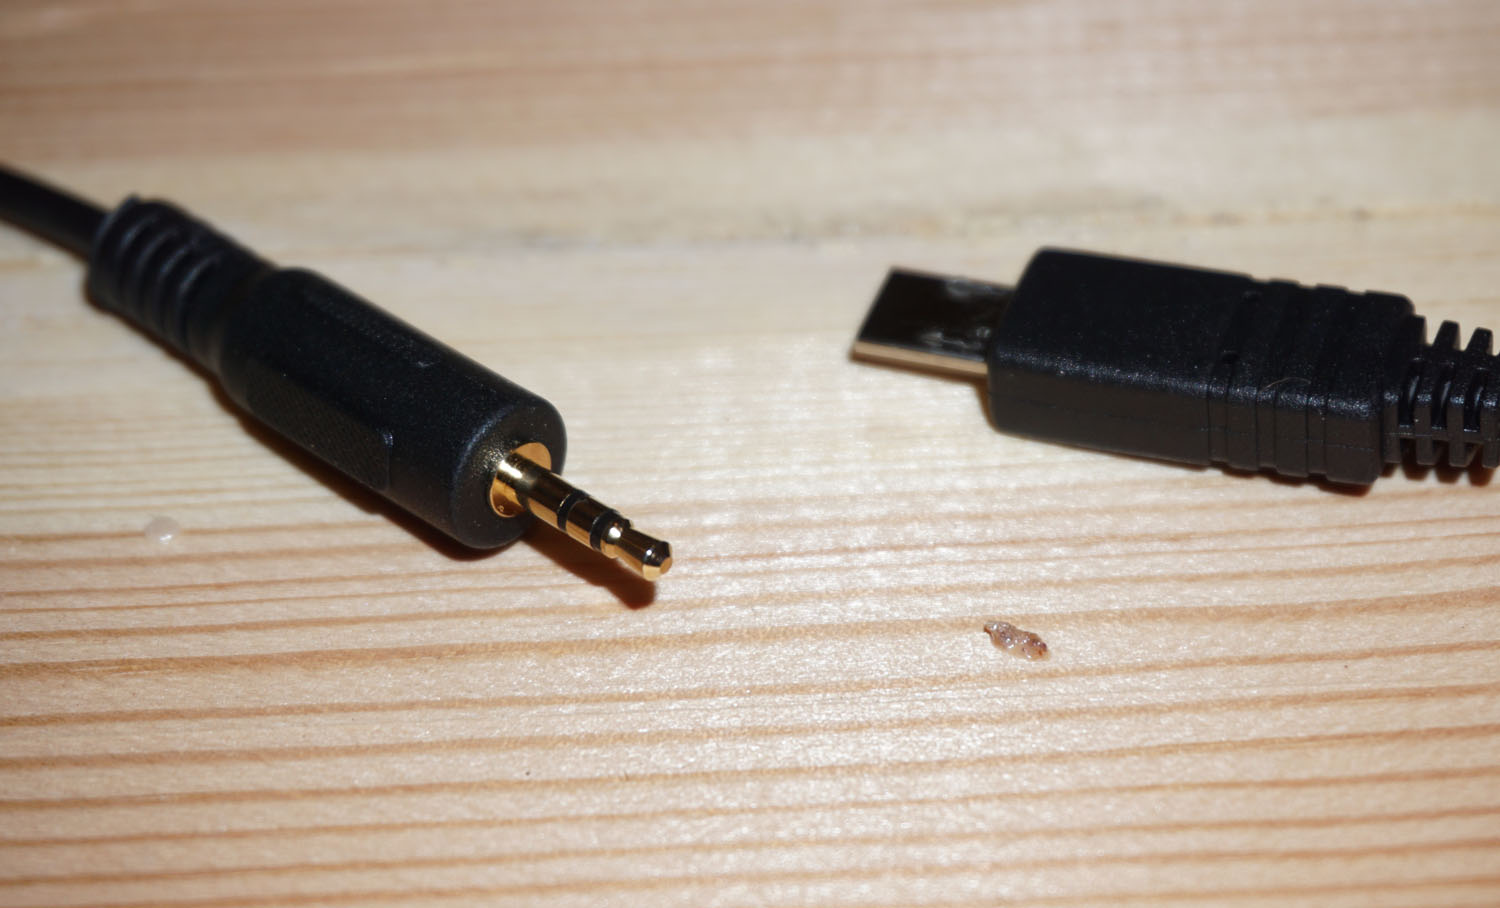
OK. I bought a remote cable for the Sony A6000. The cable was separate from the switch - probably so the maker could change the cable depending on shich camera it was for. The cable had the micro USB plug at the camera end and a 2.5mm stereo jack at the switch end. Useful as the 2.5mm will fit my Pentax as Lloydy pointed out. However my intention was not to use the pentax with the 'sniper. So I went to Maplins to buy a 2.5mm socket for the stock instead of 3.5mm. No luck, I'll use the 3.5's I already have. I bought a couple of 3.5mm angled plugs and decided to cut the remote cable in half and make two connectors.
Both ends of the cable

I cut and bared the wire, there were three. One for focus, one for release and one common. I plugged the lead into the camera and touched each one so I could see the effect. Which pins in the plug were which wasn't important so I decided the common would be the tip and the two others were the focus and shutter respectively, remembering which colours they were I soldered them into the plug.
Plug wired up

It is important to keep shutter and focus completely separate until the trigger is pulled. The release wont work without the focus but if the two are permanently connected the screen goes blank. No info or preview or anything. I soldered the same colour wires onto the line socket.
The micro switch is a double pole double throw type DPDT, the common pins are soldered together and the focus and trigger leads are attached to the pins thet will close when the switch is activated. The rear pins I snipped off as they are not used. There was a large metal leaf attached to the switch, I removed this so the trigger operates the switch directly.
Socket and microswitch connected
 ' '
I pushed the 3.5mm socket though the 'pin' hole and it fitted perfectly. There is not much room for this socket but it will fit. I glued a small piece of scrap plastic to the trigger plate in case the switch pins touched but but this wasn't necessary as it turns out as the switch wedges nicely between the secured socket and the trigger pivot. I filled the gap with hot glue much like the original photo in my first post. Its not going anywhere now.
Socket and microswitch in position prior to glueing.

This is completely reversible and no Photosnipers were harmed in the making of this modification
Let me know if you do it.
_________________
Hero in the 'messin-with-cameras-for-the-hell-of-it department'. Official. |
|
| Back to top |
|
|
Lloydy
Joined: 02 Sep 2009
Posts: 7785
Location: Ironbridge. UK.
Expire: 2022-01-01
|
| Posted: Thu Oct 30, 2014 11:20 pm Post subject: |
|
|
Lloydy wrote:
Phil, is the microswitch progressive - does it have two click positions?
_________________
LENSES & CAMERAS FOR SALE.....
I have loads of stuff that I have to get rid of, if you see me commenting about something I have got and you want one, ask me.
My Flickr https://www.flickr.com/photos/mudplugga/
My ipernity -
http://www.ipernity.com/home/294337 |
|
| Back to top |
|
|
KingRoach

Joined: 21 Dec 2013
Posts: 87
Location: United Kingdom
|
| Posted: Fri Oct 31, 2014 12:20 am Post subject: |
|
|
KingRoach wrote:
This is real nice. Keep it up, Phil!
_________________
HELP MY STUDIES
I'm a Photographer on a Budget
500px - flickr - deviantART |
|
| Back to top |
|
|
philslizzy
Joined: 07 Aug 2012
Posts: 4748
Location: Cheshire, England
|
| Posted: Fri Oct 31, 2014 7:58 pm Post subject: |
|
|
philslizzy wrote:
| KingRoach wrote: |
| This is real nice. Keep it up, Phil! |
Thanks for that. I like messing about with cameras! This is a good kit and it is great to use it as it was intended. I wonder why they never made a clockwork-motor Zenit for this.
| Lloydy wrote: |
| Phil, is the microswitch progressive - does it have two click positions? |
No Dave only one position, The rear pins are connected via the switch to the common (middle) if the switch is pushed the connection breaks. The pins at the front connect when when it is pushed. They are the ones I used for the focus and trigger. The focus and trigger are kept separate until the switch is pushed, then they are connected to the common which is shorted.
Your normal cheap remote trigger has two positions. first is focus and second is trigger, you can see it on the photo in my original post. I considered using it but it was too big and besides I had a microswitch in my spares box.
If you had a progressive microswitch, then I'd wire the focus to position one and trigger to position two. I didn't know you could get one of these otherwise I may have gone down that route. However I'm happy with what I've got.

These are my spares, if you want one I can send one. UK only
on ebay it's this item: Click here to see on Ebay
2.5mm socket: Click here to see on Ebay
I plan to visit the local deer park very soon, they are rutting and I got one or two good shots on Wednesday with an old Hanimex 200mm. The Tair, on a tripod will probably do the job nicely.
Now to see If I can hack the stock so it will attach to my tripod so I won't have to dismantle the thing to use it.
_________________
Hero in the 'messin-with-cameras-for-the-hell-of-it department'. Official. |
|
| Back to top |
|
|
Lloydy
Joined: 02 Sep 2009
Posts: 7785
Location: Ironbridge. UK.
Expire: 2022-01-01
|
| Posted: Sat Nov 01, 2014 12:00 am Post subject: |
|
|
Lloydy wrote:
My plan is to use it with the K10 and the Sony, and I would like the focus confirmation for the K10 - I find it moderately useful when I'm using the K10 on a tripod with my home made remote switch which has two buttons. I'm looking at 2 very small switches that can be mounted side by side with a stepped pad on the trigger lever. I think I can just about squeeze 2 switches in if I relieve 1mm from the inside cavity of the stock casting, it's 0.5mm each side for maybe 15mm length and 10mm depth, which won't affect the strength and won't be seen either.
I will need to have the facility to swop leads as well - I will jack plug the output and have two fly leads.
_________________
LENSES & CAMERAS FOR SALE.....
I have loads of stuff that I have to get rid of, if you see me commenting about something I have got and you want one, ask me.
My Flickr https://www.flickr.com/photos/mudplugga/
My ipernity -
http://www.ipernity.com/home/294337 |
|
| Back to top |
|
|
philslizzy
Joined: 07 Aug 2012
Posts: 4748
Location: Cheshire, England
|
| Posted: Sat Nov 01, 2014 11:02 am Post subject: |
|
|
philslizzy wrote:
Good idea although complicating the job. I hadn't thought of operating focus confirm on the Pentax because I have the split image focusing screen fitted, it tallies up exactly with the focus confirm. Havent you got one yet?
The Nikon does it anyway, incidentally A dandelion chip attached to the body adapter will give auto exposure. Doubling duty also when it's used on any T mount lens. Useful.
A problem, perhaps, with the Pentax is that the socket and plug may get in the way of the camera as the body is quite deep. Unless you use a tiny 2.5mm plug as you have proposed.
Re the leads, the one I have has a double ended cable each, end perfect for the Pentax and the Sony with your headphone plug attached. Mind you a double ended 2.5mm cable ought not to be too hard to construct out of a couple of pound-shop headphones.
Lets see how you get on.
Thanks to others for your interest in this topic, please let me know your thoughts, or let us know how you did it.
_________________
Hero in the 'messin-with-cameras-for-the-hell-of-it department'. Official. |
|
| Back to top |
|
|
Lloydy
Joined: 02 Sep 2009
Posts: 7785
Location: Ironbridge. UK.
Expire: 2022-01-01
|
| Posted: Sat Nov 01, 2014 6:44 pm Post subject: |
|
|
Lloydy wrote:
I've just ordered one of these - Click here to see on Ebay - which has a detachable lead with the 2.5 plug. Put a 2.5 socket in the stock and the Sony will use this cable and the K10 a 2.5 to 2.5.
_________________
LENSES & CAMERAS FOR SALE.....
I have loads of stuff that I have to get rid of, if you see me commenting about something I have got and you want one, ask me.
My Flickr https://www.flickr.com/photos/mudplugga/
My ipernity -
http://www.ipernity.com/home/294337
Last edited by Lloydy on Sun Nov 02, 2014 4:32 pm; edited 1 time in total |
|
| Back to top |
|
|
peterqd

Joined: 28 Feb 2007
Posts: 7448
Location: near High Wycombe, UK
Expire: 2014-01-04
|
| Posted: Sun Nov 02, 2014 11:59 am Post subject: |
|
|
peterqd wrote:
Dave, when you use the eBay brackets, just include the item number, not the whole URL, otherwise it doesn't work correctly. I would have
edited your post if I could, but I don't have Mod powers in the DIY forum, so I've reposted it below. This link works OK.
Lloydy said - I've just ordered one of these - Click here to see on Ebay - which has a detachable lead with the 2.5 plug. Put a 2.5
socket in the stock and the Sony will use this cable and the K10 a 2.5 to 2.5.
_________________
Peter - Moderator |
|
| Back to top |
|
|
Lloydy
Joined: 02 Sep 2009
Posts: 7785
Location: Ironbridge. UK.
Expire: 2022-01-01
|
| Posted: Sun Nov 02, 2014 4:31 pm Post subject: |
|
|
Lloydy wrote:
Thank you Peter, I've edited the link now..
_________________
LENSES & CAMERAS FOR SALE.....
I have loads of stuff that I have to get rid of, if you see me commenting about something I have got and you want one, ask me.
My Flickr https://www.flickr.com/photos/mudplugga/
My ipernity -
http://www.ipernity.com/home/294337 |
|
| Back to top |
|
|
philslizzy
Joined: 07 Aug 2012
Posts: 4748
Location: Cheshire, England
|
| Posted: Mon Nov 03, 2014 1:58 am Post subject: |
|
|
philslizzy wrote:
| Lloydy wrote: |
| I've just ordered one of these - Click here to see on Ebay - which has a detachable lead with the 2.5 plug. Put a 2.5 socket in the stock and the Sony will use this cable and the K10 a 2.5 to 2.5. |
That is the one I bought with the double ended lead.
Show pics of your mod.
_________________
Hero in the 'messin-with-cameras-for-the-hell-of-it department'. Official. |
|
| Back to top |
|
|
Lloydy
Joined: 02 Sep 2009
Posts: 7785
Location: Ironbridge. UK.
Expire: 2022-01-01
|
| Posted: Mon Nov 03, 2014 11:23 am Post subject: |
|
|
Lloydy wrote:
I haven't got the micro switches yet, but work will start once I do. 
_________________
LENSES & CAMERAS FOR SALE.....
I have loads of stuff that I have to get rid of, if you see me commenting about something I have got and you want one, ask me.
My Flickr https://www.flickr.com/photos/mudplugga/
My ipernity -
http://www.ipernity.com/home/294337 |
|
| Back to top |
|
|
philslizzy
Joined: 07 Aug 2012
Posts: 4748
Location: Cheshire, England
|
| Posted: Mon Nov 03, 2014 11:18 pm Post subject: |
|
|
philslizzy wrote:
You can keep the focus lead closed all the time, I tried it today and focus confirm stays on all the time - but no screen info.
Oh and if you are thinking of using poundshop headphones as donors for the 3.5mm jack - then good luck. You'll need it. I wasted �2 and 2 hours this morning trying to solder one of those fiddly little buggers onto my camera lead. Threw the lot away. ferkin useless.
_________________
Hero in the 'messin-with-cameras-for-the-hell-of-it department'. Official. |
|
| Back to top |
|
|
Lloydy
Joined: 02 Sep 2009
Posts: 7785
Location: Ironbridge. UK.
Expire: 2022-01-01
|
| Posted: Mon Nov 03, 2014 11:37 pm Post subject: |
|
|
Lloydy wrote:
There's a special kind of wire used in some headphone leads, and other things where thin and flexible leads are required, that doesn't solder. The wire seems to overheat, turn black and brittle. I've got a good electronics soldering iron with a tiny tip, various fluxes, and solders - but it will not solder.
I suspect that these cables are steel with a tin plate on the individual filaments, that burns off at the temperature we see in a normal soldering iron rendering normal flux / solder useless. I think that at the factory some kind of low temperature solder is used.
_________________
LENSES & CAMERAS FOR SALE.....
I have loads of stuff that I have to get rid of, if you see me commenting about something I have got and you want one, ask me.
My Flickr https://www.flickr.com/photos/mudplugga/
My ipernity -
http://www.ipernity.com/home/294337 |
|
| Back to top |
|
|
philslizzy
Joined: 07 Aug 2012
Posts: 4748
Location: Cheshire, England
|
| Posted: Tue Nov 04, 2014 9:30 am Post subject: |
|
|
philslizzy wrote:
Yes, its as thin as a hair and appears to be laquered, the laquer acting as the insulation. No wonder cheap headphones are rubbish (not to mention the sound quality)
_________________
Hero in the 'messin-with-cameras-for-the-hell-of-it department'. Official. |
|
| Back to top |
|
|
Lloydy
Joined: 02 Sep 2009
Posts: 7785
Location: Ironbridge. UK.
Expire: 2022-01-01
|
| Posted: Tue Nov 04, 2014 4:07 pm Post subject: |
|
|
Lloydy wrote:
I'm so pissed off.................I modified the trigger, made a switch, it works perfectly - although I haven't got the 2.5 socket yet.
Got the lens out of the case and fitted it on the stock to try the stop down mechanism - and the f*****g aperture blades decided to tangle themselves up!  There wasn't even oil on the blades of this lens, it's as close to mint as you could expect for a lens this old..... There wasn't even oil on the blades of this lens, it's as close to mint as you could expect for a lens this old..... 
I found this link -
http://forum.mflenses.com/tair-3-300-4-5-part-of-the-photosniper-repair-guide-t27056.html
so I guess I'd better get the tools out....
_________________
LENSES & CAMERAS FOR SALE.....
I have loads of stuff that I have to get rid of, if you see me commenting about something I have got and you want one, ask me.
My Flickr https://www.flickr.com/photos/mudplugga/
My ipernity -
http://www.ipernity.com/home/294337 |
|
| Back to top |
|
|
|
|