| View previous topic :: View next topic |
| Author |
Message |
Lloydy


Joined: 02 Sep 2009
Posts: 7785
Location: Ironbridge. UK.
Expire: 2022-01-01
|
 Posted: Tue Nov 04, 2014 11:08 pm Post subject: Posted: Tue Nov 04, 2014 11:08 pm Post subject: |
 |
|
Lloydy wrote:
I've got the lens in two pieces, I'll probably try to get the blades back later this week. 
but the switch I made is a success, at least I think it's a success.
In the end I chose the simple approach, just a simple open or closed two wire switch but using the metal of the Photosniper trigger as one of the connections, I just removed the long pin that actuates the Zenit shutter and replaced it with a screw and secured one wire under the head - I filed off a bit of paint just to ensure a better contact to the soldered eyelet connector.
The other contact is fitted in the hole where the actuator pin pokes through. I used a very short length - approx 3mm - of 6mm outside dia' PVC tube ( car windscreen washer tube ) pushed into the hole as an insulator. Each side of the metal plate I used a fibre washer with a 6mm hole to also insulate the 3.5mm screw and nut that is pushed through the PVC tube. Under the nut is the wire with an eyelet connector that makes contact with the screw and nut - but not the metalwork of the trigger ass'y.


I will run the cable forward to a point in front of the trigger, maybe in front of the securing wheel, and drill the alloy body and fit a 2.5mm jack plug.
I've tested the switch with a meter for maybe 1/2 hour and it seems to work perfectly. I just need to fix the damn lens! ( I'm still pissed off  ) )
_________________
LENSES & CAMERAS FOR SALE.....
I have loads of stuff that I have to get rid of, if you see me commenting about something I have got and you want one, ask me.
My Flickr https://www.flickr.com/photos/mudplugga/
My ipernity -
http://www.ipernity.com/home/294337 |
|
| Back to top |
|
 |
Lloydy
Joined: 02 Sep 2009
Posts: 7785
Location: Ironbridge. UK.
Expire: 2022-01-01
|
| Posted: Thu Nov 06, 2014 3:02 pm Post subject: |
|
|
Lloydy wrote:
Well,,,,,I fixed the lens.  The instructions in the link above aren't bad at all. there was a tiny bit of oil on the blades, around the edges and unseen through the lens, it really was a slight trace and no more. I think the spring loaded crash as it stops down is probably enough to dislodge the slightest of oiled blades. I was tempted to take at least one of the three springs out of the lens to lessen the crash, but I didn't - it doesn't need the auto stop down with a digi cam, so I'll just be careful when I set the aperture and if I use the auto lever when I set it, I'll hold the ring and release it slowly. If I like the lens I will probably disable the spring release and just have the aperture on the click ring. The instructions in the link above aren't bad at all. there was a tiny bit of oil on the blades, around the edges and unseen through the lens, it really was a slight trace and no more. I think the spring loaded crash as it stops down is probably enough to dislodge the slightest of oiled blades. I was tempted to take at least one of the three springs out of the lens to lessen the crash, but I didn't - it doesn't need the auto stop down with a digi cam, so I'll just be careful when I set the aperture and if I use the auto lever when I set it, I'll hold the ring and release it slowly. If I like the lens I will probably disable the spring release and just have the aperture on the click ring.
_________________
LENSES & CAMERAS FOR SALE.....
I have loads of stuff that I have to get rid of, if you see me commenting about something I have got and you want one, ask me.
My Flickr https://www.flickr.com/photos/mudplugga/
My ipernity -
http://www.ipernity.com/home/294337 |
|
| Back to top |
|
|
philslizzy

Joined: 07 Aug 2012
Posts: 4748
Location: Cheshire, England
|
| Posted: Thu Nov 06, 2014 3:38 pm Post subject: |
|
|
philslizzy wrote:
| Lloydy wrote: |
| Well,,,,,I fixed the lens. The instructions in the link above aren't bad at all. there was a tiny bit of oil on the blades, around the edges and unseen through the lens, it really was a slight trace and no more. I think the spring loaded crash as it stops down is probably enough to dislodge the slightest of oiled blades. I was tempted to take at least one of the three springs out of the lens to lessen the crash, but I didn't - it doesn't need the auto stop down with a digi cam, so I'll just be careful when I set the aperture and if I use the auto lever when I set it, I'll hold the ring and release it slowly. If I like the lens I will probably disable the spring release and just have the aperture on the click ring. |
Glad to see you've sorted it. The spring is bloody strong I'd like to see how you disable it. Click stops would be better as the aperture is fiddly. The spring on mine goes with a real crash.
Nice switch BTW. I went for the easy, reversible approach. 
Well, I hope its inspired others to do the same.
_________________
Hero in the 'messin-with-cameras-for-the-hell-of-it department'. Official. |
|
| Back to top |
|
|
Lloydy
Joined: 02 Sep 2009
Posts: 7785
Location: Ironbridge. UK.
Expire: 2022-01-01
|
| Posted: Thu Nov 06, 2014 5:21 pm Post subject: |
|
|
Lloydy wrote:
I was more concerned with fixing the damn thing than making mod's to it, but now I know my way around it I might modify the stop down mechanism in the future.
I've borrowed this picture from the repair thread.
The yellow part of the lens rotates in the direction of the blue arrow, the smaller the aperture the more it rotates.
The red arrows are the springs that send it crashing closed when the stop down lever is pressed.
The pink arrow is the tongue of the rotating part with a screw going through a slot to the blade actuator
The green arrow is the 'stop' - this moves with the yellow part until it engages with the stop down lever - the external lever. When the lever is pressed the yellow part rotates back - opposite to the blue arrow - and the 'stop' crashes into a tongue on the aperture ring, which is on the outer part of the lens and more or less in line with the point of the green arrow.

If that makes sense?
I think, that if the tension of the springs is reduced, the click stops lightened, and the stop down ring disabled, the aperture ring will work just like a normal lens. 
The switch is totally reversible, and could even be used with the Zenit if I replaced the screw through the lever with the original pin and made the wire contact in a different place.
_________________
LENSES & CAMERAS FOR SALE.....
I have loads of stuff that I have to get rid of, if you see me commenting about something I have got and you want one, ask me.
My Flickr https://www.flickr.com/photos/mudplugga/
My ipernity -
http://www.ipernity.com/home/294337 |
|
| Back to top |
|
|
nikono
Joined: 04 Nov 2014
Posts: 38
|
| Posted: Thu Nov 20, 2014 2:06 am Post subject: |
|
|
nikono wrote:
For fun, I mod-ernized the FotoSniper with a newer camera, old lens (effective power as shown 300mm x 3 x 1.7), focus ring is at hand.

With the wireless transmitter taped facing down, the trigger pin pointing up will do its trick.
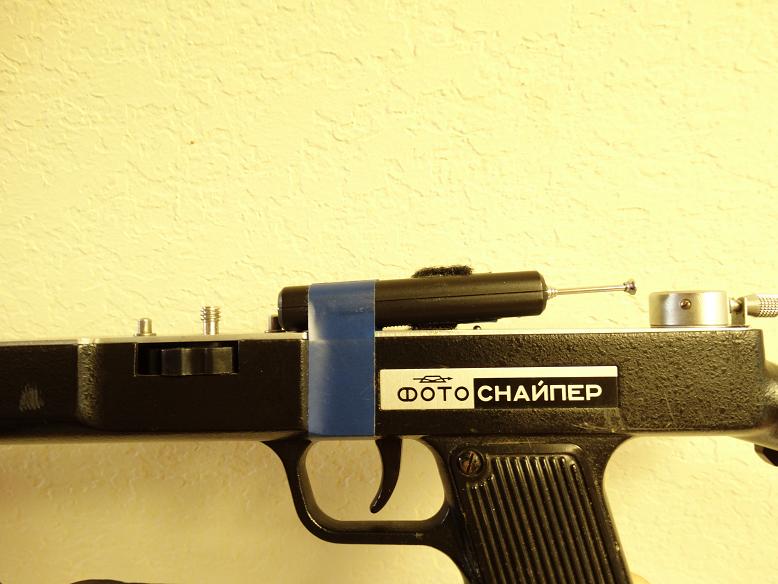
Red light means "triggered!"

All can be disassembled in few minutes when there's a police raid (LOL). |
|
| Back to top |
|
|
philslizzy
Joined: 07 Aug 2012
Posts: 4748
Location: Cheshire, England
|
| Posted: Thu Nov 20, 2014 10:42 am Post subject: |
|
|
philslizzy wrote:
A nice simple solution, but it wouldnt work with the Tair as there would be no room for the transmitter.
_________________
Hero in the 'messin-with-cameras-for-the-hell-of-it department'. Official. |
|
| Back to top |
|
|
nikono
Joined: 04 Nov 2014
Posts: 38
|
| Posted: Fri Nov 21, 2014 2:01 am Post subject: |
|
|
nikono wrote:
Don't give up.
The wireless control has two parts. A square receiver that connects to the camera and a long shaped transmitter. Either part should work for any lens.
For the Tair lens, the empty space at the trigger pin should fit the receiver without its flash shoe. The receiver also has a trigger button is at its middle so all should look squarely good after the mod.
A clean way to tape it is to route the black electrical tape between the handle's plate and the handle. |
|
| Back to top |
|
|
Lloydy
Joined: 02 Sep 2009
Posts: 7785
Location: Ironbridge. UK.
Expire: 2022-01-01
|
| Posted: Thu Feb 26, 2015 8:29 pm Post subject: |
|
|
Lloydy wrote:
My Photosniper has been in its box for ages waiting for me to just solder the wires from the jack plug to the pair of miniature micro switches.
All the modifications are reversible except for the small drilled hole where the cable comes out. The intention is to fit a proper jack socket into the hole. I got two from Maplins but they were absolute junk and the heat of soldering wrecked them. So until I find a decent quality socket I got a 2.5mm stereo extension and chopped the plug off and it's now a fly lead hanging out of the hole. I used 2.5 jack socket because the wired remote has that size plug and I can use the same lead.
Inside, I made a new alloy trigger to gain about 1.5mm extra space, I could have filed the original trigger but it was easy enough to make another, which has a step to fire the switches separately.
The two miniature micro switches are mounted in a alloy bracket and bolted through a hole in the top plate of the stock.
It works nicely with the Sony A6000, the lens is really sharp and the whole thing is very easy to use.

_________________
LENSES & CAMERAS FOR SALE.....
I have loads of stuff that I have to get rid of, if you see me commenting about something I have got and you want one, ask me.
My Flickr https://www.flickr.com/photos/mudplugga/
My ipernity -
http://www.ipernity.com/home/294337 |
|
| Back to top |
|
|
philslizzy
Joined: 07 Aug 2012
Posts: 4748
Location: Cheshire, England
|
| Posted: Fri Feb 27, 2015 10:56 am Post subject: |
|
|
philslizzy wrote:
So many ways to skin this particular cat. Nice mod Dave.
_________________
Hero in the 'messin-with-cameras-for-the-hell-of-it department'. Official. |
|
| Back to top |
|
|
Olivier

Joined: 18 Feb 2009
Posts: 5077
Location: France
Expire: 2015-08-06
|
| Posted: Fri Feb 27, 2015 11:02 pm Post subject: |
|
|
Olivier wrote:
Interesting topic ! Thank you.
There was another kind of mod for canon EOS in the sticky section :
http://forum.mflenses.com/adapting-a-photosniper-to-a-canon-eos-by-thierry-hacquard-t55797.html
Here is the page
http://t.hacquard.free.fr/site2/sniper_1_en.html
_________________
Olivier - Moderator 
Dslr : Olympus Pen E-P2 - Fujifilm X-Pro2 - Canon 5D MkII.
SLr and MF lenses : for feedback and helping people, cameras and lenses I own : full list here http://forum.mflenses.com/viewtopic,p,1442740.html#1442740 |
|
| Back to top |
|
|
|
|
|
You cannot post new topics in this forum
You cannot reply to topics in this forum
You cannot edit your posts in this forum
You cannot delete your posts in this forum
You cannot vote in polls in this forum
|


