| View previous topic :: View next topic |
| Author |
Message |
slimyfishy
Joined: 07 Mar 2024
Posts: 3
|
 Posted: Thu Mar 07, 2024 11:30 pm Post subject: What's going on with my Hexanon 57mm 1.2? Posted: Thu Mar 07, 2024 11:30 pm Post subject: What's going on with my Hexanon 57mm 1.2? |
 |
|
slimyfishy wrote:
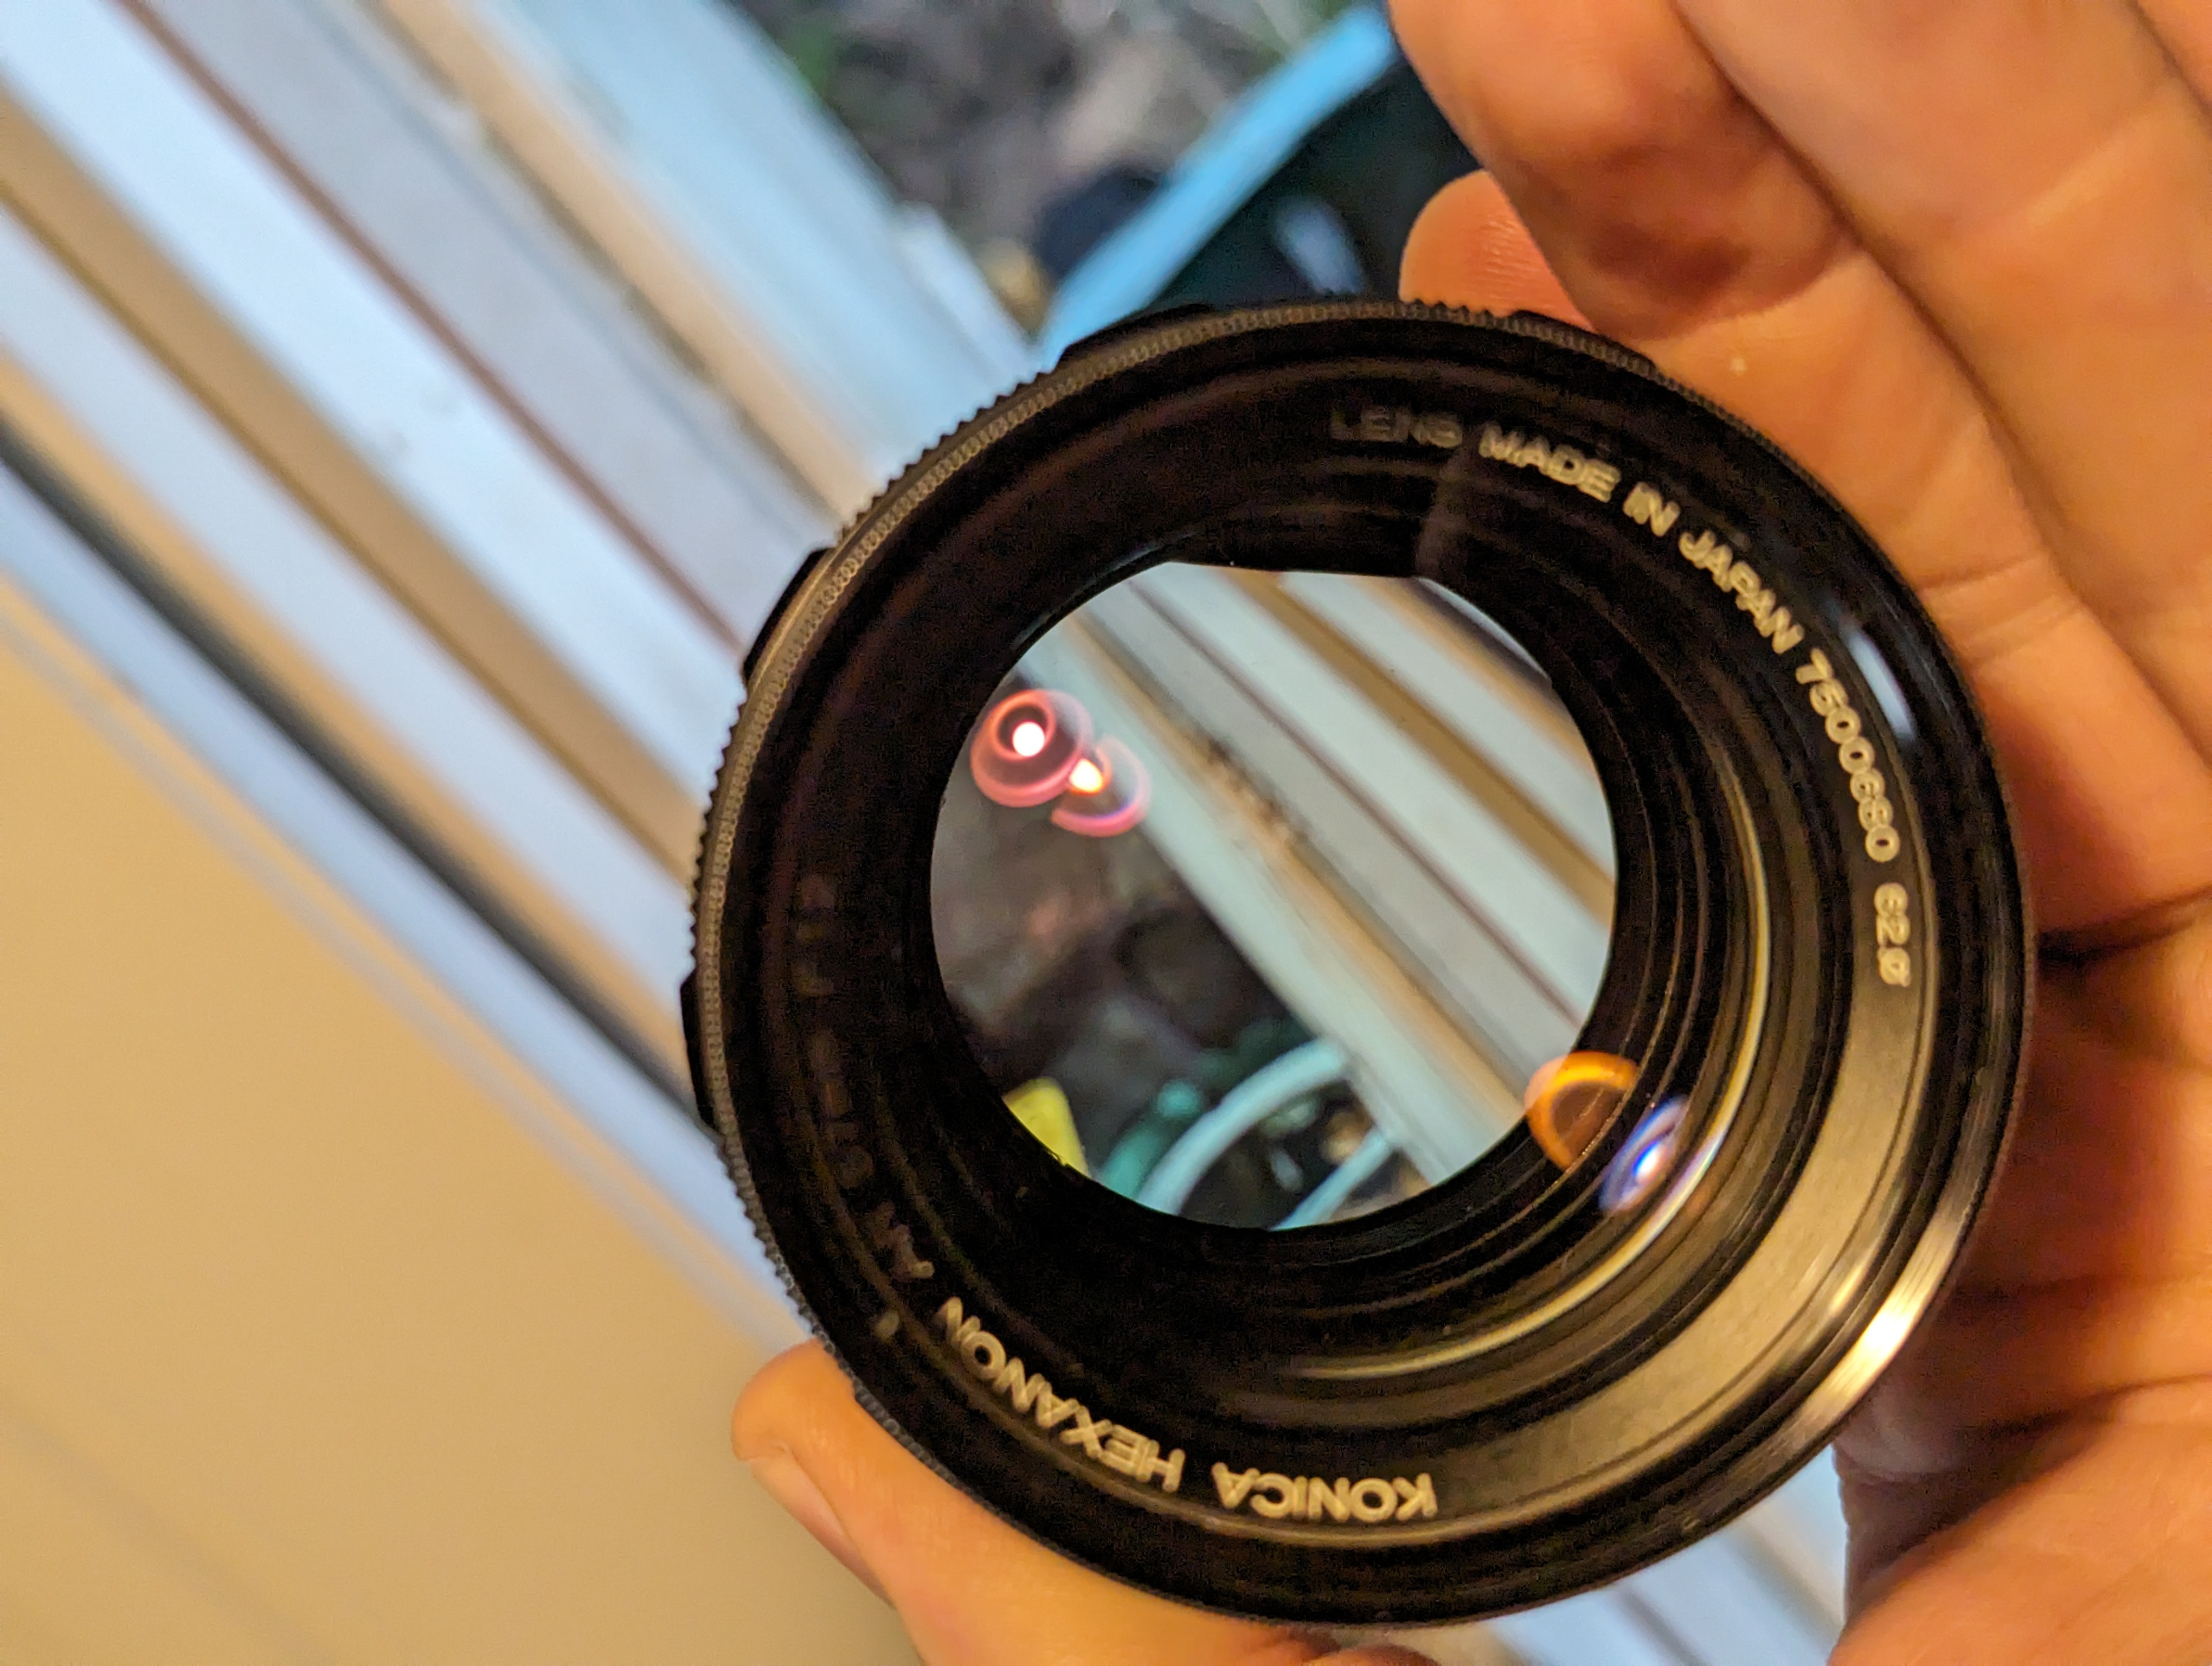
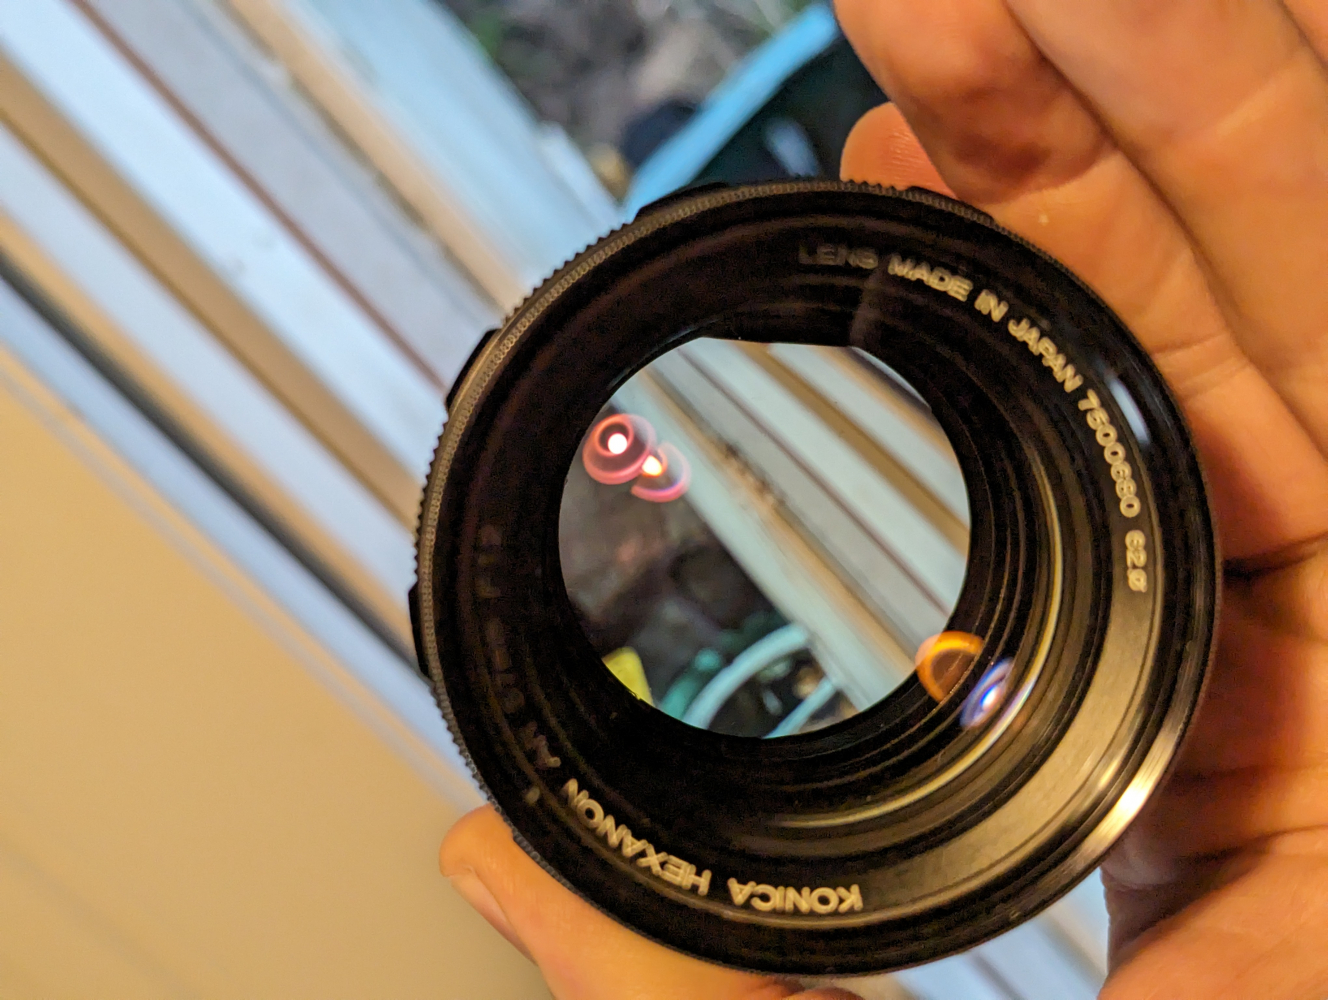
Recently I purchased an old Hexanon 57mm 1.2 that looks to be in great condition. There is no oil, fungus, haze etc... The problem I'm having is that at any aperture larger than f/4 it looks like it's shooting through a fog bank. Everything gets a dreamy soft glowing look. I've tried several different brands of adapters on my Canon R7. I've taken it to two different repair people who didn't want to work on the lens. My personal theory is that maybe an element was reversed, whoever had it before me had de-clicked the aperture so maybe they took the lens apart too. Does anyone have any theories.
Thanks
Ian
#1

#2

#3
#4
 |
|
| Back to top |
|
 |
visualopsins


Joined: 05 Mar 2009
Posts: 10957
Location: California
Expire: 2025-04-11
|
| Posted: Thu Mar 07, 2024 11:55 pm Post subject: Re: What's going on with my Hexanon 57mm 1.2? |
|
|
visualopsins wrote:
Welcome slimyfishy
| slimyfishy wrote: |
Recently I purchased an old Hexanon 57mm 1.2 that looks to be in great condition. There is no oil, fungus, haze etc... The problem I'm having is that at any aperture larger than f/4 it looks like it's shooting through a fog bank. Everything gets a dreamy soft glowing look. I've tried several different brands of adapters on my Canon R7. I've taken it to two different repair people who didn't want to work on the lens. My personal theory is that maybe an element was reversed, whoever had it before me had de-clicked the aperture so maybe they took the lens apart too. Does anyone have any theories.
Thanks
Ian
#1
#2
#3
#4
|
_________________
☮☮☮☮☮☮☮☮☮☮☮☮☮☮☮☮☮☮☮☮☮☮☮☮☮☮☮☮☮☮☮☮ like attracts like! ☮☮☮☮☮☮☮☮☮☮☮☮☮☮☮☮☮☮☮☮☮☮☮☮☮☮☮☮☮☮☮☮
Cameras: Sony ILCE-7RM2, Spotmatics II, F, and ESII, Nikon P4
Lenses:
M42 Asahi Optical Co., Takumar 1:4 f=35mm, 1:2 f=58mm (Sonnar), 1:2.4 f=58mm (Heliar), 1:2.2 f=55mm (Gaussian), 1:2.8 f=105mm (Model I), 1:2.8/105 (Model II), 1:5.6/200, Tele-Takumar 1:5.6/200, 1:6.3/300, Macro-Takumar 1:4/50, Auto-Takumar 1:2.3 f=35, 1:1.8 f=55mm, 1:2.2 f=55mm, Super-TAKUMAR 1:3.5/28 (fat), 1:2/35 (Fat), 1:1.4/50 (8-element), Super-Multi-Coated Fisheye-TAKUMAR 1:4/17, Super-Multi-Coated TAKUMAR 1:4.5/20, 1:3.5/24, 1:3.5/28, 1:2/35, 1:3.5/35, 1:1.8/85, 1:1.9/85 1:2.8/105, 1:3.5/135, 1:2.5/135 (II), 1:4/150, 1:4/200, 1:4/300, 1:4.5/500, Super-Multi-Coated Macro-TAKUMAR 1:4/50, 1:4/100, Super-Multi-Coated Bellows-TAKUMAR 1:4/100, SMC TAKUMAR 1:1.4/50, 1:1.8/55
M42 Carl Zeiss Jena Flektogon 2.4/35
Contax Carl Zeiss Vario-Sonnar T* 28-70mm F3.5-4.5
Pentax K-mount SMC PENTAX-A ZOOM 1:3.5 35~105mm, SMC PENTAX ZOOM 1:4 45~125mm
Nikon Micro-NIKKOR-P-C Auto 1:3.5 f=55mm, NIKKOR-P Auto 105mm f/2.5 Pre-AI (Sonnar), Micro-NIKKOR 105mm 1:4 AI, NIKKOR AI-S 35-135mm f/3,5-4,5
Tamron SP 17mm f/3.5 (51B), Tamron SP 17mm f/3.5 (151B), SP 500mm f/8 (55BB), SP 70-210mm f/3.5 (19AH)
Vivitar 100mm 1:2.8 MC 1:1 Macro Telephoto (Kiron)
|
|
| Back to top |
|
|
jamaeolus

Joined: 19 Mar 2014
Posts: 2964
Location: Eugene
Expire: 2015-08-20
|
| Posted: Fri Mar 08, 2024 5:40 am Post subject: |
|
|
jamaeolus wrote:
Are you using a hood?
_________________
photos are moments frozen in time |
|
| Back to top |
|
|
slimyfishy
Joined: 07 Mar 2024
Posts: 3
|
| Posted: Fri Mar 08, 2024 6:17 am Post subject: |
|
|
slimyfishy wrote:
| jamaeolus wrote: |
| Are you using a hood? |
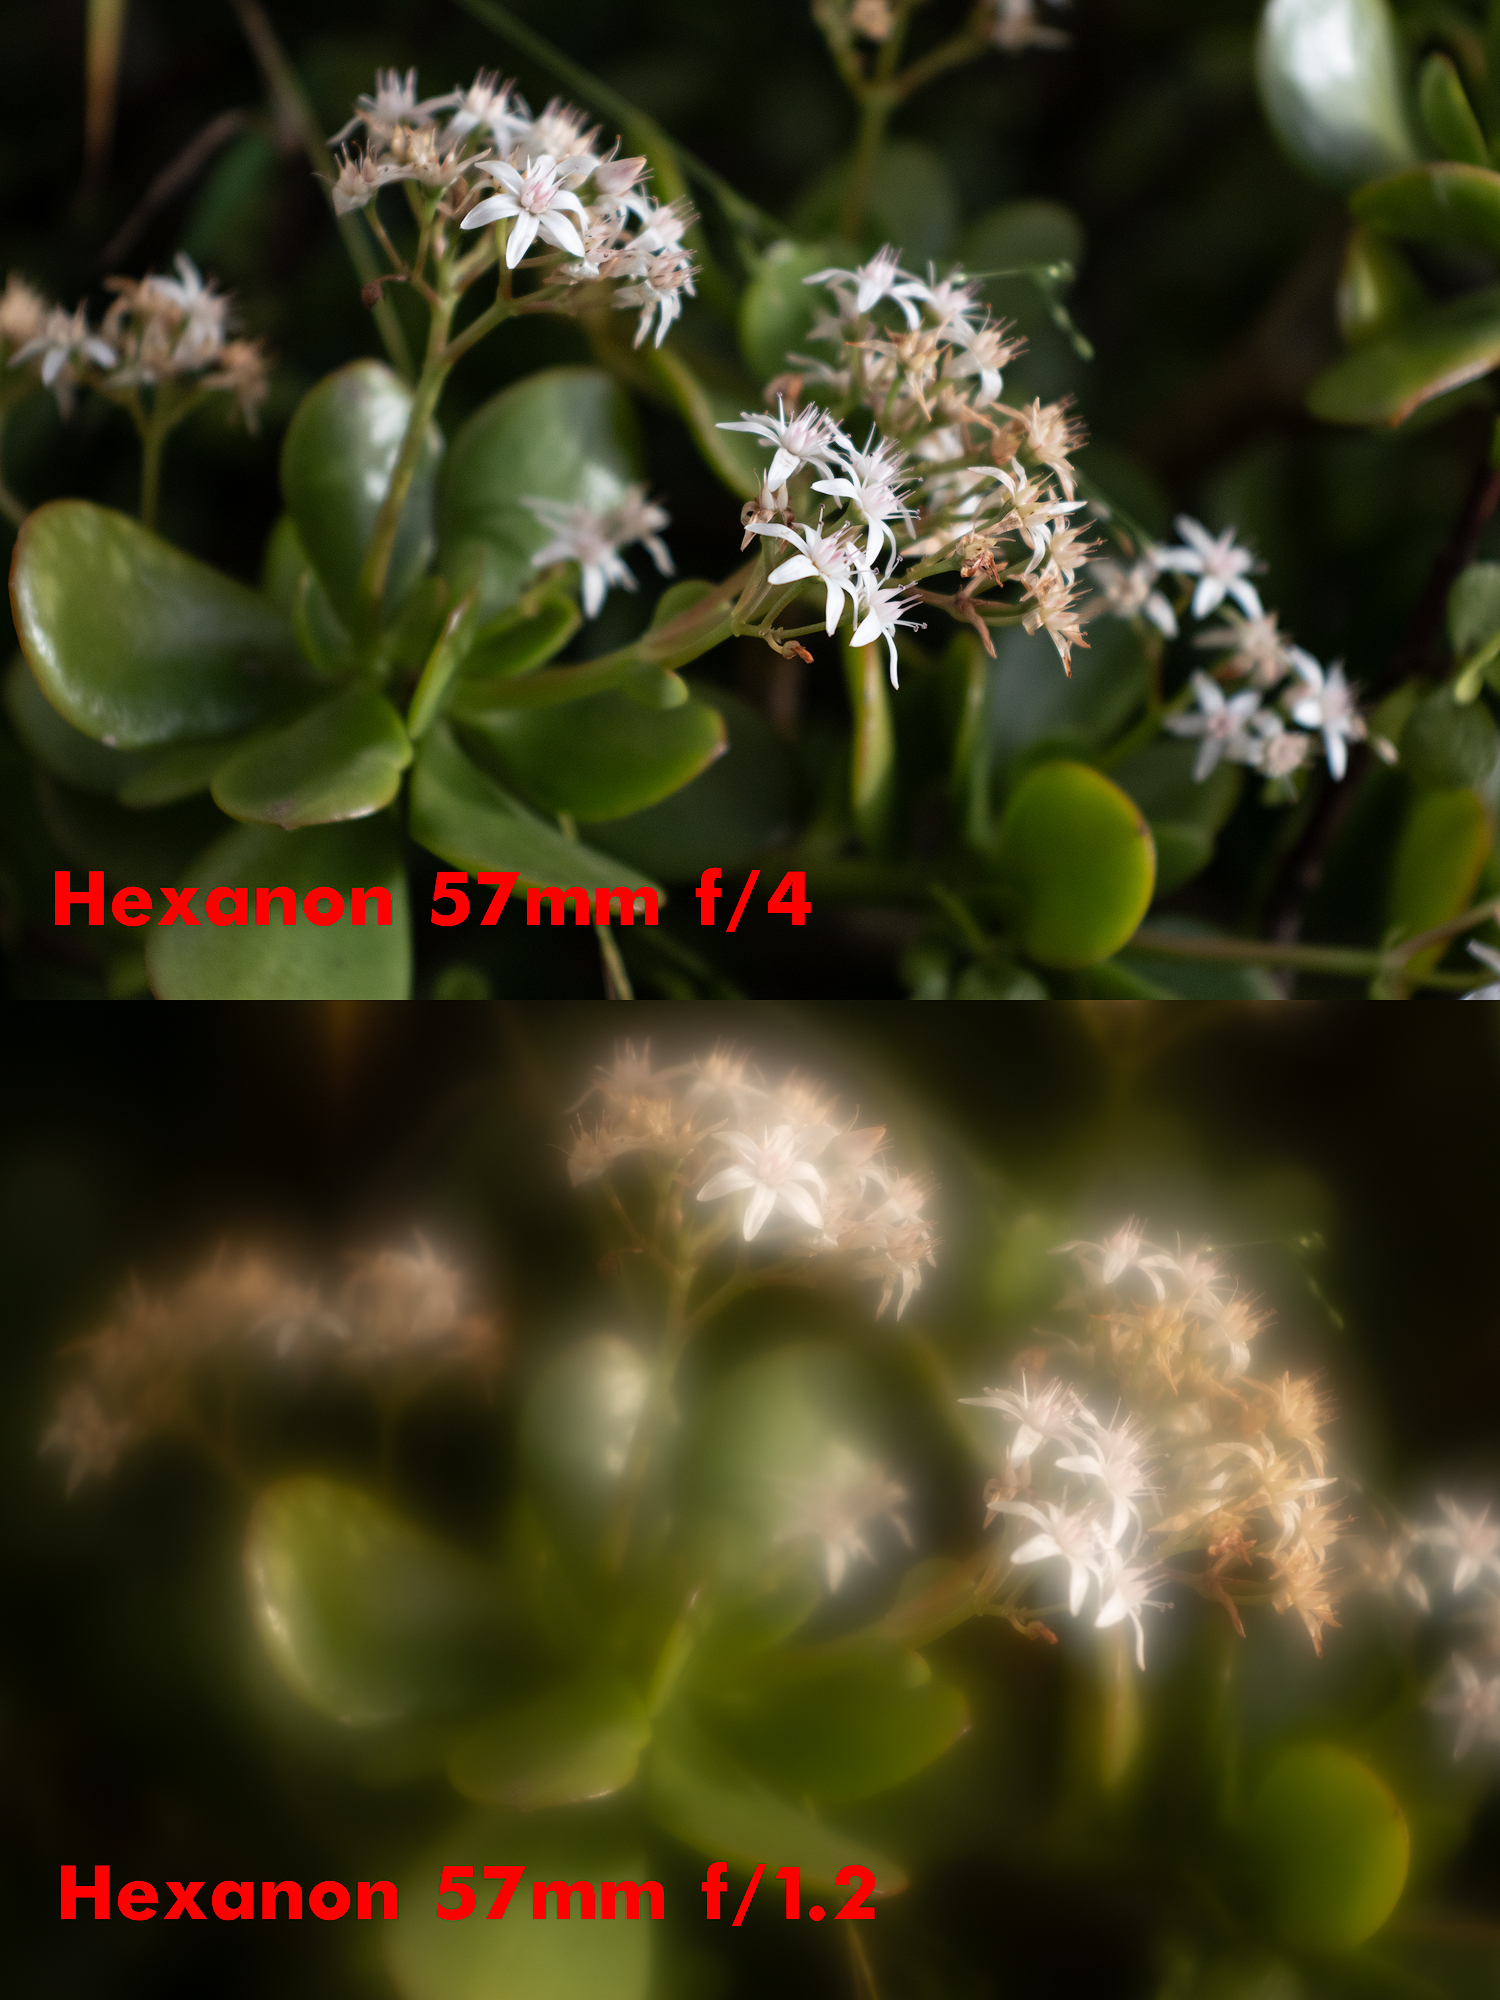
Tried with and without a hood, does the same in a dark room with no direct light hitting the front elements. Here's a comparison with some other fast vintage lenses I have. I understand there will be some chromatic aberrations, glowing edges, and softness with vintage lenses... but this is extreme.
#1

#2

#3
 |
|
| Back to top |
|
|
caspert79

Joined: 31 Oct 2010
Posts: 3132
Location: The Netherlands
|
| Posted: Fri Mar 08, 2024 6:25 am Post subject: |
|
|
caspert79 wrote:
Definitely something wrong. |
|
| Back to top |
|
|
calvin83

Joined: 12 Apr 2009
Posts: 7555
Location: Hong Kong
|
| Posted: Fri Mar 08, 2024 6:47 am Post subject: |
|
|
calvin83 wrote:
I don't see much chance of an element was reversed if you look at the optical scheme of this lens. Even it does, it will be easy to spot it. My advice is to return it unless you bought it as it.
_________________
https://lensfever.com/
https://www.instagram.com/_lens_fever/
The best lens is the one you have with you. |
|
| Back to top |
|
|
BrianSVP


Joined: 09 Jun 2023
Posts: 335
Location: Philadelphia
|
| Posted: Fri Mar 08, 2024 3:46 pm Post subject: |
|
|
BrianSVP wrote:
If you're in the U.S. and you want to send it over, I can take a look at it, as I have a good bit of experience with this lens. All vintage 1.2s are going to be soft wide open, but your images certainly seem excessive. It certainly could be assembled incorrectly, but these Hexanons are prone to oil migration, so one of the inner elements could also have a thin film on it that's difficult to see.
If interested, shoot me a PM.
I also should add that these lenses do have a weird construction for their aperture ring, and have to be disassembled pretty substantially to declick, and it's actually a poor cnadidate for declicking, since positive spring pressure on the aperture mechanism will cause its position to shift if the ring is not held firmly while in use. In fact, it's probably more likely that whoever did it was trying a normal service had the ball detents/springs fly off somewhere never to be found and just gave up and put it back together without them in, which would support the theory of a botched reassembly.
Last edited by BrianSVP on Fri Mar 15, 2024 8:25 pm; edited 1 time in total |
|
| Back to top |
|
|
stevemark
Joined: 29 Apr 2011
Posts: 3930
Location: Switzerland
|
| Posted: Fri Mar 08, 2024 9:35 pm Post subject: |
|
|
stevemark wrote:
| BrianSVP wrote: |
... All vintage 1.2s are going to be soft wide open, but your images certainly seem excessive. It certainly could be assembled incorrectly, but these Hexanons are prone to oil migration, so one of the inner elements could also have a thin film on it that's difficult to see.
|
No.
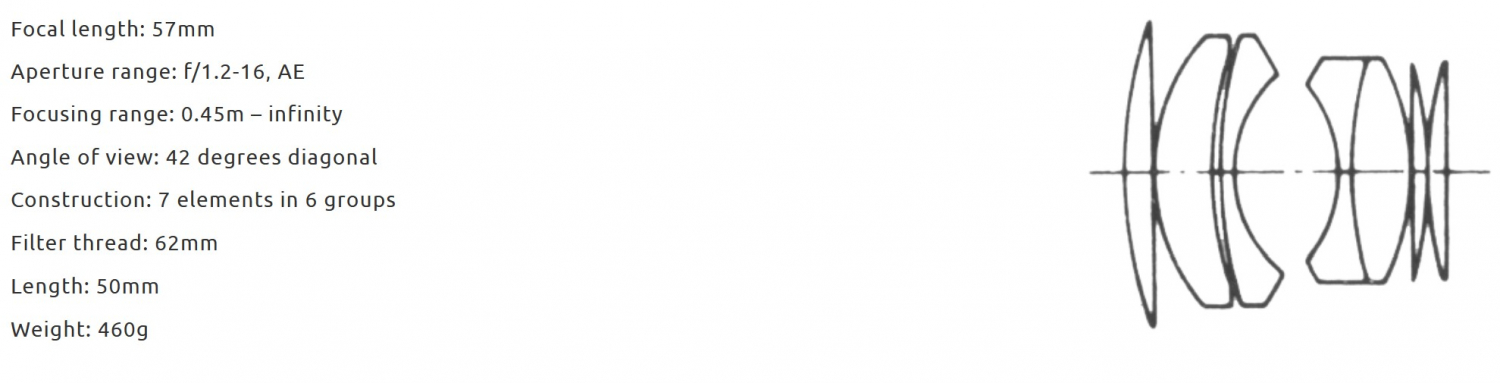
If you look at the image taken at f1.2 with the Konica lens, you immediately will notice two strange things:
1) low contrast / "haze"
2) depth-of-field is way too big for a normal f1.2 lens.
This happens if the spherical aberration of a certain lens isn't corrected as it should.
I'm pretty sure that either the two last elements have been mixed up (look at the lens section), or the distance between some elements isn't correct.
Stephan
_________________
www.artaphot.ch |
|
| Back to top |
|
|
BrianSVP
Joined: 09 Jun 2023
Posts: 335
Location: Philadelphia
|
| Posted: Sat Mar 09, 2024 12:51 am Post subject: |
|
|
BrianSVP wrote:
Working from memory, but I am pretty sure the last two elements actually can't be reversed, since the rearmost element is permanently mounted into the rearmost sleeve ring. Could be that the second from rear is in backwards, or something is spaced wrong.
| stevemark wrote: |
| BrianSVP wrote: |
... All vintage 1.2s are going to be soft wide open, but your images certainly seem excessive. It certainly could be assembled incorrectly, but these Hexanons are prone to oil migration, so one of the inner elements could also have a thin film on it that's difficult to see.
|
No.
If you look at the image taken at f1.2 with the Konica lens, you immediately will notice two strange things:
1) low contrast / "haze"
2) depth-of-field is way too big for a normal f1.2 lens.
This happens if the spherical aberration of a certain lens isn't corrected as it should.
I'm pretty sure that either the two last elements have been mixed up (look at the lens section), or the distance between some elements isn't correct.
Stephan |
|
|
| Back to top |
|
|
slimyfishy
Joined: 07 Mar 2024
Posts: 3
|
| Posted: Sat Mar 09, 2024 6:36 am Post subject: |
|
|
slimyfishy wrote:
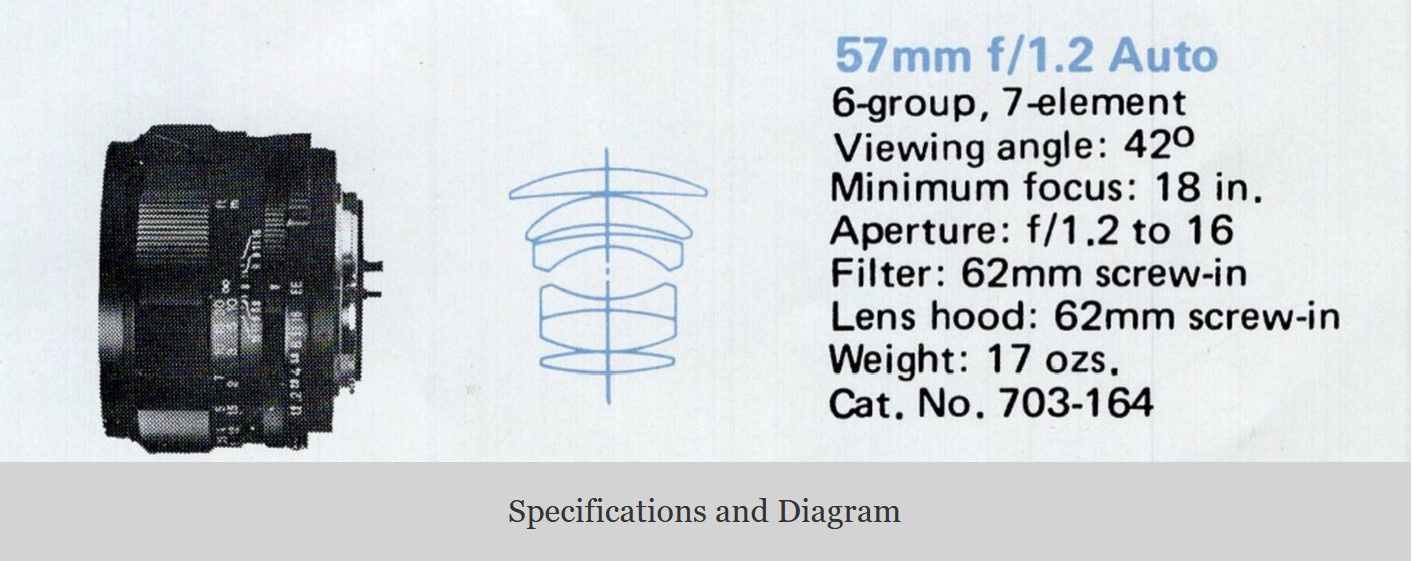
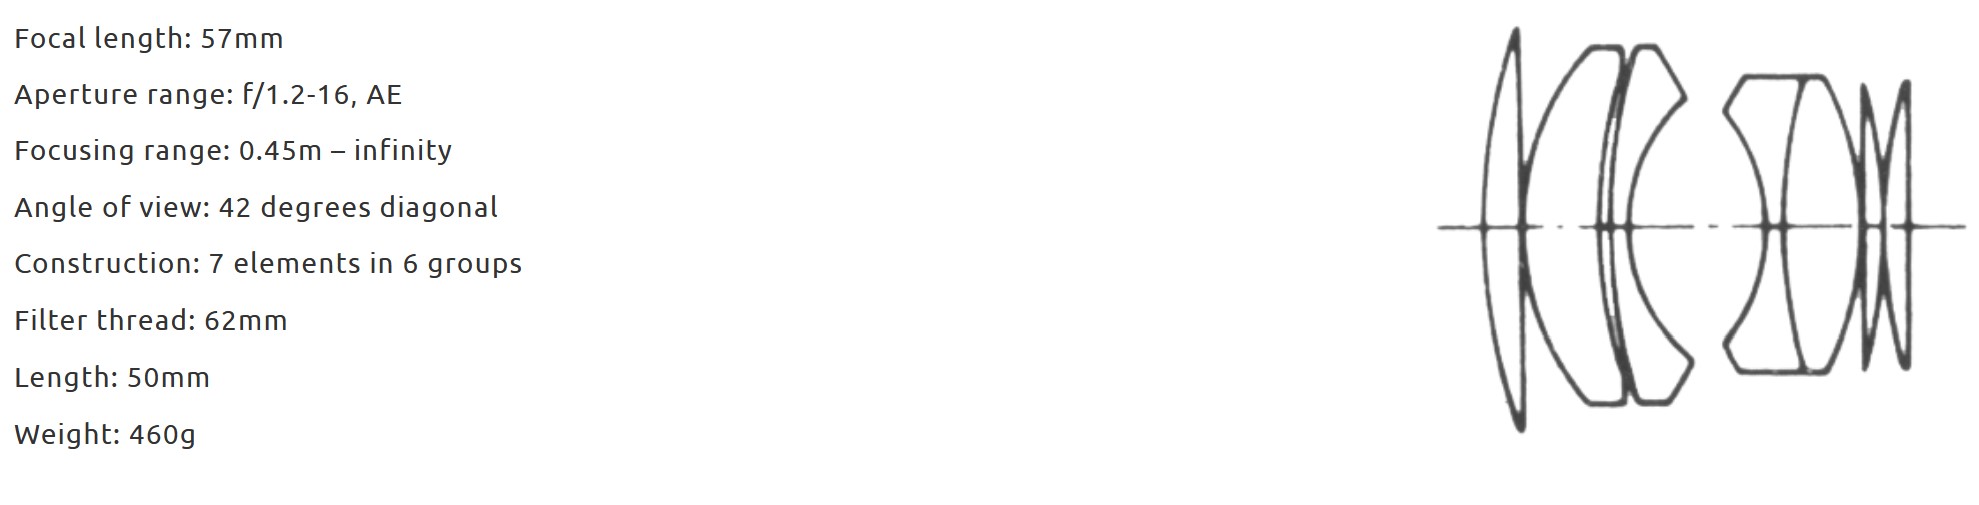
It's frustrating for sure, I'm located in San Diego and have tried two different shops that work on vintage lenses. They basically didn't want to be bothered messing around in the lens since they couldn't see any obvious physical issue like haze, fungus, oil etc... One tech basically told me to dump it off on someone else and get a Nikon. As far as the lens diagram, I seem to find two different versions. My lens is number 7500680 so not sure which schematic is correct.
#1

#2
#3
 |
|
| Back to top |
|
|
calvin83
Joined: 12 Apr 2009
Posts: 7555
Location: Hong Kong
|
| Posted: Sat Mar 09, 2024 7:31 am Post subject: |
|
|
calvin83 wrote:
The first diagram should be incorrect as all copies are in 7e/6g.
_________________
https://lensfever.com/
https://www.instagram.com/_lens_fever/
The best lens is the one you have with you. |
|
| Back to top |
|
|
BrianSVP
Joined: 09 Jun 2023
Posts: 335
Location: Philadelphia
|
| Posted: Fri Mar 15, 2024 8:23 pm Post subject: |
|
|
BrianSVP wrote:
Hey everyone, I ended up offering to see if I could get slimyfishy's lens working for him, so he sent it my way, and I did indeed fix it today. Along the way, I made some interesting observations. I'm quoting the message I sent him below for everyone's edification. Had I known it would end up being as involved as it was, I would have taken pics along the way, but some of the info below still might be useful for some people. Bolded text in parenthses wasn't in the original message, but I added it for clarity for readers of this thread.
| Quote: |
Hi (slimyfishy),
Well, I just spent the past couple hours on your lens. A lot of interesting findings. First, this is an iteration of the lens I have never seen before, and it was, shall we say, "interesting" to work on. (Looking at the serial number on this particular lens, it looks very early compared to other examples on the web, lower than any other example I've seen ) Unlike later versions, in which the optical blocks can be popped out the front of the lens by removing one retaining ring, in this one, you pretty much have to tear down the entire lens in a specific order to get the rear group out. As I proceeded to pull it apart, I could see very obvious signs that it had been worked on in the past. I won't say "serviced," because the level of competency on display was far from great. "Butchered" might be a better word. Lots of evidence of tool marks, grease slathered haphazardly everywhere, and all kinds of other problems.
Since I had it all apart anyway, I let my OCD get the better of me and decided to just go ahead and do a full CLA on it. Since the obvious issue was optical, I started there. As others have suggested, the rear group was not assembled correctly. It wasn't just a matter of one element being in backwards. Not only were both rear elements in backwards, but they were also in the wrong order! (unlike what I suggested upthread, the rearmost element in this one was not permanently affixed in its sleeve) The second to last element had a number of small chips around its edge. The reason this happened is that like a lot of components in this lens, things will only fit correctly if put in in the right direction. Not only were the elements in the wrong way, but so were the spacers, and as a result, the spacer apparently put excessive pressure on that element, causing it to flex and chip around the edges from the internal torsion. Fortunately, the chipped portions appear to be out of the light path and don't affect the imaging. There was also a chip in the blackened portion of the doublet at the rear of the front cell. This is in the light path, so I blackened it in with matte paint.
Pretty much all inner surfaces also needed cleaning. It was pretty obvious that someone had cleaned them in the past, both in the front and rear groups, as the retaining rings had tool marks on them, and there were a lot more large dust particles in between elements than I myself would typically try to leave behind when doing a CLA. Now, the electrostatic charge of the glass does inherently attract dust, so there will always be a few left behind after a CLA, but it definitely seemed excessive. There also was oil on all the interior lens surfaces. It wasn't heavy, but it was there and was obvious on inspection with the elements out. I cleaned all the elements off and blew out the dust, and reassembled everything in the proper order, and as a result, everything is quite a bit cleaner, and I was able to resolve the softness problem. I also noticed that there was quite a bit of thorium yellowing going on in the elements of the rear group, so I'm going to let it sit under a UV lamp for the next couple of days to see if we can improve that.
One other interesting observation I made re: the rear group. Apparently at least with respect to this iteration, the optical diagram floating around the web is incorrect:
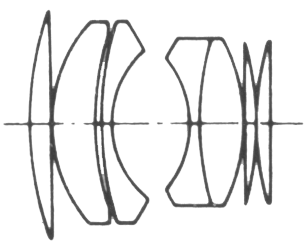
Notice how in this diagram, the rearmost planoconvex element is thicker than the second one in? In reality, it is the other way around! I actually tried reassembling the lens following this diaram, but the geometry of the elements and the spacers doesn't allow it! Things will only seat correctly with the thinner planoconvex in the rear position.
The focus helical was also assembled incorrectly. Due the large size of the elements in this lens, the interior is extremely tight, with puzzle-like construction. (it has to be done in this order: 1)remove front barrel, front lens cell, 2) detach front front half of helical from aperture assembly 3) remove front half of helical, 4) remove aperture assembly/rear cell 5) remove outer focus ring 6) remove rear half of helical. Either the entire rear mount or the inner baffle have to be removed in order to take the aperture assembly out in step 4. ) As a result, there is really only one proper way to put everything together and be able to attain infinity focus when the optical block is correctly assembled. With the rear assembled incorrectly, whoever worked on it before was able to apparently reach infinity, but once that was corrected, I had to do trial and error on the entry points on each half of the helical to get everything working properly. ( both the front and rear sides of the helical have multiple entry points. I used the slot cut into the inner focus ring to allow the outer focus ring to drop on to get a general sense of where the helical rings should end up when in the vicinity of infinity focus.)Fortunately, I was able to do it in only a few tries, so that didn't take too long.
While everything was disassembled, I also cleaned all the barrel components and helical of degraded grease and grit and relubed everything, so the action should feel a lot smoother to you. I also checked what your local guy did with the aperture ring. The ring on this lens actually uses two ball detents, one on on either side. One provides full stops, and the other half stops. Your local guy only did the full stop side, neglecting the half stops! I was able to find a spring and detent of approximately the correct size and give you your half stops back as well. As built, the springs are supposed to have two tensioning adjustment screws holding them in that allow you to adjust the firmness of the clicks. These weren't there, so the clicks are fairly mushy compared to how they are supposed to feel, but at least they are all there.
Anyway, like I said, it will be in UV treatment for a couple days, but it should be ready to come home to you on Monday or Tuesday. after it's deyellowed, I'll shoot a few example shots and post them in the thread, then send your lens back home to you.
|
Last edited by BrianSVP on Fri Mar 15, 2024 9:39 pm; edited 1 time in total |
|
| Back to top |
|
|
caspert79
Joined: 31 Oct 2010
Posts: 3132
Location: The Netherlands
|
| Posted: Fri Mar 15, 2024 8:30 pm Post subject: |
|
|
caspert79 wrote:
Great work Brian, and an interesting read. Quite infuriating that some people butcher such a beautiful lens. |
|
| Back to top |
|
|
RokkorDoctor


Joined: 27 Nov 2021
Posts: 1405
Location: Kent, UK
Expire: 2025-05-01
|
| Posted: Fri Mar 15, 2024 8:37 pm Post subject: |
|
|
RokkorDoctor wrote:
| BrianSVP wrote: |
Hey everyone, I ended up offering to see if I could get slimyfishy's lens working for him, so he sent it my way, and I did indeed fix it today. Along the way, I made some interesting observations. I'm quoting the message I sent him below for everyone's edification. Had I known it would end up being as involved as it was, I would have taken pics along the way, but some of the info below still might be useful for some people. Bolded text in parenthses wasn't in the original message, but I added it for clarity for readers of this thread.
| Quote: |
Hi (slimyfishy),
Well, I just spent the past couple hours on your lens. A lot of interesting findings....
|
|
Wow, you did all that in a couple of hours? I'm impressed! 
Lenses I work on are usually still correctly assembled when I get them, but even then what you did takes me the best part of a day, cleaning and re-lubricating all parts.
Admission: I have never been a fast worker 
_________________
Mark
SONY A7S, A7RII + dust-sealed modded Novoflex/Fotodiox/Rayqual MD-NEX adapters
Minolta SR-1, SRT-101/303, XD7/XD11, XGM, X700
Bronica SQAi
Ricoh GX100
Minolta majority of all Rokkor SR/AR/MC/MD models made
Sigma 14mm/3.5 for SR mount
Tamron SP 60B 300mm/2.8 (Adaptall)
Samyang T-S 24mm/3.5 (Nikon mount, DIY converted to SR mount)
Schneider-Kreuznach PC-Super-Angulon 28mm/2.8 (SR mount)
Bronica PS 35/40/50/65/80/110/135/150/180/200/250mm |
|
| Back to top |
|
|
BrianSVP
Joined: 09 Jun 2023
Posts: 335
Location: Philadelphia
|
| Posted: Fri Mar 15, 2024 9:03 pm Post subject: |
|
|
BrianSVP wrote:
Ha, thanks! After you've done your first few hundred lenses, it gets to be like those guys in the army who can completely disassemble and reassemble their M16 in a couple of minutes with their eyes closed. I can get a Super Takumar 50mm f/1.4 down to individual parts in under 5 minutes and reassemble it in 10-15. I've figured out tricks for just about every step in the process at this point. Having a good tool kit helps a lot, too.
What tends to greatly increase the time a given lens takes more than anything is overuse of glue/stuck parts. Kirons and Fujinons are particularly bad in this regard. A lot of the European lenses what have very tiny/intricate mechanisms can take a long time. The Japanese primes tend to be much easier in this regard and tend to go fast. Konica primes are an oddball in that they tend to be built differently from a lot of the other Japanese brands, but once you get to know their quirks, they go pretty fast, too.
Once you start considering zooms/lenses w/floating elements all bets are off, no matter who the manufacturer is. You never really know what it's going to be like until you have it opened up. AF adds a whole other level of complexity.
| RokkorDoctor wrote: |
| BrianSVP wrote: |
Hey everyone, I ended up offering to see if I could get slimyfishy's lens working for him, so he sent it my way, and I did indeed fix it today. Along the way, I made some interesting observations. I'm quoting the message I sent him below for everyone's edification. Had I known it would end up being as involved as it was, I would have taken pics along the way, but some of the info below still might be useful for some people. Bolded text in parenthses wasn't in the original message, but I added it for clarity for readers of this thread.
| Quote: |
Hi (slimyfishy),
Well, I just spent the past couple hours on your lens. A lot of interesting findings....
|
|
Wow, you did all that in a couple of hours? I'm impressed!
Lenses I work on are usually still correctly assembled when I get them, but even then what you did takes me the best part of a day, cleaning and re-lubricating all parts.
Admission: I have never been a fast worker |
|
|
| Back to top |
|
|
calvin83
Joined: 12 Apr 2009
Posts: 7555
Location: Hong Kong
|
| Posted: Sat Mar 16, 2024 4:29 am Post subject: |
|
|
calvin83 wrote:
| BrianSVP wrote: |
Ha, thanks! After you've done your first few hundred lenses, it gets to be like those guys in the army who can completely disassemble and reassemble their M16 in a couple of minutes with their eyes closed. I can get a Super Takumar 50mm f/1.4 down to individual parts in under 5 minutes and reassemble it in 10-15. I've figured out tricks for just about every step in the process at this point. Having a good tool kit helps a lot, too.
What tends to greatly increase the time a given lens takes more than anything is overuse of glue/stuck parts. Kirons and Fujinons are particularly bad in this regard. A lot of the European lenses what have very tiny/intricate mechanisms can take a long time. The Japanese primes tend to be much easier in this regard and tend to go fast. Konica primes are an oddball in that they tend to be built differently from a lot of the other Japanese brands, but once you get to know their quirks, they go pretty fast, too.
Once you start considering zooms/lenses w/floating elements all bets are off, no matter who the manufacturer is. You never really know what it's going to be like until you have it opened up. AF adds a whole other level of complexity.
| RokkorDoctor wrote: |
| BrianSVP wrote: |
Hey everyone, I ended up offering to see if I could get slimyfishy's lens working for him, so he sent it my way, and I did indeed fix it today. Along the way, I made some interesting observations. I'm quoting the message I sent him below for everyone's edification. Had I known it would end up being as involved as it was, I would have taken pics along the way, but some of the info below still might be useful for some people. Bolded text in parenthses wasn't in the original message, but I added it for clarity for readers of this thread.
| Quote: |
Hi (slimyfishy),
Well, I just spent the past couple hours on your lens. A lot of interesting findings....
|
|
Wow, you did all that in a couple of hours? I'm impressed!
Lenses I work on are usually still correctly assembled when I get them, but even then what you did takes me the best part of a day, cleaning and re-lubricating all parts.
Admission: I have never been a fast worker |
|
 
_________________
https://lensfever.com/
https://www.instagram.com/_lens_fever/
The best lens is the one you have with you. |
|
| Back to top |
|
|
LittleAlex

Joined: 27 Nov 2008
Posts: 1680
Location: L'vov (Western Ukraine)
|
| Posted: Sat Mar 16, 2024 8:04 am Post subject: |
|
|
LittleAlex wrote:
| BrianSVP wrote: |
| Hey everyone, I ended up offering to see if I could get slimyfishy's lens working for him, so he sent it my way, and I did indeed fix it today. |
_________________
"Sharpness is a bourgeois concept" - © H. Cartier Bresson |
|
| Back to top |
|
|
LittleAlex
Joined: 27 Nov 2008
Posts: 1680
Location: L'vov (Western Ukraine)
|
| Posted: Sat Mar 16, 2024 8:31 am Post subject: |
|
|
LittleAlex wrote:
| BrianSVP wrote: |
those guys in the army who can completely disassemble and reassemble their M16 in a couple of minutes with their eyes closed.
|
Have to mention, that with the AK-47 it is much, much easier task.
_________________
"Sharpness is a bourgeois concept" - © H. Cartier Bresson |
|
| Back to top |
|
|
LittleAlex
Joined: 27 Nov 2008
Posts: 1680
Location: L'vov (Western Ukraine)
|
| Posted: Sat Mar 16, 2024 8:38 am Post subject: |
|
|
LittleAlex wrote:
| caspert79 wrote: |
| Quite infuriating that some people butcher such a beautiful lens. |
But might it be that someone simply did try to turn it into the SF lens?
For the same task I have use sometime that Hexanon 57/1.2 with 2X Tele Converter (four lenses) on the full opening:

However, is it quite possible that not everybody would prefer so rustic, and too uncomplicated way?
_________________
"Sharpness is a bourgeois concept" - © H. Cartier Bresson
Last edited by LittleAlex on Sat Mar 16, 2024 8:40 am; edited 1 time in total |
|
| Back to top |
|
|
caspert79
Joined: 31 Oct 2010
Posts: 3132
Location: The Netherlands
|
| Posted: Sat Mar 16, 2024 8:59 am Post subject: |
|
|
caspert79 wrote:
| LittleAlex wrote: |
| caspert79 wrote: |
| Quite infuriating that some people butcher such a beautiful lens. |
But might it be that someone simply did try to turn it into the SF lens? |
I don’t think so. There are plenty of cheap and easily available lenses you could use for that. |
|
| Back to top |
|
|
BrianSVP
Joined: 09 Jun 2023
Posts: 335
Location: Philadelphia
|
| Posted: Sat Mar 16, 2024 3:14 pm Post subject: |
|
|
BrianSVP wrote:
Results of the fix (click for full size):

100% center crops (click for full size):

Photos taken on a Lumix S5, A mode, ISO400, with my default processing profile in LR, no advanced processing done. Contact sheets created in PS with the Contact Sheet II tool, exported as JPG 100%.
After a day under UV, there's still a slight Thorium yellowing that's apparent when looking through the lens but only slightly in these pics. I expect it to be 100% clear by Monday.
Last edited by BrianSVP on Sat Mar 16, 2024 3:28 pm; edited 1 time in total |
|
| Back to top |
|
|
BrianSVP
Joined: 09 Jun 2023
Posts: 335
Location: Philadelphia
|
| Posted: Sat Mar 16, 2024 3:17 pm Post subject: |
|
|
BrianSVP wrote:
Ha, so I've heard!
| LittleAlex wrote: |
| BrianSVP wrote: |
those guys in the army who can completely disassemble and reassemble their M16 in a couple of minutes with their eyes closed.
|
Have to mention, that with the AK-47 it is much, much easier task. |
|
|
| Back to top |
|
|
LittleAlex
Joined: 27 Nov 2008
Posts: 1680
Location: L'vov (Western Ukraine)
|
| Posted: Sat Mar 16, 2024 5:38 pm Post subject: |
|
|
LittleAlex wrote:
| BrianSVP wrote: |
Ha, so I've heard!
|
Well.. So I learned by my own experience very well. In due time, of course.
_________________
"Sharpness is a bourgeois concept" - © H. Cartier Bresson |
|
| Back to top |
|
|
KEO

Joined: 27 Sep 2018
Posts: 772
Location: USA
|
| Posted: Sat Mar 16, 2024 6:52 pm Post subject: |
|
|
KEO wrote:
| BrianSVP wrote: |
| What tends to greatly increase the time a given lens takes more than anything is overuse of glue/stuck parts. |
I have far less experience than you, but this has been my impression as well.
Great job on the fix.
|
|
| Back to top |
|
|
Sakyaputta


Joined: 01 Feb 2022
Posts: 59
Location: Beijing, China
|
| Posted: Sun Mar 17, 2024 2:52 pm Post subject: |
|
|
Sakyaputta wrote:
| BrianSVP wrote: |
Hey everyone, I ended up offering to see if I could get slimyfishy's lens working for him, so he sent it my way, and I did indeed fix it today. Along the way, I made some interesting observations...
|
Heavens bless all the good people like you, Brian! ðŸ™
Very educating and entertaining reading your process too! 👠|
|
| Back to top |
|
|
|
|