| View previous topic :: View next topic |
| Author |
Message |
tomzcafe


Joined: 01 Jun 2009
Posts: 196
|
 Posted: Wed May 11, 2011 1:41 pm Post subject: Colors - Levels Posted: Wed May 11, 2011 1:41 pm Post subject: Colors - Levels |
 |
|
tomzcafe wrote:
Recently, a friend of mine told me that there is flaw in the current digital camera systems, which none of them actually produce a so-called real image.
There is always a layer or fog or something that block the actual image to be reproduced correctly.
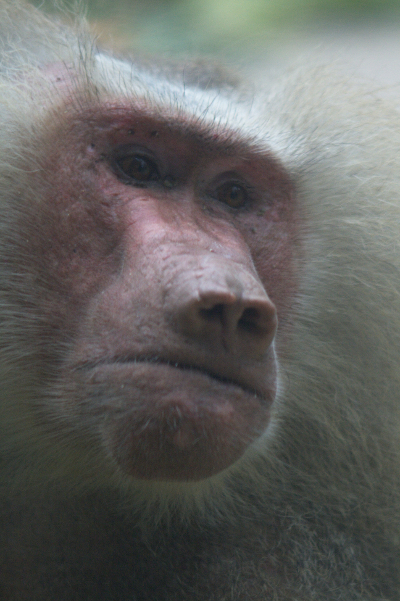
Here is an example, albeit not a very extreme difference, taken using Takumar 200/3.5 with UV filter

Considering that the above picture was taken behind a thick glass cage which was not so clean (as in clear see-through), I was somewhat satisfied with it.
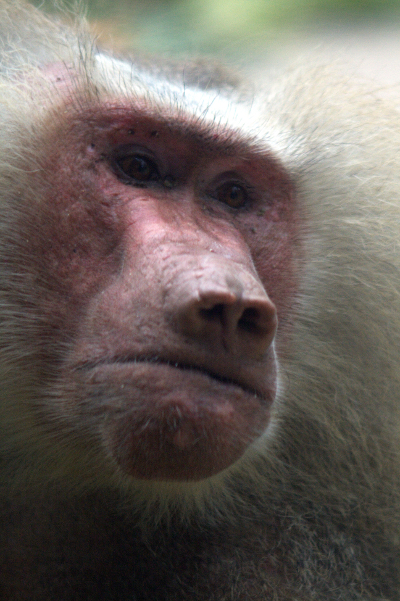
Then I tried the Colors - Levels using GIMP and I got this:

ps : I get more better result where the color really vibrant on other pictures.
I took a look on my other pictures and I realised that somehow I can see a thin layer of fog in every picture and which can be removed using GIMP - Colors - Levels, to make them more attractive picture.
How many of you do the same work flow as above before you publish your final pictures ?
Is there any better way to have it done in camera, rather than having image editor such as GIMP or PICASA to do this kind of job ?
Now that I am actually quite addicted to change the levels on my pictures, is there a way to do it in batch process ?
_________________
http://www.flickr.com/photos/oom_tommy |
|
| Back to top |
|
 |
visualopsins


Joined: 05 Mar 2009
Posts: 11055
Location: California
Expire: 2025-04-11
|
 Posted: Wed May 11, 2011 1:56 pm Post subject: Posted: Wed May 11, 2011 1:56 pm Post subject: |
 |
|
visualopsins wrote:
Tutorials: Photoshop Levels (specific for PS, applies generally to all PP programs with Levels control)
Some PP programs will copy the PP 'recipe' for one image and apply it to multiple other images for example Canon Digital Photo Professional. Gimp? I don't know, there may be a plug-in...
_________________
☮☮☮☮☮☮☮☮☮☮☮☮☮☮☮☮☮☮☮☮☮☮☮☮☮☮☮☮☮☮☮☮ like attracts like! ☮☮☮☮☮☮☮☮☮☮☮☮☮☮☮☮☮☮☮☮☮☮☮☮☮☮☮☮☮☮☮☮
Cameras: Sony ILCE-7RM2, Spotmatics II, F, and ESII, Nikon P4
Lenses:
M42 Asahi Optical Co., Takumar 1:4 f=35mm, 1:2 f=58mm (Sonnar), 1:2.4 f=58mm (Heliar), 1:2.2 f=55mm (Gaussian), 1:2.8 f=105mm (Model I), 1:2.8/105 (Model II), 1:5.6/200, Tele-Takumar 1:5.6/200, 1:6.3/300, Macro-Takumar 1:4/50, Auto-Takumar 1:2.3 f=35, 1:1.8 f=55mm, 1:2.2 f=55mm, Super-TAKUMAR 1:3.5/28 (fat), 1:2/35 (Fat), 1:1.4/50 (8-element), Super-Multi-Coated Fisheye-TAKUMAR 1:4/17, Super-Multi-Coated TAKUMAR 1:4.5/20, 1:3.5/24, 1:3.5/28, 1:2/35, 1:3.5/35, 1:1.8/85, 1:1.9/85 1:2.8/105, 1:3.5/135, 1:2.5/135 (II), 1:4/150, 1:4/200, 1:4/300, 1:4.5/500, Super-Multi-Coated Macro-TAKUMAR 1:4/50, 1:4/100, Super-Multi-Coated Bellows-TAKUMAR 1:4/100, SMC TAKUMAR 1:1.4/50, 1:1.8/55
M42 Carl Zeiss Jena Flektogon 2.4/35
Contax Carl Zeiss Vario-Sonnar T* 28-70mm F3.5-4.5
Pentax K-mount SMC PENTAX-A ZOOM 1:3.5 35~105mm, SMC PENTAX ZOOM 1:4 45~125mm
Nikon Micro-NIKKOR-P-C Auto 1:3.5 f=55mm, NIKKOR-P Auto 105mm f/2.5 Pre-AI (Sonnar), Micro-NIKKOR 105mm 1:4 AI, NIKKOR AI-S 35-135mm f/3,5-4,5
Tamron SP 17mm f/3.5 (51B), Tamron SP 17mm f/3.5 (151B), SP 500mm f/8 (55BB), SP 70-210mm f/3.5 (19AH)
Vivitar 100mm 1:2.8 MC 1:1 Macro Telephoto (Kiron)
|
|
| Back to top |
|
 |
Cistron

Joined: 25 Feb 2011
Posts: 238
Location: London/Vienna
|
 Posted: Wed May 11, 2011 5:09 pm Post subject: Posted: Wed May 11, 2011 5:09 pm Post subject: |
 |
|
Cistron wrote:
I think you only need to raise the black levels. Don't touch the whites, as this caused the burned-out area on the forehead.
Alternatively, try to apply an S-shaped curve - not sure if Gimp can do that though. |
|
| Back to top |
|
 |
Orio

Joined: 24 Feb 2007
Posts: 29545
Location: West Emilia
Expire: 2012-12-04
|
 Posted: Wed May 11, 2011 10:28 pm Post subject: Posted: Wed May 11, 2011 10:28 pm Post subject: |
 |
|
Orio wrote:
You can tell your friend, that it's not the digital cameras to produce a layer of fog (  ), rather it's uncontrasty lenses that produce such images. ), rather it's uncontrasty lenses that produce such images.
Reasons for lenses with low contrast may be the lack of a lens hood, poor coating, low quality glass, bad lens design.
It is possible to correct this problem by the use of Levels in photo editing programs. Keep in mind however that using low contrast lenses and correcting the results with levels can restore the appearance of a high contrast lens (except when there are visible flare phenomena), but the image will have less quality compared to an image taken with a higher contrast lens, because the low contrast lens uses only a part of the dynamic range potential of a digital camera, usually in the centre of the histogram. This means that restoring contrast with black and white point shifting is likely to have a similar effect as raising exposure of underexposed shots - that is, it is likely to introduce more noise compared to a photograph taken with a natively high contrast lens that exploited the full dynamic range of the sensor at the time of capture.
_________________
Orio, Administrator
T*
NE CEDE MALIS AUDENTIOR ITO
Ferrania film is reborn! http://www.filmferrania.it/
Support the Ornano film chemicals company and help them survive!
http://forum.mflenses.com/ornano-chemical-products-t55525.html |
|
| Back to top |
|
 |
tomzcafe


Joined: 01 Jun 2009
Posts: 196
|
 Posted: Wed May 11, 2011 10:50 pm Post subject: Posted: Wed May 11, 2011 10:50 pm Post subject: |
 |
|
tomzcafe wrote:
Thanks for the link and the tips.
GIMP does have the S-shape curve.
I think lack of contrast is the right term, as Orio highlighted, which indeed the impression I get after applying colors levels on the image.
one more question, can this be overcome with so-call custom setting in the camera ?
it may be troublesome, that one lens requires one setting due to the lens characteristic in exploiting the dynamic range of the sensor, but it may be better to do it this way rather than to PP for tens of pictures taken on default camera setting.
_________________
http://www.flickr.com/photos/oom_tommy |
|
| Back to top |
|
 |
trifox


Joined: 14 May 2008
Posts: 3614
Location: UK
Expire: 2014-05-29
|
 Posted: Sat May 14, 2011 11:23 pm Post subject: Posted: Sat May 14, 2011 11:23 pm Post subject: |
 |
|
trifox wrote:
Set your camera to the neutral settings or very close to them..
As stated before - be careful with highlights - they're 'extremely crippled' with digital camera -- well dark tones too but 'lights' are more noticeable..
The best PP application is Photoshop -- there is no equivalent to it.
GIMP is so so but not very comfortable but almost equivalent to Photoshop.
If you do RAW developing - there are many apps but if you wanna really have a good output, you must end with Photoshop anyway
That application is essential if you do any post-process or pre-press (printing)
Always have control over histograms. Do try to keep darks as not totally black and highlights as not totally white.
From my experience, (pre-press operator and retoucher, used Photoshop 10 years) there is NO EQUIVALENT to film in PP.
Only PP with scan (transparent) 6x9 cm on perfect scanner can give amazing output.
Picture from digital camera can not be adjusted in Photoshop too much. But that's not Photoshop's fault obviously! 
tf
_________________
Flickr.com |
|
| Back to top |
|
 |
|
|
|
You cannot post new topics in this forum
You cannot reply to topics in this forum
You cannot edit your posts in this forum
You cannot delete your posts in this forum
You cannot vote in polls in this forum
|
