| View previous topic :: View next topic |
| Author |
Message |
mo


Joined: 27 Aug 2009
Posts: 8979
Location: Australia
Expire: 2016-07-30
|
 Posted: Fri Apr 02, 2010 3:56 am Post subject: How do you shoot into back light? Posted: Fri Apr 02, 2010 3:56 am Post subject: How do you shoot into back light? |
 |
|
mo wrote:
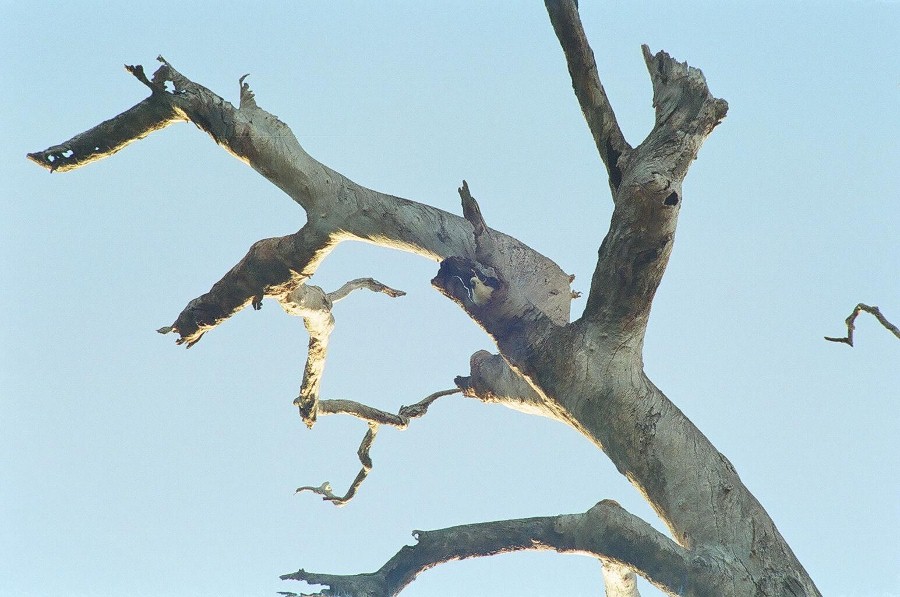
Example Below....I know it could be better but how do you do it? I use Manual cameras no digital SLR.How do you bring the cocky and tree out of the shade.I come across this problem all the time and don't know how to set the exposure accordingly. I know a longer lens would have helped but what are the adjustments for exposure is there a rule to go by with strong back light or side light
_________________
Moira, Moderator 
Fuji XE-1,Pentax K-01,Panasonic G1,Panasonic G5,Pentax MX
Ricoh Singlex TLS,KR-5,KR-5Super,XR-10
Lenses
Auto Rikenon's 55/1.4, 1.8, 2.8... 50/1.7 Takumar 2/58 Preset Takumar 2.8/105 Auto Takumar 2.2/55, 3.5/35 Super Takumar 1.8/55...Macro Takumar F4/50... CZJ Biotar ALU M42 2/58 CZJ Tessar ALU M42 2.8/50
CZJ DDR Flektogon Zebra M42 2.8/35 CZJ Pancolar M42 2/50 CZJ Pancolar Exakta 2/50
Auto Mamiya/Sekor 1.8/55 ...Auto Mamiya/Sekor 2/50 Auto Mamiya/Sekor 2.8/50 Auto Mamiya/Sekor 200/3.5 Tamron SP500/8 Tamron SP350/5.6 Tamron SP90/2.5
Primoplan 1.9/58 Primagon 4.5/35 Telemegor 5.5/150 Angenieux 3.5/28 Angenieux 3,5/135 Y 2
Canon FL 58/1.2,Canon FL85/1.8,Canon FL 100/3.5,Canon SSC 2.8/100 ,Konica AR 100/2.8, Nikkor P 105/2.5
|
|
| Back to top |
|
 |
Scheimpflug


Joined: 06 Feb 2010
Posts: 1888
Location: New Zealand / USA
Expire: 2011-11-18
|
| Posted: Fri Apr 02, 2010 5:29 am Post subject: |
|
|
Scheimpflug wrote:
Have you thought about using a fill flash?
I believe the technique is to set the exposure for the bright background, then use the fill flash to lighten the shadowed side of the foreground. Perhaps even with several flashes, or an off-camera flash... |
|
| Back to top |
|
|
mo
Joined: 27 Aug 2009
Posts: 8979
Location: Australia
Expire: 2016-07-30
|
| Posted: Fri Apr 02, 2010 6:40 am Post subject: |
|
|
mo wrote:
Not sure how practical that is when out in a park ,would the flash reach that far up a tree? I have a few flashes picked up with the cameras I have bought over the years.The other aspect is when the cockatoos are in that hole that is their nest so a flash may scare them off 
_________________
Moira, Moderator
Fuji XE-1,Pentax K-01,Panasonic G1,Panasonic G5,Pentax MX
Ricoh Singlex TLS,KR-5,KR-5Super,XR-10
Lenses
Auto Rikenon's 55/1.4, 1.8, 2.8... 50/1.7 Takumar 2/58 Preset Takumar 2.8/105 Auto Takumar 2.2/55, 3.5/35 Super Takumar 1.8/55...Macro Takumar F4/50... CZJ Biotar ALU M42 2/58 CZJ Tessar ALU M42 2.8/50
CZJ DDR Flektogon Zebra M42 2.8/35 CZJ Pancolar M42 2/50 CZJ Pancolar Exakta 2/50
Auto Mamiya/Sekor 1.8/55 ...Auto Mamiya/Sekor 2/50 Auto Mamiya/Sekor 2.8/50 Auto Mamiya/Sekor 200/3.5 Tamron SP500/8 Tamron SP350/5.6 Tamron SP90/2.5
Primoplan 1.9/58 Primagon 4.5/35 Telemegor 5.5/150 Angenieux 3.5/28 Angenieux 3,5/135 Y 2
Canon FL 58/1.2,Canon FL85/1.8,Canon FL 100/3.5,Canon SSC 2.8/100 ,Konica AR 100/2.8, Nikkor P 105/2.5
|
|
| Back to top |
|
|
Scheimpflug
Joined: 06 Feb 2010
Posts: 1888
Location: New Zealand / USA
Expire: 2011-11-18
|
| Posted: Fri Apr 02, 2010 6:51 am Post subject: |
|
|
Scheimpflug wrote:
It might reach that far.. it probably depends on the flash, but it might be worth a try.
Otherwise, since you are working with film, all I can think of is to do some dodging/burning in the darkroom. Once you have it scanned, you could edit the photos in photoshop, or take multiple exposures and make a HDR composite... but that's definitely more work. |
|
| Back to top |
|
|
mo
Joined: 27 Aug 2009
Posts: 8979
Location: Australia
Expire: 2016-07-30
|
| Posted: Fri Apr 02, 2010 6:54 am Post subject: |
|
|
mo wrote:
Sadly I am not in the film developing stage...I have looked at it but not gone that way...yet  I have my L plates on just learning the basics.The flash would be interesting especially if I have any walkers nearby... I have my L plates on just learning the basics.The flash would be interesting especially if I have any walkers nearby... 
_________________
Moira, Moderator
Fuji XE-1,Pentax K-01,Panasonic G1,Panasonic G5,Pentax MX
Ricoh Singlex TLS,KR-5,KR-5Super,XR-10
Lenses
Auto Rikenon's 55/1.4, 1.8, 2.8... 50/1.7 Takumar 2/58 Preset Takumar 2.8/105 Auto Takumar 2.2/55, 3.5/35 Super Takumar 1.8/55...Macro Takumar F4/50... CZJ Biotar ALU M42 2/58 CZJ Tessar ALU M42 2.8/50
CZJ DDR Flektogon Zebra M42 2.8/35 CZJ Pancolar M42 2/50 CZJ Pancolar Exakta 2/50
Auto Mamiya/Sekor 1.8/55 ...Auto Mamiya/Sekor 2/50 Auto Mamiya/Sekor 2.8/50 Auto Mamiya/Sekor 200/3.5 Tamron SP500/8 Tamron SP350/5.6 Tamron SP90/2.5
Primoplan 1.9/58 Primagon 4.5/35 Telemegor 5.5/150 Angenieux 3.5/28 Angenieux 3,5/135 Y 2
Canon FL 58/1.2,Canon FL85/1.8,Canon FL 100/3.5,Canon SSC 2.8/100 ,Konica AR 100/2.8, Nikkor P 105/2.5
|
|
| Back to top |
|
|
Excalibur

Joined: 19 Jul 2009
Posts: 5017
Location: UK
Expire: 2014-04-21
|
| Posted: Fri Apr 02, 2010 7:50 am Post subject: |
|
|
Excalibur wrote:
Well it depends if you have spot metering on your camera, but anyway the meter is set for the standard of "Kodak grey" so it can be fooled and the best thing is to take a meter reading of something else (away from the subject) that looks Kodak grey to the exposure meter e.g. deep green grass or bushes, grey pavement, grey bark of a tree etc and set the aperture or shutter speed......then compose your shot of the tree, but there is still a problem because the subject is in the shade so open up a stop or two.
_________________
Canon A1, AV1, T70 & T90, EOS 300 and EOS300v, Chinon CE and CP-7M. Contax 139, Fuji STX-2, Konica Autoreflex TC, FS-1, FT-1, Minolta X-700, X-300, XD-11, SRT101b, Nikon EM, FM, F4, F90X, Olympus OM2, Pentax S3, Spotmatic, Pentax ME super, Praktica TL 5B, & BC1, , Ricoh KR10super, Yashica T5D, Bronica Etrs, Mamiya RB67 pro AND drum roll:- a Sony Nex 3
.........past gear Tele Rolleiflex and Rollei SL66.
Many lenses from good to excellent. |
|
| Back to top |
|
|
mo
Joined: 27 Aug 2009
Posts: 8979
Location: Australia
Expire: 2016-07-30
|
| Posted: Fri Apr 02, 2010 10:10 am Post subject: |
|
|
mo wrote:
Thanks for the tips.I will be doing some shooting over the weekend in a wetlands area and plenty of birds up a tree. so will practice.I use the Ricoh KR10 at the moment.
_________________
Moira, Moderator
Fuji XE-1,Pentax K-01,Panasonic G1,Panasonic G5,Pentax MX
Ricoh Singlex TLS,KR-5,KR-5Super,XR-10
Lenses
Auto Rikenon's 55/1.4, 1.8, 2.8... 50/1.7 Takumar 2/58 Preset Takumar 2.8/105 Auto Takumar 2.2/55, 3.5/35 Super Takumar 1.8/55...Macro Takumar F4/50... CZJ Biotar ALU M42 2/58 CZJ Tessar ALU M42 2.8/50
CZJ DDR Flektogon Zebra M42 2.8/35 CZJ Pancolar M42 2/50 CZJ Pancolar Exakta 2/50
Auto Mamiya/Sekor 1.8/55 ...Auto Mamiya/Sekor 2/50 Auto Mamiya/Sekor 2.8/50 Auto Mamiya/Sekor 200/3.5 Tamron SP500/8 Tamron SP350/5.6 Tamron SP90/2.5
Primoplan 1.9/58 Primagon 4.5/35 Telemegor 5.5/150 Angenieux 3.5/28 Angenieux 3,5/135 Y 2
Canon FL 58/1.2,Canon FL85/1.8,Canon FL 100/3.5,Canon SSC 2.8/100 ,Konica AR 100/2.8, Nikkor P 105/2.5
|
|
| Back to top |
|
|
Excalibur
Joined: 19 Jul 2009
Posts: 5017
Location: UK
Expire: 2014-04-21
|
| Posted: Fri Apr 02, 2010 11:40 am Post subject: |
|
|
Excalibur wrote:
| Mo-Fo wrote: |
| Thanks for the tips.I will be doing some shooting over the weekend in a wetlands area and plenty of birds up a tree. so will practice.I use the Ricoh KR10 at the moment. |
Oh forgot...deepish blue sky is similar to "Kodak grey" so if the sky is nice and blue behind your birds or tree (and plenty of sky is included in the shots) then the basic exposure is correct so all you need to do is open up one or two stops because the subject is in the shadow.
BTW White sky behind a subject and you have to compensate, because the exposure meter is:- Yes you guessed it, set to "Kodak grey".
_________________
Canon A1, AV1, T70 & T90, EOS 300 and EOS300v, Chinon CE and CP-7M. Contax 139, Fuji STX-2, Konica Autoreflex TC, FS-1, FT-1, Minolta X-700, X-300, XD-11, SRT101b, Nikon EM, FM, F4, F90X, Olympus OM2, Pentax S3, Spotmatic, Pentax ME super, Praktica TL 5B, & BC1, , Ricoh KR10super, Yashica T5D, Bronica Etrs, Mamiya RB67 pro AND drum roll:- a Sony Nex 3
.........past gear Tele Rolleiflex and Rollei SL66.
Many lenses from good to excellent. |
|
| Back to top |
|
|
Scheimpflug
Joined: 06 Feb 2010
Posts: 1888
Location: New Zealand / USA
Expire: 2011-11-18
|
| Posted: Fri Apr 02, 2010 11:52 am Post subject: |
|
|
Scheimpflug wrote:
| Mo-Fo wrote: |
| Sadly I am not in the film developing stage...I have looked at it but not gone that way...yet I have my L plates on just learning the basics. |
Absolutely give it a try, if you can. A course at the nearest community college would be a great way to get a taste without having to buy any equipment.
You mentioned the L plates - It's interesting how different people learn photography.
When I first learned, I was given some bulk film, an empty film cartridge, and a black bag with two holes in it. I had to load the film into the cartridge inside the bag without being able to see it (it was unexposed film), then put it into a SLR and take a roll of pictures with only some basic instruction on how they worked. We then developed the film in a darkroom, learned to use an enlarger, and made the prints. This was all part of a class, with about 15 students.
The teacher then selected a few prints from each student, hung them up on the wall, and one-by-one told us what mistakes we had made and at what point in the process. 
It was a completely head-first jump into the deep end - we didn't ease into it at all. And we made a ton of mistakes. But the difference between the first roll and the second was astounding.  |
|
| Back to top |
|
|
Nesster

Joined: 24 Apr 2008
Posts: 5883
Location: NJ, USA
Expire: 2014-02-20
|
| Posted: Fri Apr 02, 2010 4:54 pm Post subject: |
|
|
Nesster wrote:
As a hint, the Nikon EM has a back-light switch that increases exposure 2 stops, and it works great most of the time.
I find often that when I notice a light level difference, it's usually at least 2 stops. Rarely am I so in the zone that I am sensitive to 1 stop differences...
_________________
-Jussi
Camera photos
Print Photographica
|
|
| Back to top |
|
|
mo
Joined: 27 Aug 2009
Posts: 8979
Location: Australia
Expire: 2016-07-30
|
| Posted: Fri Apr 02, 2010 10:44 pm Post subject: |
|
|
mo wrote:
The Ricoh has one of those it sits on the film side/ASA setting and has the settings -2 -1 0 +1 +2...so that's what it is for
_________________
Moira, Moderator
Fuji XE-1,Pentax K-01,Panasonic G1,Panasonic G5,Pentax MX
Ricoh Singlex TLS,KR-5,KR-5Super,XR-10
Lenses
Auto Rikenon's 55/1.4, 1.8, 2.8... 50/1.7 Takumar 2/58 Preset Takumar 2.8/105 Auto Takumar 2.2/55, 3.5/35 Super Takumar 1.8/55...Macro Takumar F4/50... CZJ Biotar ALU M42 2/58 CZJ Tessar ALU M42 2.8/50
CZJ DDR Flektogon Zebra M42 2.8/35 CZJ Pancolar M42 2/50 CZJ Pancolar Exakta 2/50
Auto Mamiya/Sekor 1.8/55 ...Auto Mamiya/Sekor 2/50 Auto Mamiya/Sekor 2.8/50 Auto Mamiya/Sekor 200/3.5 Tamron SP500/8 Tamron SP350/5.6 Tamron SP90/2.5
Primoplan 1.9/58 Primagon 4.5/35 Telemegor 5.5/150 Angenieux 3.5/28 Angenieux 3,5/135 Y 2
Canon FL 58/1.2,Canon FL85/1.8,Canon FL 100/3.5,Canon SSC 2.8/100 ,Konica AR 100/2.8, Nikkor P 105/2.5
|
|
| Back to top |
|
|
Orio

Joined: 24 Feb 2007
Posts: 29545
Location: West Emilia
Expire: 2012-12-04
|
| Posted: Sat Apr 03, 2010 12:03 am Post subject: |
|
|
Orio wrote:
The best way to meter for backlight is to use a hand meter and meter the incident light (i.e. point the meter to the light source).
If you don't have a hand light meter, put yourself in a position where you receive the same light as the subject, and meter a 18% grey cardboard - or your hand, if you don't have the cardboard.
Both these methods will give you the "standard" light measure (the incident light method being more precise).
Of course photo is an art not a science, so you may want to shift from the ideal measure depending on your artistic goal. But in any case, the standard measuring is always to be taken, in order to know "where you are".
_________________
Orio, Administrator
T*
NE CEDE MALIS AUDENTIOR ITO
Ferrania film is reborn! http://www.filmferrania.it/
Support the Ornano film chemicals company and help them survive!
http://forum.mflenses.com/ornano-chemical-products-t55525.html |
|
| Back to top |
|
|
mo
Joined: 27 Aug 2009
Posts: 8979
Location: Australia
Expire: 2016-07-30
|
| Posted: Sat Apr 03, 2010 1:49 am Post subject: |
|
|
mo wrote:
Thanks Orio at the moment I am trying just for correct metering ,I have a hand held meter which I will bring with me. I have found a beautiful tree that goes like a S nice curves,not a straight line like other gum trees so I have a practice subject
_________________
Moira, Moderator
Fuji XE-1,Pentax K-01,Panasonic G1,Panasonic G5,Pentax MX
Ricoh Singlex TLS,KR-5,KR-5Super,XR-10
Lenses
Auto Rikenon's 55/1.4, 1.8, 2.8... 50/1.7 Takumar 2/58 Preset Takumar 2.8/105 Auto Takumar 2.2/55, 3.5/35 Super Takumar 1.8/55...Macro Takumar F4/50... CZJ Biotar ALU M42 2/58 CZJ Tessar ALU M42 2.8/50
CZJ DDR Flektogon Zebra M42 2.8/35 CZJ Pancolar M42 2/50 CZJ Pancolar Exakta 2/50
Auto Mamiya/Sekor 1.8/55 ...Auto Mamiya/Sekor 2/50 Auto Mamiya/Sekor 2.8/50 Auto Mamiya/Sekor 200/3.5 Tamron SP500/8 Tamron SP350/5.6 Tamron SP90/2.5
Primoplan 1.9/58 Primagon 4.5/35 Telemegor 5.5/150 Angenieux 3.5/28 Angenieux 3,5/135 Y 2
Canon FL 58/1.2,Canon FL85/1.8,Canon FL 100/3.5,Canon SSC 2.8/100 ,Konica AR 100/2.8, Nikkor P 105/2.5
|
|
| Back to top |
|
|
Scheimpflug
Joined: 06 Feb 2010
Posts: 1888
Location: New Zealand / USA
Expire: 2011-11-18
|
| Posted: Sat Apr 03, 2010 1:52 am Post subject: |
|
|
Scheimpflug wrote:
Keep in mind though that a metering change might not be the magic fix.  Your first exposure certainly wasn't "wrong", it was just not what you wanted for the foreground subject. It was correct for the sky, which covers the majority of the frame, and about perfect for the highlights on the lower tree branches. Your first exposure certainly wasn't "wrong", it was just not what you wanted for the foreground subject. It was correct for the sky, which covers the majority of the frame, and about perfect for the highlights on the lower tree branches.
So once you start adjusting the exposure for the shadows, you may find that you quickly run out of dynamic range for the highlights. For example, the lower portions of the tree branches in your photo here are already clipping the red channel, and within a few percent of clipping on the green as well. Adjusting the exposure may fix the darker sections of the bark, but it will also make the bright parts worse - larger sections will be clipped.
So sometimes you can work around lighting deficiencies with exposure adjustments... but not always. Sometimes you just have to fix the lighting.
For what it is worth, have you ever watched a pro shoot an outdoor model shot in the sun? Often times instead of a fill flash, they will use large reflectors to help fill in the foreground. This probably wouldn't be as effective on the large tree, but it might be a useful technique for smaller objects.
A few examples:


 |
|
| Back to top |
|
|
mo
Joined: 27 Aug 2009
Posts: 8979
Location: Australia
Expire: 2016-07-30
|
| Posted: Sat Apr 03, 2010 1:55 am Post subject: |
|
|
mo wrote:
LOL I have a few things to try this weekend,Thanks for the input Scheimpflug
(by the way does your Tag name mean anything?)
_________________
Moira, Moderator
Fuji XE-1,Pentax K-01,Panasonic G1,Panasonic G5,Pentax MX
Ricoh Singlex TLS,KR-5,KR-5Super,XR-10
Lenses
Auto Rikenon's 55/1.4, 1.8, 2.8... 50/1.7 Takumar 2/58 Preset Takumar 2.8/105 Auto Takumar 2.2/55, 3.5/35 Super Takumar 1.8/55...Macro Takumar F4/50... CZJ Biotar ALU M42 2/58 CZJ Tessar ALU M42 2.8/50
CZJ DDR Flektogon Zebra M42 2.8/35 CZJ Pancolar M42 2/50 CZJ Pancolar Exakta 2/50
Auto Mamiya/Sekor 1.8/55 ...Auto Mamiya/Sekor 2/50 Auto Mamiya/Sekor 2.8/50 Auto Mamiya/Sekor 200/3.5 Tamron SP500/8 Tamron SP350/5.6 Tamron SP90/2.5
Primoplan 1.9/58 Primagon 4.5/35 Telemegor 5.5/150 Angenieux 3.5/28 Angenieux 3,5/135 Y 2
Canon FL 58/1.2,Canon FL85/1.8,Canon FL 100/3.5,Canon SSC 2.8/100 ,Konica AR 100/2.8, Nikkor P 105/2.5
|
|
| Back to top |
|
|
Scheimpflug
Joined: 06 Feb 2010
Posts: 1888
Location: New Zealand / USA
Expire: 2011-11-18
|
| Posted: Sat Apr 03, 2010 2:16 am Post subject: |
|
|
Scheimpflug wrote:
| Mo-Fo wrote: |
LOL I have a few things to try this weekend,Thanks for the input Scheimpflug
(by the way does your Tag name mean anything?) |
No problem. Good luck!
"Scheimpflug" is the principle behind optics systems with non-parallel focal planes... the concept behind the tilt part of tilt-shift lenses. Plus, it's fun to pronounce.


Wikipedia has a page on it at: http://en.wikipedia.org/wiki/Scheimpflug_principle
I first learned about it not through photography, but through video projection optics. Fun stuff. |
|
| Back to top |
|
|
mo
Joined: 27 Aug 2009
Posts: 8979
Location: Australia
Expire: 2016-07-30
|
| Posted: Sat Apr 03, 2010 4:46 am Post subject: |
|
|
mo wrote:
Over my head...cool name!
_________________
Moira, Moderator
Fuji XE-1,Pentax K-01,Panasonic G1,Panasonic G5,Pentax MX
Ricoh Singlex TLS,KR-5,KR-5Super,XR-10
Lenses
Auto Rikenon's 55/1.4, 1.8, 2.8... 50/1.7 Takumar 2/58 Preset Takumar 2.8/105 Auto Takumar 2.2/55, 3.5/35 Super Takumar 1.8/55...Macro Takumar F4/50... CZJ Biotar ALU M42 2/58 CZJ Tessar ALU M42 2.8/50
CZJ DDR Flektogon Zebra M42 2.8/35 CZJ Pancolar M42 2/50 CZJ Pancolar Exakta 2/50
Auto Mamiya/Sekor 1.8/55 ...Auto Mamiya/Sekor 2/50 Auto Mamiya/Sekor 2.8/50 Auto Mamiya/Sekor 200/3.5 Tamron SP500/8 Tamron SP350/5.6 Tamron SP90/2.5
Primoplan 1.9/58 Primagon 4.5/35 Telemegor 5.5/150 Angenieux 3.5/28 Angenieux 3,5/135 Y 2
Canon FL 58/1.2,Canon FL85/1.8,Canon FL 100/3.5,Canon SSC 2.8/100 ,Konica AR 100/2.8, Nikkor P 105/2.5
|
|
| Back to top |
|
|
martinsmith99

Joined: 31 Aug 2008
Posts: 6943
Location: S Glos, UK
Expire: 2013-11-18
|
| Posted: Sat Apr 03, 2010 1:50 pm Post subject: |
|
|
martinsmith99 wrote:
I won't bother adding anything to the exposure tips, but I will say the flash won't bother the birds. I was told by someone that works with birds of prey that they cannot see it.
_________________
Casual attendance these days |
|
| Back to top |
|
|
venkatnet
Joined: 14 Mar 2010
Posts: 3
|
| Posted: Wed Apr 14, 2010 4:37 am Post subject: Contax TLA-30 |
|
|
venkatnet wrote:
Hi Orio,
Can you please elaborate on the Contax TLA-30 flash on Canon 5D. If you can explain the setting on the flash unit it would be very helpful. I would like to use this flash as a fill flash. Thanks in advance! venkatnet
_________________
Canon 5D Nikon D70s Nikon F3 Nikon F4 Nikon EM |
|
| Back to top |
|
|
peterqd

Joined: 28 Feb 2007
Posts: 7447
Location: near High Wycombe, UK
Expire: 2014-01-04
|
| Posted: Wed Apr 14, 2010 8:57 am Post subject: |
|
|
peterqd wrote:
Mo, in a situation like that tree, just pointing the camera at it from your shooting position and using auto exposure is going to result in the meter averaging the light to try to get a balance between low and highlights. The result will be underexposure of the tree because most of the picture is brighter sky. It's a similar situation to a snap of a person in the snow. The opposite case is, for instance, a bride in a white wedding dress in front of a dark wall - the camera will tend to overexpose the dress.
You can never get a proper balance in one shot containing widely different high and low lights (at least not without some darkroom trickery) and there will always be some compromise. So you need to decide which parts of the picture you want to expose correctly and those you can allow to over or under expose. In your case, if you want the tree correctly exposed then the sky is always going to be overexposed, but this is preferable to a shadowy subject as in your pic.
My approach would be to go right up close to the tree and take an exposure reading of the trunk with no sky in the picture. Then, with the camera on manual, set the shutter speed and aperture to those values before going back to the wider shot. This is where cameras with exposure lock feature (e.g. the Chinon Memotrons or Pentax P30n) are handy.
Another thing to remember is that the camera meter reading can be affected by light entering through the viewfinder, so you should block the v/f when taking the meter reading. If your camera is on auto you should try to block it as you press the shutter. Some cameras have an internal blind which does this, and some have a plastic cap that slides over the outside of the v/f. An eye-cup helps as long as you don't wear glasses.
_________________
Peter - Moderator |
|
| Back to top |
|
|
mo
Joined: 27 Aug 2009
Posts: 8979
Location: Australia
Expire: 2016-07-30
|
| Posted: Wed Apr 14, 2010 10:50 am Post subject: |
|
|
mo wrote:
Thanks Peter some great points ,yes I would prefer the tree to be exposed correctly Or the bird on the tree.
I have noticed the viewfinder problem with exposure and I do wear Glasses...when the issue pops up I cup my hand over the viewfinder and it works.I mainly use the manual setting as I am trying to get a grasp on how it all works and it has been hard but fun and rewarding
Thanks Martin,I am glad it won't hurt the birds.
_________________
Moira, Moderator
Fuji XE-1,Pentax K-01,Panasonic G1,Panasonic G5,Pentax MX
Ricoh Singlex TLS,KR-5,KR-5Super,XR-10
Lenses
Auto Rikenon's 55/1.4, 1.8, 2.8... 50/1.7 Takumar 2/58 Preset Takumar 2.8/105 Auto Takumar 2.2/55, 3.5/35 Super Takumar 1.8/55...Macro Takumar F4/50... CZJ Biotar ALU M42 2/58 CZJ Tessar ALU M42 2.8/50
CZJ DDR Flektogon Zebra M42 2.8/35 CZJ Pancolar M42 2/50 CZJ Pancolar Exakta 2/50
Auto Mamiya/Sekor 1.8/55 ...Auto Mamiya/Sekor 2/50 Auto Mamiya/Sekor 2.8/50 Auto Mamiya/Sekor 200/3.5 Tamron SP500/8 Tamron SP350/5.6 Tamron SP90/2.5
Primoplan 1.9/58 Primagon 4.5/35 Telemegor 5.5/150 Angenieux 3.5/28 Angenieux 3,5/135 Y 2
Canon FL 58/1.2,Canon FL85/1.8,Canon FL 100/3.5,Canon SSC 2.8/100 ,Konica AR 100/2.8, Nikkor P 105/2.5
|
|
| Back to top |
|
|
Esox lucius

Joined: 26 Aug 2008
Posts: 2441
Location: Helsinki, Finland
Expire: 2011-11-18
|
| Posted: Wed Apr 14, 2010 11:44 am Post subject: |
|
|
Esox lucius wrote:
I would use fill-in flash. I know SB-800 can be zoomed as well as easily reach 40m at ISO 100, Nikon's SB-900 packs a lot more punch. Canon's and other manufacturer's portable flashes can cover the same distances also.
_________________
Vilhelm
Nikon DSLR: D4, D800, Nikon D3, D70
Nikon SLR: Nikon F100, Nikon FM2n
Nikkor MF: 20/2.8 Ai-S, 24/2 Ai-S, 24/2.8 Ai-S, 28/2 Ai-S, 28/2.8 Ai-S, 35/1.4 AIS, 35/2 Ai-S, 45/2.8 GN, 50/1.2 Ai, 50/1.2 Ai-S, 50/1.4 Ai, 50/1.4 Ai-S, 50/1.8 AI-S "long", 50/1.8 AI-S "short", 55/1.2 Ai, 85/1.4 Ai-S, 85/1.8H, 105/2.5 Ai, 135/2.8Q, 135/3.5 Ai, 180/2.8 Ai-S ED
Nikkor AF/AF-S FX: 14-24/2.8G, 16/2.8D Fisheye, 16-35/4G VR, 17-35/2.8D, 24/1.4G, 24/3.5D PC-E, 24/2.8D, 24-70/2.8G, 28/1.4D, 28/1.8G, 35/1.4G, 35/2D, 50/1.4D, 50/1.4G, 50/1.8G, 60/2.8 Micro, 60/2.8G Micro, 70-200/2.8G VR, 70-200/2.8G VR II, 80-400/4.5-5.6D VR, 85/1.4G, 85/2.8D PC-E Micro, 105/2D DC, 105/2.8G VR Micro, 135/2D DC, 200/2G VR, 200-400/4G VR, 300/2.8G VR, 300/4D ED, 400/2.8G VR, 800/5.6E VR
Nikkor AF/AF-S DX: 10.5/2.8G Fisheye, 12-24/4G, 18-70/3.5-4.5G
Topcor: Auto-Topcor 58/1.4,
Voigtländer SL: 40/2 Ultron, 58/1.4 Nokton, 75/2.5 Color-Heliar, 90/3.5 APO-Lanthar, 125/2.5 APO-Lanthar, 180/4 APO-Lanthar
Zeiss ZF: Planar T* 85/1.4 ZF
M42 SLR: Voigtländer Bessaflex TM
M42: Flektogon 20/4, Flektogon 35/2.4, Tessar 50/2.8 T, Super-Takumar 55/1.8, Biotar 58/2 T, Pentacon 135/2.8, Sonnar 135/3.5
Medium format: several Zeiss Super Ikonta 532/16 Opton-Tessar 80mm f/2.8, Zeiss Ikonta 524/16 Opton-Tessar 75mm f/3.5
Leica: R7, M4, Super-Angulon-R 4/21, Elmarit-R 2.8/28, Summicron-R 2/35, Summicron-M 2/35, Summicron-M 2/50, Elmarit-R 2,8/180 |
|
| Back to top |
|
|
lexanite
Joined: 04 Jul 2010
Posts: 4
Location: Indonesia
|
| Posted: Fri Nov 26, 2010 11:27 am Post subject: |
|
|
lexanite wrote:
With that condition I will try Fill in Flash:
Set the camera dial at speed priority, lowest ISO, set shutter speed at the max flash syncro speed (to minimise the effect of back light), for example, 1/250 for 7D, 1/500 for D70S, then focus and fire.
Sorry for my poor english.
The Flash in place and switch on for sure...
_________________
EOS-7D, EOS-40D, EOS 50, D70s, Lumix LZ10, AFS 18-105mm, EF 28-135 IS/3.5-5.6, EF 100 /2.8 macro, EF 60/2.8 macro, EF 17-40/4L, EF 24-105 F/4L, EF 70-200/4L, EF 70-200 F/4L IS, EF 10-22/3.5, EF 50/1.8, Sigma EX 80-400 /4.5-5.6 OS APO DG. Sekonic L-308S, Helios 58/2, Tak 55/2, Tak 50/1.4, Zeiss Pancolar 50/1.8, Zeiss N-Mirotar 210mm/0.03, Zeiss Sonnar 135/3.5, Zeiss Triotar 135/4, Tak 135/3.5, Zeiss Biometar 80/2.8, Zeiss Biotar 58/2, WO Megrez72 430/6, Jupiter21M 200/4, Vivitar 135/2.8, Vivitar 55/2.8, Macro Bellows/Slide Duplicator: Canon FL, Panagor, Industar. FL 50/1.4, Zakar 35-75/3.5, Industar 52/2.8, Formula 5 MC 80-200/4.5, FL 135/2.5, Yashinon DX 300/5.6, EBC X-Fujinon T 200/4.5, |
|
| Back to top |
|
|
|
|


