| View previous topic :: View next topic |
| Author |
Message |
stevemark

Joined: 29 Apr 2011
Posts: 3924
Location: Switzerland
|
 Posted: Fri Aug 23, 2024 9:01 pm Post subject: Nikkor AiS 2.8/55mm Micro Repair Posted: Fri Aug 23, 2024 9:01 pm Post subject: Nikkor AiS 2.8/55mm Micro Repair |
 |
|
stevemark wrote:
The Micro Nikkor AiS 28/55mm certainly is one of the most iconic macro lenses. Introduced in 1979, it was sold until 2020 - for more than fourty years! The Micro Nikkor 2.8/55mm has - unlike its equally legendary precedessor, the Micro Nikkor 3.5/55mm - a floating focusing mechanism. In addition to the double helix required for close focusing, this additional floating focusing mechanism plus the two mechanisms required for transmission of the aperture setting and the aperture activation result in a rather complicated mechanical construction of the lens barrel.
Early AiS 2.8/55mm lenses usually suffer from a sticky aperture, since the three helices were calling for a grease with low viscsity (which tends to spread into the aperture mechanism, blocking it). In addition it may cause fungus growth. When this problem became obvious, Nikon changed the grease, but the new grease was creating another problem since its higher viscosity would lead to stiff focusing after a few years (or even to a completely blocked focusing ring). In other words: Most of the AiS 2.8/55mm Micro Nikkors these days suffer from either a sticky aperture or a blocked focusing ring. Cleaning and re-lubing those lenses isn't as easy as with ordinary primes, but it's doable if you know how to do it.
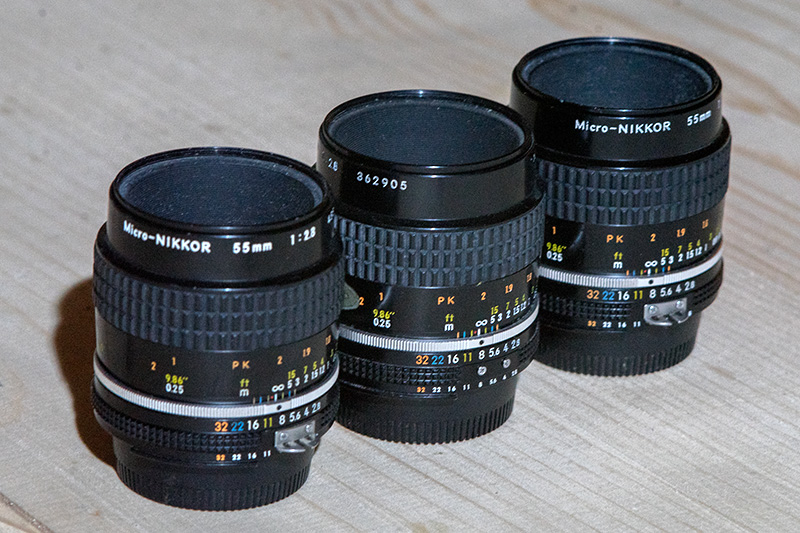
Some years ago I got three AiS 2.8/55mm Nikkors either cheap or for free from my local photo store - one with its aperture stuck wide open, the two others with some very stiff or completely blocked focusing mechanisms. Some days ago I decided to re-store them.
_________________
www.artaphot.ch
Last edited by stevemark on Fri Aug 23, 2024 9:26 pm; edited 1 time in total |
|
| Back to top |
|
 |
stevemark
Joined: 29 Apr 2011
Posts: 3924
Location: Switzerland
|
| Posted: Fri Aug 23, 2024 9:13 pm Post subject: |
|
|
stevemark wrote:
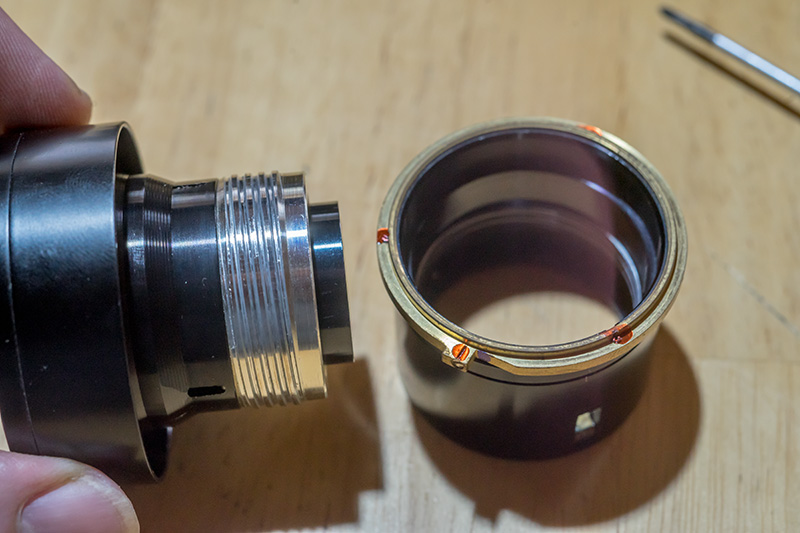
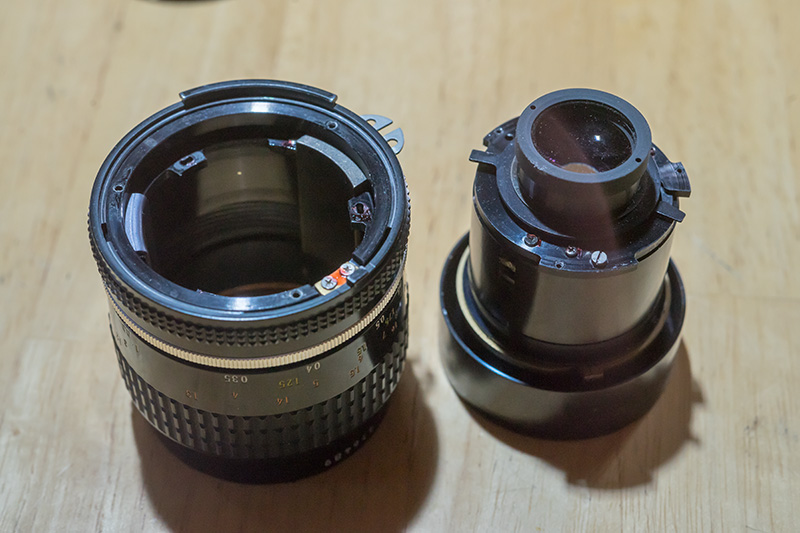
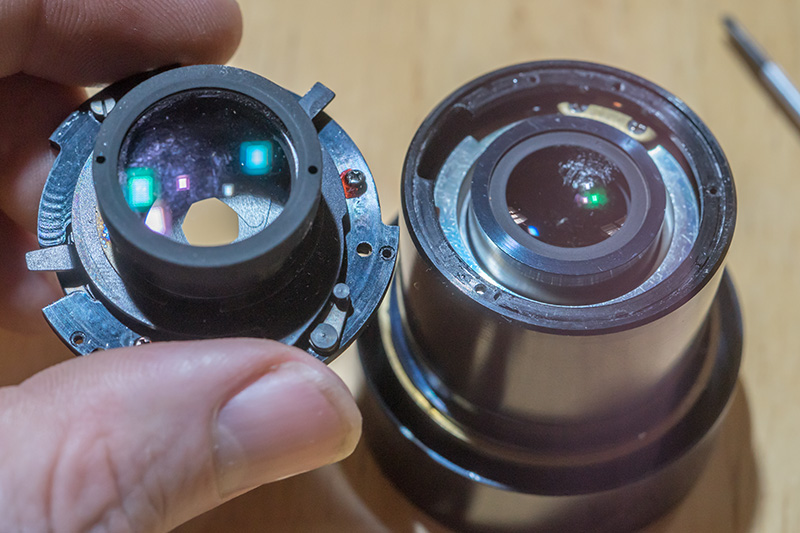
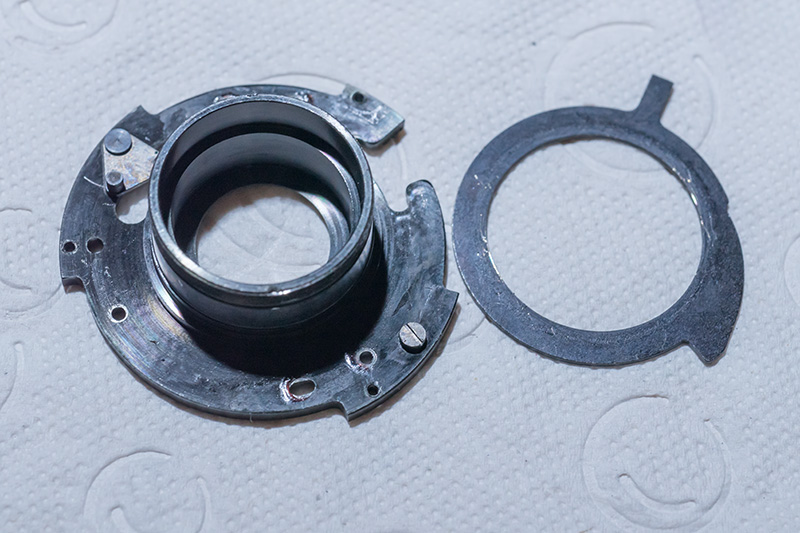
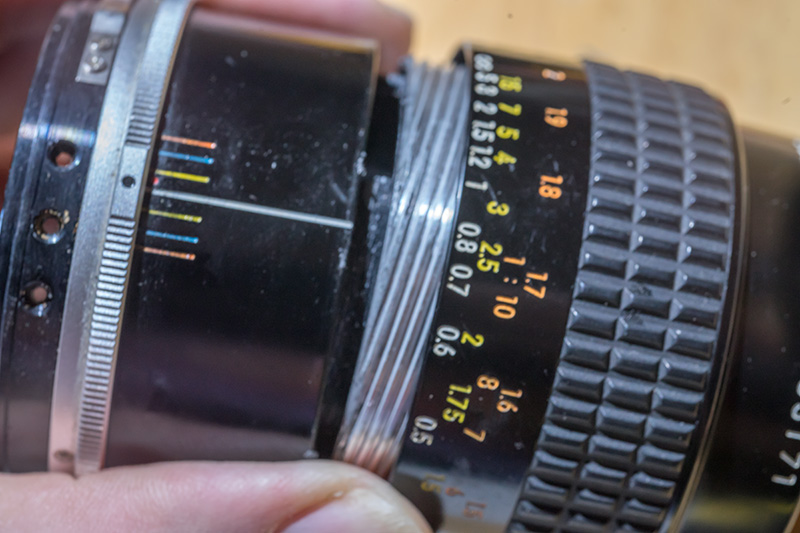
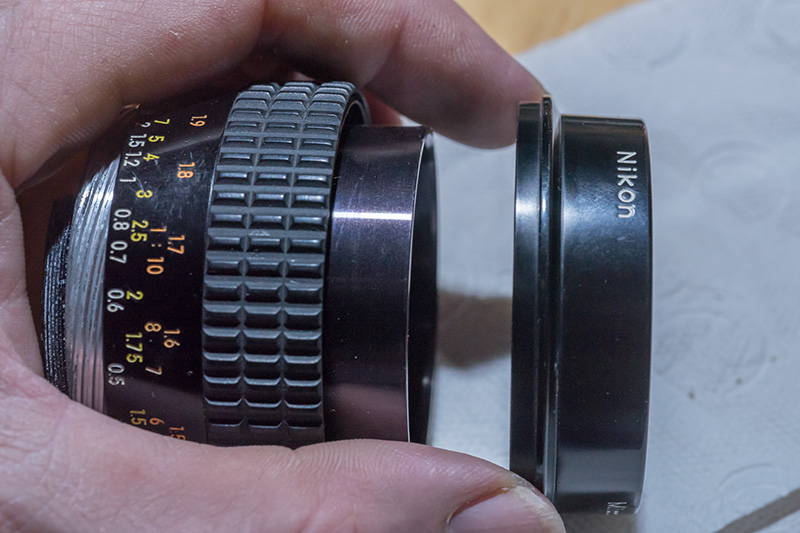
PART I - SEPARATING LENS BODY & CRC MECHANISM FROM THE FOCUSING MECHANISM
OK - let's start.
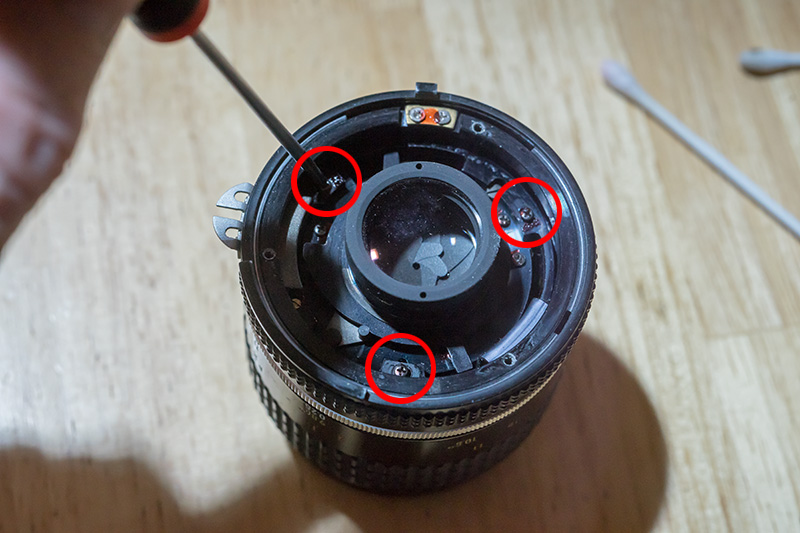
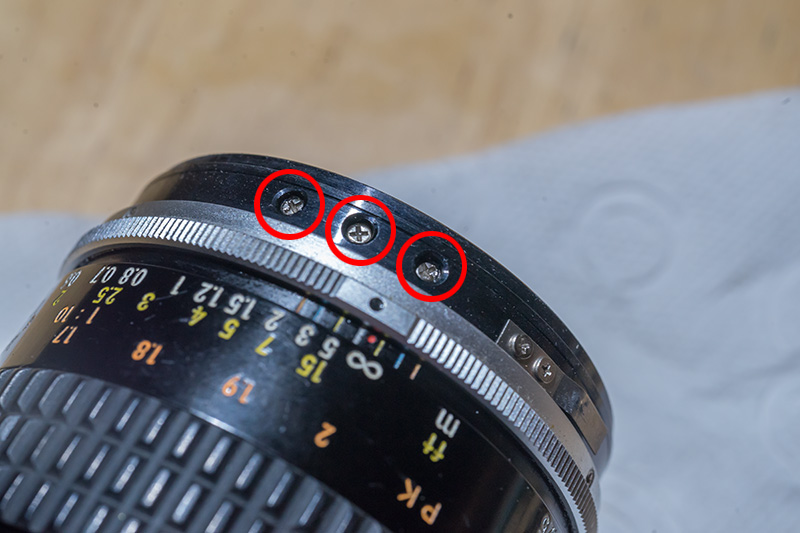
First we remove the bayonet. Be sure to loosen the screws by
1) soaking them with a few drops of acetone for a few minutes and
2) using the correct screwdriver (very important - see here: https://richardhaw.com/2015/12/29/best-practices-part-1/#more-421)
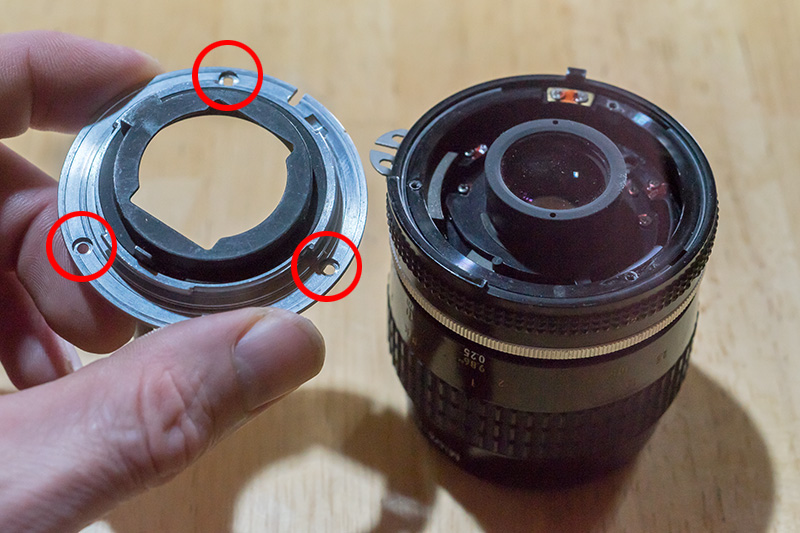
Be sure the lens is set to infinity!!
Now soak these screws with acetone and remove them:

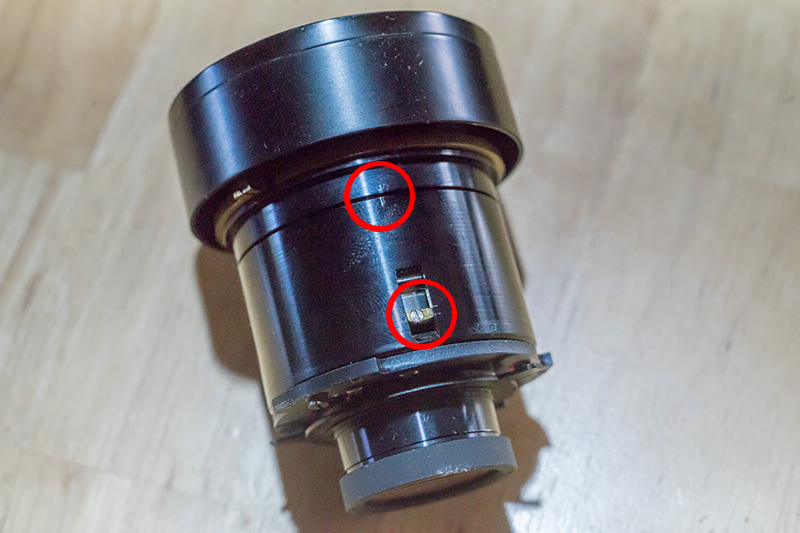
Then carefully extract the lens (including the CRC mechanism, shown on the right) from the main focusing mechanism (shown on the left):

_________________
www.artaphot.ch
Last edited by stevemark on Sat Aug 24, 2024 10:27 am; edited 1 time in total |
|
| Back to top |
|
|
stevemark
Joined: 29 Apr 2011
Posts: 3924
Location: Switzerland
|
| Posted: Fri Aug 23, 2024 10:23 pm Post subject: |
|
|
stevemark wrote:
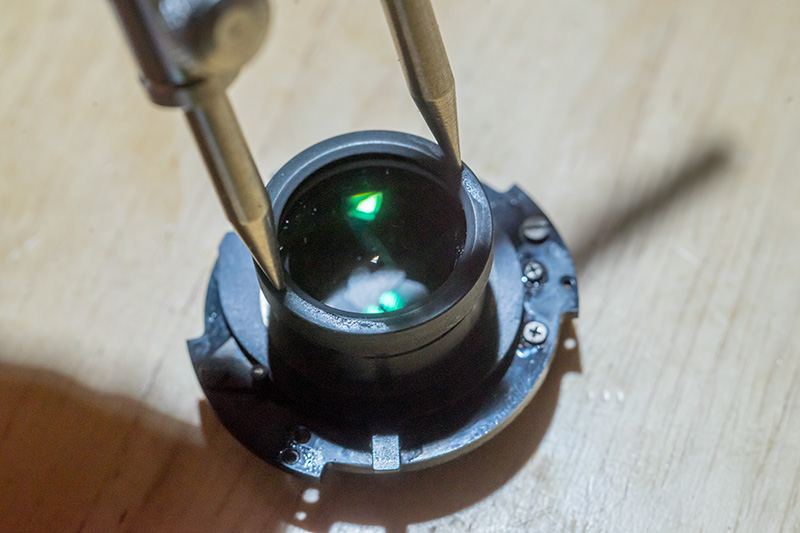
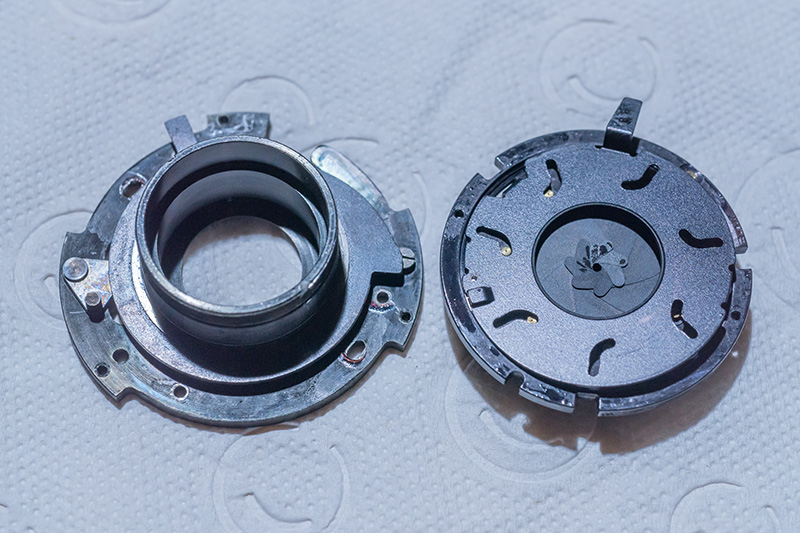
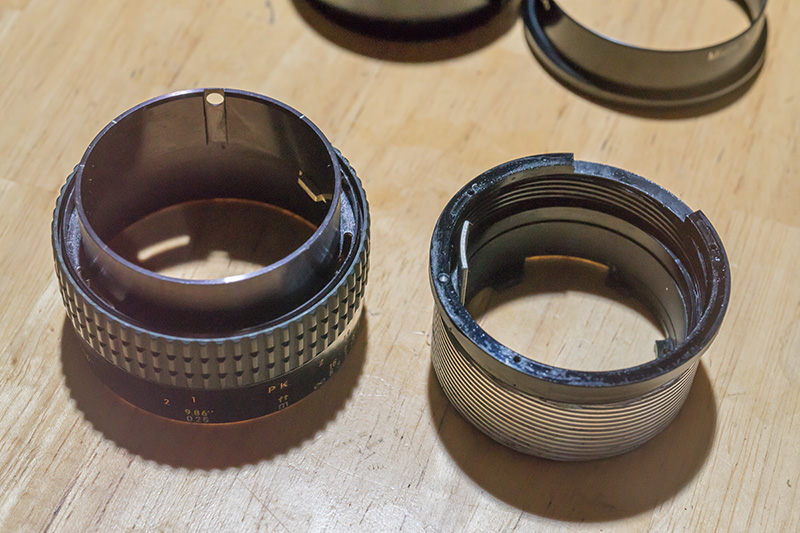
PART II - DISMANTLING THE CRC FOCUSING MECHANISM
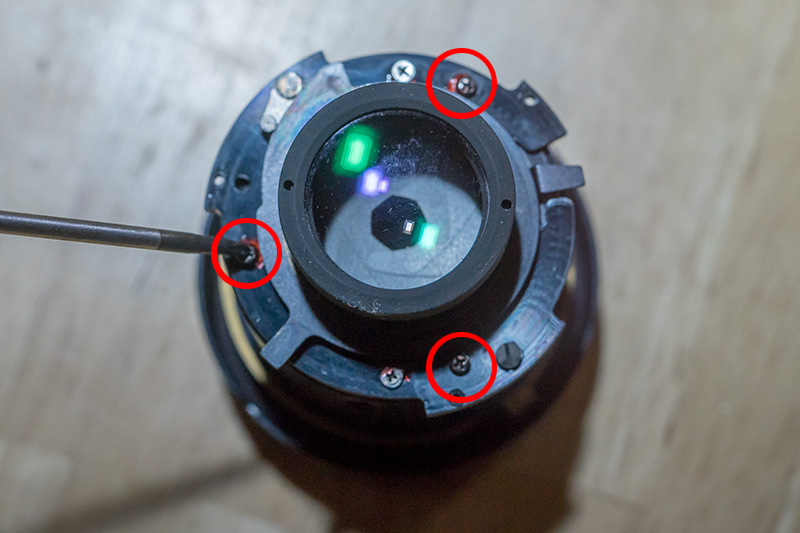
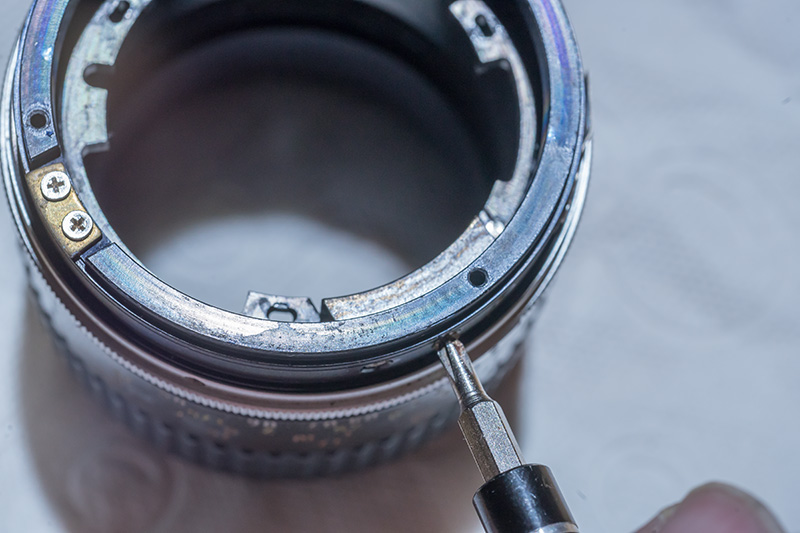
Be sure not to mess with the relative position of the two parts of the main lens (they should still be in the infinity position!) and mark the correct position of the two parts of the lens:

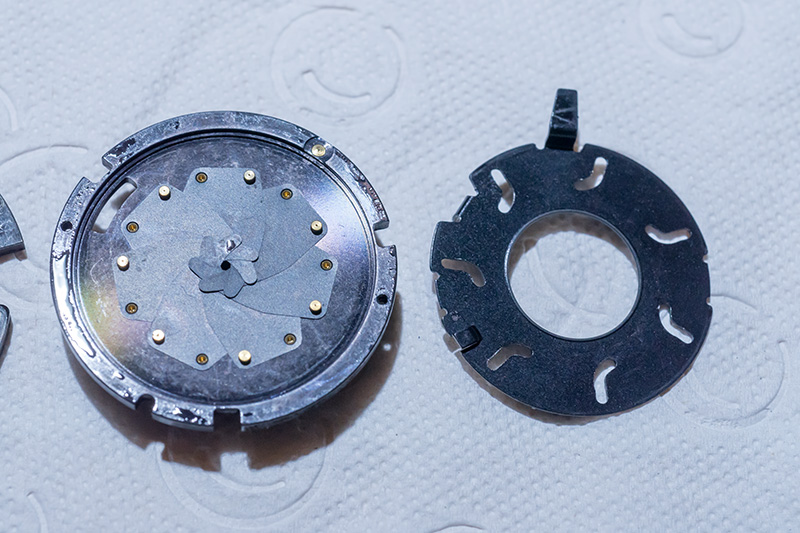
Remove the rear part of the lens (including the aperture mechanism) by removing the three corresponding screws (one may be hidden partially/temporally by the aperture mechanism):

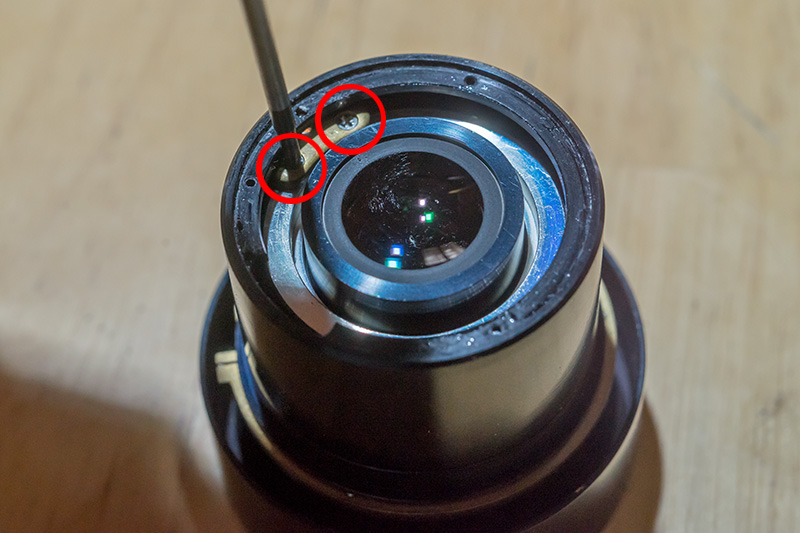
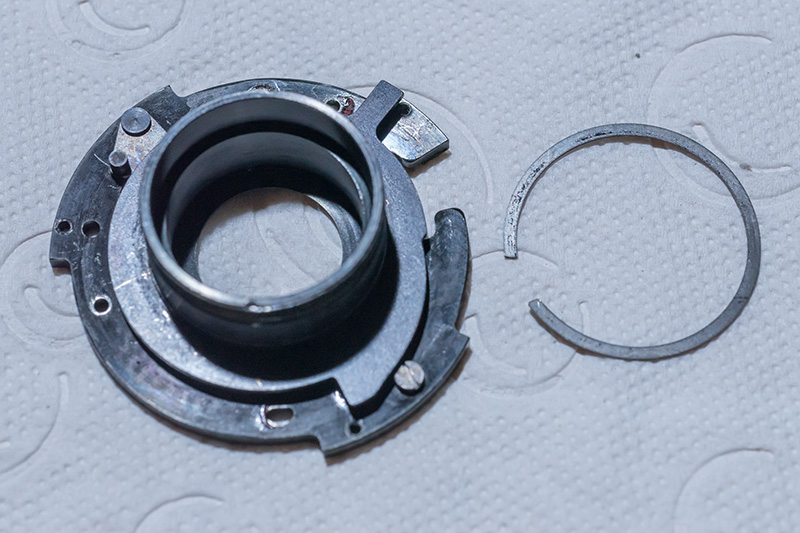
Remove these two screws and extract the corresponding guide mechanism (brass!) for the CRC helicoid

Now we can dismantle the CRC helicoid:

_________________
www.artaphot.ch
Last edited by stevemark on Sat Aug 24, 2024 10:41 am; edited 2 times in total |
|
| Back to top |
|
|
stevemark
Joined: 29 Apr 2011
Posts: 3924
Location: Switzerland
|
| Posted: Fri Aug 23, 2024 10:40 pm Post subject: |
|
|
stevemark wrote:
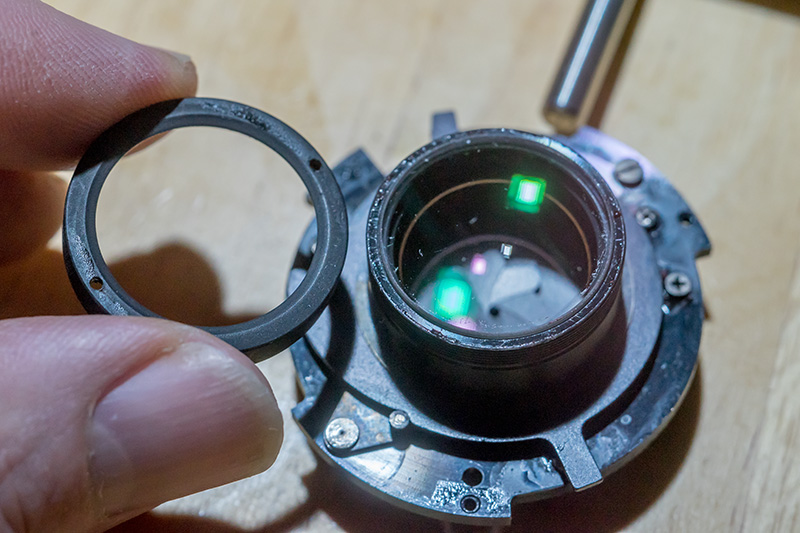
PART III - CLEANING THE REAR LENSES
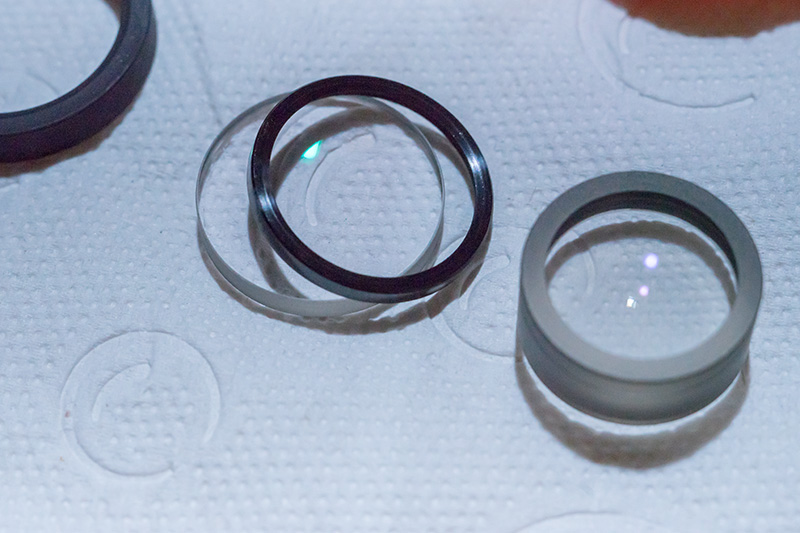
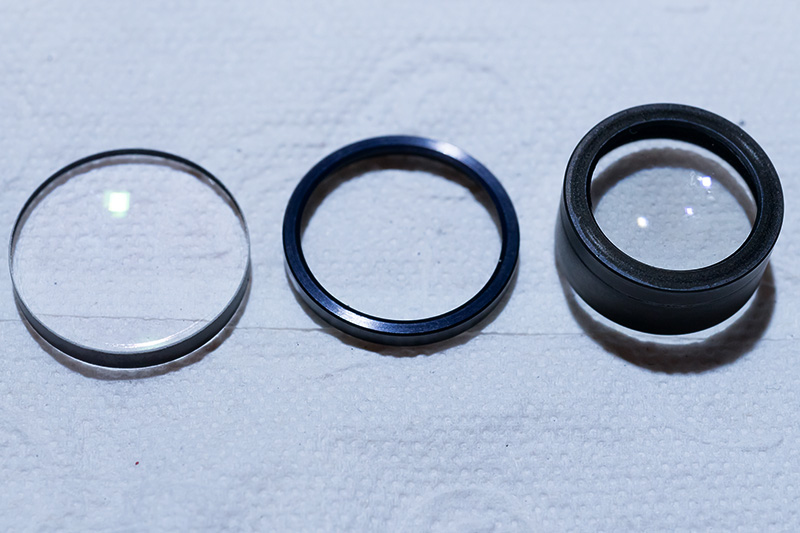
Take the rear part of the lens and use a lens spanner wrench to remove the responding retainer:
After its removal the rear lens as well as the rear inner doublet and a spacer are accessible. Be sure to carefully extract them.

Mark the lens elements as well as the spacer so that you will able to re-mount them correctly (e. g. use a marker). After extracting the lenses you may clean them if necessary (e. g. fungus or haze):
_________________
www.artaphot.ch
Last edited by stevemark on Fri Aug 23, 2024 10:44 pm; edited 2 times in total |
|
| Back to top |
|
|
stevemark
Joined: 29 Apr 2011
Posts: 3924
Location: Switzerland
|
| Posted: Fri Aug 23, 2024 10:43 pm Post subject: |
|
|
stevemark wrote:
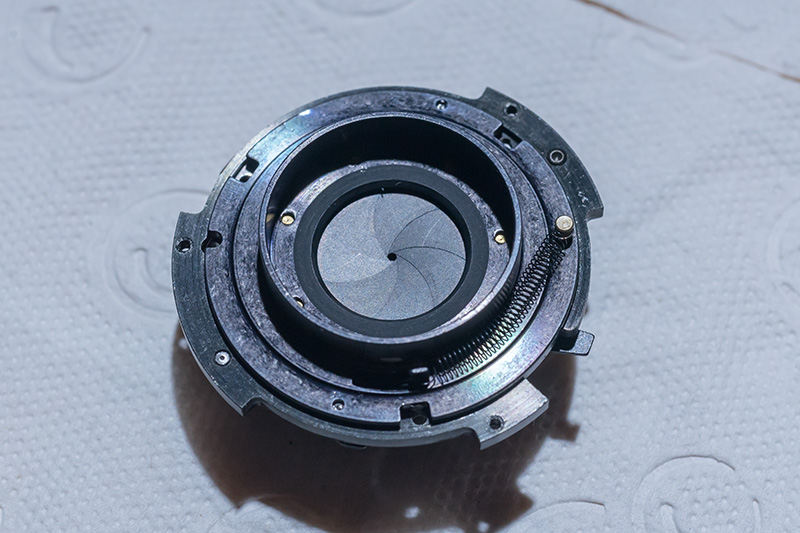
PART III - CLEANING THE APERTURE MECHANISM
Open the aperture mechanism (look at how dirty the blades are ...):
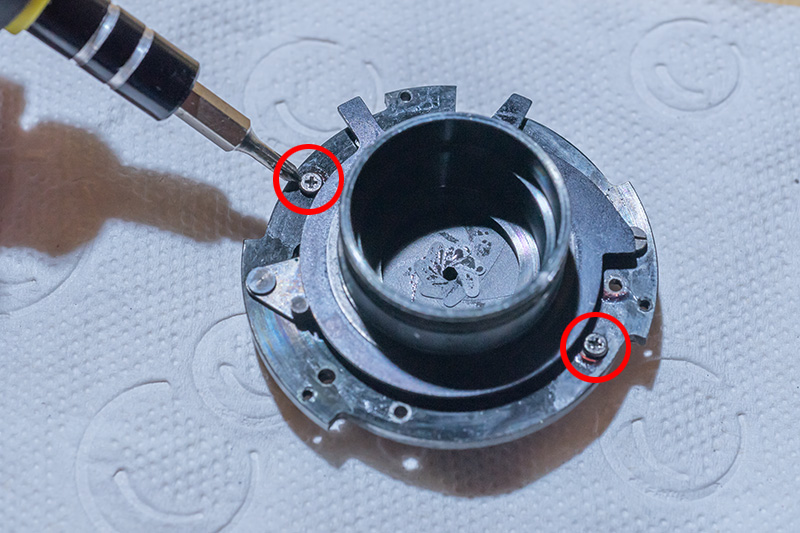
Further dismantle the aperture mechanism. To remove the oil, the aperture blades as well as the other parts of the mechanism now can be soaked in acetone.
If the transmission mechanism is oily (it usually is!) it should be cleaned as well. Dismantle it by removing the tiny collar (us a flat screwdriver which is about 1-2mm wide):
After cleaning everything thoroughly, we now can re-assemble the aperture mechanism:
_________________
www.artaphot.ch |
|
| Back to top |
|
|
stevemark
Joined: 29 Apr 2011
Posts: 3924
Location: Switzerland
|
| Posted: Fri Aug 23, 2024 11:44 pm Post subject: |
|
|
stevemark wrote:
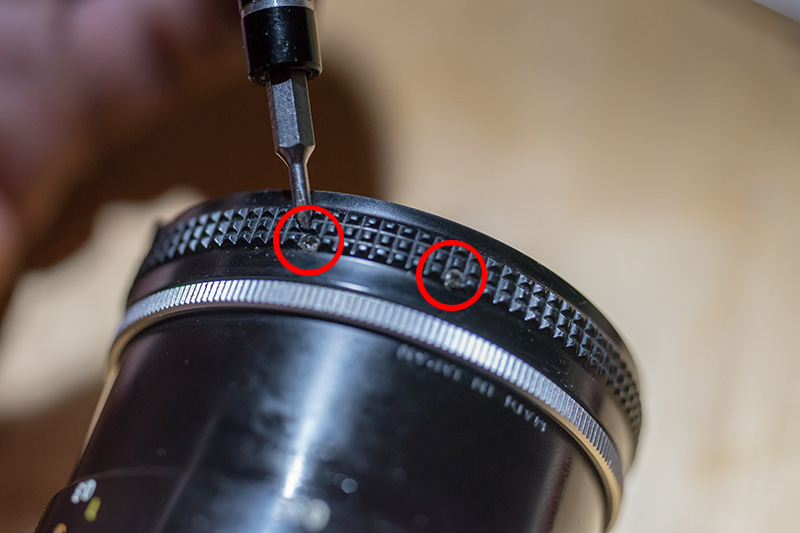
PART IV - CLEANING AND RE-LUBING THE MAIN FOCUSING DOUBLE HELICOID
Now let's go on cleaning and re-lubing the main helicoid (left part on the image below):

First we have to remove these two screws. ATTENTION - THEY EASILY CAN BE DESTROYED IF YOU DON'T FOLLOW THE PROCEDURE GIVEN BELOW!! Be aware that removing them is the most tricky part of the entire repair ...!

0) These screws are NOT glued with epoxy, even though Richard Haw claims otherwise. It's NOT necessary to heat them up (and potentiually damage the entire mechanism)
1) Pour some acetone in a beaker (about 1 cm is enough), and put the focusing mechanism/aperture ring into the beaker so that the screws are covered with acetone
2) Let it soak for 15-30 min
3) Use the correct (!!) screwdriver
4) Apply a lot of pressure while extracting the screws
5) Do not just turn the screwdrive in one direction, but initially loosen the screws by carefully turning first in one direction, then in the other direction, back and forth (ten or twenty times if necessary)
6) As soon as you notice the screws are loosening, extract them as usual
Once you've removed them, the most difficult/dangerous part is over!
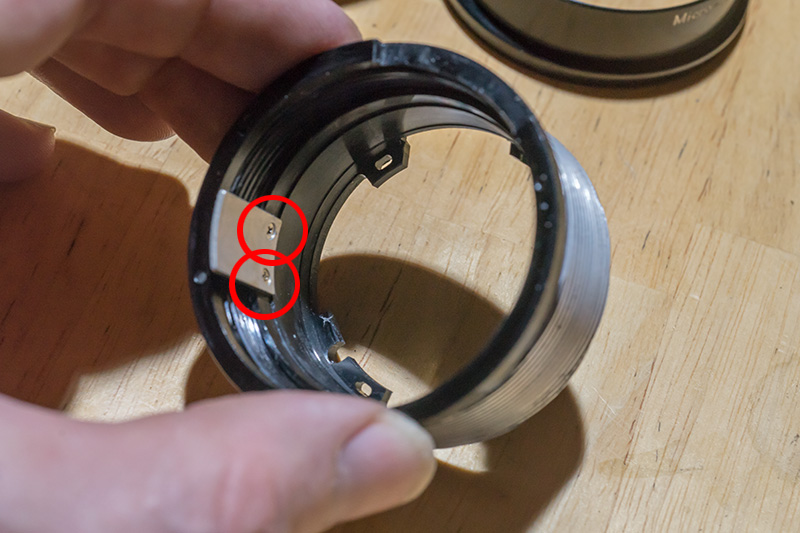
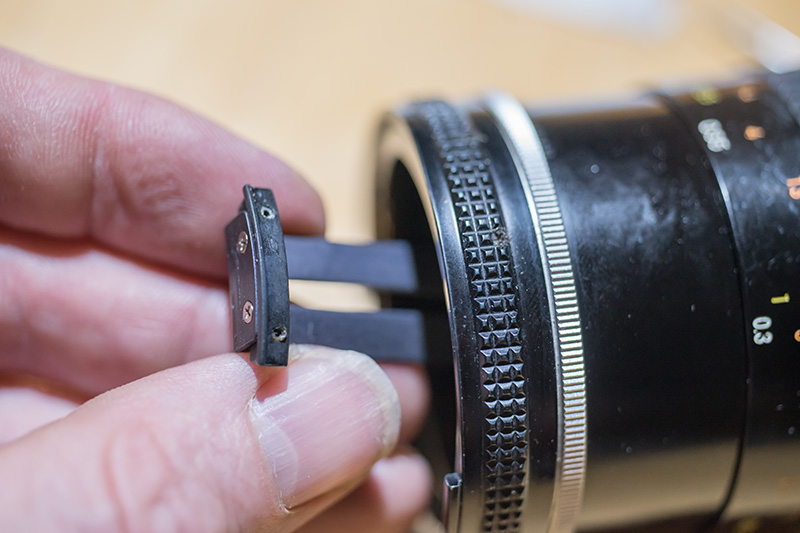
Remove the aperture fork which couples the aperture ring with the iris mechanism:
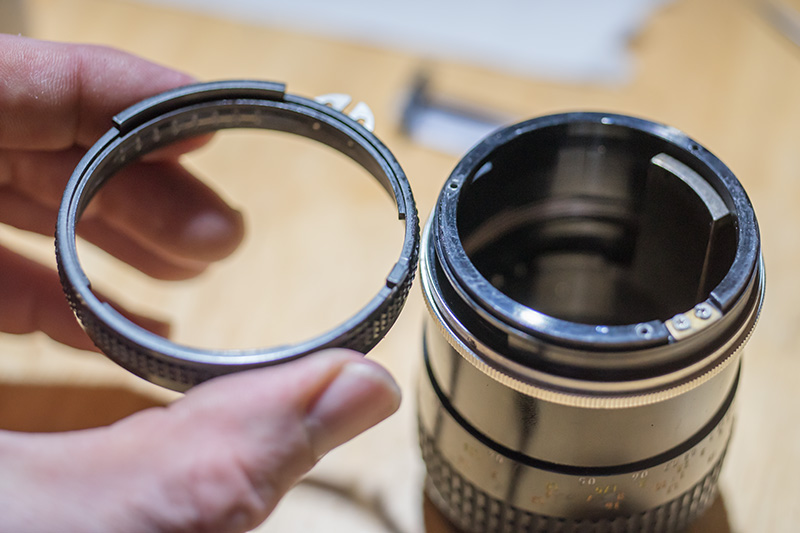
Remove the aperture ring:
Remove the three screws holding the helicoid key. ATTENTION - THOSE SCREWS ARE DIFFICULT TO REMOVE AS WELL; USE THE SAME PROCEDURES AS ABOVE. They are NOT glued in with epoxy, and heating is unnecessary!! 15-30min soaking in acetone is sufficient:


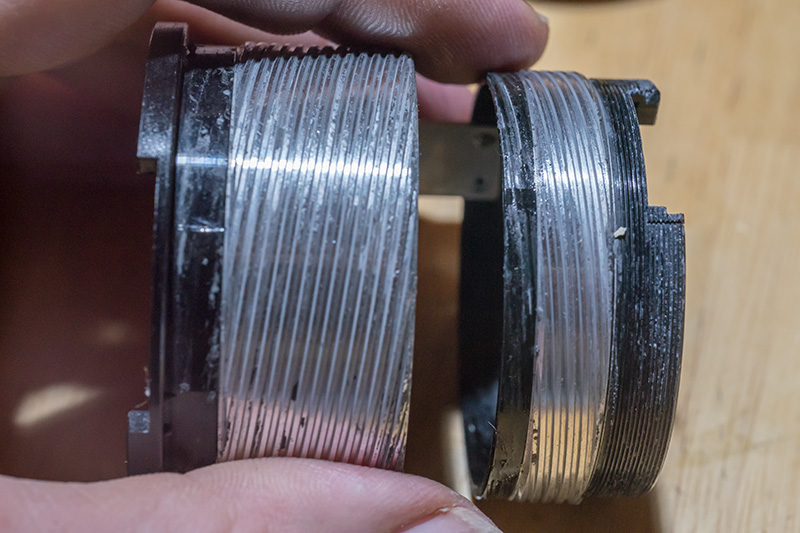
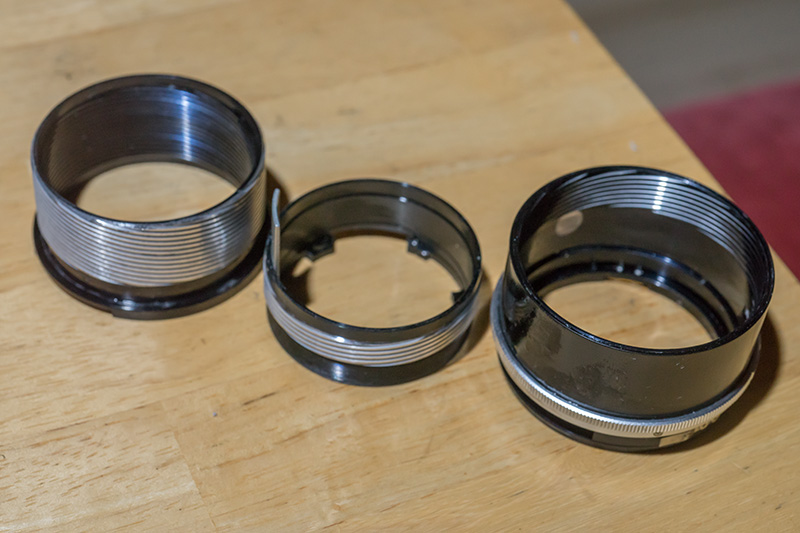
Now you can separate the two parts of the first helicoid - be sure to mark the point where they separate. It's about at this position (at the 0.7 .. 0.8 m mark):
Now the front ring may be removed:
Separating the two parts of the outer helicoid - DON'T FORGET TO MARK THE POSITION WHERE THEY SEPARATE:
Removing the two screws of the key for the inner helicoid:

Separate the two parts of the inner helicoid AND CAREFULLY MARK THE POSITION WHERE THEY SEPARATE:

The three parts of the main double helicoid (remember there's another [third] helicoid for the CRC mechanism):

Clean the helicoids first with plenty of a good liquid detergent (tooth brush works well), and do the same using aceton. Once the threads are clean, re-lube them with a grease of low viscosity. Do NOT apply much grease; a tiny amount is sufficient - otherwise the focusing will be stiiff in spite of all your work ...
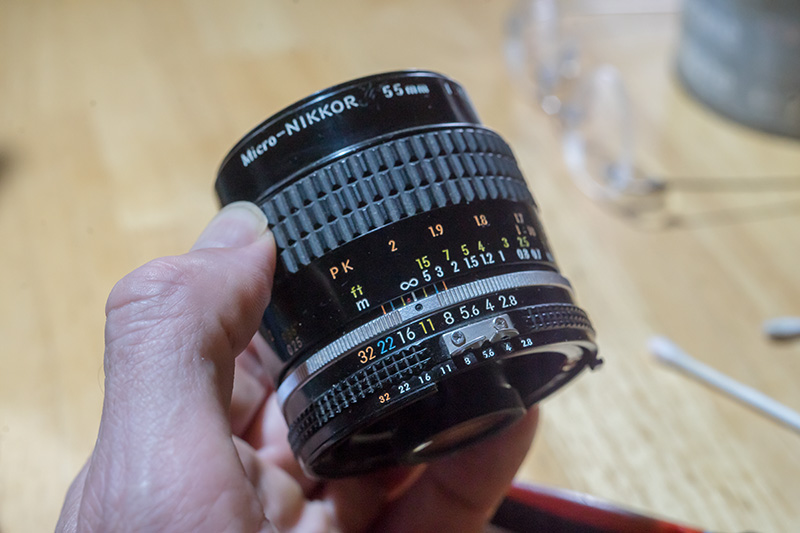
Now re-assemble and enjoy 
S
_________________
www.artaphot.ch |
|
| Back to top |
|
|
kiddo

Joined: 29 Jun 2018
Posts: 1218
|
| Posted: Sat Aug 24, 2024 7:30 pm Post subject: |
|
|
kiddo wrote:
thank you Steve, i´ve had this lens cla´d by shop and they´ve used some grease that makes no fun using the lens , as i´d expect smoothness as yashica/vivitar 55mm at least, before attempting to do it myself, i´d need to buy the proper grease for this nikon threads, so which one would you recommend ? |
|
| Back to top |
|
|
stevemark
Joined: 29 Apr 2011
Posts: 3924
Location: Switzerland
|
| Posted: Sun Aug 25, 2024 9:46 am Post subject: |
|
|
stevemark wrote:
| kiddo wrote: |
| thank you Steve, i´ve had this lens cla´d by shop and they´ve used some grease that makes no fun using the lens , as i´d expect smoothness as yashica/vivitar 55mm at least, before attempting to do it myself, i´d need to buy the proper grease for this nikon threads, so which one would you recommend ? |
As you can see from my postings above, the Nikkor has three (!) helices insetad of the usual single helix for focusing. It was an early CRC construction, and having three helices proved to be cumbersome (same is true for the Micro Nikkor AiS 2.8/105mm). Later constructions such as the Minolta AF 2.8/100mm Macro were relying on mechanical priciples developped for zoom lenses.
The (early) Micro Nikkor AiS 2.8/55mm does focus as smoothly as my Yashica ML 2.8/55mm, even though the Yashica doesn't have a CRRC mechanism. Originally, Nikon seems to have used a grease with really low viscosity. As we know that grease - over time - was going everywhere, including aperture blades. I don't have access to such a grease.
I have three different grease samples from Losimol (that's the German company producing the greases for Leica and Canon EF lenses, among others). I got those samples tem yeard ago, via a German engineer working at a large German car manufacturer. Those greases were not for (public) sale at the time, and they have disappeared from their website since:
1) Losimol Losoid 33B (recommended for helicoids)
2) Losimol Losoid 3345 (viscosity 5.5 Pa s, used by Canon for certain EF lenses around 2010)
3) Losimol Losoid 3346
Sadly I didn't download all the factsheets; so I can't comment on the properties / viscosities of these greases. I remember 33B had the lowest viscosity, and so I chose it for the Micro Nikkor AiS 2.8/55mm.
Apart from viscosity, the amount of grease applied is very important. I have seen HUGE differencies in focusing smoothness e. g. on the MC 1.2/58 and MC 1.7/85mm, depending on the amount of grease applied. If you want really smooth focusing on an ordinare lens (= jus one focusing thread, not three), you MUST aplly only the smallesr amount possible, but in a EVRY EVENLY MANNER. This isn't as easy as it sounds. For me it works best if I dissolve a liitle bit of grease in a small amount of acetone. Using a soft toothbrush one can distribute small amounts of the above solution evenly onto the helices.
While repairing my AiS 2.8/55mm lenses I didn't do that, and therefore focusing is a bit on the stiff side (as in your sample probably). Not as smooth as the ML 2.8/55 Macro, but nothing to worry about either.
S
_________________
www.artaphot.ch |
|
| Back to top |
|
|
Doc Sharptail

Joined: 23 Nov 2020
Posts: 1154
Location: Winnipeg Canada
|
| Posted: Mon Aug 26, 2024 6:42 am Post subject: |
|
|
Doc Sharptail wrote:
This is quite interesting.
I have a much older variant with the same aperture fork mechanism that I did not dis-assemble- it appears to rotate on some pretty tiny bearings, so I left it alone. Same tensioning spring, though.
Just one un-related question:
Have the coatings changed from the deep green to the pale purple/pink color on these A/i-s variants? Kind of curious as one of your photo's shows some of that green on one of the rear elements.
-D.S.
_________________
D-810, F2, FTN.
35mm f2 O.C. nikkor
50 f2 H nikkor, 50 f 1.4 AI-s, 135 f3.5 Q,
50 f2 K nikkor 2x, 28-85mm f3.5-4.5 A/I-s, 35-105 3.5-4.5 A/I-s, 200mm f4 Micro A/I, partial list.
"Ain't no half-way" -S.R.V.
"Oh Yeah... Alright" -Paul Simon |
|
| Back to top |
|
|
stevemark
Joined: 29 Apr 2011
Posts: 3924
Location: Switzerland
|
| Posted: Mon Aug 26, 2024 9:13 pm Post subject: |
|
|
stevemark wrote:
| Doc Sharptail wrote: |
This is quite interesting.
I have a much older variant |
There's no "much older variant" - there's only one version of the Micro Nikkor 2.8/55mm, the AiS vesrion which was produced from 1979 to 2020 (!!). See here:
http://www.photosynthesis.co.nz/nikon/lenses.html#55Micro
| Doc Sharptail wrote: |
| with the same aperture fork mechanism that I did not dis-assemble- it appears to rotate on some pretty tiny bearings, so I left it alone. Same tensioning spring, though. |
Are you talking about one of the 3.5/55mm Micro Nikkors? they have a completely different optical and mechanical construction ... Xenotar typen (instead of Planar), no CRC correction, just one helicoid ...
| Doc Sharptail wrote: |
Just one un-related question:
Have the coatings changed from the deep green to the pale purple/pink color on these A/i-s variants? Kind of curious as one of your photo's shows some of that green on one of the rear elements.
-D.S. |
I dont' have the AiS 2.8/55 here with me right now. Usually, however, pale purple is related to single coating, and green is some form of multicoated. BTW multicoated is not always better than single coated; the optimal coating depends on the refraction index of the corresponding lens. Single coating usually is sufficient for lenses made from high refractive glass; multicoating is optimal for lneses made from medium-to-low refractive glass. That's why Minolta always was talking about "differentiated achromatic coating" - which meant singel coating, double coating or multicoating depending on the glass used for a certain lens. Looking at older Minolta glass you sometimes will find purple, blue, geen and yellowish surfaces within the same lens!
S
_________________
www.artaphot.ch |
|
| Back to top |
|
|
Doc Sharptail
Joined: 23 Nov 2020
Posts: 1154
Location: Winnipeg Canada
|
| Posted: Tue Aug 27, 2024 4:52 am Post subject: |
|
|
Doc Sharptail wrote:
| stevemark wrote: |
| Doc Sharptail wrote: |
This is quite interesting.
I have a much older variant |
There's no "much older variant" - there's only one version of the Micro Nikkor 2.8/55mm, the AiS vesrion which was produced from 1979 to 2020 (!!). See here:
http://www.photosynthesis.co.nz/nikon/lenses.html#55Micro
| Doc Sharptail wrote: |
| with the same aperture fork mechanism that I did not dis-assemble- it appears to rotate on some pretty tiny bearings, so I left it alone. Same tensioning spring, though. |
Are you talking about one of the 3.5/55mm Micro Nikkors? they have a completely different optical and mechanical construction ... Xenotar typen (instead of Planar), no CRC correction, just one helicoid ...
| Doc Sharptail wrote: |
Just one un-related question:
Have the coatings changed from the deep green to the pale purple/pink color on these A/i-s variants? Kind of curious as one of your photo's shows some of that green on one of the rear elements.
-D.S. |
I dont' have the AiS 2.8/55 here with me right now. Usually, however, pale purple is related to single coating, and green is some form of multicoated. BTW multicoated is not always better than single coated; the optimal coating depends on the refraction index of the corresponding lens. Single coating usually is sufficient for lenses made from high refractive glass; multicoating is optimal for lneses made from medium-to-low refractive glass. That's why Minolta always was talking about "differentiated achromatic coating" - which meant singel coating, double coating or multicoating depending on the glass used for a certain lens. Looking at older Minolta glass you sometimes will find purple, blue, geen and yellowish surfaces within the same lens!
S |
I'm not so sure the new(er) coatings are a single coating- they appear on the later 105 2.5 A/i-s, and most of the AF-D series.
I haven't been able to find out much- which means is that I still haven't found subject material that Nikon has published.
As for the older lens- yes it is a closely related, optically and mechanically different variant, but much, much older.
Thanks for pointing it out.
-D.S.
_________________
D-810, F2, FTN.
35mm f2 O.C. nikkor
50 f2 H nikkor, 50 f 1.4 AI-s, 135 f3.5 Q,
50 f2 K nikkor 2x, 28-85mm f3.5-4.5 A/I-s, 35-105 3.5-4.5 A/I-s, 200mm f4 Micro A/I, partial list.
"Ain't no half-way" -S.R.V.
"Oh Yeah... Alright" -Paul Simon |
|
| Back to top |
|
|
|
|
|
You cannot post new topics in this forum
You cannot reply to topics in this forum
You cannot edit your posts in this forum
You cannot delete your posts in this forum
You cannot vote in polls in this forum
|