| View previous topic :: View next topic |
| Author |
Message |
gud
Joined: 06 May 2017
Posts: 35
|
 Posted: Sun May 21, 2017 9:46 pm Post subject: Disassemble CZJ Biotar 58mm F2-F22 cooper nose 16 blades Posted: Sun May 21, 2017 9:46 pm Post subject: Disassemble CZJ Biotar 58mm F2-F22 cooper nose 16 blades |
 |
|
gud wrote:
Hi All.
I`d got CZJ Biotar with 14 Blades , which is really tough to turn focus ring.
I already went through whole forum and was not able to find topic with disassembly of the Biotar that looks like mine.
It is the right one from this topic http://forum.mflenses.com/two-very-different-biotar-58-mm-f2-carl-zeiss-jena-t22298.html
But amount of blades is 14 (or 13).
The problem is that there are no screws or bolts outside.
The only place , where there are some signs to start disassembly , is the optic element in the back.
I`ve tried to turn it with spanning wrench but it just rotate really hard and does not go out.
Finally I ended up to put some drops of WD40 on the threads of focusing ring inside (they became visible if you turn focus ring to minimal focus distance).
This solved problem a bit, but there are still a lot of dirt and dust inside.
Anyone would be kind to help with the experience to disassemble this one ?
Thank you!
Last edited by gud on Sun Jul 09, 2017 12:59 pm; edited 2 times in total |
|
| Back to top |
|
 |
tomasg

Joined: 01 Nov 2009
Posts: 1135
Expire: 2014-04-28
|
| Posted: Mon May 22, 2017 8:36 am Post subject: |
|
|
tomasg wrote:
I will do a tutorial for the lens on the right soon, i can tell you how you can open your lens, but if you didn t figure it out how on your own i think you shouldn t do it (no offense meant), the helicoids on these lenses can be difficult to put back togheter correctly. |
|
| Back to top |
|
|
gud
Joined: 06 May 2017
Posts: 35
|
| Posted: Mon May 22, 2017 12:52 pm Post subject: |
|
|
gud wrote:
| tomasg wrote: |
| .. i can tell you how you can open your lens, but if you didn t figure it out how on your own i think you shouldn t do it (no offense meant), the helicoids on these lenses can be difficult to put back togheter correctly. |
I do not really like idea about giving lenses to service cause I bought already around 10 lenses from local flea market and 4 of them had minor defects after this "professional service". This , actually , was probably the reason why they ended there. I was managed to fix all 4 by just disassembling and assembling them back properly . So, considering this experience , i would prefer to do service with my curvy hands rather than give lens away for "professional service" , that will cost me money as well .
So ,If you know for sure how this lens supposed to be opened, I would really appreciate if you share with me. The only thing I havent tried yet - Helios 44 approach - when head is forcefully turned until whole optical tube with front plate goes out. But this one I would prefer to try , when i know for sure that this is a proper way to commence.
Thank you! |
|
| Back to top |
|
|
tomasg
Joined: 01 Nov 2009
Posts: 1135
Expire: 2014-04-28
|
| Posted: Mon May 22, 2017 4:05 pm Post subject: |
|
|
tomasg wrote:
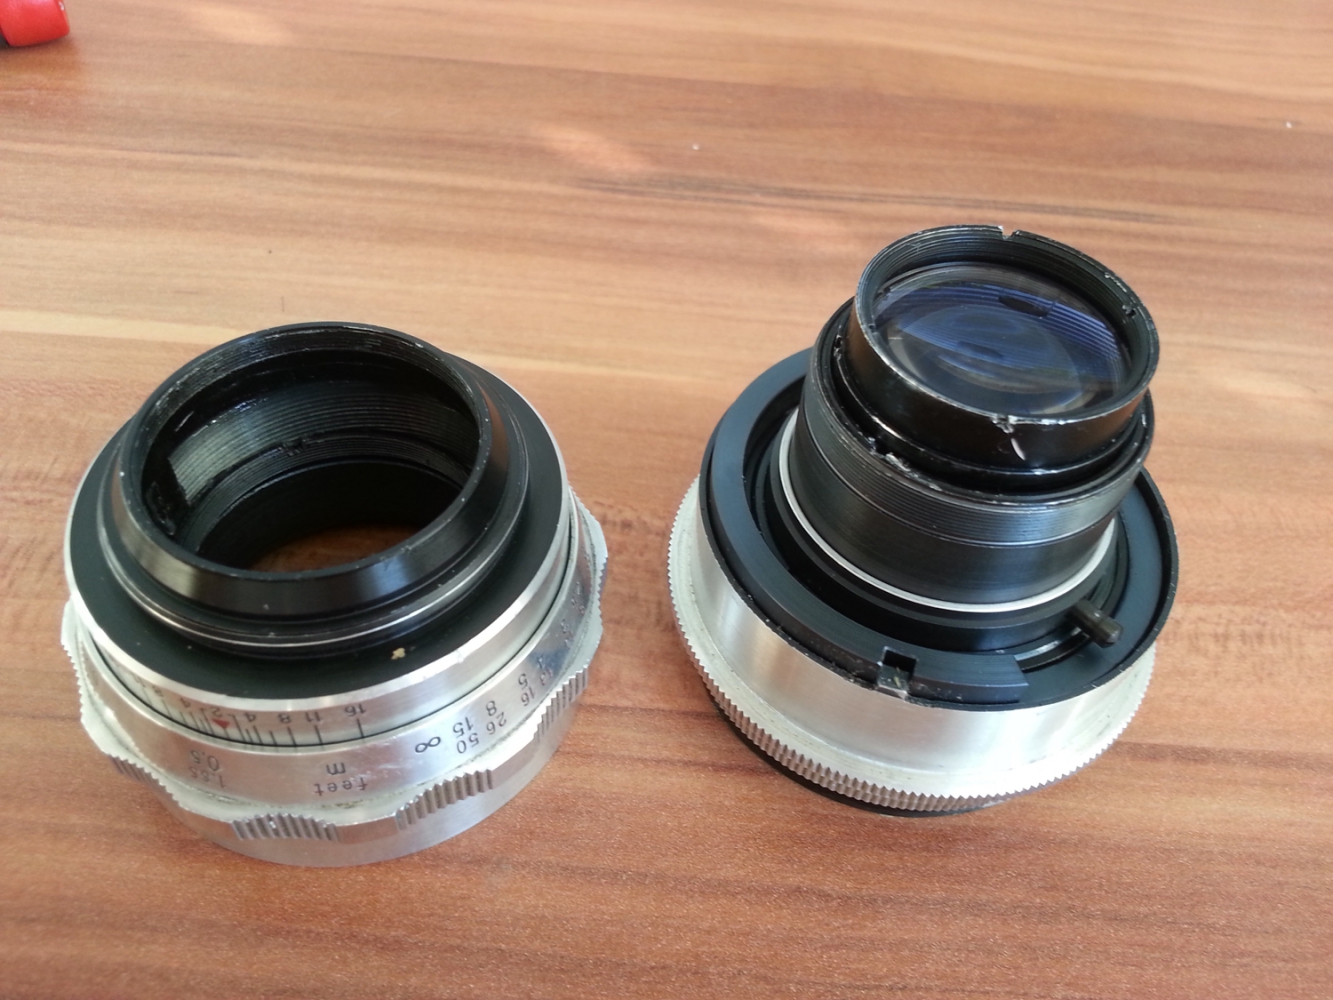
Separating the lens into two blocks, similar to the Helios 44 is actually easy, the ring that you have to untighten at the back where you already tried, is the outermost one. Focus the lens to miminum focusing distance and take a good look, it s not one of the rings around the rear lens element. Be careful, being the outer most one makes it difficult to acess with a spanner.
The difficult part to get back togheter will be the focusing heliocoid, if you dissasemble it.
Tomas |
|
| Back to top |
|
|
tomasg
Joined: 01 Nov 2009
Posts: 1135
Expire: 2014-04-28
|
| Posted: Mon May 22, 2017 4:23 pm Post subject: |
|
|
tomasg wrote:
This outer ring thing is a very common in this type of German made lenses of that era, but as you can see from the damage to the other rings in the pictures, the pearson that tried to open my copy wasn t aware of it, just like you so again....be careful. The second picture is showing the ring almost fully untighten!


 |
|
| Back to top |
|
|
gud
Joined: 06 May 2017
Posts: 35
|
| Posted: Mon May 22, 2017 7:17 pm Post subject: |
|
|
gud wrote:
Many thank you for reply with pictures! However, I cannot separate lens in 2 parts as Helios 44 , black top ring on the top does not turn. If i hold it with diaphragm ring , it just hit the stopper with click and does not move further. I`ve tried CCW and CW - same stuff. Regarding ring on the back of the lens, do i need to turn it before separate lens in 2 parts or after? If before - i cannot reach it with spanner wrench , distance between optical tube and case is too thin. |
|
| Back to top |
|
|
tomasg
Joined: 01 Nov 2009
Posts: 1135
Expire: 2014-04-28
|
| Posted: Tue May 23, 2017 9:45 am Post subject: |
|
|
tomasg wrote:
This ring holds togheter the two parts, so of course you have to untigjten it first. Only after this the two parts sepatate, but not by turning them, but by pulling them apart. Yes i told you it s doffocult to reach. |
|
| Back to top |
|
|
Mir

Joined: 07 Feb 2011
Posts: 978
Location: Montreal, Canada
Expire: 2017-09-30
|
| Posted: Wed May 24, 2017 12:49 pm Post subject: |
|
|
Mir wrote:
http://www.digicamclub.de/attachment.php?attachmentid=35528&d=1408991825
_________________
"Obsta principiis, finem respice"
"There is a fine line between hobby and mental illness"
MISC: Tamron SP 35-80 (01A), Auto Chinon Tomioka 1.4/55, Tokina AT-X 2.5/90, Tamron SP 5,6/300 (54B)
ZEISS: WG Distagon 2.8/25, WG Distagon 2.8/35 HFT, WG Planar HFT 1.4/50, Ultron 1.8/50, WG Sonnar 2.8/85, WG Sonnar HFT 2.8/135
VOIGTLÄNDER : Ultron Aspherical 1.8/21, Ultron 2/28, Nokton Aspherical 1.2/35, Nokton Classic 1.4/40, Nokton Aspherical 1.5/50, Color-Heliar 2.5/75
MINOLTA: MD 3.5/35-70 Macro, MD 1.2/50, MC Rokkor-X 1.2/58, MD Macro 3.5/50
LEITZ: SUMMICRON-R 2/35 (II), SUMMICRON-R 2/50 (II), TELE ELMARIT-M 2,8/90 (Thin)
CANON RF: 2.8/28, 2/35, 1.2/50, 1.4/50, Serenar 1.8/50, 2/85, 2/100, 3.5/100
LTM : CHIYODA KOGAKU SUPER ROKKOR 1.8/5cm, CHIYOKO SUPER ROKKOR C 2/5cm, TOKYO KOGAKU Topcor-S 2/5cm, Nippon Kogaku NIKKOR-H.C 2/5cm, FUJI FILM CO. FUJINON L 2/5cm, KMZ Jupiter-8 2/5cm
And a small Minolta AF set: 2.8/20, 1.4/35, 1.4/50, 2/100, 4.5/100-200
@we3fotography
@7plus_pictures
@_whats.that.car_ |
|
| Back to top |
|
|
gud
Joined: 06 May 2017
Posts: 35
|
| Posted: Thu May 25, 2017 7:19 am Post subject: |
|
|
gud wrote:
Dear Sir! Huge thanks for this awesomness detailed manual.
I`m almost convinced to just poor WD40 inside it and wait until it will work better.
I have Red T Biotar with brass-copper frontal ring, if this will help.
Regarding manual, I do not have a ring from fig 1, but i have a threads on housing , so I presume someone lost it already before me.
When i set the lens to minimal focus , i can see 6 rings , if i start to count from the optical element. Aftert the second one, all other 4 rings are really deep and last 6th ring`s slot for unscrewing is 100% not available for regular and probably custom tools, cause angle of entering the lens body and angle to apply needed pressure to unscrew , extremely differ.
I`m still cracking my head what to do with this. |
|
| Back to top |
|
|
tomasg
Joined: 01 Nov 2009
Posts: 1135
Expire: 2014-04-28
|
| Posted: Thu May 25, 2017 1:51 pm Post subject: |
|
|
tomasg wrote:
Just my opinion, but the tutorial is not very good and i don t say that because i write tutorials myself. These types of lenses come apart in two main parts, the optical block and the focusing part. There is no reason to start bydissasembling the front optics while the lens is still in one part. The lens elements shoukdn t be touched unless really needed. There is a reason why the back has so many rings, adjustments done in the factory. The really complicated part is the focusing helicoids, no mention of that. I answerd the first post only to avoid damaging the lens. One last advice, don t use WD40, you won t solve anything, good luck. |
|
| Back to top |
|
|
gud
Joined: 06 May 2017
Posts: 35
|
| Posted: Sun Jul 09, 2017 12:41 pm Post subject: |
|
|
gud wrote:
To close the topic.
I was able to disassemble this one , clean , oil and assemble back.
Despite my lens looks the same as tomasg fotos (Updated: I just noticed it has cooper nose and F22 , so it is still some different version ), the ring , holding optical and mechanical unit together, is 5th from the center (not 4th, as it is in all manuals), and it is the most outer ring. To reach and unscrew it, I was forced to put a little of WD40 and wait for week-two. After that, medium tension, applied with smallest screwdriver was enough to make the ring easily move and unscrew.
While assemble back, I was able to restore infinity of this lens for my Samsung by removing alu spacer from optical unit , that pushed it around 1mm closer to the camera. |
|
| Back to top |
|
|
Sciolist

Joined: 29 Mar 2017
Posts: 1445
Location: Scotland
Expire: 2021-04-16
|
| Posted: Sun Jul 09, 2017 8:42 pm Post subject: |
|
|
Sciolist wrote:
| gud wrote: |
| While assemble back, I was able to restore infinity of this lens for my Samsung by removing alu spacer from optical unit , that pushed it around 1mm closer to the camera. |
Yes, I tried 'spacer out' too, but found if you introduced the focusing ring section to the depth of field marked section at 2.5m, rather than infinity, you achieved infinity with the spacer on. |
|
| Back to top |
|
|
Lightshow


Joined: 04 Nov 2011
Posts: 3669
Location: Calgary
|
| Posted: Sat Sep 09, 2017 4:23 pm Post subject: |
|
|
Lightshow wrote:
| gud wrote: |
To close the topic.
I was able to disassemble this one , clean , oil and assemble back.
Despite my lens looks the same as tomasg fotos (Updated: I just noticed it has cooper nose and F22 , so it is still some different version ), the ring , holding optical and mechanical unit together, is 5th from the center (not 4th, as it is in all manuals), and it is the most outer ring. To reach and unscrew it, I was forced to put a little of WD40 and wait for week-two. After that, medium tension, applied with smallest screwdriver was enough to make the ring easily move and unscrew.
While assemble back, I was able to restore infinity of this lens for my Samsung by removing alu spacer from optical unit , that pushed it around 1mm closer to the camera. |
I see you used a screwdriver in place of a spanner, it's so much harder to remove/install these rings without a spanner, they tend to bind when forced from one location and you can end up destroying the slots that the spanners fit into.
_________________
A Manual Focus Junky...
One photographers junk lens is an artists favorite tool.
My lens list
http://www.flickr.com/photos/lightshow-photography/ |
|
| Back to top |
|
|
|
|
|
You cannot post new topics in this forum
You cannot reply to topics in this forum
You cannot edit your posts in this forum
You cannot delete your posts in this forum
You cannot vote in polls in this forum
|


