| View previous topic :: View next topic |
| Author |
Message |
magnet-2009


Joined: 22 Apr 2009
Posts: 505
Location: Greece, Athens
|
 Posted: Mon Feb 01, 2010 9:02 pm Post subject: Macro Rail photography / zeiss 2.0/35 ZE Posted: Mon Feb 01, 2010 9:02 pm Post subject: Macro Rail photography / zeiss 2.0/35 ZE |
 |
|
magnet-2009 wrote:


_________________
My flickr___ My Wix___ RailPictures |
|
| Back to top |
|
 |
Bruce
Joined: 15 Jan 2008
Posts: 842
Location: Boston, Ma USA
Expire: 2014-11-22
|
| Posted: Mon Feb 01, 2010 10:25 pm Post subject: |
|
|
Bruce wrote:
They cerrtainly look sharp enough, did you do a lot of processing to these as Im seeing a double border
on the high contrast areas?
_________________
Digital: Canon 40d & 5DmkII, Film: Hasselblad 203fe/Zeiss 80/2.8 cfe
Adapters for EOS: Cy; M42; Zenit39; Exakta; LeicaR; OlympusOM; PK; Nikon; Rollei35; Retina; Adaptal; P-6 |
|
| Back to top |
|
|
magnet-2009
Joined: 22 Apr 2009
Posts: 505
Location: Greece, Athens
|
| Posted: Mon Feb 01, 2010 10:32 pm Post subject: |
|
|
magnet-2009 wrote:
Yes Bruce, you are right. Unfortunately I have this result from the raw file. It is not pp result.
That's why I posted the photos. I have pm Orio, I can't explain it.
I have no problem with regular frames... Orio asked for the raws and he'll have them.
_________________
My flickr___ My Wix___ RailPictures |
|
| Back to top |
|
|
Orio

Joined: 24 Feb 2007
Posts: 29545
Location: West Emilia
Expire: 2012-12-04
|
| Posted: Mon Feb 01, 2010 10:36 pm Post subject: |
|
|
Orio wrote:
what raw converter have you been using Magnet?
_________________
Orio, Administrator
T*
NE CEDE MALIS AUDENTIOR ITO
Ferrania film is reborn! http://www.filmferrania.it/
Support the Ornano film chemicals company and help them survive!
http://forum.mflenses.com/ornano-chemical-products-t55525.html |
|
| Back to top |
|
|
magnet-2009
Joined: 22 Apr 2009
Posts: 505
Location: Greece, Athens
|
| Posted: Mon Feb 01, 2010 10:44 pm Post subject: |
|
|
magnet-2009 wrote:
Orio, DPP and Camera Raw give the same result.
_________________
My flickr___ My Wix___ RailPictures |
|
| Back to top |
|
|
Orio
Joined: 24 Feb 2007
Posts: 29545
Location: West Emilia
Expire: 2012-12-04
|
| Posted: Mon Feb 01, 2010 10:45 pm Post subject: |
|
|
Orio wrote:
Have you sent the files? I'll give them a go at my workstation.
_________________
Orio, Administrator
T*
NE CEDE MALIS AUDENTIOR ITO
Ferrania film is reborn! http://www.filmferrania.it/
Support the Ornano film chemicals company and help them survive!
http://forum.mflenses.com/ornano-chemical-products-t55525.html |
|
| Back to top |
|
|
magnet-2009
Joined: 22 Apr 2009
Posts: 505
Location: Greece, Athens
|
| Posted: Mon Feb 01, 2010 10:47 pm Post subject: |
|
|
magnet-2009 wrote:
Just sending. In fact 2 emails - 5dii files, you know.
_________________
My flickr___ My Wix___ RailPictures |
|
| Back to top |
|
|
Orio
Joined: 24 Feb 2007
Posts: 29545
Location: West Emilia
Expire: 2012-12-04
|
| Posted: Mon Feb 01, 2010 11:52 pm Post subject: |
|
|
Orio wrote:
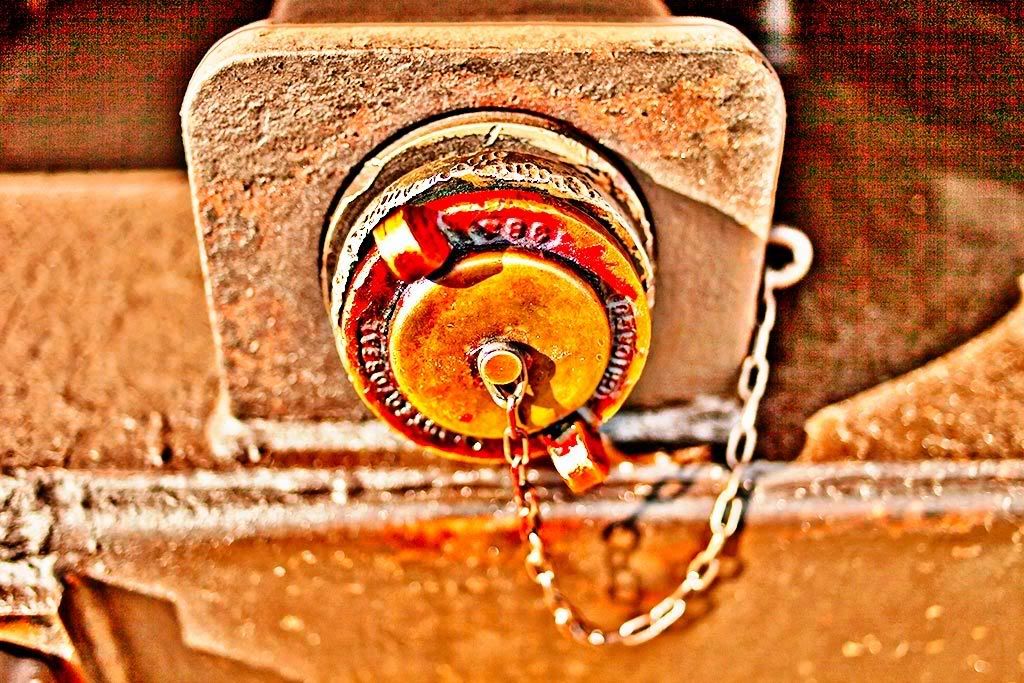
hi Dimitris
here's one of your files, converted with Breezebrowser Pro.
Breezebrowser Pro is a browser/converter program that uses the same SDK of Canon's own DPP, therefore, it converts images identically as DPP:

All that I can see, is a nice image, very sharp for being wide open, with some (forgivable) lateral chromatic aberration.
Nothing that resembles your terrible image.
So, whatever problem is that causes those artifacts, it's in your software, or in your workflow - not in the RAW file.
Hope this makes you feel better! 
Orio
_________________
Orio, Administrator
T*
NE CEDE MALIS AUDENTIOR ITO
Ferrania film is reborn! http://www.filmferrania.it/
Support the Ornano film chemicals company and help them survive!
http://forum.mflenses.com/ornano-chemical-products-t55525.html |
|
| Back to top |
|
|
peterqd


Joined: 28 Feb 2007
Posts: 7448
Location: near High Wycombe, UK
Expire: 2014-01-04
|
| Posted: Tue Feb 02, 2010 12:49 am Post subject: |
|
|
peterqd wrote:
Wow, what a difference! I use DPP and I've never seen that effect before.
_________________
Peter - Moderator |
|
| Back to top |
|
|
Bruce
Joined: 15 Jan 2008
Posts: 842
Location: Boston, Ma USA
Expire: 2014-11-22
|
| Posted: Tue Feb 02, 2010 3:18 am Post subject: |
|
|
Bruce wrote:
Yes! they look 200% improved!
The first images look as something I would do when
I go heavy handed on the sliders. 
I think they call it "crushing the shadows"
as opposed to "blowing out the highlights"
_________________
Digital: Canon 40d & 5DmkII, Film: Hasselblad 203fe/Zeiss 80/2.8 cfe
Adapters for EOS: Cy; M42; Zenit39; Exakta; LeicaR; OlympusOM; PK; Nikon; Rollei35; Retina; Adaptal; P-6 |
|
| Back to top |
|
|
magnet-2009
Joined: 22 Apr 2009
Posts: 505
Location: Greece, Athens
|
| Posted: Tue Feb 02, 2010 5:48 am Post subject: |
|
|
magnet-2009 wrote:
Thank you very much Orio for your interest and your time.
Thank you Bruce for your comment. You were right.
I have already reset the camera raw settings and everything is fine.
_________________
My flickr___ My Wix___ RailPictures |
|
| Back to top |
|
|
Orio
Joined: 24 Feb 2007
Posts: 29545
Location: West Emilia
Expire: 2012-12-04
|
| Posted: Tue Feb 02, 2010 9:12 am Post subject: |
|
|
Orio wrote:
| magnet-2009 wrote: |
Thank you very much Orio for your interest and your time.
Thank you Bruce for your comment. You were right.
I have already reset the camera raw settings and everything is fine. |
What sliders did you change to get that effect?
And how could possibly two different raw converters give the same absurd result without you being aware that you edited the parameters?
Why didn't you think to verify that the images were ok without those edits?
_________________
Orio, Administrator
T*
NE CEDE MALIS AUDENTIOR ITO
Ferrania film is reborn! http://www.filmferrania.it/
Support the Ornano film chemicals company and help them survive!
http://forum.mflenses.com/ornano-chemical-products-t55525.html |
|
| Back to top |
|
|
kds315*

Joined: 12 Mar 2008
Posts: 16544
Location: Weinheim, Germany
Expire: 2021-03-09
|
| Posted: Tue Feb 02, 2010 9:50 am Post subject: |
|
|
kds315* wrote:
What an amazing difference!
The first images look like someone tried to make a HDR image from the same RAW file - some converts allows that.
_________________
Klaus - Admin
"S'il vient a point, me souviendra" [Thomas Bohier (1460-1523)]
http://www.macrolenses.de for macro and special lens info
http://www.pbase.com/kds315/uv_photos for UV Images and lens/filter info
https://www.flickr.com/photos/kds315/albums my albums using various lenses
http://photographyoftheinvisibleworld.blogspot.com/ my UV BLOG
http://www.travelmeetsfood.com/blog Food + Travel BLOG
https://galeriafotografia.com Architecture + Drone photography
Currently most FAV lens(es):
X80QF f3.2/80mm
Hypergon f11/26mm
ELCAN UV f5.6/52mm
Zeiss UV-Planar f4/60mm
Zeiss UV-Planar f2/62mm
Lomo Уфар-12 f2.5/41mm
Lomo Зуфар-2 f4.0/350mm
Lomo ZIKAR-1A f1.2/100mm
Nikon UV Nikkor f4.5/105mm
Zeiss UV-Sonnar f4.3/105mm
CERCO UV-VIS-NIR f1.8/45mm
CERCO UV-VIS-NIR f4.1/94mm
CERCO UV-VIS-NIR f2.8/100mm
Steinheil Quarzobjektiv f1.8/50mm
Pentax Quartz Takumar f3.5/85mm
Carl Zeiss Jena UV-Objektiv f4/60mm
NYE OPTICAL Lyman-Alpha II f1.1/90mm
NYE OPTICAL Lyman-Alpha I f2.8/200mm
COASTAL OPTICS f4/60mm UV-VIS-IR Apo
COASTAL OPTICS f4.5/105mm UV-Micro-Apo
Pentax Ultra-Achromatic Takumar f4.5/85mm
Pentax Ultra-Achromatic Takumar f5.6/300mm
Rodenstock UV-Rodagon f5.6/60mm + 105mm + 150mm
|
|
| Back to top |
|
|
magnet-2009
Joined: 22 Apr 2009
Posts: 505
Location: Greece, Athens
|
| Posted: Tue Feb 02, 2010 9:57 am Post subject: |
|
|
magnet-2009 wrote:
Very good questions Orio. Lets talk about it.
1. I opened the wrong file using dpp [already worked with camera raw] and not the file directly from the camera. Too old to rock n' roll, too young to die.
2. The workflow I followed and worked very good with my files using Canon lens was the following:
http://www.youtube.com/user/cbrushphoto
The camera raw settings that made the problem are:
http://www.youtube.com/user/cbrushphoto#p/u/15/w5vA0yk37IU
http://www.youtube.com/user/cbrushphoto#p/u/14/AkFcdIfjTJk
I can't follow it with zeiss lens. No pp needed in fact.  [to poilu [to poilu  ] ]
I didn't see the smooth dpp result because I open raw with camera raw and the workflow settings are extreme at the begining.
BTW is there any topic about pp workflow?
_________________
My flickr___ My Wix___ RailPictures |
|
| Back to top |
|
|
Orio
Joined: 24 Feb 2007
Posts: 29545
Location: West Emilia
Expire: 2012-12-04
|
| Posted: Tue Feb 02, 2010 11:04 am Post subject: |
|
|
Orio wrote:
Dimitris,
before following this or that PP tutorial, keep this in mind:
1) ANY digital editing that you apply on an image, degrades the information of the image. Even if the image looks better, the information in it is degraded compared to original state.
This is always true
2) Editing an image is an individual act. There are no workflows that can work well for every image. When serious people (like me ) prepare workflow, actions, etc, they always provide different settings - like when I made the zeissify action, I made it in 5 or 6 different settings. But, the most important thing is the personal judgement. What the person did in the tutorial, that is, to save a default that will be used on all images, is the best way to ruin your images
3) Many people think with this mind: "I take a photo, just a basic act of click on the camera, then the magic will happen in photoshop".
This is the bad amateur way of doing things.
And it leads to bad amateur results.
The way the pros think, is: "I do my best to get the best shot right out of the camera. Then, if, and only if, something is wrong, I will rescue it in photoshop, for as much as it is needed to rescue the fault and nothing more"
The reason why you buy a lens like the Z Distagon, is to think and act like the pro. To do like the bad amateur, the kit lens is sufficient.
-
_________________
Orio, Administrator
T*
NE CEDE MALIS AUDENTIOR ITO
Ferrania film is reborn! http://www.filmferrania.it/
Support the Ornano film chemicals company and help them survive!
http://forum.mflenses.com/ornano-chemical-products-t55525.html |
|
| Back to top |
|
|
Orio
Joined: 24 Feb 2007
Posts: 29545
Location: West Emilia
Expire: 2012-12-04
|
| Posted: Tue Feb 02, 2010 11:08 am Post subject: |
|
|
Orio wrote:
| kds315* wrote: |
The first images look like someone tried to make a HDR image from the same RAW file |
Yes, but also more. The colours are completely messed up. Like if a difference layer was overimposed in multiply or darken mode, or something.
_________________
Orio, Administrator
T*
NE CEDE MALIS AUDENTIOR ITO
Ferrania film is reborn! http://www.filmferrania.it/
Support the Ornano film chemicals company and help them survive!
http://forum.mflenses.com/ornano-chemical-products-t55525.html |
|
| Back to top |
|
|
magnet-2009
Joined: 22 Apr 2009
Posts: 505
Location: Greece, Athens
|
| Posted: Tue Feb 02, 2010 11:49 am Post subject: |
|
|
magnet-2009 wrote:
OK. I know now, Zeiss need no pp. No blue for green, no pp.
_________________
My flickr___ My Wix___ RailPictures |
|
| Back to top |
|
|
magnet-2009
Joined: 22 Apr 2009
Posts: 505
Location: Greece, Athens
|
| Posted: Tue Feb 02, 2010 12:07 pm Post subject: |
|
|
magnet-2009 wrote:
| Orio wrote: |
| kds315* wrote: |
The first images look like someone tried to make a HDR image from the same RAW file |
Yes, but also more. The colours are completely messed up. Like if a difference layer was overimposed in multiply or darken mode, or something. |
If you are interested follow the workflow and you'll get "the" result.
I follow a different way from now on.
_________________
My flickr___ My Wix___ RailPictures |
|
| Back to top |
|
|
patrickh

Joined: 23 Aug 2007
Posts: 8551
Location: Oregon
Expire: 2011-11-18
|
| Posted: Tue Feb 02, 2010 7:00 pm Post subject: |
|
|
patrickh wrote:
Orio
We can all take something away from that advice. Thanks
patrickh
_________________
DSLR: Nikon D300 Nikon D200 Nex 5N
MF Zooms: Kiron 28-85/3.5, 28-105/3.2, 75-150/3.5, Nikkor 50-135/3.5 AIS // MF Primes: Nikkor 20/4 AI, 24/2 AI, 28/2 AI, 28/2.8 AIS, 28/3.5 AI, 35/1.4 AIS, 35/2 AIS, 35/2.8 PC, 45/2.8 P, 50/1.4 AIS, 50/1.8 AIS, 50/2 AI, 55/2.8 AIS micro, 55/3.5 AI micro, 85/2 AI, 100/2,8 E, 105/1,8 AIS, 105/2,5 AIS, 135/2 AIS, 135/2.8 AIS, 200/4 AI, 200/4 AIS micro, 300/4.5 AI, 300/4.5 AI ED, Arsat 50/1.4, Kiron 28/2, Vivitar 28/2.5, Panagor 135/2.8, Tamron 28/2.5, Tamron 90/2.5 macro, Vivitar 90/2.5 macro (Tokina) Voigtlander 90/3.5 Vivitar 105/2.5 macro (Kiron) Kaleinar 100/2.8 AI Tamron 135/2.5, Vivitar 135/2.8CF, 200/3.5, Tokina 400/5,6
M42: Vivitar 28/2.5, Tamron 28/2.5, Formula5 28/2.8, Mamiya 28/2.8, Pentacon 29/2.8, Flektogon 35/2.4, Flektogon 35/2.8, Takumar 35/3.5, Curtagon 35/4, Takumar 50/1.4, Volna-6 50/2.8 macro, Mamiya 50/1.4, CZJ Pancolar 50/1,8, Oreston 50/1.8, Takumar 50/2, Industar 50/3.5, Sears 55/1.4, Helios 58/2, Jupiter 85/2, Helios 85/1.5, Takumar 105/2.8, Steinheil macro 105/4.5, Tamron 135/2.5, Jupiter 135/4, CZ 135/4, Steinheil Culminar 135/4,5, Jupiter 135/3.5, Takumar 135/3.5, Tair 135/2.8, Pentacon 135/2.8, CZ 135/2.8, Taika 135/3.5, Takumar 150/4, Jupiter 200/4, Takumar 200/4
Exakta: Topcon 100/2.8(M42), 35/2.8, 58/1.8, 135/2.8, 135/2.8 (M42), Kyoei Acall 135/3.5
C/Y: Yashica 28/2.8, 50/1.7, 135/2.8, Zeiss Planar 50/1.4, Distagon 25/2.8
Hexanon: 28/3.5, 35/2.8, 40/1.8, 50/1.7, 52/1.8, 135/3.2, 135/3.5, 35-70/3.5, 200/3.5
P6 : Mir 38 65/3.5, Biometar 80/2.8, Kaleinar 150/2.8, Sonnar 180/2.8
Minolta SR: 28/2.8, 28/3.5, 35/2.8, 45/2, 50/2, 58/1.4, 50/1.7, 135/2.8, 200/3.5
RF: Industar 53/2.8, Jupiter 8 50/2
Enlarg: Rodagon 50/5,6, 80/5,6, 105/5.6, Vario 44-52/4, 150/5.6 180/5.6 El Nikkor 50/2,8,63/2.8,75/4, 80/5,6, 105/5.6, 135/5.6 Schneider 60/5.6, 80/5.6, 80/4S,100/5.6S,105/5.6,135/5.6, 135/5.6S, 150/5.6S, Leica 95/4 |
|
| Back to top |
|
|
magnet-2009
Joined: 22 Apr 2009
Posts: 505
Location: Greece, Athens
|
| Posted: Tue Feb 02, 2010 10:20 pm Post subject: |
|
|
magnet-2009 wrote:


_________________
My flickr___ My Wix___ RailPictures |
|
| Back to top |
|
|
Orio
Joined: 24 Feb 2007
Posts: 29545
Location: West Emilia
Expire: 2012-12-04
|
| Posted: Tue Feb 02, 2010 10:22 pm Post subject: |
|
|
Orio wrote:
Less bad than before, but I still see the double edge.
Also, you deprived the image of dark tones, now it is weak.
_________________
Orio, Administrator
T*
NE CEDE MALIS AUDENTIOR ITO
Ferrania film is reborn! http://www.filmferrania.it/
Support the Ornano film chemicals company and help them survive!
http://forum.mflenses.com/ornano-chemical-products-t55525.html |
|
| Back to top |
|
|
magnet-2009
Joined: 22 Apr 2009
Posts: 505
Location: Greece, Athens
|
| Posted: Tue Feb 02, 2010 10:47 pm Post subject: |
|
|
magnet-2009 wrote:
Third trial and we are oooooff topic.


_________________
My flickr___ My Wix___ RailPictures |
|
| Back to top |
|
|
Orio
Joined: 24 Feb 2007
Posts: 29545
Location: West Emilia
Expire: 2012-12-04
|
| Posted: Tue Feb 02, 2010 11:21 pm Post subject: |
|
|
Orio wrote:
Dark tones are good now.
Still a hint of double edges though... try not to apply sharpening after resize.
_________________
Orio, Administrator
T*
NE CEDE MALIS AUDENTIOR ITO
Ferrania film is reborn! http://www.filmferrania.it/
Support the Ornano film chemicals company and help them survive!
http://forum.mflenses.com/ornano-chemical-products-t55525.html |
|
| Back to top |
|
|
magnet-2009
Joined: 22 Apr 2009
Posts: 505
Location: Greece, Athens
|
| Posted: Wed Feb 03, 2010 6:45 am Post subject: |
|
|
magnet-2009 wrote:
Last trial. Realy, I made very little use of the sliders [no sharpening at all]. The double line rose because I've used too much the fill light slider at camera raw.


_________________
My flickr___ My Wix___ RailPictures |
|
| Back to top |
|
|
poilu
Joined: 26 Aug 2007
Posts: 10471
Location: Greece
Expire: 2019-08-29
|
| Posted: Wed Feb 03, 2010 7:21 am Post subject: |
|
|
poilu wrote:
| magnet wrote: |
| The double line rose because I've used too much the fill light slider at camera raw |
dangerous tool to use, especially if the lcd is not calibrated
check http://www.lagom.nl/lcd-test/ and make sure you can see all black level & saturation
as pointed by Orio last year, the 5DII must be exposed properly, not many latitude in post processing
banding on #1 is a bad advertise for such a expensive dslr
I have amplified the contrast so you can better see it
 |
|
| Back to top |
|
|
|
|


