| View previous topic :: View next topic |
| Author |
Message |
mo


Joined: 27 Aug 2009
Posts: 8982
Location: Australia
Expire: 2016-07-30
|
 Posted: Wed Jan 13, 2010 11:31 pm Post subject: Super Takumar 1:1.8/55 repair/Internal paint removal Posted: Wed Jan 13, 2010 11:31 pm Post subject: Super Takumar 1:1.8/55 repair/Internal paint removal |
 |
|
mo wrote:
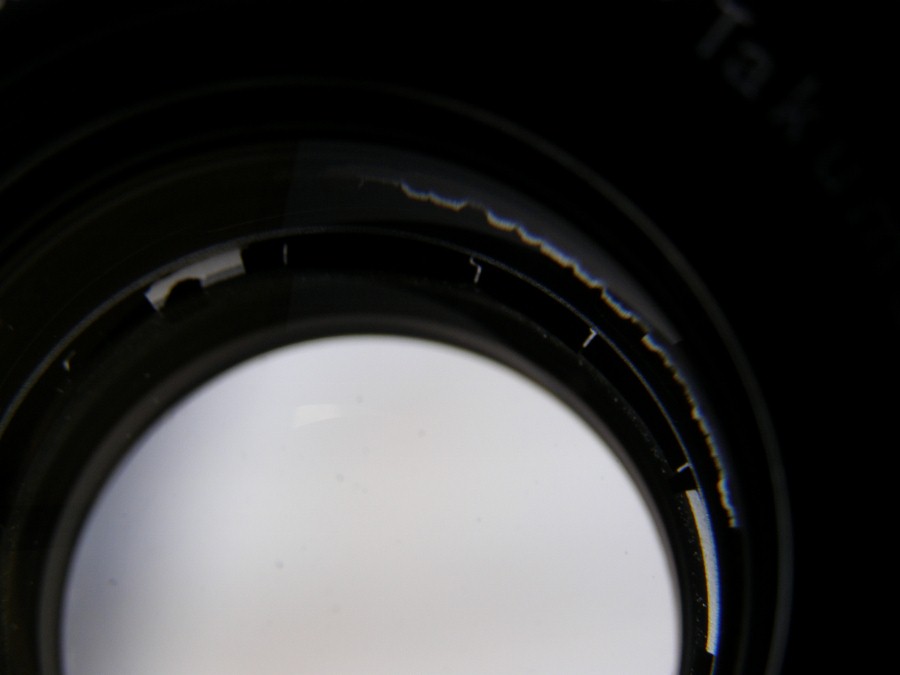
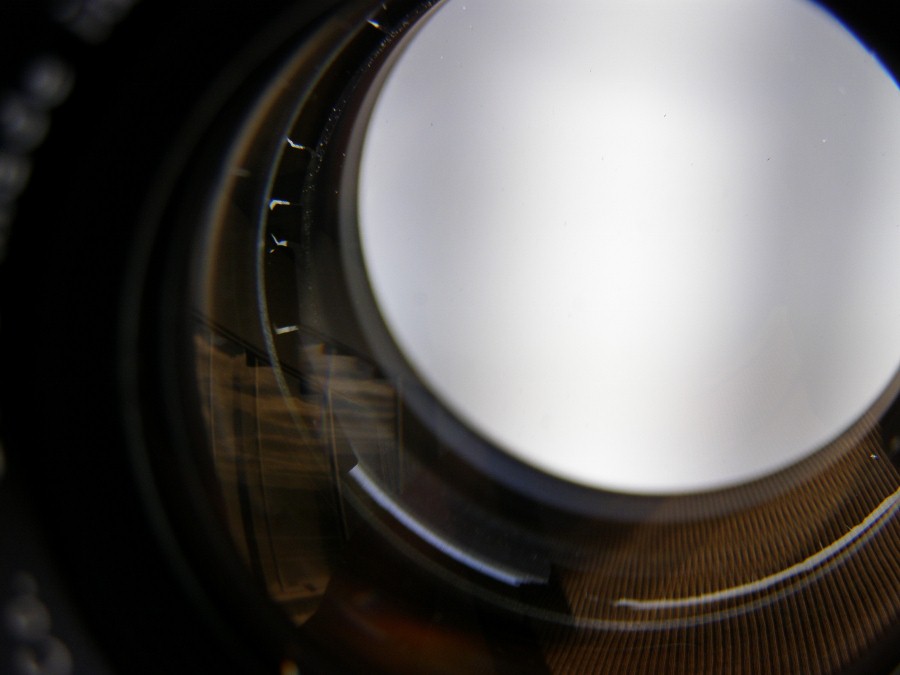
I received my FIRST Super Takumar 1:1.8/55....worn on the outside(who cares) Smooth turning of the dial ,the A/M switch works.Clear glass,A few specks of dust...NOW have a look at the photos and tell me please what this is...To me it is something that is cracking and falling off as it goes around the whole rim of the lens,There are bits missing but I can not see them anywhere inside.This is hidden when the blades close,so it is in the back half of the lens.It is a little nugget of a lens...It was a great ebay buy until this but if it won't effect the lens I will keep it.


_________________
Moira, Moderator 
Fuji XE-1,Pentax K-01,Panasonic G1,Panasonic G5,Pentax MX
Ricoh Singlex TLS,KR-5,KR-5Super,XR-10
Lenses
Auto Rikenon's 55/1.4, 1.8, 2.8... 50/1.7 Takumar 2/58 Preset Takumar 2.8/105 Auto Takumar 2.2/55, 3.5/35 Super Takumar 1.8/55...Macro Takumar F4/50... CZJ Biotar ALU M42 2/58 CZJ Tessar ALU M42 2.8/50
CZJ DDR Flektogon Zebra M42 2.8/35 CZJ Pancolar M42 2/50 CZJ Pancolar Exakta 2/50
Auto Mamiya/Sekor 1.8/55 ...Auto Mamiya/Sekor 2/50 Auto Mamiya/Sekor 2.8/50 Auto Mamiya/Sekor 200/3.5 Tamron SP500/8 Tamron SP350/5.6 Tamron SP90/2.5
Primoplan 1.9/58 Primagon 4.5/35 Telemegor 5.5/150 Angenieux 3.5/28 Angenieux 3,5/135 Y 2
Canon FL 58/1.2,Canon FL85/1.8,Canon FL 100/3.5,Canon SSC 2.8/100 ,Konica AR 100/2.8, Nikkor P 105/2.5
Last edited by mo on Fri Jan 15, 2010 12:02 am; edited 1 time in total |
|
| Back to top |
|
 |
ludoo


Joined: 18 Sep 2009
Posts: 1397
Location: Milan, Italy
Expire: 2011-12-05
|
| Posted: Wed Jan 13, 2010 11:40 pm Post subject: |
|
|
ludoo wrote:
Are you sure there are bits missing? It's difficult to say from the pictures (and I don't have lots of experience), but it might be separation on the two rear cemented elements. |
|
| Back to top |
|
|
mo
Joined: 27 Aug 2009
Posts: 8982
Location: Australia
Expire: 2016-07-30
|
| Posted: Wed Jan 13, 2010 11:48 pm Post subject: |
|
|
mo wrote:
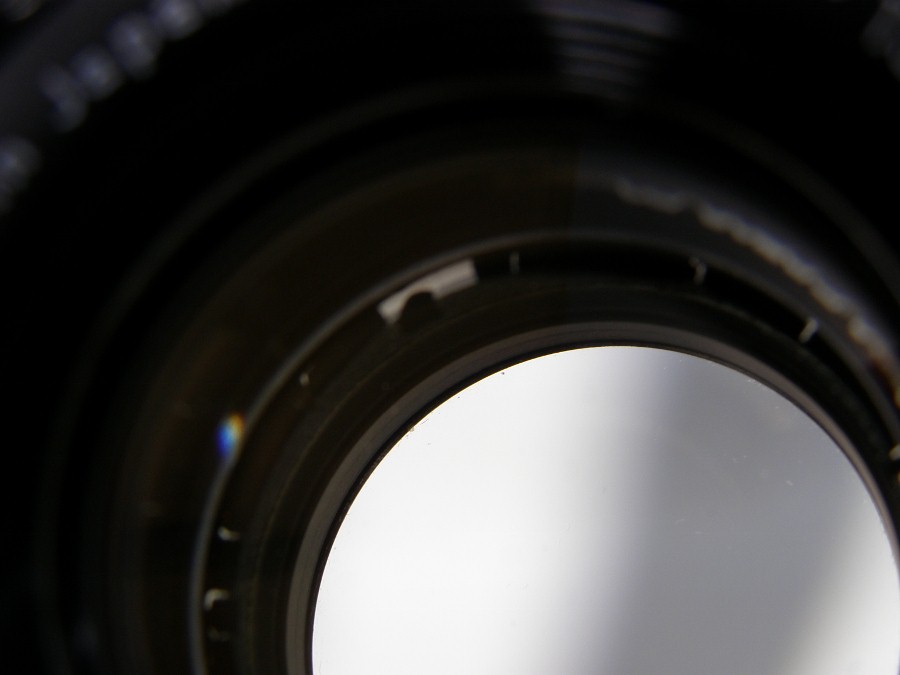
Yes ,do you see the white gaps then the black on the 2nd photo,bottom right and top left of the photo? The black stuff reminds me of dried paint on glass when you can pick it off.It is cracking as you see in the first photo the white lines from the top left of the photo.I can try and get clearer pictures but it is hard to get the internal shots.(any tips on how to do this?)
I think it is paint or what ever is used internally as when I look at it from the rear you can see a fine ridge with the silver /bare metal with remains of paint.And just to confirm I have a "floater" it just moved out from somewhere right in the front of the lens...gave it a little shake and it went back to the edge....OH no is all lost on this? 
I was looking forward to having a Tak.
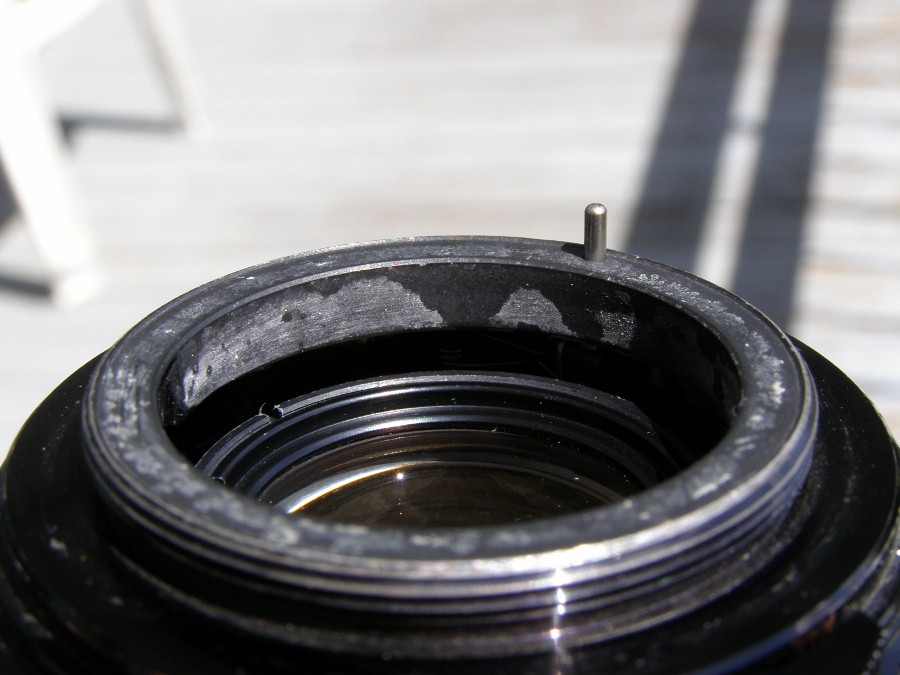
External of the mount with paint loss

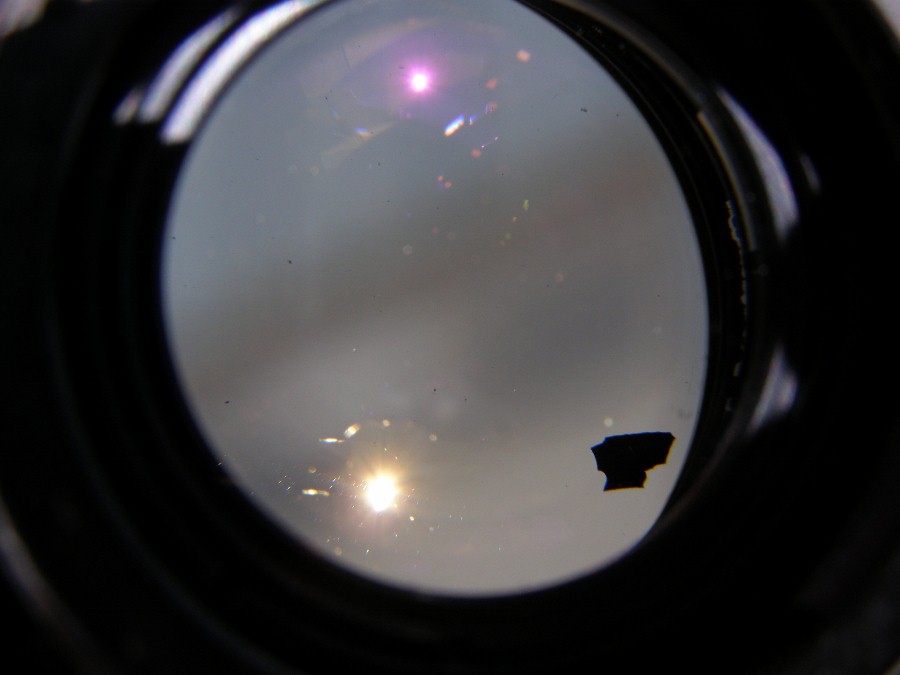
The "Floater"..well a different one from before...you get the idea..

[/b]
_________________
Moira, Moderator
Fuji XE-1,Pentax K-01,Panasonic G1,Panasonic G5,Pentax MX
Ricoh Singlex TLS,KR-5,KR-5Super,XR-10
Lenses
Auto Rikenon's 55/1.4, 1.8, 2.8... 50/1.7 Takumar 2/58 Preset Takumar 2.8/105 Auto Takumar 2.2/55, 3.5/35 Super Takumar 1.8/55...Macro Takumar F4/50... CZJ Biotar ALU M42 2/58 CZJ Tessar ALU M42 2.8/50
CZJ DDR Flektogon Zebra M42 2.8/35 CZJ Pancolar M42 2/50 CZJ Pancolar Exakta 2/50
Auto Mamiya/Sekor 1.8/55 ...Auto Mamiya/Sekor 2/50 Auto Mamiya/Sekor 2.8/50 Auto Mamiya/Sekor 200/3.5 Tamron SP500/8 Tamron SP350/5.6 Tamron SP90/2.5
Primoplan 1.9/58 Primagon 4.5/35 Telemegor 5.5/150 Angenieux 3.5/28 Angenieux 3,5/135 Y 2
Canon FL 58/1.2,Canon FL85/1.8,Canon FL 100/3.5,Canon SSC 2.8/100 ,Konica AR 100/2.8, Nikkor P 105/2.5
|
|
| Back to top |
|
|
visualopsins

Joined: 05 Mar 2009
Posts: 10543
Location: California
Expire: 2025-04-11
|
| Posted: Thu Jan 14, 2010 2:39 am Post subject: |
|
|
visualopsins wrote:
corroded aluminum in photo of mount; from salty sea-air environment?
the white threads could be fungus.
cemented elements are separating on edges.
the lens needs a thorough cleaning to remove corrosion and salts.
_________________
☮☮☮☮☮☮☮☮☮☮☮☮☮☮☮☮☮☮☮☮☮☮☮☮☮☮☮☮☮☮☮☮ like attracts like! ☮☮☮☮☮☮☮☮☮☮☮☮☮☮☮☮☮☮☮☮☮☮☮☮☮☮☮☮☮☮☮☮
Cameras: Sony ILCE-7RM2, Spotmatics II, F, and ESII, Nikon P4
Lenses:
M42 Asahi Optical Co., Takumar 1:4 f=35mm, 1:2 f=58mm (Sonnar), 1:2.4 f=58mm (Heliar), 1:2.2 f=55mm (Gaussian), 1:2.8 f=105mm (Model I), 1:2.8/105 (Model II), 1:5.6/200, Tele-Takumar 1:5.6/200, 1:6.3/300, Macro-Takumar 1:4/50, Auto-Takumar 1:2.3 f=35, 1:1.8 f=55mm, 1:2.2 f=55mm, Super-TAKUMAR 1:3.5/28 (fat), 1:2/35 (Fat), 1:1.4/50 (8-element), Super-Multi-Coated Fisheye-TAKUMAR 1:4/17, Super-Multi-Coated TAKUMAR 1:4.5/20, 1:3.5/24, 1:3.5/28, 1:2/35, 1:3.5/35, 1:1.8/85, 1:1.9/85 1:2.8/105, 1:3.5/135, 1:2.5/135 (II), 1:4/150, 1:4/200, 1:4/300, 1:4.5/500, Super-Multi-Coated Macro-TAKUMAR 1:4/50, 1:4/100, Super-Multi-Coated Bellows-TAKUMAR 1:4/100, SMC TAKUMAR 1:1.4/50, 1:1.8/55
M42 Carl Zeiss Jena Flektogon 2.4/35
Contax Carl Zeiss Vario-Sonnar T* 28-70mm F3.5-4.5
Pentax K-mount SMC PENTAX ZOOM 1:3.5 35~105mm, SMC PENTAX ZOOM 1:4 45~125mm
Nikon Micro-NIKKOR-P-C Auto 1:3.5 f=55mm, NIKKOR-P Auto 105mm f/2.5 Pre-AI (Sonnar), Micro-NIKKOR 105mm 1:4 AI, NIKKOR AI-S 35-135mm f/3,5-4,5
Tamron SP 17mm f/3.5 (51B), Tamron SP 17mm f/3.5 (51BB), SP 500mm f/8 (55BB), SP 70-210mm f/3.5 (19AH)
Vivitar 100mm 1:2.8 MC 1:1 Macro Telephoto (Kiron)
|
|
| Back to top |
|
|
mo
Joined: 27 Aug 2009
Posts: 8982
Location: Australia
Expire: 2016-07-30
|
| Posted: Thu Jan 14, 2010 2:47 am Post subject: |
|
|
mo wrote:
Arghhhhh The pain and frustration.....
That first statement came back and bit me on the butt..."worn on the outside(who cares)"
IT MAY BE A SIGN OF DANGER INSIDE!!  It cost $38 not worth the hassle of sending it back ....how easy is it to clean myself?? It cost $38 not worth the hassle of sending it back ....how easy is it to clean myself??
Edited post from the original as talked with the seller and it was a mistake on her part....was genuine about it.
_________________
Moira, Moderator
Fuji XE-1,Pentax K-01,Panasonic G1,Panasonic G5,Pentax MX
Ricoh Singlex TLS,KR-5,KR-5Super,XR-10
Lenses
Auto Rikenon's 55/1.4, 1.8, 2.8... 50/1.7 Takumar 2/58 Preset Takumar 2.8/105 Auto Takumar 2.2/55, 3.5/35 Super Takumar 1.8/55...Macro Takumar F4/50... CZJ Biotar ALU M42 2/58 CZJ Tessar ALU M42 2.8/50
CZJ DDR Flektogon Zebra M42 2.8/35 CZJ Pancolar M42 2/50 CZJ Pancolar Exakta 2/50
Auto Mamiya/Sekor 1.8/55 ...Auto Mamiya/Sekor 2/50 Auto Mamiya/Sekor 2.8/50 Auto Mamiya/Sekor 200/3.5 Tamron SP500/8 Tamron SP350/5.6 Tamron SP90/2.5
Primoplan 1.9/58 Primagon 4.5/35 Telemegor 5.5/150 Angenieux 3.5/28 Angenieux 3,5/135 Y 2
Canon FL 58/1.2,Canon FL85/1.8,Canon FL 100/3.5,Canon SSC 2.8/100 ,Konica AR 100/2.8, Nikkor P 105/2.5
Last edited by mo on Fri Jan 15, 2010 12:07 am; edited 1 time in total |
|
| Back to top |
|
|
SkedAddled

Joined: 19 Oct 2008
Posts: 1428
Location: Michigan, USA
Expire: 2021-08-12
|
| Posted: Thu Jan 14, 2010 3:19 am Post subject: |
|
|
SkedAddled wrote:
Looks similar to the situation I have with my Tokina-made Soligor
135mm lens. As it was included with the Tamron SP 60-300
I was bidding for, it was my first experiment with lens disassembly
& cleaning, because I only cared about the Tamron.
What it turned out to be, was the black paint covering the ground edges
of the optics, presumably to reduce interior light flares and/or refraction.
The paint has blistered or bubbled away from the glass edges, resulting
in highly visible light spots when viewed at slight angles from outside
the front element. When I freed the front element upon disassembly for
cleaning, just my careful handling of the element caused several flakes
of the paint to come loose and fall away.
Just like your Tak, my lens has clear indications of aluminum corrosion,
and it was heavily infested with fungus. I suspect a wet/damp environment
also led to the paint blistering away from the optics' edges. I managed
to successfully clean away the fungus, but I have done nothing to
attempt to restore the black coating of the edges of the glass.
_________________
Craig
Of course I'm all right! Why? What have you heard!?
Canon Digital EOS 5D Mk IV, EOS 50D, Powershot S3 iS
Vivitar 28 f/2.8 OM - Zuiko 50 f/1.8 OM - Tamron SP 28-80 f/3.5 AD2[Favorite!] - Hanimar 135 f/3.5 M42 - Soligor 135 f/2.8 T4 - Tamron SP 60-300 f/3.8 AD2 - Soligor 75-260 f/4.5 M42 - Soligor 400 f/6.3 T4 - Soligor 500 f/8 T2 Cat + Matched 2X TC - Addiction Growing!
This is us -- We drive these -- We're named these |
|
| Back to top |
|
|
mo
Joined: 27 Aug 2009
Posts: 8982
Location: Australia
Expire: 2016-07-30
|
| Posted: Thu Jan 14, 2010 6:38 am Post subject: |
|
|
mo wrote:
is there anything I can do for the mount to slow down or kill the corrosion or has it stopped?
I will see if there are any instructions to disassemble the Tak,I have sent a email to the camera guy who usually repairs my cameras to see if he will do it.
_________________
Moira, Moderator
Fuji XE-1,Pentax K-01,Panasonic G1,Panasonic G5,Pentax MX
Ricoh Singlex TLS,KR-5,KR-5Super,XR-10
Lenses
Auto Rikenon's 55/1.4, 1.8, 2.8... 50/1.7 Takumar 2/58 Preset Takumar 2.8/105 Auto Takumar 2.2/55, 3.5/35 Super Takumar 1.8/55...Macro Takumar F4/50... CZJ Biotar ALU M42 2/58 CZJ Tessar ALU M42 2.8/50
CZJ DDR Flektogon Zebra M42 2.8/35 CZJ Pancolar M42 2/50 CZJ Pancolar Exakta 2/50
Auto Mamiya/Sekor 1.8/55 ...Auto Mamiya/Sekor 2/50 Auto Mamiya/Sekor 2.8/50 Auto Mamiya/Sekor 200/3.5 Tamron SP500/8 Tamron SP350/5.6 Tamron SP90/2.5
Primoplan 1.9/58 Primagon 4.5/35 Telemegor 5.5/150 Angenieux 3.5/28 Angenieux 3,5/135 Y 2
Canon FL 58/1.2,Canon FL85/1.8,Canon FL 100/3.5,Canon SSC 2.8/100 ,Konica AR 100/2.8, Nikkor P 105/2.5
|
|
| Back to top |
|
|
Mal1905

Joined: 30 Oct 2008
Posts: 1705
Location: Dublin, Ireland
Expire: 2011-11-18
|
| Posted: Thu Jan 14, 2010 4:22 pm Post subject: |
|
|
Mal1905 wrote:
Disassembly is pretty easy with the Takumars. I recently took one apart to see if I could repair the aperture blades, but unfortunately it will require expertise of a greater nature than mine.
I used the rubber tip off a crutch to loosen and remove the beauty ring (Where it says 'Asahi Optical Co, etc' )on the front of the lens. If the filter ring isn't bent, this should prove to be quite easy to do.
Next up, you'll need to remove the front element - you'll see two notches. For this you will need a more specialised tool - I use a lens wrench, but I've read of people using dividers and even scissors with the tips filed down to do this! BE CAREFUL at this stage not to damage the glass when unscrewing the element.
Depending on the model (and I'm at the office with no lenses nearby to confirm), the front element may also be attached to the middle one, so the entire assembly will come out in one go.
Using the same tool as above, you then need to tackle the rear elements. Unscrew them - AGAIN BEING CAREFUL - and remove from the rear lens housing.
At this stage, the lens should be open and ready to perform the important work!
Hope this is at least of some use to you - I'll take a Super-Takumar apart when I get home and photograph the steps as I do it. Will then post the images into this thread for you.
Unless of course, somebody has already taken the opportunity to do all this and is going to post it anyway 
_________________
Canon EOS 5D / EOS 40D
Carl Zeiss Jena: Flektogon 2.8/20, 2.4/35, 2.8/35, Pancolar 2/50, MC 1.8/50, MC 1.8/80, Triotar 4/135, Tessar 2.8/50, S 4/135 1Q, S 3.5/135, Sonnar 3.5/135 MC, 2.8/180, Biotar 2/5,8cm, 2/58, 1.5/75
Carl Zeiss: Distagon 2/28 T*, 1.4/35 T*, Ultron 1.8/50, Tessar 2.8/50, Planar 1.4/50 T* MM, 1.7/50 T* MM, 1.4/85 T* AEG, Sonnar 2.8/135 T*�
Asahi Optical Co.: Super-Multi-Coated Takumar 4.5/20, 3.5/24, 3.5/28, 2/35, 3.5/35, 1.4/50, 1.8/55, 1.8/85, 2.8/105, 2.8/120, 2.5/135 I & II, 3.5/135, 4/150, 4/200, 4/300, 5.6/400, 4/45-125, 4.5/85-210, Super-Takumar 4.5/20, 3.5/24, 3.5/28, 2/35, 3.5/35, 1.4/50, 1.8/55, 2/55, 2.8/105, 3.5/135, 4/150, 4/200, 4.5/70-150, Fish-Eye-Takumar 4/17, Macro-Takumar 4/50, Super-Macro Takumar 4/50, Super-Multi-Coated Macro-Takumar 4/50, 4/100, Bellows-Takumar 4/100, Asahi-Kogaku Takumar 3.5/50, 2.4/58, 3.5/100, Asahi-Kogaku Tele-Takumar 3.5/135, Auto-Takumar 2.3/35, 3.5/35, 1.8/55, 1.8/55 (Zebra), 2/55, 2.2/55, 1.8/85, 2.8/105, 3.5/135, Takumar 4/35, 2.2/55, 2/58, 2.8/105, 3.5/135, 3.5/200, 5.6/200, Tele-Takumar 5.6/200, 6.3/300, SMC Takumar 1.4/50, 1.8/55, 2/55, SMC-M 1.4/50, 1.7/50, 2/50�
Tomioka: Tominon 2/5cm, Auto-Chinon 3.5/21, 1.4/55, Auto-Yashinon DS-M 1.2/55 |
|
| Back to top |
|
|
Mal1905
Joined: 30 Oct 2008
Posts: 1705
Location: Dublin, Ireland
Expire: 2011-11-18
|
| Posted: Thu Jan 14, 2010 8:51 pm Post subject: |
|
|
Mal1905 wrote:
Okay, a little later than planned, but here are some photos of a dismantling!
Time taken from start to finish? Less than 10 minutes - it took longer to edit the photos!
1. The lens - a Super-Takumar 1.8/55
2. The tools - a crutch tip and a lens spanner (wrench)
3. The two notches into which you place the blades of the wrench after you've removed the beauty ring with the crutch tip.
4. The front lens assembly may be further opened by unscrewing the two pieces. The front element may also be removed, but chances are it's been glued into place and will need careful removal.
5. The notches at the rear of the lens. The two smaller, inner notches are for the rear element to be unscrewed. The outer ones (circled) will remove the rear lens assembly.
6. The rear lens assembly may be further opened by unscrewing the two pieces as shown.
7. The disassembled Super-Takumar.
_________________
Canon EOS 5D / EOS 40D
Carl Zeiss Jena: Flektogon 2.8/20, 2.4/35, 2.8/35, Pancolar 2/50, MC 1.8/50, MC 1.8/80, Triotar 4/135, Tessar 2.8/50, S 4/135 1Q, S 3.5/135, Sonnar 3.5/135 MC, 2.8/180, Biotar 2/5,8cm, 2/58, 1.5/75
Carl Zeiss: Distagon 2/28 T*, 1.4/35 T*, Ultron 1.8/50, Tessar 2.8/50, Planar 1.4/50 T* MM, 1.7/50 T* MM, 1.4/85 T* AEG, Sonnar 2.8/135 T*�
Asahi Optical Co.: Super-Multi-Coated Takumar 4.5/20, 3.5/24, 3.5/28, 2/35, 3.5/35, 1.4/50, 1.8/55, 1.8/85, 2.8/105, 2.8/120, 2.5/135 I & II, 3.5/135, 4/150, 4/200, 4/300, 5.6/400, 4/45-125, 4.5/85-210, Super-Takumar 4.5/20, 3.5/24, 3.5/28, 2/35, 3.5/35, 1.4/50, 1.8/55, 2/55, 2.8/105, 3.5/135, 4/150, 4/200, 4.5/70-150, Fish-Eye-Takumar 4/17, Macro-Takumar 4/50, Super-Macro Takumar 4/50, Super-Multi-Coated Macro-Takumar 4/50, 4/100, Bellows-Takumar 4/100, Asahi-Kogaku Takumar 3.5/50, 2.4/58, 3.5/100, Asahi-Kogaku Tele-Takumar 3.5/135, Auto-Takumar 2.3/35, 3.5/35, 1.8/55, 1.8/55 (Zebra), 2/55, 2.2/55, 1.8/85, 2.8/105, 3.5/135, Takumar 4/35, 2.2/55, 2/58, 2.8/105, 3.5/135, 3.5/200, 5.6/200, Tele-Takumar 5.6/200, 6.3/300, SMC Takumar 1.4/50, 1.8/55, 2/55, SMC-M 1.4/50, 1.7/50, 2/50�
Tomioka: Tominon 2/5cm, Auto-Chinon 3.5/21, 1.4/55, Auto-Yashinon DS-M 1.2/55
Last edited by Mal1905 on Mon Apr 02, 2012 4:13 pm; edited 1 time in total |
|
| Back to top |
|
|
mo
Joined: 27 Aug 2009
Posts: 8982
Location: Australia
Expire: 2016-07-30
|
| Posted: Thu Jan 14, 2010 11:58 pm Post subject: |
|
|
mo wrote:
THANK YOU.....Now when I get in there how is the best way to remove the paint? my guess just by what I see is it will fall off really easily...but that leaves me with the dilemma of do I repaint it with something ie to stop any more corrosion.
SkedAddled did mention maybe the back internal elements are separating,now this does not worry me to much if I can get a few years out of this lens then that is ok .I know the glass looks clear front and back so no having to clean glass just paint removal and maybe something I can put on the surface to re-coat it/protect it?Any ideas on what to do?
Mal you have no idea on how much this helps me....not only in confidence but a great visual aid.
I changed the title of this post to reflect better what it is about and that others can find it more easier
_________________
Moira, Moderator
Fuji XE-1,Pentax K-01,Panasonic G1,Panasonic G5,Pentax MX
Ricoh Singlex TLS,KR-5,KR-5Super,XR-10
Lenses
Auto Rikenon's 55/1.4, 1.8, 2.8... 50/1.7 Takumar 2/58 Preset Takumar 2.8/105 Auto Takumar 2.2/55, 3.5/35 Super Takumar 1.8/55...Macro Takumar F4/50... CZJ Biotar ALU M42 2/58 CZJ Tessar ALU M42 2.8/50
CZJ DDR Flektogon Zebra M42 2.8/35 CZJ Pancolar M42 2/50 CZJ Pancolar Exakta 2/50
Auto Mamiya/Sekor 1.8/55 ...Auto Mamiya/Sekor 2/50 Auto Mamiya/Sekor 2.8/50 Auto Mamiya/Sekor 200/3.5 Tamron SP500/8 Tamron SP350/5.6 Tamron SP90/2.5
Primoplan 1.9/58 Primagon 4.5/35 Telemegor 5.5/150 Angenieux 3.5/28 Angenieux 3,5/135 Y 2
Canon FL 58/1.2,Canon FL85/1.8,Canon FL 100/3.5,Canon SSC 2.8/100 ,Konica AR 100/2.8, Nikkor P 105/2.5
|
|
| Back to top |
|
|
Kathmandu

Joined: 09 Dec 2009
Posts: 1479
Location: (Kathmandu,Nepal. Currently)Pacific Northwest, USA
Expire: 2012-04-08
|
| Posted: Fri Jan 15, 2010 12:26 am Post subject: |
|
|
Kathmandu wrote:
Looks like you have an interesting project. Will be checking in to see how it goes for you. I've never had to open a Super Tak . Lucky for the dismantling looks pretty straight forward. |
|
| Back to top |
|
|
mo
Joined: 27 Aug 2009
Posts: 8982
Location: Australia
Expire: 2016-07-30
|
| Posted: Fri Jan 15, 2010 12:34 am Post subject: |
|
|
mo wrote:
I have pulled apart 2 different lens so far and this looks like the easiest,I will wait for some advice on the corrosion/repainting once I am in there before I start this project.
I don't have the tools but will have to improvise...is it correct using a sink plug 49mm(clean one of course) will do the job on removing the front beauty ring ring.And it looks like the scissors or dividers will be my choice of tools for the rest.And I can not forget patience
_________________
Moira, Moderator
Fuji XE-1,Pentax K-01,Panasonic G1,Panasonic G5,Pentax MX
Ricoh Singlex TLS,KR-5,KR-5Super,XR-10
Lenses
Auto Rikenon's 55/1.4, 1.8, 2.8... 50/1.7 Takumar 2/58 Preset Takumar 2.8/105 Auto Takumar 2.2/55, 3.5/35 Super Takumar 1.8/55...Macro Takumar F4/50... CZJ Biotar ALU M42 2/58 CZJ Tessar ALU M42 2.8/50
CZJ DDR Flektogon Zebra M42 2.8/35 CZJ Pancolar M42 2/50 CZJ Pancolar Exakta 2/50
Auto Mamiya/Sekor 1.8/55 ...Auto Mamiya/Sekor 2/50 Auto Mamiya/Sekor 2.8/50 Auto Mamiya/Sekor 200/3.5 Tamron SP500/8 Tamron SP350/5.6 Tamron SP90/2.5
Primoplan 1.9/58 Primagon 4.5/35 Telemegor 5.5/150 Angenieux 3.5/28 Angenieux 3,5/135 Y 2
Canon FL 58/1.2,Canon FL85/1.8,Canon FL 100/3.5,Canon SSC 2.8/100 ,Konica AR 100/2.8, Nikkor P 105/2.5
|
|
| Back to top |
|
|
Kathmandu
Joined: 09 Dec 2009
Posts: 1479
Location: (Kathmandu,Nepal. Currently)Pacific Northwest, USA
Expire: 2012-04-08
|
| Posted: Fri Jan 15, 2010 1:09 am Post subject: |
|
|
Kathmandu wrote:
I would put the sink plug over the nameplate to see if it physically fits the name plate- I found sink plugs that have a hollow in the middle and a lip around works best for me. I can actually push it down with the palm of my hand without it actually touching the glass, but just the nameplate- and then I rotate the lens with the other hand. You should use the method you are comfortable with. The first turn has to have some torque behind it- you know to break it loose if it has not in a long time. Then you can just turn the sink plug with your fingers.
In nameplates that are corroded underneath -i have dropped Zippo or Ronson fluid- a drop here and a drop there (on the outside periphery)-it seems to help ease the unscrewing a lot. |
|
| Back to top |
|
|
mo
Joined: 27 Aug 2009
Posts: 8982
Location: Australia
Expire: 2016-07-30
|
| Posted: Fri Jan 15, 2010 1:16 am Post subject: |
|
|
mo wrote:
Thanks for the pointer not sure I understand this part
| Quote: |
| you know to break it loose if it has not in a long time |
Thanks
_________________
Moira, Moderator
Fuji XE-1,Pentax K-01,Panasonic G1,Panasonic G5,Pentax MX
Ricoh Singlex TLS,KR-5,KR-5Super,XR-10
Lenses
Auto Rikenon's 55/1.4, 1.8, 2.8... 50/1.7 Takumar 2/58 Preset Takumar 2.8/105 Auto Takumar 2.2/55, 3.5/35 Super Takumar 1.8/55...Macro Takumar F4/50... CZJ Biotar ALU M42 2/58 CZJ Tessar ALU M42 2.8/50
CZJ DDR Flektogon Zebra M42 2.8/35 CZJ Pancolar M42 2/50 CZJ Pancolar Exakta 2/50
Auto Mamiya/Sekor 1.8/55 ...Auto Mamiya/Sekor 2/50 Auto Mamiya/Sekor 2.8/50 Auto Mamiya/Sekor 200/3.5 Tamron SP500/8 Tamron SP350/5.6 Tamron SP90/2.5
Primoplan 1.9/58 Primagon 4.5/35 Telemegor 5.5/150 Angenieux 3.5/28 Angenieux 3,5/135 Y 2
Canon FL 58/1.2,Canon FL85/1.8,Canon FL 100/3.5,Canon SSC 2.8/100 ,Konica AR 100/2.8, Nikkor P 105/2.5
|
|
| Back to top |
|
|
Kathmandu
Joined: 09 Dec 2009
Posts: 1479
Location: (Kathmandu,Nepal. Currently)Pacific Northwest, USA
Expire: 2012-04-08
|
| Posted: Fri Jan 15, 2010 1:23 am Post subject: |
|
|
Kathmandu wrote:
What I meant was if it has not been opened via the name plate in a long time before-it may be held down firmly-so you would have get it break any bonds whether is corrosion , or whatever to start your unscrewing. Hope thats clearer.
Go for it. |
|
| Back to top |
|
|
mo
Joined: 27 Aug 2009
Posts: 8982
Location: Australia
Expire: 2016-07-30
|
| Posted: Fri Jan 15, 2010 1:26 am Post subject: |
|
|
mo wrote:
Thanks made it very clear appreciate your help!
_________________
Moira, Moderator
Fuji XE-1,Pentax K-01,Panasonic G1,Panasonic G5,Pentax MX
Ricoh Singlex TLS,KR-5,KR-5Super,XR-10
Lenses
Auto Rikenon's 55/1.4, 1.8, 2.8... 50/1.7 Takumar 2/58 Preset Takumar 2.8/105 Auto Takumar 2.2/55, 3.5/35 Super Takumar 1.8/55...Macro Takumar F4/50... CZJ Biotar ALU M42 2/58 CZJ Tessar ALU M42 2.8/50
CZJ DDR Flektogon Zebra M42 2.8/35 CZJ Pancolar M42 2/50 CZJ Pancolar Exakta 2/50
Auto Mamiya/Sekor 1.8/55 ...Auto Mamiya/Sekor 2/50 Auto Mamiya/Sekor 2.8/50 Auto Mamiya/Sekor 200/3.5 Tamron SP500/8 Tamron SP350/5.6 Tamron SP90/2.5
Primoplan 1.9/58 Primagon 4.5/35 Telemegor 5.5/150 Angenieux 3.5/28 Angenieux 3,5/135 Y 2
Canon FL 58/1.2,Canon FL85/1.8,Canon FL 100/3.5,Canon SSC 2.8/100 ,Konica AR 100/2.8, Nikkor P 105/2.5
|
|
| Back to top |
|
|
Kathmandu
Joined: 09 Dec 2009
Posts: 1479
Location: (Kathmandu,Nepal. Currently)Pacific Northwest, USA
Expire: 2012-04-08
|
| Posted: Fri Jan 15, 2010 1:44 am Post subject: |
|
|
Kathmandu wrote:
Youre welcome-
I think "Mal1905" made it very illustrative with his photos. |
|
| Back to top |
|
|
Mal1905
Joined: 30 Oct 2008
Posts: 1705
Location: Dublin, Ireland
Expire: 2011-11-18
|
| Posted: Fri Jan 15, 2010 10:38 am Post subject: |
|
|
Mal1905 wrote:
| Mo-Fo wrote: |
THANK YOU.....Now when I get in there how is the best way to remove the paint? my guess just by what I see is it will fall off really easily...but that leaves me with the dilemma of do I repaint it with something ie to stop any more corrosion.
SkedAddled did mention maybe the back internal elements are separating,now this does not worry me to much if I can get a few years out of this lens then that is ok .I know the glass looks clear front and back so no having to clean glass just paint removal and maybe something I can put on the surface to re-coat it/protect it?Any ideas on what to do?
Mal you have no idea on how much this helps me....not only in confidence but a great visual aid.
I changed the title of this post to reflect better what it is about and that others can find it more easier |
Glad to be able to help Mo-Fo
As regards the elements separating - I don't think that this is the case with your lens. Having completely dismantled the lens (including unscrewing the 'optional' bits), I was left with individual pieces of glass (can't remember exactly how many, and am at work now), but none of which were stuck together.
Invest in a rubber air-blower (not sure whether or not canned air would damage the diaphragm blades) if you don't already have one, and perhaps a very small wire brush to remove any loose flakes of paint. If you do choose this route, BE CAREFUL!!! Try to brush off the flakes without getting them on or in the diaphragm blades, and use the blower regularly to remove excess flakes and dust.
The blower will also come in handy for getting rid of specks of dust off the individual components when re-assembling the lens.
_________________
Canon EOS 5D / EOS 40D
Carl Zeiss Jena: Flektogon 2.8/20, 2.4/35, 2.8/35, Pancolar 2/50, MC 1.8/50, MC 1.8/80, Triotar 4/135, Tessar 2.8/50, S 4/135 1Q, S 3.5/135, Sonnar 3.5/135 MC, 2.8/180, Biotar 2/5,8cm, 2/58, 1.5/75
Carl Zeiss: Distagon 2/28 T*, 1.4/35 T*, Ultron 1.8/50, Tessar 2.8/50, Planar 1.4/50 T* MM, 1.7/50 T* MM, 1.4/85 T* AEG, Sonnar 2.8/135 T*�
Asahi Optical Co.: Super-Multi-Coated Takumar 4.5/20, 3.5/24, 3.5/28, 2/35, 3.5/35, 1.4/50, 1.8/55, 1.8/85, 2.8/105, 2.8/120, 2.5/135 I & II, 3.5/135, 4/150, 4/200, 4/300, 5.6/400, 4/45-125, 4.5/85-210, Super-Takumar 4.5/20, 3.5/24, 3.5/28, 2/35, 3.5/35, 1.4/50, 1.8/55, 2/55, 2.8/105, 3.5/135, 4/150, 4/200, 4.5/70-150, Fish-Eye-Takumar 4/17, Macro-Takumar 4/50, Super-Macro Takumar 4/50, Super-Multi-Coated Macro-Takumar 4/50, 4/100, Bellows-Takumar 4/100, Asahi-Kogaku Takumar 3.5/50, 2.4/58, 3.5/100, Asahi-Kogaku Tele-Takumar 3.5/135, Auto-Takumar 2.3/35, 3.5/35, 1.8/55, 1.8/55 (Zebra), 2/55, 2.2/55, 1.8/85, 2.8/105, 3.5/135, Takumar 4/35, 2.2/55, 2/58, 2.8/105, 3.5/135, 3.5/200, 5.6/200, Tele-Takumar 5.6/200, 6.3/300, SMC Takumar 1.4/50, 1.8/55, 2/55, SMC-M 1.4/50, 1.7/50, 2/50�
Tomioka: Tominon 2/5cm, Auto-Chinon 3.5/21, 1.4/55, Auto-Yashinon DS-M 1.2/55 |
|
| Back to top |
|
|
cooltouch

Joined: 15 Jan 2009
Posts: 9097
Location: Houston, Texas
|
| Posted: Fri Jan 15, 2010 7:21 pm Post subject: |
|
|
cooltouch wrote:
Having repaired more than a few lenses myself, I'm in agreement with Mal's advice. He mentions using a small wire brush. I would add to that, and specify my preference for a brass-wired brush rather than a steel-wired one. Brass is softer than steel and is less likely to abrade any surfaces.
You asked about what paint to use to replace that which flaked off. First, I would use the brass-wired brush to remove any loose paint, and if you can get it in there, I'd probably follow up with some medium grit sandpaper. Be sure to thoroughly blow out any debris after doing this. For paint, I would go with a flat-black enamel. And for this I'd take spray enamel, and spray a small amount into a disposable container until you have a small pool of it, then use a small artist's brush to brush the paint on just where it's needed. If you need to mask any areas, be sure to put down some masking tape first to protect any areas you don't want paint to get on.
_________________
Michael
My Gear List: http://michaelmcbroom.com/photo/gear.html
My Gallery: http://michaelmcbroom.com/gallery3/index.php/
My Flickr Page: https://www.flickr.com/photos/11308754@N08/albums
My Music: https://soundcloud.com/michaelmcbroom/albums
My Blog: http://michaelmcbroom.com/blogistan/ |
|
| Back to top |
|
|
mo
Joined: 27 Aug 2009
Posts: 8982
Location: Australia
Expire: 2016-07-30
|
| Posted: Fri Jan 15, 2010 8:45 pm Post subject: |
|
|
mo wrote:
Ok you have given me plenty to work with...this may take awhile as I gather the required tools....and find some time when the kids are not around so I can concentrate  .It scares me but I have a set of great photos and advice to guide me...I will take photos as I go. .It scares me but I have a set of great photos and advice to guide me...I will take photos as I go.
Any type of masking tape?
Small Update my repairer got back to me with a quote of under $66au which included a thorough clean and also painting with reflective paint...uhhh the dilemma,I don't want to jump out of doing it myself..but this I think is not a bad offer.and after all you guys went through to help...would you find it offensive if I jumped ship?
_________________
Moira, Moderator
Fuji XE-1,Pentax K-01,Panasonic G1,Panasonic G5,Pentax MX
Ricoh Singlex TLS,KR-5,KR-5Super,XR-10
Lenses
Auto Rikenon's 55/1.4, 1.8, 2.8... 50/1.7 Takumar 2/58 Preset Takumar 2.8/105 Auto Takumar 2.2/55, 3.5/35 Super Takumar 1.8/55...Macro Takumar F4/50... CZJ Biotar ALU M42 2/58 CZJ Tessar ALU M42 2.8/50
CZJ DDR Flektogon Zebra M42 2.8/35 CZJ Pancolar M42 2/50 CZJ Pancolar Exakta 2/50
Auto Mamiya/Sekor 1.8/55 ...Auto Mamiya/Sekor 2/50 Auto Mamiya/Sekor 2.8/50 Auto Mamiya/Sekor 200/3.5 Tamron SP500/8 Tamron SP350/5.6 Tamron SP90/2.5
Primoplan 1.9/58 Primagon 4.5/35 Telemegor 5.5/150 Angenieux 3.5/28 Angenieux 3,5/135 Y 2
Canon FL 58/1.2,Canon FL85/1.8,Canon FL 100/3.5,Canon SSC 2.8/100 ,Konica AR 100/2.8, Nikkor P 105/2.5
|
|
| Back to top |
|
|
Mal1905
Joined: 30 Oct 2008
Posts: 1705
Location: Dublin, Ireland
Expire: 2011-11-18
|
| Posted: Fri Jan 22, 2010 12:20 pm Post subject: |
|
|
Mal1905 wrote:
| Mo-Fo wrote: |
Ok you have given me plenty to work with...this may take awhile as I gather the required tools....and find some time when the kids are not around so I can concentrate .It scares me but I have a set of great photos and advice to guide me...I will take photos as I go.
Any type of masking tape?
Small Update my repairer got back to me with a quote of under $66au which included a thorough clean and also painting with reflective paint...uhhh the dilemma,I don't want to jump out of doing it myself..but this I think is not a bad offer.and after all you guys went through to help...would you find it offensive if I jumped ship? |
What's the latest on your Tak Mo-Fo? Did you DIY or send it to the repairman?
_________________
Canon EOS 5D / EOS 40D
Carl Zeiss Jena: Flektogon 2.8/20, 2.4/35, 2.8/35, Pancolar 2/50, MC 1.8/50, MC 1.8/80, Triotar 4/135, Tessar 2.8/50, S 4/135 1Q, S 3.5/135, Sonnar 3.5/135 MC, 2.8/180, Biotar 2/5,8cm, 2/58, 1.5/75
Carl Zeiss: Distagon 2/28 T*, 1.4/35 T*, Ultron 1.8/50, Tessar 2.8/50, Planar 1.4/50 T* MM, 1.7/50 T* MM, 1.4/85 T* AEG, Sonnar 2.8/135 T*�
Asahi Optical Co.: Super-Multi-Coated Takumar 4.5/20, 3.5/24, 3.5/28, 2/35, 3.5/35, 1.4/50, 1.8/55, 1.8/85, 2.8/105, 2.8/120, 2.5/135 I & II, 3.5/135, 4/150, 4/200, 4/300, 5.6/400, 4/45-125, 4.5/85-210, Super-Takumar 4.5/20, 3.5/24, 3.5/28, 2/35, 3.5/35, 1.4/50, 1.8/55, 2/55, 2.8/105, 3.5/135, 4/150, 4/200, 4.5/70-150, Fish-Eye-Takumar 4/17, Macro-Takumar 4/50, Super-Macro Takumar 4/50, Super-Multi-Coated Macro-Takumar 4/50, 4/100, Bellows-Takumar 4/100, Asahi-Kogaku Takumar 3.5/50, 2.4/58, 3.5/100, Asahi-Kogaku Tele-Takumar 3.5/135, Auto-Takumar 2.3/35, 3.5/35, 1.8/55, 1.8/55 (Zebra), 2/55, 2.2/55, 1.8/85, 2.8/105, 3.5/135, Takumar 4/35, 2.2/55, 2/58, 2.8/105, 3.5/135, 3.5/200, 5.6/200, Tele-Takumar 5.6/200, 6.3/300, SMC Takumar 1.4/50, 1.8/55, 2/55, SMC-M 1.4/50, 1.7/50, 2/50�
Tomioka: Tominon 2/5cm, Auto-Chinon 3.5/21, 1.4/55, Auto-Yashinon DS-M 1.2/55 |
|
| Back to top |
|
|
mo
Joined: 27 Aug 2009
Posts: 8982
Location: Australia
Expire: 2016-07-30
|
| Posted: Fri Jan 22, 2010 7:52 pm Post subject: |
|
|
mo wrote:
I chickened out and sent it off....should be back in a few weeks along with my TLS nice and clean.I did however make my sink plug "beauty" ring remover and tried it out before I sent it off and it worked really smoothly.So while I did not "fix" this one I am going to put some effort into collecting the appropriate tools so next time I can get in there before I have time to think about sending it away.... 
Mal your instructions won't go astray in helping someone and if ever I need them I know where to come...sorry I did not get to use them this time around.
_________________
Moira, Moderator
Fuji XE-1,Pentax K-01,Panasonic G1,Panasonic G5,Pentax MX
Ricoh Singlex TLS,KR-5,KR-5Super,XR-10
Lenses
Auto Rikenon's 55/1.4, 1.8, 2.8... 50/1.7 Takumar 2/58 Preset Takumar 2.8/105 Auto Takumar 2.2/55, 3.5/35 Super Takumar 1.8/55...Macro Takumar F4/50... CZJ Biotar ALU M42 2/58 CZJ Tessar ALU M42 2.8/50
CZJ DDR Flektogon Zebra M42 2.8/35 CZJ Pancolar M42 2/50 CZJ Pancolar Exakta 2/50
Auto Mamiya/Sekor 1.8/55 ...Auto Mamiya/Sekor 2/50 Auto Mamiya/Sekor 2.8/50 Auto Mamiya/Sekor 200/3.5 Tamron SP500/8 Tamron SP350/5.6 Tamron SP90/2.5
Primoplan 1.9/58 Primagon 4.5/35 Telemegor 5.5/150 Angenieux 3.5/28 Angenieux 3,5/135 Y 2
Canon FL 58/1.2,Canon FL85/1.8,Canon FL 100/3.5,Canon SSC 2.8/100 ,Konica AR 100/2.8, Nikkor P 105/2.5
|
|
| Back to top |
|
|
Mal1905
Joined: 30 Oct 2008
Posts: 1705
Location: Dublin, Ireland
Expire: 2011-11-18
|
| Posted: Sat Jan 23, 2010 3:55 pm Post subject: |
|
|
Mal1905 wrote:
| Mo-Fo wrote: |
| Mal your instructions won't go astray in helping someone and if ever I need them I know where to come...sorry I did not get to use them this time around. |
Don't worry about not using them MoFo, it was actually a bit of fun putting them together, and like you say, they're here and available if someone else needs to strip down a Tak
_________________
Canon EOS 5D / EOS 40D
Carl Zeiss Jena: Flektogon 2.8/20, 2.4/35, 2.8/35, Pancolar 2/50, MC 1.8/50, MC 1.8/80, Triotar 4/135, Tessar 2.8/50, S 4/135 1Q, S 3.5/135, Sonnar 3.5/135 MC, 2.8/180, Biotar 2/5,8cm, 2/58, 1.5/75
Carl Zeiss: Distagon 2/28 T*, 1.4/35 T*, Ultron 1.8/50, Tessar 2.8/50, Planar 1.4/50 T* MM, 1.7/50 T* MM, 1.4/85 T* AEG, Sonnar 2.8/135 T*�
Asahi Optical Co.: Super-Multi-Coated Takumar 4.5/20, 3.5/24, 3.5/28, 2/35, 3.5/35, 1.4/50, 1.8/55, 1.8/85, 2.8/105, 2.8/120, 2.5/135 I & II, 3.5/135, 4/150, 4/200, 4/300, 5.6/400, 4/45-125, 4.5/85-210, Super-Takumar 4.5/20, 3.5/24, 3.5/28, 2/35, 3.5/35, 1.4/50, 1.8/55, 2/55, 2.8/105, 3.5/135, 4/150, 4/200, 4.5/70-150, Fish-Eye-Takumar 4/17, Macro-Takumar 4/50, Super-Macro Takumar 4/50, Super-Multi-Coated Macro-Takumar 4/50, 4/100, Bellows-Takumar 4/100, Asahi-Kogaku Takumar 3.5/50, 2.4/58, 3.5/100, Asahi-Kogaku Tele-Takumar 3.5/135, Auto-Takumar 2.3/35, 3.5/35, 1.8/55, 1.8/55 (Zebra), 2/55, 2.2/55, 1.8/85, 2.8/105, 3.5/135, Takumar 4/35, 2.2/55, 2/58, 2.8/105, 3.5/135, 3.5/200, 5.6/200, Tele-Takumar 5.6/200, 6.3/300, SMC Takumar 1.4/50, 1.8/55, 2/55, SMC-M 1.4/50, 1.7/50, 2/50�
Tomioka: Tominon 2/5cm, Auto-Chinon 3.5/21, 1.4/55, Auto-Yashinon DS-M 1.2/55 |
|
| Back to top |
|
|
kuuan

Joined: 14 Jan 2008
Posts: 4573
Location: right now: Austria
Expire: 2014-12-26
|
| Posted: Sat Jan 23, 2010 4:26 pm Post subject: |
|
|
kuuan wrote:
what GREAT, simply but comprehensive instructions to take apart a Takumar lens THANK YOU Mal!
and I reckon this is the same with pretty much any Super / S-M-C / SMC Takumar, yes?
_________________
my photos on flickr: https://www.flickr.com/photos/kuuan/collections |
|
| Back to top |
|
|
Mal1905
Joined: 30 Oct 2008
Posts: 1705
Location: Dublin, Ireland
Expire: 2011-11-18
|
| Posted: Sat Jan 23, 2010 5:25 pm Post subject: |
|
|
Mal1905 wrote:
| kuuan wrote: |
what GREAT, simply but comprehensive instructions to take apart a Takumar lens THANK YOU Mal!
and I reckon this is the same with pretty much any Super / S-M-C / SMC Takumar, yes? |
Thanks A
This is the first one I've removed all the elements from, and I haven't attacked the diaphragm in one yet, but there are different methods required to dismantle other Takumars.
Some of them have small screws on the inside which need to be removed to get at the middle elements - others are different when it comes to removing the rear elements, but broadly speaking, they are pretty similar.
When I get time, I'll photograph the other variants and post them.
_________________
Canon EOS 5D / EOS 40D
Carl Zeiss Jena: Flektogon 2.8/20, 2.4/35, 2.8/35, Pancolar 2/50, MC 1.8/50, MC 1.8/80, Triotar 4/135, Tessar 2.8/50, S 4/135 1Q, S 3.5/135, Sonnar 3.5/135 MC, 2.8/180, Biotar 2/5,8cm, 2/58, 1.5/75
Carl Zeiss: Distagon 2/28 T*, 1.4/35 T*, Ultron 1.8/50, Tessar 2.8/50, Planar 1.4/50 T* MM, 1.7/50 T* MM, 1.4/85 T* AEG, Sonnar 2.8/135 T*�
Asahi Optical Co.: Super-Multi-Coated Takumar 4.5/20, 3.5/24, 3.5/28, 2/35, 3.5/35, 1.4/50, 1.8/55, 1.8/85, 2.8/105, 2.8/120, 2.5/135 I & II, 3.5/135, 4/150, 4/200, 4/300, 5.6/400, 4/45-125, 4.5/85-210, Super-Takumar 4.5/20, 3.5/24, 3.5/28, 2/35, 3.5/35, 1.4/50, 1.8/55, 2/55, 2.8/105, 3.5/135, 4/150, 4/200, 4.5/70-150, Fish-Eye-Takumar 4/17, Macro-Takumar 4/50, Super-Macro Takumar 4/50, Super-Multi-Coated Macro-Takumar 4/50, 4/100, Bellows-Takumar 4/100, Asahi-Kogaku Takumar 3.5/50, 2.4/58, 3.5/100, Asahi-Kogaku Tele-Takumar 3.5/135, Auto-Takumar 2.3/35, 3.5/35, 1.8/55, 1.8/55 (Zebra), 2/55, 2.2/55, 1.8/85, 2.8/105, 3.5/135, Takumar 4/35, 2.2/55, 2/58, 2.8/105, 3.5/135, 3.5/200, 5.6/200, Tele-Takumar 5.6/200, 6.3/300, SMC Takumar 1.4/50, 1.8/55, 2/55, SMC-M 1.4/50, 1.7/50, 2/50�
Tomioka: Tominon 2/5cm, Auto-Chinon 3.5/21, 1.4/55, Auto-Yashinon DS-M 1.2/55 |
|
| Back to top |
|
|
|
|