| View previous topic :: View next topic |
| Author |
Message |
GordoNorte
Joined: 14 Mar 2024
Posts: 6
Location: Alberta, Canada
|
 Posted: Thu Mar 14, 2024 6:44 am Post subject: Project - Tamron 300/2.8 - I have questions! Posted: Thu Mar 14, 2024 6:44 am Post subject: Project - Tamron 300/2.8 - I have questions! |
 |
|
GordoNorte wrote:
Hi All,
I have been browsing this forum for some time now learning a great deal about lenses and their characteristics in general so I’m glad to be able to join! I’m a hobbyist photographer with the Nikon program and didn’t own any MFs since recently when I bid on a “project†Tamron off Yahoo Japan.
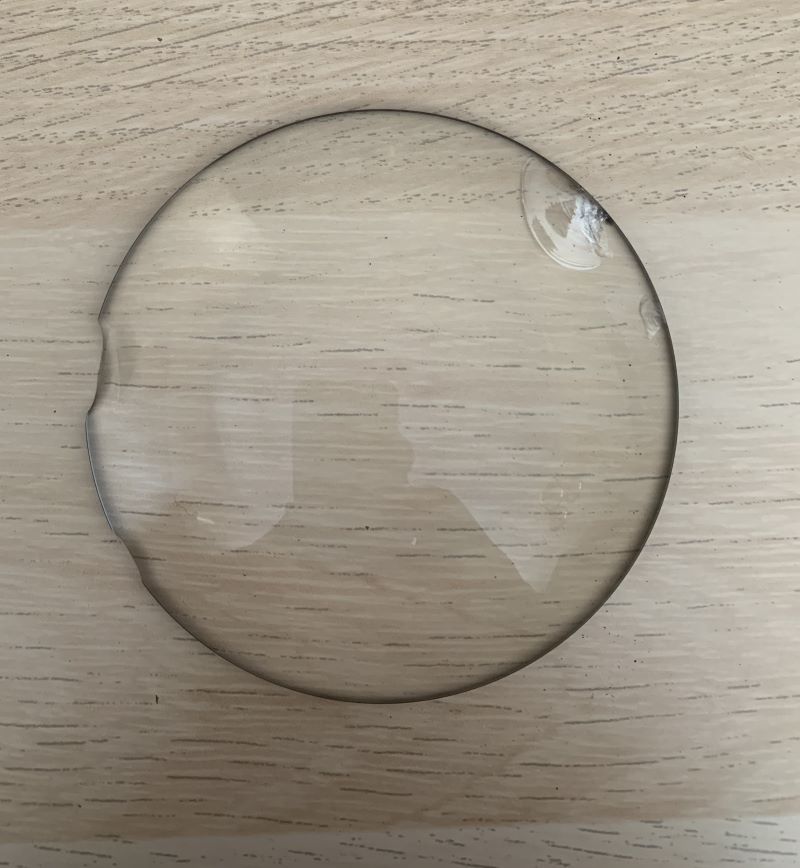
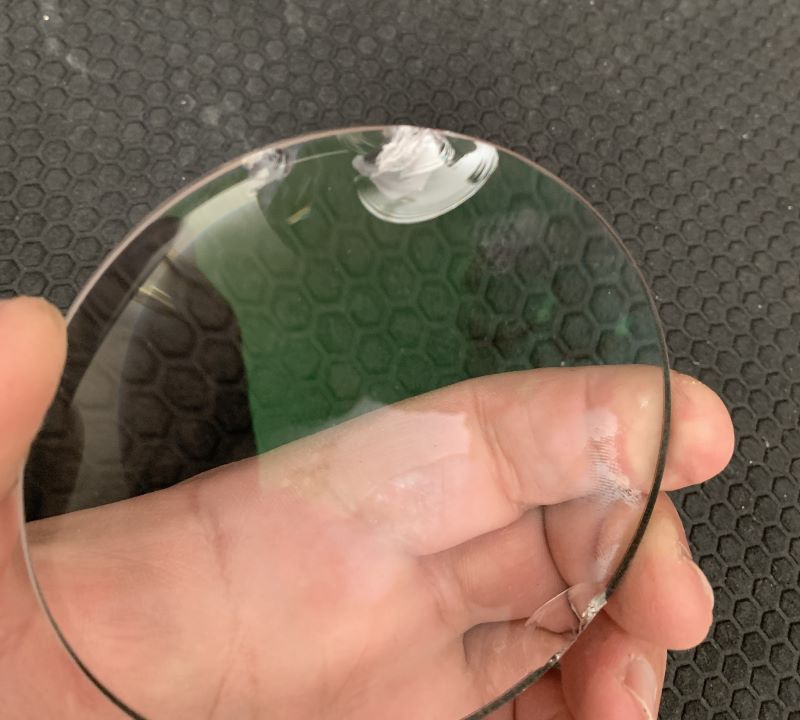
The lens is a 300/2.8 model 60B complete with all accessories and case but was heavily discounted due to a large chip on the front element and foggy imagery. The lens is in great condition other than the obvious chunk missing in the front; there was also debris inside which I suspected was from the chip shedding glass pieces. I took a pic soon as received and it did look quite bad, blueish and that white area looks like “glowingâ€.
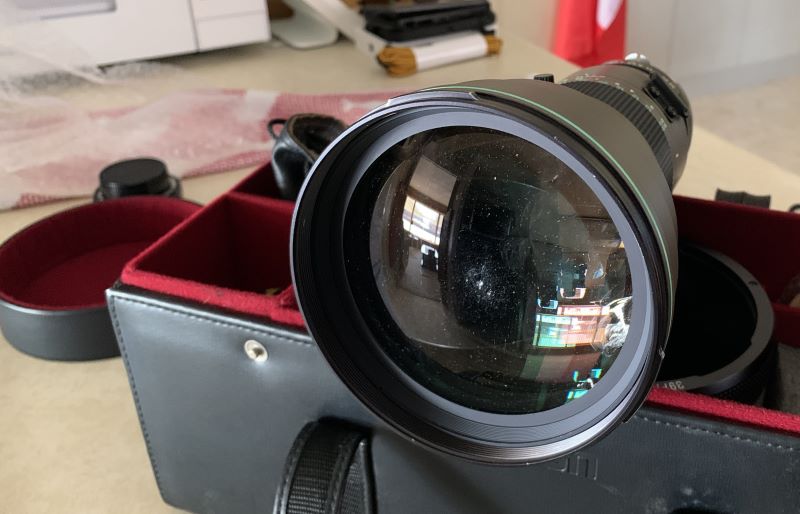

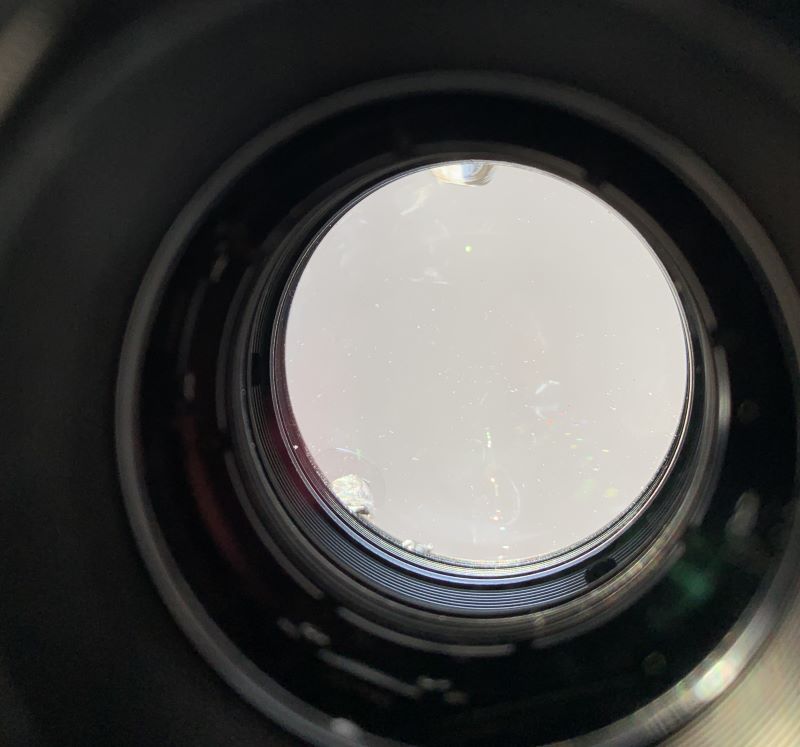
Curious that the threaded ring was loose as I was able to unscrew by hand. First thing I notice was that the elements were touching in the centre where glass debris accumulated and the 3 chips. After cleaning the coating looked OK, no fungus but some of the tiny glass pieces embedded in the surface and I couldn’t wipe it off. Second surprise was that the elements were switched: #2 was last (the chipped one) also the spacer was not placed in between the elements hence why they were touching each other. Anyways, I cleaned everything and reassembled per picture below but could not tighten the rings (first time I took a lens apart, I don't even have the tool yet haha). I also rotated the element to bring the chip outside the sensor area. Results: images look great! Though I don’t know how to evaluate IQ in a more clinical way…


A few questions I was wondering if you could help me with:
- What happened here? How the internal element got broken? A mystery indeed…
- I suspect the uneven chipped surfaces will cast glare across the elements and add "artistic expression" to the image. Is there anyway that can be done to alleviate that?
- I think that with use the chip will continue to shed bits, is there a way to patch the corner at least to seal it.
- Should I be worried about a crack propagating from the chip with temperature variation? I live in Western Canada and in winter It's very common in windshields for cracks to start from rock chips with the influence of sudden temperature variations.
- Is there any tests I could do check image quality?
Interesting project, so far I'm enjoying!
Thanks all!
Cheers,
Art. |
|
| Back to top |
|
 |
visualopsins


Joined: 05 Mar 2009
Posts: 11019
Location: California
Expire: 2025-04-11
|
| Posted: Thu Mar 14, 2024 7:41 am Post subject: Re: Project - Tamron 300/2.8 - I have questions! |
|
|
visualopsins wrote:
| GordoNorte wrote: |
Hi All,
I have been browsing this forum for some time now learning a great deal about lenses and their characteristics in general so I’m glad to be able to join! I’m a hobbyist photographer with the Nikon program and didn’t own any MFs since recently when I bid on a “project†Tamron off Yahoo Japan.
The lens is a 300/2.8 model 60B complete with all accessories and case but was heavily discounted due to a large chip on the front element and foggy imagery. The lens is in great condition other than the obvious chunk missing in the front; there was also debris inside which I suspected was from the chip shedding glass pieces. I took a pic soon as received and it did look quite bad, blueish and that white area looks like “glowingâ€.
Curious that the threaded ring was loose as I was able to unscrew by hand. First thing I notice was that the elements were touching in the centre where glass debris accumulated and the 3 chips. After cleaning the coating looked OK, no fungus but some of the tiny glass pieces embedded in the surface and I couldn’t wipe it off. Second surprise was that the elements were switched: #2 was last (the chipped one) also the spacer was not placed in between the elements hence why they were touching each other. Anyways, I cleaned everything and reassembled per picture below but could not tighten the rings (first time I took a lens apart, I don't even have the tool yet haha). I also rotated the element to bring the chip outside the sensor area. Results: images look great! Though I don’t know how to evaluate IQ in a more clinical way…
A few questions I was wondering if you could help me with:
- What happened here? How the internal element got broken? A mystery indeed…
- I suspect the uneven chipped surfaces will cast glare across the elements and add "artistic expression" to the image. Is there anyway that can be done to alleviate that?
- I think that with use the chip will continue to shed bits, is there a way to patch the corner at least to seal it.
- Should I be worried about a crack propagating from the chip with temperature variation? I live in Western Canada and in winter It's very common in windshields for cracks to start from rock chips with the influence of sudden temperature variations.
- Is there any tests I could do check image quality?
Interesting project, so far I'm enjoying!
Thanks all!
Cheers,
Art. |
Welcome GordoNorte
_________________
☮☮☮☮☮☮☮☮☮☮☮☮☮☮☮☮☮☮☮☮☮☮☮☮☮☮☮☮☮☮☮☮ like attracts like! ☮☮☮☮☮☮☮☮☮☮☮☮☮☮☮☮☮☮☮☮☮☮☮☮☮☮☮☮☮☮☮☮
Cameras: Sony ILCE-7RM2, Spotmatics II, F, and ESII, Nikon P4
Lenses:
M42 Asahi Optical Co., Takumar 1:4 f=35mm, 1:2 f=58mm (Sonnar), 1:2.4 f=58mm (Heliar), 1:2.2 f=55mm (Gaussian), 1:2.8 f=105mm (Model I), 1:2.8/105 (Model II), 1:5.6/200, Tele-Takumar 1:5.6/200, 1:6.3/300, Macro-Takumar 1:4/50, Auto-Takumar 1:2.3 f=35, 1:1.8 f=55mm, 1:2.2 f=55mm, Super-TAKUMAR 1:3.5/28 (fat), 1:2/35 (Fat), 1:1.4/50 (8-element), Super-Multi-Coated Fisheye-TAKUMAR 1:4/17, Super-Multi-Coated TAKUMAR 1:4.5/20, 1:3.5/24, 1:3.5/28, 1:2/35, 1:3.5/35, 1:1.8/85, 1:1.9/85 1:2.8/105, 1:3.5/135, 1:2.5/135 (II), 1:4/150, 1:4/200, 1:4/300, 1:4.5/500, Super-Multi-Coated Macro-TAKUMAR 1:4/50, 1:4/100, Super-Multi-Coated Bellows-TAKUMAR 1:4/100, SMC TAKUMAR 1:1.4/50, 1:1.8/55
M42 Carl Zeiss Jena Flektogon 2.4/35
Contax Carl Zeiss Vario-Sonnar T* 28-70mm F3.5-4.5
Pentax K-mount SMC PENTAX-A ZOOM 1:3.5 35~105mm, SMC PENTAX ZOOM 1:4 45~125mm
Nikon Micro-NIKKOR-P-C Auto 1:3.5 f=55mm, NIKKOR-P Auto 105mm f/2.5 Pre-AI (Sonnar), Micro-NIKKOR 105mm 1:4 AI, NIKKOR AI-S 35-135mm f/3,5-4,5
Tamron SP 17mm f/3.5 (51B), Tamron SP 17mm f/3.5 (151B), SP 500mm f/8 (55BB), SP 70-210mm f/3.5 (19AH)
Vivitar 100mm 1:2.8 MC 1:1 Macro Telephoto (Kiron)
|
|
| Back to top |
|
|
RokkorDoctor


Joined: 27 Nov 2021
Posts: 1424
Location: Kent, UK
Expire: 2025-05-01
|
| Posted: Thu Mar 14, 2024 10:49 am Post subject: |
|
|
RokkorDoctor wrote:
This is probably no help but I would avoid rapid temperature fluctuations.
Since you already rotated the element such that the chip is outside the frame, I would probably use a permanent marker / sharpie to paint the chipped area black and reduce internal reflections.
Beyond that I can't think of much more to be done.
Did I understand correctly that there is currently no spacer between the first two elements and that they are therefore touching again? If so that wouldn't be good and may lead to further damage.
_________________
Mark
SONY A7S, A7RII + dust-sealed modded Novoflex/Fotodiox/Rayqual MD-NEX adapters
Minolta SR-1, SRT-101/303, XD7/XD11, XGM, X700
Bronica SQAi
Ricoh GX100
Minolta majority of all Rokkor SR/AR/MC/MD models made
Sigma 14mm/3.5 for SR mount
Tamron SP 60B 300mm/2.8 (Adaptall)
Samyang T-S 24mm/3.5 (Nikon mount, DIY converted to SR mount)
Schneider-Kreuznach PC-Super-Angulon 28mm/2.8 (SR mount)
Bronica PS 35/40/50/65/80/110/135/150/180/200/250mm |
|
| Back to top |
|
|
GordoNorte
Joined: 14 Mar 2024
Posts: 6
Location: Alberta, Canada
|
| Posted: Thu Mar 14, 2024 2:29 pm Post subject: |
|
|
GordoNorte wrote:
Hi RokkorDoctor,
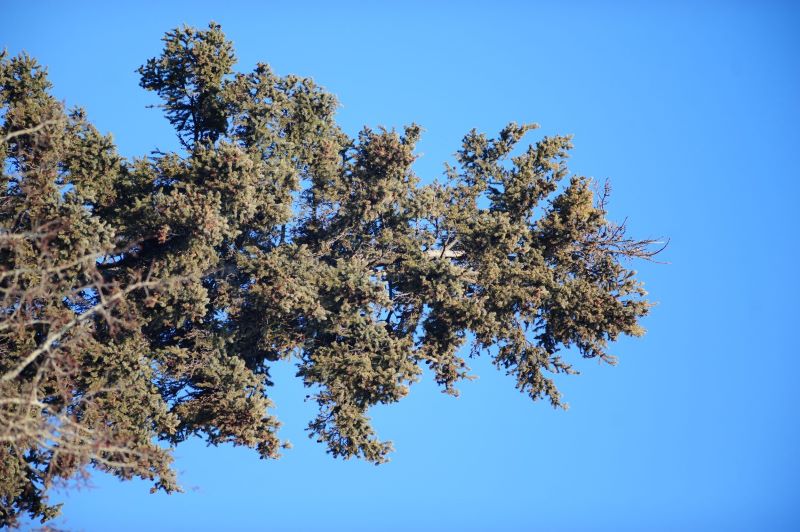
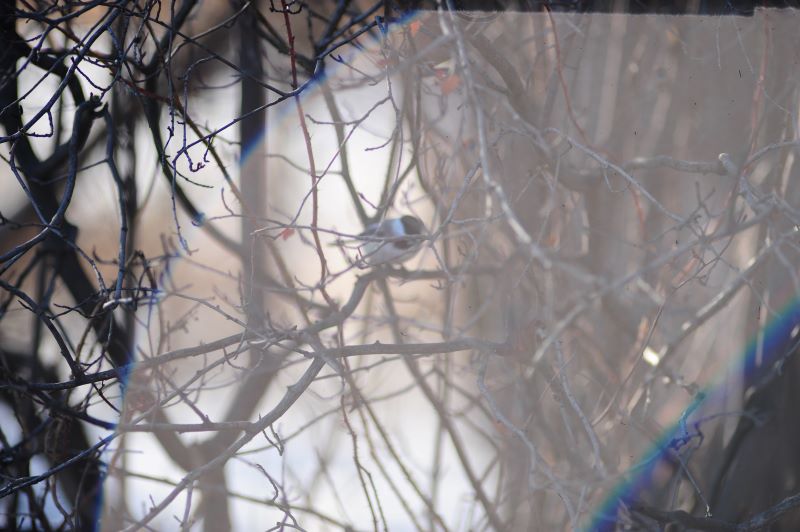
Thanks for the tip, so plain sharpie marker should do the trick eh? I will give it a try! I did realize now that one of the pics I took does show glare. The sun was at about 10 o'clock front the bird; I didn't have the shroud on so don't know if normal glare to be expected or exacerbated by the defect. I see from your signature that you do have one... Any comment on that to expect glarewise?
About the spacer: It had been assembled incorrectly. I'm not sure if the pictures I posted came through as for me it only shows an icon, but the order when found was AB21C, I reassembled A1B2C now the glass aren't touching each other. So the bad one is inside now, #2. (how it got broken remains a mystery)
Thanks!
Art. |
|
| Back to top |
|
|
visualopsins
Joined: 05 Mar 2009
Posts: 11019
Location: California
Expire: 2025-04-11
|
| Posted: Thu Mar 14, 2024 5:20 pm Post subject: |
|
|
visualopsins wrote:
| RokkorDoctor wrote: |
| ...Since you already rotated the element such that the chip is outside the frame, I would probably use a permanent marker / sharpie to paint the chipped area black and reduce internal reflections.... |
Not a wide angle lens so the chip will be outside the frame only when lens is stopped down...correct?
_________________
☮☮☮☮☮☮☮☮☮☮☮☮☮☮☮☮☮☮☮☮☮☮☮☮☮☮☮☮☮☮☮☮ like attracts like! ☮☮☮☮☮☮☮☮☮☮☮☮☮☮☮☮☮☮☮☮☮☮☮☮☮☮☮☮☮☮☮☮
Cameras: Sony ILCE-7RM2, Spotmatics II, F, and ESII, Nikon P4
Lenses:
M42 Asahi Optical Co., Takumar 1:4 f=35mm, 1:2 f=58mm (Sonnar), 1:2.4 f=58mm (Heliar), 1:2.2 f=55mm (Gaussian), 1:2.8 f=105mm (Model I), 1:2.8/105 (Model II), 1:5.6/200, Tele-Takumar 1:5.6/200, 1:6.3/300, Macro-Takumar 1:4/50, Auto-Takumar 1:2.3 f=35, 1:1.8 f=55mm, 1:2.2 f=55mm, Super-TAKUMAR 1:3.5/28 (fat), 1:2/35 (Fat), 1:1.4/50 (8-element), Super-Multi-Coated Fisheye-TAKUMAR 1:4/17, Super-Multi-Coated TAKUMAR 1:4.5/20, 1:3.5/24, 1:3.5/28, 1:2/35, 1:3.5/35, 1:1.8/85, 1:1.9/85 1:2.8/105, 1:3.5/135, 1:2.5/135 (II), 1:4/150, 1:4/200, 1:4/300, 1:4.5/500, Super-Multi-Coated Macro-TAKUMAR 1:4/50, 1:4/100, Super-Multi-Coated Bellows-TAKUMAR 1:4/100, SMC TAKUMAR 1:1.4/50, 1:1.8/55
M42 Carl Zeiss Jena Flektogon 2.4/35
Contax Carl Zeiss Vario-Sonnar T* 28-70mm F3.5-4.5
Pentax K-mount SMC PENTAX-A ZOOM 1:3.5 35~105mm, SMC PENTAX ZOOM 1:4 45~125mm
Nikon Micro-NIKKOR-P-C Auto 1:3.5 f=55mm, NIKKOR-P Auto 105mm f/2.5 Pre-AI (Sonnar), Micro-NIKKOR 105mm 1:4 AI, NIKKOR AI-S 35-135mm f/3,5-4,5
Tamron SP 17mm f/3.5 (51B), Tamron SP 17mm f/3.5 (151B), SP 500mm f/8 (55BB), SP 70-210mm f/3.5 (19AH)
Vivitar 100mm 1:2.8 MC 1:1 Macro Telephoto (Kiron)
|
|
| Back to top |
|
|
mr_tibbs2004

Joined: 23 Jul 2021
Posts: 141
Location: United States
|
| Posted: Thu Mar 14, 2024 5:28 pm Post subject: |
|
|
mr_tibbs2004 wrote:
I would assume the lens was taken apart in the past (who knows why) and reassembled incorrectly. During the break down or reassembly most likely the element was damaged. That's my best guess anyways.  |
|
| Back to top |
|
|
GordoNorte
Joined: 14 Mar 2024
Posts: 6
Location: Alberta, Canada
|
| Posted: Thu Mar 14, 2024 5:45 pm Post subject: |
|
|
GordoNorte wrote:
| visualopsins wrote: |
| RokkorDoctor wrote: |
| ...Since you already rotated the element such that the chip is outside the frame, I would probably use a permanent marker / sharpie to paint the chipped area black and reduce internal reflections.... |
Not a wide angle lens so the chip will be outside the frame only when lens is stopped down...correct? |
I'm not sure if that is the case, but I thought that light passing through that fringe area is discarded for being outside the sensor envelope...
 |
|
| Back to top |
|
|
visualopsins
Joined: 05 Mar 2009
Posts: 11019
Location: California
Expire: 2025-04-11
|
| Posted: Thu Mar 14, 2024 7:32 pm Post subject: |
|
|
visualopsins wrote:
| GordoNorte wrote: |
| visualopsins wrote: |
| RokkorDoctor wrote: |
| ...Since you already rotated the element such that the chip is outside the frame, I would probably use a permanent marker / sharpie to paint the chipped area black and reduce internal reflections.... |
Not a wide angle lens so the chip will be outside the frame only when lens is stopped down...correct? |
I'm not sure if that is the case, but I thought that light passing through that fringe area is discarded for being outside the sensor envelope...
pic |
A light source at center of frame shines rays all over the front element, which are all focused to the center of the sensor regardless of sensor size. Aperture iris cuts off the rays from the front lens circumference.
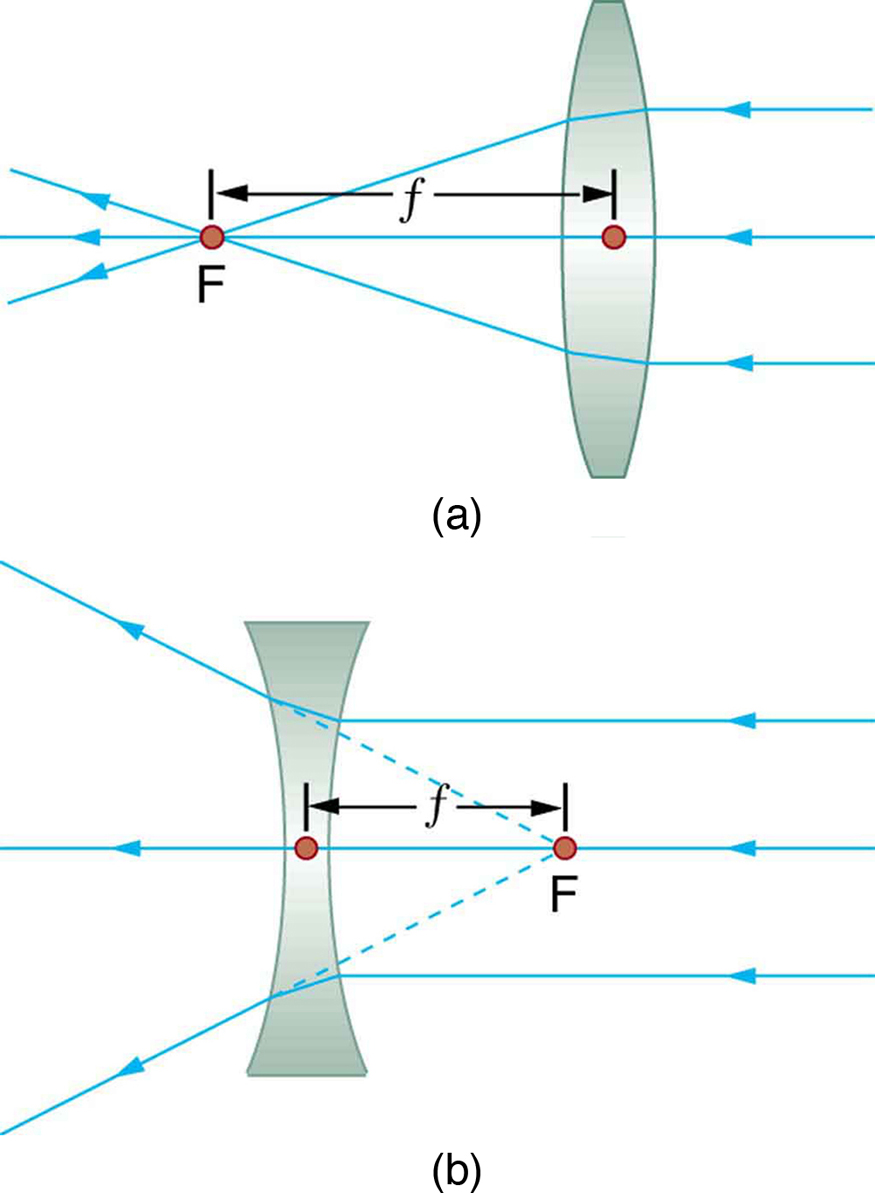
https://philschatz.com/physics-book/resources/Figure%2026_06_05.jpg
_________________
☮☮☮☮☮☮☮☮☮☮☮☮☮☮☮☮☮☮☮☮☮☮☮☮☮☮☮☮☮☮☮☮ like attracts like! ☮☮☮☮☮☮☮☮☮☮☮☮☮☮☮☮☮☮☮☮☮☮☮☮☮☮☮☮☮☮☮☮
Cameras: Sony ILCE-7RM2, Spotmatics II, F, and ESII, Nikon P4
Lenses:
M42 Asahi Optical Co., Takumar 1:4 f=35mm, 1:2 f=58mm (Sonnar), 1:2.4 f=58mm (Heliar), 1:2.2 f=55mm (Gaussian), 1:2.8 f=105mm (Model I), 1:2.8/105 (Model II), 1:5.6/200, Tele-Takumar 1:5.6/200, 1:6.3/300, Macro-Takumar 1:4/50, Auto-Takumar 1:2.3 f=35, 1:1.8 f=55mm, 1:2.2 f=55mm, Super-TAKUMAR 1:3.5/28 (fat), 1:2/35 (Fat), 1:1.4/50 (8-element), Super-Multi-Coated Fisheye-TAKUMAR 1:4/17, Super-Multi-Coated TAKUMAR 1:4.5/20, 1:3.5/24, 1:3.5/28, 1:2/35, 1:3.5/35, 1:1.8/85, 1:1.9/85 1:2.8/105, 1:3.5/135, 1:2.5/135 (II), 1:4/150, 1:4/200, 1:4/300, 1:4.5/500, Super-Multi-Coated Macro-TAKUMAR 1:4/50, 1:4/100, Super-Multi-Coated Bellows-TAKUMAR 1:4/100, SMC TAKUMAR 1:1.4/50, 1:1.8/55
M42 Carl Zeiss Jena Flektogon 2.4/35
Contax Carl Zeiss Vario-Sonnar T* 28-70mm F3.5-4.5
Pentax K-mount SMC PENTAX-A ZOOM 1:3.5 35~105mm, SMC PENTAX ZOOM 1:4 45~125mm
Nikon Micro-NIKKOR-P-C Auto 1:3.5 f=55mm, NIKKOR-P Auto 105mm f/2.5 Pre-AI (Sonnar), Micro-NIKKOR 105mm 1:4 AI, NIKKOR AI-S 35-135mm f/3,5-4,5
Tamron SP 17mm f/3.5 (51B), Tamron SP 17mm f/3.5 (151B), SP 500mm f/8 (55BB), SP 70-210mm f/3.5 (19AH)
Vivitar 100mm 1:2.8 MC 1:1 Macro Telephoto (Kiron)
|
|
| Back to top |
|
|
GordoNorte
Joined: 14 Mar 2024
Posts: 6
Location: Alberta, Canada
|
| Posted: Thu Mar 14, 2024 8:04 pm Post subject: |
|
|
GordoNorte wrote:
| visualopsins wrote: |
| GordoNorte wrote: |
| visualopsins wrote: |
| RokkorDoctor wrote: |
| ...Since you already rotated the element such that the chip is outside the frame, I would probably use a permanent marker / sharpie to paint the chipped area black and reduce internal reflections.... |
Not a wide angle lens so the chip will be outside the frame only when lens is stopped down...correct? |
I'm not sure if that is the case, but I thought that light passing through that fringe area is discarded for being outside the sensor envelope...
pic |
A light source at center of frame shines rays all over the front element, which are all focused to the center of the sensor regardless of sensor size. Aperture iris cuts off the rays from the front lens circumference.
https://philschatz.com/physics-book/resources/Figure%2026_06_05.jpg |
hum... makes complete sense, that was a wrong assumption of mine, I must have read somewhere... Though I didn't notice anything blatantly off in the pictures I took (other than glare in some)... granted I had lots of light and my camera is a bit old (D3) so not the greatest resolution. I shouldn't complain given is was a project with no guarantees it will render good images.
Cheers!
Art. |
|
| Back to top |
|
|
Lloydy

Joined: 02 Sep 2009
Posts: 7794
Location: Ironbridge. UK.
Expire: 2022-01-01
|
| Posted: Thu Mar 14, 2024 11:04 pm Post subject: |
|
|
Lloydy wrote:
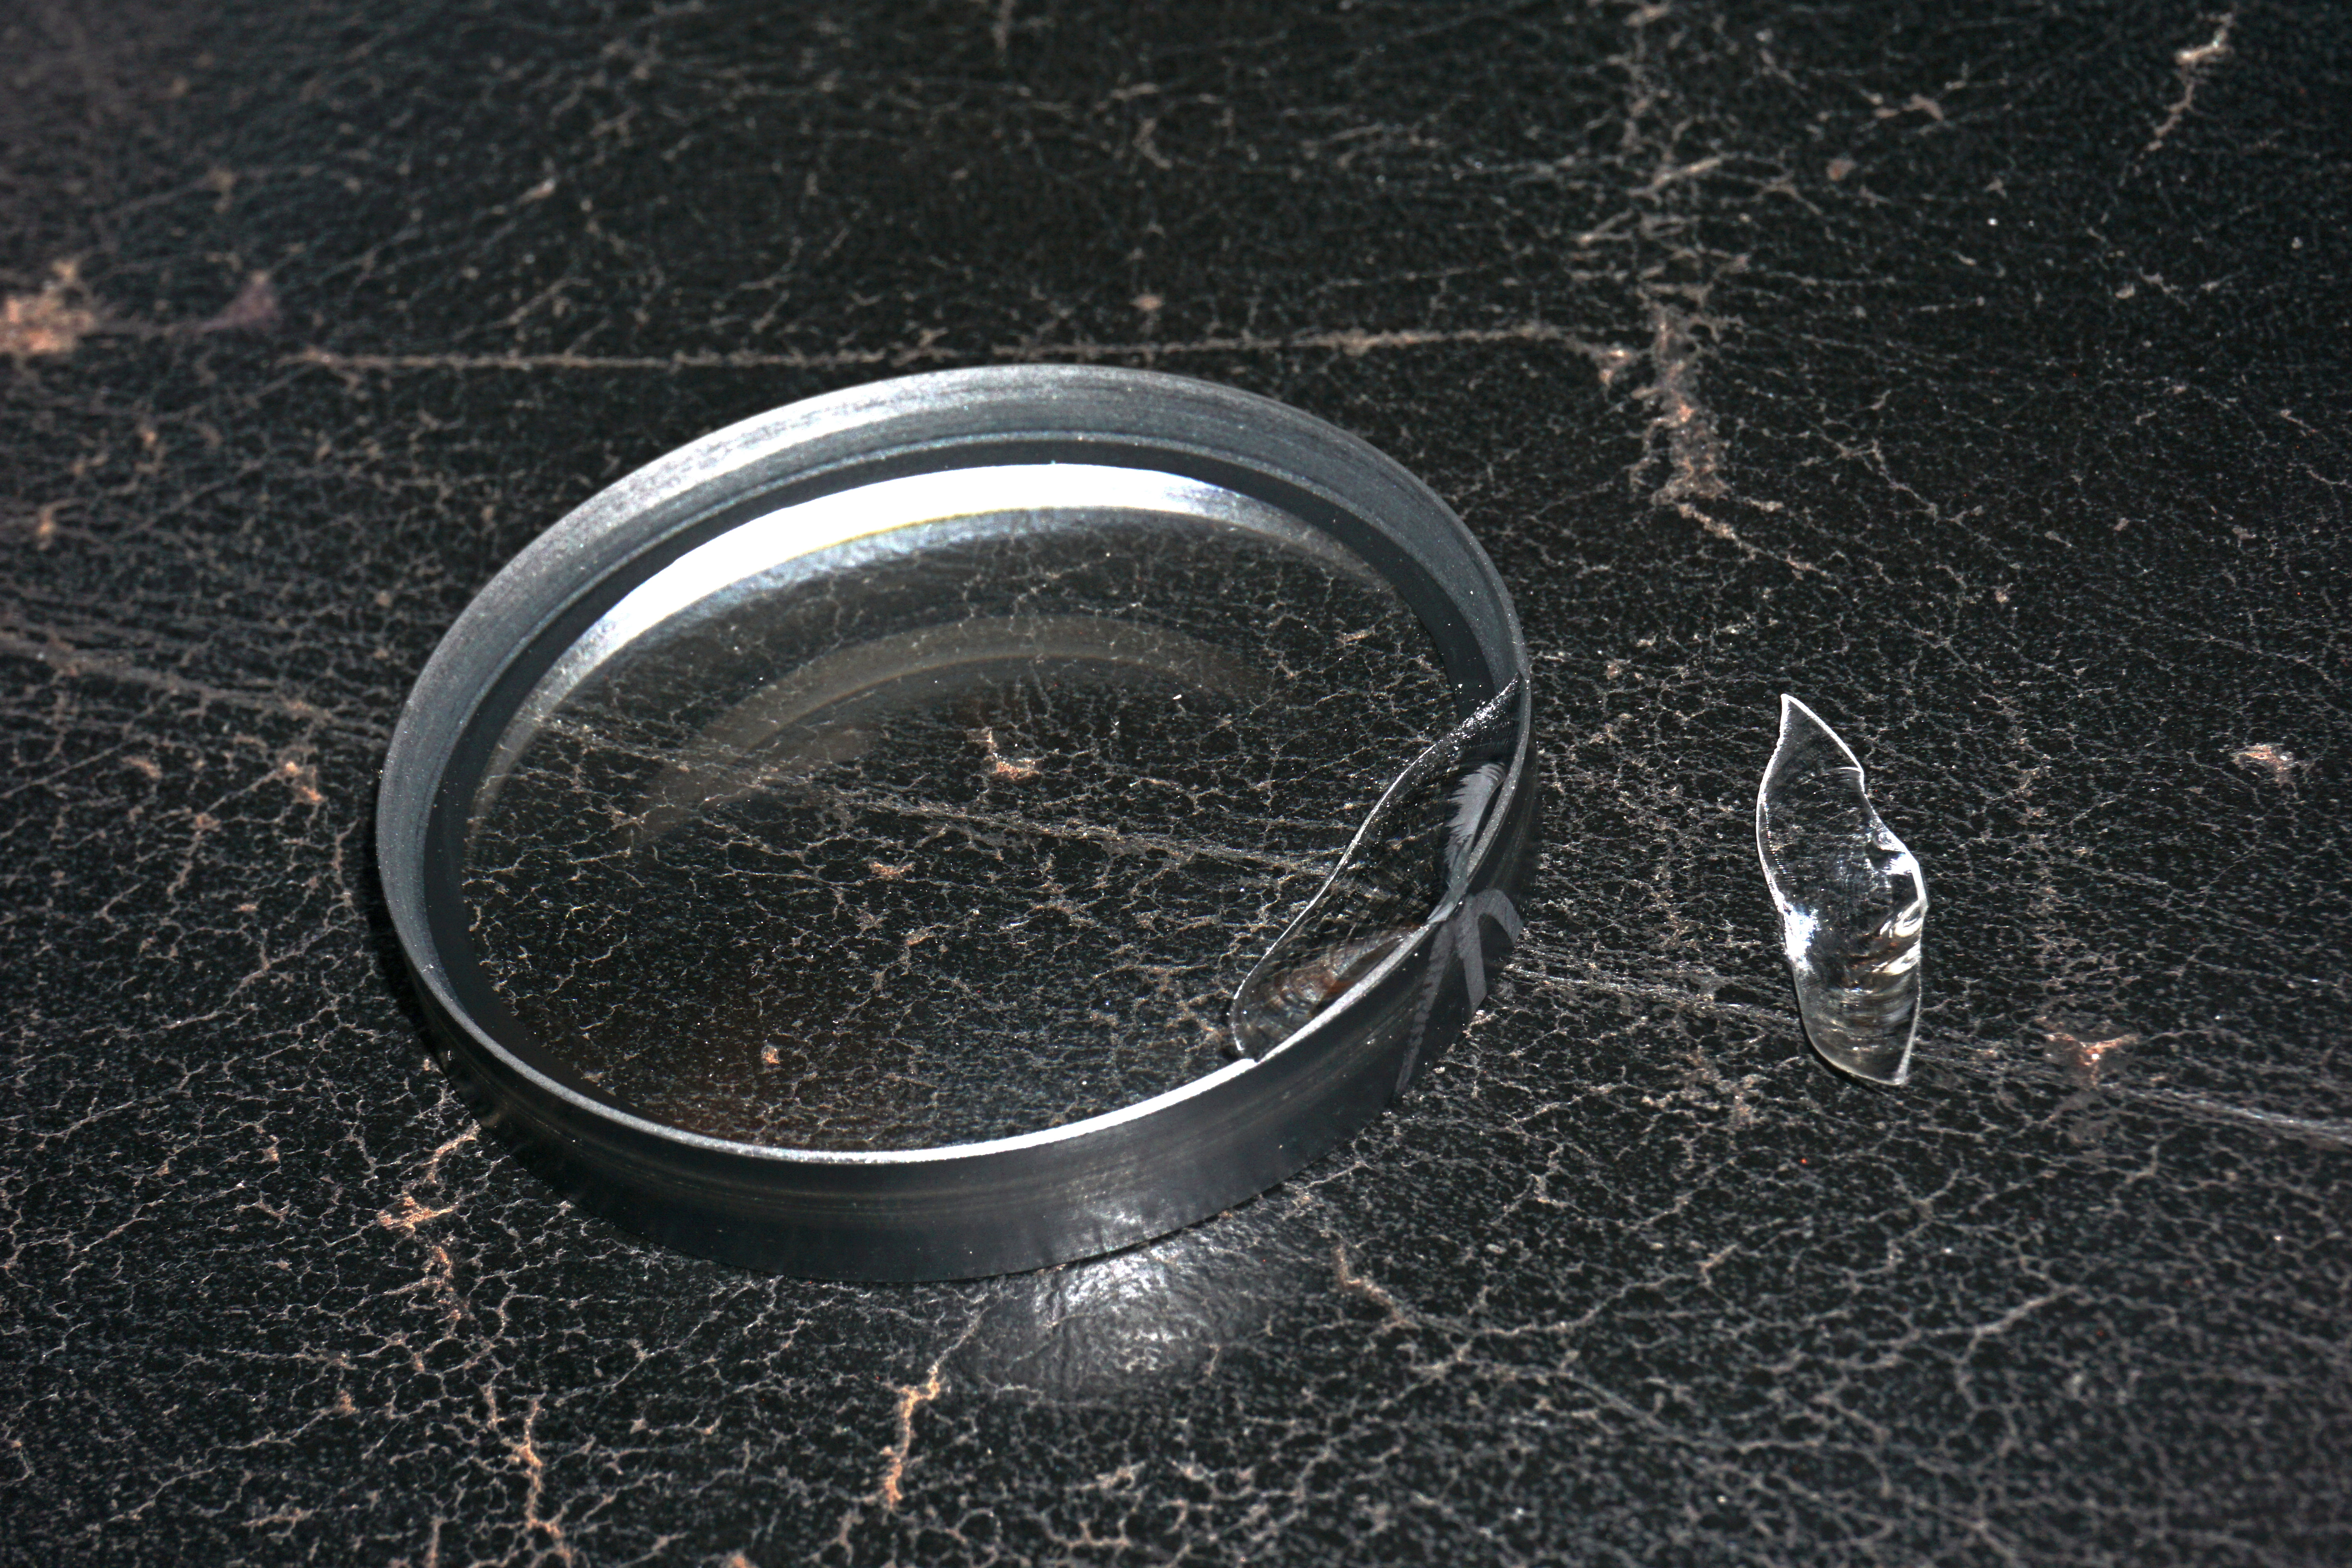
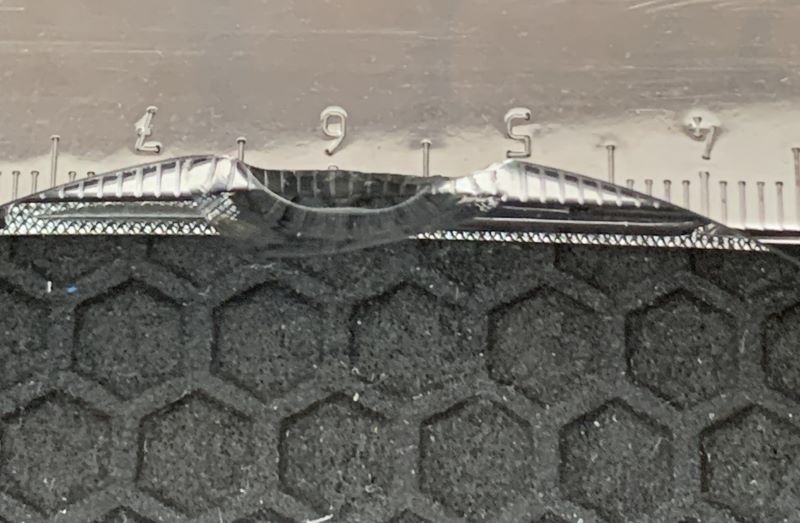
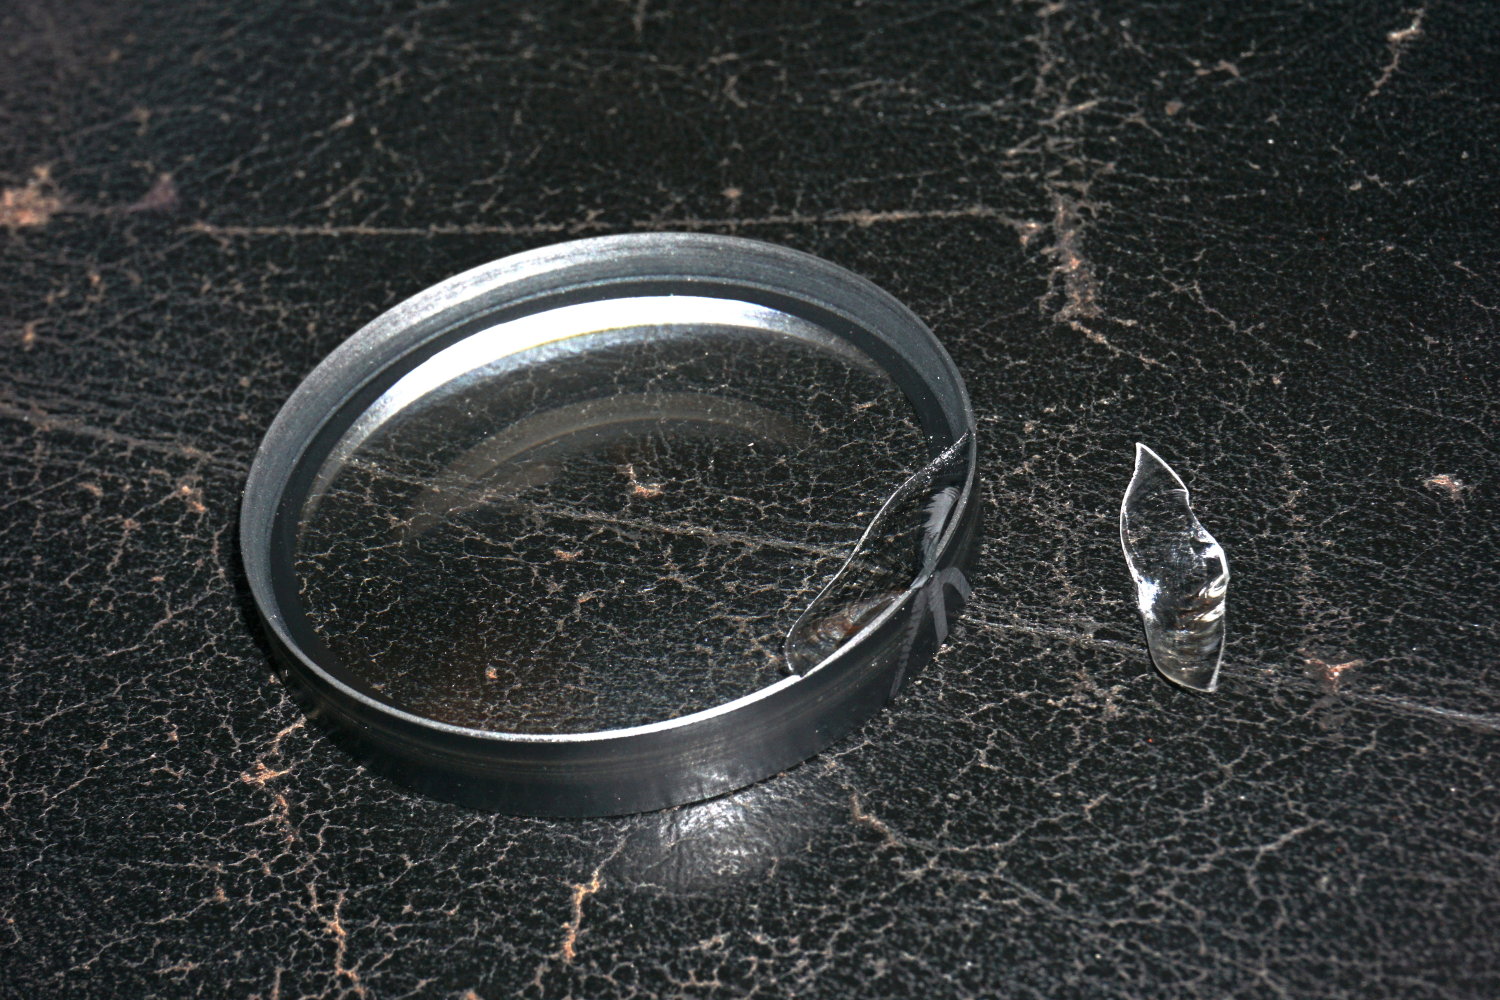
It's surprising how fragile lenses can be, this is from an old Meyer Optic Gorlitz 200 / 4 which I dropped from maybe 10 inches onto the plastic lid of a storage box. But sometimes I have pretty much hammered lenses out of bodies.
_________________
LENSES & CAMERAS FOR SALE.....
I have loads of stuff that I have to get rid of, if you see me commenting about something I have got and you want one, ask me.
My Flickr https://www.flickr.com/photos/mudplugga/
My ipernity -
http://www.ipernity.com/home/294337 |
|
| Back to top |
|
|
RokkorDoctor
Joined: 27 Nov 2021
Posts: 1424
Location: Kent, UK
Expire: 2025-05-01
|
| Posted: Fri Mar 15, 2024 10:25 am Post subject: |
|
|
RokkorDoctor wrote:
| visualopsins wrote: |
| RokkorDoctor wrote: |
| ...Since you already rotated the element such that the chip is outside the frame, I would probably use a permanent marker / sharpie to paint the chipped area black and reduce internal reflections.... |
Not a wide angle lens so the chip will be outside the frame only when lens is stopped down...correct? |
Correct, when shooting wide-open (or near-wide-open) the chip will still be inside the envelope of light used to form the image. When stopped down the chipped area will gradually disappear out of the frame if the chip has been rotated to be either on top or bottom orientation of the lens.
Judging from my own copy of this particular lens and the images shown, I would estimate the chip moves "out of sight" from around f/8 or f/11.
After painting the chipped area black the most obvious impact will be on the bokeh-balls at wider apertures, which will look pretty distracting.
If this lens is used like it often is, at f/8~ish for centrally framed subjects such as birds/wildlife, it will still be quite useable I suspect.
When used from f/2.8 to f/5.6 its usability will very much depend on the subject matter and lighting.
_________________
Mark
SONY A7S, A7RII + dust-sealed modded Novoflex/Fotodiox/Rayqual MD-NEX adapters
Minolta SR-1, SRT-101/303, XD7/XD11, XGM, X700
Bronica SQAi
Ricoh GX100
Minolta majority of all Rokkor SR/AR/MC/MD models made
Sigma 14mm/3.5 for SR mount
Tamron SP 60B 300mm/2.8 (Adaptall)
Samyang T-S 24mm/3.5 (Nikon mount, DIY converted to SR mount)
Schneider-Kreuznach PC-Super-Angulon 28mm/2.8 (SR mount)
Bronica PS 35/40/50/65/80/110/135/150/180/200/250mm |
|
| Back to top |
|
|
GordoNorte
Joined: 14 Mar 2024
Posts: 6
Location: Alberta, Canada
|
| Posted: Fri Mar 15, 2024 3:00 pm Post subject: |
|
|
GordoNorte wrote:
| Lloydy wrote: |
| It's surprising how fragile lenses can be, this is from an old Meyer Optic Gorlitz 200 / 4 which I dropped from maybe 10 inches onto the plastic lid of a storage box. But sometimes I have pretty much hammered lenses out of bodies. |
wow, nice flint.. I mean, bummer... was it still usable afterwards? That makes me think that maybe mine got damaged when someone tried to pry it out. This particular element was inside some sort of a cartridge with another element and tolerances were quite tight that I had to flip upside down and negotiate a bit to dislodge...
Anyways, I'm ordering the tool so I can take it apart again, paint and somehow seal the edge from further flaking and give it a thorough clean.
Cheers! |
|
| Back to top |
|
|
RokkorDoctor
Joined: 27 Nov 2021
Posts: 1424
Location: Kent, UK
Expire: 2025-05-01
|
| Posted: Fri Mar 15, 2024 3:38 pm Post subject: |
|
|
RokkorDoctor wrote:
| GordoNorte wrote: |
| Lloydy wrote: |
| It's surprising how fragile lenses can be, this is from an old Meyer Optic Gorlitz 200 / 4 which I dropped from maybe 10 inches onto the plastic lid of a storage box. But sometimes I have pretty much hammered lenses out of bodies. |
wow, nice flint.. I mean, bummer... was it still usable afterwards? That makes me think that maybe mine got damaged when someone tried to pry it out. This particular element was inside some sort of a cartridge with another element and tolerances were quite tight that I had to flip upside down and negotiate a bit to dislodge...
Anyways, I'm ordering the tool so I can take it apart again, paint and somehow seal the edge from further flaking and give it a thorough clean.
Cheers! |
Yes, very plausible that someone tried to "pry" the element out with a thin flat object like a thin screwdriver. Never try to do that.
_________________
Mark
SONY A7S, A7RII + dust-sealed modded Novoflex/Fotodiox/Rayqual MD-NEX adapters
Minolta SR-1, SRT-101/303, XD7/XD11, XGM, X700
Bronica SQAi
Ricoh GX100
Minolta majority of all Rokkor SR/AR/MC/MD models made
Sigma 14mm/3.5 for SR mount
Tamron SP 60B 300mm/2.8 (Adaptall)
Samyang T-S 24mm/3.5 (Nikon mount, DIY converted to SR mount)
Schneider-Kreuznach PC-Super-Angulon 28mm/2.8 (SR mount)
Bronica PS 35/40/50/65/80/110/135/150/180/200/250mm |
|
| Back to top |
|
|
GordoNorte
Joined: 14 Mar 2024
Posts: 6
Location: Alberta, Canada
|
| Posted: Fri Mar 15, 2024 4:01 pm Post subject: |
|
|
GordoNorte wrote:
| RokkorDoctor wrote: |
| visualopsins wrote: |
| RokkorDoctor wrote: |
| ...Since you already rotated the element such that the chip is outside the frame, I would probably use a permanent marker / sharpie to paint the chipped area black and reduce internal reflections.... |
Not a wide angle lens so the chip will be outside the frame only when lens is stopped down...correct? |
Correct, when shooting wide-open (or near-wide-open) the chip will still be inside the envelope of light used to form the image. When stopped down the chipped area will gradually disappear out of the frame if the chip has been rotated to be either on top or bottom orientation of the lens.
Judging from my own copy of this particular lens and the images shown, I would estimate the chip moves "out of sight" from around f/8 or f/11.
After painting the chipped area black the most obvious impact will be on the bokeh-balls at wider apertures, which will look pretty distracting.
If this lens is used like it often is, at f/8~ish for centrally framed subjects such as birds/wildlife, it will still be quite useable I suspect.
When used from f/2.8 to f/5.6 its usability will very much depend on the subject matter and lighting. |
The tiny birds I'm trying to capture are rather elusive and I can't get too close without spooking them. The idea of buying this 2.8 was to use with teles, 1.6x, maybe 2x? My D3 limits how much I can crop before the image suffers from low res... well I'm not peddling print to natgeo so does not need to be perfect. I'll keep playing with it!
Side project is playing with MFT, I managed to get a set of 10ea or so misc. adaptors, now looking for an MFT camera.
Cheers, |
|
| Back to top |
|
|
kiddo
Joined: 29 Jun 2018
Posts: 1264
|
| Posted: Wed May 08, 2024 9:58 pm Post subject: |
|
|
kiddo wrote:
Some elements are very even fitted because the paint of the inner body ,or because some element might have had paint applied on the lateral sides to prevent reflection; removing some of these elements are not always easy I guess, sometimes there's risk to damage the glass , I guess alcohol it should be applied before removing the element. |
|
| Back to top |
|
|
Lloydy
Joined: 02 Sep 2009
Posts: 7794
Location: Ironbridge. UK.
Expire: 2022-01-01
|
| Posted: Wed May 08, 2024 10:16 pm Post subject: |
|
|
Lloydy wrote:
| kiddo wrote: |
| Some elements are very even fitted because the paint of the inner body ,or because some element might have had paint applied on the lateral sides to prevent reflection; removing some of these elements are not always easy I guess, sometimes there's risk to damage the glass , I guess alcohol it should be applied before removing the element. |
Wherever possible I use a suction tool to lift elements out, it's easier to keep them square with the sucker in the center.
_________________
LENSES & CAMERAS FOR SALE.....
I have loads of stuff that I have to get rid of, if you see me commenting about something I have got and you want one, ask me.
My Flickr https://www.flickr.com/photos/mudplugga/
My ipernity -
http://www.ipernity.com/home/294337 |
|
| Back to top |
|
|
kiddo
Joined: 29 Jun 2018
Posts: 1264
|
| Posted: Thu May 09, 2024 2:27 pm Post subject: |
|
|
kiddo wrote:
| Lloydy wrote: |
| kiddo wrote: |
| Some elements are very even fitted because the paint of the inner body ,or because some element might have had paint applied on the lateral sides to prevent reflection; removing some of these elements are not always easy I guess, sometimes there's risk to damage the glass , I guess alcohol it should be applied before removing the element. |
Wherever possible I use a suction tool to lift elements out, it's easier to keep them square with the sucker in the center. |
Even Nikon recommend using specific paint for the edges of the elements (specific lenses. Like 80-200mm 2.8 Ed) ,so in case that paint wasn't dry before inserting the elements, using suction cup would not allow removing it , alcohol or acetone might me needed to free up the elements . Sometimes people might use brute force to remove elements (screwdriver etc) and the results might be the same like this case. |
|
| Back to top |
|
|
|
|