| View previous topic :: View next topic |
| Author |
Message |
Mr.Bittacy

Joined: 16 Jun 2019
Posts: 76
|
 Posted: Thu Feb 20, 2020 5:15 am Post subject: Nikkor AIS 300 2.8 Disassembly Posted: Thu Feb 20, 2020 5:15 am Post subject: Nikkor AIS 300 2.8 Disassembly |
 |
|
Mr.Bittacy wrote:
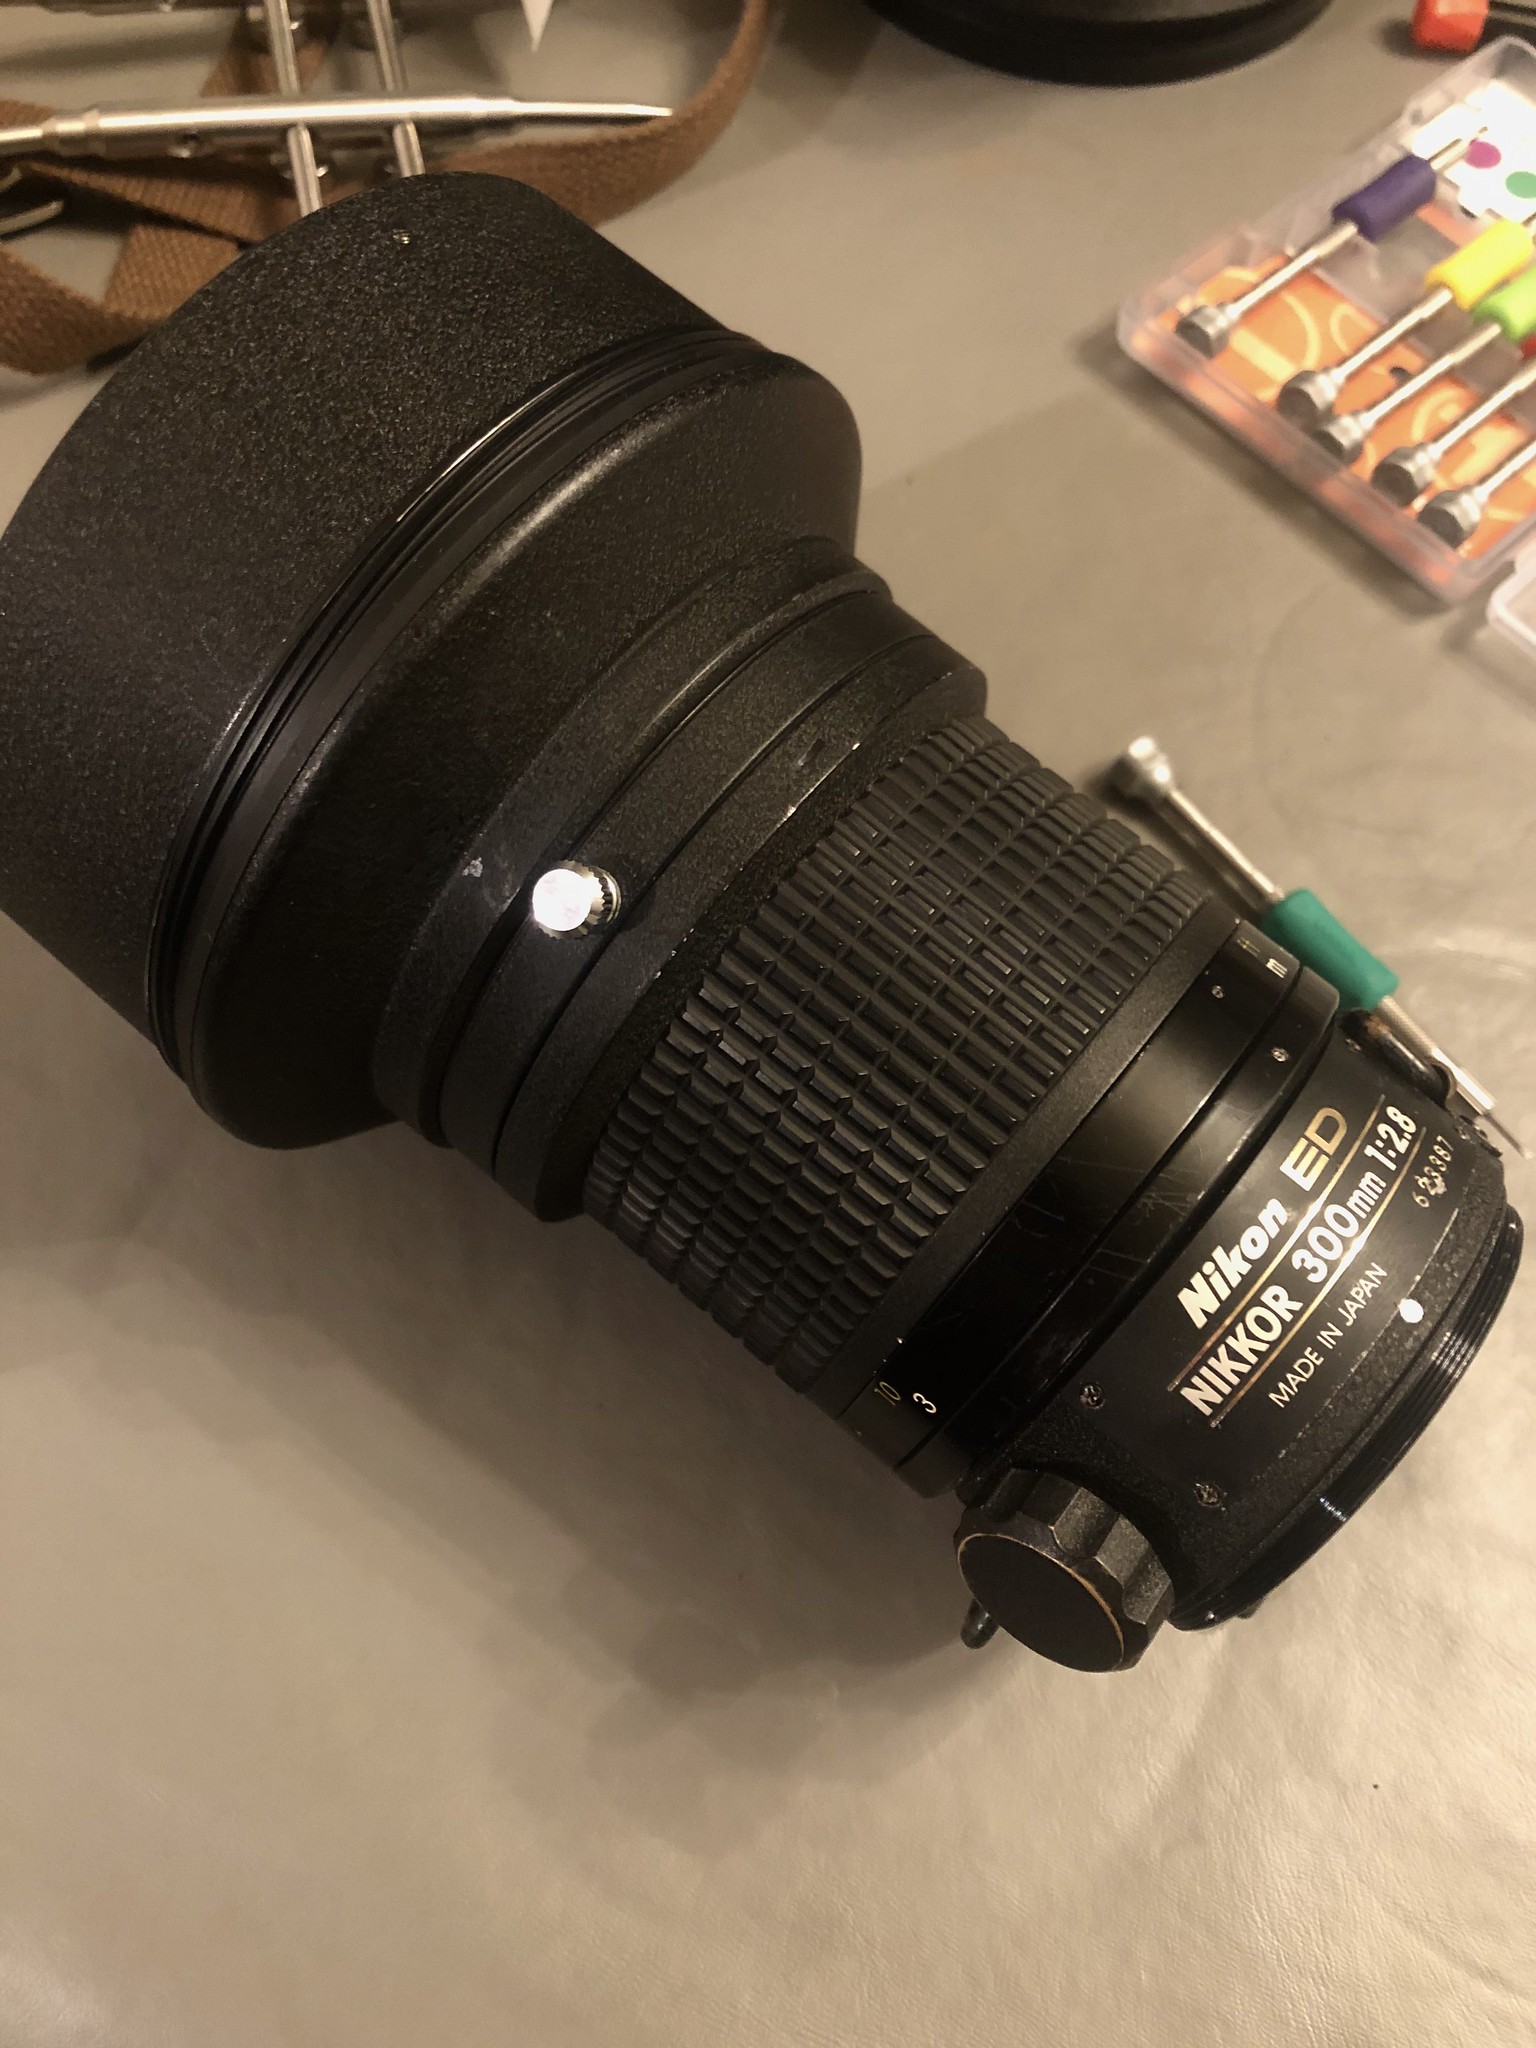
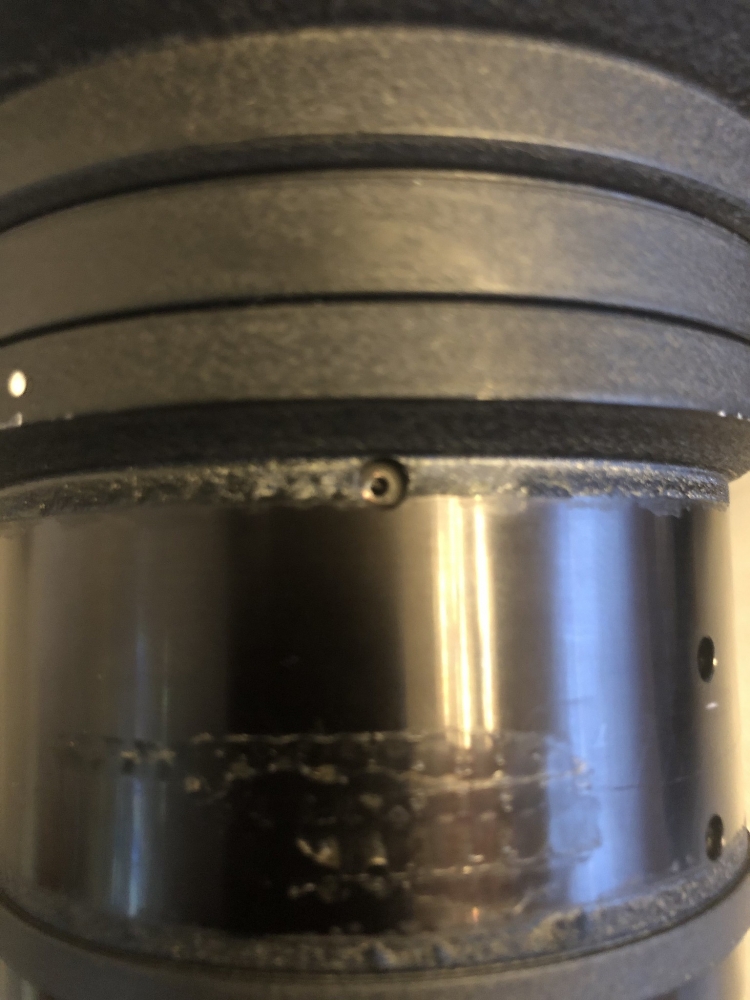
I know its kind of a long shot but I have not been able to find any information anywhere. i am wanting to disassemble my Nikkor 300 2.8, it has a little mold on the focusing element that shows up when the lens is stopped down, also when gripping the front barrel and rear of the lens there is an annoying wiggle I would like to eliminate. The problem is that I am stumped on how to proceed. It is relatively easy to get to the point shown in the pictures below. The two pins on the rear were lacquered in place, I even removed them but it seemed to be a dead end. Has anyone had one of these lenses disassembled past this point or know anyone that has? Any help or pointers are greatly appreciated!


 |
|
| Back to top |
|
 |
Mr.Bittacy
Joined: 16 Jun 2019
Posts: 76
|
| Posted: Sun Apr 05, 2020 2:58 am Post subject: |
|
|
Mr.Bittacy wrote:
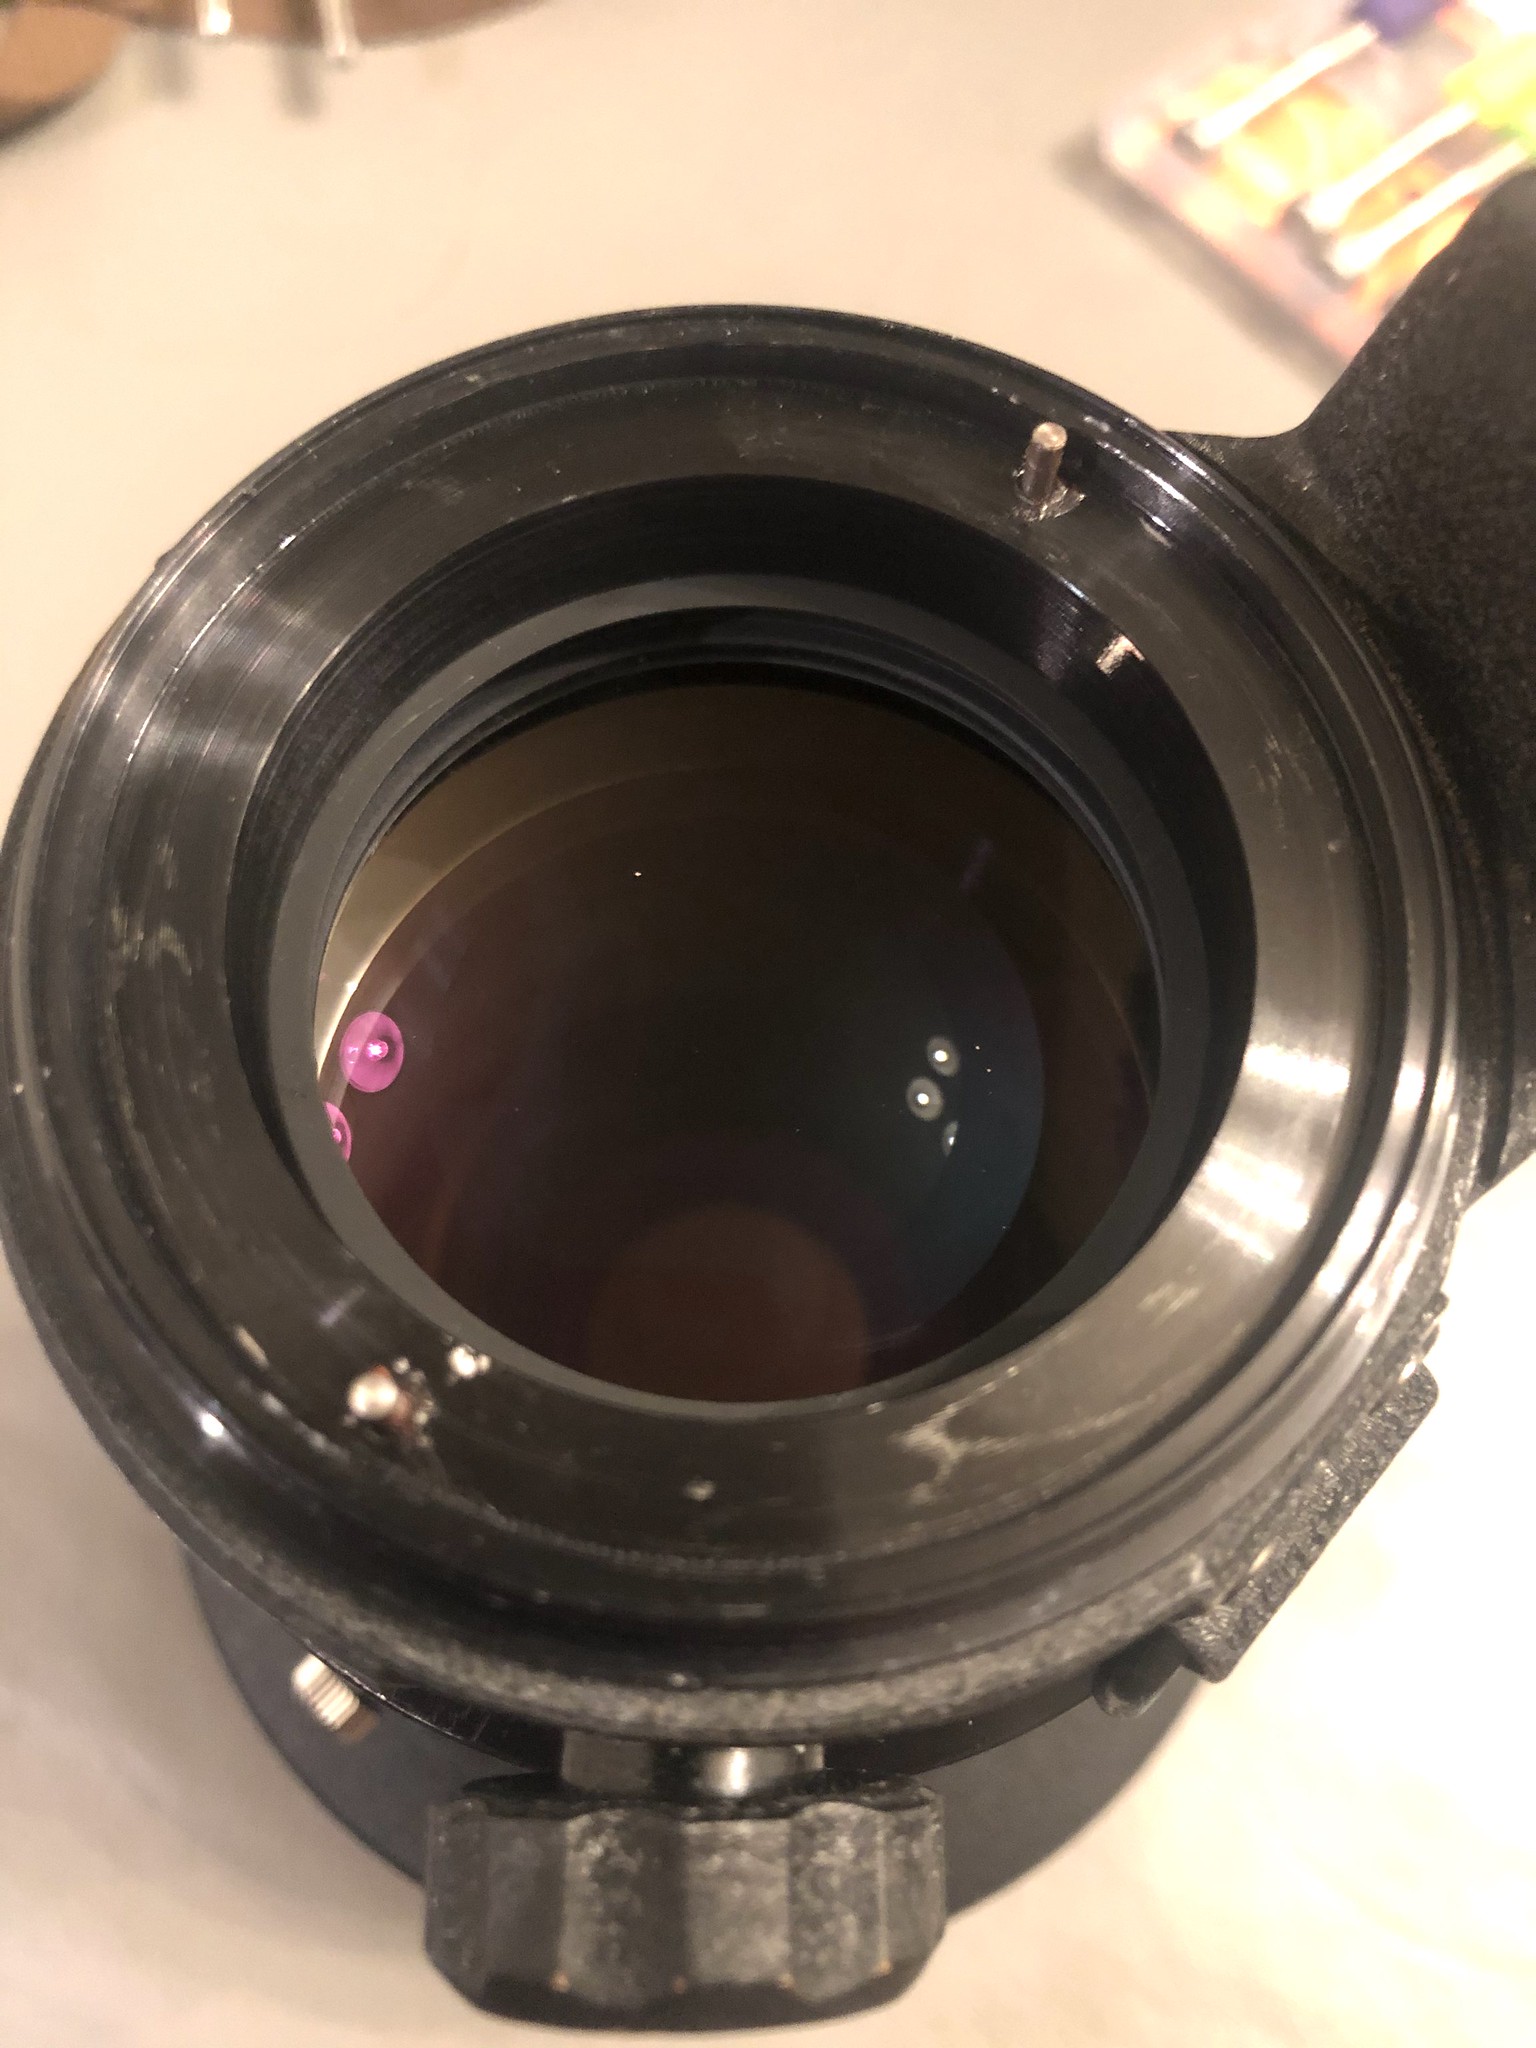
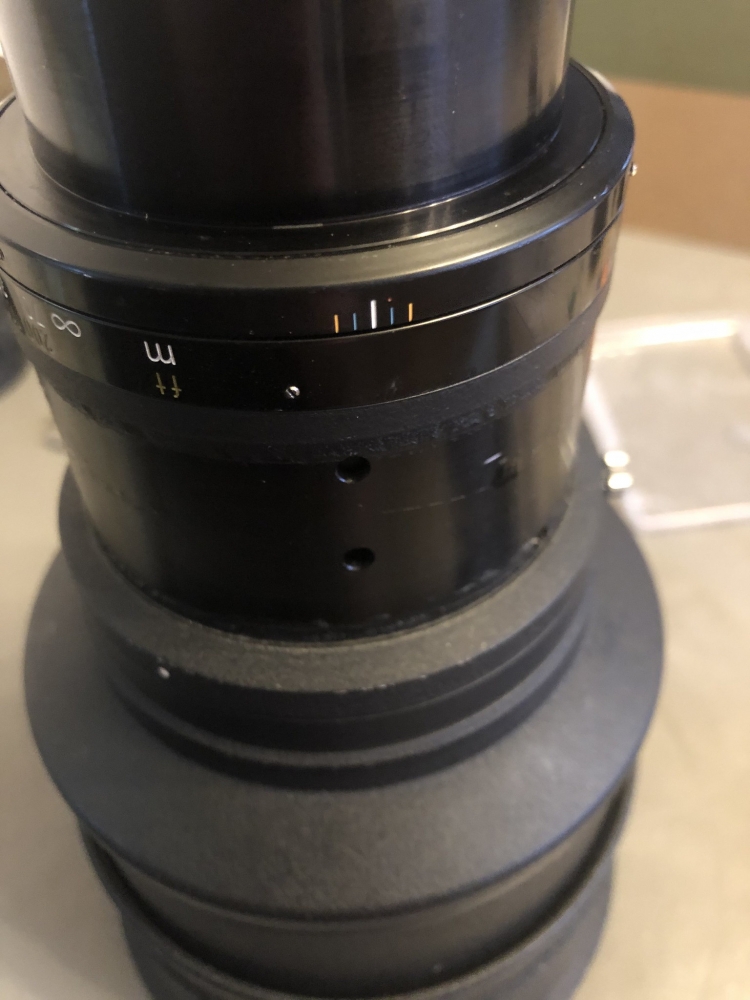
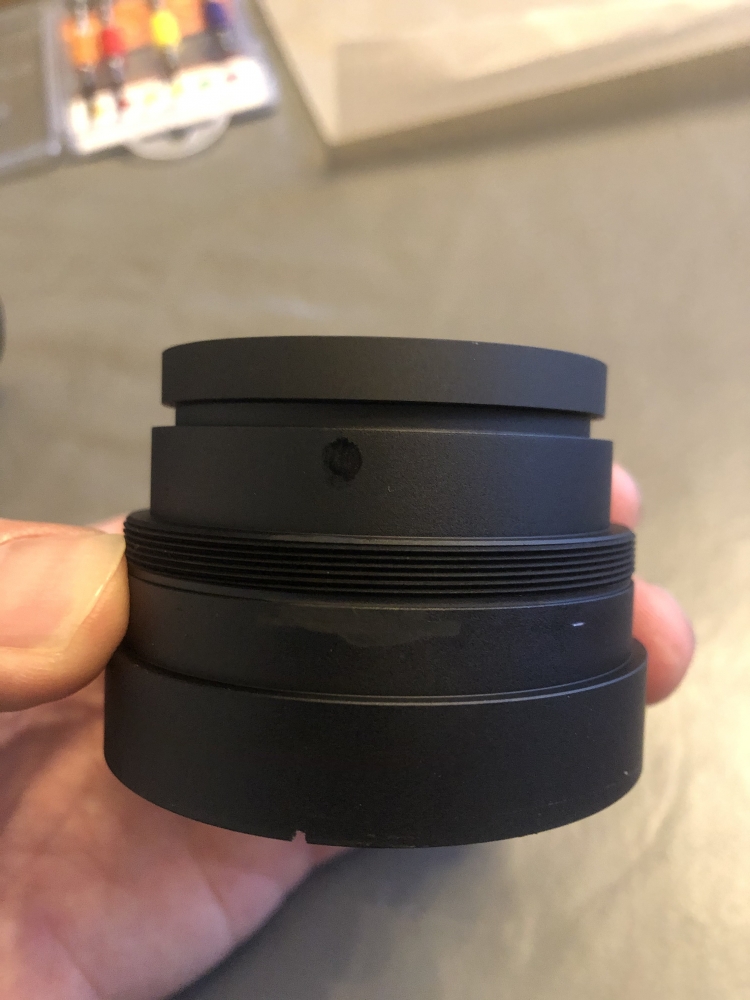
Finally figured it out and got the mold cleaned out. Since there is absolutely no information on how to do this available online here are a few pictures and basic guidance. The first step I did was to loosed the three set screws on the aperture assembly, these are the ones closest to the tripod mount ( I don't have a picture of this because it is easy to figure out) and then screwed the aperture and drop in filter assembly off ( there is a spacer between these pieces so make sure you don't lose it. Next I loosened the three set screws just below the hood when it is extended and unscrewed the front element assembly ( Pictured below)

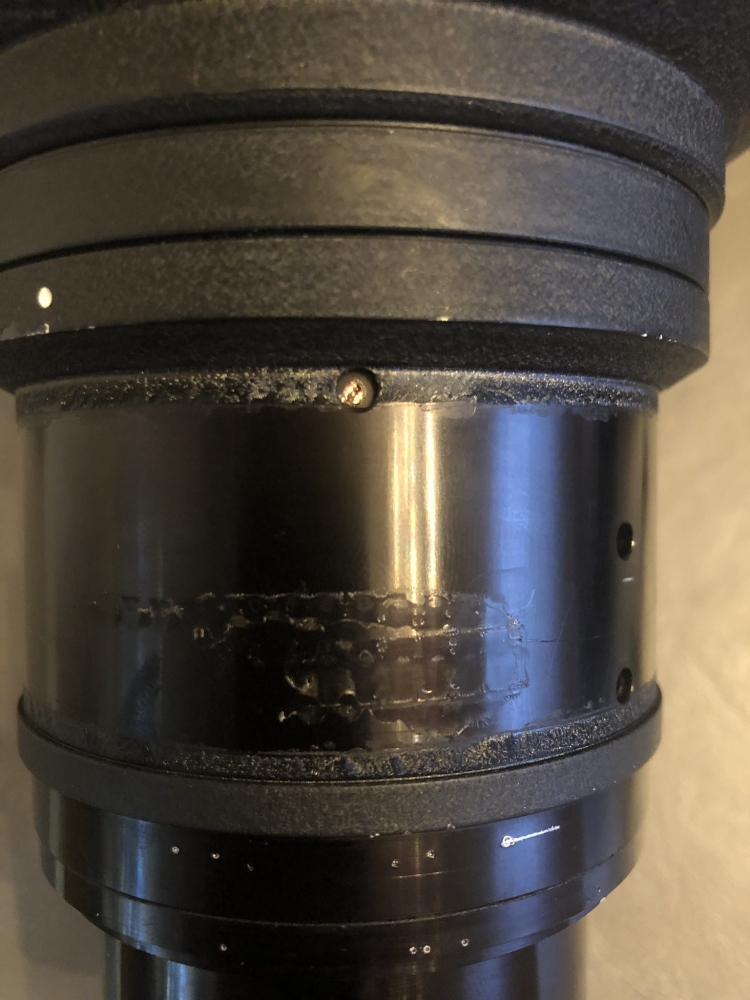
Then I used some nail polish remover to remove the sealant holding in the two set pins shown in the earlier picture and removed them. Then using the two holes left behind use a lens spanner to unscrew this collar, make sure your spanner does not go into the holes too far or it will lock to the rear element assembly (My initial mistake). The picture below shows the pins out of this collar. There is a spacer between this collar and the focus group so don't lose it.
. 
Then remove the index collar and distance collar, both of which have three set screws
Next use a toothpick to loosen and remove the rubber focus grip. Mine split due to the age of it.
Now that the grip is removed there are holes near the top of the focus ring, don't mess with the other ones unless you want to disassemble the helicoid and you will probably want to do that later, rotate the focus ring and remove three set screws, there is sealant on them so use a little nail polish remover to loosen it.

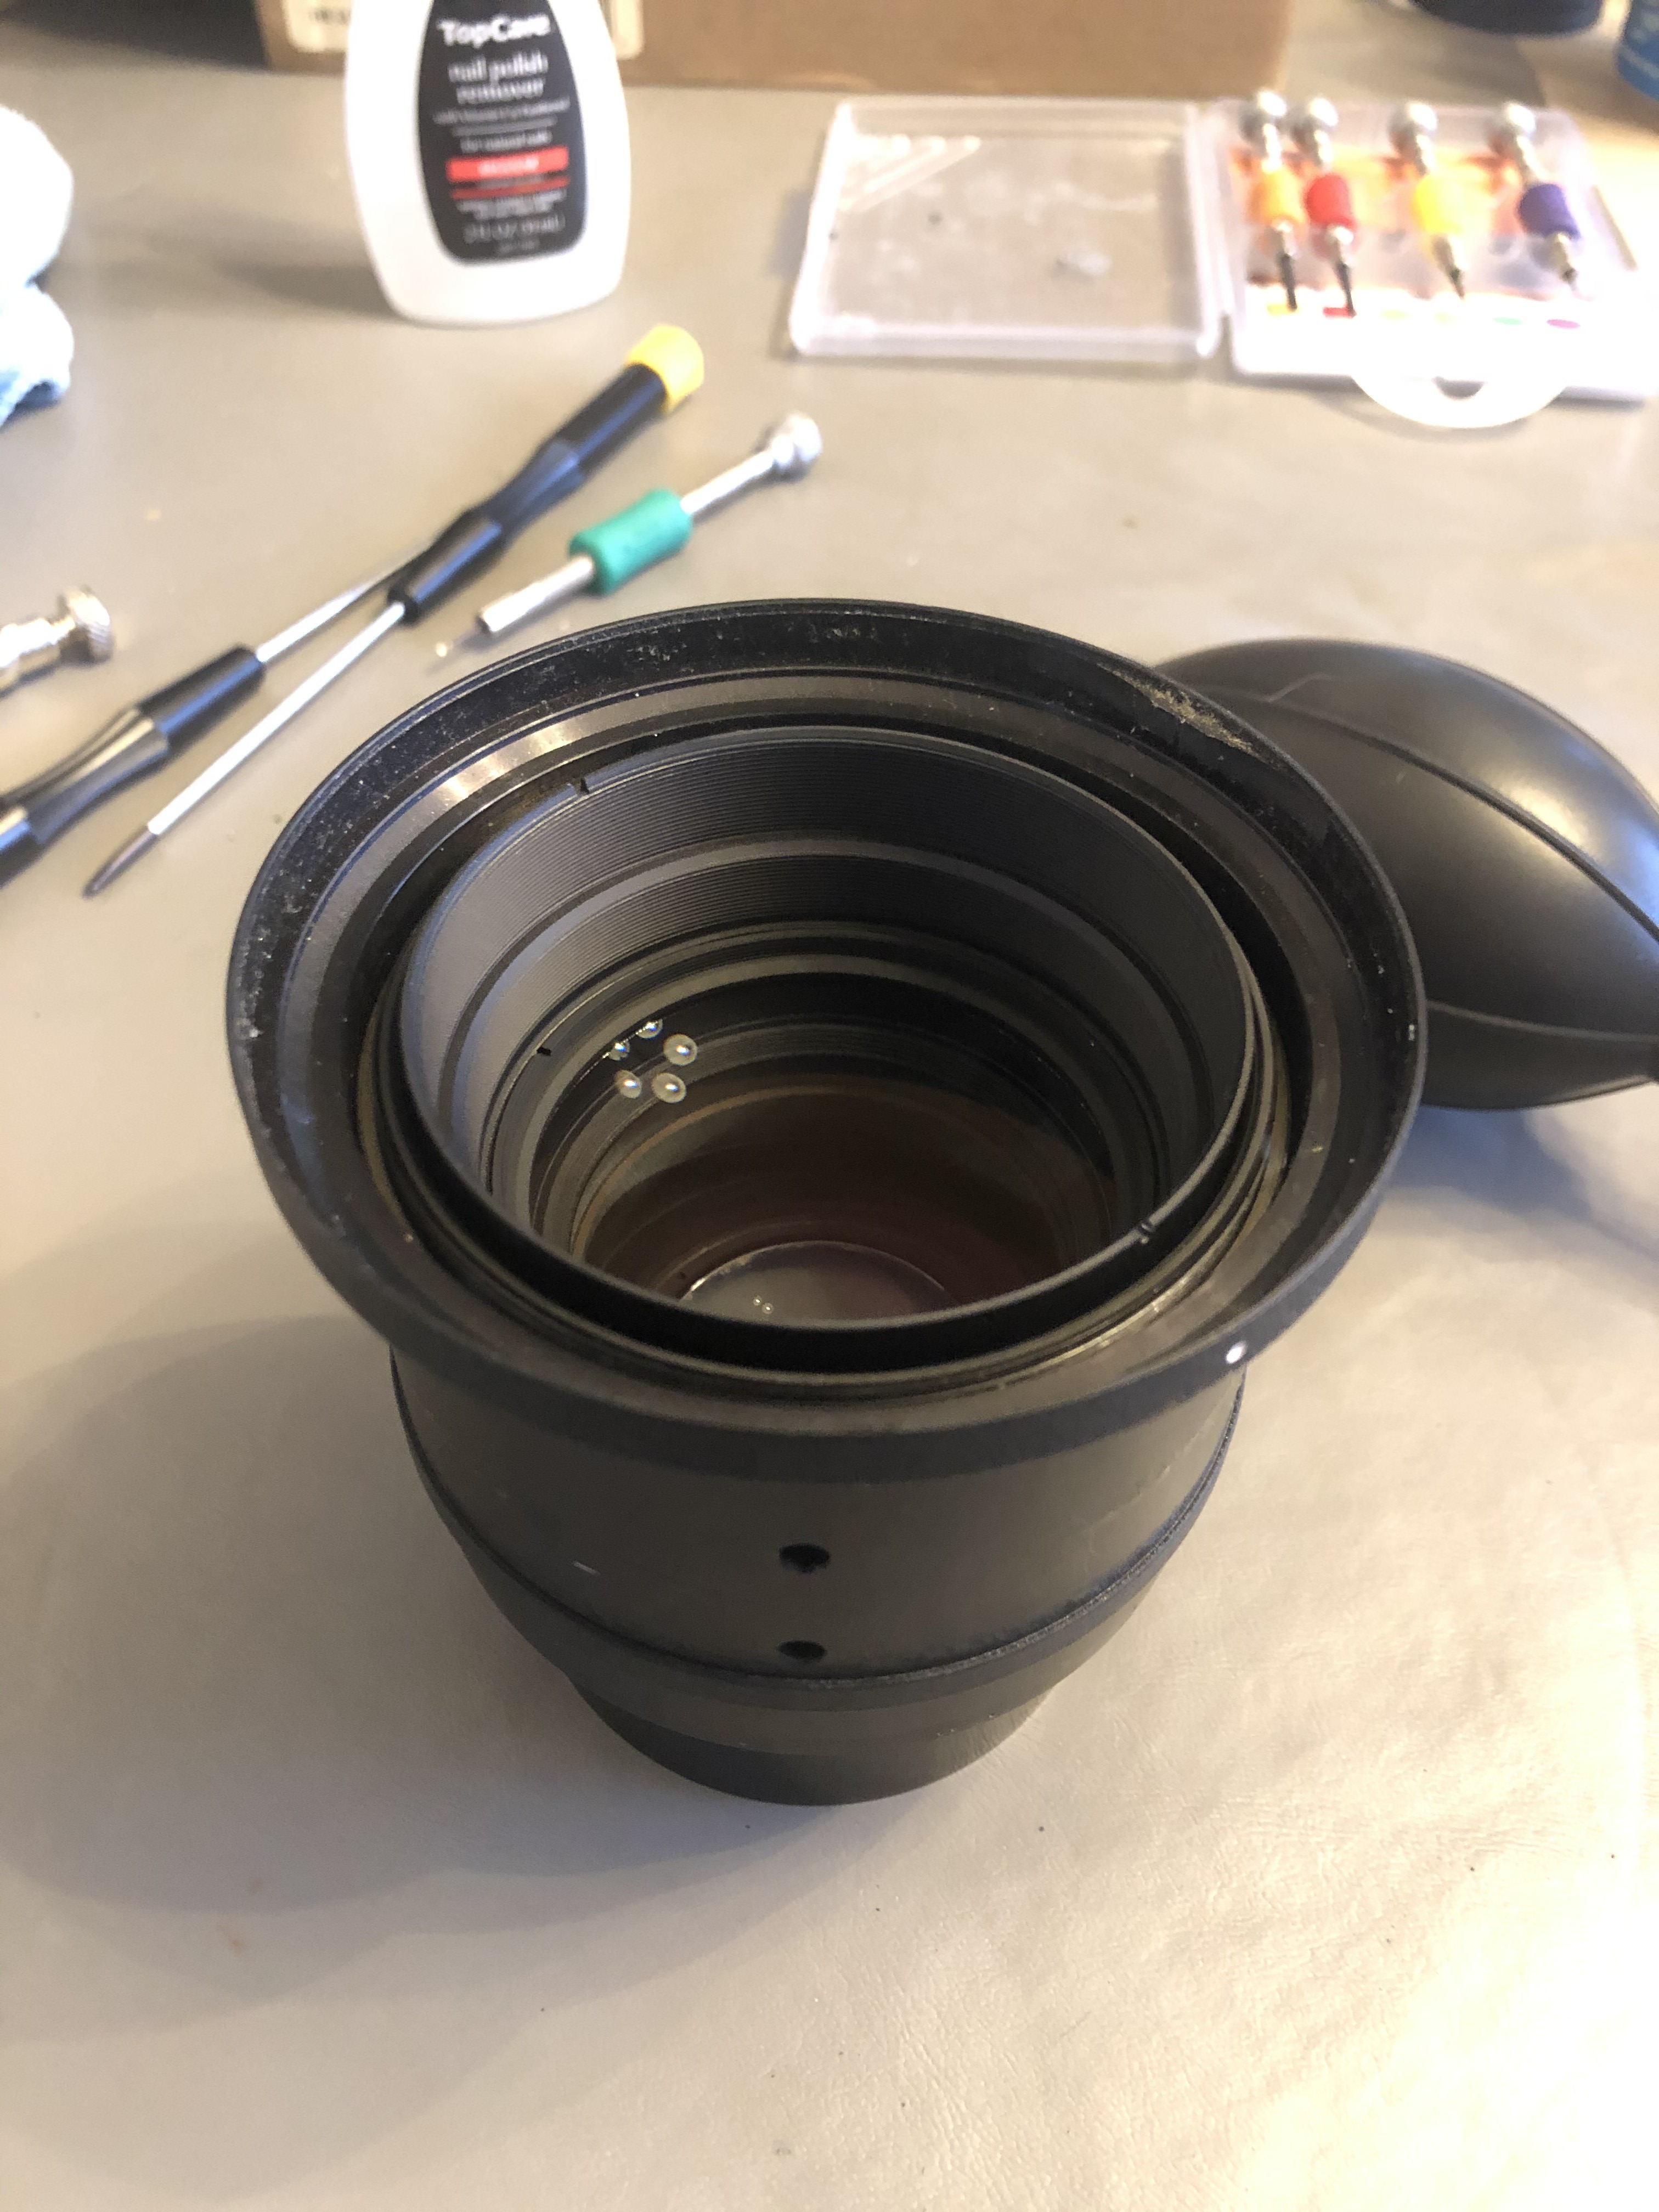
Now that these screws are removed you can unscrew the front element housing from the focusing group

Now use your lens spanner to unscrew the lens element group and clean what you need to clean.
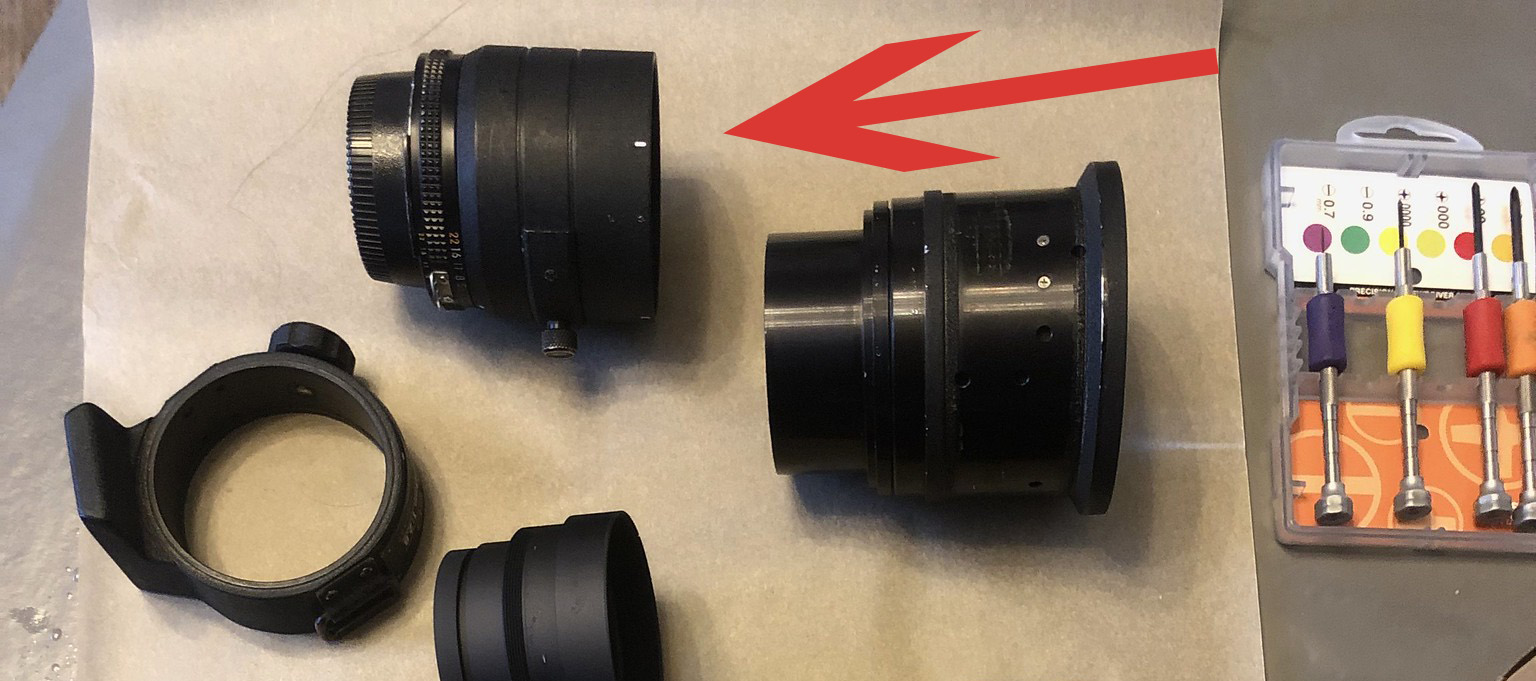
Here are all the pieces that I removed. Reassembly is in reverse.
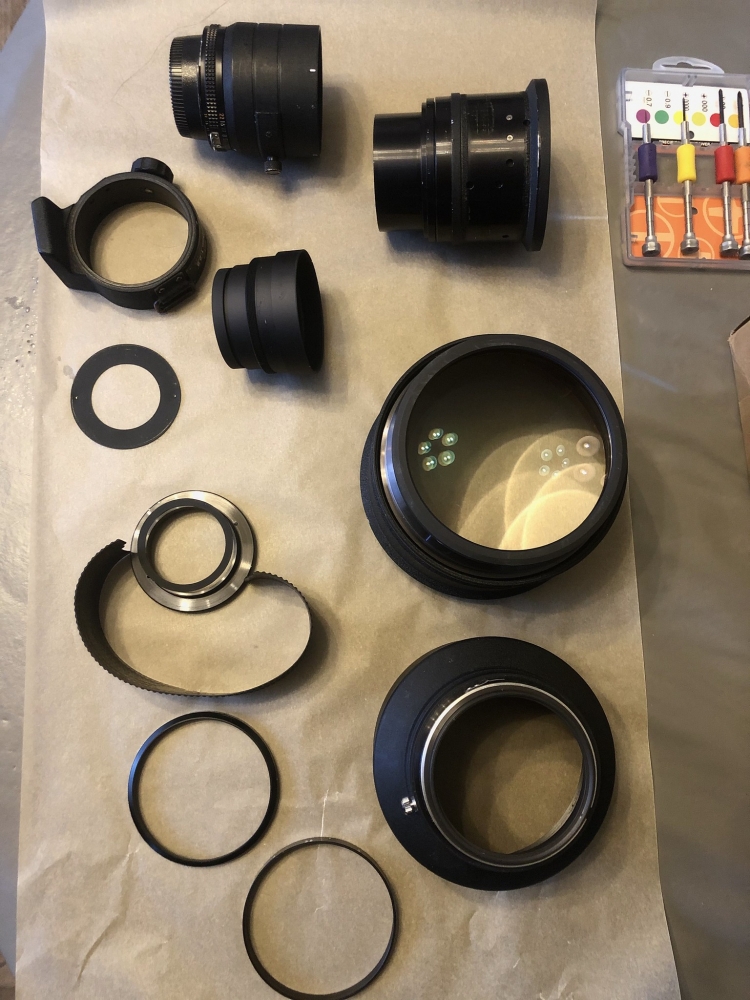
This is not a comprehensive guide and is just a guideline. As usual I take no responsibility if you ruin your lens. If you have not repaired other lenses this is probably not the first one you want to do. Mine is clean now and I can stop down and take pictures of the sky no problem. Really happy I got it cleaned even if it took a couple months to figure out. |
|
| Back to top |
|
|
marcusBMG

Joined: 07 Dec 2012
Posts: 1318
Location: Conwy N Wales
|
| Posted: Sun Apr 05, 2020 12:55 pm Post subject: |
|
|
marcusBMG wrote:
Good work, thanks for posting the info (probably belongs in repairs or diy section).
_________________
pentax ME super (retired)
Pentax K3-ii; pentax K-S2; Samsung NX 20; Lumix G1 + adapters;
Adaptall collection (proliferating!) inc 200-500mm 31A, 300mm f2.8, 400mm f4.
Primes: takumar 55mm; smc 28mm, 50mm; kino/komine 28mm f2's, helios 58mm, Tamron Nestar 400mm, novoflex 400mm, Vivitar 135mm close focus, 105mm macro; Jupiter 11A; CZJ 135mm.
A classic zoom or two: VS1 (komine), Kiron Zoomlock... |
|
| Back to top |
|
|
Mr.Bittacy
Joined: 16 Jun 2019
Posts: 76
|
| Posted: Sun Apr 05, 2020 1:52 pm Post subject: |
|
|
Mr.Bittacy wrote:
Good point, not sure how to get it moved though.. |
|
| Back to top |
|
|
Himself

Joined: 01 Mar 2007
Posts: 3245
Location: Montreal
Expire: 2013-05-30
|
| Posted: Sun Apr 05, 2020 2:43 pm Post subject: |
|
|
Himself wrote:
Topic moved where it belongs.
More than that, I asked almost the same question a week ago, how to dismantle the aforementioned lens, because mine has a broken/stuck diaphragm.
Now seeing your post I'd give it another try.
Thanks!
_________________
Moderator Himself |
|
| Back to top |
|
|
Mr.Bittacy
Joined: 16 Jun 2019
Posts: 76
|
| Posted: Sun Apr 05, 2020 3:24 pm Post subject: |
|
|
Mr.Bittacy wrote:
Thanks for moving it and hope it’s of some help! I didn’t disassemble the aperture assembly but it is really easy to remove. There are three sets of two set screws and you just remove the three that are closest to the tripod mount and unscrew the mount and aperture assembly. |
|
| Back to top |
|
|
Himself
Joined: 01 Mar 2007
Posts: 3245
Location: Montreal
Expire: 2013-05-30
|
| Posted: Sun Apr 05, 2020 6:37 pm Post subject: |
|
|
Himself wrote:
| Mr.Bittacy wrote: |
| Thanks for moving it and hope it’s of some help! I didn’t disassemble the aperture assembly but it is really easy to remove. There are three sets of two set screws and you just remove the three that are closest to the tripod mount and unscrew the mount and aperture assembly. |
Very helpful your post. Much appreciated.
I'll remove the mount and put up some pictures.
And we'll go from there.
_________________
Moderator Himself |
|
| Back to top |
|
|
Himself
Joined: 01 Mar 2007
Posts: 3245
Location: Montreal
Expire: 2013-05-30
|
| Posted: Tue Apr 07, 2020 3:22 pm Post subject: |
|
|
Himself wrote:
If you still have it open can you take a picture with the innards of the diaphragm section?
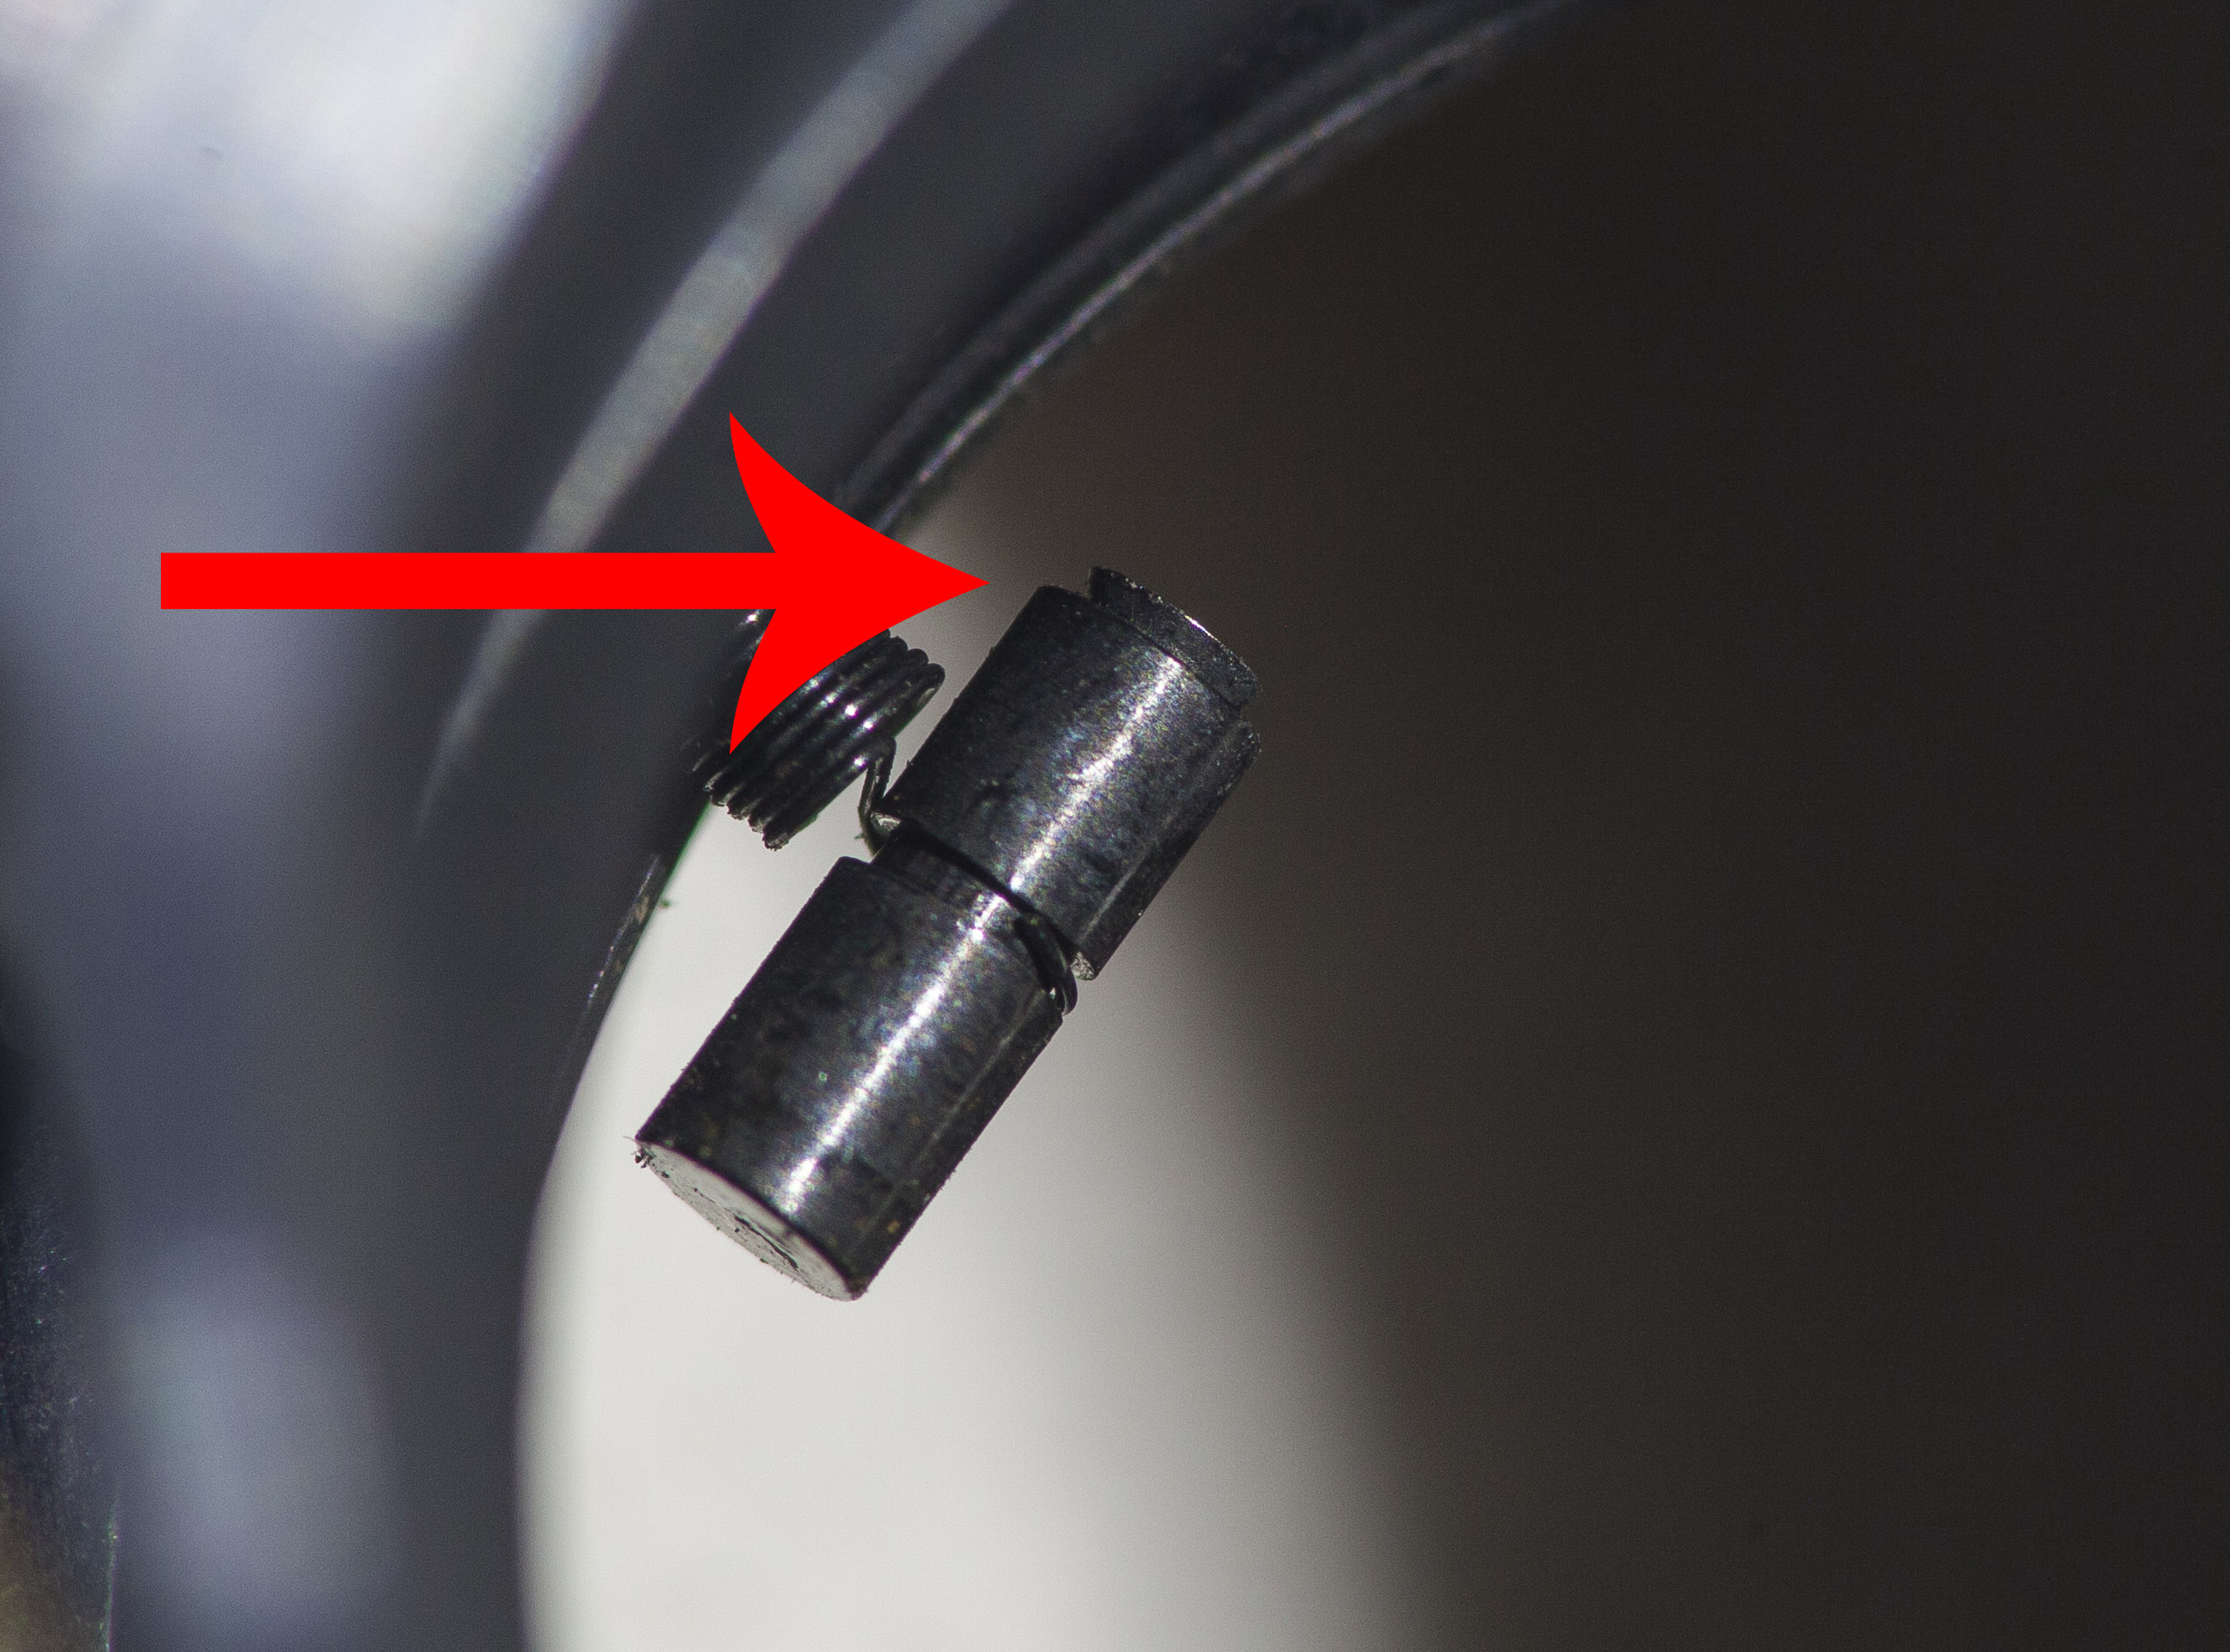
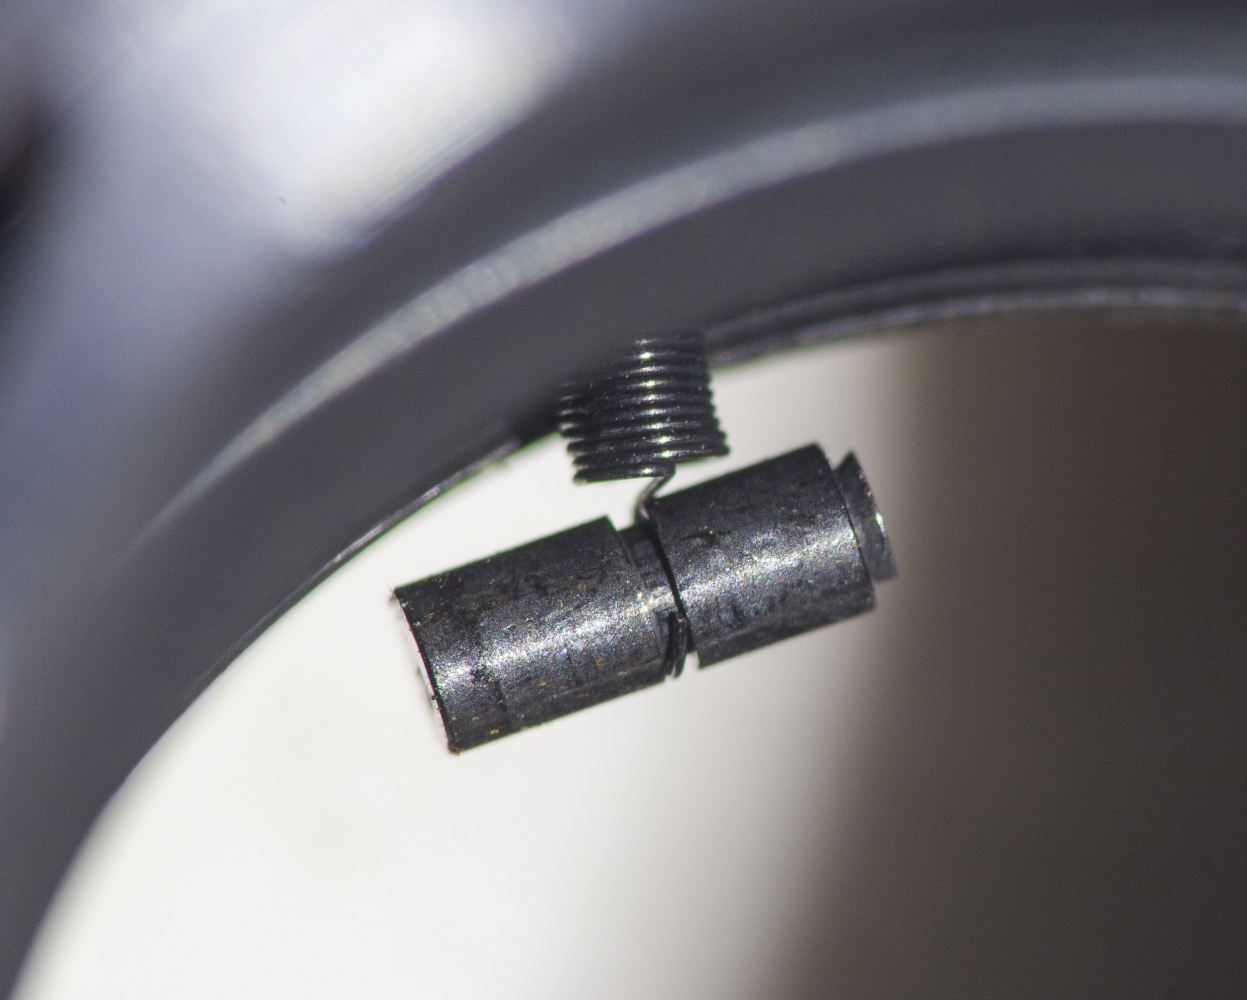
I can't figure out where my hanging bit ( the spring with the cylinder ) is coming from. Maybe I miss some bits/links in there.

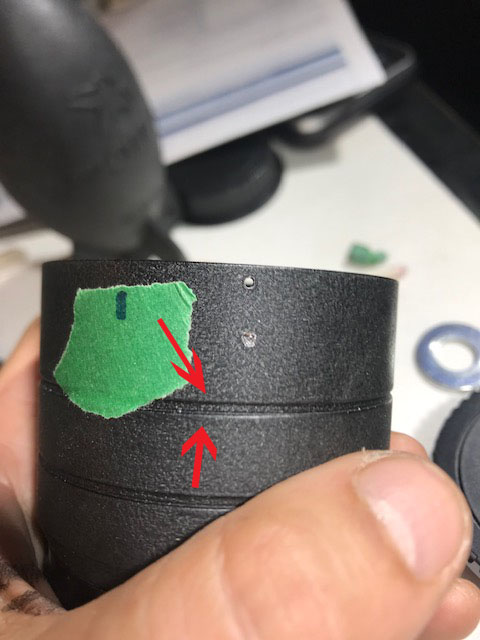
I removed the 3 set screws and I unscrewed that section. There is another set (3 of them) of set screws under the top ones that is probably holding the aperture ring in place. What do you think? The slanted red arrow is on the ring with the diaphragm.

_________________
Moderator Himself |
|
| Back to top |
|
|
Mr.Bittacy
Joined: 16 Jun 2019
Posts: 76
|
| Posted: Tue Apr 07, 2020 8:15 pm Post subject: |
|
|
Mr.Bittacy wrote:
I’ll unscrew the back and take a picture of that area, I’m thinking you are on the right track but there has to be something connecting the diaphragm to the aperture ring so I would take off the mount and look in there to see what needs to be disconnected before trying to unscrew the diaphragm part... |
|
| Back to top |
|
|
Mr.Bittacy
Joined: 16 Jun 2019
Posts: 76
|
| Posted: Wed Apr 08, 2020 12:03 am Post subject: |
|
|
Mr.Bittacy wrote:
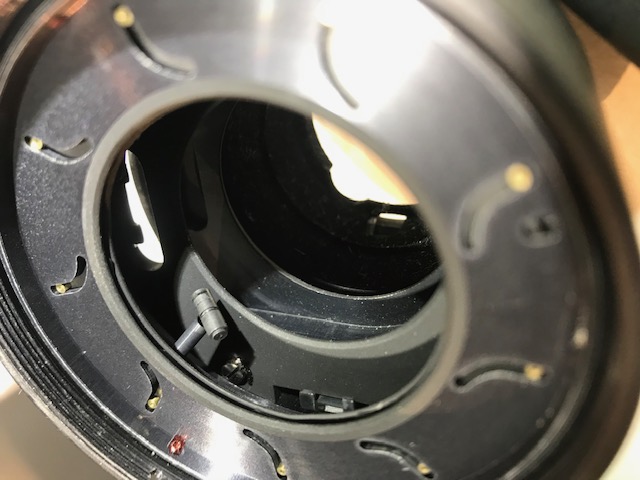
Ok, I took the aperture part off and took a couple pictures, let me know if there are any other ones that I can get for you.
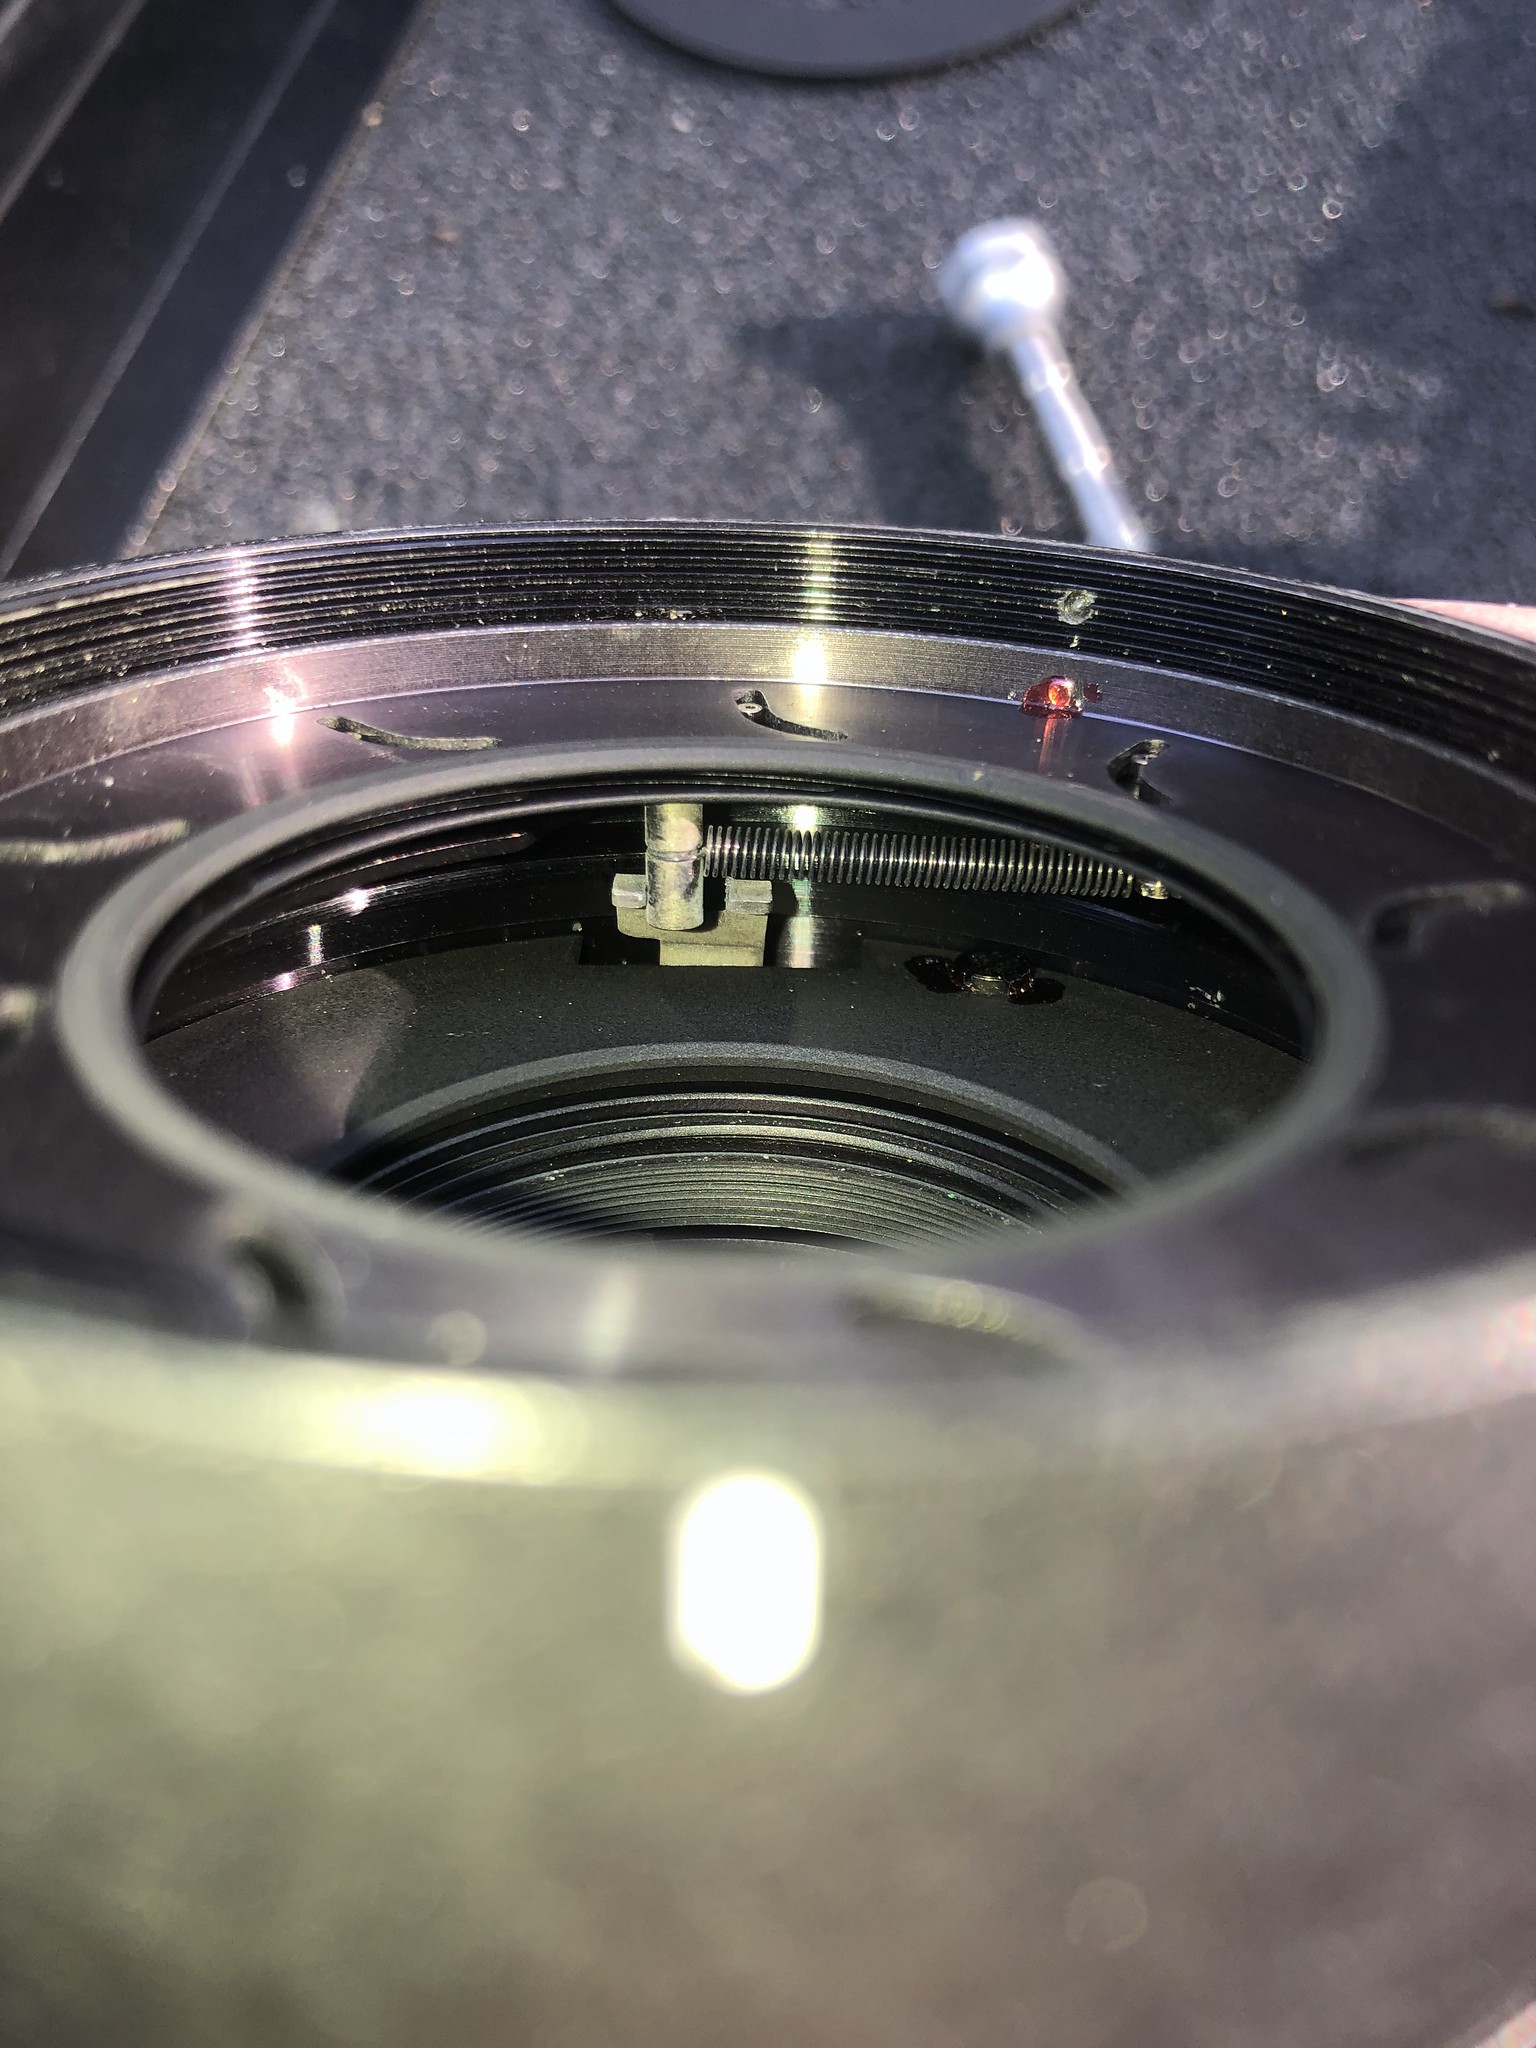
This first one shows the part that I believe is off in yours, it is for the ( Not sure if its the right term) aperture preview lever, so maybe if it is off then your aperture is working fine but always being forced open due to this part being off.

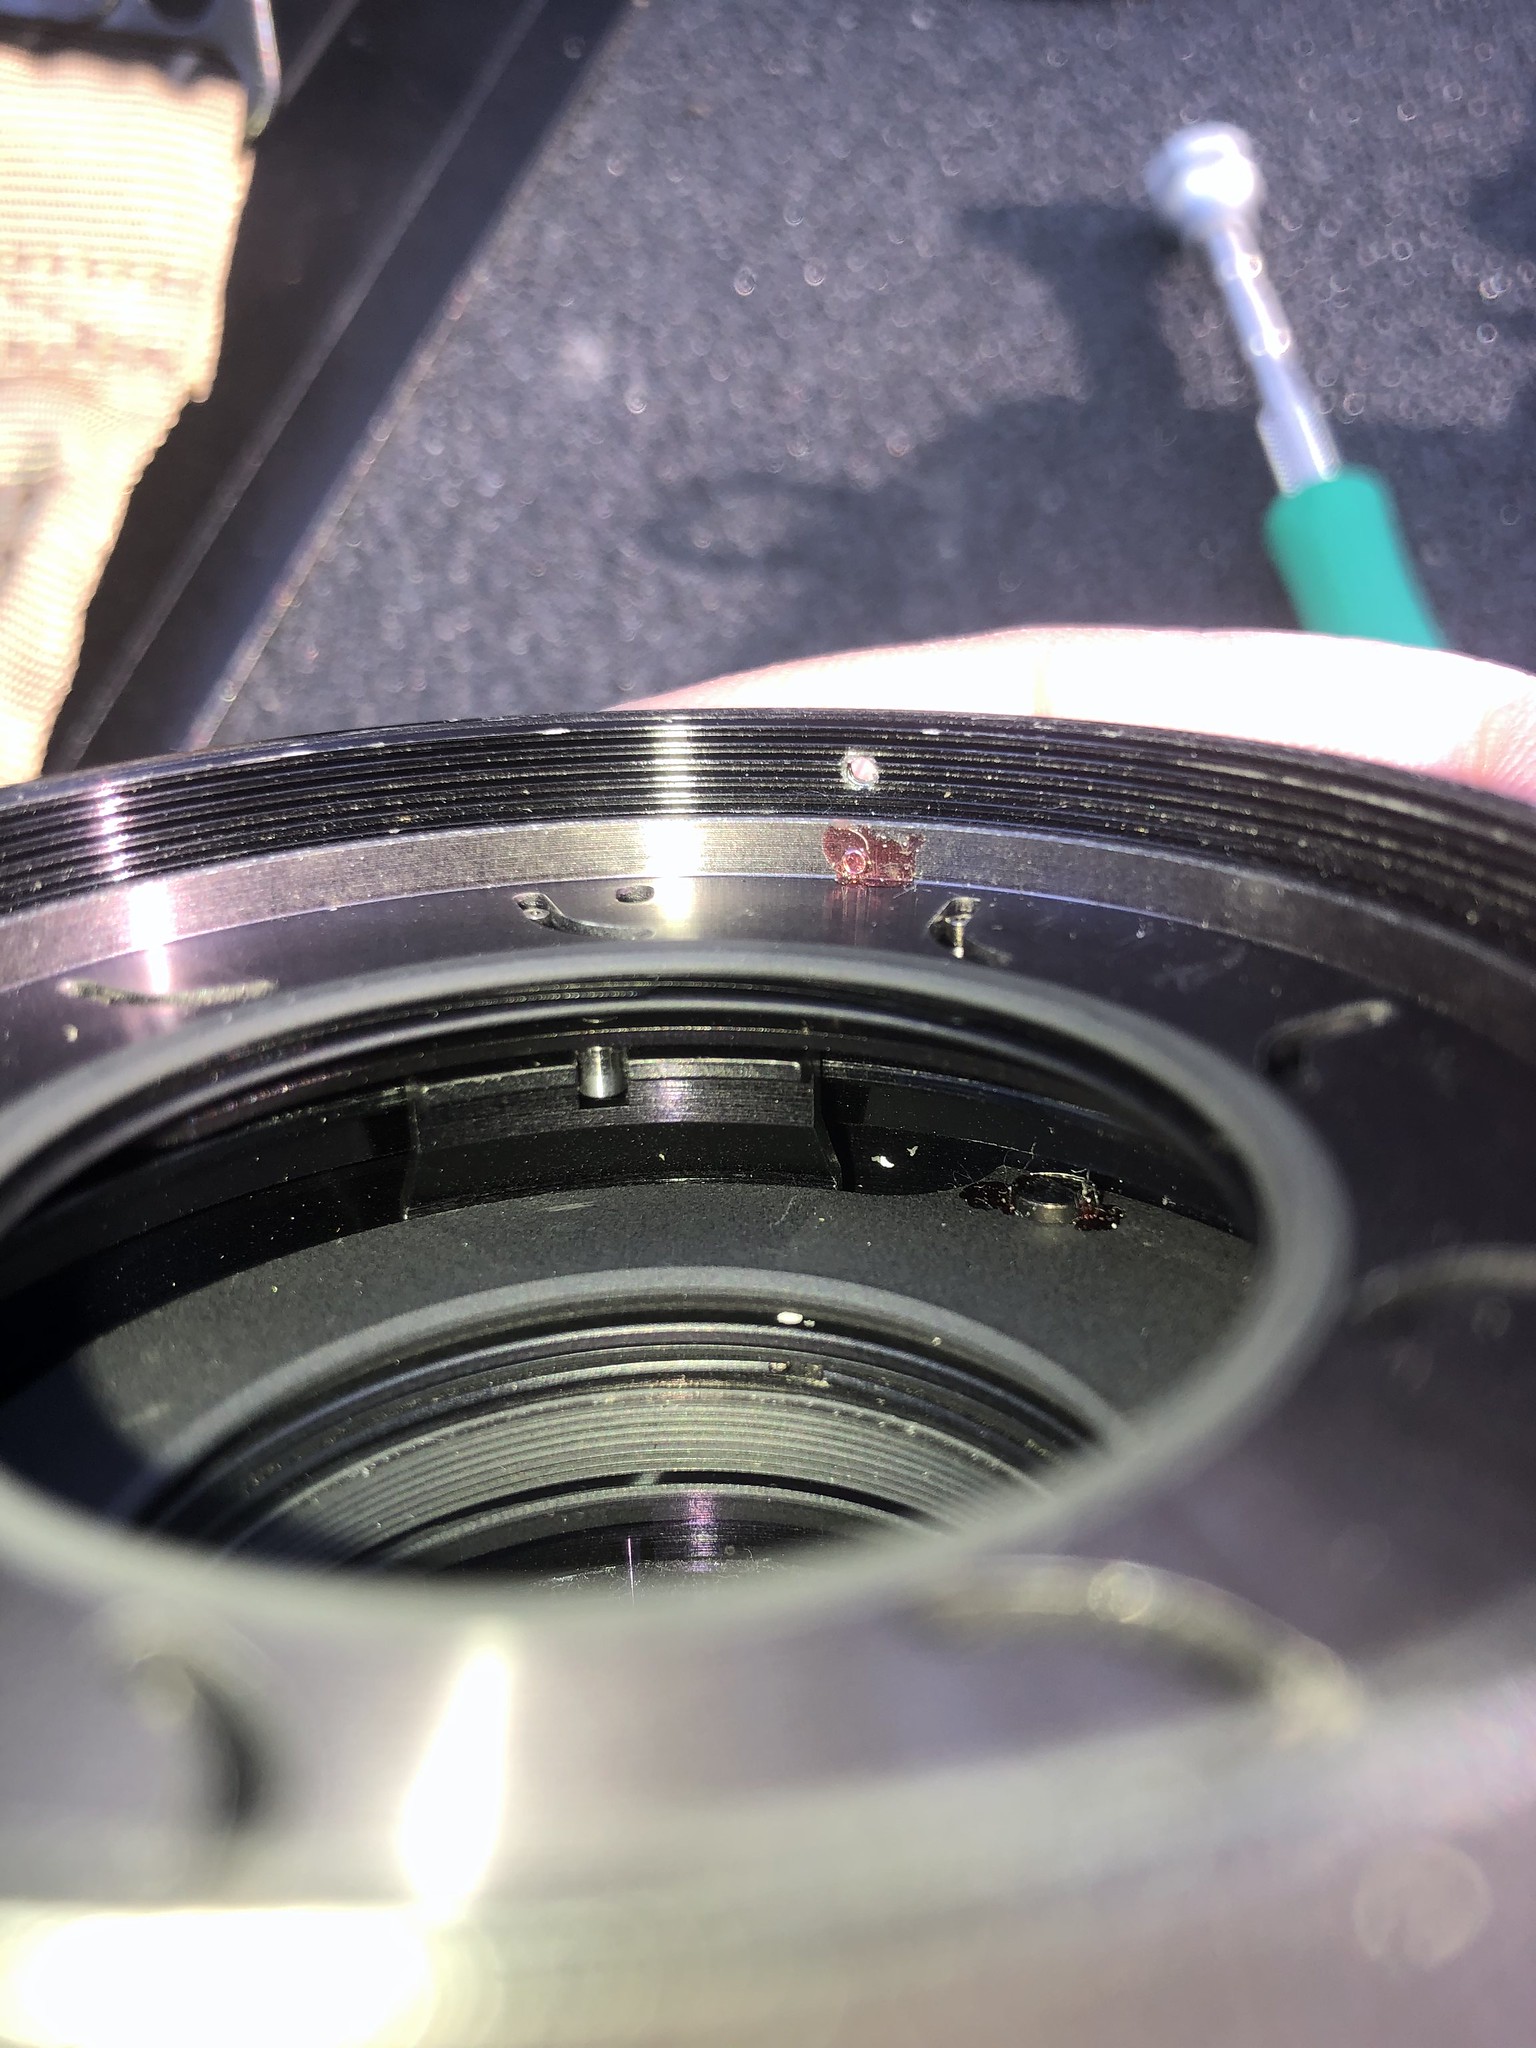
This is the fork for the actual aperture ring

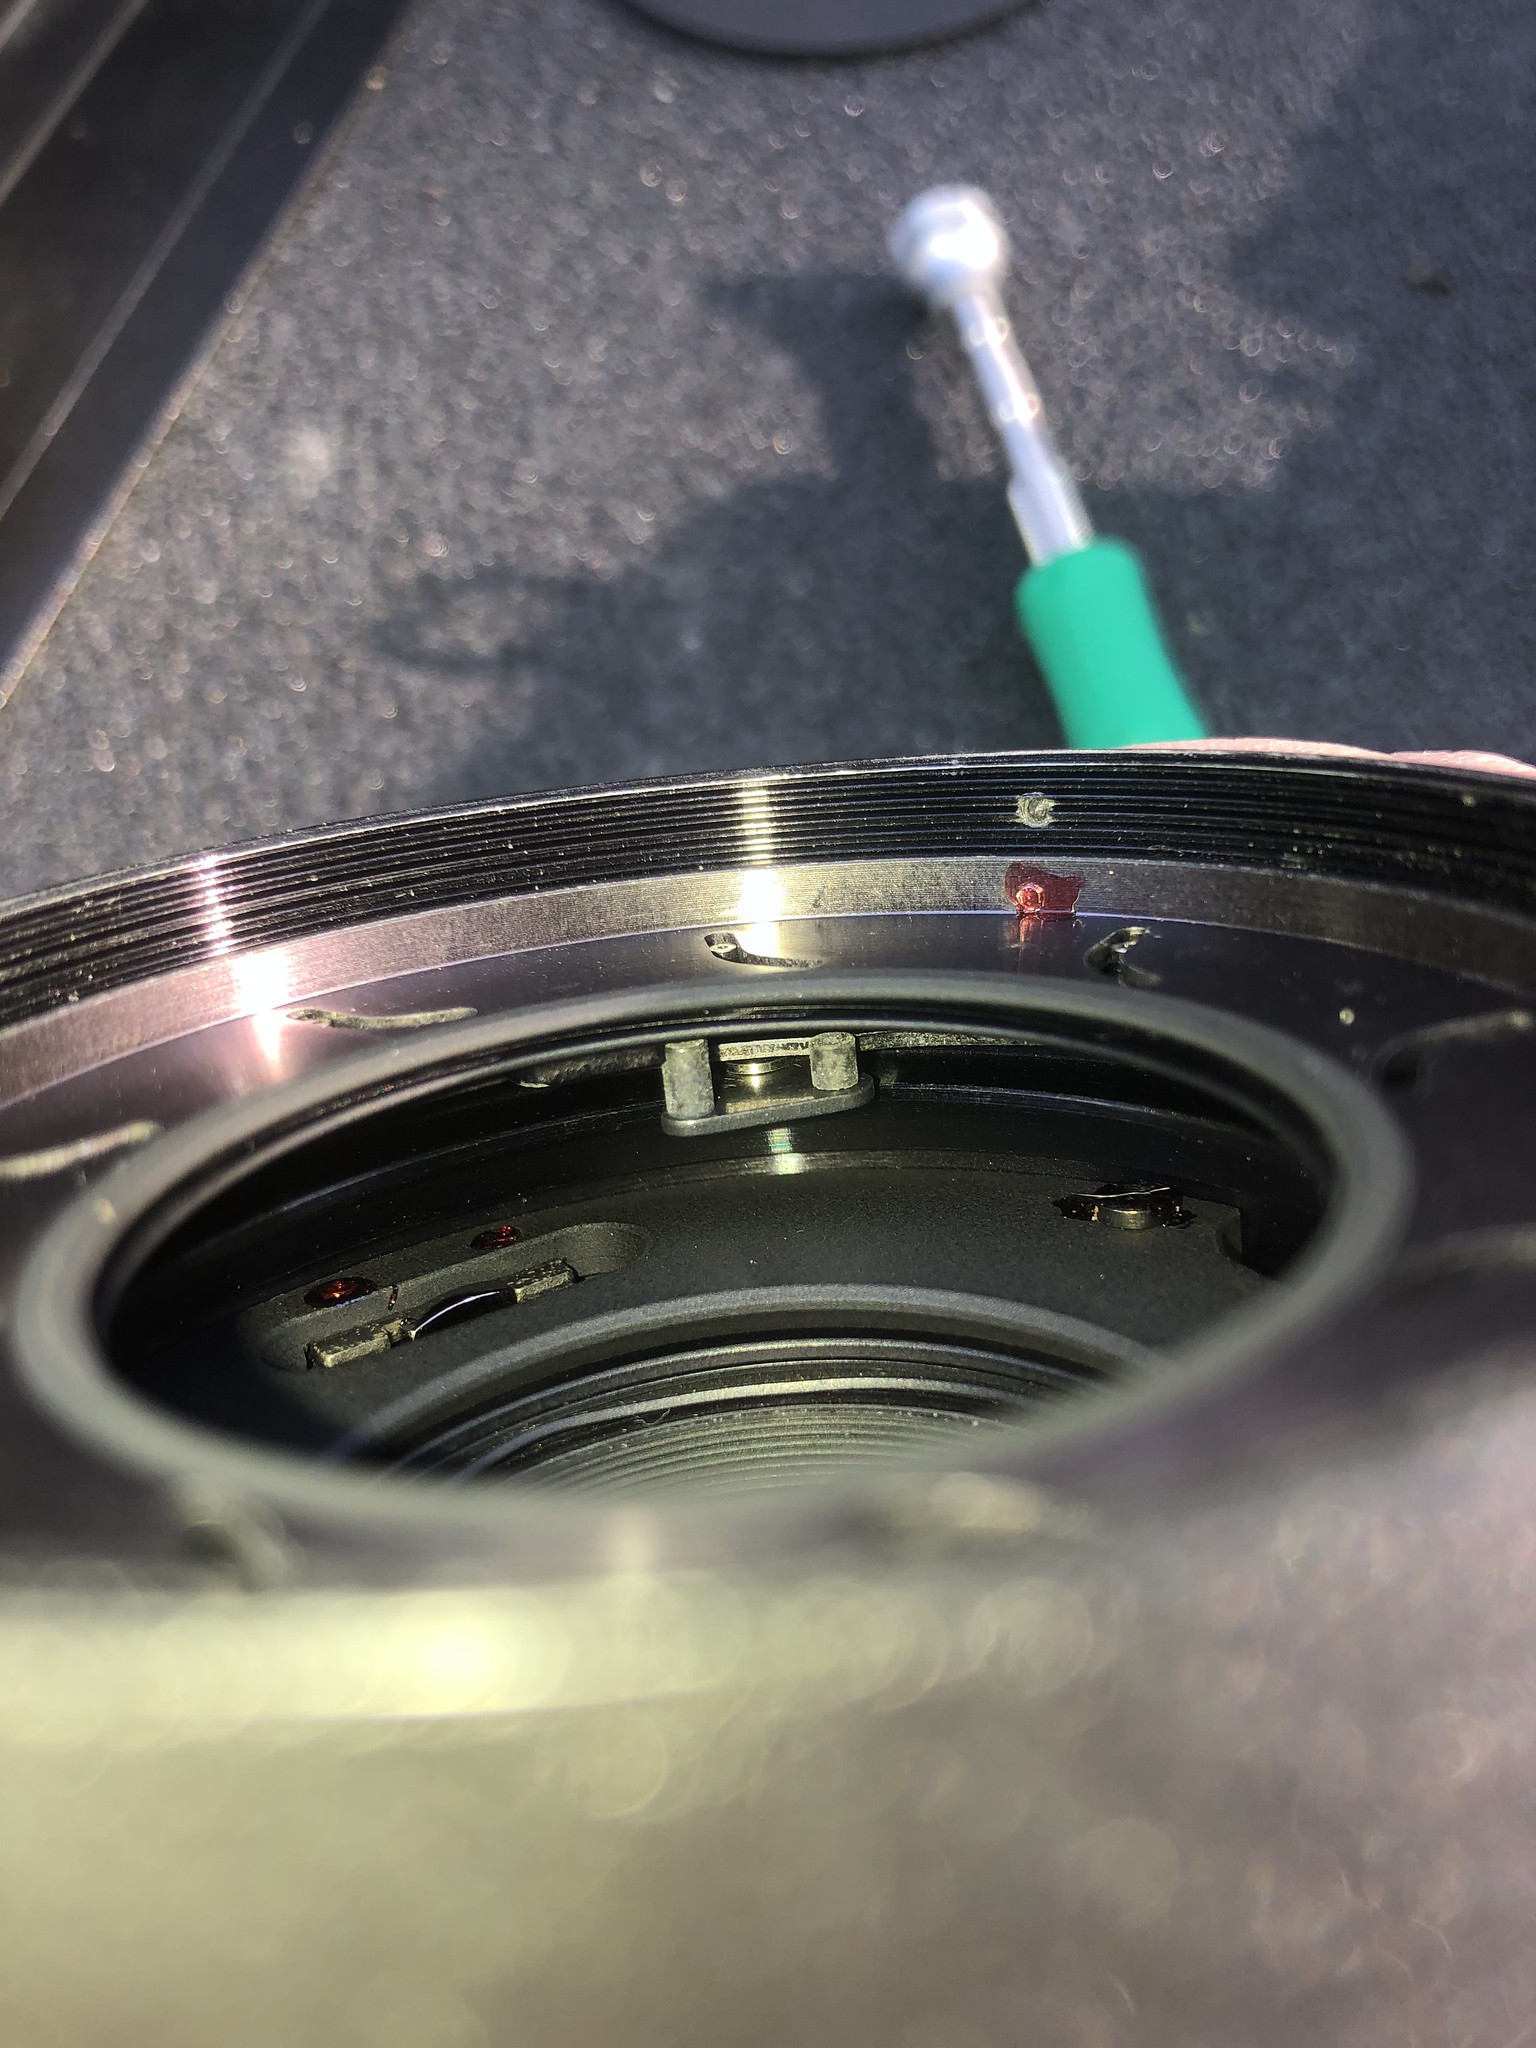
And I am not sure what this part is for

Personally I would take it apart and try to fix the preview lever linkage but if it is truly broken then maybe you could just disable it ( if your using a mirrorless camera) then at least you could still adjust the aperture normally.
Andrew |
|
| Back to top |
|
|
Mr.Bittacy
Joined: 16 Jun 2019
Posts: 76
|
| Posted: Wed Apr 08, 2020 2:15 am Post subject: |
|
|
Mr.Bittacy wrote:
Looking at your picture more closely it doesn't look like there is any noticeable damage to that post, maybe it just somehow got dislodged? If you could feel where the hole is maybe you could get it back in place with a pair of bent needle nose pliers, maybe dab a little nail polish on it to seal it without even taking it any further apart or you may be able to see something with the mount off to help. |
|
| Back to top |
|
|
Himself
Joined: 01 Mar 2007
Posts: 3245
Location: Montreal
Expire: 2013-05-30
|
| Posted: Wed Apr 08, 2020 5:12 pm Post subject: |
|
|
Himself wrote:
Thank you again! Much appreciated!
Your first picture: now I know where to put it, I don't know what I'll get with that, but nonetheless I'll do it. After I find my tweezers 
That lever, in my lens, is not connected with anything so that's way I said that I don't know what I'll get.
Second picture: the same to my lens, it's the lever that gets moved by the aperture ring. It moves only it doesn't open or close anything.
Third picture : I have yet to find the meaning of that part.
I'm using a Canon 5D Mark II
_________________
Moderator Himself |
|
| Back to top |
|
|
Himself
Joined: 01 Mar 2007
Posts: 3245
Location: Montreal
Expire: 2013-05-30
|
| Posted: Thu Apr 09, 2020 6:18 pm Post subject: |
|
|
Himself wrote:
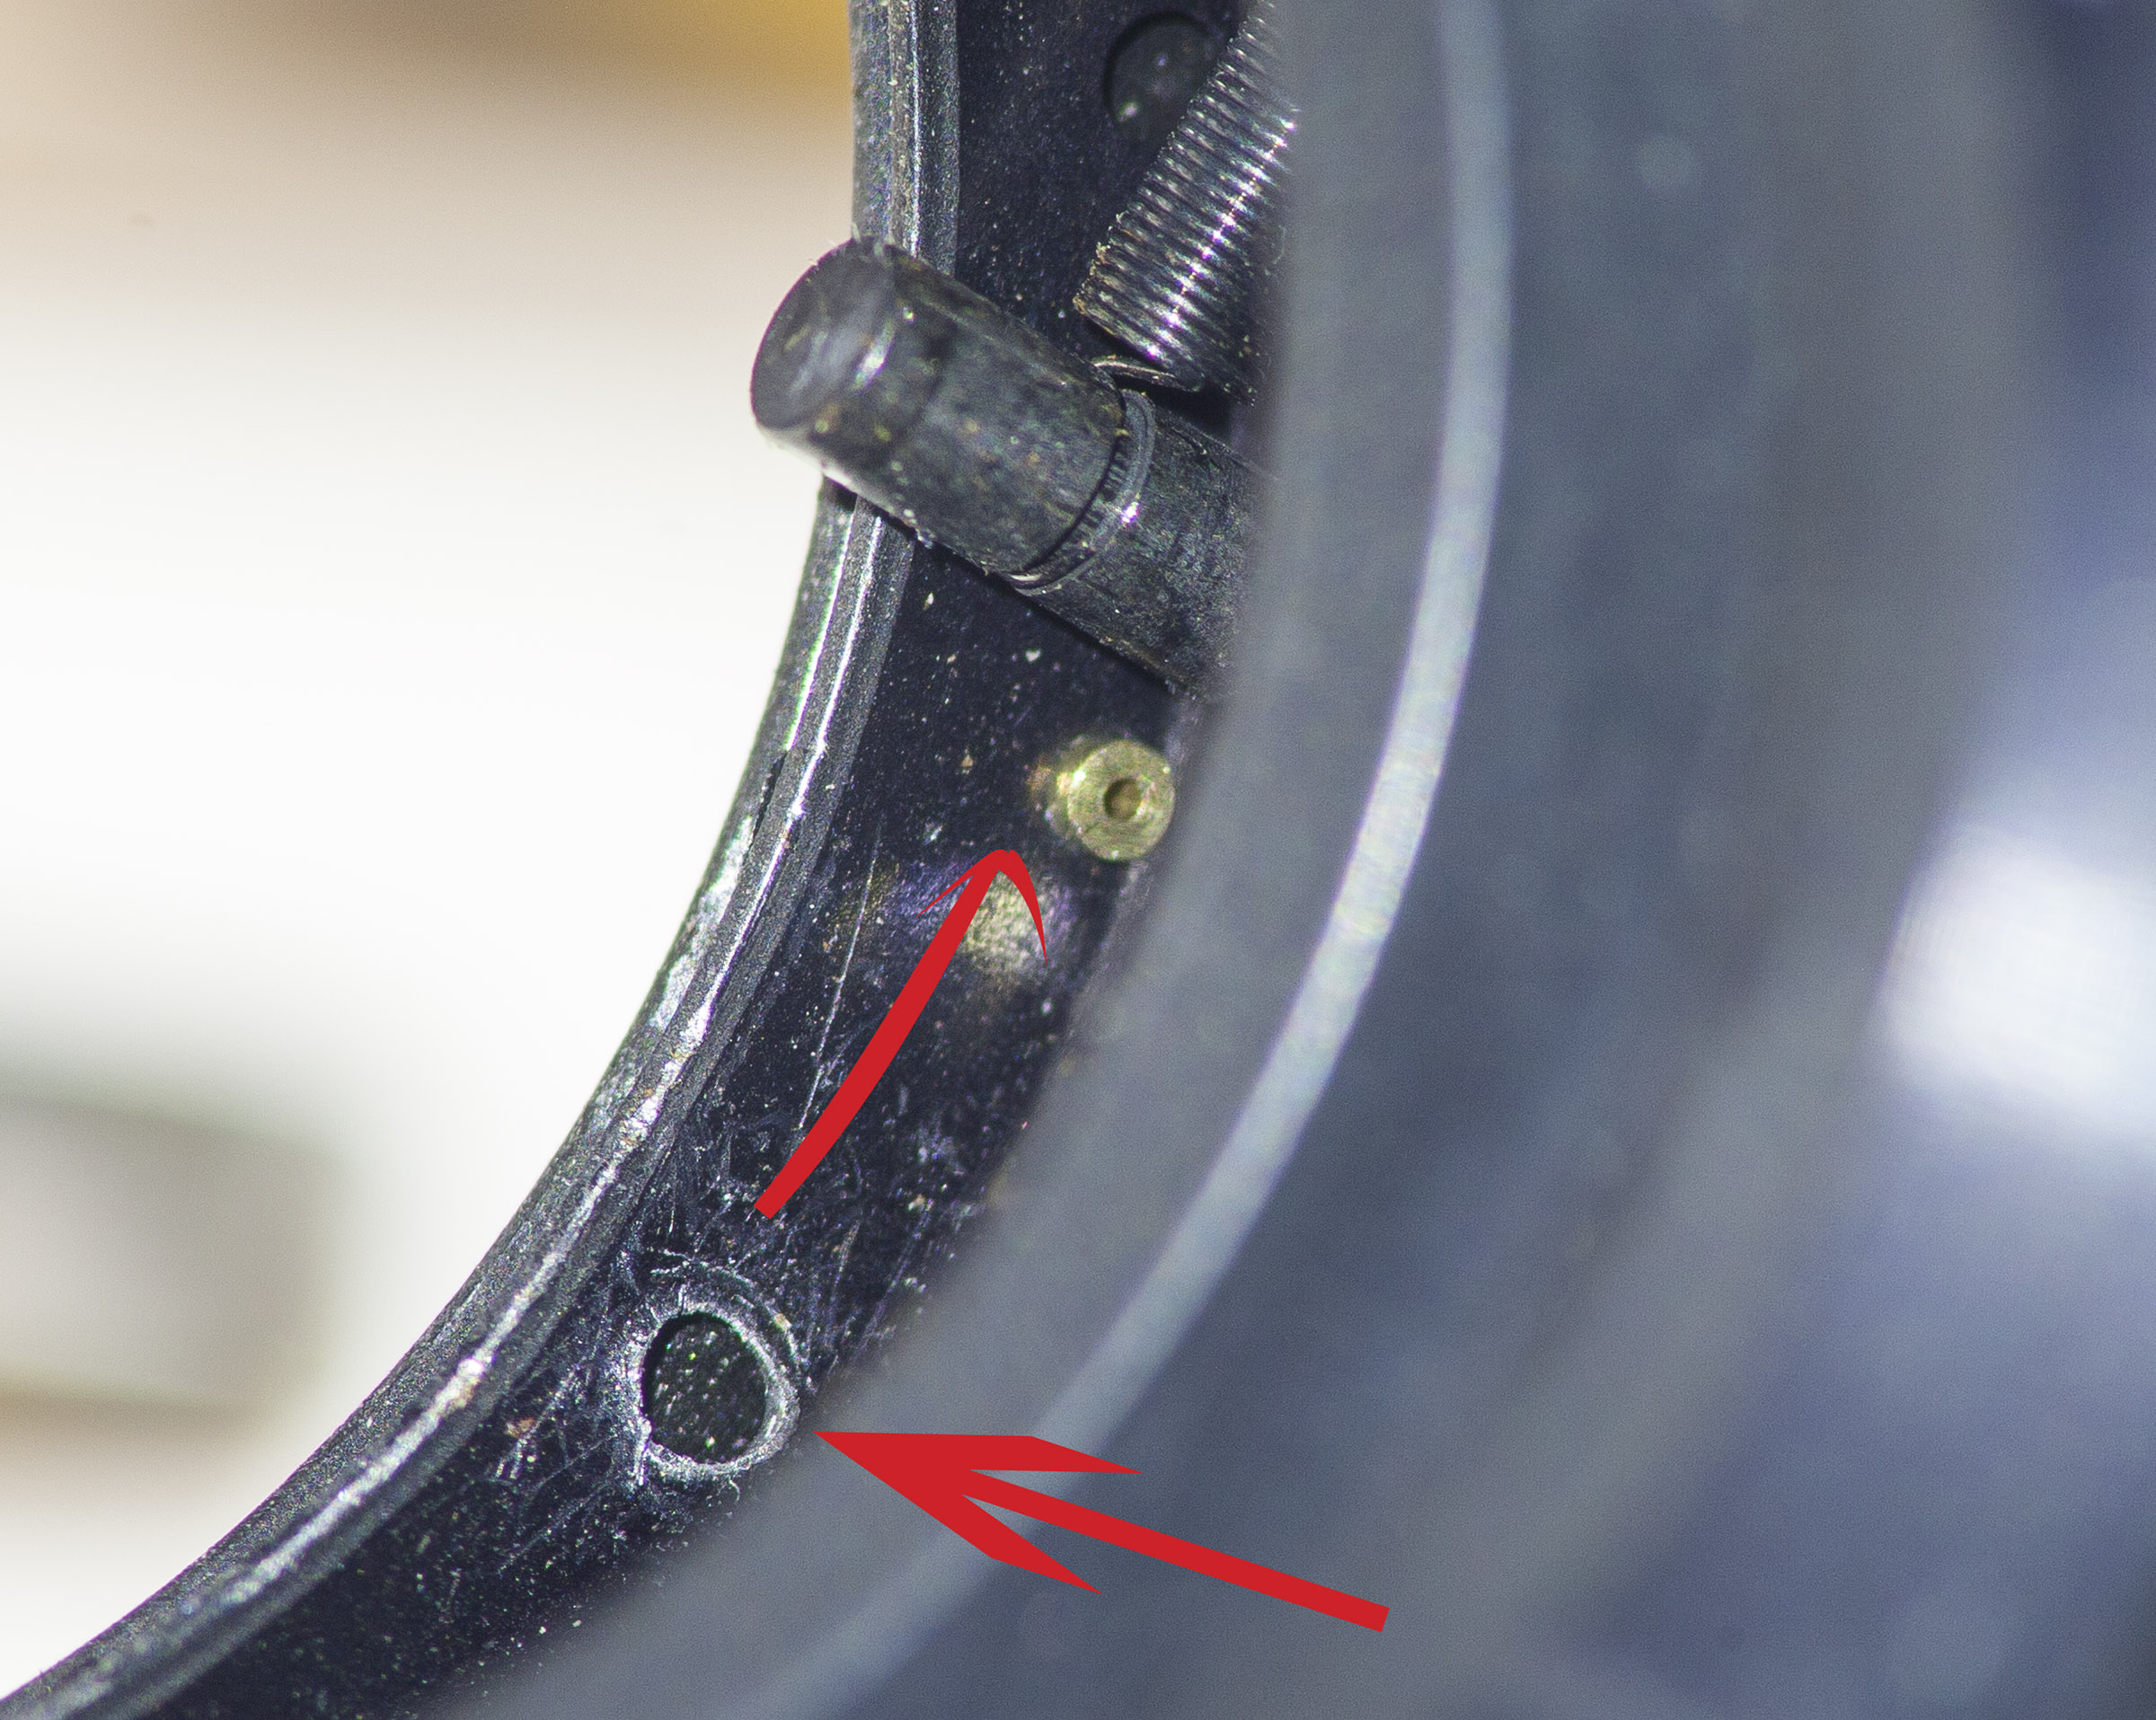
The pin at the end of the spring has a small shoulder - red arrow - that goes into the hole of the plate. The plate has a circular movement that open or close the blades. The hole looks to have some jagged edges and I'm afraid to press the pin into it because what I see black through the hole are the blades and I don't want to damage them.
Otherwise the blades are moving easily, not damaged at all.
Any idea how to remove the diaphragm block/unit?
The service manual I thought it to be for us the layman but it's not.
Pictures taken with Canon FD 200/4 macro.


_________________
Moderator Himself
Last edited by Himself on Thu Apr 09, 2020 11:21 pm; edited 1 time in total |
|
| Back to top |
|
|
Himself
Joined: 01 Mar 2007
Posts: 3245
Location: Montreal
Expire: 2013-05-30
|
| Posted: Thu Apr 09, 2020 11:17 pm Post subject: |
|
|
Himself wrote:
I'm thinking to superglue a larger piece of blade ( trimmed to size but larger than the pin itself) to the pin and then glue everything on top of the actual hole.
Pro? Cons? Anyone?
_________________
Moderator Himself |
|
| Back to top |
|
|
visualopsins

Joined: 05 Mar 2009
Posts: 11053
Location: California
Expire: 2025-04-11
|
| Posted: Thu Apr 09, 2020 11:54 pm Post subject: |
|
|
visualopsins wrote:
Rely on mechanical connection rather than only glue itself, i.e., something other than only glue in the hole, a small wire perhaps, also connected to everything on top.
_________________
☮☮☮☮☮☮☮☮☮☮☮☮☮☮☮☮☮☮☮☮☮☮☮☮☮☮☮☮☮☮☮☮ like attracts like! ☮☮☮☮☮☮☮☮☮☮☮☮☮☮☮☮☮☮☮☮☮☮☮☮☮☮☮☮☮☮☮☮
Cameras: Sony ILCE-7RM2, Spotmatics II, F, and ESII, Nikon P4
Lenses:
M42 Asahi Optical Co., Takumar 1:4 f=35mm, 1:2 f=58mm (Sonnar), 1:2.4 f=58mm (Heliar), 1:2.2 f=55mm (Gaussian), 1:2.8 f=105mm (Model I), 1:2.8/105 (Model II), 1:5.6/200, Tele-Takumar 1:5.6/200, 1:6.3/300, Macro-Takumar 1:4/50, Auto-Takumar 1:2.3 f=35, 1:1.8 f=55mm, 1:2.2 f=55mm, Super-TAKUMAR 1:3.5/28 (fat), 1:2/35 (Fat), 1:1.4/50 (8-element), Super-Multi-Coated Fisheye-TAKUMAR 1:4/17, Super-Multi-Coated TAKUMAR 1:4.5/20, 1:3.5/24, 1:3.5/28, 1:2/35, 1:3.5/35, 1:1.8/85, 1:1.9/85 1:2.8/105, 1:3.5/135, 1:2.5/135 (II), 1:4/150, 1:4/200, 1:4/300, 1:4.5/500, Super-Multi-Coated Macro-TAKUMAR 1:4/50, 1:4/100, Super-Multi-Coated Bellows-TAKUMAR 1:4/100, SMC TAKUMAR 1:1.4/50, 1:1.8/55
M42 Carl Zeiss Jena Flektogon 2.4/35
Contax Carl Zeiss Vario-Sonnar T* 28-70mm F3.5-4.5
Pentax K-mount SMC PENTAX-A ZOOM 1:3.5 35~105mm, SMC PENTAX ZOOM 1:4 45~125mm
Nikon Micro-NIKKOR-P-C Auto 1:3.5 f=55mm, NIKKOR-P Auto 105mm f/2.5 Pre-AI (Sonnar), Micro-NIKKOR 105mm 1:4 AI, NIKKOR AI-S 35-135mm f/3,5-4,5
Tamron SP 17mm f/3.5 (51B), Tamron SP 17mm f/3.5 (151B), SP 500mm f/8 (55BB), SP 70-210mm f/3.5 (19AH)
Vivitar 100mm 1:2.8 MC 1:1 Macro Telephoto (Kiron)
|
|
| Back to top |
|
|
Himself
Joined: 01 Mar 2007
Posts: 3245
Location: Montreal
Expire: 2013-05-30
|
| Posted: Fri Apr 10, 2020 4:12 am Post subject: |
|
|
Himself wrote:
I don't want to touch the hole at all.
I'm afraid I might damage the blades.
Just go around it with glue.
_________________
Moderator Himself |
|
| Back to top |
|
|
Mr.Bittacy
Joined: 16 Jun 2019
Posts: 76
|
| Posted: Sat Apr 11, 2020 5:05 am Post subject: |
|
|
Mr.Bittacy wrote:
Seems like your best bet is to the get the aperture out, looks like the post was put in there almost like a rivet and it somehow pulled out of the metal.. since that’s just for the auto preview lever which you don’t need I would try to find a way to permanently keep that plate in the position that allows the blades to stop down with the ring.. either with tape or a spring so it can be undone. If your not using a Nikon camera it is kind of pointless to fix that pArt except for resale.. just try moving the plate with a screw driver or pick in that hole and find the position that allows the blades to stop down and then just tape it or something... |
|
| Back to top |
|
|
Mr.Bittacy
Joined: 16 Jun 2019
Posts: 76
|
| Posted: Sat Apr 11, 2020 5:09 am Post subject: |
|
|
Mr.Bittacy wrote:
It must rely on that spring tension to keep it in a position that allows you to stop it down.. now it’s probably just in a spot where it thinks you are constantly depressing the lever to open the blades. |
|
| Back to top |
|
|
Himself
Joined: 01 Mar 2007
Posts: 3245
Location: Montreal
Expire: 2013-05-30
|
| Posted: Sat Apr 11, 2020 1:07 pm Post subject: |
|
|
Himself wrote:
| Mr.Bittacy wrote: |
| Seems like your best bet is to the get the aperture out, looks like the post was put in there almost like a rivet and it somehow pulled out of the metal.. since that’s just for the auto preview lever which you don’t need I would try to find a way to permanently keep that plate in the position that allows the blades to stop down with the ring.. either with tape or a spring so it can be undone. If your not using a Nikon camera it is kind of pointless to fix that pArt except for resale.. just try moving the plate with a screw driver or pick in that hole and find the position that allows the blades to stop down and then just tape it or something... |
I'll try that to see how it works.
_________________
Moderator Himself |
|
| Back to top |
|
|
|
|
|
You cannot post new topics in this forum
You cannot reply to topics in this forum
You cannot edit your posts in this forum
You cannot delete your posts in this forum
You cannot vote in polls in this forum
|