| View previous topic :: View next topic |
| Author |
Message |
AlunH
Joined: 26 Jan 2012
Posts: 23
Location: London
|
 Posted: Thu Feb 02, 2012 5:19 pm Post subject: My First Re Lube - CZJ Triotar 135: Advice Please... Posted: Thu Feb 02, 2012 5:19 pm Post subject: My First Re Lube - CZJ Triotar 135: Advice Please... |
 |
|
AlunH wrote:
Hello Gentlemen!
I'm looking for advice, info and words of support but first, a big thanks to the founders, moderators and contributors of this forum. What i've learnt from the wealth of knowledge here so far has enabled me to get some great lenses, in the focal lengths i wanted, at a fraction the price of Canon glass. Plus much more unique and fun to shoot with!!
My biggest purchase so far was from a German eBayer just this week. A Carl Zeiss Jena Triotar 4 / 135. The glass (as described) IS in A1 condition. The barrel is ok but a ding in the filter thread (not mentioned) means no filters for me on this one  But worst of all? The helical is almost glued tight it just unscrews from the mount when try to focus close. But worst of all? The helical is almost glued tight it just unscrews from the mount when try to focus close.
So it is clear I have 4 choices...
1. Take the lens in for repair and pay more than twice it's value to have someone fix it.
2. Accept that this is my first ever lens service project.
3. Sell the lens on to some other unsuspecting fool (just like me) on eBay.
4. Enjoy my new shiny paper weight that set me back more than �70 with shipping!
I dont have: the cash for 1. the nerve for 2. the heart for 3. or the need for a paper weight. So I'm gonna open box number 2! Woohoo!!
I've looked at some previous threads on here about taking these beasties apart and heard them described as 'tricky'. Well since all i'm interested in doing is gettting to the helicoid, cleaning it, re lubing it and then putting it back together. I'm hopng that the real fiddly bit (taking the lens carrier apart) wont be required. Following my Boy Scout training, I decided to 'Be Prepared!' and do as much research as possible before rolling out the work mat. I've trawled the net and even spoken to someone at Zeiss (they dont look after Jena stuff but are jolly nice people!)
So, this is what I plan to do. (I will make a photo blog of this and add a tag later, so you can track my progress/ the demise of my beloved lens)
Im going to try and find somone with a spanner wrench that I can borrow as buying one to repair just one lens seems a bit silly. Or, as suggested by the chap at Zeiss, "make one yourself out of a scrap of 3mm sheet steel" (I like the second option) and carefully insert said spanner into the two cut outs in the ring you can see just inside the base (camera end) of the lens. I've been reassured by the Zeiss man that this will undo in the normal 'right hand thread' direction. Confirmation Required
Once this tube has been removed, the lens should 'slip apart and give me access to a couple of screws for removing the outer helicoid'. I am intrigued and excited about this part!
Apparently the next job is to mark the points at which the different parts join together by making a couple of light marks in the metal tubes using something like a scribe or centre punch. This is so that when i put it all back together, I have some reference to the relative position of each part to its neighbour.
The next bit of advice i got from 'Zeiss Man' was that once I have removed the retaining screws, i should unscrew the inner helical from the outer one and just as they are about to come apart, make more marks to show where to offer them back up to each other during the re-assembly phase. This is very important because, due to the number of threads in the helix's, there could be a bout fifteen different points at which you can start the thread off when re attaching them. If they are offered up to each other out of alignment, they will fit but infinity focus might not be possible
Once the helical parts of the lens are apart and the lens carrier set to one side, the process of cleaning can take place. I have on old toothbrush ready for action and have heard of using lighter fluid, naptha (which I think is the same), Isopropyl alcohol or Kerosene as a cleaning agent. Does anyone here know which is best? I have some white spirits at home, Would that be ok? Im guessing just a powerful solvent is required. I also have a small domestic ultrasonic cleaner (the type one uses for cleaning jewelery etc.) at home and wondered if i should finish the parts off in there with some mild detergent and warm water, before a final wipe with an IPA pad to remove any moisture.
The next phase would be a re grease. Does anyone here have some cheap but safe alternatives to commercial helicoid grease? Also, how much of this stuff do i need to slap on?
The man at Zeiss also recommended a company called Micro-Tools for degreasers and proper helicoid grease. But it looks like expensive goo! What do you guys think, should I get the good stuff or is there something i might have around the house or garage which would be just as good? Whatever the answer, for those of you who do this regularly, the guys at Micro Tools seem to have EVERYTHING a lens repairer might ever need!
I hope that once I have the bits cleaned and relubed, fitting the various parts back together will be a retrace of my previous steps.
I have taken on board the suggestions of others here and will be wearing unpowdered latex gloves throughout this procedure . But are there any other precautions i should take regarding dust or ideal levels of humidity etc?
Any other suggestions you guys have are most welcome, and so long as I have the ability to hold a camera steady whilst i'm attempting this, I hope to have a photo documented, step by step guide to this procedure for others to learn from. Even if it's a "How NOT To Guide"!
Thanks in advance and sorry for the long post!
Alun
_________________
DSLR: - Canon EOS500D/ 1DS /6D/Canon
SLR: - Canon FTb QL /Pentax Spotmatic ...
Lenses (AF): - EF 20-35mm f2.8L, EF 28-135mm IS USM, EF 50mm f1.8, EF 70-200 f2.8L USM, EF 2x Extender Mk1...
Lenses (MF): - Canon FL 55 /1.2, Carl Zeiss Jenna MC 135mm 3.5, Jupiter 9 85mm f2, Helios 44-2 58mm f2, Helios 44-m 58mm f2, Carl Zeiss Jena Triotar 135mm f4, CZJ 35mm f2.4 Flektogon (x2), CZJ Pancolar 1.8/80mm, MTO 1000mm f10, MTO 500mm f8, Pentax SMC Takumar 50mm f1.4, RMC Tokina 17mm f3.5, Tamron SP17 /3.5, Pentacon 135mm f2.8
|
|
| Back to top |
|
 |
Jesito


Joined: 24 Aug 2007
Posts: 5745
Location: Olivella, Catalonia, (Spain)
Expire: 2015-01-07
|
| Posted: Thu Feb 02, 2012 10:52 pm Post subject: |
|
|
Jesito wrote:
Have you tried to put it on top of a heating radiator for a while?.
Many times, the grease gets more fluid, and exercising the helicoid can get much better...
Regards.
Jes.
_________________
Jesito, Moderator 
Jesito's backsack:
Zooms Sigma 70-300, Tamron 35-135 and 70-210 short, 70-210 long, 28-70 CF Macro, 35-70, 35-80, Vivitar 70-210 KA, Tamron 70-250.
Fixed Industar-50, , Tamron 24mm, Tamron 135mm, Sands Hunter 135mm, Pancolar 50mm, Volna-3, many Exakta lenses
DSLR SIGMA SD9 & SD14, EOS 5D, Sony A700 and NEXF3, Oly E-330, E-400, E-450, E-1
TLR/6x6/645 YashicaMat, Petri 6x45, Nettar, Franka Solida, Brilliant
SLR Minolta X300, Fuji STX II, Praktica VLC3, Pentax P30t, EXA500, EXA 1A, Spotmatic(2), Chinon CM-4S, Ricoh, Contax, Konica TC-X , Minolta 5000, 7000i, 3Sxi, EOS 500 and CX
Rangefinders Chinon 35EE, Konica C35 auto, Canonet 28, Yashica Lynx, FED-2, Yashica electro 35, Argus C3 & C4, Regula Cita III, Voigtlander Vitoret (many), Welta Welti-I, Kodak Signette 35, Zorki-4, Bessa-R & L, Minolta Weathermatic, olympus XA2
Compact Film Konica C35V, Voigtlander Vitorets, Canon Prima Super 105, Olympus XA2 and XA3
Compact Digital Olympus C-5050, Aiptek Slim 3000, Canon Powershot A540, Nikon 5200, SIGMA DP1s, Polaroid X530, IXUS55, Kodak 6490, Powershot G9 and G10
CSCCanon EOS-M, Samsung NX100 and NX210, Lumix G5, NEX-F3 |
|
| Back to top |
|
|
indianadinos


Joined: 06 Jul 2008
Posts: 1310
Location: Toulouse, France
Expire: 2011-12-05
|
| Posted: Thu Feb 02, 2012 10:54 pm Post subject: |
|
|
indianadinos wrote:
Hi,
Although i'm not a professional repairman, i have succeeded in cleaning some lenses ...
For what they are worth, here are my advices for your points ...
At first, the spanner wrench: either find a friend with a good one, or buy yourself a good one. Some cheap spanners may have soft tips, that may rip and scratch your lens. If in doubt, Calvin (calvin83 on this forum) made a group buy some time ago, you could check with him ...
Moreover, you could start to like fixing old lenses, so it would be a fine investment ...
A cheap alternative, could be a steel compass. I still have one, and used before buying a real spanner wrench. Well, it is cheap, adaptable to most of the lenses, but if the tips rip, you can say goodbye to the lens ...
For what concerns the infinity focus, your source is right. Personally, i use a strip of adhesive tape to mark the point where the helical and the barrel separate (stitch the strip on both the barrel and the helical, then cut it with a cutter - this will be a useful mark for screwing back later) ...
For cleaning before lubricating again, i use Zippo fluid (almost 100% pure kerosene), cheaper than isopropyl alcohol, and then i finish with some optical cleaning fluid ...
For lubricating: according to various sources, the best lubricants seem to be those based on molybdenum bi-sulfide, but they are really expensive and hard to find ... Personally, i use white lithium grease, easy to find and relatively cheap ...
And yes, Micro Tools is an excellent source of pro-grade tools ...
Now, for what concerns the other hints ...
Be sure to have a children-and-pets-free room. Maybe you will start your cleaning and you will decide to do something else before finishing (it occurred to me quite often) ...
Then, a workplace with something anti-rebound (for the little screws and/or bearing balls). I use a big micro-fiber cloth ...
Finally, some gloves may be useful when playing with chemicals (and to avoid fingerprints on the glass) ...
... And for sure, i have forgotten something ...
Hope this will help ...
_________________
Please visit my blogs Shooting with a Pentax K10D / FF Visions
Takumar: 24/3.5, 28/3.5, 35/2, 35/3.5, 50/1.4, 55/1.8, 85/1.8, 105/2.8, 120/2.8, 135/3.5, 150/4, 200/4
Pentax-K: M28/2.8, K28/3.5, M50/1.4, A50/1.7, M50/4 Macro, K85/1.8, K105/2.8, K135/2.5, M200/4, M70-150/4
Zeiss: Flektogon 20/2.8, 20/4, 35/2.4, 35/2.8, Tessar 50/2.8, Pancolar 50/1.8, Biotar 58/2, Sonnar 135/3.5, Sonnar 180/2.8
Meyer: Primagon 35/4.5, Domiplan 50/2.8, Oreston 50/1.8, Primoplan 58/1.9, Trioplan 100/2.8, Orestor 100/2.8, Orestor 135/2.8
Schacht/Steinheil: Travenar 90/2.8, Travenon 135/4.5, Quinar 135/2.8, Quinar 135/3.5
Russian: MIR 37B, Industar 50/3.5, Helios 44M & 44M-2, Jupiter 37A
P6: Flektogon 50/4, Biometar 80/2.8, Orestor 300/4
Nikkor: Nikkor-O 35/2, Micro 55/3.5, Nikkor-S 50/1.4, Nikkor-Q 135/2.8
Fuji: EBC 28/3.5, EBC 55/3.5 Macro, EBC 135/2.5
Misc Lenses: Kiron 105/2.8 Macro, Tamron SP90/2.5
... and a few other Vivitar, Tamron, Sigma and Soligor lenses ...
|
|
| Back to top |
|
|
AlunH
Joined: 26 Jan 2012
Posts: 23
Location: London
|
| Posted: Fri Feb 03, 2012 10:27 pm Post subject: |
|
|
AlunH wrote:
Thanks for the tips gents!
Jes, I tried the radiator trick and it did make things a little looser but not much, so I decided to go for a strip down.
I made a "key" to engage with what I will call the baffle tube (insert correct name here) and removed the lens carrier from the focus helicals. The lens is now stripped and using Swarfega Jizer, I have removed the old grease which had turned to something resembling ear wax!
I have taken a few minutes to gather my thoughts and write this whilst the various parts soak in warm water in the ultrasonic cleaning bath. I made marks where needed and will re assemble and test soon. Plenty of photos taken and will upload them later with some notes.
After taking a look at the various lock rings which hold the lens carrier together, I think Indianadinos is spot on the money about getting a really good spanner wrench. That lot looks very "tricky" as previously described.
Oh well back to the bench I go.....
Al
_________________
DSLR: - Canon EOS500D/ 1DS /6D/Canon
SLR: - Canon FTb QL /Pentax Spotmatic ...
Lenses (AF): - EF 20-35mm f2.8L, EF 28-135mm IS USM, EF 50mm f1.8, EF 70-200 f2.8L USM, EF 2x Extender Mk1...
Lenses (MF): - Canon FL 55 /1.2, Carl Zeiss Jenna MC 135mm 3.5, Jupiter 9 85mm f2, Helios 44-2 58mm f2, Helios 44-m 58mm f2, Carl Zeiss Jena Triotar 135mm f4, CZJ 35mm f2.4 Flektogon (x2), CZJ Pancolar 1.8/80mm, MTO 1000mm f10, MTO 500mm f8, Pentax SMC Takumar 50mm f1.4, RMC Tokina 17mm f3.5, Tamron SP17 /3.5, Pentacon 135mm f2.8
|
|
| Back to top |
|
|
AlunH
Joined: 26 Jan 2012
Posts: 23
Location: London
|
| Posted: Sat Feb 04, 2012 1:01 am Post subject: |
|
|
AlunH wrote:
Well, it's all back together and it wasn't as scary as I first imagined! I'll try and get round to posting some photos this weekend.
There was a large build up of grease between the inner and outer helicals, and marks from where A N Other had been before. Trouble is, as this is my first attempt at this, I think I have either a) spread the grease too evenly over the entire helical threads or b) used a grease with too high a viscosity. I used a Teflon based bike grease because I couldn't justify the 30 or so euros for the 'right stuff'. It's back together and focuses fine but not as loose as I had hoped. It is a great improvement but stil a little tight, unless I take it really slow. It's too dark to test infinity focus but all other marks seem to be about right.
I'm loving this lens already!!! 
I suppose I will have to put an order in for some proper light weight helical grease and do it all over again!
Does anyone have a suggestion of which goo to use for this particular lens?
Alun
_________________
DSLR: - Canon EOS500D/ 1DS /6D/Canon
SLR: - Canon FTb QL /Pentax Spotmatic ...
Lenses (AF): - EF 20-35mm f2.8L, EF 28-135mm IS USM, EF 50mm f1.8, EF 70-200 f2.8L USM, EF 2x Extender Mk1...
Lenses (MF): - Canon FL 55 /1.2, Carl Zeiss Jenna MC 135mm 3.5, Jupiter 9 85mm f2, Helios 44-2 58mm f2, Helios 44-m 58mm f2, Carl Zeiss Jena Triotar 135mm f4, CZJ 35mm f2.4 Flektogon (x2), CZJ Pancolar 1.8/80mm, MTO 1000mm f10, MTO 500mm f8, Pentax SMC Takumar 50mm f1.4, RMC Tokina 17mm f3.5, Tamron SP17 /3.5, Pentacon 135mm f2.8
|
|
| Back to top |
|
|
NewStuff

Joined: 31 Mar 2011
Posts: 847
Location: Wales, UK
|
| Posted: Sat Feb 04, 2012 1:31 am Post subject: |
|
|
NewStuff wrote:
Would Graphite Lock Lube work for this? I have used it fine for other threads in other applications.
_________________
Too many to list. |
|
| Back to top |
|
|
AlunH
Joined: 26 Jan 2012
Posts: 23
Location: London
|
| Posted: Mon Feb 06, 2012 11:48 am Post subject: |
|
|
AlunH wrote:
| NewStuff wrote: |
| Would Graphite Lock Lube work for this? I have used it fine for other threads in other applications. |
I read someone elses suggestion not to use any kind of powder based lubricant due to the possibility of working it's way on to the optics.
So, I decided to try a thinner grease.
From recommendations here and on other forums, I went for a white lithium grease. Again, from a bicycle shop, and decided to try two methods.
Firstly, decrease the amount of grease currently in the helicoid and see if that works.
Second, completely clean out the current grease and replace with the White Lithium.
I stripped the lens down and tried a suggestion I'd seen elsewhere; To wipe away, and clean one of the helicoids so it is completely dry, then reconnect the parts and test again. I also did the same with the mating surface between the focus ring thread and the outer Helicoid. This would establish if I had merely packed in too much grease, or if the grease was too viscose. It turned out to be the later. There seemed to be very little difference in the effort required to turn the focus ring.
So, another squirt of Jizer and a wipe down, followed by a long warm bath in the Ultrasonic cleaner� Then, refreshed, I cleaned the lens parts! 
Once they had dried out on top of a radiator, I used a short, flat profiled artist brush to 'paint' the White Lithium grease into the helicoid. Advise please on whether this is a good or bad method. This time I only did the inner one. The same with the thread between the body and the outer helicoid. On reassembling, I could immediately tell the difference. Much looser.
When I finally fitted all the parts back together, the overall feel was still a little tight but a vast improvement on before. I'm hoping that it will loosen up as the grease settles itself out towards the extents of the threads.
There does seem to be a very minute amount of play that i can just about feel as I change directions when focusing. This leads me to believe that i have used slightly too little grease and it is still too thick for the job. So I think that once I find a lighter grade of grease, I'll be going through the whole process again. I did however, find the entire experience very rewarding. Taking a quite frankly unusable lens and with a little TLC, breathing a little more life into what I found to be an astonishingly beautiful piece of engineering, which I hope will go on for another 50 years. This could get addictive!!
I expect I will be purchasing some lighter grade grease at some point soon and will update this thread (pun intended) with the results. I think I might be picking up some more 'seized up' lenses too and having a bash at getting them well again.
So please, if anyone has an old dog of a lens that�s all sticky and gummed up, PM me and i'll give you the address of a good care home!
Here's the tools I used to perform the task.
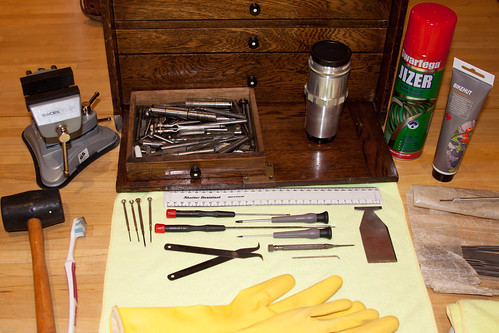
ToolsReady by Alun H, on Flickr
The fish shaped metal object near the end of the ruler is the "key" that I made for undoing the Baffle tube. The Hacksaw ( out of the picture) and the vice were used to make the 'key' from a piece of 1/16th mild steel plate which I found in my great grandfather's tool box. Modern equivalent would be about 1.5mm thick.
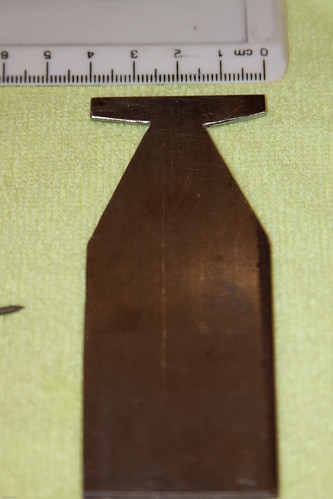
Homemade_Baffle_Key by Alun H, on Flickr
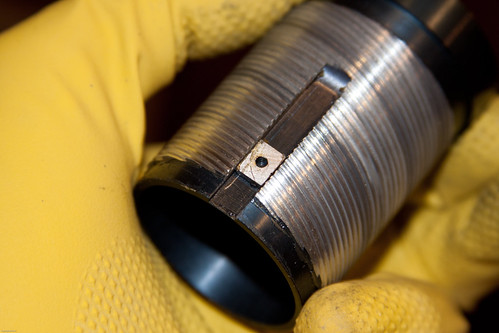
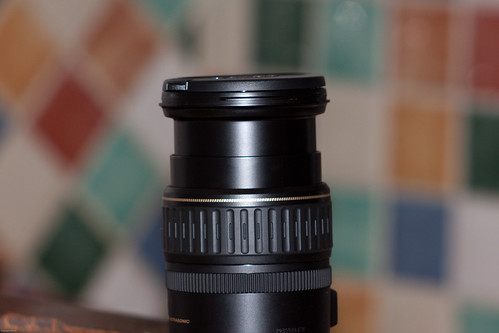
The neck of the M42 thread is narrower than the baffle tube inner diameter.
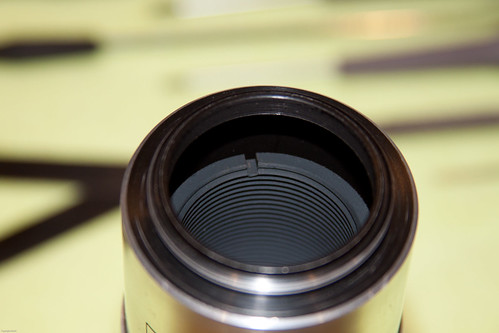
CZJTriotar_Baffle_Tube by Alun H, on Flickr
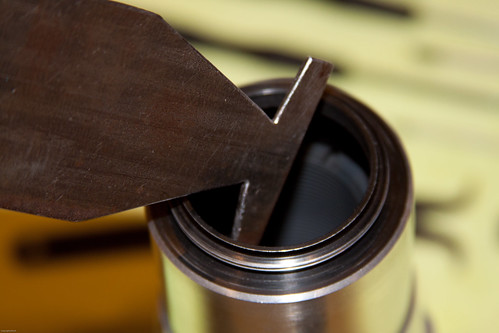
Baffle_and_Key by Alun H, on Flickr
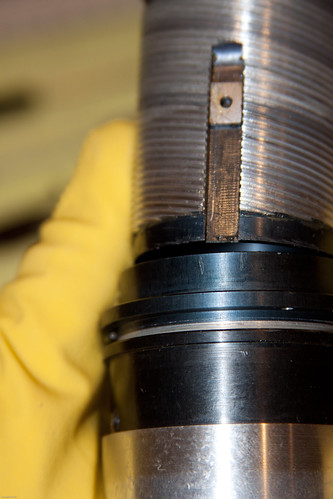
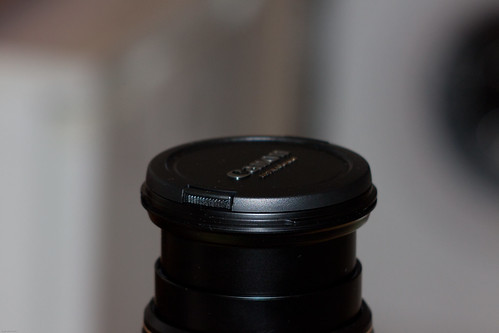
Hence the cut outs to allow the key to enter the end of the tube.
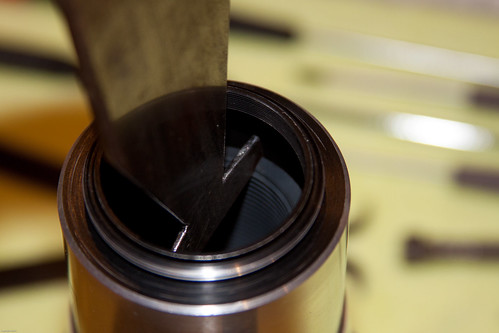
Key_In_Position by Alun H, on Flickr
Note: If you intend to disassemble the lens carrier I would suggest the purchase of a good quality Lens Spanner Wrench. I didn't need to as all I was working on was the focus helicoid assembly.
Lifting the lens carrier out, reveals four screws.
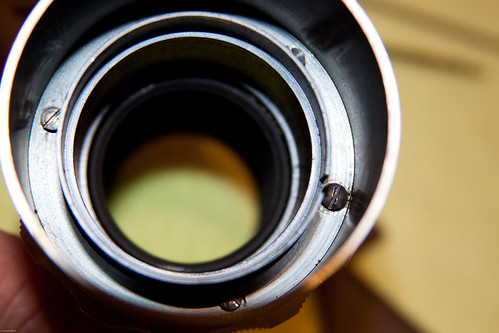
Helicoid_Screws by Alun H, on Flickr
The three evenly spaced ones hold the focus ring to the outer helicoid. The fourth, slightly larger Pan Head screw (on the far right) provides the end stop and does not need to be removed. Note the marks where someone else has had a go at it before. All these screws had been coated in rather to much Loctite. It had dribbled down the inside of the focus ring and left sticky marks where it had run. Luckily it had not quite made it to the lens carrier! What are peoples opinions with regard to using loctite on internal lens screws?.. I didn't use any.
Lifting off the focus ring leaves you with the lens tube, outer helical and inner helical. The baffle tube is still inside, trapped between the inner helical and the lens tube. It is lose at this point so be careful not to allow it to rattle around inside.
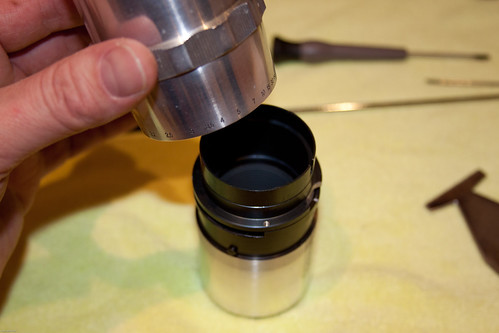
Focus_Ring_removal by Alun H, on Flickr
I marked line up points between the three parts.
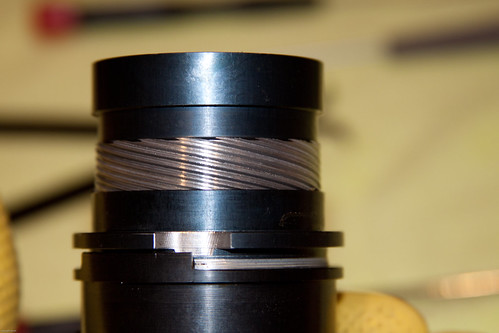
Helicoids by Alun H, on Flickr
Holding the lens tube with the near/ far DOF markings facing you, there are there are two small screws, one to the left and one to the right. The one on the right connects to a slide which rests in a slot in the inner helical, The slide holds the inner helical (and lens carrier) in line with the lower lens tube and slides up the slot as the focus ring/ outer helicoid is turned. Undo the one on the right and you will be able to turn (left handed thread) and remove the inner helical. It is very important to mark where the helicoids part company, so that they go back together in the same place. There are about 15 helical threads and as many positions where the two tubes can be put back together. Only one is the correct one.
Extraction_Markings by Alun H, on Flickr
I marked the slide to show which way to put it back in the groove of the inner helix tube. Judging from the gouge in the slot it looks like this has perhaps been put back wrong in the past. It slid without feeling scratchy so I marked it with a cross and decided it was going back the same way it came out.
Inner_Helicoid_Slide by Alun H, on Flickr
Here's all the parts laid out. From left to right. Lens carrier, focus ring, inner helicoid, outer helicoid (wrong way round), lower lens tube, baffle tube.
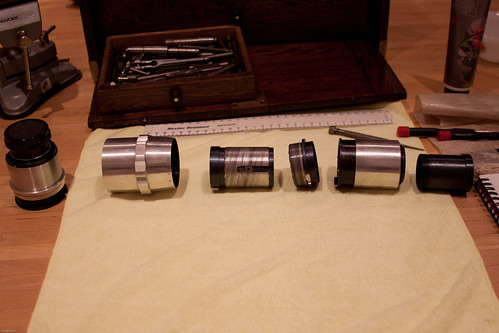
Exploded_View by Alun H, on Flickr
Re assembly really is just doing the reverse of what you did to take it apart. I'd like to hear some tips on where to apply grease and how. I've heard some people say they put a smear around the first half inch of one helicoid and some blobs at certain points on each helical thread. It would be interesting to know if anyone has a service manual for this lens from the old Jena factory.
Once back together, I stuck it on the front of my 550D and took a shot of my other Jena 135 Zeiss at 4.5. Whoever said these Triotars are soft is lying!
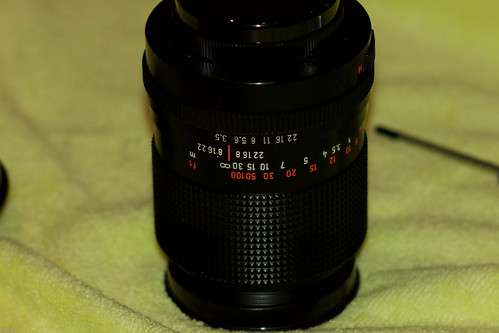
Wide_Open by Alun H, on Flickr
Wide open, this is a little softer, in a velvety smooth cream dream kind of way. I can't wait to put this to use on skin. Love the O. O. F. - soft, soft, soft.
Nice_Bokeh by Alun H, on Flickr
Again wide open, with a washing machine in the background.
Still_Sharp by Alun H, on Flickr
So, I�ll be testing infinity later today but I think it will be ok� fingers crossed.
Thanks for the input so far everyone!
AlunH
_________________
DSLR: - Canon EOS500D/ 1DS /6D/Canon
SLR: - Canon FTb QL /Pentax Spotmatic ...
Lenses (AF): - EF 20-35mm f2.8L, EF 28-135mm IS USM, EF 50mm f1.8, EF 70-200 f2.8L USM, EF 2x Extender Mk1...
Lenses (MF): - Canon FL 55 /1.2, Carl Zeiss Jenna MC 135mm 3.5, Jupiter 9 85mm f2, Helios 44-2 58mm f2, Helios 44-m 58mm f2, Carl Zeiss Jena Triotar 135mm f4, CZJ 35mm f2.4 Flektogon (x2), CZJ Pancolar 1.8/80mm, MTO 1000mm f10, MTO 500mm f8, Pentax SMC Takumar 50mm f1.4, RMC Tokina 17mm f3.5, Tamron SP17 /3.5, Pentacon 135mm f2.8
|
|
| Back to top |
|
|
indianadinos
Joined: 06 Jul 2008
Posts: 1310
Location: Toulouse, France
Expire: 2011-12-05
|
| Posted: Wed Feb 08, 2012 12:03 am Post subject: |
|
|
indianadinos wrote:
Wow, really interesting fix ... Now i can try to reassemble an old Triotar i bought dismantled ...
_________________
Please visit my blogs Shooting with a Pentax K10D / FF Visions
Takumar: 24/3.5, 28/3.5, 35/2, 35/3.5, 50/1.4, 55/1.8, 85/1.8, 105/2.8, 120/2.8, 135/3.5, 150/4, 200/4
Pentax-K: M28/2.8, K28/3.5, M50/1.4, A50/1.7, M50/4 Macro, K85/1.8, K105/2.8, K135/2.5, M200/4, M70-150/4
Zeiss: Flektogon 20/2.8, 20/4, 35/2.4, 35/2.8, Tessar 50/2.8, Pancolar 50/1.8, Biotar 58/2, Sonnar 135/3.5, Sonnar 180/2.8
Meyer: Primagon 35/4.5, Domiplan 50/2.8, Oreston 50/1.8, Primoplan 58/1.9, Trioplan 100/2.8, Orestor 100/2.8, Orestor 135/2.8
Schacht/Steinheil: Travenar 90/2.8, Travenon 135/4.5, Quinar 135/2.8, Quinar 135/3.5
Russian: MIR 37B, Industar 50/3.5, Helios 44M & 44M-2, Jupiter 37A
P6: Flektogon 50/4, Biometar 80/2.8, Orestor 300/4
Nikkor: Nikkor-O 35/2, Micro 55/3.5, Nikkor-S 50/1.4, Nikkor-Q 135/2.8
Fuji: EBC 28/3.5, EBC 55/3.5 Macro, EBC 135/2.5
Misc Lenses: Kiron 105/2.8 Macro, Tamron SP90/2.5
... and a few other Vivitar, Tamron, Sigma and Soligor lenses ...
|
|
| Back to top |
|
|
AlunH
Joined: 26 Jan 2012
Posts: 23
Location: London
|
| Posted: Wed Feb 08, 2012 1:08 pm Post subject: |
|
|
AlunH wrote:
| indianadinos wrote: |
| Wow, really interesting fix ... Now i can try to reassemble an old Triotar i bought dismantled ... |
If you do, I'd like to hear what lube you use and how it turns out. Post up some pics if you do work on the lens carrier too please!
_________________
DSLR: - Canon EOS500D/ 1DS /6D/Canon
SLR: - Canon FTb QL /Pentax Spotmatic ...
Lenses (AF): - EF 20-35mm f2.8L, EF 28-135mm IS USM, EF 50mm f1.8, EF 70-200 f2.8L USM, EF 2x Extender Mk1...
Lenses (MF): - Canon FL 55 /1.2, Carl Zeiss Jenna MC 135mm 3.5, Jupiter 9 85mm f2, Helios 44-2 58mm f2, Helios 44-m 58mm f2, Carl Zeiss Jena Triotar 135mm f4, CZJ 35mm f2.4 Flektogon (x2), CZJ Pancolar 1.8/80mm, MTO 1000mm f10, MTO 500mm f8, Pentax SMC Takumar 50mm f1.4, RMC Tokina 17mm f3.5, Tamron SP17 /3.5, Pentacon 135mm f2.8
|
|
| Back to top |
|
|
56 DIN

Joined: 24 Apr 2010
Posts: 1656
Location: Germany Erbach /ODW
Expire: 2021-11-18
|
| Posted: Wed Feb 08, 2012 8:15 pm Post subject: |
|
|
56 DIN wrote:
thanks for this clear & precise description
_________________
Thomas
NEX & manual lenses
Nikon & manual lenses |
|
| Back to top |
|
|
GT
Joined: 23 Nov 2011
Posts: 11
Location: Italy
|
| Posted: Sun Feb 19, 2012 10:26 pm Post subject: |
|
|
GT wrote:
Don't know if this can help, but when I dismantled my Triotar I first tried Vaseline-based grease, and found it too thick; then Lithium grease, and still too thick. In the end, I tried sewing machine lubricant (Sirenol) and found it was much better. A Triotar will never be silky smooth in focusing, anyway. That's a common issue with many russian lenses as far as I know.
I have to admit that I didn't clean the Lithium grease completely off before lubricating with the sewing machine oil. So my good result may be the effect of a mixture of the two. I know it's not recommended to mix lubricants, but actually I don't think it will hurt, and I like the new feeling very much.
ps To unscrew the Baffle tube, I simply took a huge nail (whose diameter was thick enough to stand the pressure without twisting) and operated it with pliers.
No need to build up a special tool
Same with the spanner wrench, I used a good caliper.
Women are more practical, lol : ))
Last edited by GT on Sun Feb 19, 2012 10:33 pm; edited 1 time in total |
|
| Back to top |
|
|
Hutschi
Joined: 19 Nov 2014
Posts: 10
Location: Dresden
|
| Posted: Sat Jan 20, 2024 6:42 pm Post subject: |
|
|
Hutschi wrote:
Thank you very much, it will help a lot, even if a very old thread.
I have a triotar, too, now.
It is for Exa mount. I made an adaptor for Pentax. I will miss infinity. Is there any method to readjust the focus length? |
|
| Back to top |
|
|
|
|


