RokkorDoctor


Joined: 27 Nov 2021
Posts: 1269
Location: Kent, UK
|
 Posted: Tue Mar 15, 2022 10:18 pm Post subject: Minolta MC TELE ROKKOR-QE 100mm f/3.5 focus adjust Posted: Tue Mar 15, 2022 10:18 pm Post subject: Minolta MC TELE ROKKOR-QE 100mm f/3.5 focus adjust |
 |
|
RokkorDoctor wrote:
In this post I will show how to adjust infinity focus on the Minolta MC TELE ROKKOR-QE 100mm f/3.5 lens. It is a bit different in construction from the later Rokkor lenses that most will be used to.
I gave this lens a full CLA yesterday, as it had been waiting for this for some time. It was apparent that it had already seen a few service attempts before by someone not using the right tools. TBH I suspect this one was cobbled together from the good parts of a few other lenses; some machined surfaces were not quite the perfect fit I am used to seeing from Minolta. Nevertheless, all parts were genuine MC TELE ROKKOR-QE 100mm f/3.5 parts, but probably not all from concurrent production runs. Nevertheless, I got it to perfect condition, apart from it not quite reaching infinity focus 
As I needed to partly disassemble it again to adjust infinity focus, I thought I would share this with you folks.
On most Rokkor lenses (esp. the later ones) infinity focus can easily be adjusted by loosening three screws that fix the focus grip to the helicoid, and adjust the rotational alignment. This can normally be done with all parts of the lens in place, after removal of the name/beauty ring only.
However, on this lens (and quite a few older Rokkor lenses) this is impossible because the focus grip is attached to the helicoid in a fixed position. On these lenses, collimation adjustment is done via shims/spacers between the optical block and the helicoid.
Note: On some older Rokkor lenses you can make a rough collimation adjustment using the fine thread of the helicoid, but this only really works if you can can realign the course thread of the helicoid accordingly. The focus grip on this lens can be fitted in three distinct positions relative to the helicoid, at 120 degree intervals. If the course thread on the helicoid has a multiple of three starts, this would work (roughly). Unfortunately the course thread on this helicoid is a 14-start thread, so no dice...
Anyway, let's start...
The first task is to find out by how much infinity focus is short. I don't have a collimator that can tell me how much short focus is, so I am using a body with split-prism focussing screen of known perfect collimation, a viewfinder magnifier, and a very distant subject. As I can't focus beyond infinity, I judge by eye by how much I need to hold focus back to double the split image error, which is the far f/5.6 DOF mark. This indicates that infinity focus will be reached if we could rotate the focus ring infinity mark to the near f/5.6 DOF mark. Measuring the lens extension between the far f/5.6 DOF mark and the center mark is 0.18mm. This makes sense; the usual film-day COC criterion is 30 microns. Times 5.6 is 0.17mm: close enough.
So, we need to shift the optical block nearer to the mount by 0.18mm.
On this lens, we start by removing the light baffle on the back, remove the three black pan-head screws and lift out the baffle:
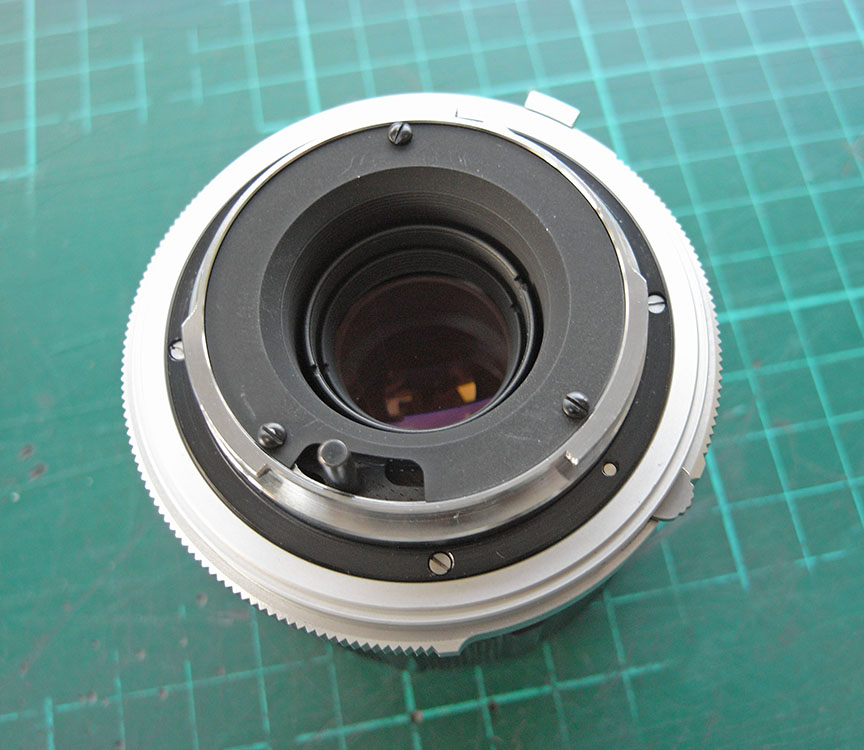
Why do we do that? In order to adjust infinity focus we will need to take the entire optical block out; reinserting it later requires alignment of a couple of aperture control tabs, and this is impossible to see with the baffle still in place. In the image below, with the lens set to MFD, you can see the two aperture linkages that will need to be re-engaged later on; the aperture close-down transmission on the left, the aperture setting transmission on the right. The tab in the middle is the helicoid key.

Next, we turn our attention to the name ring, which will need to come out. The spanner wrench slots bear some scars from a previous attempt by someone; I will use my rubber tools:

Once the name ring is out, we can see a small grub screw that locks the filter holder in place (apologies, that screw is out of focus in the below image  ). Once that grub screw has been loosened a bit, the filter holder unscrews anti-clockwise (usual right-hand thread). Note some more scars inflicted to the front cell spanner wrench slots by someone not having used the appropriate tools, or a poor quality one... ). Once that grub screw has been loosened a bit, the filter holder unscrews anti-clockwise (usual right-hand thread). Note some more scars inflicted to the front cell spanner wrench slots by someone not having used the appropriate tools, or a poor quality one...

With the filter holder removed (lurking in the background), we can notice two things:
1) the screws holding down the focus grip go through simple round holes; there is no facility to re-align the focus grip relative to the helicoid
2) we can see the retaining ring/nut that fixes the entire optical block & aperture mechanism in the helicoid

Next, we remove the retaining ring/nut, and then we can lift out the entire optical/aperture block:

In the below close-up, in the middle we can see the brass spacer used for collimation of the lens. As this lens can't quite reach infinity, this means this spacer is slightly to thick.

In another close-up, we can see the aperture control mechanism, which consist of a brass ring/collar screwed onto the back of the block with a very fine thread. On the left is the aperture open/close control rod, at the bottom the control arc that determines the aperture size. The fork at the top connects to the aperture ring of the lens and rotates the brass collar to adjust the aperture size. Yesterday I did need to re-lubricate the fine thread with some molybdenum disulfide dry-lube, which required removal of the brass collar and therefore removal of the aperture assembly.

The spacer is 2.60mm thick (yes, there is a parallax in the image below  ). We need to remove 0.18mm so the target thickness is 2.42mm. A vernier calliper is also a vital measurement tool to have if you do a lot of lens repair. Get one with 0.02mm resolution like the one below, the ones with 0.05mm resolution are not really accurate enough for lens work... ). We need to remove 0.18mm so the target thickness is 2.42mm. A vernier calliper is also a vital measurement tool to have if you do a lot of lens repair. Get one with 0.02mm resolution like the one below, the ones with 0.05mm resolution are not really accurate enough for lens work...

I have no milling setup, so trimming down the spacer I do by careful lapping on sandpaper on a very flat stone surface. First with some course paper:

Once the target thickness is almost reached, I finish off with some fine 1200 grit sandpaper:

The space that this spacer will slot into will have a very small radius in the corner, so it is important to chamfer the edges to allow for clearance:

Finally, with the new spacer fitted, assembly is in reverse order, starting with re-inserting the optical block. I find that rubber name-ring removal tools are an excellent tool to offer up the lens block to the helicoid block. I use the same method for reinserting an assembled aperture assembly into an optical block, e.g. with the rubber tool shown on the left.

Finally, with everything reassembled, infinity focus now checks out 100% spot on. 
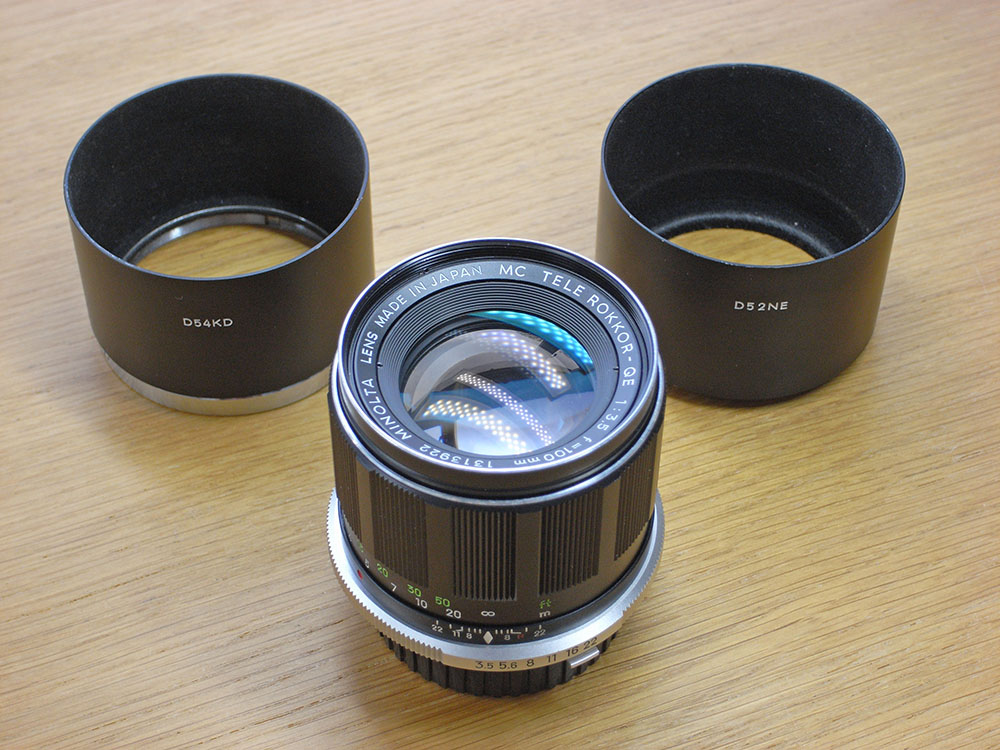
The final product shown below, with the two compatible lens hoods shown alongside:
_________________
Mark
SONY A7S, A7RII + dust-sealed modded Novoflex/Fotodiox/Rayqual MD-NEX adapters
Minolta SR-1, SRT-101/303, XD7/XD11, XGM, X700
Bronica SQAi
Ricoh GX100
Minolta majority of all Rokkor SR/AR/MC/MD models made
Sigma 14mm/3.5 for SR mount
Tamron SP 60B 300mm/2.8 (Adaptall)
Samyang T-S 24mm/3.5 (Nikon mount, DIY converted to SR mount)
Schneider-Kreuznach PC-Super-Angulon 28mm/2.8 (SR mount)
Bronica PS 35/40/50/65/80/110/135/150/180/200/250mm |
|


