| View previous topic :: View next topic |
| Author |
Message |
David

Joined: 13 Apr 2011
Posts: 1869
Location: Denver, Colorado
Expire: 2013-01-25
|
 Posted: Wed Oct 31, 2012 5:29 am Post subject: Home-made Perspective-control Lens for <$40 Posted: Wed Oct 31, 2012 5:29 am Post subject: Home-made Perspective-control Lens for <$40 |
 |
|
David wrote:
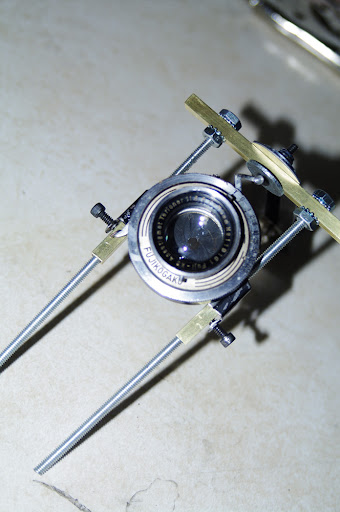
So I made a perspective-control lens tonight for less than $40. I picked up an old Fuji Kogaku Lyra Six III with a rusty, perforated body not capable of being saved, but the lens is good (though I had to completely disassemble it to clean all the elements.)
The lens' image circle is in the 85mm range, and my K-7's sensor diagonal is 28mm. In sum, this means the lens can provide up to 18.3mm of horizontal shift, and 22.2mm of vertical shift (in each irection for both measure.) Diagonally, the lens can provide something like 27.4mm of shift. Are all of those millimeters usable, not really. But it's still some pretty impressive stuff.
I mounted the lens on a horizontal standard to provide vertical lift and up to ~65 degrees of lens upward flipability. That's FAR more than could ever be realistically used, but it's better to have too much than not enough.
The lens standard attached to the camera's tripod mount via part of one of those drywall angle things that bought and proceeded to destroy. The lens standard also rotates on the same plane as the monorail that connects to the tripod socket via a friction grip held fast by two washers and a nylon lock nut.
Some downsides:
1- The monorail is too close to the camera and doesn't allow the full downward actuation.
2- My far-from-precise machining (performed with a hand drill on the kitchen counter) put the standard columns at an inward angle, making bringing the lens to the sensor center-line a challenge.
3- The sliders on the lens are pretty poorly designed.
4- The bellows fabric hasn't arrived, so my test shots relied on a black pillow case in a dark room. So the test shot quality simply isn't there yet.
5- The lens stops down to f32, but the K-7's sensor (so far, without a bellows) seems to be unhappy with any shots taken smaller than f16.
6- The lens is 80-year-old technology (and construction), so it's not optically perfect... to say the least.
7- Getting the lens into plane with the sensor poses some difficulty.
8- Looks totally ghetto.
Some advantages:
1- This is a 75mm lens, and the monorail is about 100mm long, allowing some 'macro' work.
2- The lens can be focused on the monorail OR with the front element, increasing the usable range.
3- Greater movement latitude than any perspective-control lens available in APS-C or 35mm.
4- Looks totally ghetto.
The next iteration would benefit from a flat piece of brass used for the standard and formed with a press break or maybe hand-held pliers (where am I going to get a press break?) Also, making the monorail attach to the lens mount instead of the camera would increase usability. Adjusting the monorail length with this on a tripod (the tripod screwed into the monorail attachment bolt) is basically impossible without having the bolt attaching the monorail to the camera be dangerously loose. A later iteration would also benefit from a monorail that drops below the camera's bottom to allow downward tilts and shifts.
Additionally, this lens bracket was not ideally suited for this application and required some creative engineering (putting it on backwards and drilling some holes) to get it to fit this use. A future iteration will require some thought about how to best accommodate this lens.
Now for some pictures. First, the device:
1

2

3

4
5

Now the device 'mounted' on the K-7. When the bellows fabric arrives, I'm going to make a simple bag bellows and put an old k flange on one end (a leftover from a now-deceased 970's Sigma lens -- not one anyone would miss.)
6

7

8

9

10

11

12

Now, some samples. Bear in mind that to darken the lens-to-sensor space, I used a pillow case held in place with masking tape. So there's some glare and quality loss due to that. I suspect that the bellows fabric will yeield better results.
13

f6.3 before I got the pillow case (light blocking provided by being in a dark room.)
14
f6.3 (light blocking provided by my hands)
15

f8 (pillow case in place)
16

f32 (I suspect this will improve once the bellows is completed.)
17

f16
Edited to include closing remarks.
In sum, I'm really excited by these initial results. With the pillowcase in place and the lens stopped down, the images have good color, contrast, and clarity. The sharpness at 100% is acceptable, for sure. In fact, here's a 100% crop of the f16 image:

So, when the bellows is made, this lens will get some additional tests and then there will be some real samples to share. After that, a framework rebuild.
_________________
http://www.youtube.com/user/hancockDavidM |
|
| Back to top |
|
 |
ZoneV
Joined: 09 Nov 2009
Posts: 1632
Location: Germany
Expire: 2011-12-02
|
| Posted: Wed Oct 31, 2012 8:54 am Post subject: |
|
|
ZoneV wrote:
Thank you for showing this!
Interessting approach to get a tilt shift setup!
I wonder if it could help further, to use the screws for vertical shift. Make the screws turnable and control the shift very exact. But probably this is not needed.
An enlarger lens ~80mm/4 or such could probably help regarding the image quality.
_________________
Camera modification, repair and DIY - some links to look through: http://www.4photos.de/camera-diy/index-en.html
I AM A LENS NERD!
Epis, Elmaron, Emerald, Ernostar, Helioplan and Heidosmat.
Epiotar, Kameraobjektiv, Anastigmat, Epis, Meganast, Magnagon, Quinar, Culmigon, Novotrinast, Novflexar, Colorplan, Sekor, Kinon, Talon, Telemegor, Xenon, Xenar, Ultra, Ultra Star. Tessar, Janar, Visionar, Kiptar, Kipronar and Rotelar.
|
|
| Back to top |
|
|
hoanpham

Joined: 31 Jan 2011
Posts: 2575
Expire: 2015-01-18
|
| Posted: Wed Oct 31, 2012 9:28 am Post subject: |
|
|
hoanpham wrote:
That's awesome work David.
I like the mech how it tilts and shifts the lens.
It should be perfect for macro shots with tiltable bellow,
Or mounting on a nex body.
_________________
La migliore cura di LBA � imparare una nuova lingua. Le meilleur rem�de de LBA est d'apprendre une nouvelle langue. La mejor cura del LBA es aprender una nueva lengua. |
|
| Back to top |
|
|
|
|
|
You cannot post new topics in this forum
You cannot reply to topics in this forum
You cannot edit your posts in this forum
You cannot delete your posts in this forum
You cannot vote in polls in this forum
|


