| View previous topic :: View next topic |
| Author |
Message |
dan_


Joined: 05 Dec 2012
Posts: 1058
Location: Romania
Expire: 2016-12-19
|
 Posted: Sat Oct 11, 2014 2:03 pm Post subject: Forcing the Visionar 100mm f/1.6 to accept a diaphragm Posted: Sat Oct 11, 2014 2:03 pm Post subject: Forcing the Visionar 100mm f/1.6 to accept a diaphragm |
 |
|
dan_ wrote:
First episode
- Preparing for the battle -
I have my 100mm f/1.6 Visionar for some time, I have tested it with an electrical tape adapted mount and it renders in a very pleasant way, to me at least.
The IQ is very good already wide opened but with a cardboard smaller opening it improves even more. And, being a 35mm. movie projector lens, it covers very well APS-C format. Testing it in front of my Speed Booster proved that even the FF image it produces is quite good.
It is a lens that certainly deserves a proper mount, diaphragm and focusing helicoid.
Unfortunately, because of its large barrel diameter and very small ( only ~0.5mm.) distance between it's front and back groups none of my diaphragm units fit it.
The project of giving a diaphragm to my Visionar was looking like a dead horse and I even considered selling the lens.
But the situation recently changed when I found an old and crappy Russian LF lens with a large diaphragm. That diaphragm,
after measuring it again an again, seamed to fit the Visionar. That made me reconsider the Visionar project.
First I've disassemble both the Visionar and the Industar-51, the diaphragm donor lens, and measured them as precisely as possible.
After that I made my battle plan and some basic scratches. It looks like the diaphragm unit will match the Visionar, but very tight.
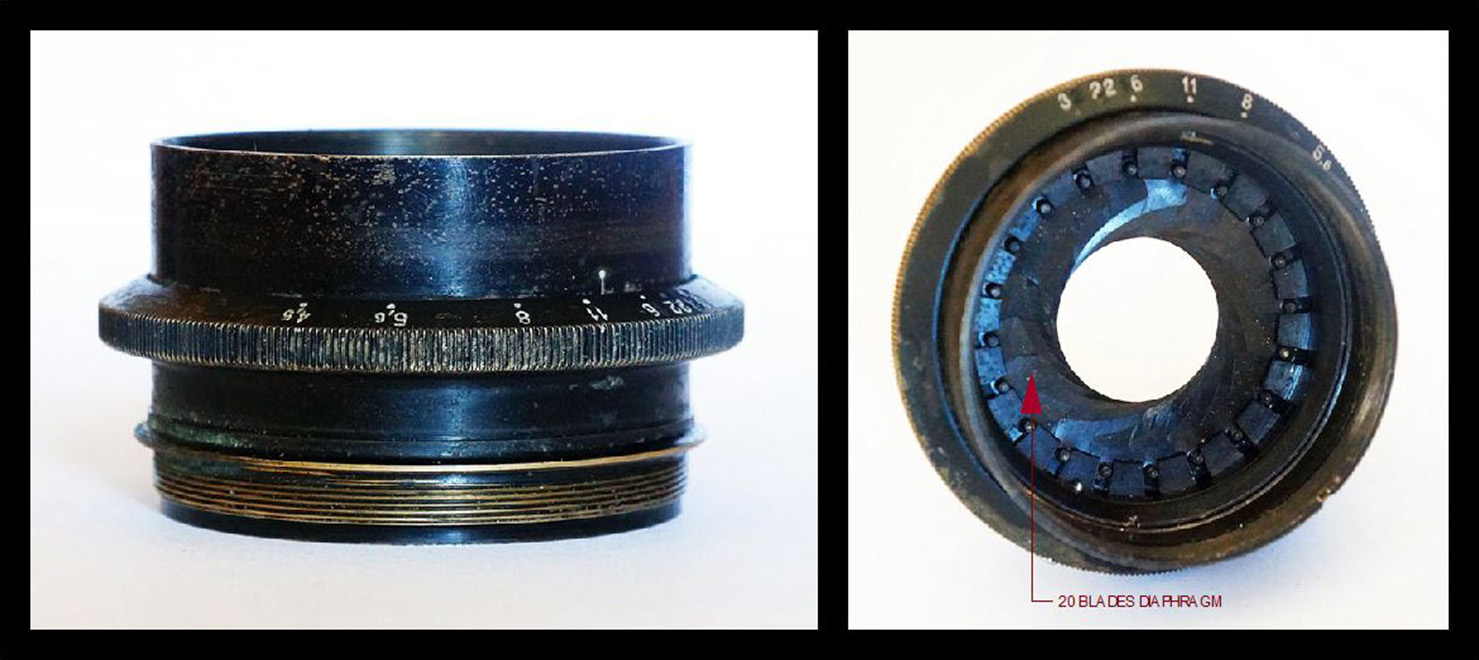
Let me introduce you the enemies.

The diaphragm unit, with 20 blades.

The disassembled 100mm Visionar.
The total length of 97.5 mm should be the lens length after remounting the front and back groups in diaphragm, otherwise I'll loose the battle.
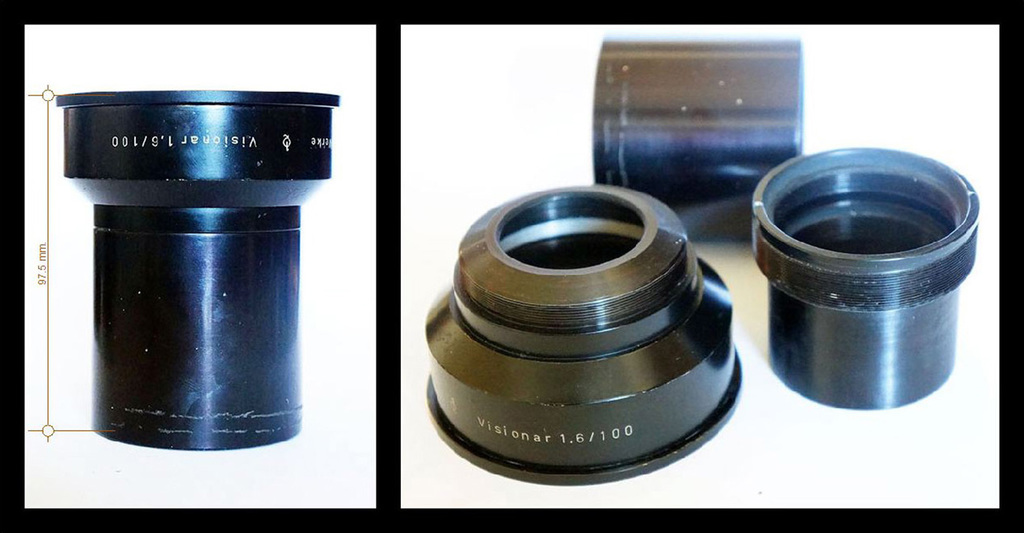
The front lens group mount.
The back lens group mount.
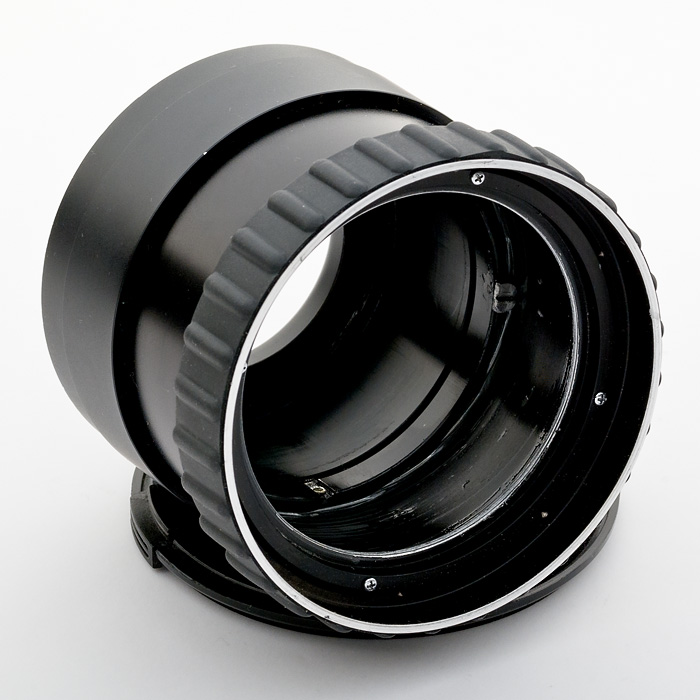
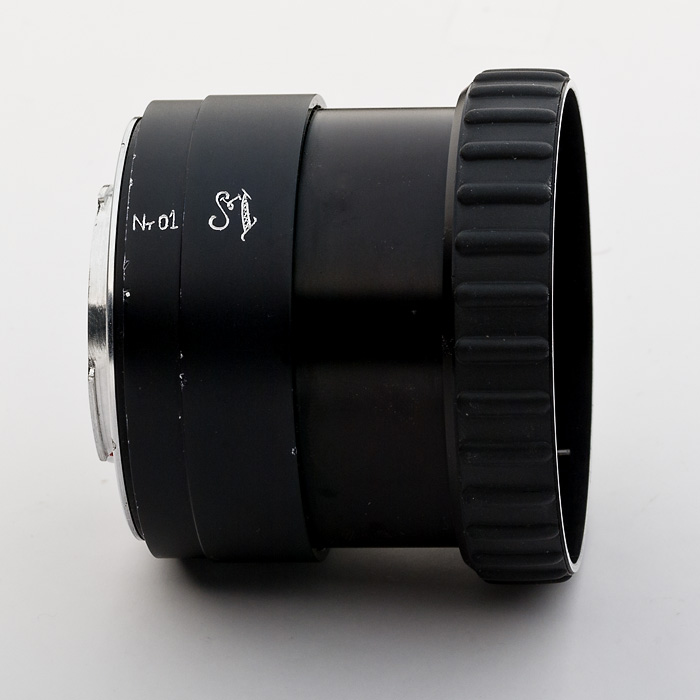
Fortunately I already have the focusing helicoid with a Leica R mount. This is the easy part.
Now the hard part begins.
There are some inner diameters I couldn't measure with the precision I wanted and both on the front and back groups barrels will have,
after the lathe will bring them to the needed dimension, short zones with a wall thickness, if I'm lucky, of only 0.2mm-0.25mm.
Those regions are just before the last lens of the front group and last lens of back group, so they don't need to support much weight.
It's going to be a tight fight between me and the Visionar. Who will win? We'll see.
This evening I'll go to my old lathe master and begin with adapting the front group of the lens to the diaphragm.
To be continued (hopefully, tommorow)
Last edited by dan_ on Sat Oct 11, 2014 10:08 pm; edited 1 time in total |
|
| Back to top |
|
 |
kds315*


Joined: 12 Mar 2008
Posts: 16661
Location: Weinheim, Germany
Expire: 2021-03-09
|
| Posted: Sat Oct 11, 2014 5:45 pm Post subject: |
|
|
kds315* wrote:
Looking forward to seeing your progress on that Dan!
_________________
Klaus - Admin
"S'il vient a point, me souviendra" [Thomas Bohier (1460-1523)]
http://www.macrolenses.de for macro and special lens info
http://www.pbase.com/kds315/uv_photos for UV Images and lens/filter info
https://www.flickr.com/photos/kds315/albums my albums using various lenses
http://photographyoftheinvisibleworld.blogspot.com/ my UV BLOG
http://www.travelmeetsfood.com/blog Food + Travel BLOG
https://galeriafotografia.com Architecture + Drone photography
Currently most FAV lens(es):
X80QF f3.2/80mm
Hypergon f11/26mm
ELCAN UV f5.6/52mm
Zeiss UV-Planar f4/60mm
Zeiss UV-Planar f2/62mm
Lomo Уфар-12 f2.5/41mm
Lomo Зуфар-2 f4.0/350mm
Lomo ZIKAR-1A f1.2/100mm
Nikon UV Nikkor f4.5/105mm
Zeiss UV-Sonnar f4.3/105mm
CERCO UV-VIS-NIR f1.8/45mm
CERCO UV-VIS-NIR f4.1/94mm
CERCO UV-VIS-NIR f2.8/100mm
Steinheil Quarzobjektiv f1.8/50mm
Pentax Quartz Takumar f3.5/85mm
Carl Zeiss Jena UV-Objektiv f4/60mm
NYE OPTICAL Lyman-Alpha II f1.1/90mm
NYE OPTICAL Lyman-Alpha I f2.8/200mm
COASTAL OPTICS f4/60mm UV-VIS-IR Apo
COASTAL OPTICS f4.5/105mm UV-Micro-Apo
Pentax Ultra-Achromatic Takumar f4.5/85mm
Pentax Ultra-Achromatic Takumar f5.6/300mm
Rodenstock UV-Rodagon f5.6/60mm + 105mm + 150mm
|
|
| Back to top |
|
|
IAZA

Joined: 16 Apr 2010
Posts: 2587
Location: Indonesia
|
| Posted: Sun Oct 12, 2014 2:10 pm Post subject: |
|
|
IAZA wrote:
I have the same idea, not find solution yet.
Where will you put the blades, on original Visionar tube? or in between lens and helicoid?
_________________
nex5, Olympus EPM1, yashica half 14, Canon eos 650 want to see samples of mine? please click My lenses
and My gallery
~Suat~ |
|
| Back to top |
|
|
kds315*
Joined: 12 Mar 2008
Posts: 16661
Location: Weinheim, Germany
Expire: 2021-03-09
|
| Posted: Sun Oct 12, 2014 2:42 pm Post subject: |
|
|
kds315* wrote:
| IAZA wrote: |
I have the same idea, not find solution yet.
Where will you put the blades, on original Visionar tube? or in between lens and helicoid? |
Dan took the Visionar apart and tries to get the iris between front and rear group - the best way to do it.
_________________
Klaus - Admin
"S'il vient a point, me souviendra" [Thomas Bohier (1460-1523)]
http://www.macrolenses.de for macro and special lens info
http://www.pbase.com/kds315/uv_photos for UV Images and lens/filter info
https://www.flickr.com/photos/kds315/albums my albums using various lenses
http://photographyoftheinvisibleworld.blogspot.com/ my UV BLOG
http://www.travelmeetsfood.com/blog Food + Travel BLOG
https://galeriafotografia.com Architecture + Drone photography
Currently most FAV lens(es):
X80QF f3.2/80mm
Hypergon f11/26mm
ELCAN UV f5.6/52mm
Zeiss UV-Planar f4/60mm
Zeiss UV-Planar f2/62mm
Lomo Уфар-12 f2.5/41mm
Lomo Зуфар-2 f4.0/350mm
Lomo ZIKAR-1A f1.2/100mm
Nikon UV Nikkor f4.5/105mm
Zeiss UV-Sonnar f4.3/105mm
CERCO UV-VIS-NIR f1.8/45mm
CERCO UV-VIS-NIR f4.1/94mm
CERCO UV-VIS-NIR f2.8/100mm
Steinheil Quarzobjektiv f1.8/50mm
Pentax Quartz Takumar f3.5/85mm
Carl Zeiss Jena UV-Objektiv f4/60mm
NYE OPTICAL Lyman-Alpha II f1.1/90mm
NYE OPTICAL Lyman-Alpha I f2.8/200mm
COASTAL OPTICS f4/60mm UV-VIS-IR Apo
COASTAL OPTICS f4.5/105mm UV-Micro-Apo
Pentax Ultra-Achromatic Takumar f4.5/85mm
Pentax Ultra-Achromatic Takumar f5.6/300mm
Rodenstock UV-Rodagon f5.6/60mm + 105mm + 150mm
|
|
| Back to top |
|
|
iangreenhalgh1

Joined: 18 Mar 2011
Posts: 15679
Expire: 2014-01-07
|
| Posted: Sun Oct 12, 2014 4:32 pm Post subject: |
|
|
iangreenhalgh1 wrote:
Goodluck Dan.
I did the same thing with a Leitz Colorplan 2.5/90 and the iris from an old brass lens just marked Air Ministry.
I thought it was a success at first but I must have got the spacing wrong somehow as the lens with iris produced only soft results.
_________________
I don't care who designed it, who made it or what country it comes from - I just enjoy using it! |
|
| Back to top |
|
|
dan_
Joined: 05 Dec 2012
Posts: 1058
Location: Romania
Expire: 2016-12-19
|
| Posted: Sun Oct 12, 2014 8:51 pm Post subject: |
|
|
dan_ wrote:
First of all thank you all for encouragement.
Second episode
- The frontal confrontation begins with an attack from the back -
Yesterday's goal was to give the front group mount its final shape and to attach it to the diaphragm unit.
In order to do that I had to first attach to the diaphragm the back lens group as close to the diaphragm blades as possible and after that it was simple to precisely count the front group dimensions in order to keep unchanged the total length of the lens - 97.5 mm.
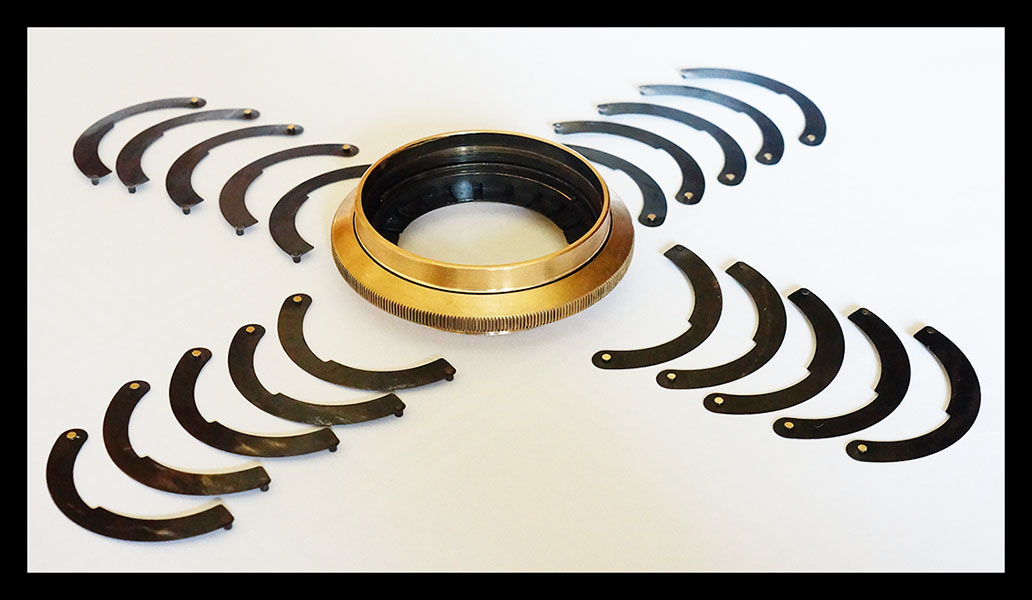
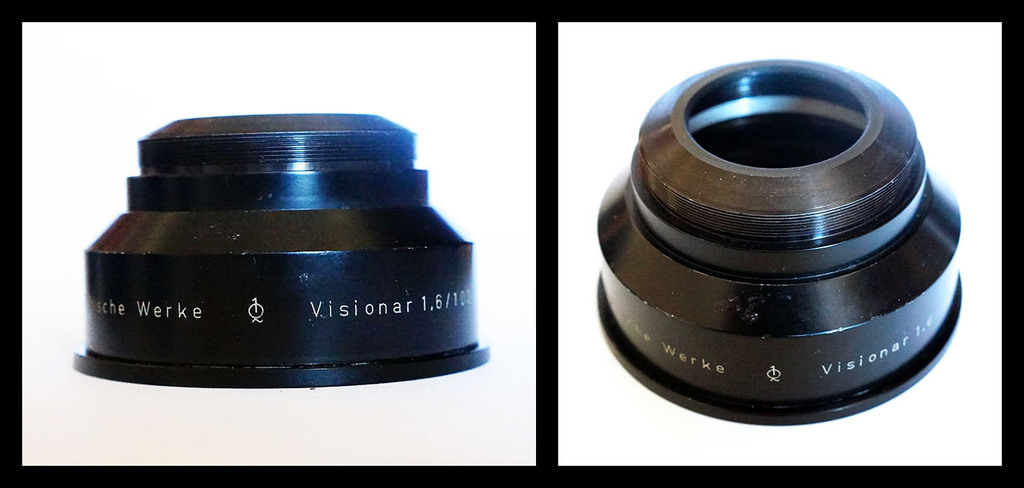
THE DIAPHRAGM UNIT
First step was to cut the diaphragm unit to the minimal length that will permit an easy way to mount the front and back groups and an easy operation. I cut it at 6 mm. from the diaphragm ring to front and back. This led to a total length of 20 mm.
After that I made a 0.5 mm. steps thread on the back - this will permit me to mount the back group to the diaphragm. The front group can be fitted to screw into a thread already existent inside the diaphragm unit.
The diaphragm unit looks now like that:
In order to allow the back group to be mounted as close as possible to the diaphragm blades the back rivets of the blades had to be shortened a little.
The diaphragm unit and the 20 blades:

Now I could go to the next step :
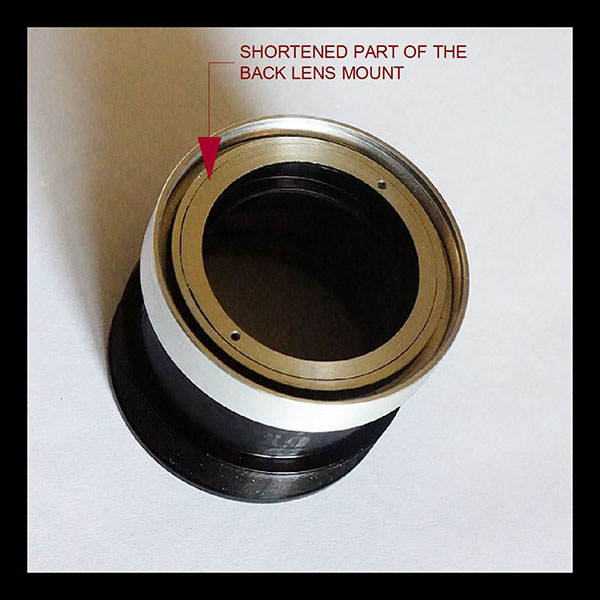
MOUNTING THE BACK GROUP TO THE DIAPHRAGM UNIT
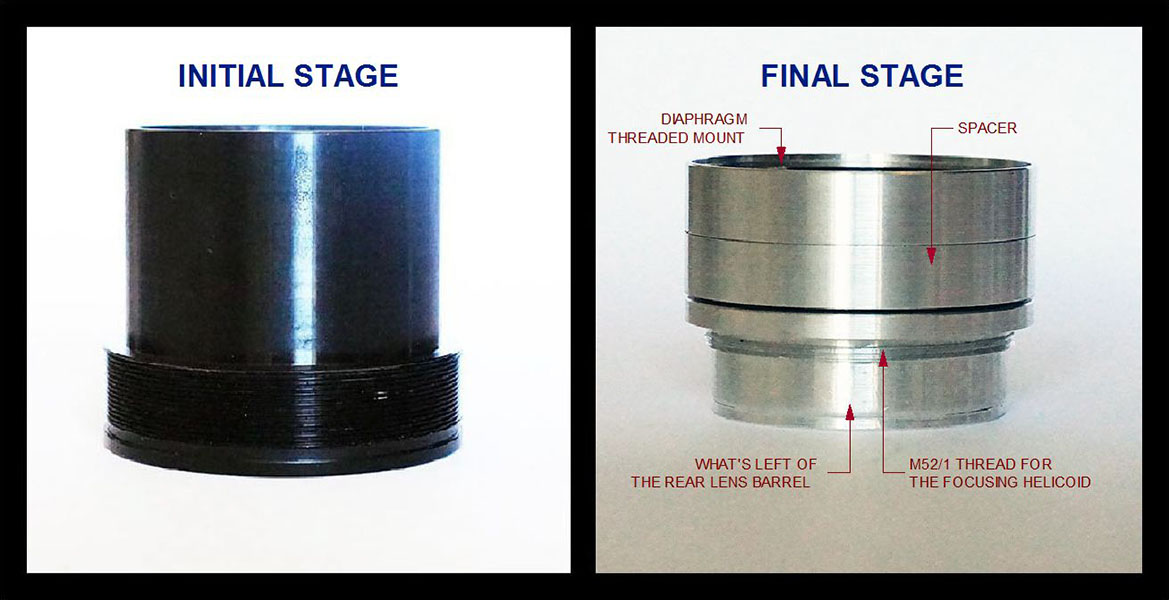
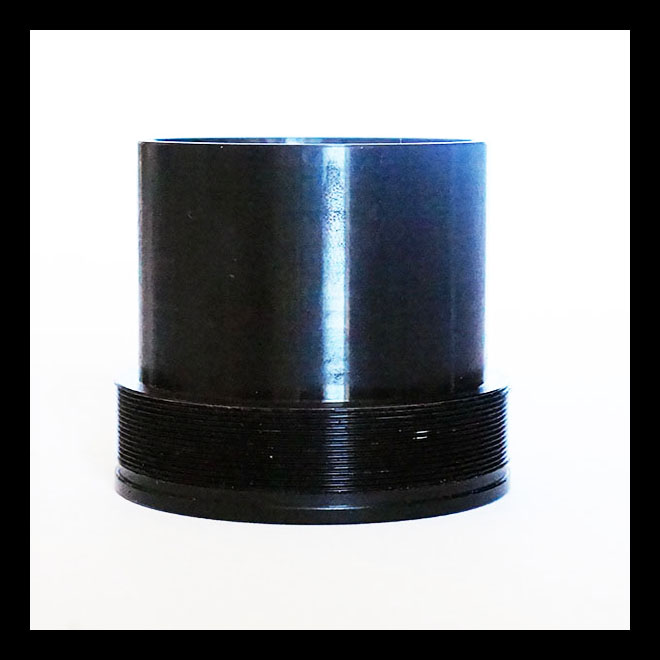
First step was to shorten the part of the back group mount facing the diaphragm as much as possible. That will allow the back group to be
mounted with 2.5 mm closer to the diaphragm blades. Now the distance between front and back groups metallic parts should be 3 mm instead of 0.5 mm as it initially was. The distance between the glass parts remains unchanged.
It looks now like that:

Next step was to make a mounting piece that will screw on both the back of the diaphragm and on the back group (into a previously made thread at it's end facing the diaphragm) .
The mounting piece allows me to mount the back group at 0.3 mm off the diaphragm blades. This mounting piece, after correctly screwed at its position, is cemented to the back group barrel.
The back group mount looks now like this:

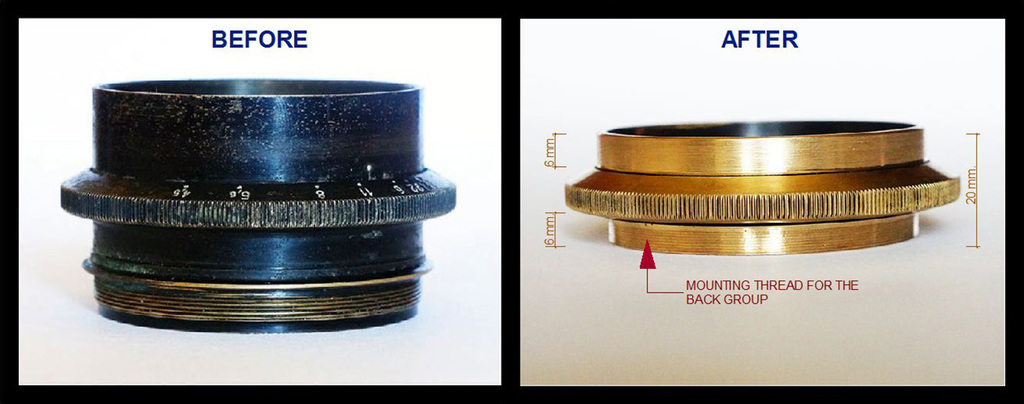
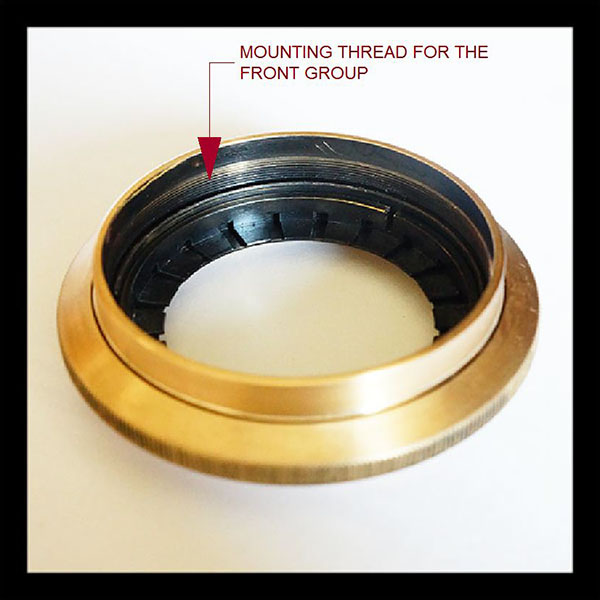
MOUNTING THE FRONT GROUP TO THE DIAPHRAGM UNIT
It was now possible to count the final dimensions of the front group mount in order to maintain the total length of the lens.
The front group had to screw directly into a thread existent inside the diaphragm unit. Wile making the corresponding thread on the front barrel the protective Al. mask of the last lens of the front group had to be cut. It was better if I could keep it, but I wasn't lucky - I had to cut it. By cutting it the free distance between the front and back groups increased with 3 mm., to a total of 6 mm. The distance between the glass parts remains unchanged.
The front group looks now like that:
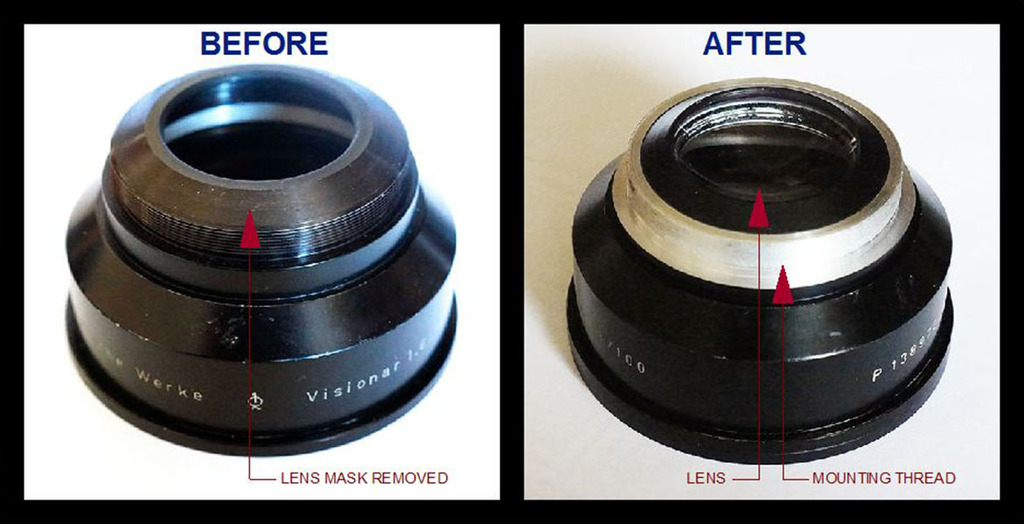
Because of cutting its protective mask the last lens (facing the diaphragm) of the front group will need to be cemented in place on the
barrel. I'll do that by using some elastic Silicone glue to allow the different dilatation between the metal mount and glass.
It has some Schnideritte and I'll replace its lateral black paint as well.
Now both the front and back groups barrels mounted to the diaphragm are looking like that:

The goal of mounting a diaphragm between the front and back lens groups while preserving the total length of the lens (97.5 mm.) was achieved.
This first battle gave me an useful advantage but a price had to be paid : I had to cut the protective Al. mask of the last lens from the front group and I'll need to cement that lens to the barrel.
The war is not yet over and surprises can occur.
In the next episode, probably in 3-4 days, I'll make the back group match the Leica R focusing helicoid.
To be continued
Last edited by dan_ on Mon Oct 13, 2014 7:16 am; edited 3 times in total |
|
| Back to top |
|
|
Olivier

Joined: 18 Feb 2009
Posts: 5083
Location: France
Expire: 2015-08-06
|
| Posted: Sun Oct 12, 2014 9:27 pm Post subject: |
|
|
Olivier wrote:

Congratulations for the GREAT job done !
I'm really impressed.
What Tools have you to your disposal ?
_________________
Olivier - Moderator 
Dslr : Olympus Pen E-P2 - Fujifilm X-Pro2 - Canon 5D MkII.
SLr and MF lenses : for feedback and helping people, cameras and lenses I own : full list here http://forum.mflenses.com/viewtopic,p,1442740.html#1442740 |
|
| Back to top |
|
|
Lloydy

Joined: 02 Sep 2009
Posts: 7795
Location: Ironbridge. UK.
Expire: 2022-01-01
|
| Posted: Sun Oct 12, 2014 10:34 pm Post subject: |
|
|
Lloydy wrote:
impressive work Dan, I look forward to the conclusion. 
_________________
LENSES & CAMERAS FOR SALE.....
I have loads of stuff that I have to get rid of, if you see me commenting about something I have got and you want one, ask me.
My Flickr https://www.flickr.com/photos/mudplugga/
My ipernity -
http://www.ipernity.com/home/294337 |
|
| Back to top |
|
|
SVP

Joined: 15 Jan 2009
Posts: 665
Location: Greece
Expire: 2017-12-17
|
| Posted: Mon Oct 13, 2014 8:24 am Post subject: |
|
|
SVP wrote:
Brave man! Congrats! |
|
| Back to top |
|
|
dan_
Joined: 05 Dec 2012
Posts: 1058
Location: Romania
Expire: 2016-12-19
|
| Posted: Mon Oct 13, 2014 9:22 pm Post subject: |
|
|
dan_ wrote:
Thank you gentlemen!
| Olivier wrote: |
| What Tools have you to your disposal ? |
Most of the work was done by lathe, Olivier. |
|
| Back to top |
|
|
Olivier
Joined: 18 Feb 2009
Posts: 5083
Location: France
Expire: 2015-08-06
|
| Posted: Mon Oct 13, 2014 9:47 pm Post subject: |
|
|
Olivier wrote:
Thank you Dan.
I don't have the skills to use a lathe.
It's a very precise work.
_________________
Olivier - Moderator
Dslr : Olympus Pen E-P2 - Fujifilm X-Pro2 - Canon 5D MkII.
SLr and MF lenses : for feedback and helping people, cameras and lenses I own : full list here http://forum.mflenses.com/viewtopic,p,1442740.html#1442740 |
|
| Back to top |
|
|
David
Joined: 13 Apr 2011
Posts: 1869
Location: Denver, Colorado
Expire: 2013-01-25
|
| Posted: Tue Oct 14, 2014 6:24 am Post subject: |
|
|
David wrote:
Wow! I'm looking forward to sample shots.
_________________
http://www.youtube.com/user/hancockDavidM |
|
| Back to top |
|
|
uddhava

Joined: 22 Aug 2012
Posts: 3072
Location: Hungary
Expire: 2021-06-21
|
| Posted: Tue Oct 14, 2014 9:16 am Post subject: |
|
|
uddhava wrote:
Interesting, but way beyond me.
I look forward to the results. Hope everything goes well. |
|
| Back to top |
|
|
dan_
Joined: 05 Dec 2012
Posts: 1058
Location: Romania
Expire: 2016-12-19
|
| Posted: Thu Oct 23, 2014 7:50 pm Post subject: |
|
|
dan_ wrote:
Thank you David and uddhava.
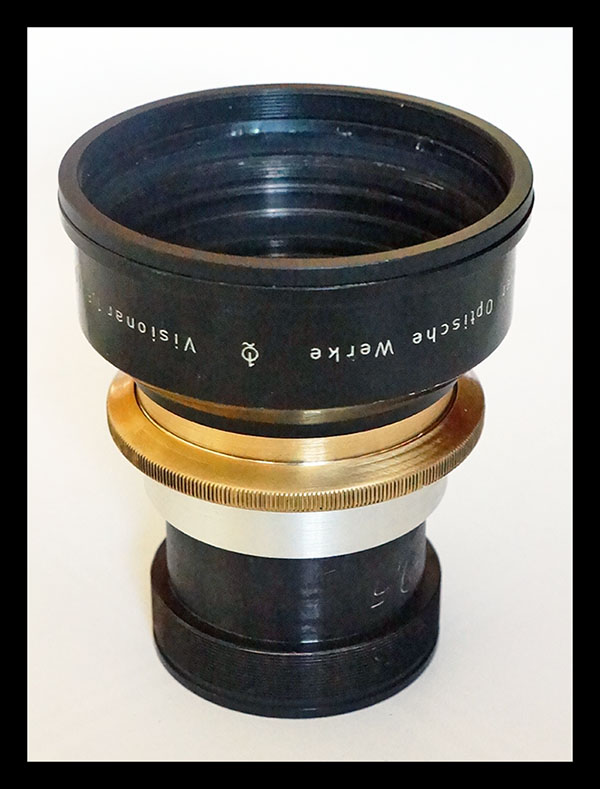
Last episode
- The Completed Adaptation -
Finally I've managed to successfully complete the adaptation.
The rear group is now looking like this:

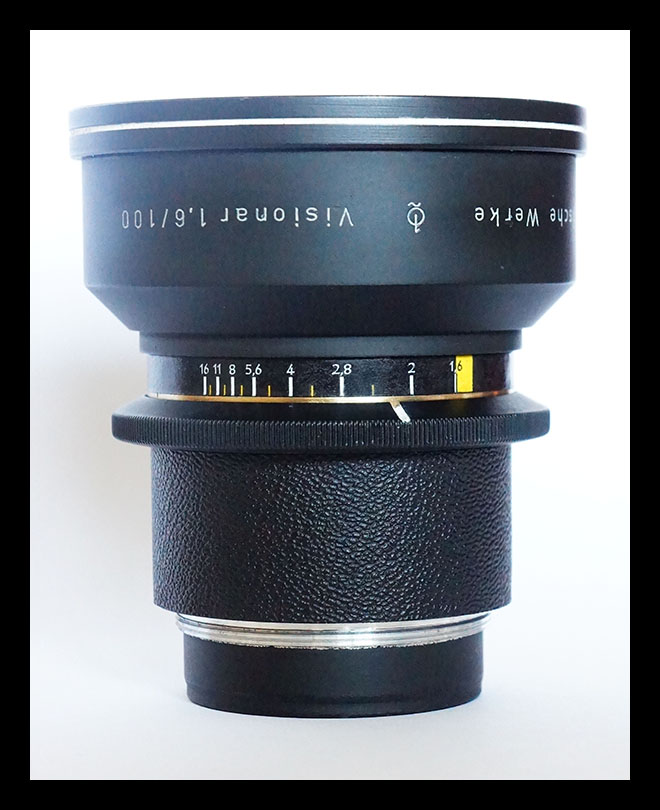
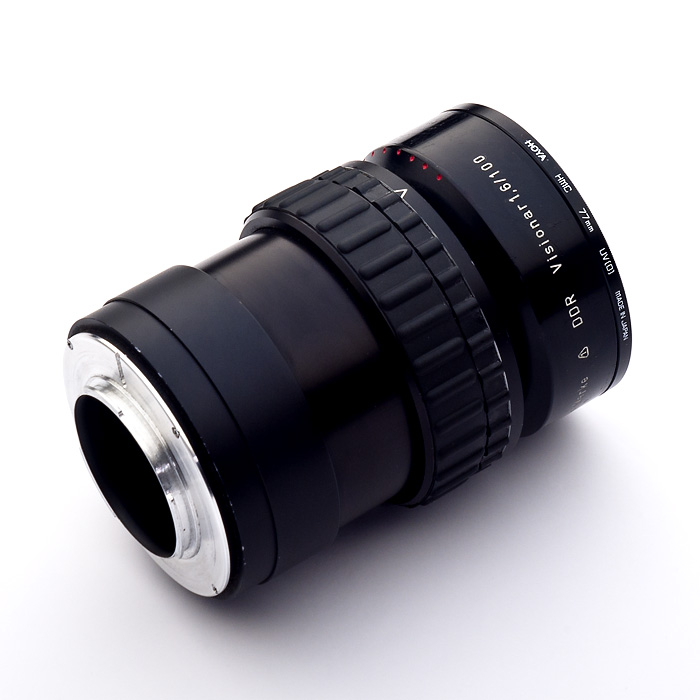
After marking the diaphragm f-stops and painting the whole lens is looks like this:


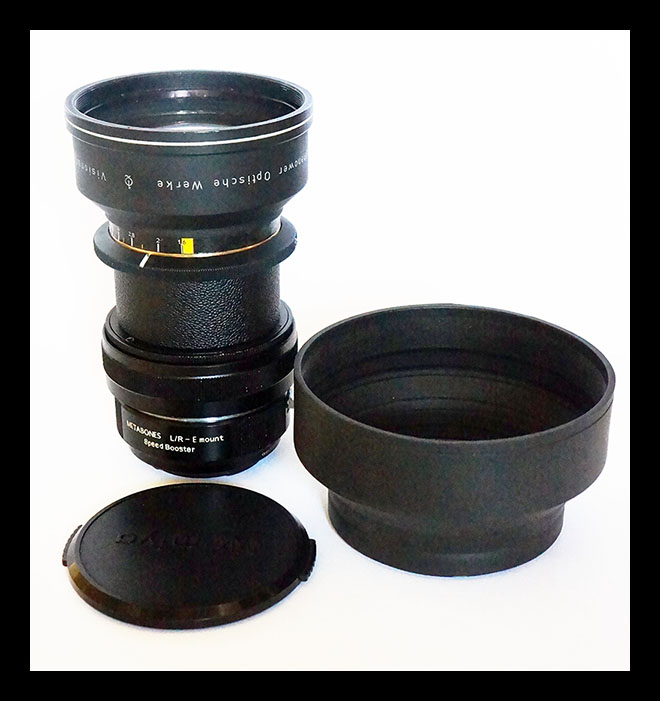
And mounted in the focusing helicoid, with Speed Booster, lens cap anh hood:

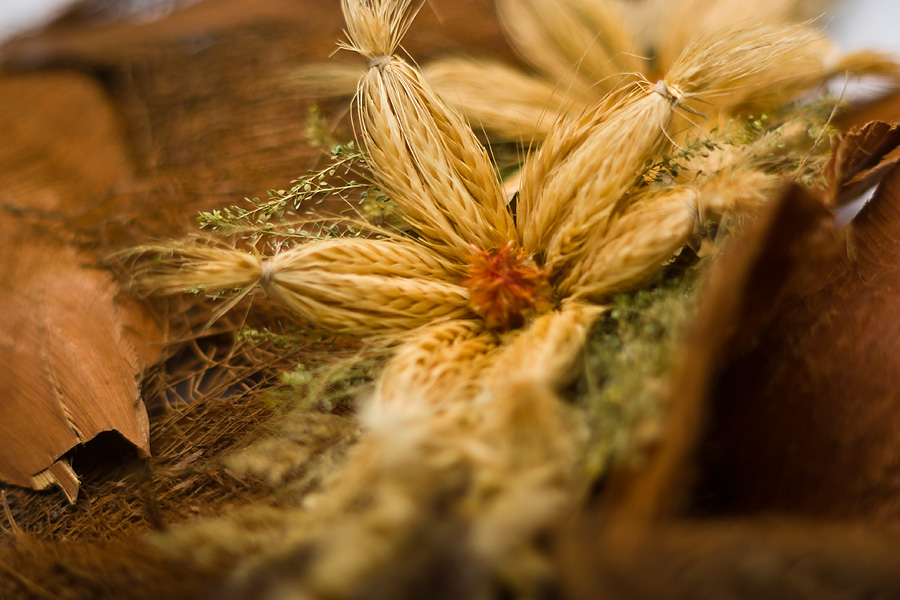
First sample photos taken with this lens can be seen here:
http://forum.mflenses.com/visionar-100-mm-f-1-6-and-speed-booster-first-shots-t68540.html |
|
| Back to top |
|
|
Olivier
Joined: 18 Feb 2009
Posts: 5083
Location: France
Expire: 2015-08-06
|
| Posted: Thu Oct 23, 2014 9:16 pm Post subject: |
|
|
Olivier wrote:
Wow !
Fantastic job and great results.
Thanks a lot for sharing. 
_________________
Olivier - Moderator
Dslr : Olympus Pen E-P2 - Fujifilm X-Pro2 - Canon 5D MkII.
SLr and MF lenses : for feedback and helping people, cameras and lenses I own : full list here http://forum.mflenses.com/viewtopic,p,1442740.html#1442740 |
|
| Back to top |
|
|
Lloydy
Joined: 02 Sep 2009
Posts: 7795
Location: Ironbridge. UK.
Expire: 2022-01-01
|
| Posted: Thu Oct 23, 2014 10:07 pm Post subject: |
|
|
Lloydy wrote:
I've been an engineer, a hands on engineer, all my life. I have a workshop at home, I enjoy engineering. I appreciate engineering. This lens conversion is engineering, and damn good engineering. A great job Dan, this is not some hack job.
_________________
LENSES & CAMERAS FOR SALE.....
I have loads of stuff that I have to get rid of, if you see me commenting about something I have got and you want one, ask me.
My Flickr https://www.flickr.com/photos/mudplugga/
My ipernity -
http://www.ipernity.com/home/294337 |
|
| Back to top |
|
|
dan_
Joined: 05 Dec 2012
Posts: 1058
Location: Romania
Expire: 2016-12-19
|
| Posted: Fri Oct 24, 2014 4:41 pm Post subject: |
|
|
dan_ wrote:
Thank you Olivier and Lloydy, your appreciation is very valuable to me. |
|
| Back to top |
|
|
SVP
Joined: 15 Jan 2009
Posts: 665
Location: Greece
Expire: 2017-12-17
|
| Posted: Sat Oct 25, 2014 8:10 pm Post subject: |
|
|
SVP wrote:
Very professional-looking result, congrats! |
|
| Back to top |
|
|
dan_
Joined: 05 Dec 2012
Posts: 1058
Location: Romania
Expire: 2016-12-19
|
| Posted: Sun Oct 26, 2014 11:22 pm Post subject: |
|
|
dan_ wrote:
Thank you. |
|
| Back to top |
|
|
David
Joined: 13 Apr 2011
Posts: 1869
Location: Denver, Colorado
Expire: 2013-01-25
|
| Posted: Mon Oct 27, 2014 1:11 am Post subject: |
|
|
David wrote:
Yeah, you could sell that to me and I wouldn't have any idea it was a conversion. Have you given up your day job yet?
_________________
http://www.youtube.com/user/hancockDavidM |
|
| Back to top |
|
|
dan_
Joined: 05 Dec 2012
Posts: 1058
Location: Romania
Expire: 2016-12-19
|
| Posted: Mon Oct 27, 2014 7:21 pm Post subject: |
|
|
dan_ wrote:
 Not yet, but who knows ... Not yet, but who knows ... |
|
| Back to top |
|
|
Kamosor
Joined: 15 Jan 2014
Posts: 16
Location: Poland
|
| Posted: Fri Oct 31, 2014 9:27 pm Post subject: |
|
|
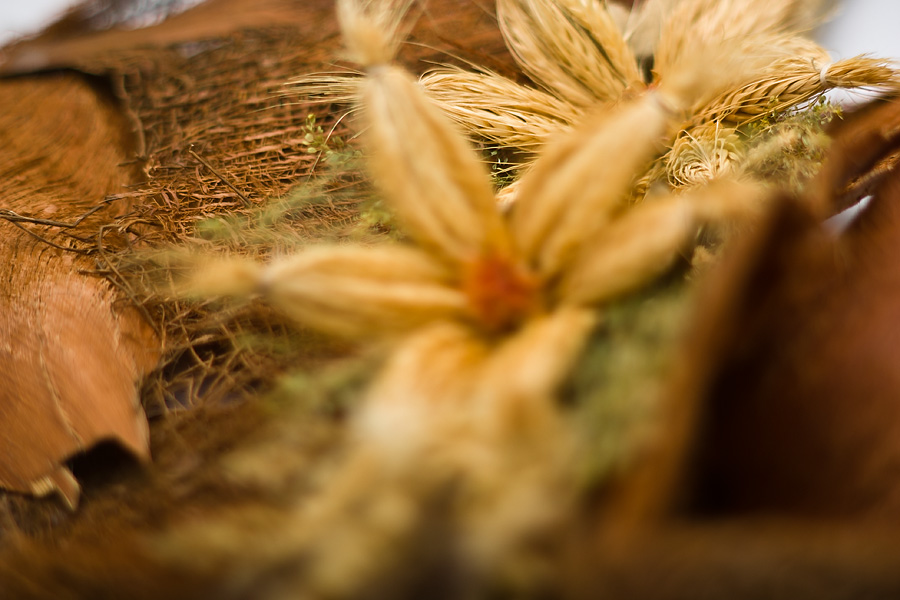
Kamosor wrote:
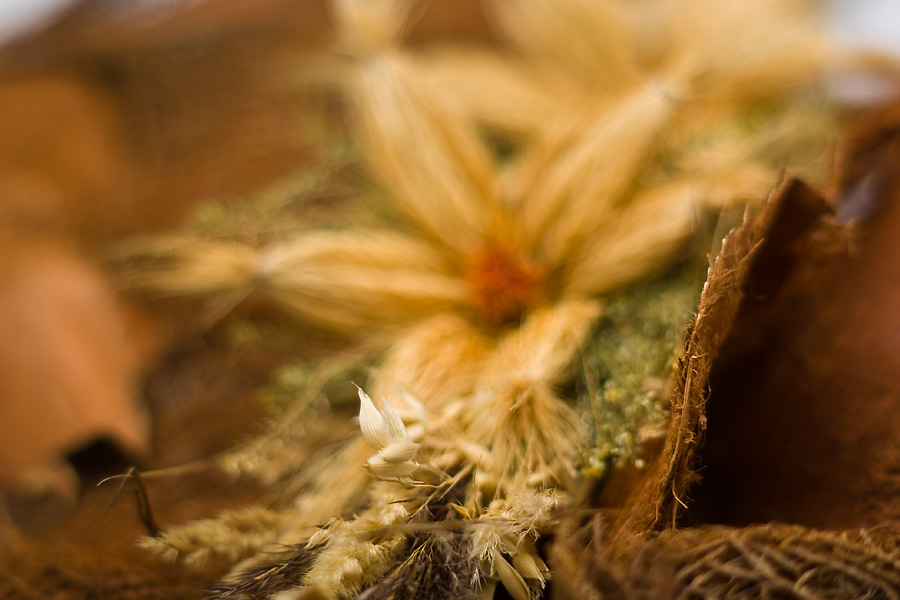
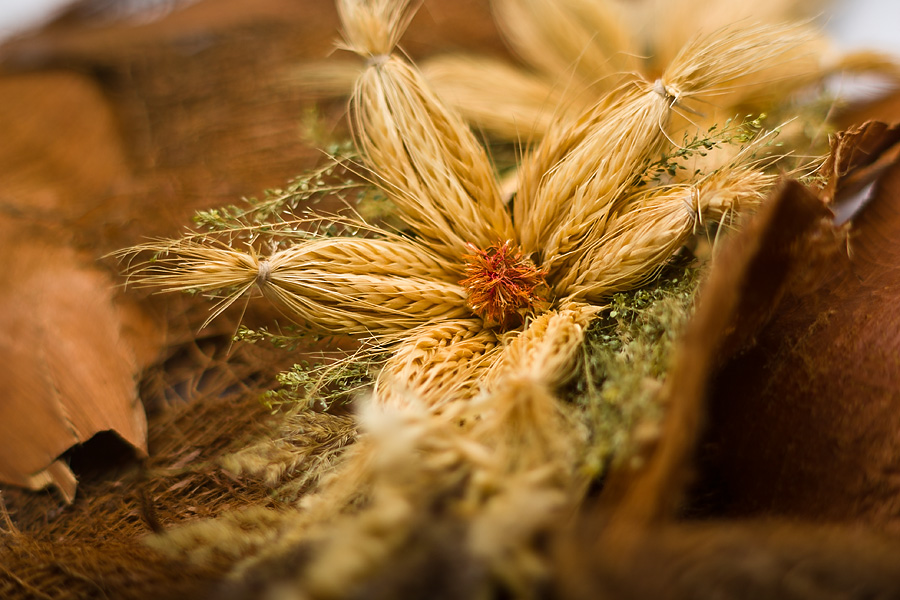
Great job Dan! It is Marek Mazur's simple and compact helicoid focus back and some autumn colors photos.


Play with wide open DOF.

 |
|
| Back to top |
|
|
kds315*
Joined: 12 Mar 2008
Posts: 16661
Location: Weinheim, Germany
Expire: 2021-03-09
|
| Posted: Sat Nov 01, 2014 8:33 am Post subject: |
|
|
kds315* wrote:
Nice results!!
_________________
Klaus - Admin
"S'il vient a point, me souviendra" [Thomas Bohier (1460-1523)]
http://www.macrolenses.de for macro and special lens info
http://www.pbase.com/kds315/uv_photos for UV Images and lens/filter info
https://www.flickr.com/photos/kds315/albums my albums using various lenses
http://photographyoftheinvisibleworld.blogspot.com/ my UV BLOG
http://www.travelmeetsfood.com/blog Food + Travel BLOG
https://galeriafotografia.com Architecture + Drone photography
Currently most FAV lens(es):
X80QF f3.2/80mm
Hypergon f11/26mm
ELCAN UV f5.6/52mm
Zeiss UV-Planar f4/60mm
Zeiss UV-Planar f2/62mm
Lomo Уфар-12 f2.5/41mm
Lomo Зуфар-2 f4.0/350mm
Lomo ZIKAR-1A f1.2/100mm
Nikon UV Nikkor f4.5/105mm
Zeiss UV-Sonnar f4.3/105mm
CERCO UV-VIS-NIR f1.8/45mm
CERCO UV-VIS-NIR f4.1/94mm
CERCO UV-VIS-NIR f2.8/100mm
Steinheil Quarzobjektiv f1.8/50mm
Pentax Quartz Takumar f3.5/85mm
Carl Zeiss Jena UV-Objektiv f4/60mm
NYE OPTICAL Lyman-Alpha II f1.1/90mm
NYE OPTICAL Lyman-Alpha I f2.8/200mm
COASTAL OPTICS f4/60mm UV-VIS-IR Apo
COASTAL OPTICS f4.5/105mm UV-Micro-Apo
Pentax Ultra-Achromatic Takumar f4.5/85mm
Pentax Ultra-Achromatic Takumar f5.6/300mm
Rodenstock UV-Rodagon f5.6/60mm + 105mm + 150mm
|
|
| Back to top |
|
|
dan_
Joined: 05 Dec 2012
Posts: 1058
Location: Romania
Expire: 2016-12-19
|
| Posted: Sat Nov 01, 2014 9:36 am Post subject: |
|
|
dan_ wrote:
Thanks Kamosor. Very nice adapter and results, indeed. What mount is it for?
In fact your adapter was the starting point for mine. At first I was thinking that adapting a diaphragm to a Visionar 100 mm. is not possible but, as far as I remember, you've posted a photo with your adapted Visionar in another post on MFlenses. That showed me that such a possibility exists and made me look for a suitable diaphragm unit. |
|
| Back to top |
|
|
kds315*
Joined: 12 Mar 2008
Posts: 16661
Location: Weinheim, Germany
Expire: 2021-03-09
|
| Posted: Sat Nov 01, 2014 10:12 am Post subject: |
|
|
kds315* wrote:
Kamosor's is for Canon EOS
_________________
Klaus - Admin
"S'il vient a point, me souviendra" [Thomas Bohier (1460-1523)]
http://www.macrolenses.de for macro and special lens info
http://www.pbase.com/kds315/uv_photos for UV Images and lens/filter info
https://www.flickr.com/photos/kds315/albums my albums using various lenses
http://photographyoftheinvisibleworld.blogspot.com/ my UV BLOG
http://www.travelmeetsfood.com/blog Food + Travel BLOG
https://galeriafotografia.com Architecture + Drone photography
Currently most FAV lens(es):
X80QF f3.2/80mm
Hypergon f11/26mm
ELCAN UV f5.6/52mm
Zeiss UV-Planar f4/60mm
Zeiss UV-Planar f2/62mm
Lomo Уфар-12 f2.5/41mm
Lomo Зуфар-2 f4.0/350mm
Lomo ZIKAR-1A f1.2/100mm
Nikon UV Nikkor f4.5/105mm
Zeiss UV-Sonnar f4.3/105mm
CERCO UV-VIS-NIR f1.8/45mm
CERCO UV-VIS-NIR f4.1/94mm
CERCO UV-VIS-NIR f2.8/100mm
Steinheil Quarzobjektiv f1.8/50mm
Pentax Quartz Takumar f3.5/85mm
Carl Zeiss Jena UV-Objektiv f4/60mm
NYE OPTICAL Lyman-Alpha II f1.1/90mm
NYE OPTICAL Lyman-Alpha I f2.8/200mm
COASTAL OPTICS f4/60mm UV-VIS-IR Apo
COASTAL OPTICS f4.5/105mm UV-Micro-Apo
Pentax Ultra-Achromatic Takumar f4.5/85mm
Pentax Ultra-Achromatic Takumar f5.6/300mm
Rodenstock UV-Rodagon f5.6/60mm + 105mm + 150mm
|
|
| Back to top |
|
|
|
|
|
You cannot post new topics in this forum
You cannot reply to topics in this forum
You cannot edit your posts in this forum
You cannot delete your posts in this forum
You cannot vote in polls in this forum
|