| View previous topic :: View next topic |
| Author |
Message |
fstop
Joined: 11 Apr 2010
Posts: 29
|
 Posted: Wed May 05, 2010 3:19 pm Post subject: disassemble & clean element of Sears zoom 28-70m f/3.5-4 Posted: Wed May 05, 2010 3:19 pm Post subject: disassemble & clean element of Sears zoom 28-70m f/3.5-4 |
 |
|
fstop wrote:
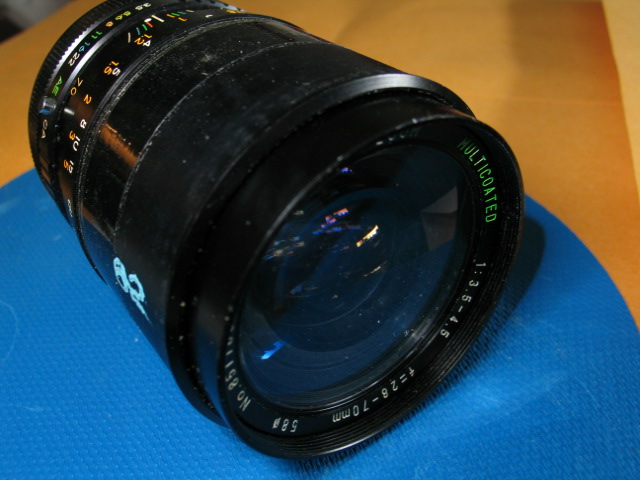
This is a Sears fd 28-70mm f:3.5-4.5 one touch macro zoom lens that I got as an incidental purchase with a camera a little while ago. I wanted to give it a try when I noticed that the second element from front seems to have some hazy or oily marks on it. Apparently somebody left it uncleaned after touching it.
How do I go about opening the lens to reach that (it is right behind the front element)?
I have taken out the decoration ring around the front lens (the plastic ring with the lens specs on it), but the front element did not fall out as I was hoping.
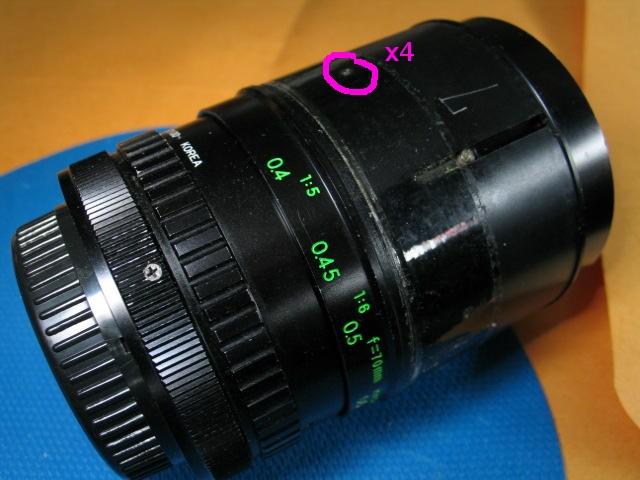
Next, I took off the rubber grip from the zoom ring and I see four small screws under the clear tape and one screw in a slot that appears to guide the zoom motion of the lens.


 |
|
| Back to top |
|
 |
fstop
Joined: 11 Apr 2010
Posts: 29
|
| Posted: Wed May 05, 2010 4:56 pm Post subject: |
|
|
fstop wrote:
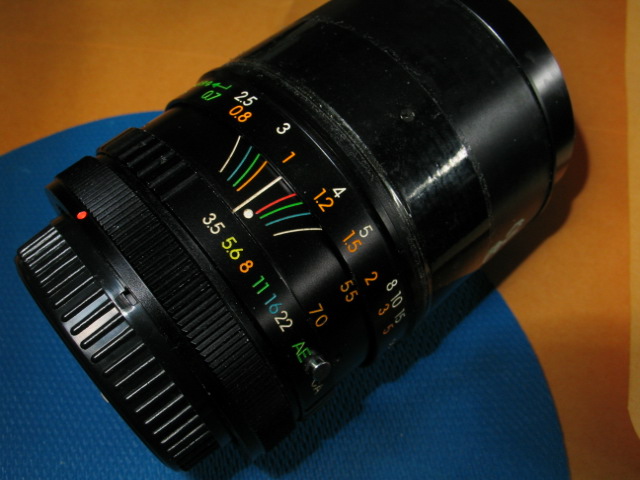
Some progress. By removing the set screw in the slot in the focus ring, I am able to unscrew the front element.
With the front element off, the inner element is accessible. I was able to clean the front surface of the inner element.
However, the oily marks are also behind this element, i.e. on it face on the rear. I am suspecting reaching that has something to do with the four screws on the focusing ring. If I try to unscrew these (by first removing the clear tape that covers them), what should I take care about? Any springs or loose parts to surprise me? |
|
| Back to top |
|
|
unclemack

Joined: 21 Jun 2009
Posts: 51
Location: UK frozen north
|
| Posted: Wed May 05, 2010 11:36 pm Post subject: |
|
|
unclemack wrote:
Hi, I don't know this particular lens but it appears to be of conventional design so I hope some general information may be of help.
First though, just so we're on the same page: a single piece of glass is referred to as an element - from your description I'm guessing you've removed the front (focussing) group of elements by unscrewing the multistart focus threads, sometimes called the helicoid.
Usually behind the decorator bezel there's a locking ring which is unscrewed by using a lens wrench in its 2 notches.
You should be able to see how the front group comes apart if it does come apart. Sometimes an element is held in by the edge of the housing being pressed over the edge of the glass ("peened") and if this is the case you may want to stop here.
Be very gentle with the multistart threads when you replace the focussing group - slowly "click" it backwards, then try it forwards at different start points - if you force it you can cause burrs on the alloy threads and it won't focus smoothly.
There's usually only one correct position for the multistart threads which allows that screw from the slot to align properly with the slot. You'll have to use trial and error unless you marked the housing before removing it.
The tape usually just holds the focus ring to the distance scale so that you can adjust infinity setting.
The 4 screws probably hold the outer zoom/focus grip to an internal sliding group and are best left alone unless you want to dismantle the complete lens.
Good luck! |
|
| Back to top |
|
|
fstop
Joined: 11 Apr 2010
Posts: 29
|
| Posted: Thu May 06, 2010 12:32 am Post subject: |
|
|
fstop wrote:
| unclemack wrote: |
| First though, just so we're on the same page: a single piece of glass is referred to as an element - from your description I'm guessing you've removed the front (focussing) group of elements by unscrewing the multistart focus threads, sometimes called the helicoid. |
Yes, I removed the screw that goes in to that helicoid (that has the front part of the lens). The screw is shown in a photo I posted earlier, it goes through a slot in the outer barrel.
I have attached a photo showing what I did (I have re-assembled the lens and cannot take a photo of the disassembled parts at present).
| unclemack wrote: |
| Usually behind the decorator bezel there's a locking ring which is unscrewed by using a lens wrench in its 2 notches. |
When I unscrewed the decorator bezel (which has the focal length and f-stop range written over it), there was no locking ring obvious to me. I noticed that the glass was glues to that front helicoid at its circumference.
| unclemack wrote: |
| You should be able to see how the front group comes apart if it does come apart. Sometimes an element is held in by the edge of the housing being pressed over the edge of the glass ("peened") and if this is the case you may want to stop here. |
I don't think I need to ungroup the front element (I understand that this group of element is just glasses joined with cement making up one solid group?).
When I took off the front helicoid, the front part of the lens, of course, came off with it. The part of the lens visible next in the barrel (middle element?) is the one I want to clean from both sides. That is where I am stuck at, how to reach that part.
In other words, the part of the lens fixed in the front helicoid is clear now, I just want to clean the lens part that is next from the front.
| unclemack wrote: |
Be very gentle with the multistart threads when you replace the focussing group - slowly "click" it backwards, then try it forwards at different start points - if you force it you can cause burrs on the alloy threads and it won't focus smoothly.
There's usually only one correct position for the multistart threads which allows that screw from the slot to align properly with the slot. You'll have to use trial and error unless you marked the housing before removing it. |
Yes, I noticed this when I wanted to put the helicoid back. But I had noted its position where it came off the barrel while unscrewing it so it wasn't that tough to put it back. Moreover, as you said, I also noticed that the screw hole in which the screw goes (through the slot in the our barrel -- the focuring ring) can come at the right position only when the front helicoid is threaded back starting from a particular position.
| unclemack wrote: |
The 4 screws probably hold the outer zoom/focus grip to an internal sliding group and are best left alone unless you want to dismantle the complete lens.
Good luck! |
To clean the second element from front, would I need to remove these four screws?
Thanks, I appreciate your help. |
|
| Back to top |
|
|
unclemack
Joined: 21 Jun 2009
Posts: 51
Location: UK frozen north
|
| Posted: Thu May 06, 2010 2:59 am Post subject: |
|
|
unclemack wrote:
Hi, sorry I wasn't clear which element you needed to clean.
Yes, you need to remove the screws after marking the distance scale/focus & zoom ring & removing the tape, then remove the ring.
You should then see the sliding assembly (or assemblies).
Usually with zooms of this vintage there are nylon/ptfe bushes sliding in slots.
Easy enough usually to see which bushes need to be removed to withdraw the group you need to access. Make notes, scribe adjacent parts, take pics.
Often though these elements are peened into the housing rather than being held by locking rings - not an easy job to remove & replace them.
Good luck with it, I'll check back tomorrow. |
|
| Back to top |
|
|
fstop
Joined: 11 Apr 2010
Posts: 29
|
| Posted: Thu May 06, 2010 3:19 am Post subject: |
|
|
fstop wrote:
| unclemack wrote: |
| Hi, sorry I wasn't clear which element you needed to clean. |
It's not your mistake. Even I wasn't initially sure which exact part I needed to clean. At first it appeared the oily marks were on the front side of the second element. But when I reached that and cleaned it, the marks on the other side of it also became apparent. This detail was not reflected clearly in my first post.
| unclemack wrote: |
Yes, you need to remove the screws after marking the distance scale/focus & zoom ring & removing the tape, then remove the ring.
You should then see the sliding assembly (or assemblies).
Usually with zooms of this vintage there are nylon/ptfe bushes sliding in slots.
Easy enough usually to see which bushes need to be removed to withdraw the group you need to access. |
Right. I will give it a shot tomorrow. I just wanted some lead as to where to start to get access to the inner elements, which you have given (I wasn't sure if I should be taking out the rear mount screws or these ones under the grip or the ones just near the aperture ring).
| unclemack wrote: |
Make notes, scribe adjacent parts, take pics.
Often though these elements are peened into the housing rather than being held by locking rings - not an easy job to remove & replace them.
Good luck with it, I'll check back tomorrow. |
Wonderful! Thanks a ton for the hints and warnings. I will post back how it went along with pictures. |
|
| Back to top |
|
|
unclemack
Joined: 21 Jun 2009
Posts: 51
Location: UK frozen north
|
| Posted: Thu May 06, 2010 11:16 am Post subject: |
|
|
unclemack wrote:
Hi, should have added this last night but was too tired. It was a long day.
Sometimes in addition to the screws holding the focus/zoom ring there's a locking ring which can be hard to see and harder still to remove.
And, just to make life awkward, the focus/zoom ring sometimes has to be withdrawn rearwards rather than forwards - in which case it looks as if the aperture & mount lock rings would need to be removed first.
The FD with the lock ring is easier to work on than the newer FD mount if you're doing it for the first time.
Hope it turns out to be easy after all! |
|
| Back to top |
|
|
fstop
Joined: 11 Apr 2010
Posts: 29
|
| Posted: Thu May 06, 2010 7:57 pm Post subject: |
|
|
fstop wrote:
Well, I took out the focus ring by removing the four screws. It slid off the front. But I still don't how to go further.
I also removed the ring that has the aperture numbers on it. It was secure by three grub screws. It also did not reveal how to go further.
Looks like you are right. Something else needs to removed to get access to the inner elements. BTW, upon further close examination, the oily stuff is not finger marks, but looks like haze. Needs to be cleaned anyway (softens the image). And this lens is not the new fd mount, i.e. it does not have the button to press to unlock it, just a ring to turn.
Just remove the rear element might be enough to reach the middle one. So I need to remove either of these two, which ever is the easiest.
Do you have any online resources on your hands which might show with pictures how to tackle this problem further? Perhaps on similar lenses?
BTW, once I take off the front element, the next inner element has aperture blades on top. Basically, if I ever wanted to clean the blades, I just need to take off the front element. Is this order of construction usual?
Also, the mount locking ring has only one screw. I tried unscrewing it, but I wasn't sure if there are any things under spring tension underneath it? Any hints?
Thanks. |
|
| Back to top |
|
|
fstop
Joined: 11 Apr 2010
Posts: 29
|
| Posted: Thu May 06, 2010 9:50 pm Post subject: |
|
|
fstop wrote:
| unclemack wrote: |
The FD with the lock ring is easier to work on than the newer FD mount if you're doing it for the first time.
Hope it turns out to be easy after all! |
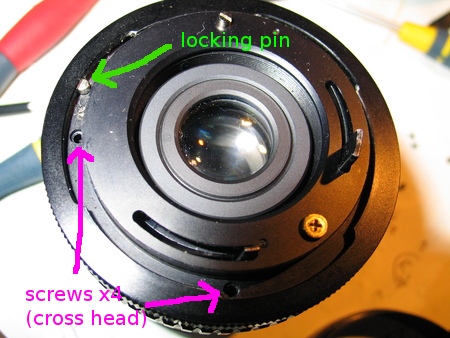
It turns out that I just needed to remove the four screws that go in just under the breach lock ring. Had to press the little silver colored locking pin to rotate the lock ring to show all the screws and took them out one by one. Then I was able to take out the mount ring as a unit and rear element fell out by inverting the lens. That element has all the glass parts that need to be cleaned.
I will update how it goes. |
|
| Back to top |
|
|
fstop
Joined: 11 Apr 2010
Posts: 29
|
| Posted: Sat May 08, 2010 1:08 am Post subject: |
|
|
fstop wrote:
Well, so as I mentioned in my earlier post, all I had to do to get the rear part of the lens out was to just take out the four cross head screws on the mount. Their location is shown below (screws have been removed).

Basically, you need to rotate the locking ring a bit to get access so couple of screws. It can be rotated by pressing the locking pin and unlocking the lock ring.
Removing those screws allowed me to remove the mount part. Note: be very careful when you remove it. The part that comes off engages the lens at at least two places: one is the fork on the mount part that engages a pin on the lens. And the other is the stop down lever I think.
NB: Do not pull out the ring that has the aperture numbers written over it. My lens is not expensive so I am experimenting and learning. I removed and two ball bearing fell out. The larger one goes below the button that alows one to put the camera in "A" mode. This bearing is pressed to the lens body by a spring under that button. I am not sure what the smaller bearing is for. Haven't yet found out where to put it back. The aperture ring, however, seems to be a bit soft now.
And, lastly, here is the order of the group of lenses in the rear element.
 |
|
| Back to top |
|
|
|
|
|
You cannot post new topics in this forum
You cannot reply to topics in this forum
You cannot edit your posts in this forum
You cannot delete your posts in this forum
You cannot vote in polls in this forum
|