| View previous topic :: View next topic |
| Author |
Message |
Aanything


Joined: 27 Aug 2011
Posts: 2201
Location: Piacenza, Italy
Expire: 2014-05-30
|
 Posted: Sun Aug 24, 2014 11:07 pm Post subject: Carl Zeiss Planar 1.8/50 QBM reassembly Posted: Sun Aug 24, 2014 11:07 pm Post subject: Carl Zeiss Planar 1.8/50 QBM reassembly |
 |
|
Aanything wrote:
Today at a local flea market I found lovely bag containing a Rollei SL 35 with many accessories, a beautiful Carl Zeiss Planar 1.8/50 (non hft, made in West Germany - I guess from the early '70s), a Tamron adaptall-2 3.5/200 with qbm mount and a Vivitar 2.8/28 close focus in nikon mount. The planar has stff focus, but the whole bag was really cheap so I bought it.
At home I disassembled the Planar quite easily, remembering the steps from a thread here. The old grease became completely solid: it took me a while to scratch it off the two helicoids, but now the lens is clean and freshly re-lubed with lithium grease.
My problem is that I can't figure out how to put it back together: the thread is without images now, and I can't find the correct order in which to reassemble the two helicoids while keeping the focus guide and aperture arm in the correct position.
This is the thread : it would be really great if somebody that knows this lens could help me, or if user Srdjan could re-upload the pics in that precious old thread.
Thanks.
_________________
C&C and editing of my pics are always welcome
Samples from my lenses
My gear
My Flickr |
|
| Back to top |
|
 |
duckrider


Joined: 11 Dec 2013
Posts: 437
Location: Germany
|
| Posted: Mon Aug 25, 2014 1:27 am Post subject: |
|
|
duckrider wrote:
http://www.digicamclub.de/showthread.php?t=17682
Good luck!
Thomas
_________________
T*homas
(from the origin land of Zeiss, an obligation  ) )
Zeiss ZF 3.5/18, 2.8/25, 2.0/35, 2/50macro, 1.4/50, 1.4/85, 2/100macro
Nikon Df, F2AS, F2A, F3/T, FM
ALPA 11Si, Angulon 2,8/35 ; Xenar 1,9/50 ; Tele-Tessar 4/200
Leica R3 SAFARI Safari Lenses 2.8/28 ; 2/50 ; 4/180
Rolleiflex SL 350 , Zeiss 2,8/16 ; 4/18 ; 2,8/25 ; 2,8/35 ; 1,4/35 ; 1,8/50 ; 2,8/85 ; 1,4/85 ; 4/135 ; 4/200
Leica M9-P, Leica M4-2, Tri-Elmar "Wate", Distagon 2,8/21, Biogon 2,8/28, Biogon 2/35, Planar 2/50, Tessar 4/85, M-Elmar 50mm, Summicron 90
Sony alpha 7r & adapters for all lenses above |
|
| Back to top |
|
|
Aanything
Joined: 27 Aug 2011
Posts: 2201
Location: Piacenza, Italy
Expire: 2014-05-30
|
| Posted: Mon Aug 25, 2014 11:11 am Post subject: |
|
|
Aanything wrote:
| duckrider wrote: |
http://www.digicamclub.de/showthread.php?t=17682
Good luck!
Thomas |
Thanks, I'll try again later.
_________________
C&C and editing of my pics are always welcome
Samples from my lenses
My gear
My Flickr |
|
| Back to top |
|
|
RSalles

Joined: 12 Aug 2012
Posts: 1373
Location: Brazil - RS / South
|
| Posted: Thu Sep 11, 2014 7:03 pm Post subject: |
|
|
RSalles wrote:
Alesandro,
I'm sending some pics showing the lens inside and try to explain how to re-assemble the lens back. Stay tunned,
Renato |
|
| Back to top |
|
|
RSalles
Joined: 12 Aug 2012
Posts: 1373
Location: Brazil - RS / South
|
| Posted: Thu Sep 11, 2014 7:39 pm Post subject: |
|
|
RSalles wrote:
... And starting...
Firstable, excuse me for the quality of the photos, were made with a cell phone and my 6 y.o daughter had used it before me, and the lens of the phone was dirty!
In the pic bellow you see the lens in the order will be mounted - from bottom to top:

Helicoid group, diaphragm ring and back metal cover with focus displacement track and pin for wide open metering.
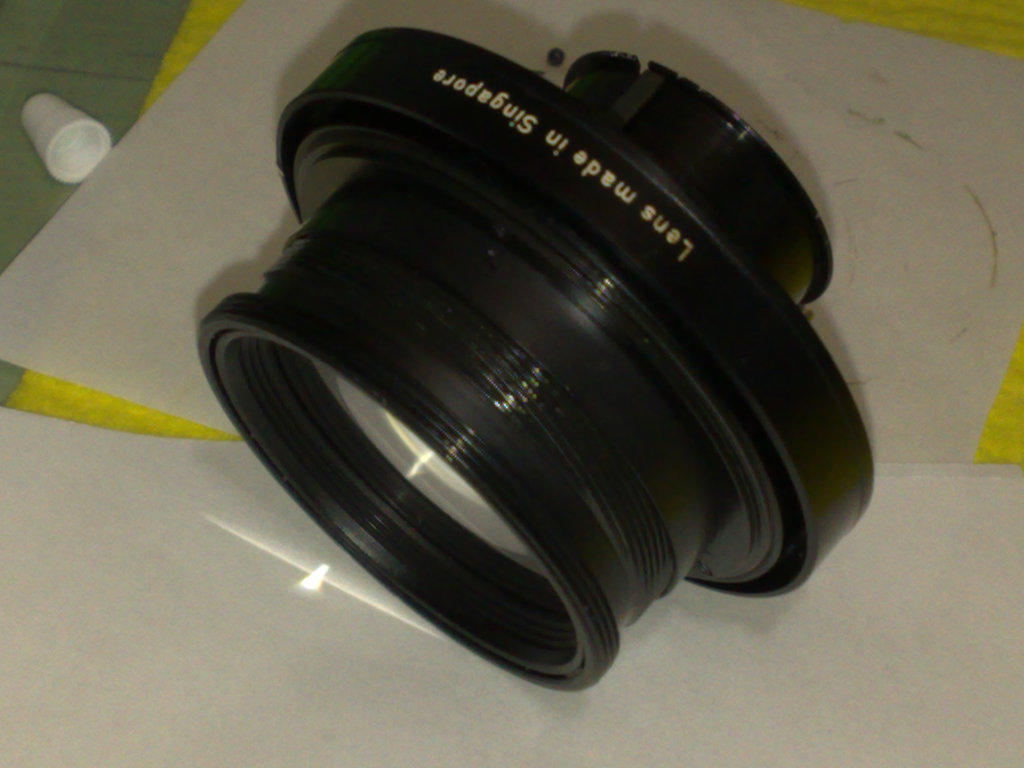
The position of the double threaded helicoid is more or less the same as showed in this photo:

The copy version is a Made In Singapore, it can be different from Germany born one, as I only have this one, I guess the construction is the same, nut only guess.
The position of the smaller diameter helicoid, the one which focus near and far with greater displacement can be screwed until the end - don't force, instead clean and relube. The other helicoid is used for infinity focus, it can be assembled at middle way, don't pay to much attention now to it as the infinity will be adjusted later with the lens mounted.
following...
Renato |
|
| Back to top |
|
|
RSalles
Joined: 12 Aug 2012
Posts: 1373
Location: Brazil - RS / South
|
| Posted: Thu Sep 11, 2014 8:02 pm Post subject: |
|
|
RSalles wrote:
... continuing...
Placing the main lens group face down, just put the aperture ring over it, it's better if the small ball which clicks in the position of the aperture is placed at the upper metal cover in its hole - the one with a spring inside - instead on this ring. You can put a very small amount of grease for placement purposes.
The position of the aperture ring is with the point of its brass pin facing up, opposite side of the lens group.
After that, it's time to put the "metal cover" of the back of the lens. It has to have the pin of the wide open metering, and the track for focus helicoid displacement already fixed before. In the picture above we can see only the pin fixed but not the track, The track must be in place before fit.
Lens group and aperture ring fitted. The next step is to fit the metal back/cover.
... continue... |
|
| Back to top |
|
|
RSalles
Joined: 12 Aug 2012
Posts: 1373
Location: Brazil - RS / South
|
| Posted: Thu Sep 11, 2014 9:02 pm Post subject: |
|
|
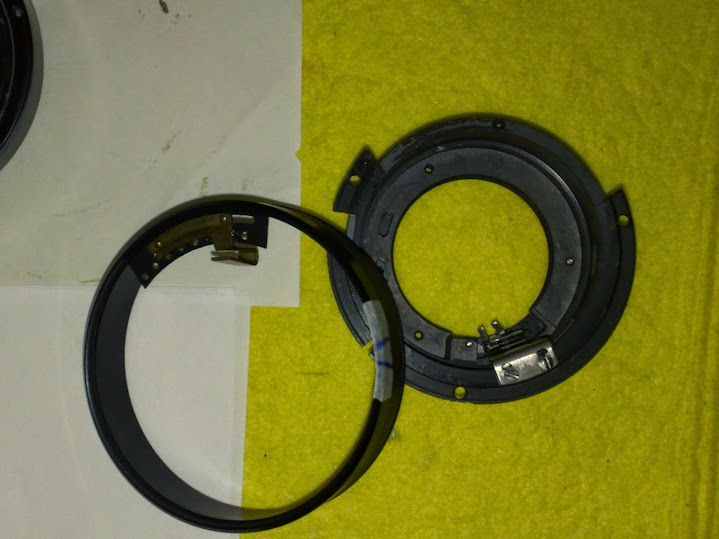
RSalles wrote:
Fitting the metal back cover of this lens is maybe the trickiest part of the job. Many parts of the lens have to be perfectly aligned to permit the back to fit in the aperture ring and the main lens group. These parts are:
- brass metal plate of the aperture ring - fits on the aperture of the brass metal ring of the group opening blade plate,
- small ball bearing - already grease semi-fixed, goes in the right place when the position of the back plate is fitted,
- wide-opening pin - connects to the thin brass stick for wide open focus procedure,
- focus displacement track and,
- register pin at the aperture ring.
The less obvious, maybe, is the register pin at the aperture ring: it has to be positioned, aligned to the unique hole in the metal back in which doesn't fit a screw:
The register pin is at 7 o'clock in the right image bellow:

This pin must fit inside a hole in the metal back, which can be clearly seen at position 3 o'clock in the following pic:

... continue... |
|
| Back to top |
|
|
RSalles
Joined: 12 Aug 2012
Posts: 1373
Location: Brazil - RS / South
|
| Posted: Thu Sep 11, 2014 10:53 pm Post subject: |
|
|
RSalles wrote:
Going further:
If everything fits nicely, pushing a bit the metal back and turning the aperture ring you have to be able to listen the clicks of the ball bearing.
Now the second trick:
There are 3 screws to fix the metal back in its place. One of these screws is longer then the other two: is the "red" painted one in the previous pic.
This screw, being longer, has an un-threaded end. This end - crossing to the other side of the helicoid - will work as infinity stop when you turn the lens, as well as a near focus stop. If you place it anywhere else, fix the 3 screws in the front of the lens, the exact mark of infinity will be in another place of the barrel, not in its mark. Until you place the 3 screws in front of the lens and its brass ring, you'll not be able to turn the lens focus:
 |
|
| Back to top |
|
|
RSalles
Joined: 12 Aug 2012
Posts: 1373
Location: Brazil - RS / South
|
| Posted: Thu Sep 11, 2014 11:01 pm Post subject: |
|
|
RSalles wrote:
To adjust infinity focus is easy: Do it after the lens is completely assembled but not the front/name ring:
Loose the 3 screws by the front of the lens as showed in the previous picture.
Put the live view of the camera in 10X or more if possible and focus a distant point supposed to be in infinity focus region,
Without turning ( block it with your hand to not turn - the focus threaded barrel, turn gently the big metal ring with the distance marks carrying with this turn the register pin until reach infinity mark, tight the 3 screws. If infinity is a bi far or near the ideal point, repeat the procedure.
Doubts? Ask,
Cheers,
Renato Salles - RSalles |
|
| Back to top |
|
|
Aanything
Joined: 27 Aug 2011
Posts: 2201
Location: Piacenza, Italy
Expire: 2014-05-30
|
| Posted: Thu Sep 11, 2014 11:13 pm Post subject: |
|
|
Aanything wrote:
Thank you very much Renato, I will let you know how it goes.
_________________
C&C and editing of my pics are always welcome
Samples from my lenses
My gear
My Flickr |
|
| Back to top |
|
|
RSalles
Joined: 12 Aug 2012
Posts: 1373
Location: Brazil - RS / South
|
| Posted: Thu Sep 11, 2014 11:26 pm Post subject: |
|
|
RSalles wrote:
| Aanything wrote: |
| Thank you very much Renato, I will let you know how it goes. |
Ok, Alessandro, glad to know it will be useful, if anything is not clear just ask,
Cheers,
Renato |
|
| Back to top |
|
|
mareinke
Joined: 14 Nov 2013
Posts: 33
Location: LA, CA
|
| Posted: Tue Feb 23, 2021 8:11 pm Post subject: |
|
|
mareinke wrote:
| RSalles wrote: |
Alesandro,
I'm sending some pics showing the lens inside and try to explain how to re-assemble the lens back. Stay tunned,
Renato |
After watching your image carefully, I just realized I ad set the inner helicoid upside down, thank you so much. |
|
| Back to top |
|
|
SQLGuy
Joined: 01 Oct 2014
Posts: 4
Location: Colorado Springs
|
| Posted: Sun Jan 22, 2023 1:28 am Post subject: |
|
|
SQLGuy wrote:
I just finished reassembling mine. It's also the Singapore version. This was helpful. Thanks.
A couple of notes, though, based on things I did wrong:
1. The part that has the aperture scale on it needs to be installed pretty much like shown here (just about 2 threads showing). I had mine on too far back, and the focus would bind once I attached the focus ring.
2. In mine, at least, there are three different screws holding the back cover assembly and the aperture ring down. The brass one goes near the alignment pin from the aperture scale ring. The long one goes opposite from the two slotted screws that hold the aperture bracket (name?). BTW, the three screws holding the cover are just the three around the sides of it... the two slotted ones don't need to be removed, and shouldn't be. Anyway, that long screw's pin becomes the infinity and MFD stop for the focus ring, so, if the focus ring is stopping the wrong places, that screw is in the wrong place.
3. When reassembling, screw the focus helicoid about as far back (towards infinity / close to the film plane) as it will go. If it's too far out, then turning the focus towards MFD too much before adjusting for infinity will cause the aperture stop down cam (name?) to fall off the end of the aperture stop down lever, and you'll need to remove the rear cover again to get it back in place.
4. No ideas, just pointing out that getting the stop down pin back in place is a pain. I finally succeeded by using tweezers to hold it and its spring while getting the mount in place. (Don't forget the washers between the mount and the back cover). |
|
| Back to top |
|
|
|
|
|
You cannot post new topics in this forum
You cannot reply to topics in this forum
You cannot edit your posts in this forum
You cannot delete your posts in this forum
You cannot vote in polls in this forum
|


