| View previous topic :: View next topic |
| Author |
Message |
kiddo

Joined: 29 Jun 2018
Posts: 1237
|
 Posted: Thu Jan 18, 2024 4:15 pm Post subject: How to adjust infinity on the lens Posted: Thu Jan 18, 2024 4:15 pm Post subject: How to adjust infinity on the lens |
 |
|
kiddo wrote:
I know for so many of you guys this issue is a piece of cake in most of the cases , but I'm sure so many others (just like me) have no clue about it.
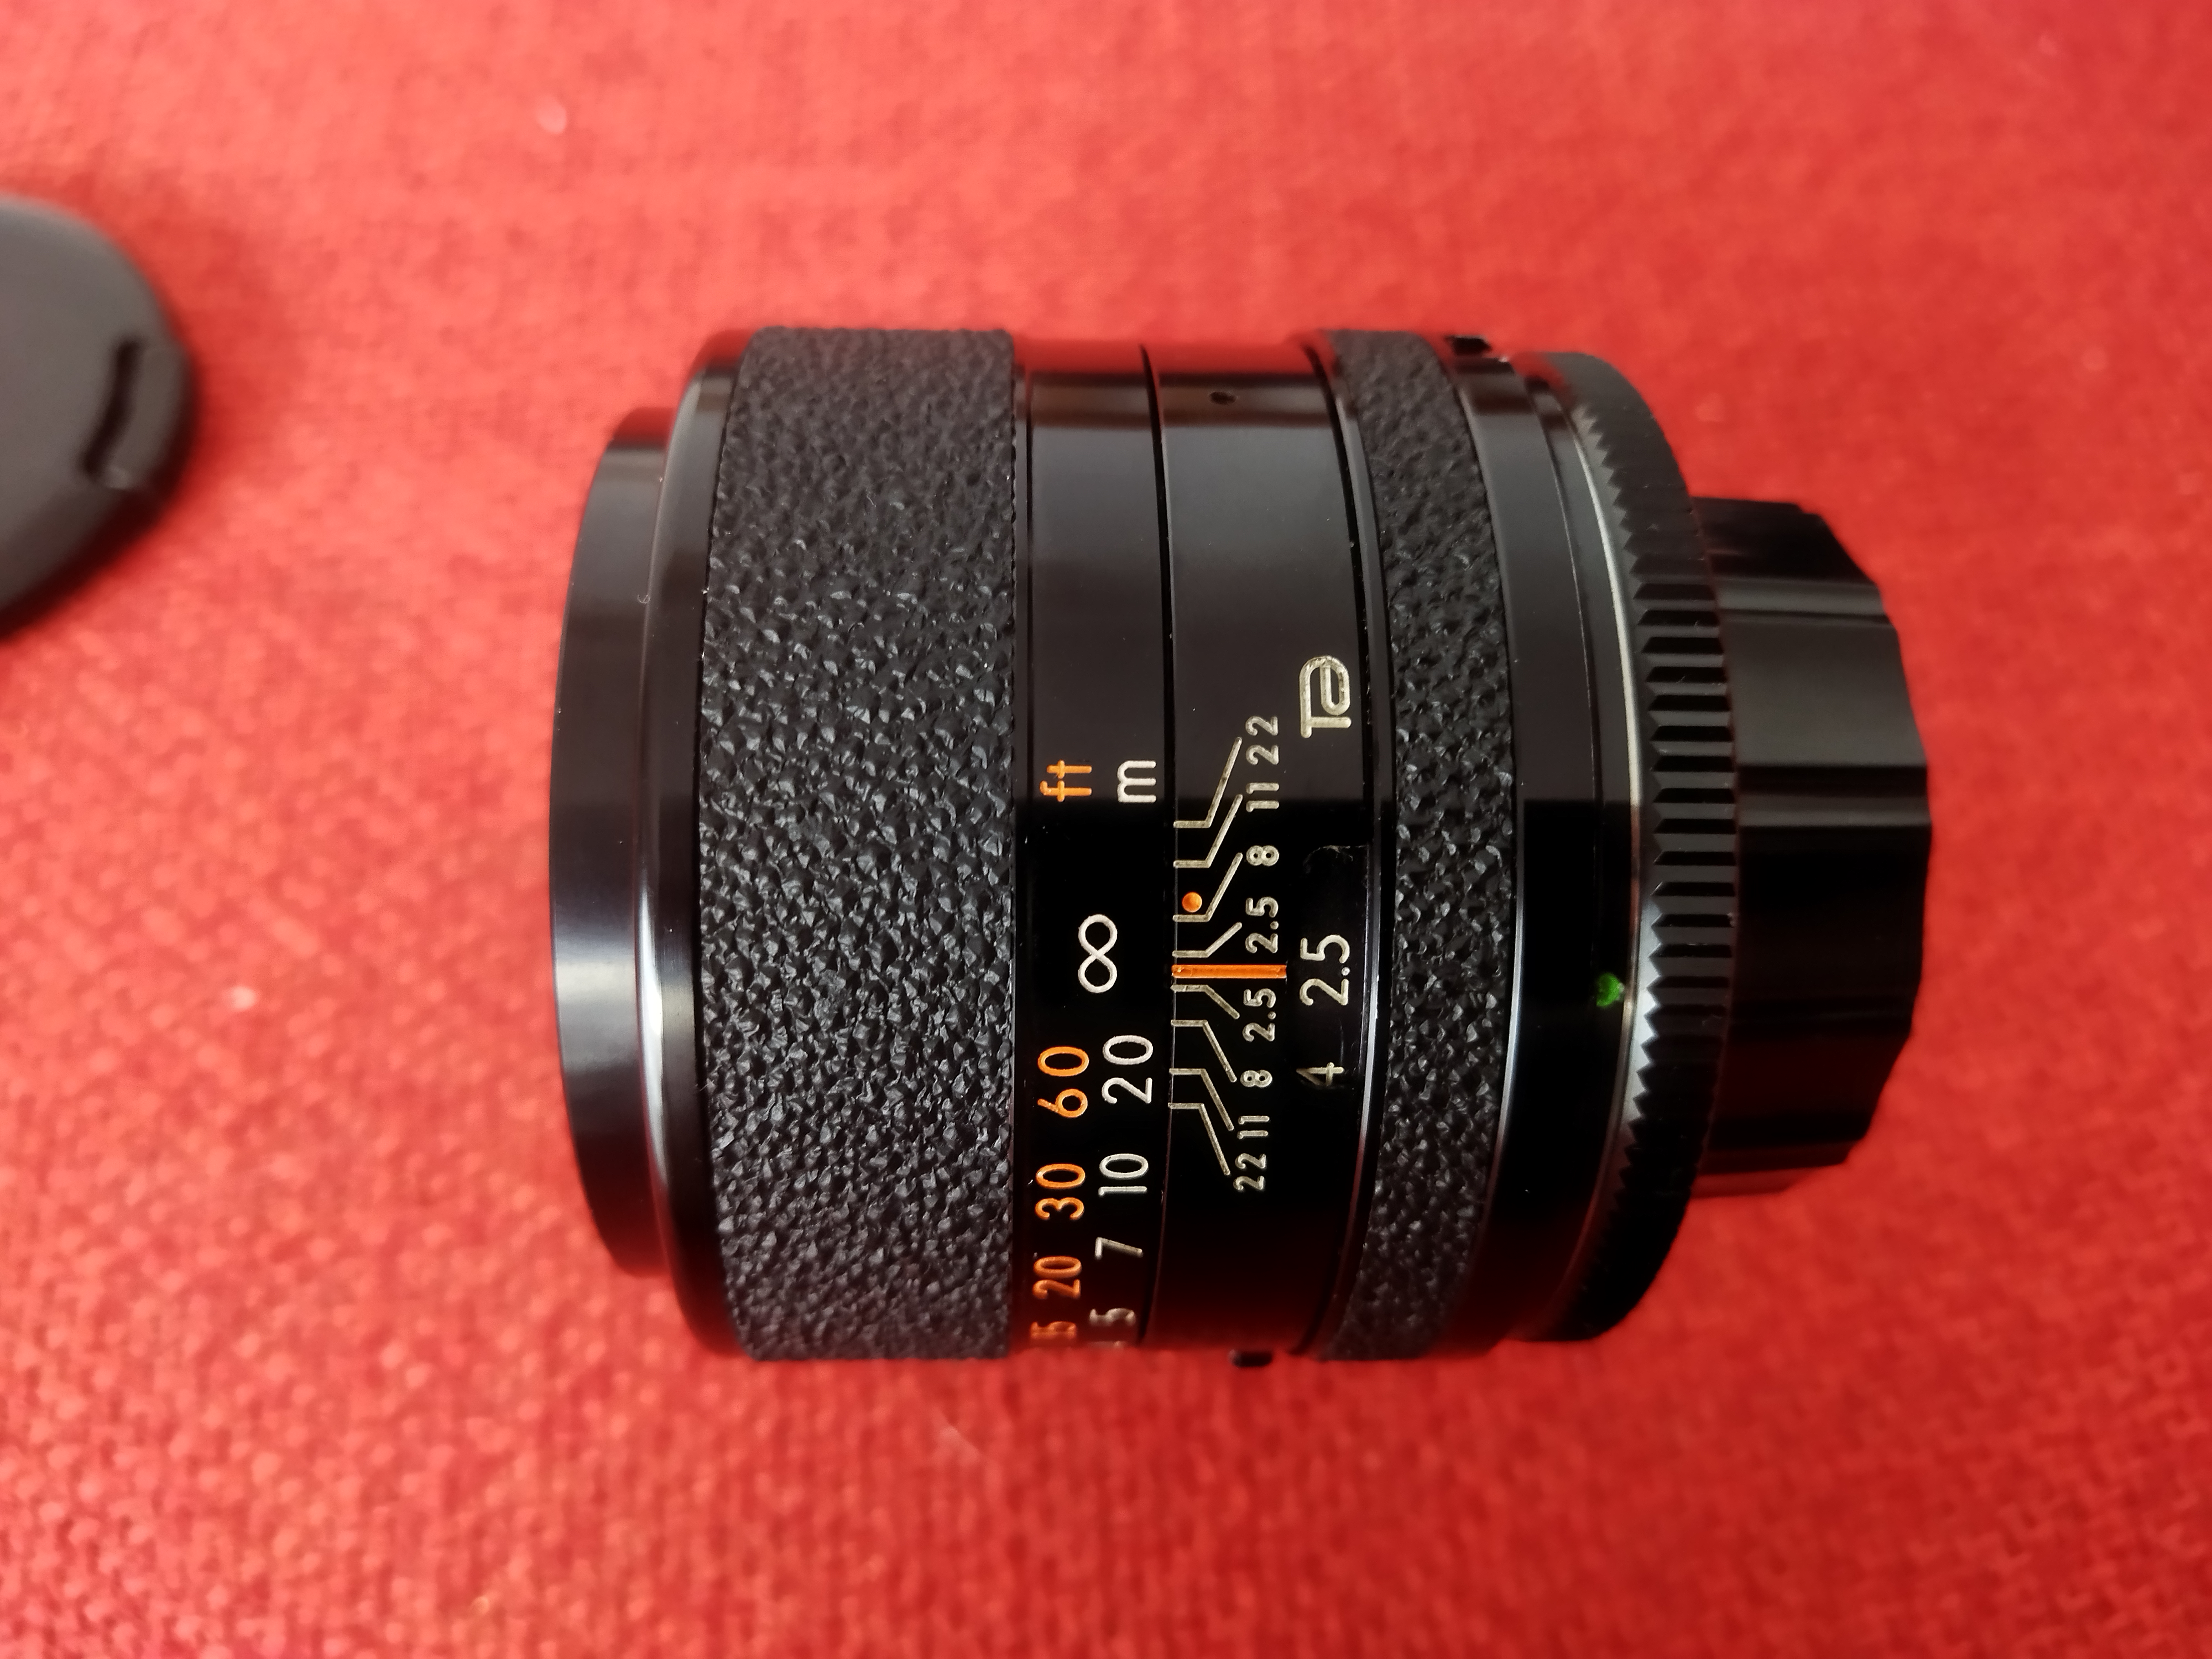
I've bought this little Tamron some time ago ,it came in Canon FD mount for which I had no adapter at that time, by the time I've got the adapter and tried it, just found out the lens wouldn't reach infinity properly. So I've got a M42 adaptall mount and with a rubber oring attached to the threads, I could adjust the lens to focus correctly ,but I know there should be a way to adjust it from the lens itself ( I did adjust the mamiya 70-150mm zoom very easy).
So ,do you guys have any thoughts about it?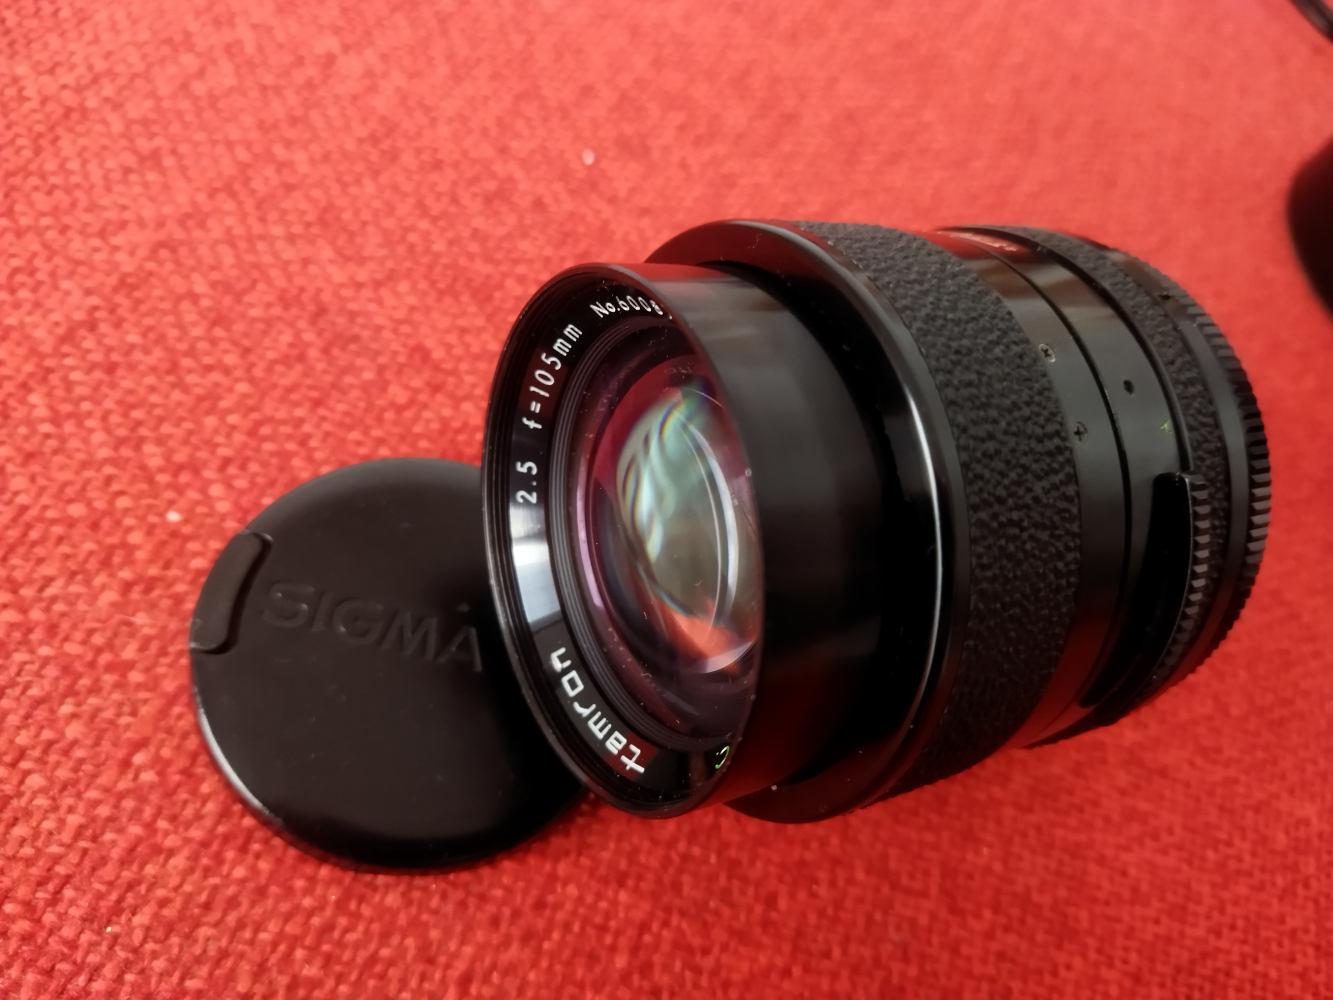  |
|
| Back to top |
|
 |
BrianSVP


Joined: 09 Jun 2023
Posts: 343
Location: Philadelphia
|
| Posted: Thu Jan 18, 2024 4:33 pm Post subject: Re: How to adjust infinity on the lens |
|
|
BrianSVP wrote:
I've not worked on this particular lens, but based on lenses of similar length/design, it's likely adjusted in one of two ways:
1. This one presumes the focus ring screws are accessed from the outside: remove the leatherette from the focus ring. It should just peel off, but if it is very tight, isopropyl alcohol can help loosen it. You will see 3-4 screw heads underneath the leather that can be loosened from the sides to free the outer ring, allowing you to adjust the infinity setting. Position accordingly and re-tighten, being sure to make sure the screws are tightened evenly, which is easier if you count the number of turns on each when you loosen them. Put the leatherette back on, and you are done.
2. This one presumes it's adjusted internally: remove the front name ring with a friction tool. If you see screws holding the front barrel on, remove them, and it should slide off. If you do not, you may have to turn the entire front barrel to unscrew it, in which case, there may be a set screw preventing it from turning it that you have to remove. Once the front barrel is off, you should see the screws that connect the outer focus ring to the inner ones. Loosen and adjust accordingly, then reassemble.
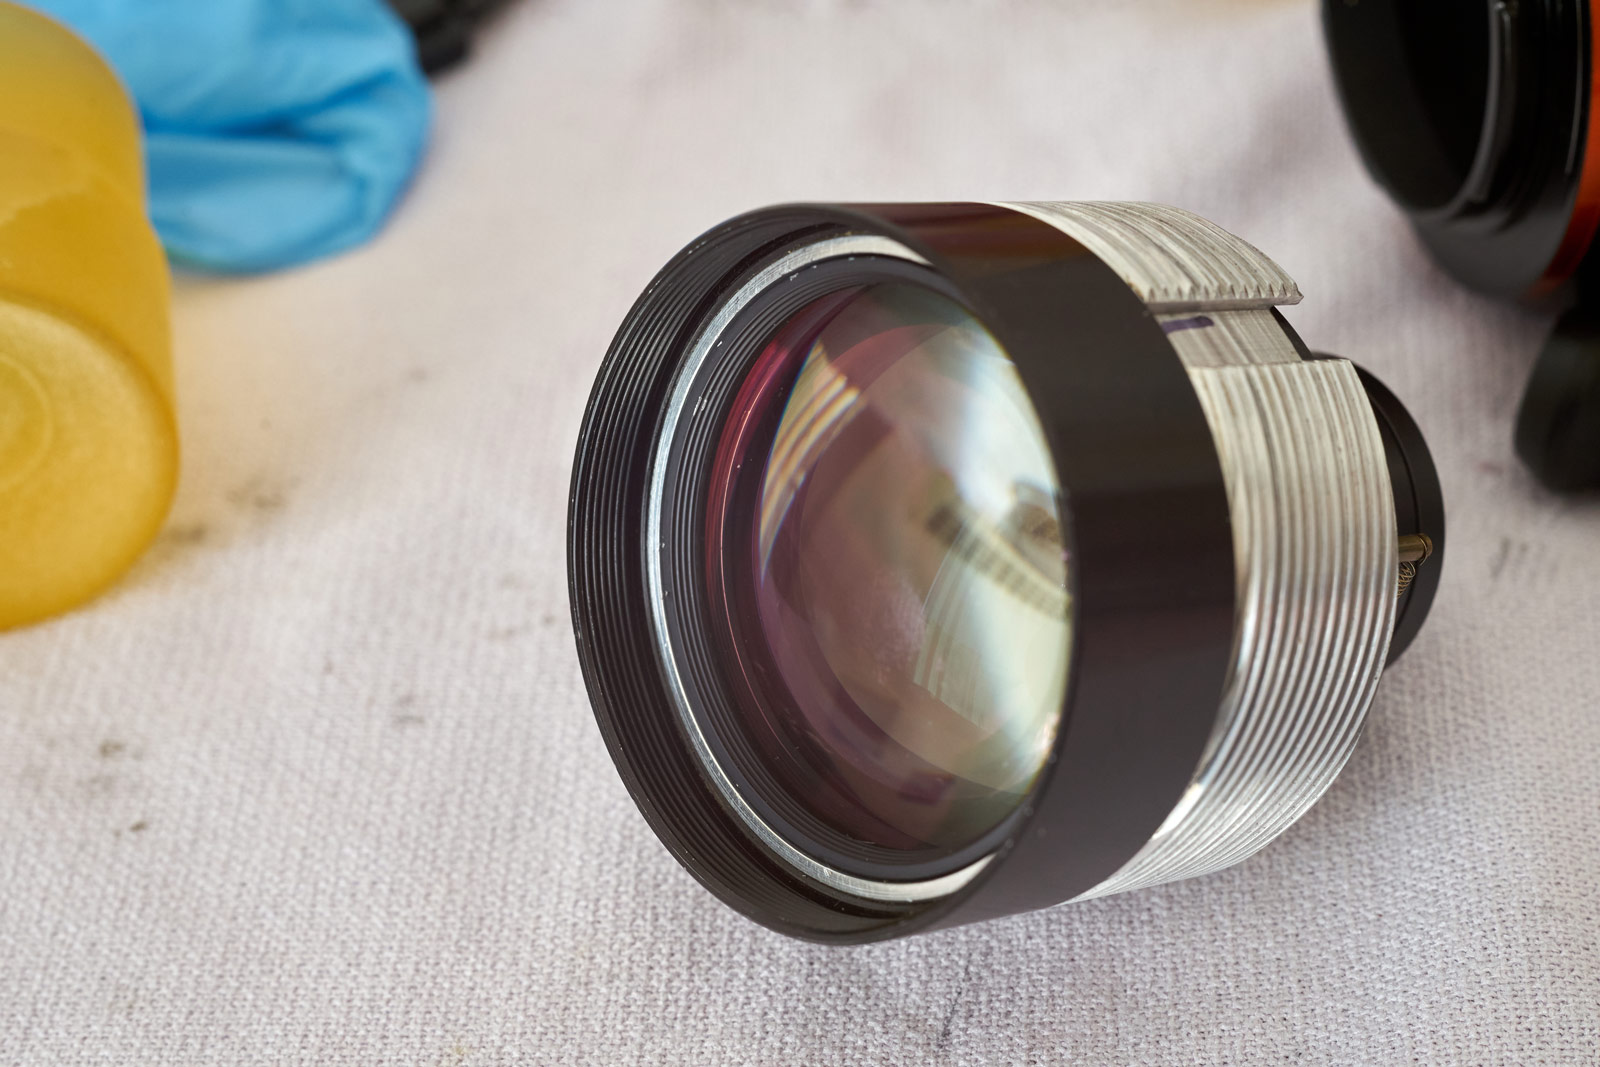
One thing I suggest NOT doing in either case is removing the two JIS screws that are already visible on the outer barrel in pic 1, as they hold the infinity stop in place, and removing them would cause it to fall off inside the lens, which will make everything more of a pain. You also may need to apply a few drops of acetone to the name ring and/or screws if they appear to use threadlocker.
EDIT: looking at the picture, there is one other possibility that is a bit of a combination of #1 and #2: the front of the focus ring may unscrew to reveal the focus adjustment screws, which are accessed from the front. This design is used fairly commonly on early Nikkors, but I'm not sure if Tamrons ever used it. If this is the case, it's likely that you have to remove the leatherette to access a set screw that keeps the front of the focus ring in place, then rotate the ring off. Either way, removing the leatherette first is probably your first step to determine whether #1 or this one is the correct approach. If not, move on to #2.
| kiddo wrote: |
I know for so many of you guys this issue is a piece of cake in most of the cases , but I'm sure so many others (just like me) have no clue about it.
I've bought this little Tamron some time ago ,it came in Canon FD mount for which I had no adapter at that time, by the time I've got the adapter and tried it, just found out the lens wouldn't reach infinity properly. So I've got a M42 adaptall mount and with a rubber oring attached to the threads, I could adjust the lens to focus correctly ,but I know there should be a way to adjust it from the lens itself ( I did adjust the mamiya 70-150mm zoom very easy).
So ,do you guys have any thoughts about it? |
|
|
| Back to top |
|
|
jamaeolus


Joined: 19 Mar 2014
Posts: 2965
Location: Eugene
Expire: 2015-08-20
|
| Posted: Thu Jan 18, 2024 5:28 pm Post subject: |
|
|
jamaeolus wrote:
If it can't reach infinity the ADAPTER is likely the culprit. You need the lens to be closer to the camera. Oftentimes it is not much. I would take a close look at the adapter and see if it was possible to shave it down a few tenths of a millimeter and still have a solid connection. Most adapters have a final metal ring held down with 4 screws. If you can remove that and then file down the aluminum underneath by taking a full sheet of 100 grit sandpaper and carefully lapping it down, being sure to rotate the adapter to be sure the amount removed is even all the way around. Then reinstall the final ring. This may not work with some FD adapters though. They are the most troublesome of all IMHO. I have had FD adapters permanently stick to the lens. The easiest solution is to buy a different adapter. One other thing to possibly consider is the cameras focus adjust function.
_________________
photos are moments frozen in time |
|
| Back to top |
|
|
kiddo
Joined: 29 Jun 2018
Posts: 1237
|
| Posted: Thu Jan 18, 2024 5:41 pm Post subject: |
|
|
kiddo wrote:
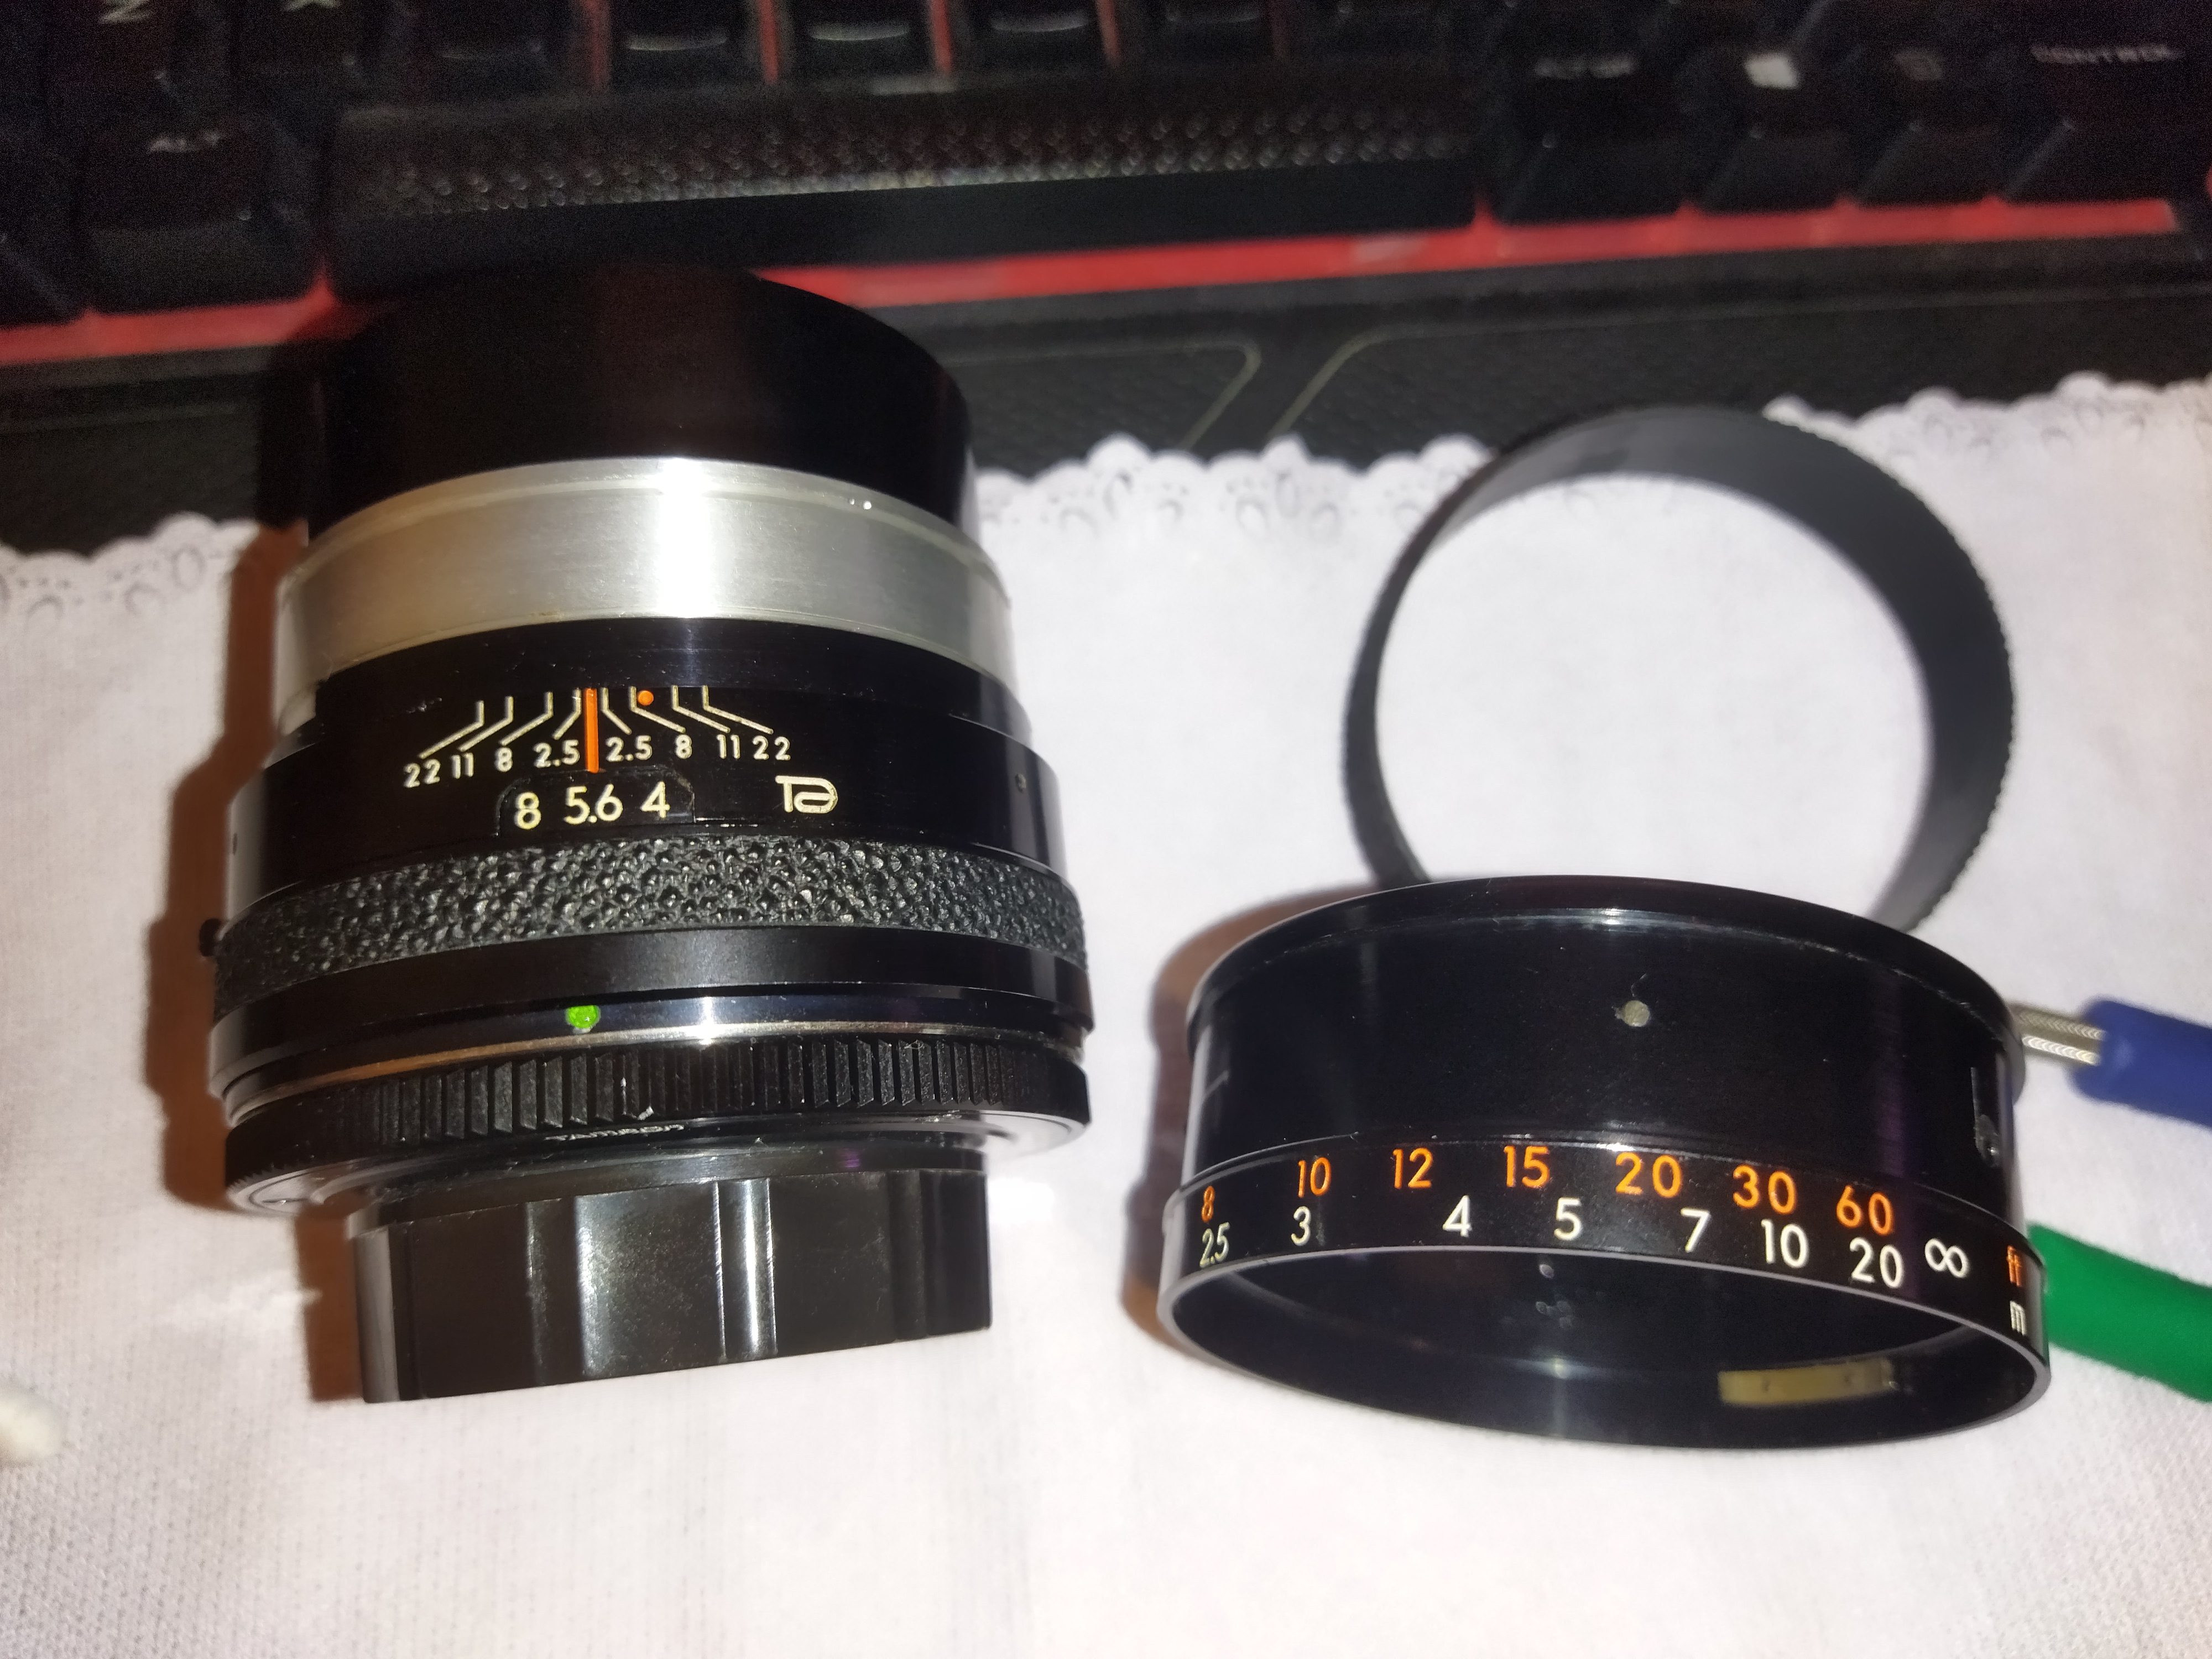
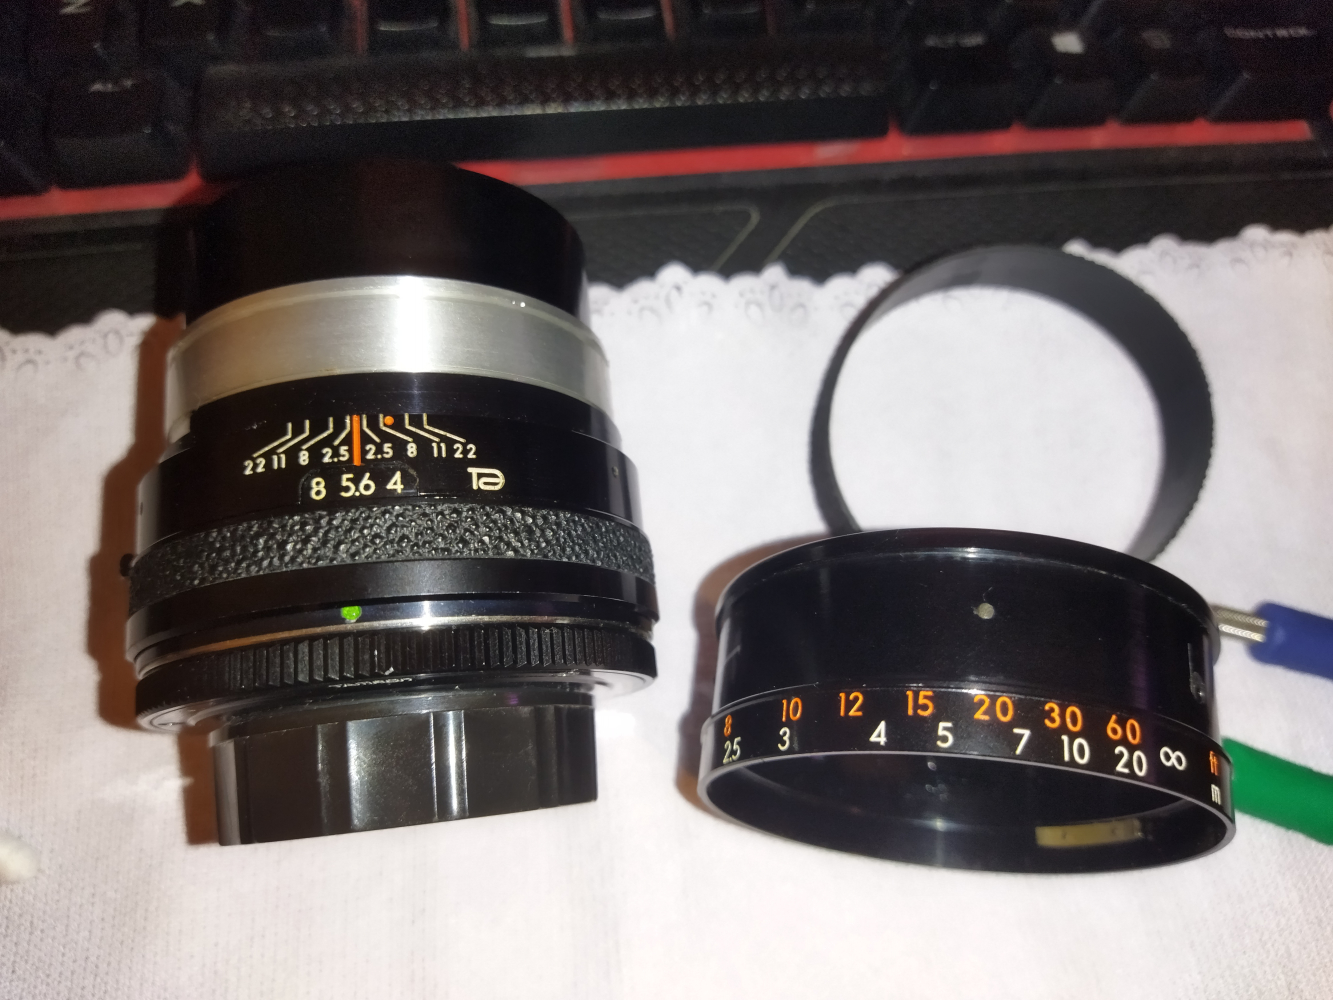
With a toothpick I removed the skin from the focusing ring and there are 4 little screws ,that I'm going to unlock with acetone and tomorrow, try to adjust the infinity
Once removed the ring with the 4 screws, I do have access to the aluminum silver ring that moves the front group, so I guess I should just adjust the infinity (maybe a little passing it) and put back together everything.
My question is, how come all these years the lens was used this way? I've tried the lens on different adaptall nikon, canon and m42, none would work infinity properly,most of the cases would reach infinity mark on 5-10meters
 |
|
| Back to top |
|
|
kiddo
Joined: 29 Jun 2018
Posts: 1237
|
| Posted: Thu Jan 18, 2024 5:48 pm Post subject: |
|
|
kiddo wrote:
Regarding the 2 little screws you told me not to remove from the focusing ring, I can see inside the ring that I've removed ,they got to do the hard stop for infinity I guess (it's the brass little piece of shim inside the black ring) |
|
| Back to top |
|
|
BrianSVP
Joined: 09 Jun 2023
Posts: 343
Location: Philadelphia
|
| Posted: Thu Jan 18, 2024 6:34 pm Post subject: |
|
|
BrianSVP wrote:
Yes, so what you want to do is mount the lens to the adapter/camera, and turn the silver internal ring until it reaches true infinity focus. Then slide the outer focus ring back on at infinity so the infinity stop on the outer stop butts up against the corresponding piece on the other side, then tighten the screws so the inner and outer rings move together.
As far as it how it got out of calibration, it probably got bumped at some point, causing the outer ring to slip. On your attached pictures there appear to be two tiny marks on the silver ring where the screws have bitten in. One is presumably where the screw originally sat, and one is where it sat after the ring shifted.
| kiddo wrote: |
| Regarding the 2 little screws you told me not to remove from the focusing ring, I can see inside the ring that I've removed ,they got to do the hard stop for infinity I guess (it's the brass little piece of shim inside the black ring) |
|
|
| Back to top |
|
|
Alun Thomas
Joined: 20 Aug 2018
Posts: 655
Location: New Zealand
|
| Posted: Thu Jan 18, 2024 6:56 pm Post subject: |
|
|
Alun Thomas wrote:
| kiddo wrote: |
My question is, how come all these years the lens was used this way? I've tried the lens on different adaptall nikon, canon and m42, none would work infinity properly,most of the cases would reach infinity mark on 5-10meters
|
I've had lenses that looked never to have been touched that were similarly afflicted. It can be difficult to detect on an optical viewfinder (more so for wide angle lenses though), although another possible explanation is that they did realise it, so the lens was never used much for that exact reason, and no repair was attempted in the lifetime of the lens. |
|
| Back to top |
|
|
kiddo
Joined: 29 Jun 2018
Posts: 1237
|
| Posted: Thu Jan 18, 2024 6:57 pm Post subject: |
|
|
kiddo wrote:
thank you very much for your help, maybe this thread might go further with other lenses also |
|
| Back to top |
|
|
BrianSVP
Joined: 09 Jun 2023
Posts: 343
Location: Philadelphia
|
| Posted: Thu Jan 18, 2024 7:21 pm Post subject: |
|
|
BrianSVP wrote:
Good point. In the days before the internet, I imagine a lot of people didn't have any idea where to begin with even a simple repair like this, especially with the screws hidden under the grip, so I could see how a lens could end up shoved in the back of a closet for many years.
FWIW, in my experience, lenses attached with set screws through the side do seem a bit more prone to this than those using washered screws from the front.
| Alun Thomas wrote: |
| kiddo wrote: |
My question is, how come all these years the lens was used this way? I've tried the lens on different adaptall nikon, canon and m42, none would work infinity properly,most of the cases would reach infinity mark on 5-10meters
|
I've had lenses that looked never to have been touched that were similarly afflicted. It can be difficult to detect on an optical viewfinder (more so for wide angle lenses though), although another possible explanation is that they did realise it, so the lens was never used much for that exact reason, and no repair was attempted in the lifetime of the lens. |
|
|
| Back to top |
|
|
BrianSVP
Joined: 09 Jun 2023
Posts: 343
Location: Philadelphia
|
| Posted: Thu Jan 18, 2024 7:23 pm Post subject: |
|
|
BrianSVP wrote:
My pleasure!
This is a rather common setup for shorter telephoto primes like this, so it's definitely applicable to a lot of other lenses.
| kiddo wrote: |
| thank you very much for your help, maybe this thread might go further with other lenses also |
|
|
| Back to top |
|
|
kiddo
Joined: 29 Jun 2018
Posts: 1237
|
| Posted: Tue Jan 23, 2024 10:40 am Post subject: |
|
|
kiddo wrote:
I've noticed some haze on the second element of the front group ,so with acetone and patience I've been able to remove the name plate ring, but , cannot go further , as there's a black ring sitting on the lens and it will not come out,neither but turning with rubber tools (applied acetone on the edges in case it had glue on it) but , won't come out, do you guys have any idea how should I go further? I've tried removing element with suction cup but no luck neither 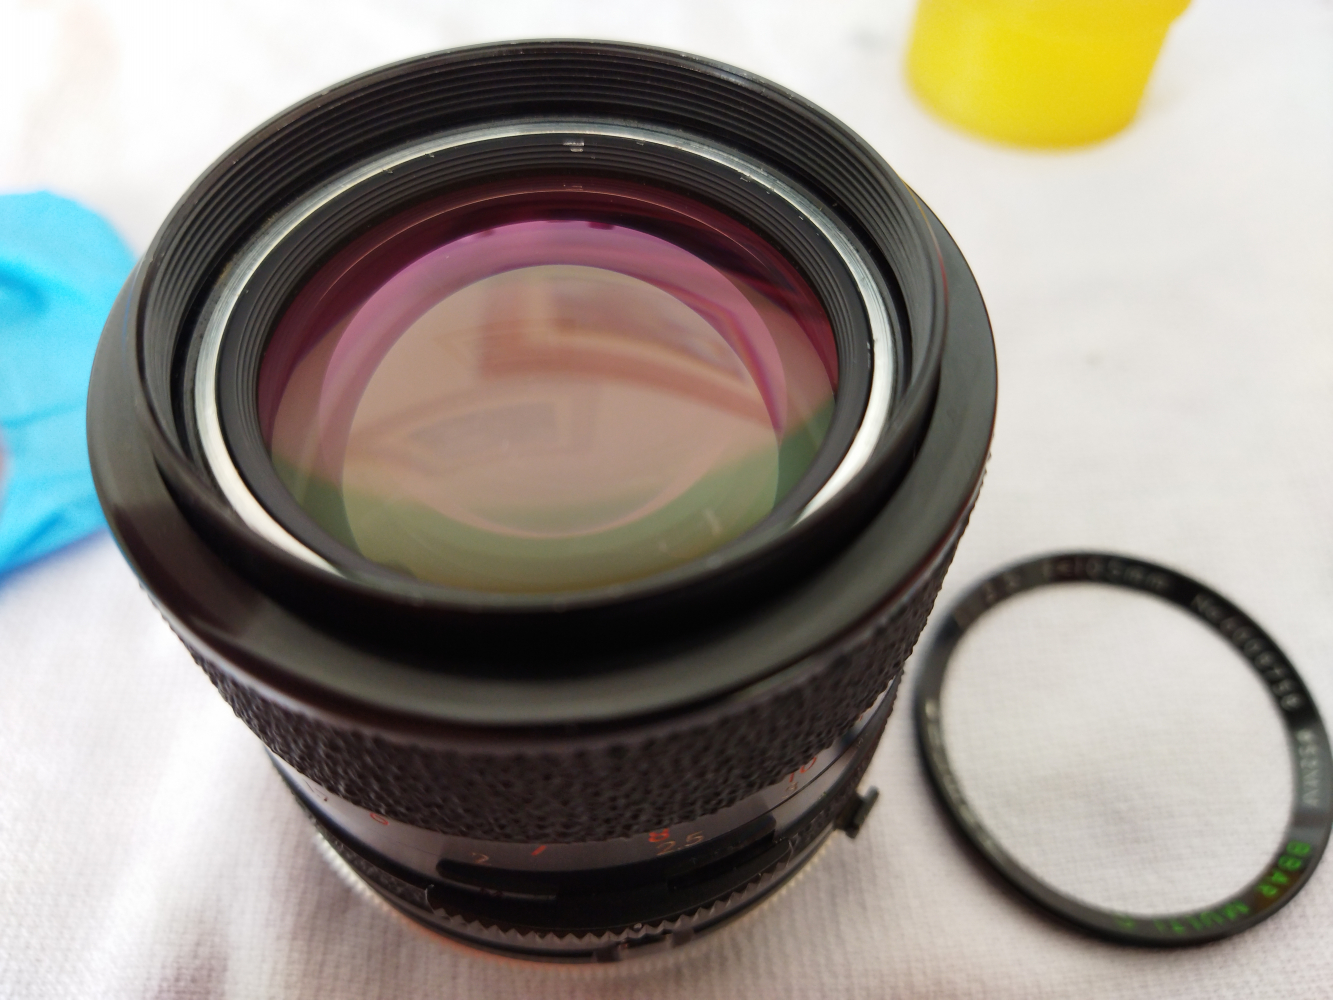 |
|
| Back to top |
|
|
BrianSVP
Joined: 09 Jun 2023
Posts: 343
Location: Philadelphia
|
| Posted: Tue Jan 23, 2024 2:06 pm Post subject: |
|
|
BrianSVP wrote:
Does the inner black ring actually move when you use the rubber tool on it, or is it holding fast?
On some lenses, you'll have to remove the front barrel first in order to remove the retaining rings below. If the black inner ring is spinning, this is probably the case. What you'd need to do is take the outer focus ring back off like you did in the earlier repair, then look for a small set screw at the base of the front barrel that keeps the barrel from rotating. Once this screw loosened, you'd then be able to turn the entire front barrel off and access the rings in the front that are blocked by it.
If the inner black ring doesn't turn at all, I'd recommend just trying to work on it some more. Someitmes gently heating the lens will help free a retaining ring that is bound up even with the threadlocker dissolved.
| kiddo wrote: |
| I've noticed some haze on the second element of the front group ,so with acetone and patience I've been able to remove the name plate ring, but , cannot go further , as there's a black ring sitting on the lens and it will not come out,neither but turning with rubber tools (applied acetone on the edges in case it had glue on it) but , won't come out, do you guys have any idea how should I go further? I've tried removing element with suction cup but no luck neither |
|
|
| Back to top |
|
|
RokkorDoctor

Joined: 27 Nov 2021
Posts: 1414
Location: Kent, UK
Expire: 2025-05-01
|
| Posted: Tue Jan 23, 2024 2:17 pm Post subject: |
|
|
RokkorDoctor wrote:
| kiddo wrote: |
| I've noticed some haze on the second element of the front group ,so with acetone and patience I've been able to remove the name plate ring, but , cannot go further , as there's a black ring sitting on the lens and it will not come out,neither but turning with rubber tools (applied acetone on the edges in case it had glue on it) but , won't come out, do you guys have any idea how should I go further? I've tried removing element with suction cup but no luck neither |
It is possible that it is not a black screwed-in retainer ring at all.
It may be the front lip of a cell that drops in from the rear, with the lens stack of that cell also dropping in from the rear.
It is also possible that it is a cell that is held in place with 3 set-screws from the side for centering, but that is not a common construction.
And there are yet more possibilities, like the ones mentioned by BrianSVP.
Even with the same lens manufacturer you may find that the odd lens here and there uses assembly methods quite different from the rest of their line of lenses. That's the fun (and puzzle) of working on lenses without a service manual.
EDIT: also never discount the possibility that something has been assembled using a left-hand thread rather than the usual right-hand thread; I've come across these in the most unexpected of places.
_________________
Mark
SONY A7S, A7RII + dust-sealed modded Novoflex/Fotodiox/Rayqual MD-NEX adapters
Minolta SR-1, SRT-101/303, XD7/XD11, XGM, X700
Bronica SQAi
Ricoh GX100
Minolta majority of all Rokkor SR/AR/MC/MD models made
Sigma 14mm/3.5 for SR mount
Tamron SP 60B 300mm/2.8 (Adaptall)
Samyang T-S 24mm/3.5 (Nikon mount, DIY converted to SR mount)
Schneider-Kreuznach PC-Super-Angulon 28mm/2.8 (SR mount)
Bronica PS 35/40/50/65/80/110/135/150/180/200/250mm |
|
| Back to top |
|
|
kiddo
Joined: 29 Jun 2018
Posts: 1237
|
| Posted: Tue Jan 23, 2024 2:54 pm Post subject: |
|
|
kiddo wrote:
| BrianSVP wrote: |
Does the inner black ring actually move when you use the rubber tool on it, or is it holding fast?
On some lenses, you'll have to remove the front barrel first in order to remove the retaining rings below. If the black inner ring is spinning, this is probably the case. What you'd need to do is take the outer focus ring back off like you did in the earlier repair, then look for a small set screw at the base of the front barrel that keeps the barrel from rotating. Once this screw loosened, you'd then be able to turn the entire front barrel off and access the rings in the front that are blocked by it.
If the inner black ring doesn't turn at all, I'd recommend just trying to work on it some more. Someitmes gently heating the lens will help free a retaining ring that is bound up even with the threadlocker dissolved.
| kiddo wrote: |
| I've noticed some haze on the second element of the front group ,so with acetone and patience I've been able to remove the name plate ring, but , cannot go further , as there's a black ring sitting on the lens and it will not come out,neither but turning with rubber tools (applied acetone on the edges in case it had glue on it) but , won't come out, do you guys have any idea how should I go further? I've tried removing element with suction cup but no luck neither |
|
Tte black inner ring it's not moving at all, I thought it might have glue but with acetone wouldn't loose neither |
|
| Back to top |
|
|
kiddo
Joined: 29 Jun 2018
Posts: 1237
|
| Posted: Tue Jan 23, 2024 4:03 pm Post subject: |
|
|
kiddo wrote:
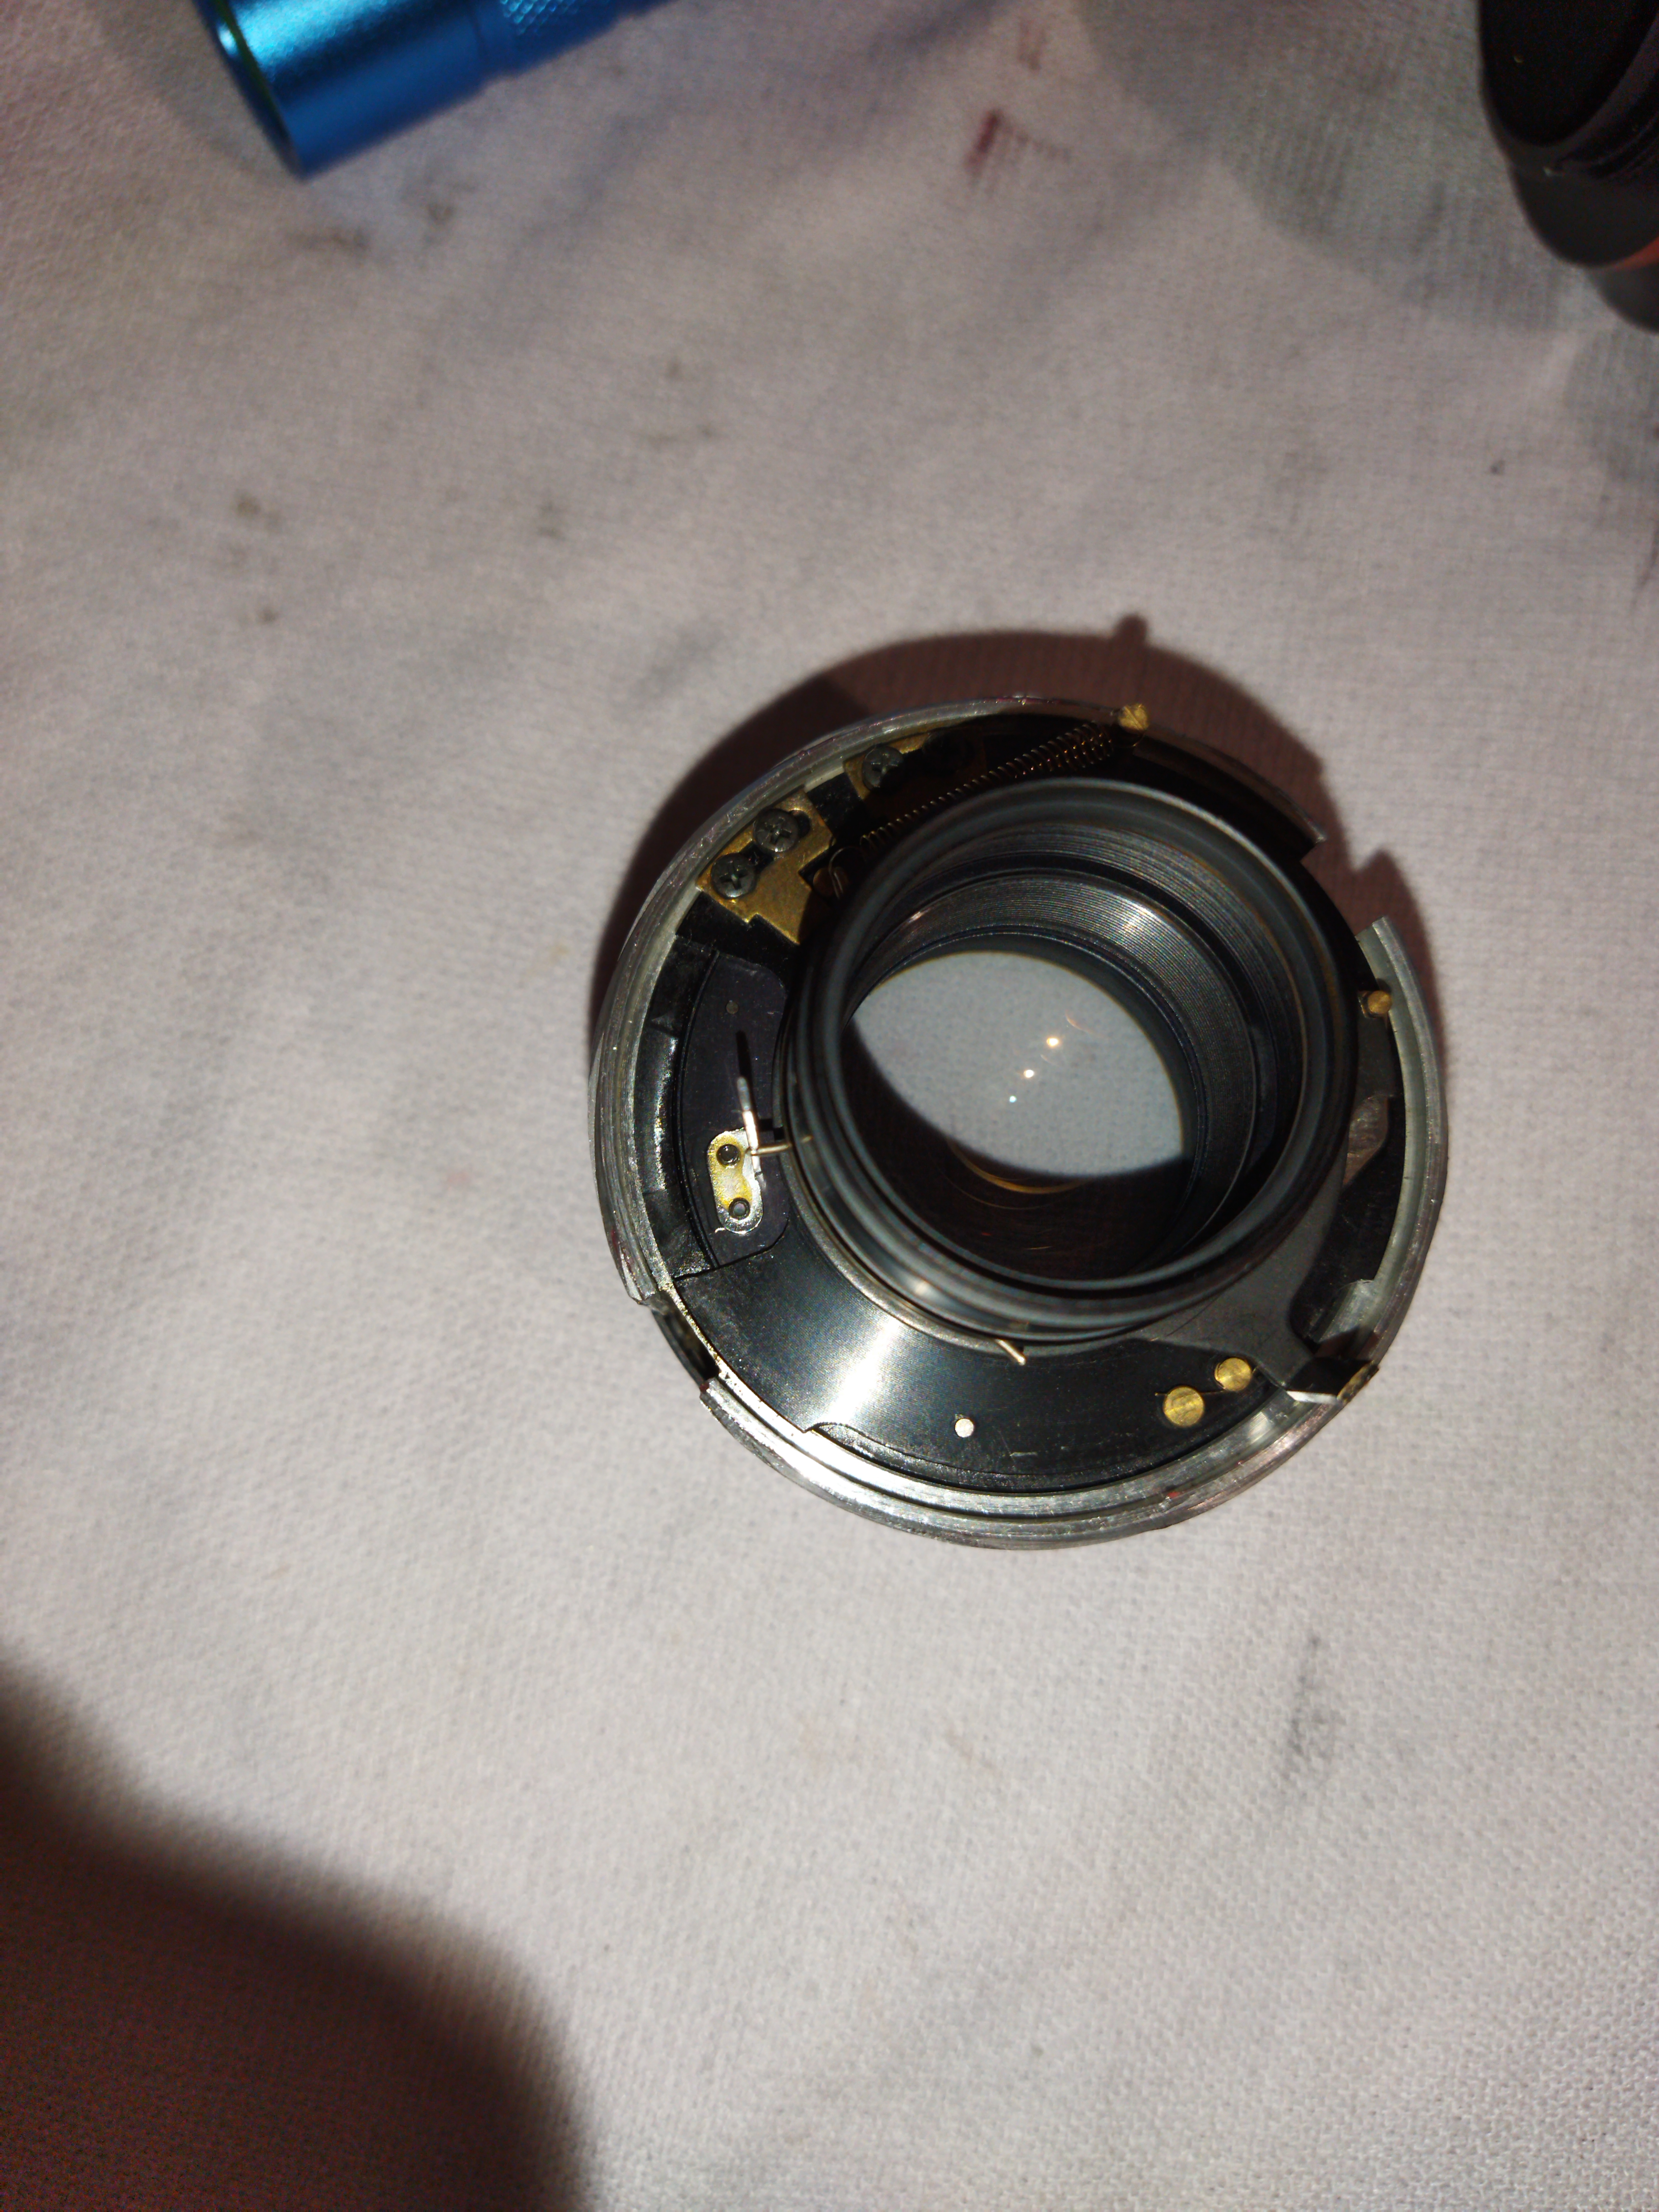
Unintentionally I've reached a next level of difficulty
I was able to keep the entrance of each helical ring ,but didn't do any measurements if them before being removed
I still don't see any way to open the front group from here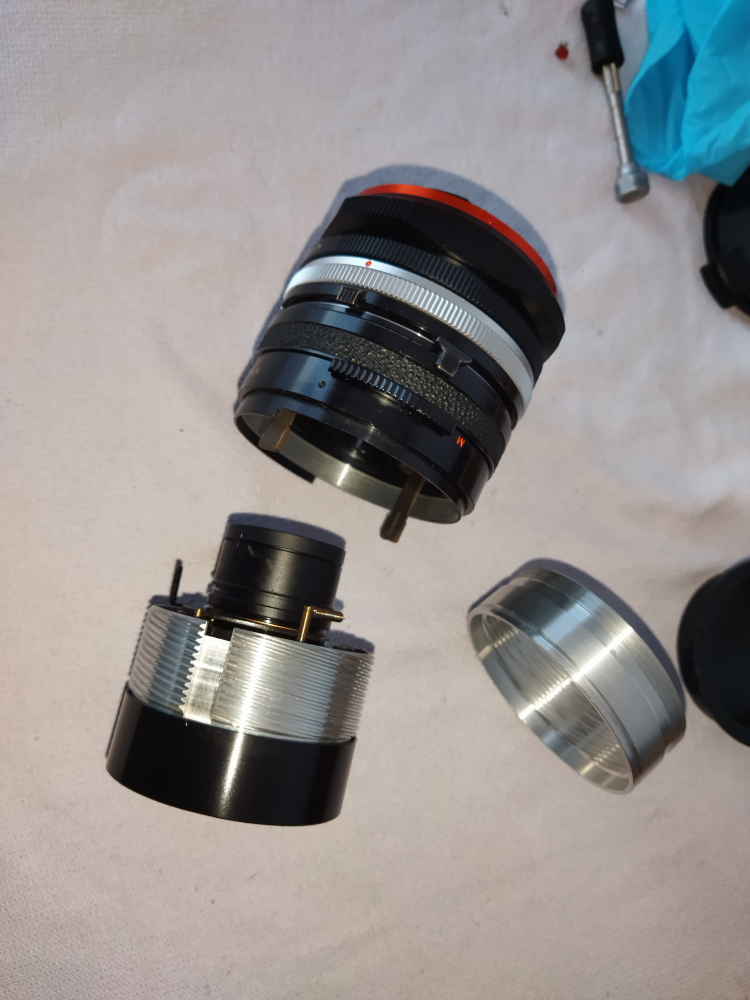 |
|
| Back to top |
|
|
stevemark
Joined: 29 Apr 2011
Posts: 3953
Location: Switzerland
|
| Posted: Tue Jan 23, 2024 5:09 pm Post subject: |
|
|
stevemark wrote:
| kiddo wrote: |
Unintentionally I've reached a next level of difficulty
I was able to keep the entrance of each helical ring ,but didn't do any measurements if them before being removed |
Common mistake. Next time you'll know better (probably ...).
Re-assembling may take some time and patience, but after some trial-and-error you'll manage.
| kiddo wrote: |
| I still don't see any way to open the front group from here |
I can't see it from the pictures - but you certainly can remove the rear lens group somehow, maybe simply by turning it (unscrew it). That would expose the aperture mechanism, and you should be able to remove it somehow (ether entirely, or step-by-step). After removing the aperture mechanism you may be able to extract the front lenses from the rear of the front group.
Be aware that this is pure speculation from my side, and not based on real world experience dismantling a Tamron 100mm lens!
S
_________________
www.artaphot.ch |
|
| Back to top |
|
|
BrianSVP
Joined: 09 Jun 2023
Posts: 343
Location: Philadelphia
|
| Posted: Tue Jan 23, 2024 5:12 pm Post subject: |
|
|
BrianSVP wrote:
Uh oh, it looks like you ran the helical all the way off the synchronizing keys, which will likely be fairly tricky to put back together without taking off the rear mount. I can walk you through that, too, and at the very least it will be a nice little tutorial on how to disassemble and reassemble a lens.
Turning back to the problem of the front element, do you see a set screw anywhere around the edge of the black front barrel right above the helical? If not, since you have it apart, can you take a picture of the rear of the half with the oprics in it - I'm trying to get a sense of how the helical and the front barrel relate. They appear to be two different pieces, but it's unclear whether the front barrel is a single component with the interior of the lens, and the helical is a ring that slides on over it, or the helical and the interior are one piece, with the front barrel being a screw on. What I am trying to determine is whether there is a seam between the helical and the interior portion of the lens or not, since it gives a clue as to the construciton.
| kiddo wrote: |
Unintentionally I've reached a next level of difficulty
I was able to keep the entrance of each helical ring ,but didn't do any measurements if them before being removed
I still don't see any way to open the front group from here |
|
|
| Back to top |
|
|
kiddo
Joined: 29 Jun 2018
Posts: 1237
|
| Posted: Tue Jan 23, 2024 6:55 pm Post subject: |
|
|
kiddo wrote:
I've tried to put it together without removing the mount, but always would be issue with the aperture not opening working properly
It seems to me that the helical is the same tube where the front elements are sitting into (even though the inner tube is blackened)

Last edited by kiddo on Tue Jan 23, 2024 8:38 pm; edited 1 time in total |
|
| Back to top |
|
|
kiddo
Joined: 29 Jun 2018
Posts: 1237
|
| Posted: Tue Jan 23, 2024 6:59 pm Post subject: |
|
|
kiddo wrote:
Forgot to mention ,there no screws outside the front barrel ,I've tried twisting by hand front black ring, in case it would release ,but it's not working neither
Interesting lens indeed ,I guess for many of you guys might be a piece of cake lol |
|
| Back to top |
|
|
kiddo
Joined: 29 Jun 2018
Posts: 1237
|
| Posted: Tue Jan 23, 2024 9:45 pm Post subject: |
|
|
kiddo wrote:
It seems the helical is the same ring for sitting the front group inside.
There's an external front black ring that will not turn by unscrewing.
And there's the rear group and aperture unit fitted on the helicoid ,but don't see how are they fixed inside there
I've tried uploading more pictures but there's "410 page" error |
|
| Back to top |
|
|
kiddo
Joined: 29 Jun 2018
Posts: 1237
|
| Posted: Wed Jan 24, 2024 11:28 am Post subject: |
|
|
kiddo wrote:
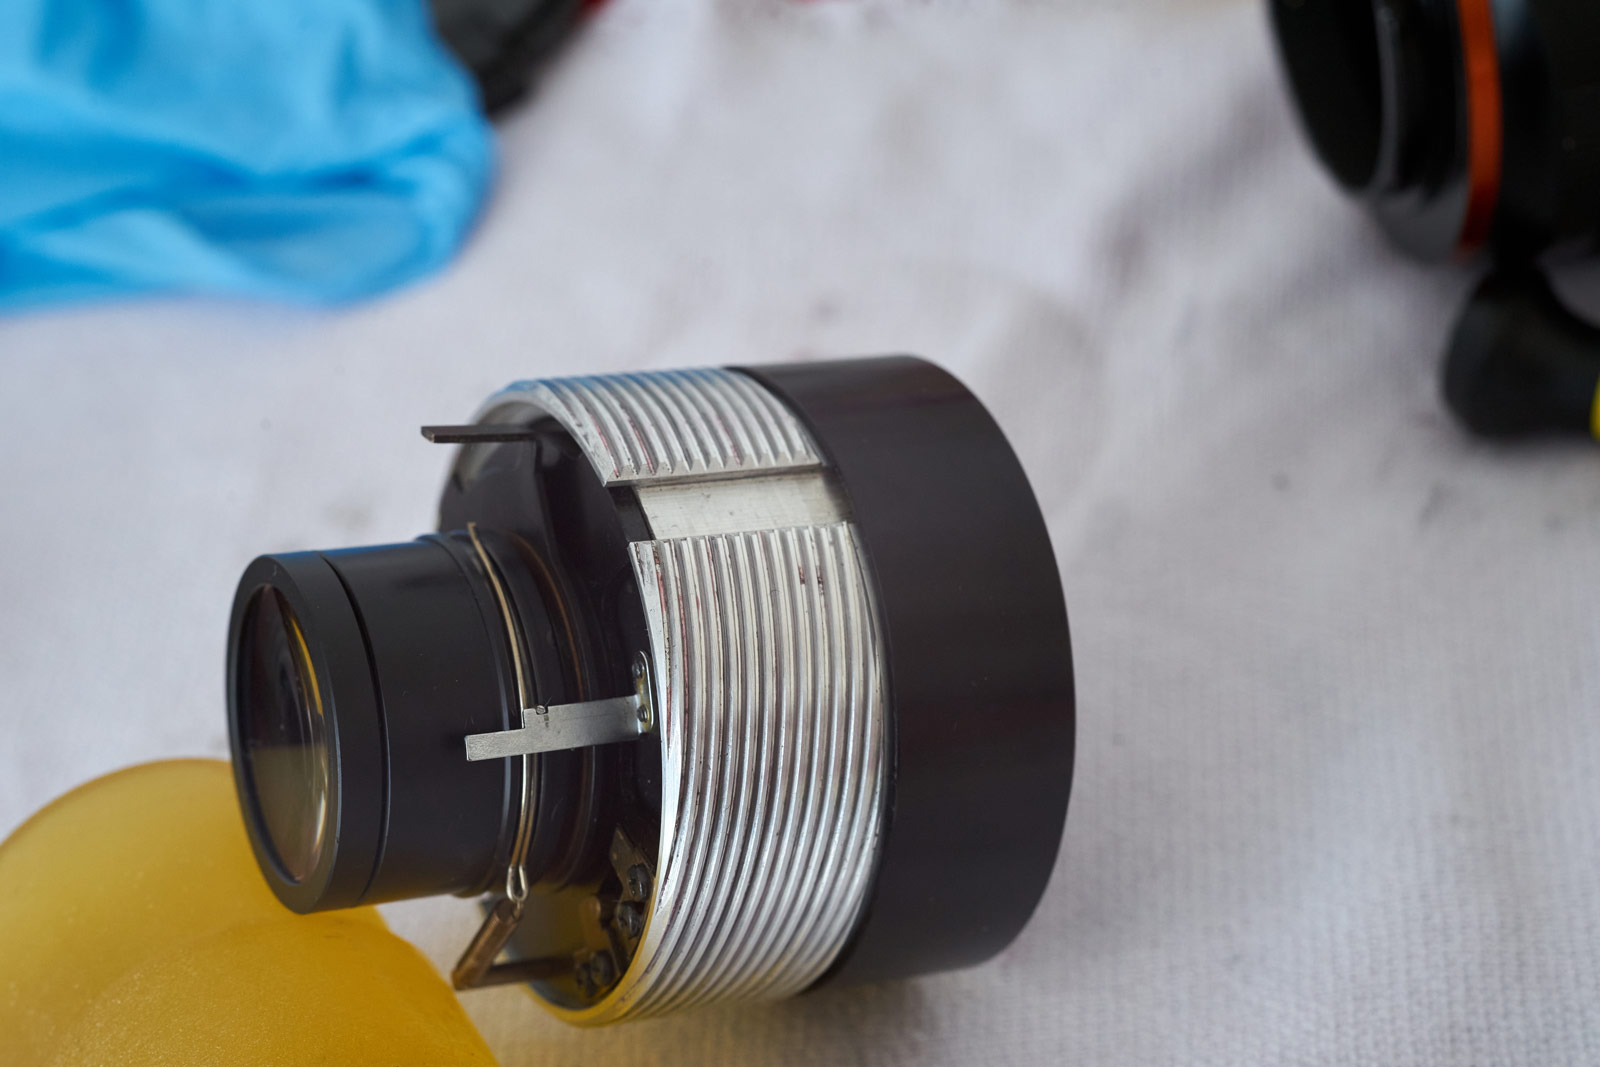
i´ll add some more pictures
i am not sure if i would reach to go further more on cleaning the inner element front group, but in case i would have to remove the adaptall mount , is there anything i should take into account before doing so? i have never opened this kind of mount before (did it on canon fd, minolta, etc)
#1
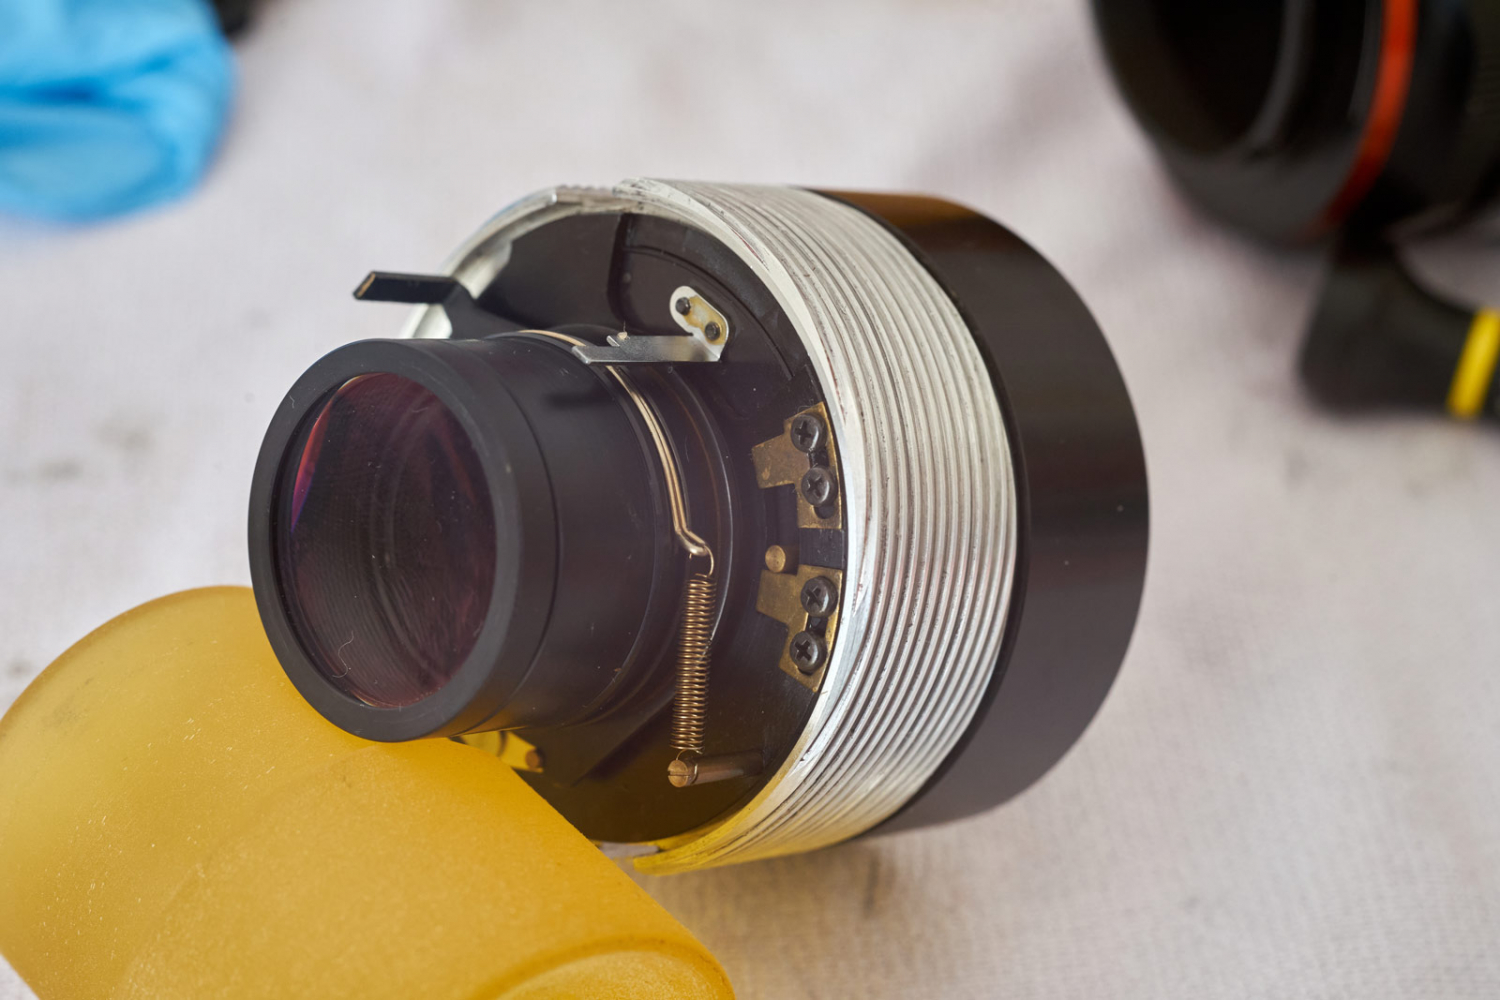
#2

#3
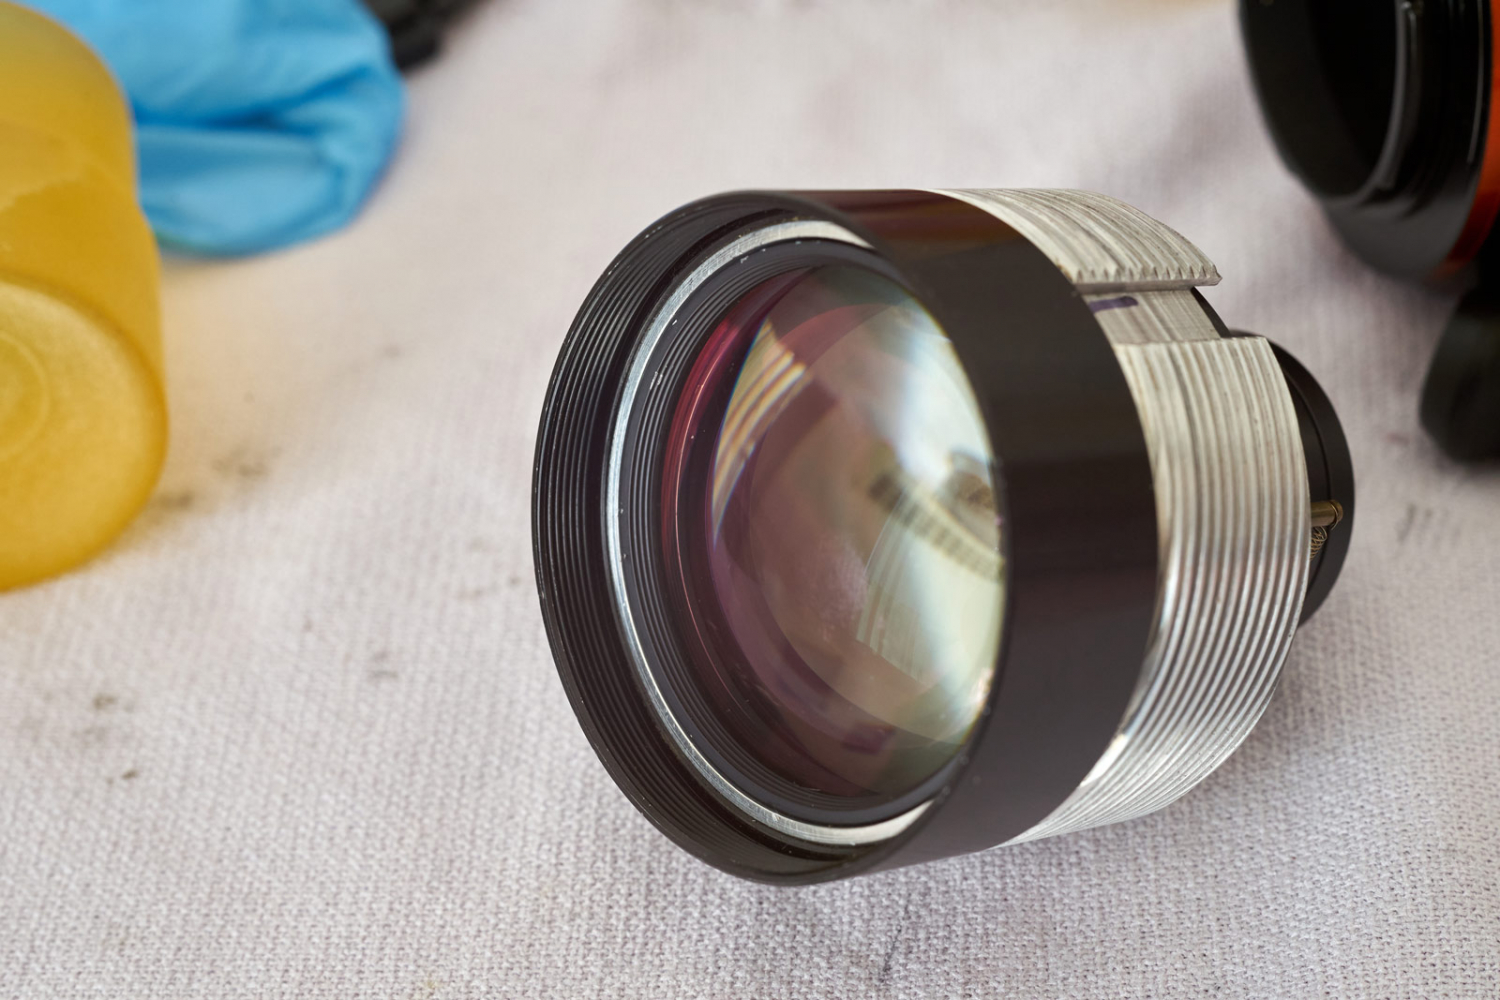
#4

Maybe the only way to acces the inner element would be through the back, after removing the aperture assembly, but I don't see anything to remove it neither |
|
| Back to top |
|
|
kiddo
Joined: 29 Jun 2018
Posts: 1237
|
| Posted: Wed Jan 24, 2024 2:12 pm Post subject: |
|
|
kiddo wrote:
Ok guys, I've accomplished to open it
The black ring from the front group it is glued , so I had to put acetone in front side and rear also (next to helicoid)
The aperture group it is also glued so it needs acetone to release it.
The whole optical group will be removed through the rear (once released the aperture group).
So, to clean the front group inside, it needs to be released the helicoid ,there's no other option.
I would appreciate some help, if there's a simpler way to put back together ,always I do it, aperture just won't work properly , so are there steps I should follow to make it right ?
Last edited by kiddo on Wed Jan 24, 2024 4:21 pm; edited 1 time in total |
|
| Back to top |
|
|
stevemark
Joined: 29 Apr 2011
Posts: 3953
Location: Switzerland
|
| Posted: Wed Jan 24, 2024 4:17 pm Post subject: |
|
|
stevemark wrote:
| kiddo wrote: |
| ... so I had to put acetone in ... |
That's something I now do quite routinely as soon as the screws don't loosen immediately. It makes servicing old lenses much easier. The screws not necessarily are glued in; quite often I simply suspect oil (separated grease) that has hardened over time.
S
_________________
www.artaphot.ch |
|
| Back to top |
|
|
kiddo
Joined: 29 Jun 2018
Posts: 1237
|
| Posted: Wed Jan 24, 2024 4:36 pm Post subject: |
|
|
kiddo wrote:
Yes ,that's also true ,but I'm telling you, this lens had glue on every ring and screw possible, the black front ring, I did try to open with acetone on front only, but I had to apply on the rear side also to release it (the side next to helicoid) .
Definitely there are worse lenses to deal with, I have a yashica ML 1.4 with red loctite (it's red) everywhere and is very very stubborn to release to clean front group affected by fungus.
Regarding the helicoids ,I'm not used to them, I did find there are several points of entrance between them ,does it have any importance Wich one to choose? In this case , the whole optical group is hold into the helicoid by 4 little screws located under the black ring from the front .
By the way, I've seen some guys working on Russian lenses , applying WD-40 to small screws before releasing them , I guess some screws are prone to oxidation more than others.so it makes sense . |
|
| Back to top |
|
|
stevemark
Joined: 29 Apr 2011
Posts: 3953
Location: Switzerland
|
| Posted: Wed Jan 24, 2024 4:52 pm Post subject: |
|
|
stevemark wrote:
| kiddo wrote: |
| Yes ,that's also true ,but I'm telling you, this lens had glue on every ring and screw possible, the black front ring, I did try to open with acetone on front only, but I had to apply on the rear side also to release it (the side next to helicoid) . |
Sounds like fun ... 
| kiddo wrote: |
Regarding the helicoids ,I'm not used to them, I did find there are several points of entrance between them ,does it have any importance Wich one to choose? |
Oh yes.
| kiddo wrote: |
| By the way, I've seen some guys working on Russian lenses , applying WD-40 to small screws before releasing them , I guess some screws are prone to oxidation more than others.so it makes sense . |
Probably more a Russian problem. I don't remember any corrosion on Japanese screws (1970-2010 time rame, and talking about Canon, Nikon, Minolta and the like). But it should work of course if you really have a rusty mess.
S
_________________
www.artaphot.ch |
|
| Back to top |
|
|
|
|