| View previous topic :: View next topic |
| Author |
Message |
jamaeolus


Joined: 19 Mar 2014
Posts: 2964
Location: Eugene
Expire: 2015-08-20
|
 Posted: Thu Feb 24, 2022 1:25 am Post subject: aperture blade reinstall. Posted: Thu Feb 24, 2022 1:25 am Post subject: aperture blade reinstall. |
 |
|
jamaeolus wrote:
I bought a barrel mount Xenotar 135mm 4.5 dirt cheap. turns out there was reasons. The coating is so degraded that it looks foggy. A problem for a different thread though. While taking apart to try to polish the optical elements the aperture blades got disrupted in their housing. Is there a good way to put them back in place? sneaky trick of some kind?
_________________
photos are moments frozen in time |
|
| Back to top |
|
 |
Oldhand

Joined: 01 Apr 2013
Posts: 5999
Location: Mid North Coast NSW - Australia
|
| Posted: Thu Feb 24, 2022 4:12 am Post subject: Re: aperture blade reinstall. |
|
|
Oldhand wrote:
| jamaeolus wrote: |
| I bought a barrel mount Xenotar 135mm 4.5 dirt cheap. turns out there was reasons. The coating is so degraded that it looks foggy. A problem for a different thread though. While taking apart to try to polish the optical elements the aperture blades got disrupted in their housing. Is there a good way to put them back in place? sneaky trick of some kind? |
I've only ever done it once, and I can't remember what the lens was, but it had a lot of blades.
It took me multiple goes and I found it best to make sure that the pins were elevated above the work surface to stop them from being pushed out by gravity. And remember that the blades sit one on top of the other until you get to the last one whose "tail" must sit under the first.
I hope that's right - memory is a little hazy - except for one thing - I never wanted to do it again Hahaha
Tom |
|
| Back to top |
|
|
RokkorDoctor


Joined: 27 Nov 2021
Posts: 1405
Location: Kent, UK
Expire: 2025-05-01
|
| Posted: Thu Feb 24, 2022 11:19 am Post subject: |
|
|
RokkorDoctor wrote:
Depends on the construction and to what extent they have been dislodged, but generally no easy way other than to remove the aperture assembly, realign all the blades, and re-insert the whole aperture assembly.
Difficult the first time you do it. But as with all things: practice makes it easier, eventually it won't be much of a bother at all.
Few hints:
- don't touch the aperture blades with your fingers; skin oils and acids makes them rust
- wooden sticks (toothpicks, cocktail-sticks) are good tools for manipulation
- some aperture blade pins are hollow (small hole in the middle). A sharp-pointed cocktail-stick can be lightly pressed in there to assist handling them
- re-inserting a complete assembly into the lens can be tricky, as they are sometimes deeply recessed. Hold the assembly up on a tall cylinder whilst lowering the lens barrel down over it. Rubber name ring removal tools are useful here.
- if the aperture needs re-adjusting, you can use the f/# stop ratio and full open aperture diameter to work out required diameters. e.g f/8 aperture diameter is half the f/4 aperture diameter.
- no lubrication is needed for the blades, they are run dry. Any oil/grease-based lubrication will make them stick. If lubrication is really required, it is likely only the edges of the rotating ring that holds the aperture blades, and then only a very small amount of dry-lube such as graphite powder or molybdenum disulfide powder.
Oldhand is correct: the blades are laid down overlapping one on top the other, the last one needs to be manipulated back underneath the first one.
Good luck! 
EDIT: corrected a few minor typos
_________________
Mark
SONY A7S, A7RII + dust-sealed modded Novoflex/Fotodiox/Rayqual MD-NEX adapters
Minolta SR-1, SRT-101/303, XD7/XD11, XGM, X700
Bronica SQAi
Ricoh GX100
Minolta majority of all Rokkor SR/AR/MC/MD models made
Sigma 14mm/3.5 for SR mount
Tamron SP 60B 300mm/2.8 (Adaptall)
Samyang T-S 24mm/3.5 (Nikon mount, DIY converted to SR mount)
Schneider-Kreuznach PC-Super-Angulon 28mm/2.8 (SR mount)
Bronica PS 35/40/50/65/80/110/135/150/180/200/250mm
Last edited by RokkorDoctor on Fri Feb 25, 2022 1:22 pm; edited 1 time in total |
|
| Back to top |
|
|
Himself
Joined: 01 Mar 2007
Posts: 3240
Location: Montreal
Expire: 2013-05-30
|
| Posted: Thu Feb 24, 2022 3:05 pm Post subject: |
|
|
Himself wrote:
Very difficult as a level. And I'm handy. At least I like to think that way 
I put a dowel through the barrel where the blades sit. If it's smaller shim it with some gaffer's tape. But it doesn't have to wobble. It has to stick out around 1/2" give or take. I used dental picks and a long thin screwdriver with a magnetized tip. It was a long barrel. 135mm lens.
Blades are to be installed, given that I put the dowel through the barrel, wide open.
Second blade goes UNDER the first one, 3rd UNDER the 2nd, etc.
_________________
Moderator Himself |
|
| Back to top |
|
|
jamaeolus
Joined: 19 Mar 2014
Posts: 2964
Location: Eugene
Expire: 2015-08-20
|
| Posted: Thu Feb 24, 2022 3:41 pm Post subject: |
|
|
jamaeolus wrote:
Yeah I'm aware of the last blades going under. It has lots of blades. I am in for a serious challenge as I am cursed with poor dexterity compounded with an age tremor.
_________________
photos are moments frozen in time |
|
| Back to top |
|
|
Mir

Joined: 07 Feb 2011
Posts: 981
Location: Montreal, Canada
Expire: 2017-09-30
|
| Posted: Fri Feb 25, 2022 2:46 am Post subject: |
|
|
Mir wrote:
| Quote: |
| with poor dexterity compounded with an age tremor |
Good luck with that ! 😂
I recently did two Canon 2/85 LTMs with 15 blades ... back to back, after cleaning those blades one by one .... both sides ...
But seriously, all of the above knowledge applies, and if you have to clean them, don't use harsh chemicals.
You'll figure it out ... you've seen them irises before !
And all you really need is a lot of patience ....
Best of luck !
_________________
"Obsta principiis, finem respice"
"There is a fine line between hobby and mental illness"
MISC: Tamron SP 35-80 (01A), Auto Chinon Tomioka 1.4/55, Tokina AT-X 2.5/90, Tamron SP 5,6/300 (54B)
ZEISS: WG Distagon 2.8/25, WG Distagon 2.8/35 HFT, WG Planar HFT 1.4/50, Ultron 1.8/50, WG Sonnar 2.8/85, WG Sonnar HFT 2.8/135
VOIGTLÄNDER : Ultron Aspherical 1.8/21, Ultron 2/28, Nokton Aspherical 1.2/35, Nokton Classic 1.4/40, Nokton Aspherical 1.5/50, Color-Heliar 2.5/75
MINOLTA: MD 3.5/35-70 Macro, MD 1.2/50, MC Rokkor-X 1.2/58, MD Macro 3.5/50
LEITZ: SUMMICRON-R 2/35 (II), SUMMICRON-R 2/50 (II), TELE ELMARIT-M 2,8/90 (Thin)
CANON RF: 2.8/28, 2/35, 1.2/50, 1.4/50, Serenar 1.8/50, 2/85, 2/100, 3.5/100
LTM : FUJINON L 2/5cm, CHIYODA KOGAKU SUPER ROKKOR 1.8/5cm, CHIYOKO SUPER ROKKOR C 2/5cm, TOKYO KOGAKU Topcor-S 2/5cm, Nippon Kogaku NIKKOR-H.C 2/5cm, KMZ Jupiter-8 2/5cm
DKL : VOIGTLÄNDER SKOPAREX 3,4/35, SEPTON 2/50, DYNAREX 3,4/90, SUPER-DYNAREX 4/135, Scheiner-Kreuznach Retina-Xenon 1,9/50
And a small Minolta AF set: 2.8/20, 1.4/35, 1.4/50, 2/100, 4.5/100-200
@we3fotography
@7plus_pictures
@_whats.that.car_ |
|
| Back to top |
|
|
Ernst Dinkla

Joined: 30 Nov 2016
Posts: 391
|
| Posted: Fri Feb 25, 2022 10:58 am Post subject: |
|
|
Ernst Dinkla wrote:
Bought a Petri 7 compact camera with a Petri 4.5cm 1.8. Dead on more aspects. It was the lens I was interested in, but its 8 blades diaphragm was damaged, not just blades loose. Bended some to their original shape, with scissors cut away corners that could not be reshaped but did not affect the opening itself, reassembled with the blades in a different order that could work. Then soaked the assembly in lighter fluid to get rid of any fat that might have gathered during the job. Works perfectly now. Its blades are not too shiny either.
_________________
Met vriendelijke groet, Ernst
http://www.pigment-print.com/spectralplots/spectrumviz_1.htm
March 2017 update, 750+ inkjet media white spectral plots |
|
| Back to top |
|
|
jamaeolus
Joined: 19 Mar 2014
Posts: 2964
Location: Eugene
Expire: 2015-08-20
|
| Posted: Fri Feb 25, 2022 11:17 pm Post subject: |
|
|
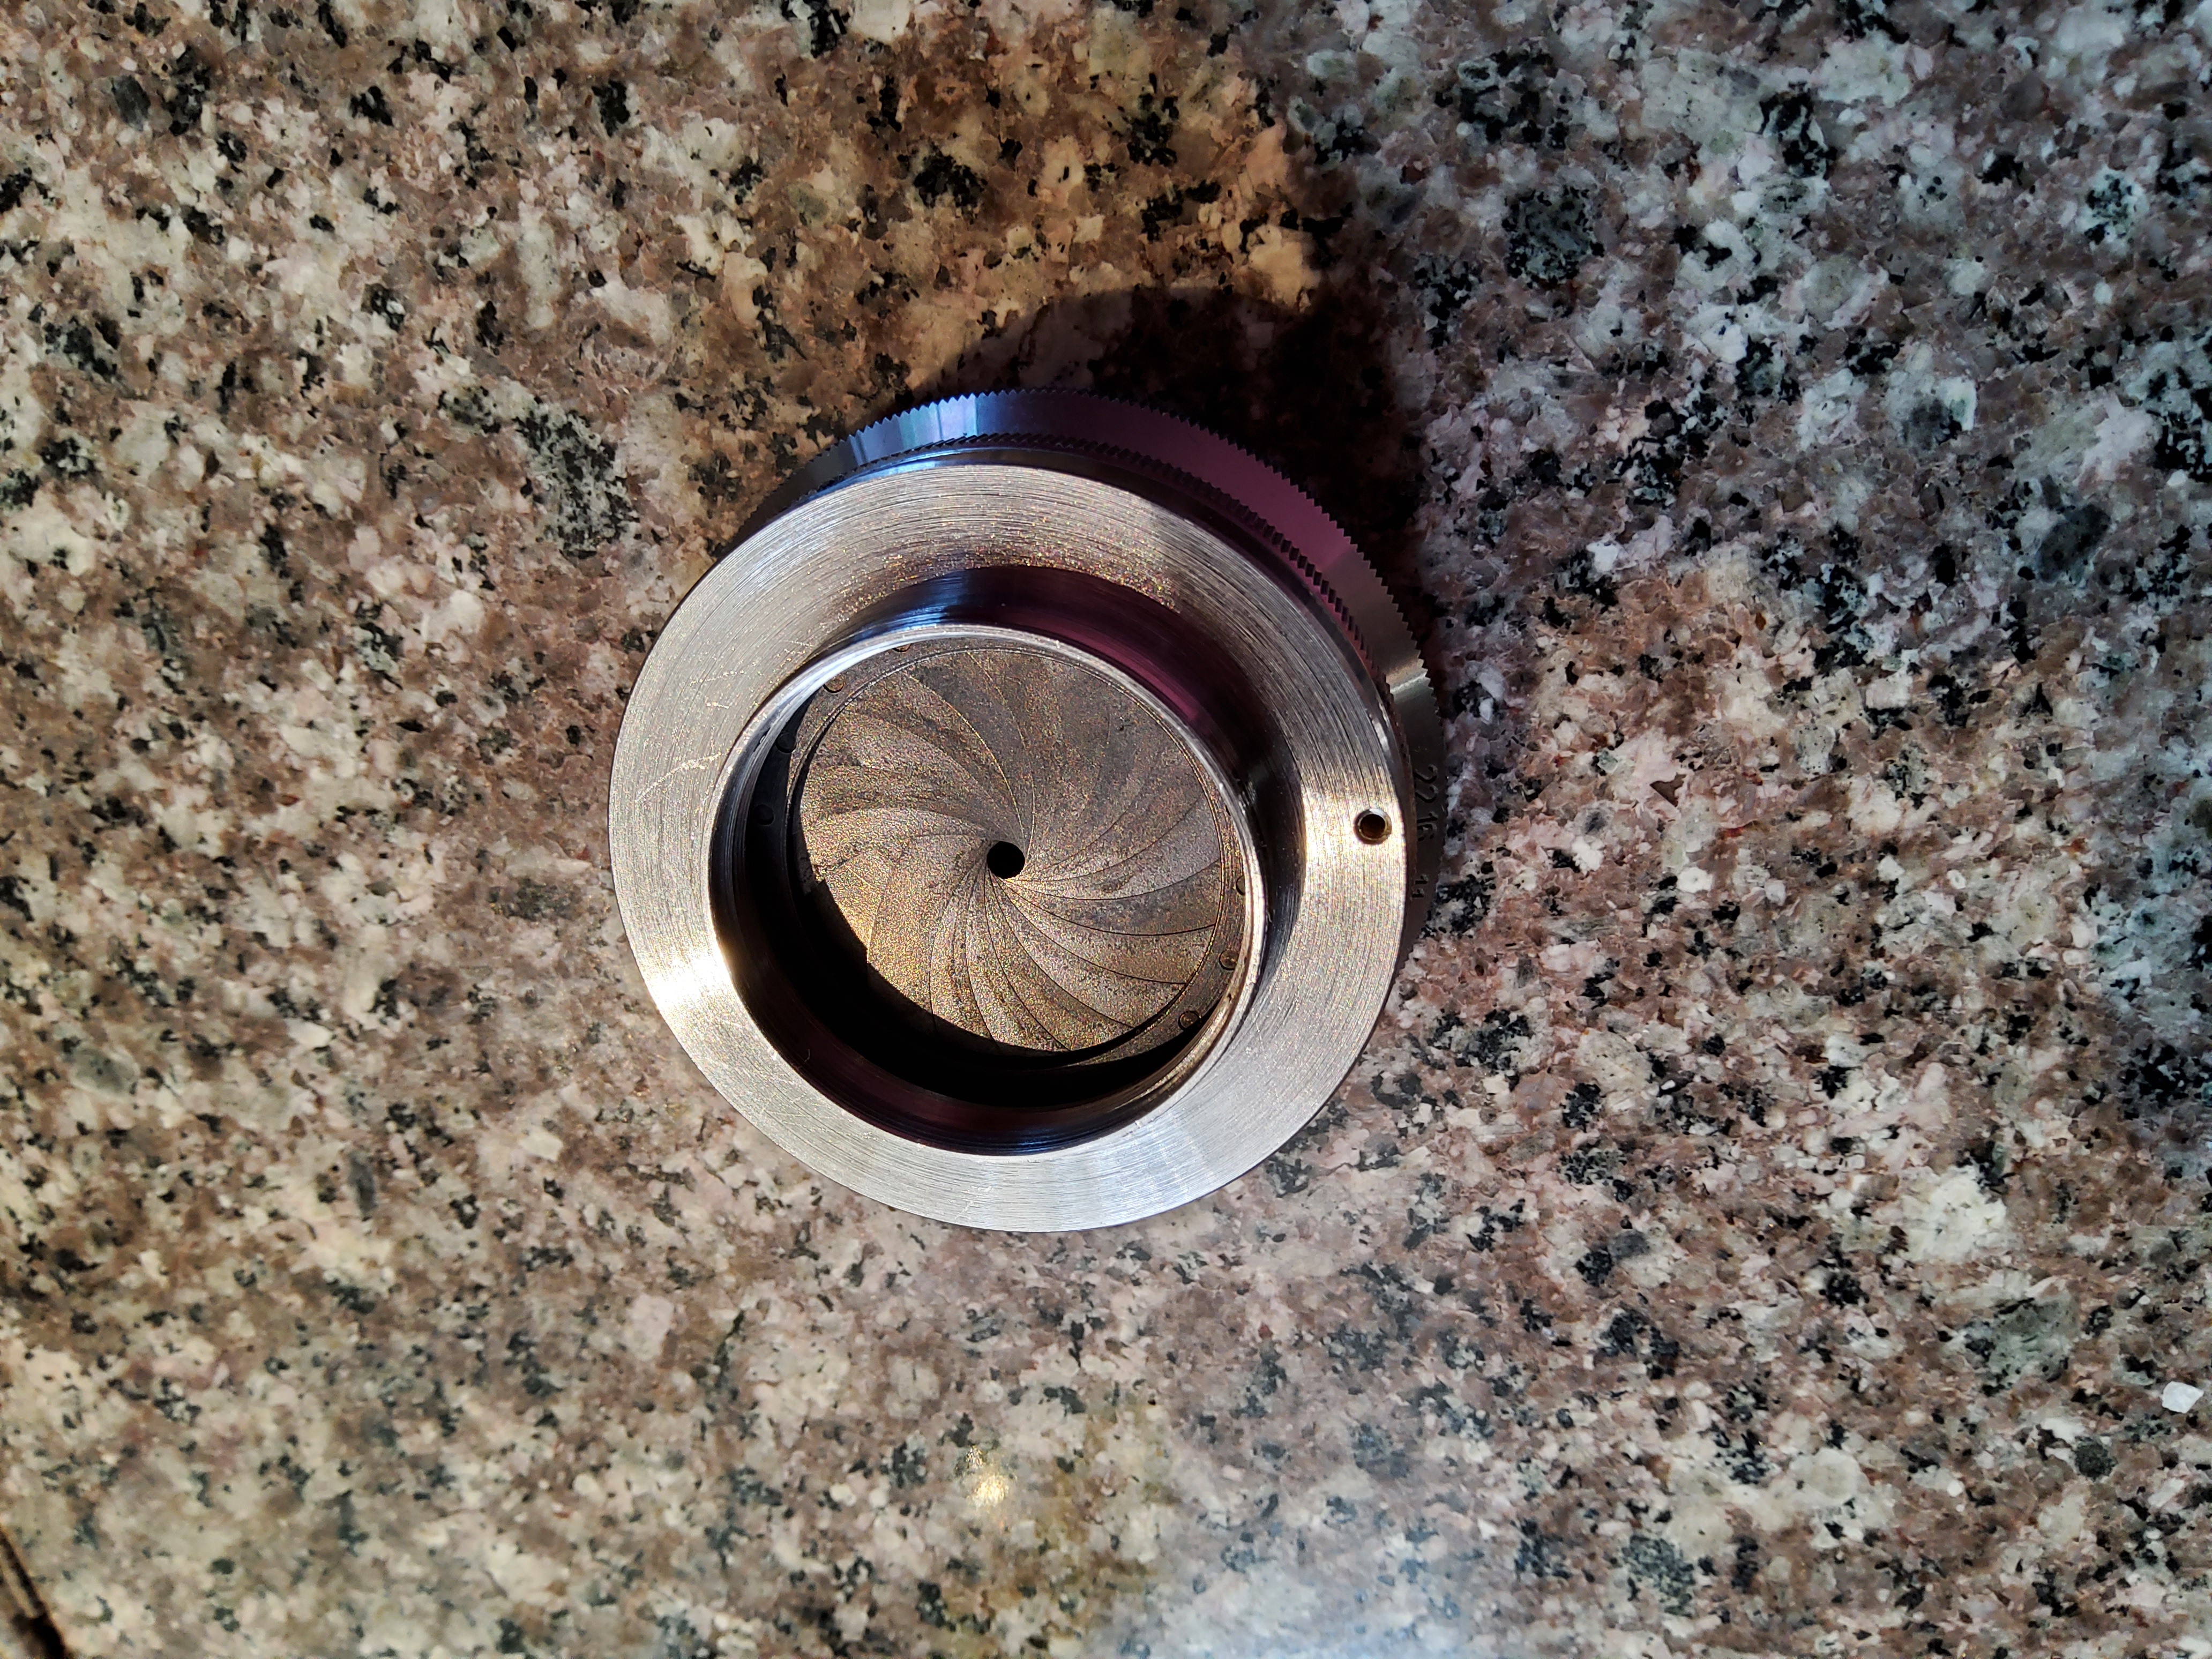
jamaeolus wrote:
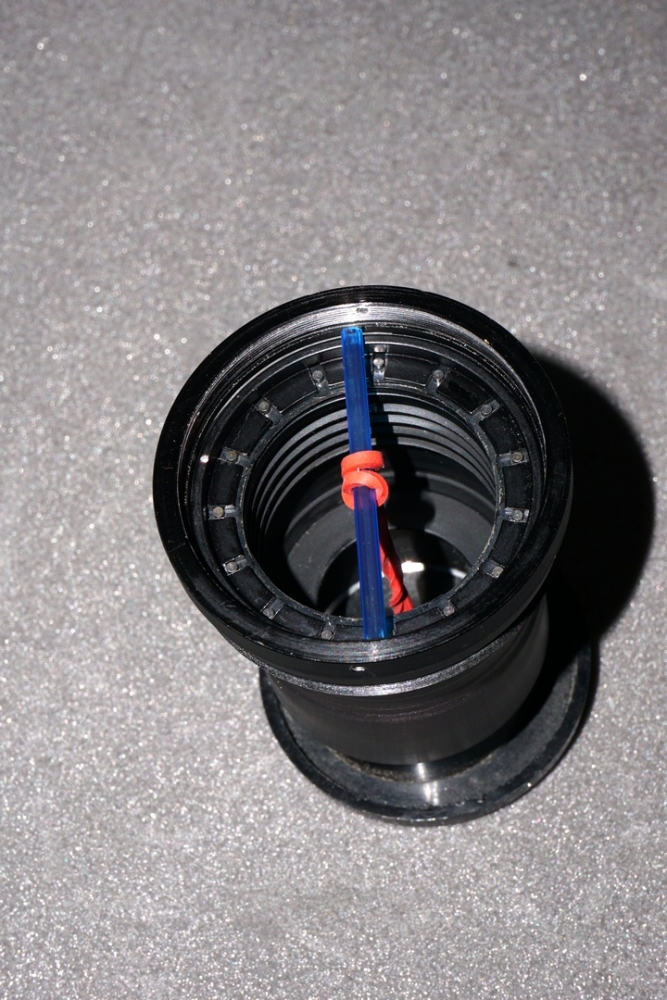
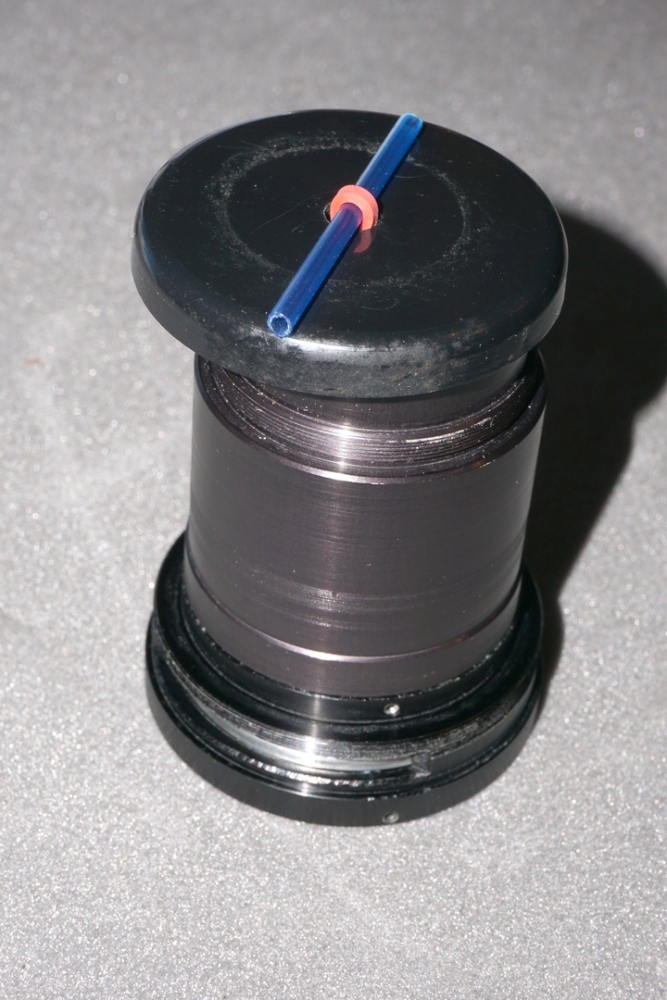
Well I did it! It took 4 tries before I came up with a technique that worked. I was having a really hard time getting the pegs of the last 3 or 4 blades to find their holes, which were hidden under the first few blades . I would get to the last one or two and it would dislodge one of the earliest. Grrrr! I needed some way to hold the initial blades pegs in their proper holes while I shifted the last few from side to side in search of their holes. Desperate, I tried magnets....don't! My wife suggested thread. Yeah yeah! After installing all the easy ones I wrapped thead tightly around the ring leaving open the portion of the blades I would need to slide under. A little finagling with a sharp pencil and or toothpicks I got all the pegs in their holes. Then using sharp pointy scissors i clipped all the thread. Then i mounted the sliding gear thingy with a bit of back and forth and the top pegs dropped in. Inserted the hold down ring and mounted it back in the housing. Now for the lenses.....
_________________
photos are moments frozen in time |
|
| Back to top |
|
|
jamaeolus
Joined: 19 Mar 2014
Posts: 2964
Location: Eugene
Expire: 2015-08-20
|
| Posted: Fri Feb 25, 2022 11:26 pm Post subject: |
|
|
jamaeolus wrote:


_________________
photos are moments frozen in time |
|
| Back to top |
|
|
Oldhand
Joined: 01 Apr 2013
Posts: 5999
Location: Mid North Coast NSW - Australia
|
| Posted: Fri Feb 25, 2022 11:38 pm Post subject: |
|
|
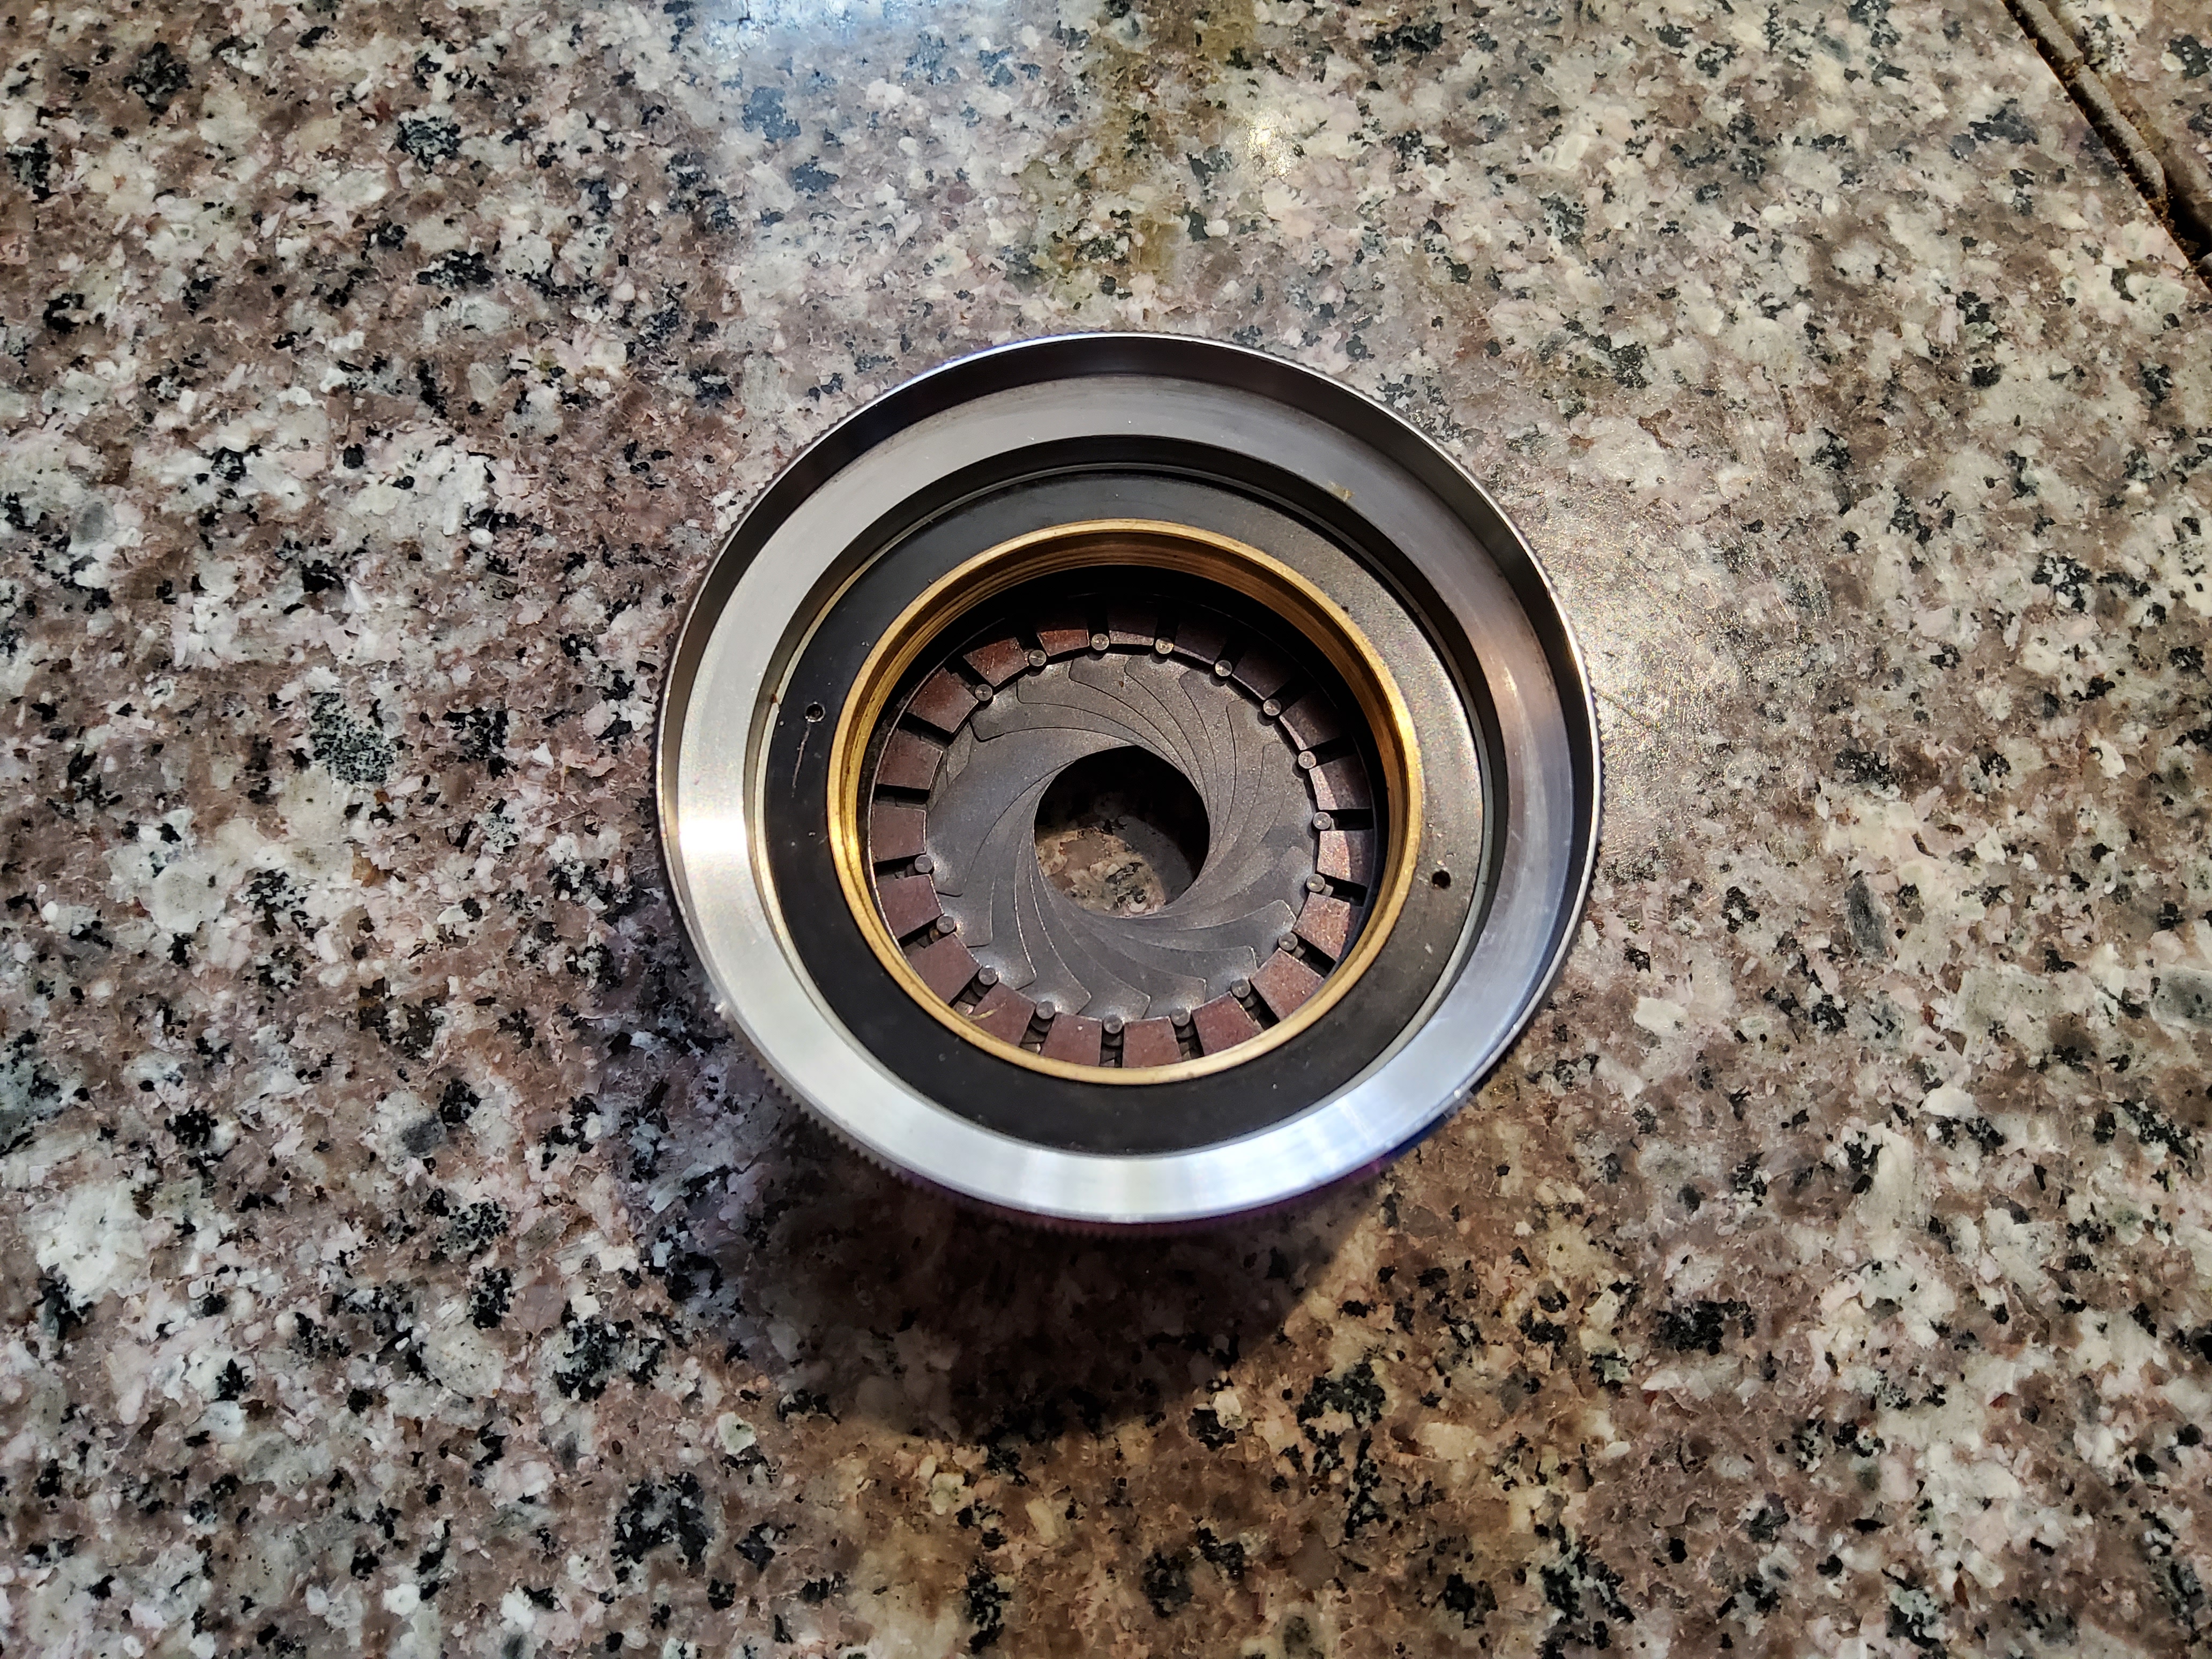
Oldhand wrote:
Well done -
you seem to be missing two aperture blades |
|
| Back to top |
|
|
Lloydy

Joined: 02 Sep 2009
Posts: 7786
Location: Ironbridge. UK.
Expire: 2022-01-01
|
| Posted: Fri Feb 25, 2022 11:41 pm Post subject: |
|
|
Lloydy wrote:
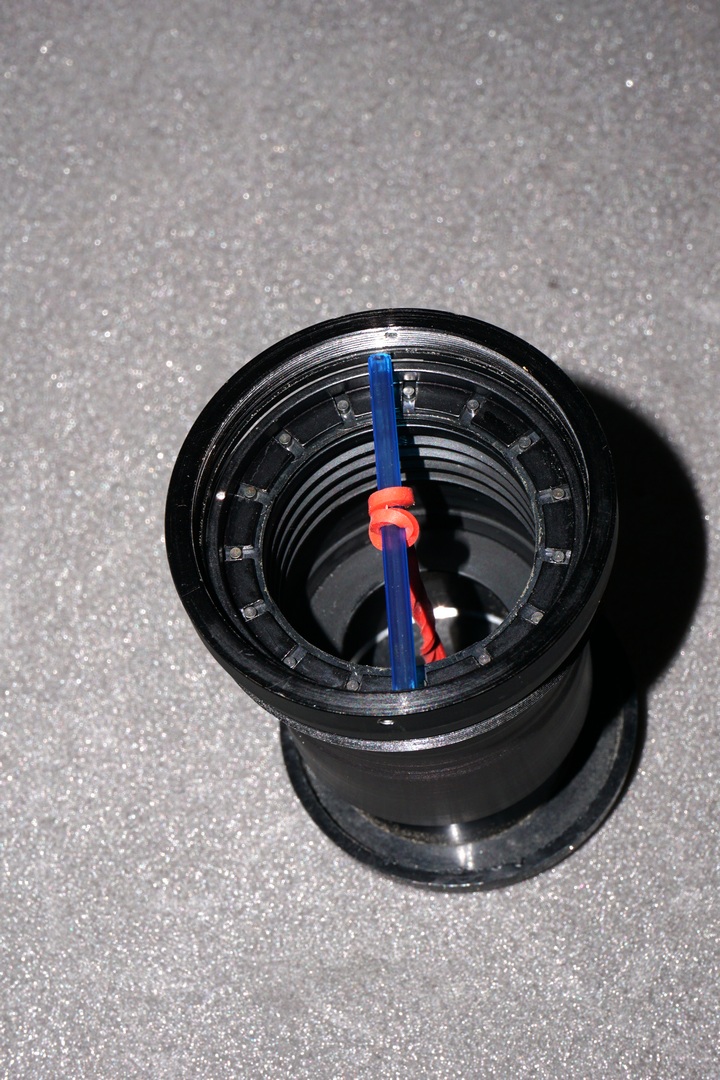
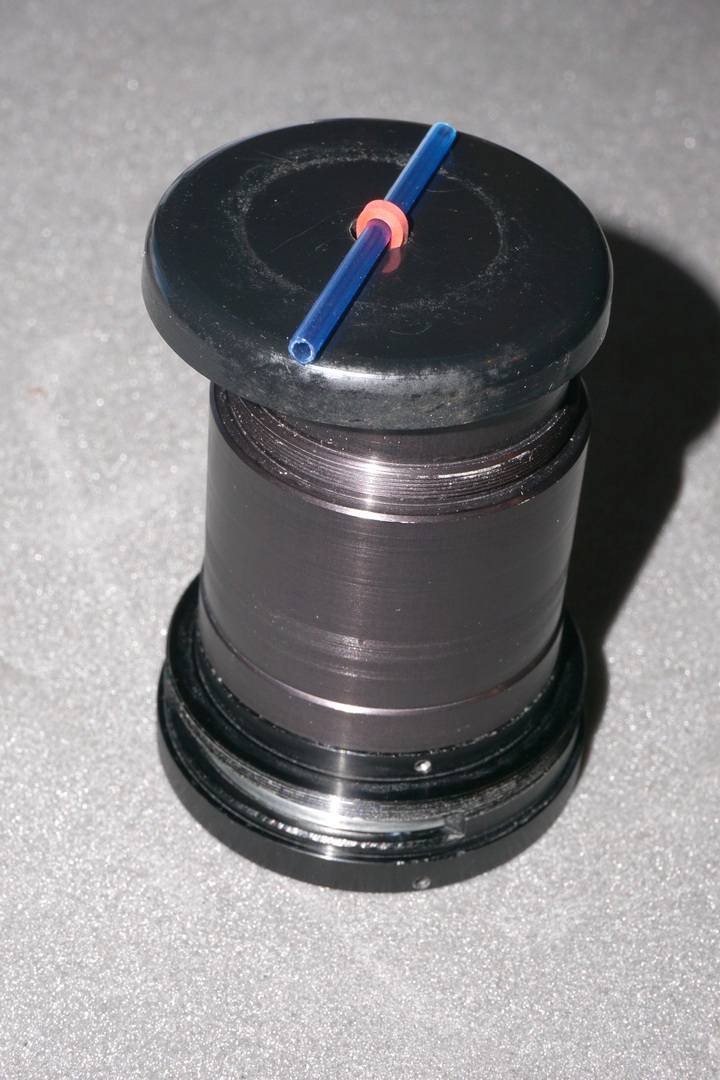
All good tips so far, I often use a tube to sit the lens on, usually a bit of plastic waste pipe fixed to a block of wood to keep it upright. I use pointed bamboo kebab , bbq sticks about 6 inches long - giant cocktail sticks - which are excellent for releasing the blade from the end of a magnetised screwdriver - and those cheap magnetizers are so good as they demagnatize as well.
A home made device I made when doing the multi bladed Pentacon's is this simple thing made with an rubber band, two bits of plastic ( cotton buds ) and some kind of washer thing for the bottom, mine has a rubber thing I had lying about but a bit of stiff cardboard would do the job. I use the slight tension of the rubber band and the plastic stick to hold the blades down as I place them. It works remarkably well and is easy enough to work around. Once the blades are in place I carefully lift the plastic stick with tweezers and cut the rubber band. It's important to have the least tension on the band as you can get away with.
https://www.amazon.co.uk/Silverline-245116-Magnetiser-Demagnetiser-50/dp/B000WTLOBI/ref=asc_df_B000WTLOBI/?tag=googshopuk-21&linkCode=df0&hvadid=208026936151&hvpos=&hvnetw=g&hvrand=16030588487740704726&hvpone=&hvptwo=&hvqmt=&hvdev=c&hvdvcmdl=&hvlocint=&hvlocphy=1006575&hvtargid=pla-450712522724&psc=1
_________________
LENSES & CAMERAS FOR SALE.....
I have loads of stuff that I have to get rid of, if you see me commenting about something I have got and you want one, ask me.
My Flickr https://www.flickr.com/photos/mudplugga/
My ipernity -
http://www.ipernity.com/home/294337 |
|
| Back to top |
|
|
Himself
Joined: 01 Mar 2007
Posts: 3240
Location: Montreal
Expire: 2013-05-30
|
| Posted: Sat Feb 26, 2022 12:18 am Post subject: |
|
|
Himself wrote:
Excellent job!
How many blades? I lost count after first 10
_________________
Moderator Himself |
|
| Back to top |
|
|
jamaeolus
Joined: 19 Mar 2014
Posts: 2964
Location: Eugene
Expire: 2015-08-20
|
| Posted: Sat Feb 26, 2022 4:30 pm Post subject: |
|
|
jamaeolus wrote:
It seems one maybe 2? Blades disappeared somehow. Which is truly puzzling as the whole lens has never left my desk during process.
_________________
photos are moments frozen in time |
|
| Back to top |
|
|
visualopsins

Joined: 05 Mar 2009
Posts: 10957
Location: California
Expire: 2025-04-11
|
| Posted: Sat Feb 26, 2022 4:51 pm Post subject: |
|
|
visualopsins wrote:
| Himself wrote: |
Excellent job!
How many blades? I lost count after first 10 |
I count 19 posts (two are missing blades)
Now that you have practiced, I wonder would placing missing blades opposite would make for rounder aperture? Then there is also the choice of opposite -- Horizontal, vertical, two diagonal choices.
_________________
☮☮☮☮☮☮☮☮☮☮☮☮☮☮☮☮☮☮☮☮☮☮☮☮☮☮☮☮☮☮☮☮ like attracts like! ☮☮☮☮☮☮☮☮☮☮☮☮☮☮☮☮☮☮☮☮☮☮☮☮☮☮☮☮☮☮☮☮
Cameras: Sony ILCE-7RM2, Spotmatics II, F, and ESII, Nikon P4
Lenses:
M42 Asahi Optical Co., Takumar 1:4 f=35mm, 1:2 f=58mm (Sonnar), 1:2.4 f=58mm (Heliar), 1:2.2 f=55mm (Gaussian), 1:2.8 f=105mm (Model I), 1:2.8/105 (Model II), 1:5.6/200, Tele-Takumar 1:5.6/200, 1:6.3/300, Macro-Takumar 1:4/50, Auto-Takumar 1:2.3 f=35, 1:1.8 f=55mm, 1:2.2 f=55mm, Super-TAKUMAR 1:3.5/28 (fat), 1:2/35 (Fat), 1:1.4/50 (8-element), Super-Multi-Coated Fisheye-TAKUMAR 1:4/17, Super-Multi-Coated TAKUMAR 1:4.5/20, 1:3.5/24, 1:3.5/28, 1:2/35, 1:3.5/35, 1:1.8/85, 1:1.9/85 1:2.8/105, 1:3.5/135, 1:2.5/135 (II), 1:4/150, 1:4/200, 1:4/300, 1:4.5/500, Super-Multi-Coated Macro-TAKUMAR 1:4/50, 1:4/100, Super-Multi-Coated Bellows-TAKUMAR 1:4/100, SMC TAKUMAR 1:1.4/50, 1:1.8/55
M42 Carl Zeiss Jena Flektogon 2.4/35
Contax Carl Zeiss Vario-Sonnar T* 28-70mm F3.5-4.5
Pentax K-mount SMC PENTAX-A ZOOM 1:3.5 35~105mm, SMC PENTAX ZOOM 1:4 45~125mm
Nikon Micro-NIKKOR-P-C Auto 1:3.5 f=55mm, NIKKOR-P Auto 105mm f/2.5 Pre-AI (Sonnar), Micro-NIKKOR 105mm 1:4 AI, NIKKOR AI-S 35-135mm f/3,5-4,5
Tamron SP 17mm f/3.5 (51B), Tamron SP 17mm f/3.5 (151B), SP 500mm f/8 (55BB), SP 70-210mm f/3.5 (19AH)
Vivitar 100mm 1:2.8 MC 1:1 Macro Telephoto (Kiron)
|
|
| Back to top |
|
|
Dejan


Joined: 05 Jan 2021
Posts: 148
Location: Belgrade, Serbia
|
| Posted: Sat Feb 26, 2022 6:47 pm Post subject: |
|
|
Dejan wrote:
| jamaeolus wrote: |
| It seems one maybe 2? Blades disappeared somehow. Which is truly puzzling as the whole lens has never left my desk during process. |
Seems so. At least now many people look for anything unique about lens' rendering and weird bokeh highlights are appreciated by some, so there's that consolation. I suppose it won't be that noticeable in most circumstances where "bubbles" aren't that prominent and rendered big, especially considering the number of blades. My slight OCD would probably get triggered though. |
|
| Back to top |
|
|
KEO

Joined: 27 Sep 2018
Posts: 772
Location: USA
|
| Posted: Sat Feb 26, 2022 7:00 pm Post subject: |
|
|
KEO wrote:
Congrats on getting that together. I know what a tricky job that is.
FWIW, I bought a beater Steinheil Quinar 135 a couple years ago, and the 10 aperture blades were constantly threatening to buckle when I stopped it down. I used a tiny, tiny amount of teflon grease (typically used for firearm actions) and it worked like a charm. It's been about two-and-a-half years and there's no sticking at all. They're smooth like butter. |
|
| Back to top |
|
|
|
|
|
You cannot post new topics in this forum
You cannot reply to topics in this forum
You cannot edit your posts in this forum
You cannot delete your posts in this forum
You cannot vote in polls in this forum
|