| View previous topic :: View next topic |
| Author |
Message |
Pontus


Joined: 18 Dec 2011
Posts: 1471
Location: Jakobstad, Finland
Expire: 2016-08-25
|
 Posted: Tue Dec 10, 2013 12:44 pm Post subject: Bokeh modification for Hexanon 57/1.2 Posted: Tue Dec 10, 2013 12:44 pm Post subject: Bokeh modification for Hexanon 57/1.2 |
 |
|
Pontus wrote:
Some people don't mind the special clipped bokeh highlights of the Konica Hexanon 57/1.2 which are caused by the fact that the rear element is in part covered by the lens mechanism. Most people however would prefer perfectly round bokeh highlights when shooting wide open with this lens.
There is an easy fix for those who are using this lens on mirrorless cameras. I haven't done the mod myself (I bought the lens at the left already modified) but it looks easy and reversible. The rear plate that is part of the Konica AR mechanism (which partly covers the rear lens element) can be removed. The result is perfectly round bokeh highlights wide open.

_________________
Follow this link for my FOR SALE list (partially updated 19.11.2015)
Last edited by Pontus on Wed Nov 04, 2015 6:22 am; edited 1 time in total |
|
| Back to top |
|
 |
Jeff Zen


Joined: 17 Jun 2009
Posts: 262
Location: Northwest USA
|
 Posted: Tue Dec 10, 2013 3:15 pm Post subject: Posted: Tue Dec 10, 2013 3:15 pm Post subject: |
 |
|
Jeff Zen wrote:
Thanks for info. Seems like a really good thing! Are there any tutorials online showing how to do this? I would like to know exactly how simple this procedure is.
PS. Just took the back off of mine to see what's what. Looks like you might need to be a professional, or at least an advanced amateur repairman to make this mod. I couldn't do it. |
|
| Back to top |
|
 |
Dogtag


Joined: 27 Jul 2013
Posts: 164
Location: Holland del norte
|
 Posted: Tue Dec 10, 2013 5:19 pm Post subject: Re: Bokeh modification for Hexanon 57/1.2 Posted: Tue Dec 10, 2013 5:19 pm Post subject: Re: Bokeh modification for Hexanon 57/1.2 |
 |
|
Dogtag wrote:
| Pontus wrote: |
Some people don't mind the special clipped bokeh highlights of the Konica Hexanon 57/1.2 which are caused by the fact that the rear element is in part covered by the lens mechanism. Mots people however would prefer perfectly round bokeh highlights when shooting wide open with this lens.
There is an easy fix for those who are using this lens on mirrorless cameras. I haven't done the mod myself (I bought the lens at the left already modified) but it looks easy and reversible. The rear plate that is part of the Konica AR mechanism (which partly covers the rear lens element) can be removed. The result is perfectly round bokeh highlights wide open.
 |
I did the same because it's a non destructible way of changing the lens and making it better suited for the A7. The cliped bokeh highlights only occurs on FF camera's like the a7, on APS-c nex this modification is useless.
Don't forget to spraypaint the inside of the chrome ring/mount matt black or you get reflections in the lens at closer focussing subjects.
| Jeff Zen wrote: |
Thanks for info. Seems like a really good thing! Are there any tutorials online showing how to do this? I would like to know exactly how simple this procedure is.
PS. Just took the back off of mine to see what's what. Looks like you might need to be a professional, or at least an advanced amateur repairman to make this mod. I couldn't do it. |
Dude, I hope you're trolling, it's not even 2 minutes of work and 3 screws.
Remove the 3 screws in on the side (the side of the chrome/stainless mount plate), remove the 4 screws in the chrome mount plate, remove chrome mount plate, remove now loose black ring/hood/thingie (don't forget to put the 3 screws back in the black ring for safe keeping). put back the chrome mount plate with the 4 screws and you're done.
Or I'm just a professional or it's just really easy, or both 
_________________
Konica AR fan
Konica AR, 135/2.5 135/3.2 135/3.5 100/2.8 85/1.8 55/3.5-macro 57/1.2 57/1.4 50/1.4 52/1.8 50/1.7(3x) 40/1.8 35/2.8 35/2 28/1.8 24/2.8
Missing UC 15mm and 21mm  |
|
| Back to top |
|
 |
Jeff Zen


Joined: 17 Jun 2009
Posts: 262
Location: Northwest USA
|
 Posted: Tue Dec 10, 2013 7:11 pm Post subject: Posted: Tue Dec 10, 2013 7:11 pm Post subject: |
 |
|
Jeff Zen wrote:
Not a troll, but maybe I'm just challenged. 
Couldn't even get the mount plate off on mine. Jammed on somehow. |
|
| Back to top |
|
 |
Pontus


Joined: 18 Dec 2011
Posts: 1471
Location: Jakobstad, Finland
Expire: 2016-08-25
|
 Posted: Tue Dec 10, 2013 7:19 pm Post subject: Posted: Tue Dec 10, 2013 7:19 pm Post subject: |
 |
|
Pontus wrote:
| Jeff Zen wrote: |
Not a troll, but maybe I'm just challenged. 
Couldn't even get the mount plate off on mine. Jammed on somehow. |
Lighten up, I'm incredibly scared of doing irreversible damage to my stuff as well 
_________________
Follow this link for my FOR SALE list (partially updated 19.11.2015) |
|
| Back to top |
|
 |
Dogtag


Joined: 27 Jul 2013
Posts: 164
Location: Holland del norte
|
 Posted: Tue Dec 10, 2013 8:10 pm Post subject: Posted: Tue Dec 10, 2013 8:10 pm Post subject: |
 |
|
Dogtag wrote:
| Jeff Zen wrote: |
Not a troll, but maybe I'm just challenged. 
Couldn't even get the mount plate off on mine. Jammed on somehow. |
Yes that's true, you first need to unscrew the black part (read the super small tutorial I wrote, follow in the same exact steps as written).
The black ring jams the mount plate so unscrewing that makes removing the mount plate easy. But do it carefully, because there are some 'leads' with springs underneath (probably greased up and slow moving but if its dry those suckers start to fly  ) )
If you want I can make a photo tutorial tomorrow?
I hate it when people destroy lenses for short term gain. (yes that means you, you canon 5d users destroying certain lenses so they don't touch your mirror.  ) ) 
_________________
Konica AR fan
Konica AR, 135/2.5 135/3.2 135/3.5 100/2.8 85/1.8 55/3.5-macro 57/1.2 57/1.4 50/1.4 52/1.8 50/1.7(3x) 40/1.8 35/2.8 35/2 28/1.8 24/2.8
Missing UC 15mm and 21mm  |
|
| Back to top |
|
 |
Jeff Zen


Joined: 17 Jun 2009
Posts: 262
Location: Northwest USA
|
 Posted: Wed Dec 11, 2013 1:38 am Post subject: Posted: Wed Dec 11, 2013 1:38 am Post subject: |
 |
|
Jeff Zen wrote:
| Dogtag wrote: |
| If you want I can make a photo tutorial tomorrow? |
Thanks,that would be really great!! I'm probably not the only one who would benefit. |
|
| Back to top |
|
 |
Dogtag


Joined: 27 Jul 2013
Posts: 164
Location: Holland del norte
|
 Posted: Wed Dec 11, 2013 9:23 am Post subject: Posted: Wed Dec 11, 2013 9:23 am Post subject: |
 |
|
Dogtag wrote:
Oke lets start: You don't have to mark anything!!!
This is what you start with, a blurry picture of a lens 
On the top of the lens there are 2 sorts of screws, 3x flathead and 4x philips screws.
First remove the 3x flathead screws on the side of the mount plate. (The green circle):
Then remove the black ring/skirt/hood/thingie:
That's it......
Place the screws back in the black ring/skirt/hood/thingie for safe keeping:
-------------------------------------------------------------------------------next level.
I want to blacken the stainless steel/chrome finish to minimize internal reflections:
You first have to do the above steps or the chrome mount ring will catch the AE latch and you can't get it off.
Remove the 4x philips screws: (in the red circle)

Carefully remove the top plate, why? well because of these:
highlighted in the orange circles are the aperture click springs, small metal bars with underneath them springs --> (bearing) ball. Mine is greased up and staying in place. But if your lens is dry or the springs under too much tension you get flying springs and rods. It's a shame if you loose a good afternoon searching the floor/room/house/vacuum cleaner.
If your aperture is too tight you can add a small drop of handy oil, or just open in up further and clean in completely (but if you're reading this because you needed help in removing the black ring part thingie, stop!!) And if everything works just fine, this is the best advice I can give you :http://www.youtube.com/watch?feature=player_detailpage&v=Kr0tTbTbmVA#t=45
You can now easily paint the ring without any risk to the optics:
You didn't have to mark any thing because it's already marked for you, here's how you reassemble the mount plate. Just align the holes as in the picture: (see red line)
Don't over tighten the screws, it's really not necessary. start with one screw and use the screw hole opposite of the first you did. slowly tighten all screws until the mount plate is secure (just like how you would place a car rim)
NOte:
You might find these:
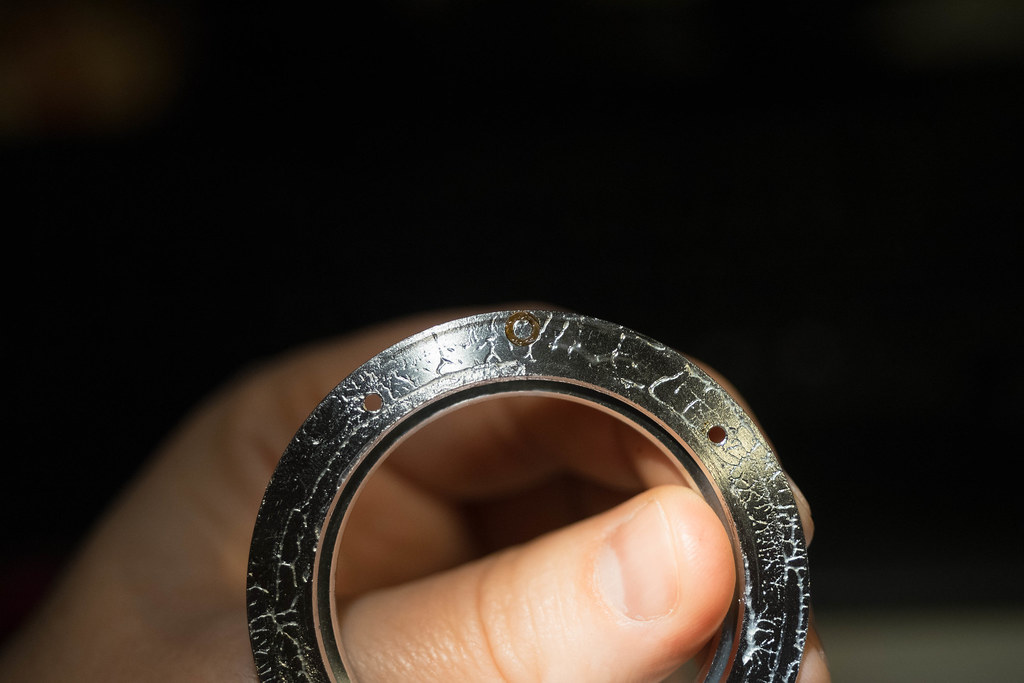
Not sure what these are, could be against galvanic corrosion or just a simple spacer (I just found one on mine), others might enlighten us 
_________________
Konica AR fan
Konica AR, 135/2.5 135/3.2 135/3.5 100/2.8 85/1.8 55/3.5-macro 57/1.2 57/1.4 50/1.4 52/1.8 50/1.7(3x) 40/1.8 35/2.8 35/2 28/1.8 24/2.8
Missing UC 15mm and 21mm  |
|
| Back to top |
|
 |
Jeff Zen


Joined: 17 Jun 2009
Posts: 262
Location: Northwest USA
|
 Posted: Thu Dec 12, 2013 2:41 am Post subject: Posted: Thu Dec 12, 2013 2:41 am Post subject: |
 |
|
Jeff Zen wrote:
Thank you Dogtag. Your expertise is well appreciated here. Your close-up photos and step-by-step instructions make everything clear to me. Thanks much for taking the time to do this! |
|
| Back to top |
|
 |
|
|
|
You cannot post new topics in this forum
You cannot reply to topics in this forum
You cannot edit your posts in this forum
You cannot delete your posts in this forum
You cannot vote in polls in this forum
|
