| View previous topic :: View next topic |
| Author |
Message |
PaulC


Joined: 23 Dec 2008
Posts: 2318
|
 Posted: Wed Sep 01, 2010 9:07 pm Post subject: First medium format slides Posted: Wed Sep 01, 2010 9:07 pm Post subject: First medium format slides |
 |
|
PaulC wrote:
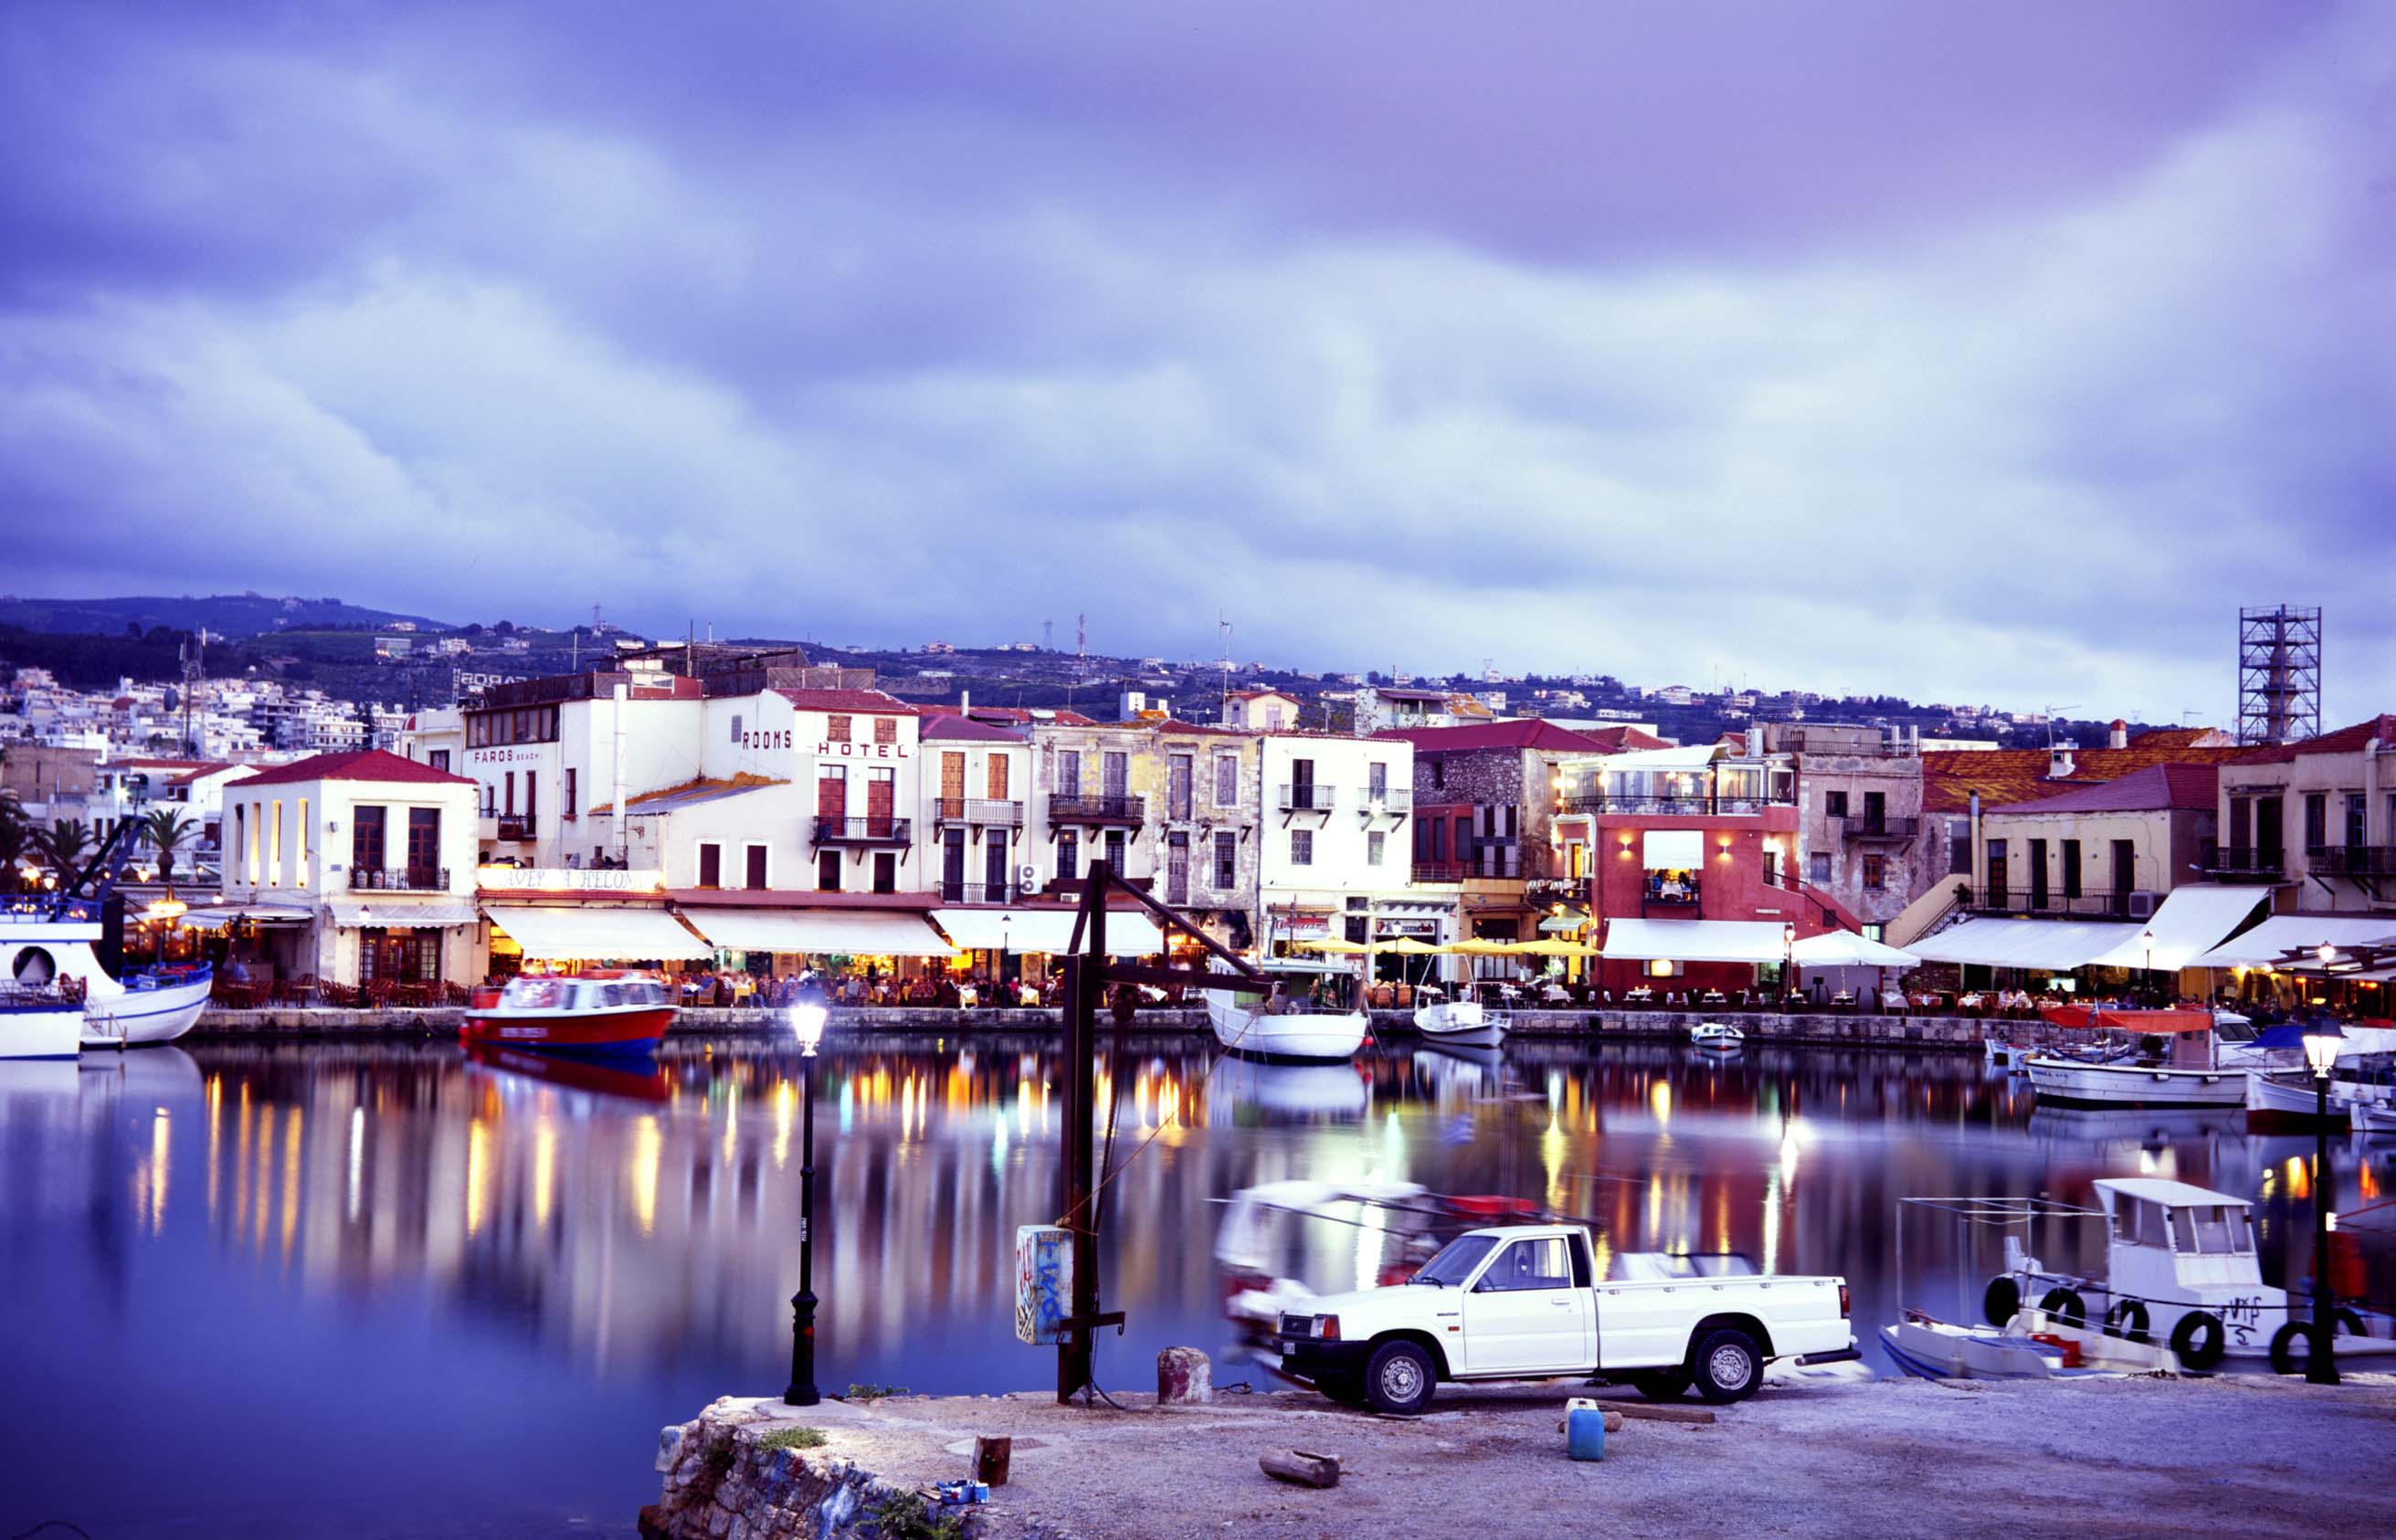
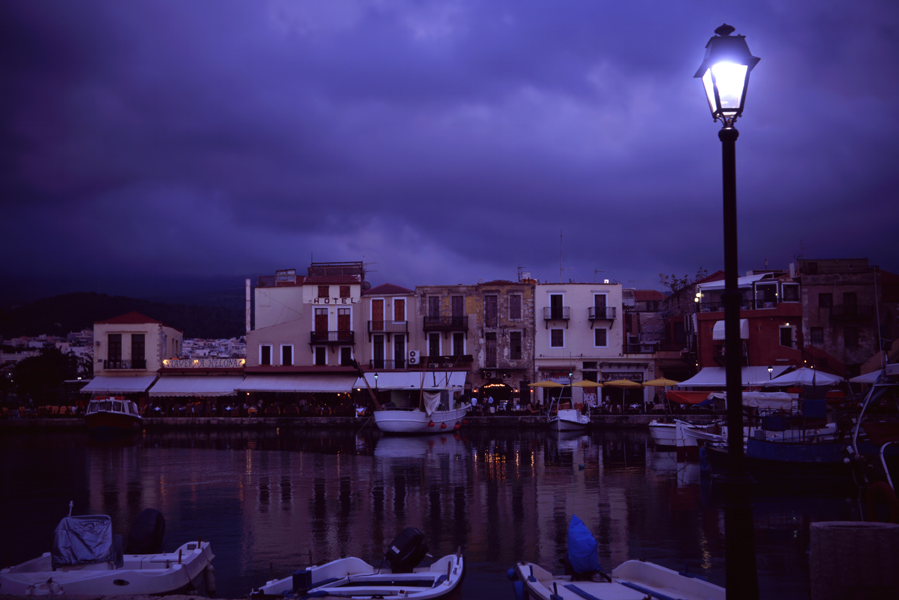
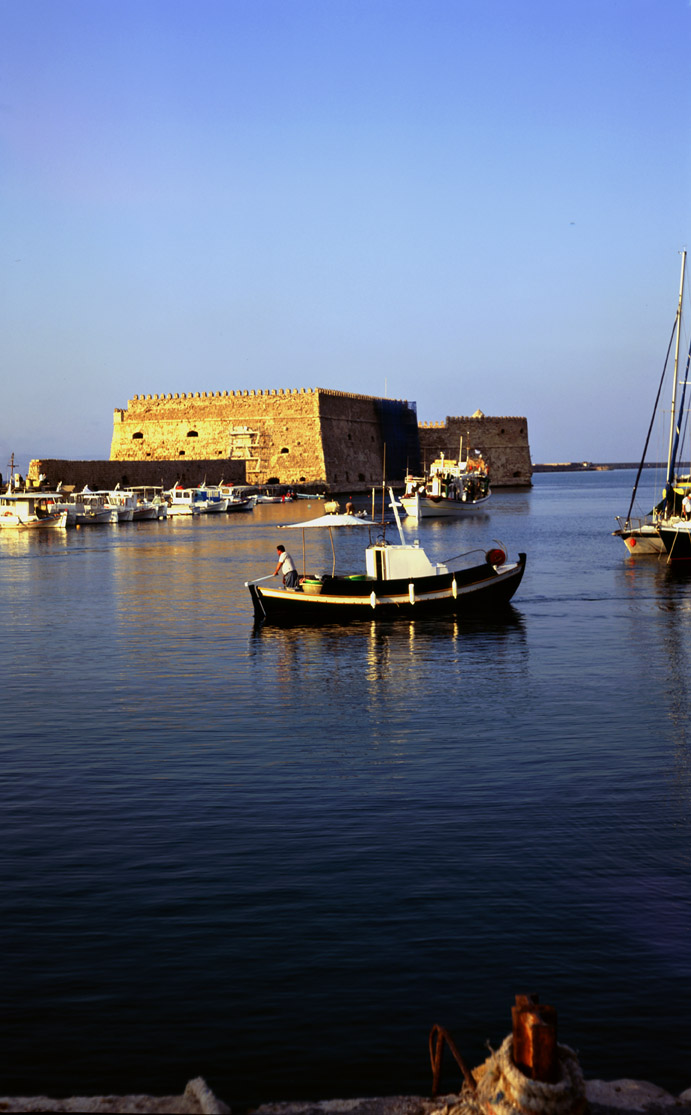
My slides (and other stuff) came back from Peak Imaging in Britain and I was really blown away by the way they look. I was slightly less blown away by the loss of detail in the scanning (my scanning, not Peak Imaging's) but it doesn't show at this size, anyway, but the colours seem to lose their vibrance.
I learned some lessons: Velvia doesn't like being mistaken for Fuji 400H and getting two stops of over-exposure. The results from some of the old folders are really staggering. The vignetting from the hood on the Flek 50/4 really becomes intolerable. My Moskva 5 leaks light far too often, possibly from the red windows but I'm not sure. The Ensign Commando continues to surprise.
This is from the very basic folding Bessa from the 1930s

Here's one from the Moskva 5 that managed to escape without getting leaked on:
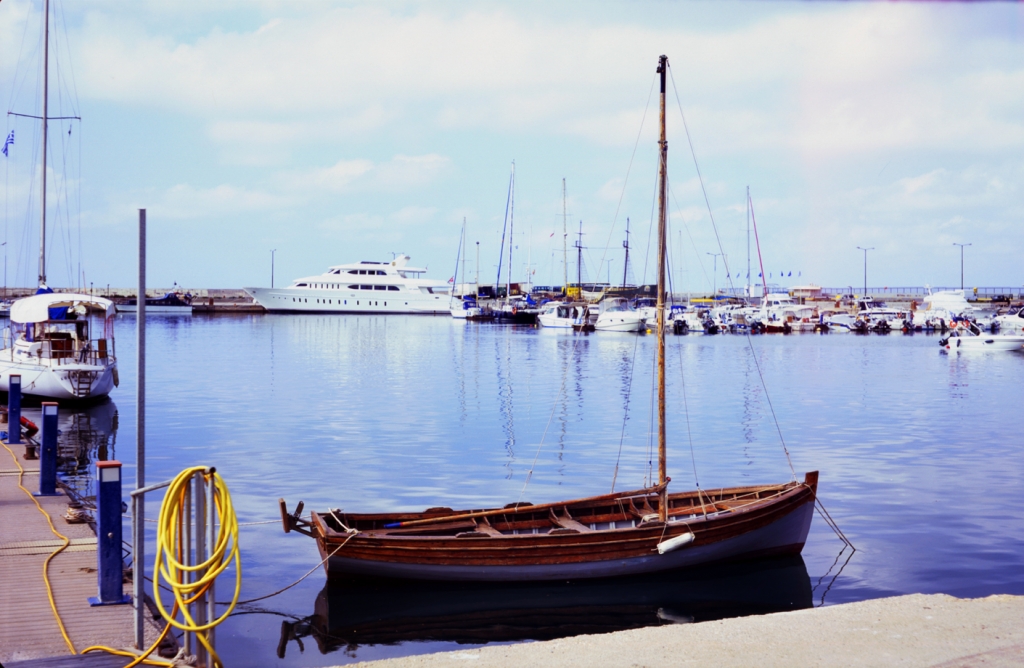
And this one is from the main machine, the Pentacon Six:

_________________
View or buy my photos at:
http://shutterstock.com/g/paulcowan
Last edited by PaulC on Thu Sep 02, 2010 9:42 am; edited 1 time in total |
|
| Back to top |
|
 |
DigiChromeEd


Joined: 29 Dec 2009
Posts: 3460
Location: Northern Ireland
|
| Posted: Wed Sep 01, 2010 9:14 pm Post subject: |
|
|
DigiChromeEd wrote:
Lovely shots - The colours in No.1 are amazing! 
_________________
"I've got a Nikon camera, I like to take a photograph" - Paul Simon |
|
| Back to top |
|
|
visualopsins

Joined: 05 Mar 2009
Posts: 10767
Location: California
Expire: 2025-04-11
|
| Posted: Wed Sep 01, 2010 10:07 pm Post subject: |
|
|
visualopsins wrote:
Very impressive! Both the photography and the results from the folders. You and especially Attila are tempting me nearly beyond my control by showing what these cameras can do! If my eyes didn't wander to my 6x7 kit by now I'd most likely have a rampant case of FBA -- folder buying addiction! But 6x7 doesn't have the character. Oops, I'd better stop here.
_________________
☮☮☮☮☮☮☮☮☮☮☮☮☮☮☮☮☮☮☮☮☮☮☮☮☮☮☮☮☮☮☮☮ like attracts like! ☮☮☮☮☮☮☮☮☮☮☮☮☮☮☮☮☮☮☮☮☮☮☮☮☮☮☮☮☮☮☮☮
Cameras: Sony ILCE-7RM2, Spotmatics II, F, and ESII, Nikon P4
Lenses:
M42 Asahi Optical Co., Takumar 1:4 f=35mm, 1:2 f=58mm (Sonnar), 1:2.4 f=58mm (Heliar), 1:2.2 f=55mm (Gaussian), 1:2.8 f=105mm (Model I), 1:2.8/105 (Model II), 1:5.6/200, Tele-Takumar 1:5.6/200, 1:6.3/300, Macro-Takumar 1:4/50, Auto-Takumar 1:2.3 f=35, 1:1.8 f=55mm, 1:2.2 f=55mm, Super-TAKUMAR 1:3.5/28 (fat), 1:2/35 (Fat), 1:1.4/50 (8-element), Super-Multi-Coated Fisheye-TAKUMAR 1:4/17, Super-Multi-Coated TAKUMAR 1:4.5/20, 1:3.5/24, 1:3.5/28, 1:2/35, 1:3.5/35, 1:1.8/85, 1:1.9/85 1:2.8/105, 1:3.5/135, 1:2.5/135 (II), 1:4/150, 1:4/200, 1:4/300, 1:4.5/500, Super-Multi-Coated Macro-TAKUMAR 1:4/50, 1:4/100, Super-Multi-Coated Bellows-TAKUMAR 1:4/100, SMC TAKUMAR 1:1.4/50, 1:1.8/55
M42 Carl Zeiss Jena Flektogon 2.4/35
Contax Carl Zeiss Vario-Sonnar T* 28-70mm F3.5-4.5
Pentax K-mount SMC PENTAX-A ZOOM 1:3.5 35~105mm, SMC PENTAX ZOOM 1:4 45~125mm
Nikon Micro-NIKKOR-P-C Auto 1:3.5 f=55mm, NIKKOR-P Auto 105mm f/2.5 Pre-AI (Sonnar), Micro-NIKKOR 105mm 1:4 AI, NIKKOR AI-S 35-135mm f/3,5-4,5
Tamron SP 17mm f/3.5 (51B), Tamron SP 17mm f/3.5 (151B), SP 500mm f/8 (55BB), SP 70-210mm f/3.5 (19AH)
Vivitar 100mm 1:2.8 MC 1:1 Macro Telephoto (Kiron)
|
|
| Back to top |
|
|
Attila

Joined: 24 Feb 2007
Posts: 57865
Location: Hungary
Expire: 2025-11-18
|
| Posted: Wed Sep 01, 2010 10:29 pm Post subject: |
|
|
Attila wrote:
Buy a shutter speed tester from Florin
http://forum.mflenses.com/shutter-tester-for-shutter-speed-up-to-1-1000th-14-99-t28474.html
Essential for old folders prepare an excel sheets with results and it will be easy make perfectly exposed slides.
https://spreadsheets.google.com/ccc?key=0AmI1YOvKt90RdGhyTmtwMjc2Z2g5dlR5eHdVVmNQQ3c&hl=en&authkey=CN-o4asO
You can see my sheets on above link , I made perfectly exposed slides even if none of the speed was okay. Without this I lost many frames like list time with Pearl III , because I was in hurry and didn't measured speeds in advance.
Light source is easy just use your desk lamp , don't need any laser light , bright led and other bullshit. It works , perfectly.
I like really first picture, pretty awesome!
_________________
-------------------------------
Items on sale on Ebay
Sony NEX-7 Carl Zeiss Planar 85mm f1.4, Minolta MD 35mm f1.8, Konica 135mm f2.5, Minolta MD 50mm f1.2, Minolta MD 250mm f5.6, Carl Zeiss Sonnar 180mm f2.8
|
|
| Back to top |
|
|
PaulC
Joined: 23 Dec 2008
Posts: 2318
|
| Posted: Wed Sep 01, 2010 10:45 pm Post subject: |
|
|
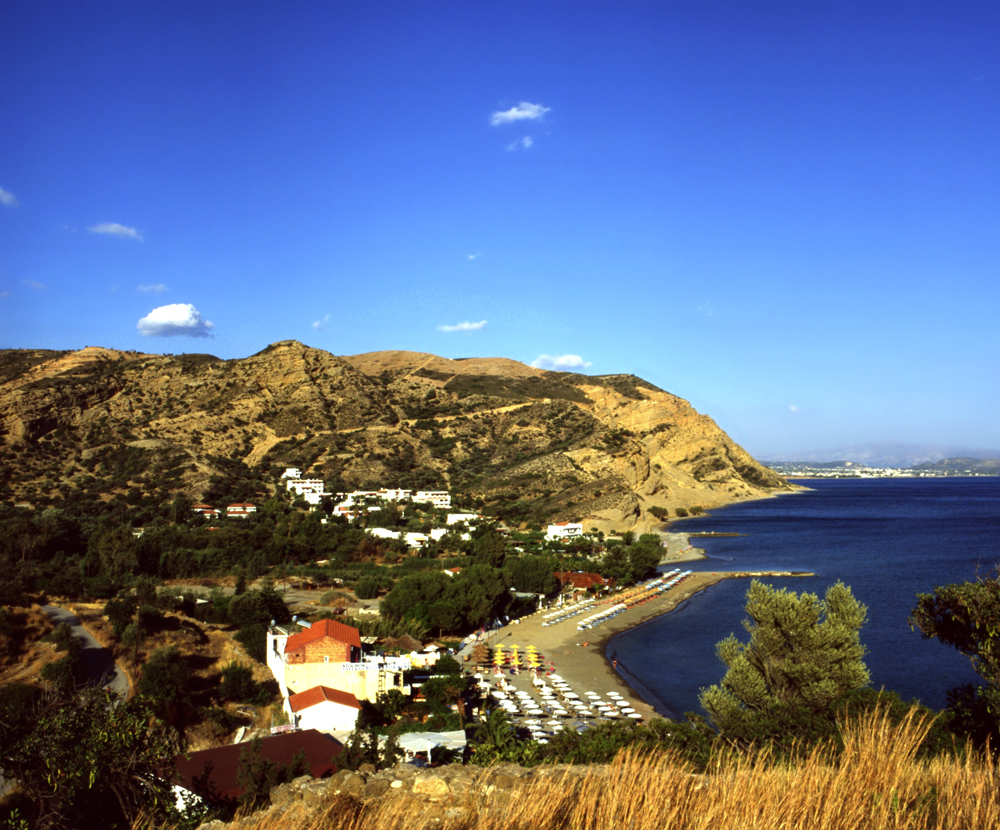
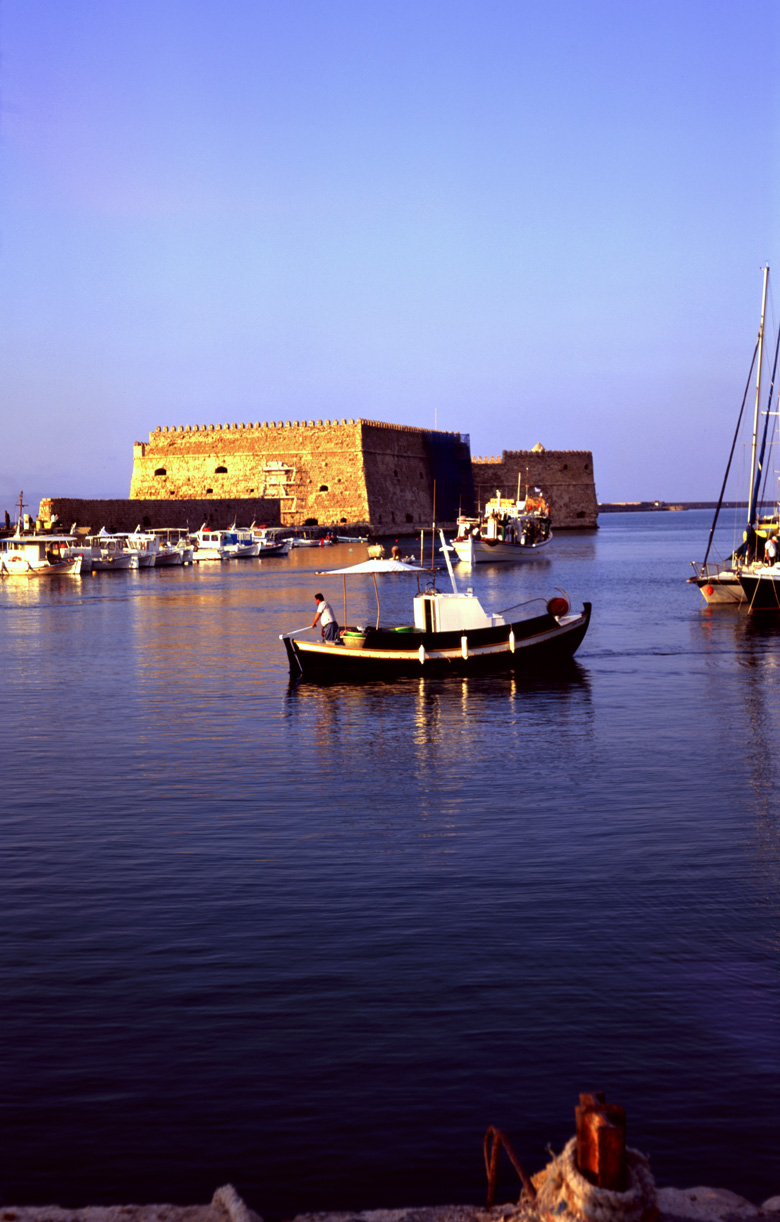
PaulC wrote:
Thanks for the advice Attila. I was deliberately underexposing the second one to get the feeling of the evening.
Here's another from a 6x9 folder - really, the scanning is very disappointing, I can see the boatman's ear quite clearly through a magnifier (well, a 50mm lens, actually) but on the scan his whole face is nothing but a blur. I suppose that is really all that is to be expected from a $200 scanner.
I think this was probably from the Beirax but I'm not sure, it was shot quite a while ago.

_________________
View or buy my photos at:
http://shutterstock.com/g/paulcowan |
|
| Back to top |
|
|
Attila
Joined: 24 Feb 2007
Posts: 57865
Location: Hungary
Expire: 2025-11-18
|
| Posted: Wed Sep 01, 2010 10:47 pm Post subject: |
|
|
Attila wrote:
Did you ironed strips before scan with books ? It is help a lot to me.
_________________
-------------------------------
Items on sale on Ebay
Sony NEX-7 Carl Zeiss Planar 85mm f1.4, Minolta MD 35mm f1.8, Konica 135mm f2.5, Minolta MD 50mm f1.2, Minolta MD 250mm f5.6, Carl Zeiss Sonnar 180mm f2.8
|
|
| Back to top |
|
|
peterqd

Joined: 28 Feb 2007
Posts: 7447
Location: near High Wycombe, UK
Expire: 2014-01-04
|
| Posted: Wed Sep 01, 2010 11:08 pm Post subject: |
|
|
peterqd wrote:
Paul, I'm confused. Are these scans by Peak or did you do them yourself? I've never had any scans done by them but I'd be very disappointed with them if they sent you scans like this.
The reason I ask is that the scan resolution is only 72, which keeps the file size down but loses a lot of detail, and I'm pretty sure that's what's happened here. Scanning at 1200 is about the minimum resolution to see fine detail (2400 or even 4800 is common) and then you can reduce the image size to keep the filesize workable.
_________________
Peter - Moderator |
|
| Back to top |
|
|
PaulC
Joined: 23 Dec 2008
Posts: 2318
|
| Posted: Wed Sep 01, 2010 11:29 pm Post subject: |
|
|
PaulC wrote:
| peterqd wrote: |
Paul, I'm confused. Are these scans by Peak or did you do them yourself? I've never had any scans done by them but I'd be very disappointed with them if they sent you scans like this.
The reason I ask is that the scan resolution is only 72, which keeps the file size down but loses a lot of detail, and I'm pretty sure that's what's happened here. Scanning at 1200 is about the minimum resolution to see fine detail (2400 or even 4800 is common) and then you can reduce the image size to keep the filesize workable. |
They are my scans with an Epson V500 and they were originally scanned at 2400 (or maybe in some cases at 1200) either way, I am getting mush out of the machine. I obviously can't post them here as 120MB files, so I reduce them to a sensible size and change the resolution to 72ppi (it's still rather mushy, even then).
I would be incandescent if I paid £30 a film and only got this sort of resolution back. I don't know what scanner Peak Imaging use but I am sure it is a hell of a lot better than mine - probably not a drum scanner, though, because they only go up to about 40MB Tiffs (and they don't say if that is 8-bit or 16-bit, I assume it must be 8-bit).
Attila: The negs arrived nice and flat, it's not a flatness problem. Might be a height problem
_________________
View or buy my photos at:
http://shutterstock.com/g/paulcowan |
|
| Back to top |
|
|
PaulC
Joined: 23 Dec 2008
Posts: 2318
|
| Posted: Thu Sep 02, 2010 12:47 am Post subject: |
|
|
PaulC wrote:
I've switched off "Digital Ice" and tried again, that seems to have improved the resolution considerably - I've got the man's ear back in the 13MP version of this. It will now print OK at up to about 18x12 inches
The scanner is also adding various odd colour casts, particularly magenta and some yellow, which I am trying to correct manually and seems to want to underexpose. Here is the latest attempt:
_________________
View or buy my photos at:
http://shutterstock.com/g/paulcowan |
|
| Back to top |
|
|
cooltouch

Joined: 15 Jan 2009
Posts: 9098
Location: Houston, Texas
|
| Posted: Thu Sep 02, 2010 5:01 am Post subject: |
|
|
cooltouch wrote:
Well, at "web" resolution, they really look nice. I have an older Epson 3170 and a somewhat newer 4990, both of which do a fine job I think with medium format. I don't bother scanning at anything higher than 2400 ppi since neither of those scanners' true resolution is much more than in the 1800-2000 ppi range anyway (despite vaunted 3200 and 4800 ppi claims, respectively). Same is the case with your V500.
You might try getting some optically flat glass and taping your slides to the glass to improve res somewhat. See the description of how to do this from the "other" manual focus site here:
http://forum.manualfocus.org/viewtopic.php?id=16980
Very picturesque locale as well, which sure helps with the images.
_________________
Michael
My Gear List: http://michaelmcbroom.com/photo/gear.html
My Gallery: http://michaelmcbroom.com/gallery3/index.php/
My Flickr Page: https://www.flickr.com/photos/11308754@N08/albums
My Music: https://soundcloud.com/michaelmcbroom/albums
My Blog: http://michaelmcbroom.com/blogistan/ |
|
| Back to top |
|
|
Esox lucius

Joined: 26 Aug 2008
Posts: 2441
Location: Helsinki, Finland
Expire: 2011-11-18
|
| Posted: Thu Sep 02, 2010 5:38 am Post subject: |
|
|
Esox lucius wrote:
Very nice shots of Rethymno and Chania!
If you are looking for optimal scanning results wiht correct film profiles I recommend you pay a visit to this website - http://www.targets.coloraid.de/
_________________
Vilhelm
Nikon DSLR: D4, D800, Nikon D3, D70
Nikon SLR: Nikon F100, Nikon FM2n
Nikkor MF: 20/2.8 Ai-S, 24/2 Ai-S, 24/2.8 Ai-S, 28/2 Ai-S, 28/2.8 Ai-S, 35/1.4 AIS, 35/2 Ai-S, 45/2.8 GN, 50/1.2 Ai, 50/1.2 Ai-S, 50/1.4 Ai, 50/1.4 Ai-S, 50/1.8 AI-S "long", 50/1.8 AI-S "short", 55/1.2 Ai, 85/1.4 Ai-S, 85/1.8H, 105/2.5 Ai, 135/2.8Q, 135/3.5 Ai, 180/2.8 Ai-S ED
Nikkor AF/AF-S FX: 14-24/2.8G, 16/2.8D Fisheye, 16-35/4G VR, 17-35/2.8D, 24/1.4G, 24/3.5D PC-E, 24/2.8D, 24-70/2.8G, 28/1.4D, 28/1.8G, 35/1.4G, 35/2D, 50/1.4D, 50/1.4G, 50/1.8G, 60/2.8 Micro, 60/2.8G Micro, 70-200/2.8G VR, 70-200/2.8G VR II, 80-400/4.5-5.6D VR, 85/1.4G, 85/2.8D PC-E Micro, 105/2D DC, 105/2.8G VR Micro, 135/2D DC, 200/2G VR, 200-400/4G VR, 300/2.8G VR, 300/4D ED, 400/2.8G VR, 800/5.6E VR
Nikkor AF/AF-S DX: 10.5/2.8G Fisheye, 12-24/4G, 18-70/3.5-4.5G
Topcor: Auto-Topcor 58/1.4,
Voigtländer SL: 40/2 Ultron, 58/1.4 Nokton, 75/2.5 Color-Heliar, 90/3.5 APO-Lanthar, 125/2.5 APO-Lanthar, 180/4 APO-Lanthar
Zeiss ZF: Planar T* 85/1.4 ZF
M42 SLR: Voigtländer Bessaflex TM
M42: Flektogon 20/4, Flektogon 35/2.4, Tessar 50/2.8 T, Super-Takumar 55/1.8, Biotar 58/2 T, Pentacon 135/2.8, Sonnar 135/3.5
Medium format: several Zeiss Super Ikonta 532/16 Opton-Tessar 80mm f/2.8, Zeiss Ikonta 524/16 Opton-Tessar 75mm f/3.5
Leica: R7, M4, Super-Angulon-R 4/21, Elmarit-R 2.8/28, Summicron-R 2/35, Summicron-M 2/35, Summicron-M 2/50, Elmarit-R 2,8/180 |
|
| Back to top |
|
|
PaulC
Joined: 23 Dec 2008
Posts: 2318
|
| Posted: Thu Sep 02, 2010 9:33 am Post subject: |
|
|
PaulC wrote:
Ah! Thanks Vilhelm, I was just coming to the conclusion that the scanner simply isn't seeing the same thing that I am. With quite a lot of selective adjustments I've managed to get this (from the Beirax, I think, on Velvia) which is very close to what I see on the slide - but a lot of work to get there.

I'm really not happy with the colour rendition on any of my other scans. It's so frustrating to want to show what a nice job the cameras, film and Peak Imaging did only to have it screwed up by the scanner. So, now I have to learn how to do scanner colour profiles - is there no end to the computer technical stuff?
(The software here also isn't very kind to photos unless you click on them.to get the big version. It would be nice if that could be improved).
_________________
View or buy my photos at:
http://shutterstock.com/g/paulcowan |
|
| Back to top |
|
|
rbelyell

Joined: 13 Oct 2009
Posts: 4269
Location: somewhere in the mountains of central NY
Expire: 2014-01-31
|
| Posted: Thu Sep 02, 2010 1:53 pm Post subject: |
|
|
rbelyell wrote:
hey paul
i really love your shots; the pentacon is great isnt it? plus i really like 6x6 for most situations, except landscapes....
i share your frustration at not getting what you want from the digitized version of the slides. my first slides were taken around the grand canyon etc and my wife and i were absolutely stunned by the results, but a little disapointed transferring.
_________________
Epson RD1 + Elmarit 21/2.8; Summarit 50/1.5; Summarit 75/2.5; Elmar-c 90/4; Sankyo Komura 135/2.8, Hektor 135/4.5; Braun Paxina 29 6x6; Photax Boyer Paris; Holga 120 Pano
GREAT STUFF FOR SALE:
Contax T
Hasselblad XPan + 45/4, 90/4
Kodak Retina Reflex IV + full set of Schneider Krueznach lenses
Mercury 2 half frame 35mm
Kodak Pro slr/n
Fuji GM670+100/3.5+65/8!
Praktisix 6x6 medium format + ZeissBiometar 120/2.8
Bessa T 101 Anniversary Edition in Navy Blue
Mamiya Six Folder with Zuiko 75/3.5
Adaptall: Tamron SP 28-85 macro
Cameras: Canon IX
PM for more complete descriptions/pix. All in great shape!
_________________________
'buy me a drink, sing me a song,
take me as i come 'cause i can't stay long' |
|
| Back to top |
|
|
PaulC
Joined: 23 Dec 2008
Posts: 2318
|
| Posted: Thu Sep 02, 2010 3:13 pm Post subject: |
|
|
PaulC wrote:
Click on the last one and in the large version you will see something close to the appearance of the slide but I had to do a lot of massaging, including selectively changing the exposure in the shadow area, to get there and darkening the sky and bright areas - so the scanner was somehow rendering shadows darker than it should and light areas washed-out.
I love my Pentacon Sixes too [got two of them one came more or less free with a lens and is now in tip-top working condition] but only one of these pictures is from the P6, the others are from folders. I'll put up some more P6 stuff later.
_________________
View or buy my photos at:
http://shutterstock.com/g/paulcowan |
|
| Back to top |
|
|
themoleman342

Joined: 21 Oct 2007
Posts: 2190
Location: East Coast (CT), U.S.A.
Expire: 2013-01-24
|
| Posted: Thu Sep 02, 2010 3:49 pm Post subject: |
|
|
themoleman342 wrote:
I have to say that I found my v700 does much much better with color-negative film. I've given up on slide film for now. The better color density just doesn't outweigh what I seem to lose in sharpness. |
|
| Back to top |
|
|
mo

Joined: 27 Aug 2009
Posts: 8979
Location: Australia
Expire: 2016-07-30
|
| Posted: Thu Sep 02, 2010 10:19 pm Post subject: |
|
|
mo wrote:
Paul for what it's worth I like what you have done,the images come across in beautiful colors, the buildings and the reflected light in the first few....and the last one....I do struggle to say in it in technical terms other than I do like what I see.....An image is an image for the viewer.
_________________
Moira, Moderator 
Fuji XE-1,Pentax K-01,Panasonic G1,Panasonic G5,Pentax MX
Ricoh Singlex TLS,KR-5,KR-5Super,XR-10
Lenses
Auto Rikenon's 55/1.4, 1.8, 2.8... 50/1.7 Takumar 2/58 Preset Takumar 2.8/105 Auto Takumar 2.2/55, 3.5/35 Super Takumar 1.8/55...Macro Takumar F4/50... CZJ Biotar ALU M42 2/58 CZJ Tessar ALU M42 2.8/50
CZJ DDR Flektogon Zebra M42 2.8/35 CZJ Pancolar M42 2/50 CZJ Pancolar Exakta 2/50
Auto Mamiya/Sekor 1.8/55 ...Auto Mamiya/Sekor 2/50 Auto Mamiya/Sekor 2.8/50 Auto Mamiya/Sekor 200/3.5 Tamron SP500/8 Tamron SP350/5.6 Tamron SP90/2.5
Primoplan 1.9/58 Primagon 4.5/35 Telemegor 5.5/150 Angenieux 3.5/28 Angenieux 3,5/135 Y 2
Canon FL 58/1.2,Canon FL85/1.8,Canon FL 100/3.5,Canon SSC 2.8/100 ,Konica AR 100/2.8, Nikkor P 105/2.5
|
|
| Back to top |
|
|
cooltouch
Joined: 15 Jan 2009
Posts: 9098
Location: Houston, Texas
|
| Posted: Thu Sep 02, 2010 10:31 pm Post subject: |
|
|
cooltouch wrote:
| PaulC wrote: |
| (The software here also isn't very kind to photos unless you click on them.to get the big version. It would be nice if that could be improved). |
??? With my browser, the size of the image doesn't change, although when I click on it, the resulting image is just a hair sharper. But I really have to look closely to be able to see the difference. (22" flatscreen, 1960x1050 res)
_________________
Michael
My Gear List: http://michaelmcbroom.com/photo/gear.html
My Gallery: http://michaelmcbroom.com/gallery3/index.php/
My Flickr Page: https://www.flickr.com/photos/11308754@N08/albums
My Music: https://soundcloud.com/michaelmcbroom/albums
My Blog: http://michaelmcbroom.com/blogistan/ |
|
| Back to top |
|
|
PaulC
Joined: 23 Dec 2008
Posts: 2318
|
| Posted: Thu Sep 02, 2010 10:52 pm Post subject: |
|
|
PaulC wrote:
I don't know. First it seems to resize to fit the browser window and then with some of them if you click on it again it goes to a larger size - that's in Firefox. Last night I thought they just got bigger regardless.
_________________
View or buy my photos at:
http://shutterstock.com/g/paulcowan |
|
| Back to top |
|
|
peterqd
Joined: 28 Feb 2007
Posts: 7447
Location: near High Wycombe, UK
Expire: 2014-01-04
|
| Posted: Fri Sep 03, 2010 7:57 am Post subject: |
|
|
peterqd wrote:
1 The forum software reduces the size of large images down to the approved limits. This seems to soften the image slightly too. If you click on the image you are linked to the original full size one, which opens in a separate window and is not softened.
2 When you open an image in Firefox, it does basically the same thing - it reduces large images to fit on the screen, but the cursor becomes a little magnifying glass with the + symbol. Clicking again displays the full size.
_________________
Peter - Moderator |
|
| Back to top |
|
|
rbelyell
Joined: 13 Oct 2009
Posts: 4269
Location: somewhere in the mountains of central NY
Expire: 2014-01-31
|
| Posted: Fri Sep 03, 2010 11:53 am Post subject: |
|
|
rbelyell wrote:
peter my experience is that all my images appear on this site as soft, lacking contrast and unsaturated. really, the photos almost bear no resemblence to those i upload. clicking on them helps all of the above a great deal and gets it much closer to the upload quality. i really dont understand the necessity for that at all and it has never been adequately explained why we just cant upload what we have and see the same thing.
_________________
Epson RD1 + Elmarit 21/2.8; Summarit 50/1.5; Summarit 75/2.5; Elmar-c 90/4; Sankyo Komura 135/2.8, Hektor 135/4.5; Braun Paxina 29 6x6; Photax Boyer Paris; Holga 120 Pano
GREAT STUFF FOR SALE:
Contax T
Hasselblad XPan + 45/4, 90/4
Kodak Retina Reflex IV + full set of Schneider Krueznach lenses
Mercury 2 half frame 35mm
Kodak Pro slr/n
Fuji GM670+100/3.5+65/8!
Praktisix 6x6 medium format + ZeissBiometar 120/2.8
Bessa T 101 Anniversary Edition in Navy Blue
Mamiya Six Folder with Zuiko 75/3.5
Adaptall: Tamron SP 28-85 macro
Cameras: Canon IX
PM for more complete descriptions/pix. All in great shape!
_________________________
'buy me a drink, sing me a song,
take me as i come 'cause i can't stay long' |
|
| Back to top |
|
|
cooltouch
Joined: 15 Jan 2009
Posts: 9098
Location: Houston, Texas
|
| Posted: Fri Sep 03, 2010 2:36 pm Post subject: |
|
|
cooltouch wrote:
Okay this raises a question for me and I apologize for hijacking the thread, but perhaps this will help address this matter of image degradation. Usually, I upload my images to my website and then show a link to them here. Only rarely do I upload my images to the forum. So I thought I'd do both. The image is a 100% crop of a very sharp photo -- taken with a 55mm f/3.5 Micro Nikkor and my Canon XS. It has more noise than I like but oh well. First is the image uploaded to this site, and second is the image linked from my website.


Interestingly, if anything, the image I upload seems to show more detail than the image I link. Also the uploaded image is "clickable" whereas the linked image is not.
One of the cool features of Windows 7 is I can quickly flip back and forth between the image shown in the message window and the clicked-on image. When cycling back and forth between the two, with my browser (latest version of Mozilla's Seamonkey aka Netscape), I can detect no significant difference.
_________________
Michael
My Gear List: http://michaelmcbroom.com/photo/gear.html
My Gallery: http://michaelmcbroom.com/gallery3/index.php/
My Flickr Page: https://www.flickr.com/photos/11308754@N08/albums
My Music: https://soundcloud.com/michaelmcbroom/albums
My Blog: http://michaelmcbroom.com/blogistan/ |
|
| Back to top |
|
|
peterqd
Joined: 28 Feb 2007
Posts: 7447
Location: near High Wycombe, UK
Expire: 2014-01-04
|
| Posted: Fri Sep 03, 2010 3:04 pm Post subject: |
|
|
peterqd wrote:
| cooltouch wrote: |
| Okay this raises a question for me and I apologize for hijacking the thread, but perhaps this will help address this matter of image degradation. Usually, I upload my images to my website and then show a link to them here. Only rarely do I upload my images to the forum. So I thought I'd do both. |
If you make sure sure your image is no wider than 1024 px, it's possible to show the original uploaded picture by editing your message and inserting img tags around the original and deleting the [ url ] tags.
_________________
Peter - Moderator
Last edited by peterqd on Fri Sep 03, 2010 3:08 pm; edited 1 time in total |
|
| Back to top |
|
|
PaulC
Joined: 23 Dec 2008
Posts: 2318
|
| Posted: Fri Sep 03, 2010 3:06 pm Post subject: |
|
|
PaulC wrote:
I can't see a difference, either. But that could mean that your website is doing the same thing to them as this one does. Have you tried comparing against your original?
One factor that may affect the results is that the image has what I would consider to be very severe compression artifacts. I guess that means that transitions between pixels are sharper than in a less compressed image which may have an influence on the website software's ability to copy it.
Another thing may be that if the image is bigger than the standard size, the compression system could be damaging it as it shrinks it to fit. In that case, same size images would display OK, larger (or smaller) images might not.
_________________
View or buy my photos at:
http://shutterstock.com/g/paulcowan |
|
| Back to top |
|
|
Attila
Joined: 24 Feb 2007
Posts: 57865
Location: Hungary
Expire: 2025-11-18
|
| Posted: Fri Sep 03, 2010 3:19 pm Post subject: |
|
|
Attila wrote:
Most website use GD module to resize pictures, what is not the best but we can live with it due difference is little really. Resize a picture on your local computer and upload here and compare them. Naturally if a picture is weak contrast and detail less difference is more visible than if a picture is processed well or made with top lenses and upload after. Almost all picture need some contrast color adjustment before upload especially if they are made with small digital sensor like 4/3 or m4/3 and shoot captured infinity distance. If you shoot in jpg , camera built in software do it for you if you shoot in raw you need to do by your self in post processing. I know only one software module what is provide better image quality under resizing called image magick what is not available on this server. So this kind of discussion kind of use less, if you not like result what server side software made. Resize your picture to less than 1024 px by your self and upload it or modify weak images to stronger one and upload them after.
_________________
-------------------------------
Items on sale on Ebay
Sony NEX-7 Carl Zeiss Planar 85mm f1.4, Minolta MD 35mm f1.8, Konica 135mm f2.5, Minolta MD 50mm f1.2, Minolta MD 250mm f5.6, Carl Zeiss Sonnar 180mm f2.8
|
|
| Back to top |
|
|
cooltouch
Joined: 15 Jan 2009
Posts: 9098
Location: Houston, Texas
|
| Posted: Fri Sep 03, 2010 4:06 pm Post subject: |
|
|
cooltouch wrote:
| PaulC wrote: |
I can't see a difference, either. But that could mean that your website is doing the same thing to them as this one does. Have you tried comparing against your original?
One factor that may affect the results is that the image has what I would consider to be very severe compression artifacts. I guess that means that transitions between pixels are sharper than in a less compressed image which may have an influence on the website software's ability to copy it.
|
I called up the image converted from the raw file to tif format with no PP and compared it to the one posted here. There is essentially no difference. I have my image processing software's jpg compression set to very low.
No compression was used on the image other than what happens during conversion to jpg. Those aren't compression artifacts you're seeing -- just noise at my camera's ISO 100 setting (the lowest it will go), even when set to raw. At 100% magnification, noise is visible with my lightweight little XS.
_________________
Michael
My Gear List: http://michaelmcbroom.com/photo/gear.html
My Gallery: http://michaelmcbroom.com/gallery3/index.php/
My Flickr Page: https://www.flickr.com/photos/11308754@N08/albums
My Music: https://soundcloud.com/michaelmcbroom/albums
My Blog: http://michaelmcbroom.com/blogistan/ |
|
| Back to top |
|
|
|
|