| View previous topic :: View next topic |
| Author |
Message |
kansalliskala


Joined: 19 Jul 2007
Posts: 5030
Location: Southern Finland countryside
Expire: 2016-12-30
|
 Posted: Fri Aug 06, 2010 9:45 am Post subject: Exposure correction and saturation Posted: Fri Aug 06, 2010 9:45 am Post subject: Exposure correction and saturation |
 |
|
kansalliskala wrote:
Anyone know a good link to how saturaton and exposure correction work together.
Better that this:
http://www.kenrockwell.com/tech/camera-adjustments.htm
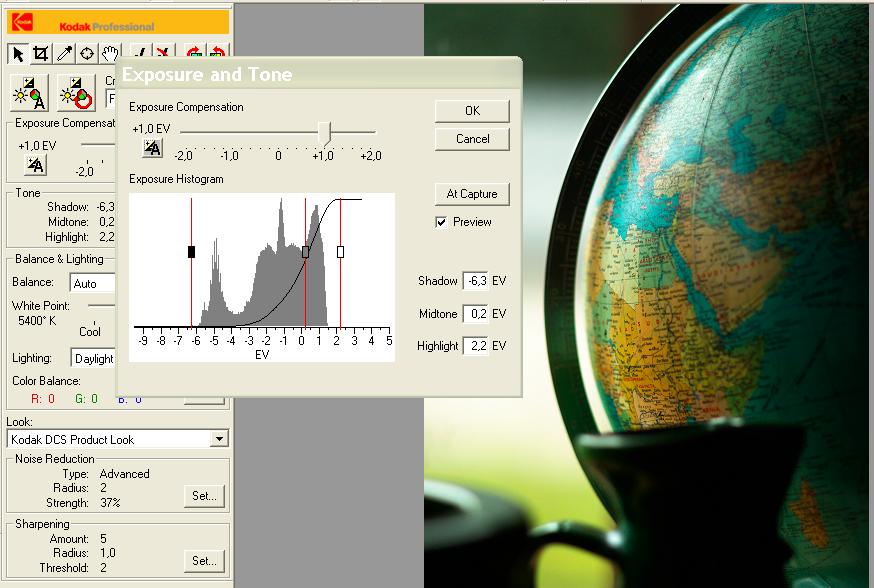
Here is the phenomenon. No colour adjustments done to the latter picture (because the stinkin' Kodak software doesn't have one, ok, it has but it is &%¤&).
EDIT: first one is much closer to reality colorwise but the shot is backlight.
This is straight from camera.

Tried to add some light and contrast but ended up "point-n-shooting" it:
_________________
MF: Kodak DCS SLR/c; Samsung NX10; OM-10; Canon T50
Zuiko 28/3.5, Distagon 35/2.8; Yashica ML 50/2;
Zuiko 50/1.4; S-M-C 120/2.8; Zuiko 135/3.5; 200/5;
Tamron AD1 135/2.8, Soligor 180/3.5; Tamron AD1 300/5.6
Tamron zooms: 01A, Z-210
Yashicaflex C; Київ 4 + Юпитер 8, 11; Polaroid 100; Olympus XA; Yashica T3
Museum stuff: Certo-Phot; Tele-Edixon 135; Polaris 90-190; Asahi Bellows; Ixus IIs
Projects: Agfa Isolette III (no shutter), Canon AE-1D (no sensor),
Nikon D80 (dead), The "Peace Camera"
AF: Canon, Tokina, Sigma Video: JVC GZ-MG275E |
|
| Back to top |
|
 |
visualopsins

Joined: 05 Mar 2009
Posts: 10778
Location: California
Expire: 2025-04-11
|
| Posted: Fri Aug 06, 2010 12:03 pm Post subject: |
|
|
visualopsins wrote:
These tutorials are for Photoshop, but operations are very similar in application using most PP softwares:
Using the Photoshop Levels Tool
Using the Photoshop Curves Tool
The other tutorials are also very good, such as the two "Understanding Histograms":
http://www.cambridgeincolour.com/tutorials.htm
The free PP software GIMP at http://gimp.org has both Levels and Curves adjustments.
_________________
☮☮☮☮☮☮☮☮☮☮☮☮☮☮☮☮☮☮☮☮☮☮☮☮☮☮☮☮☮☮☮☮ like attracts like! ☮☮☮☮☮☮☮☮☮☮☮☮☮☮☮☮☮☮☮☮☮☮☮☮☮☮☮☮☮☮☮☮
Cameras: Sony ILCE-7RM2, Spotmatics II, F, and ESII, Nikon P4
Lenses:
M42 Asahi Optical Co., Takumar 1:4 f=35mm, 1:2 f=58mm (Sonnar), 1:2.4 f=58mm (Heliar), 1:2.2 f=55mm (Gaussian), 1:2.8 f=105mm (Model I), 1:2.8/105 (Model II), 1:5.6/200, Tele-Takumar 1:5.6/200, 1:6.3/300, Macro-Takumar 1:4/50, Auto-Takumar 1:2.3 f=35, 1:1.8 f=55mm, 1:2.2 f=55mm, Super-TAKUMAR 1:3.5/28 (fat), 1:2/35 (Fat), 1:1.4/50 (8-element), Super-Multi-Coated Fisheye-TAKUMAR 1:4/17, Super-Multi-Coated TAKUMAR 1:4.5/20, 1:3.5/24, 1:3.5/28, 1:2/35, 1:3.5/35, 1:1.8/85, 1:1.9/85 1:2.8/105, 1:3.5/135, 1:2.5/135 (II), 1:4/150, 1:4/200, 1:4/300, 1:4.5/500, Super-Multi-Coated Macro-TAKUMAR 1:4/50, 1:4/100, Super-Multi-Coated Bellows-TAKUMAR 1:4/100, SMC TAKUMAR 1:1.4/50, 1:1.8/55
M42 Carl Zeiss Jena Flektogon 2.4/35
Contax Carl Zeiss Vario-Sonnar T* 28-70mm F3.5-4.5
Pentax K-mount SMC PENTAX-A ZOOM 1:3.5 35~105mm, SMC PENTAX ZOOM 1:4 45~125mm
Nikon Micro-NIKKOR-P-C Auto 1:3.5 f=55mm, NIKKOR-P Auto 105mm f/2.5 Pre-AI (Sonnar), Micro-NIKKOR 105mm 1:4 AI, NIKKOR AI-S 35-135mm f/3,5-4,5
Tamron SP 17mm f/3.5 (51B), Tamron SP 17mm f/3.5 (151B), SP 500mm f/8 (55BB), SP 70-210mm f/3.5 (19AH)
Vivitar 100mm 1:2.8 MC 1:1 Macro Telephoto (Kiron)
|
|
| Back to top |
|
|
kansalliskala
Joined: 19 Jul 2007
Posts: 5030
Location: Southern Finland countryside
Expire: 2016-12-30
|
| Posted: Fri Aug 06, 2010 1:55 pm Post subject: |
|
|
kansalliskala wrote:
Thank you!
_________________
MF: Kodak DCS SLR/c; Samsung NX10; OM-10; Canon T50
Zuiko 28/3.5, Distagon 35/2.8; Yashica ML 50/2;
Zuiko 50/1.4; S-M-C 120/2.8; Zuiko 135/3.5; 200/5;
Tamron AD1 135/2.8, Soligor 180/3.5; Tamron AD1 300/5.6
Tamron zooms: 01A, Z-210
Yashicaflex C; Київ 4 + Юпитер 8, 11; Polaroid 100; Olympus XA; Yashica T3
Museum stuff: Certo-Phot; Tele-Edixon 135; Polaris 90-190; Asahi Bellows; Ixus IIs
Projects: Agfa Isolette III (no shutter), Canon AE-1D (no sensor),
Nikon D80 (dead), The "Peace Camera"
AF: Canon, Tokina, Sigma Video: JVC GZ-MG275E |
|
| Back to top |
|
|
cooltouch

Joined: 15 Jan 2009
Posts: 9098
Location: Houston, Texas
|
| Posted: Fri Aug 06, 2010 4:48 pm Post subject: |
|
|
cooltouch wrote:
I use the Curves tool in Paint Shop Pro X2. It probably works very similar to that in PS. Here are a couple of screen captures, showing the tool's window and before and after results. Very simple. I just trim a very small bit off each end of the histogram.


You'll notice that not only does it improve contrast (maybe just a touch too much actually) and saturation, it also eliminates much of the haze.
_________________
Michael
My Gear List: http://michaelmcbroom.com/photo/gear.html
My Gallery: http://michaelmcbroom.com/gallery3/index.php/
My Flickr Page: https://www.flickr.com/photos/11308754@N08/albums
My Music: https://soundcloud.com/michaelmcbroom/albums
My Blog: http://michaelmcbroom.com/blogistan/ |
|
| Back to top |
|
|
kansalliskala
Joined: 19 Jul 2007
Posts: 5030
Location: Southern Finland countryside
Expire: 2016-12-30
|
| Posted: Fri Aug 06, 2010 6:42 pm Post subject: |
|
|
kansalliskala wrote:
| cooltouch wrote: |
| You'll notice that not only does it improve contrast (maybe just a touch too much actually) and saturation, it also eliminates much of the haze. |
Problem is, I want to add light (luminence?) and maybe contrast but not saturation.'
_________________
MF: Kodak DCS SLR/c; Samsung NX10; OM-10; Canon T50
Zuiko 28/3.5, Distagon 35/2.8; Yashica ML 50/2;
Zuiko 50/1.4; S-M-C 120/2.8; Zuiko 135/3.5; 200/5;
Tamron AD1 135/2.8, Soligor 180/3.5; Tamron AD1 300/5.6
Tamron zooms: 01A, Z-210
Yashicaflex C; Київ 4 + Юпитер 8, 11; Polaroid 100; Olympus XA; Yashica T3
Museum stuff: Certo-Phot; Tele-Edixon 135; Polaris 90-190; Asahi Bellows; Ixus IIs
Projects: Agfa Isolette III (no shutter), Canon AE-1D (no sensor),
Nikon D80 (dead), The "Peace Camera"
AF: Canon, Tokina, Sigma Video: JVC GZ-MG275E |
|
| Back to top |
|
|
cooltouch
Joined: 15 Jan 2009
Posts: 9098
Location: Houston, Texas
|
| Posted: Fri Aug 06, 2010 7:20 pm Post subject: |
|
|
cooltouch wrote:
| kansalliskala wrote: |
| cooltouch wrote: |
| You'll notice that not only does it improve contrast (maybe just a touch too much actually) and saturation, it also eliminates much of the haze. |
Problem is, I want to add light (luminence?) and maybe contrast but not saturation.' |
PSPX2 has a "clarify" feature that boosts contrast and brightness but actually desaturates an image somewhat. I find it useful frequently. But it does have a tendency to make smooth toned areas blotch up around brighter objects. Notice the sky in this shot around the clouds. You'll also notice that, while it's still bumped up contrast and brightness to a degree, the image is not as saturated as the one I posted above.

I'm thinking that you should just plan on setting your contrast and brightness to where you want it -- using curves or levels or just the brightness/contrast menu, then go to the saturation menu and slightly desaturate the image. Nothing the matter with a two-step process. Hell, some of my more involved PPs will have a half-dozen steps or more to get what I want.
_________________
Michael
My Gear List: http://michaelmcbroom.com/photo/gear.html
My Gallery: http://michaelmcbroom.com/gallery3/index.php/
My Flickr Page: https://www.flickr.com/photos/11308754@N08/albums
My Music: https://soundcloud.com/michaelmcbroom/albums
My Blog: http://michaelmcbroom.com/blogistan/ |
|
| Back to top |
|
|
|
|
|
You cannot post new topics in this forum
You cannot reply to topics in this forum
You cannot edit your posts in this forum
You cannot delete your posts in this forum
You cannot vote in polls in this forum
|


