| View previous topic :: View next topic |
| Author |
Message |
schildzilla
Joined: 13 Apr 2024
Posts: 7
|
 Posted: Sat Apr 13, 2024 4:18 pm Post subject: Pimp my ugly Cyclop 85mm 1.5 - "Airbrush" Edition Posted: Sat Apr 13, 2024 4:18 pm Post subject: Pimp my ugly Cyclop 85mm 1.5 - "Airbrush" Edition |
 |
|
schildzilla wrote:
I just wanted to share my painting results to maybe give some people ideas to pimp their old lenses, that probably would otherwise be thrown away.
That way you can also put them into a glass cabinet.
I've just received an old Cyclop 85mm 1.5 that was heavily scratched and needed some new paint.
For sure the Cyclop 85mm 1.5 is a very very very ugly lens, but I was optimistic, that it can be optimized, even if it will still be an ugly ugly ugly lens. I like my Helios 40-2 more, but it's heavier.
So I've took sandpaper (fist dry and then wet), some spray cans, tape, some other stuff and a 3D printed mesh to create the pattern.
I'm not going into every detail, that would be too much.
The back part was easy. It can be removed with 3 screws hidden under the front part that just block you from screwing the lens further out when focusing.
The back part has a fixation ring that holds the tripod mount ring. After removing the fixation ring, the tripod mount can be pulled off.
I've removed the outer paint of that fixation ring and polished it at the visible outer side.
All other parts were painted black matt, also because it is easier to repaint that part just in case it will get scratched. I also thought about glossy black, but matt is less complicated.
The front part is made of 2 peaces that are just screwed together.
I've screwed off the ring (back part), removed the paint and polished it, which now gives a decent transition from the front to the black back part of the lens.
Some tape to cover the thread and back lens is important, else you'll get problems in assembling the lens later and also the front lens was covered with tape (I could also took it out but needed to clean it later anyway).
I've sanded down the grooves in the front and polished that part a bit.
The polished front part was also covered with tape until the red base paint including the black pattern was applied.
After removing the tape and some detailing, the whole piece was painted with clear vanish.
Later after some drying time the clear vanish was sanded (to get rid of the raised pattern in the surface of the clear vanish) and painted again with clear vanish.
Drying time again, then I highly polished the paint to make the surface more even and clear.
The rest was just a little bit of clean up, putting everything together and cleaning the lenses in the inside.
Still thinking about some stickers to give some finish.
This is the result:
Before (it looked like that all around, but this was the most serviere scratch):

After:
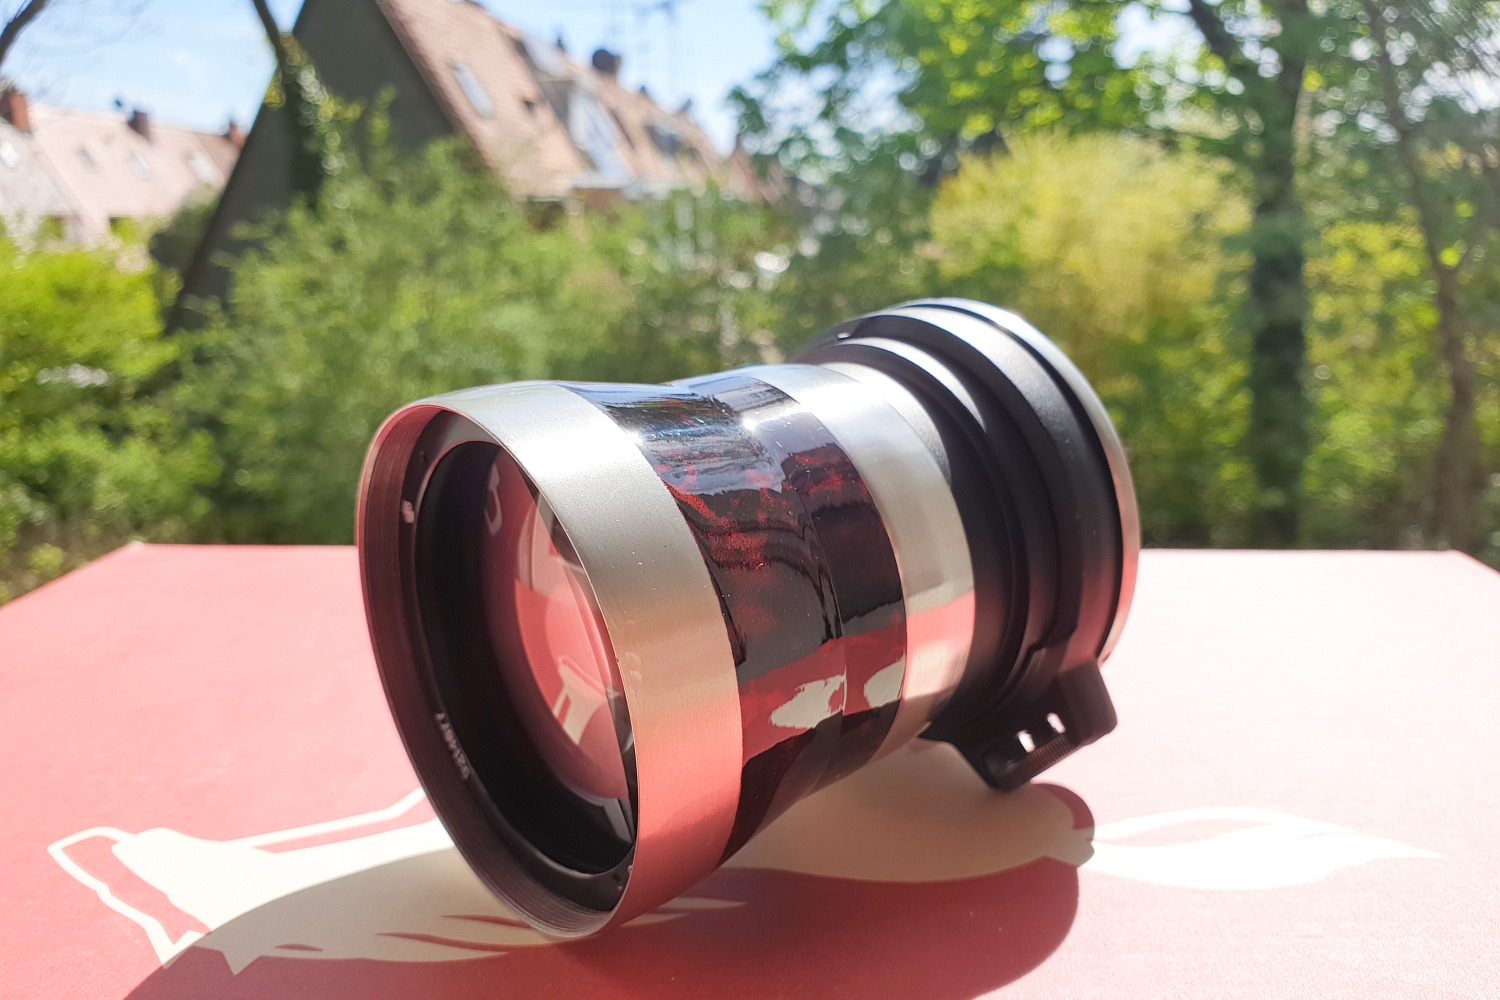
This is what will go into my glass cabinet now:
 |
|
| Back to top |
|
 |
jamaeolus


Joined: 19 Mar 2014
Posts: 2935
Location: Eugene
Expire: 2015-08-20
|
| Posted: Sat Apr 13, 2024 5:15 pm Post subject: |
|
|
jamaeolus wrote:
1st post allows no images as anti-spam measure.
_________________
photos are moments frozen in time |
|
| Back to top |
|
|
jamaeolus
Joined: 19 Mar 2014
Posts: 2935
Location: Eugene
Expire: 2015-08-20
|
| Posted: Sat Apr 13, 2024 5:17 pm Post subject: Re: Pimp my ugly Cyclop 85mm 1.5 - "Airbrush" Edit |
|
|
jamaeolus wrote:
| schildzilla wrote: |
I just wanted to share my painting results to maybe give some people ideas to pimp their old lenses, that probably would otherwise be thrown away.
That way you can also put them into a glass cabinet.
I've just received an old Cyclop 85mm 1.5 that was heavily scratched and needed some new paint.
For sure the Cyclop 85mm 1.5 is a very very very ugly lens, but I was optimistic, that it can be optimized, even if it will still be an ugly ugly ugly lens. I like my Helios 40-2 more, but it's heavier.
So I've took sandpaper (fist dry and then wet), some spray cans, tape, some other stuff and a 3D printed mesh to create the pattern.
I'm not going into every detail, that would be too much.
The back part was easy. It can be removed with 3 screws hidden under the front part that just block you from screwing the lens further out when focusing.
The back part has a fixation ring that holds the tripod mount ring. After removing the fixation ring, the tripod mount can be pulled off.
I've removed the outer paint of that fixation ring and polished it at the visible outer side.
All other parts were painted black matt, also because it is easier to repaint that part just in case it will get scratched. I also thought about glossy black, but matt is less complicated.
The front part is made of 2 peaces that are just screwed together.
I've screwed off the ring (back part), removed the paint and polished it, which now gives a decent transition from the front to the black back part of the lens.
Some tape to cover the thread and back lens is important, else you'll get problems in assembling the lens later and also the front lens was covered with tape (I could also took it out but needed to clean it later anyway).
I've sanded down the grooves in the front and polished that part a bit.
The polished front part was also covered with tape until the red base paint including the black pattern was applied.
After removing the tape and some detailing, the whole piece was painted with clear vanish.
Later after some drying time the clear vanish was sanded (to get rid of the raised pattern in the surface of the clear vanish) and painted again with clear vanish.
Drying time again, then I highly polished the paint to make the surface more even and clear.
The rest was just a little bit of clean up, putting everything together and cleaning the lenses in the inside.
Still thinking about some stickers to give some finish.
This is the result:
Before (it looked like that all around, but this was the most serviere scratch):
After:
0
This is what will go into my glass cabinet now:
|
Hopefully this works!
_________________
photos are moments frozen in time |
|
| Back to top |
|
|
jamaeolus
Joined: 19 Mar 2014
Posts: 2935
Location: Eugene
Expire: 2015-08-20
|
| Posted: Sat Apr 13, 2024 5:17 pm Post subject: |
|
|
jamaeolus wrote:
Looks good!
_________________
photos are moments frozen in time |
|
| Back to top |
|
|
schildzilla
Joined: 13 Apr 2024
Posts: 7
|
| Posted: Sat Apr 13, 2024 7:19 pm Post subject: |
|
|
schildzilla wrote:
Thank you very much.
I was already wondering why there are no pictures  |
|
| Back to top |
|
|
visualopsins

Joined: 05 Mar 2009
Posts: 10561
Location: California
Expire: 2025-04-11
|
| Posted: Sat Apr 13, 2024 8:18 pm Post subject: |
|
|
visualopsins wrote:
Welcome schildzilla!
An art showpiece. You will use it, yes?
_________________
☮☮☮☮☮☮☮☮☮☮☮☮☮☮☮☮☮☮☮☮☮☮☮☮☮☮☮☮☮☮☮☮ like attracts like! ☮☮☮☮☮☮☮☮☮☮☮☮☮☮☮☮☮☮☮☮☮☮☮☮☮☮☮☮☮☮☮☮
Cameras: Sony ILCE-7RM2, Spotmatics II, F, and ESII, Nikon P4
Lenses:
M42 Asahi Optical Co., Takumar 1:4 f=35mm, 1:2 f=58mm (Sonnar), 1:2.4 f=58mm (Heliar), 1:2.2 f=55mm (Gaussian), 1:2.8 f=105mm (Model I), 1:2.8/105 (Model II), 1:5.6/200, Tele-Takumar 1:5.6/200, 1:6.3/300, Macro-Takumar 1:4/50, Auto-Takumar 1:2.3 f=35, 1:1.8 f=55mm, 1:2.2 f=55mm, Super-TAKUMAR 1:3.5/28 (fat), 1:2/35 (Fat), 1:1.4/50 (8-element), Super-Multi-Coated Fisheye-TAKUMAR 1:4/17, Super-Multi-Coated TAKUMAR 1:4.5/20, 1:3.5/24, 1:3.5/28, 1:2/35, 1:3.5/35, 1:1.8/85, 1:1.9/85 1:2.8/105, 1:3.5/135, 1:2.5/135 (II), 1:4/150, 1:4/200, 1:4/300, 1:4.5/500, Super-Multi-Coated Macro-TAKUMAR 1:4/50, 1:4/100, Super-Multi-Coated Bellows-TAKUMAR 1:4/100, SMC TAKUMAR 1:1.4/50, 1:1.8/55
M42 Carl Zeiss Jena Flektogon 2.4/35
Contax Carl Zeiss Vario-Sonnar T* 28-70mm F3.5-4.5
Pentax K-mount SMC PENTAX ZOOM 1:3.5 35~105mm, SMC PENTAX ZOOM 1:4 45~125mm
Nikon Micro-NIKKOR-P-C Auto 1:3.5 f=55mm, NIKKOR-P Auto 105mm f/2.5 Pre-AI (Sonnar), Micro-NIKKOR 105mm 1:4 AI, NIKKOR AI-S 35-135mm f/3,5-4,5
Tamron SP 17mm f/3.5 (51B), Tamron SP 17mm f/3.5 (151B), SP 500mm f/8 (55BB), SP 70-210mm f/3.5 (19AH)
Vivitar 100mm 1:2.8 MC 1:1 Macro Telephoto (Kiron)
|
|
| Back to top |
|
|
schildzilla
Joined: 13 Apr 2024
Posts: 7
|
| Posted: Sat Apr 13, 2024 8:57 pm Post subject: |
|
|
schildzilla wrote:
| visualopsins wrote: |
Welcome schildzilla!
An art showpiece. You will use it, yes? |
Thank you very much!
Yes I will take it out for some photo shoots sometimes if my Helios 40-2 is too heavy.
The Cyclop is just about half the weight. |
|
| Back to top |
|
|
LittleAlex


Joined: 27 Nov 2008
Posts: 1485
Location: L'vov (Western Ukraine)
|
| Posted: Sat Apr 13, 2024 9:22 pm Post subject: |
|
|
LittleAlex wrote:
Cyclop 1,5 / 85 (ROMZ) - a technical version of Helios-40-2 for use in night vision devices, adapted with an iris diaphragm. Review from Rodion Eshmakov
https://radojuva.com/en/2021/06/cyclop-1-5-85-romz/
_________________
"Sharpness is a bourgeois concept" - � H. Cartier Bresson |
|
| Back to top |
|
|
kiddo
Joined: 29 Jun 2018
Posts: 1130
|
| Posted: Sat Apr 13, 2024 11:27 pm Post subject: |
|
|
kiddo wrote:
i dunno the lens, the results are nice but i`m not sure if they are the best grip for focusing |
|
| Back to top |
|
|
schildzilla
Joined: 13 Apr 2024
Posts: 7
|
| Posted: Mon Apr 15, 2024 8:31 pm Post subject: |
|
|
schildzilla wrote:
| kiddo wrote: |
| i dunno the lens, the results are nice but i`m not sure if they are the best grip for focusing |
Focusing is no issue at all. The focus ring is smooth and I've added some silicone spray to the mechanics. I can easily move it with 2 fingers.
The grip is very good, not slippery at all. It's a very small lens and therefore easy to handle.
I think I will more go for it as glass cabinet lens anyway. I will receive a Zenit camera in silver and black soon. They will match perfectly together. |
|
| Back to top |
|
|
BrianSVP


Joined: 09 Jun 2023
Posts: 304
Location: Philadelphia
|
| Posted: Mon Apr 15, 2024 9:13 pm Post subject: |
|
|
BrianSVP wrote:
Nice refinish! Interesting choice to remove the knurling. |
|
| Back to top |
|
|
Lloydy

Joined: 02 Sep 2009
Posts: 7787
Location: Ironbridge. UK.
Expire: 2022-01-01
|
| Posted: Mon Apr 15, 2024 10:30 pm Post subject: |
|
|
Lloydy wrote:
Very nice finish, I like it. 
_________________
LENSES & CAMERAS FOR SALE.....
I have loads of stuff that I have to get rid of, if you see me commenting about something I have got and you want one, ask me.
My Flickr https://www.flickr.com/photos/mudplugga/
My ipernity -
http://www.ipernity.com/home/294337 |
|
| Back to top |
|
|
kiddo
Joined: 29 Jun 2018
Posts: 1130
|
| Posted: Mon Apr 15, 2024 10:34 pm Post subject: |
|
|
kiddo wrote:
| schildzilla wrote: |
| kiddo wrote: |
| i dunno the lens, the results are nice but i`m not sure if they are the best grip for focusing |
Focusing is no issue at all. The focus ring is smooth and I've added some silicone spray to the mechanics. I can easily move it with 2 fingers.
The grip is very good, not slippery at all. It's a very small lens and therefore easy to handle.
I think I will more go for it as glass cabinet lens anyway. I will receive a Zenit camera in silver and black soon. They will match perfectly together. |
What kind of silicone spray are you using? Are you using it together with the grease ? |
|
| Back to top |
|
|
Nordentro

Joined: 24 Jun 2010
Posts: 4713
Location: Lillehammer, Norway
Expire: 2015-01-29
|
| Posted: Tue Apr 16, 2024 6:49 pm Post subject: |
|
|
Nordentro wrote:
Awesome
_________________
Lars | Manuellfokus.no |
|
| Back to top |
|
|
schildzilla
Joined: 13 Apr 2024
Posts: 7
|
| Posted: Wed Apr 17, 2024 5:11 am Post subject: |
|
|
schildzilla wrote:
| kiddo wrote: |
| schildzilla wrote: |
| kiddo wrote: |
| i dunno the lens, the results are nice but i`m not sure if they are the best grip for focusing |
Focusing is no issue at all. The focus ring is smooth and I've added some silicone spray to the mechanics. I can easily move it with 2 fingers.
The grip is very good, not slippery at all. It's a very small lens and therefore easy to handle.
I think I will more go for it as glass cabinet lens anyway. I will receive a Zenit camera in silver and black soon. They will match perfectly together. |
What kind of silicone spray are you using? Are you using it together with the grease ? |
I'm using an oil free silicone spray that can be used for any mechanics or if you want your tires look like new.
I've removed most of the old grease and added the spray to what was left of the old grease. The grease became smoother then because it's mixing up perfectly with the silicone spray. |
|
| Back to top |
|
|
schildzilla
Joined: 13 Apr 2024
Posts: 7
|
| Posted: Wed Apr 17, 2024 2:15 pm Post subject: |
|
|
schildzilla wrote:
I've just received a silver Zenit camera body. I think optically the lens with it's colors fits better on that body.
 |
|
| Back to top |
|
|
schildzilla
Joined: 13 Apr 2024
Posts: 7
|
| Posted: Sat Apr 20, 2024 11:50 am Post subject: |
|
|
schildzilla wrote:
Pimp my Cyclop 85mm F1.5 v2.0 - Coating edition:
I've noticed that my Helios 40-2 (2015 version with good coating) was way(!) sharper than the Cyclop. I was not too happy when attached to my a7R V.
Also the TechArt LM-EA9 Autofocus adapter was always off the focus a lot with an accuracy of about 30-60%.
The Cyclop wasn't sharp at all when perfectly manually focused and even worse when the sun came out.
As it was too far off the Helios, I've decided to remove the blueish weird shimmering back coating (which have had some scratches anyway which were not the cause) of the front lens, as I've had a feeling that this coating caused the quality loss.
I've used my (professional) car polishing machine (slowest speed) and an abrasive polish that is used for getting rid of holograms of car paint together with a hard foam disc (new and never used before to have no dust in it, that could cause scratches in the glass).
The polish must be allover the disk where the lens touches the foam, else it will not work and it should never run completely dry.
I've often used such a combination for car windshields in the past, to get rid of scratches on the glass, often caused by the windshield wipers, so I've had some experience with that already. Yet it was risky.
For me it worked perfectly. Took about 5 minutes including stops to carefully check the progress and I've rotated the lens during polishing.
No more back coating, no scratches and later I've waxed it by hand, also because it's easier then to clean the glass and blow away any dust on the surface later.
As long as the wax is on the lens, it also adds some extra protection against scratches, as everything touching the front lens tends to slip away instead of instantly scratching over the surface.
It looks like a brand new front lens now. I've attached a cheap 12 layer coated UV filter and a lens hood as well.
The result:
I have way better sharpness, details and contrasts now, even when the sun is coming out. I would say now it's very usable and pleasing.
Also my TechArt LM-EA9 AF adapter now automatically focuses almost perfectly on my a7R V in all lighting conditions, which it didn't before with the Cyclop.
Autofocus accuracy is now about 70-100% (mostly 90%). In comparison the Helios is about 80-100% (mostly 100%) accuracy with that adapter.
So somehow this night vision coating of the front lens affected the image quality - in my case a lot. At least you can see it on a 61MP camera.
Still the Helios 40-2 2015 version is sharper, but they came a lot closer now.
I wouldn't recommend anyone trying that for themselves, as there is a risk, that your lens will slip out of your fingers while polishing it and you must definitely know your used equipment and material perfectly.
You can also cause more damage to the lens than making something better.
I would also recommend, that if someone is trying that, to protect your area around the lens in case it slips out of your fingers to protect your surrounding and the lens itself. Some soft blankets should do a good job.
In my case it didn't slip, but it can happen with polish on your fingers.
I would definitely repeat that procedure in the future if needed.
Also works with scratched CDs and other surfaces if done properly |
|
| Back to top |
|
|
jamaeolus
Joined: 19 Mar 2014
Posts: 2935
Location: Eugene
Expire: 2015-08-20
|
| Posted: Sat Apr 20, 2024 10:42 pm Post subject: |
|
|
jamaeolus wrote:
Interesting. I have some scratched lenses that would definitely benefit from a polishing. I have been meaning to try something similar. These lenses are so damaged already as to be useless, optically speaking, so little risk involved.
_________________
photos are moments frozen in time |
|
| Back to top |
|
|
|
|
|
You cannot post new topics in this forum
You cannot reply to topics in this forum
You cannot edit your posts in this forum
You cannot delete your posts in this forum
You cannot vote in polls in this forum
|


