| View previous topic :: View next topic |
| Author |
Message |
ektar

Joined: 09 Oct 2019
Posts: 24
|
 Posted: Tue Feb 15, 2022 3:02 am Post subject: Help disassembling RMC Tokina 400/5.6 Posted: Tue Feb 15, 2022 3:02 am Post subject: Help disassembling RMC Tokina 400/5.6 |
 |
|
ektar wrote:
I have started the process of rescuing one of these. I am probably going to have to s*ck it up and buy a 72mm lens tool (unless i can figure some sort of 71mm cylinder I can wrap a rubber glove around), as I need to clean behind the front element. I think the rearmost complex is a glued pair; that assembly unscrews easily. But, I've got two issues:
1- I've got haze on the inside of the second group in from the rear. The retaining ring is deep, and my spanner just does reach in, but at that point, I can't see the tips. So, any suggestion as to how to reach about a 20mm slotted ring down inside about a 1" deep X 22mm tube?
2- Here's where I hope someone has taken one of these apart: The integral hood has lost whatever padding makes it snug when deployed. It's pretty secure when retracted, but won't stay put when pulled into place. I may discover how to get it loose once I get the front element off, but the path is not currently obvious.
Thanks!
_________________
--
Older than my lenses... |
|
| Back to top |
|
 |
visualopsins


Joined: 05 Mar 2009
Posts: 10531
Location: California
Expire: 2025-04-11
|
| Posted: Tue Feb 15, 2022 3:30 am Post subject: |
|
|
visualopsins wrote:
Okay that was too easy...googled "disassemble RMC Tokina 400/5.6" yielded:
https://www.pentaxforums.com/forums/114-maintenance-repair-articles/238048-notes-disassembling-vivitar-400mm-f5-6-a.html
_________________
☮☮☮☮☮☮☮☮☮☮☮☮☮☮☮☮☮☮☮☮☮☮☮☮☮☮☮☮☮☮☮☮ like attracts like! ☮☮☮☮☮☮☮☮☮☮☮☮☮☮☮☮☮☮☮☮☮☮☮☮☮☮☮☮☮☮☮☮
Cameras: Sony ILCE-7RM2, Spotmatics II, F, and ESII, Nikon P4
Lenses:
M42 Asahi Optical Co., Takumar 1:4 f=35mm, 1:2 f=58mm (Sonnar), 1:2.4 f=58mm (Heliar), 1:2.2 f=55mm (Gaussian), 1:2.8 f=105mm (Model I), 1:2.8/105 (Model II), 1:5.6/200, Tele-Takumar 1:5.6/200, 1:6.3/300, Macro-Takumar 1:4/50, Auto-Takumar 1:2.3 f=35, 1:1.8 f=55mm, 1:2.2 f=55mm, Super-TAKUMAR 1:3.5/28 (fat), 1:2/35 (Fat), 1:1.4/50 (8-element), Super-Multi-Coated Fisheye-TAKUMAR 1:4/17, Super-Multi-Coated TAKUMAR 1:4.5/20, 1:3.5/24, 1:3.5/28, 1:2/35, 1:3.5/35, 1:1.8/85, 1:1.9/85 1:2.8/105, 1:3.5/135, 1:2.5/135 (II), 1:4/150, 1:4/200, 1:4/300, 1:4.5/500, Super-Multi-Coated Macro-TAKUMAR 1:4/50, 1:4/100, Super-Multi-Coated Bellows-TAKUMAR 1:4/100, SMC TAKUMAR 1:1.4/50, 1:1.8/55
M42 Carl Zeiss Jena Flektogon 2.4/35
Contax Carl Zeiss Vario-Sonnar T* 28-70mm F3.5-4.5
Pentax K-mount SMC PENTAX ZOOM 1:3.5 35~105mm, SMC PENTAX ZOOM 1:4 45~125mm
Nikon Micro-NIKKOR-P-C Auto 1:3.5 f=55mm, NIKKOR-P Auto 105mm f/2.5 Pre-AI (Sonnar), Micro-NIKKOR 105mm 1:4 AI, NIKKOR AI-S 35-135mm f/3,5-4,5
Tamron SP 17mm f/3.5 (51B), Tamron SP 17mm f/3.5 (51BB), SP 500mm f/8 (55BB), SP 70-210mm f/3.5 (19AH)
Vivitar 100mm 1:2.8 MC 1:1 Macro Telephoto (Kiron)
|
|
| Back to top |
|
|
ektar
Joined: 09 Oct 2019
Posts: 24
|
| Posted: Tue Feb 15, 2022 4:13 am Post subject: |
|
|
ektar wrote:
Thanks for the link. I had seen that one, having worked on one of the Vivitar Komines a couple months ago. I didn't look close enough at the other pics; but even those don't match the lens I have. The SN starts with 87xx, not 28x, 37x, or 6x. The tripod collar is much narrower and the foot is smaller; there are no screws hidden beneath it to remove the mount end. Lastly, the filter size is 72mm; it is not a preset lens. the PentaxForums DB suggests that this one was made by Hoya, but it doesn't resemble the one that is showcased on this forum.
It might help to mention that the copy I have is a Canon FD (not nFD) mount. I would prefer to not take the mount off. I
t does have the two stacked grub screws on the objective end; it may be that that end will unscrew as described; I was hesitant today because one of the sources I found in my search suggested this was also how one adjusts infinity focus, and I was hoping to not screw that up.
_________________
--
Older than my lenses... |
|
| Back to top |
|
|
ektar
Joined: 09 Oct 2019
Posts: 24
|
| Posted: Thu Feb 17, 2022 5:09 pm Post subject: |
|
|
ektar wrote:
Okay. Here's where I am at the moment: The forward grub screw does appear to be the fixing screw for infinity focus adjustment. When that one is loosened, the front complex rotates about a turn and a half and then hits a stop. The rear screw does not appear to do anything while the front complex is assembled; with it loosened individually, nothing moves, and together with the front screw you still hit the stop. At the moment, I'm looking for a roughly 70mm cylinder to wrap and use as a tool for the name ring. Hate to spend the money on a full set of the rubber tools.
_________________
--
Older than my lenses... |
|
| Back to top |
|
|
ektar
Joined: 09 Oct 2019
Posts: 24
|
| Posted: Fri Feb 25, 2022 5:23 pm Post subject: |
|
|
ektar wrote:
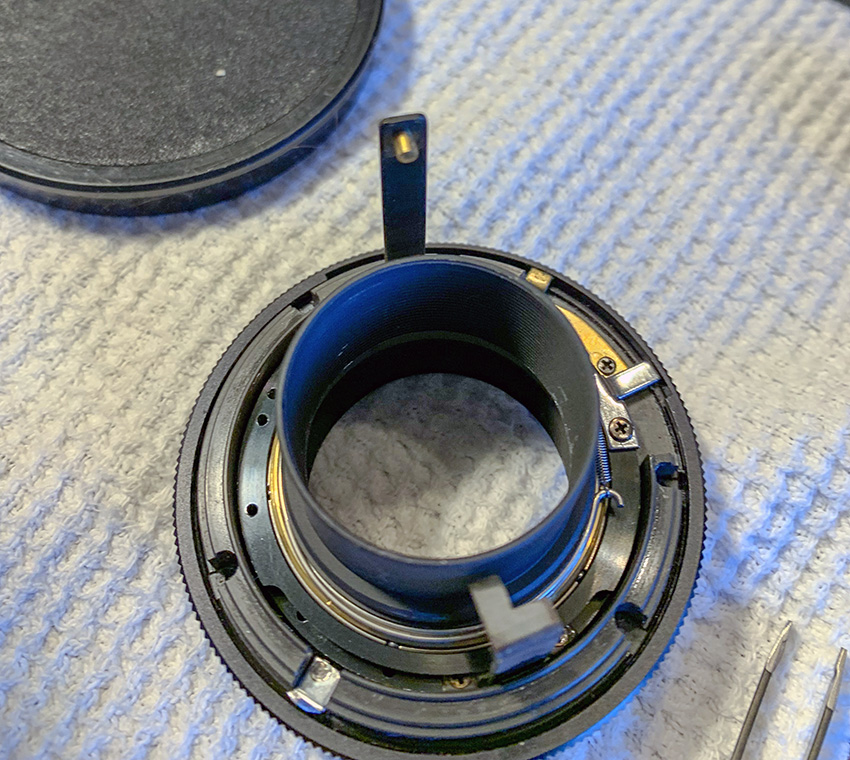
Okay: Got the front two elements out and cleaned. Was unable to unscrew the front complex to remove the hood (which is loose when deployed), but did adjust infinity focus. There was some haze on the rear surface of the second group from the back. To access that set, I had to remove the mount (I did not disassemble it).
#1
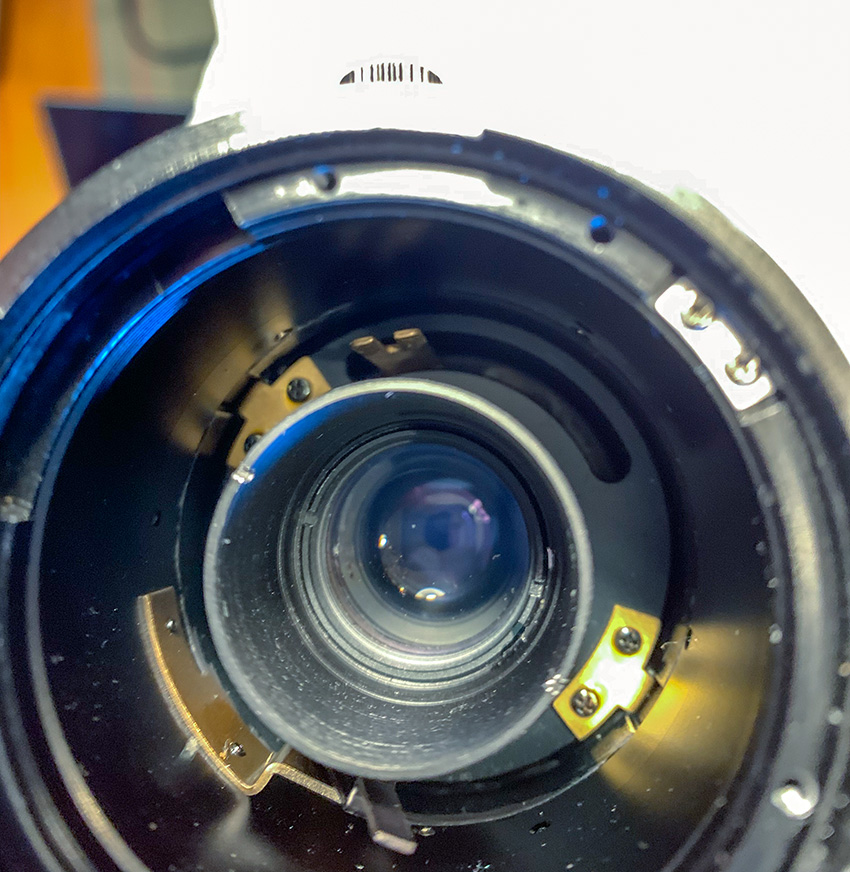
#2

The top image shows the view down inside the lens. The slotted arm at the left appears to need to engage the nub on the long arm visible in the second image. The other arm appears to engage the other lever. That slotted arm moves very little. I can't seem to get the mount reinstalled such that the aperture control works properly, meaning that the aperture ring adjusts the aperture. AFAIK the aperture worked properly before disassembly.
All help/links appreciated.
_________________
--
Older than my lenses... |
|
| Back to top |
|
|
RokkorDoctor


Joined: 27 Nov 2021
Posts: 1266
Location: Kent, UK
|
| Posted: Fri Feb 25, 2022 10:43 pm Post subject: |
|
|
RokkorDoctor wrote:
| ektar wrote: |
Okay: Got the front two elements out and cleaned. Was unable to unscrew the front complex to remove the hood (which is loose when deployed), but did adjust infinity focus. There was some haze on the rear surface of the second group from the back. To access that set, I had to remove the mount (I did not disassemble it).
#1
#2
The top image shows the view down inside the lens. The slotted arm at the left appears to need to engage the nub on the long arm visible in the second image. The other arm appears to engage the other lever. That slotted arm moves very little. I can't seem to get the mount reinstalled such that the aperture control works properly, meaning that the aperture ring adjusts the aperture. AFAIK the aperture worked properly before disassembly.
All help/links appreciated. |
OK,
I am unfamiliar with this lens and I don't know this mount, so I can only go by what I can see, but here are my thoughts:
Looking at the linkages I would conclude that the slotted arm in the top image controls the aperture size, the bottom arm is the lever for automatically closing & opening the aperture. This is based on similar constructions I am familiar with in Minolta lenses; aperture size actuators are usually confined linkages (the slot, 2 contact surfaces), whereas aperture open/close actuators are often spring-loaded linkages with only one contact surface (the bottom arm).
The bottom arm in the top image looks to be sitting at a noticeable angle, so unless it has been bent (unlikely) I assume it is mounted with a hinge-pin on the brass-coloured support and is a rotating lever that operates the aperture deeper inside the lens. I assume it is sitting at that angle because of spring tension from a more recessed actuator.
My guess is that when positioning the mount back onto the lens:
- the protruding pin on the top arm in the bottom image needs to engage the slotted arm in the top image
- At the same time whilst positioning the mount, my guess is that the other arm on the mount in the bottom image needs to be rotated counter-clockwise (as seen from the back as you are mounting it, and possibly against spring tension) and held there, so that it engages/touches the bottom arm in the top image from the right, i.e. the bottom arm in the top image ends up sitting in the aperture/gap you can see in the bottom arm in the second image.
Give that a try, but don't force anything; I could well be wrong (I'm familiar with Minolta mounts & construction, no experience with the Canon FD mount)
_________________
Mark
SONY A7S, A7RII + dust-sealed modded Novoflex/Fotodiox/Rayqual MD-NEX adapters
Minolta SR-1, SRT-101/303, XD7/XD11, XGM, X700
Bronica SQAi
Ricoh GX100
Minolta majority of all Rokkor SR/AR/MC/MD models made
Sigma 14mm/3.5 for SR mount
Tamron SP 60B 300mm/2.8 (Adaptall)
Samyang T-S 24mm/3.5 (Nikon mount, DIY converted to SR mount)
Schneider-Kreuznach PC-Super-Angulon 28mm/2.8 (SR mount)
Bronica PS 35/40/50/65/80/110/135/150/180/200/250mm |
|
| Back to top |
|
|
ektar
Joined: 09 Oct 2019
Posts: 24
|
| Posted: Sat Feb 26, 2022 3:44 am Post subject: |
|
|
ektar wrote:
Thanks, Mark. From what I can tell, your observations as to the operation are correct. I am going to disassemble it again and keep working in the direction you've suggested. What I have run into is difficulty getting the non-confined part of the linkage into correct orientation and operating as expected. A peculiarity of the FD mount is that when the lens is removed from the camera and the mount is in the "ready" mode, the aperture is inoperative. When it is mounted, the "collar" of the lens mount rotates to lock onto the camera side, and the mechanism is ready to operate. The problem with this one as I have been able to get it put together, is that the lever works the diaphragm all the time (which it should not) and the aperture dial has no affect. So, I have something in the wrong place/orientation.
I'll keep at it.
_________________
--
Older than my lenses... |
|
| Back to top |
|
|
ektar
Joined: 09 Oct 2019
Posts: 24
|
| Posted: Thu Mar 03, 2022 3:14 am Post subject: |
|
|
ektar wrote:
Okay! First, thanks Mark: Your advice matched with what I suspected was the function of the two levers. I was able to get the mount lined up with the levers by pre-loading the bottom lever. What I discovered was that the aperture control arm was somehow not able to move through its throw. As a result, I couldn't turn the mount into proper alignment. I really didn't want to disassemble the lens to get to the workings of the diaphragm control, but with a little experimentation, I discovered that when the open/close lever had jumped loose from spring tension, something got moved out of place, blocking the range of motion of the aperture size control. Moved that back into place, lined up the levers, and Bob's yer uncle. She's got some dust and some off-axis haze, but I look forward to finding out what kind of IQ is there.
_________________
--
Older than my lenses... |
|
| Back to top |
|
|
leo_willians
Joined: 19 Nov 2022
Posts: 1
|
| Posted: Sat Nov 19, 2022 6:36 pm Post subject: same problem |
|
|
leo_willians wrote:
| ektar wrote: |
| Okay! First, thanks Mark: Your advice matched with what I suspected was the function of the two levers. I was able to get the mount lined up with the levers by pre-loading the bottom lever. What I discovered was that the aperture control arm was somehow not able to move through its throw. As a result, I couldn't turn the mount into proper alignment. I really didn't want to disassemble the lens to get to the workings of the diaphragm control, but with a little experimentation, I discovered that when the open/close lever had jumped loose from spring tension, something got moved out of place, blocking the range of motion of the aperture size control. Moved that back into place, lined up the levers, and Bob's yer uncle. She's got some dust and some off-axis haze, but I look forward to finding out what kind of IQ is there. |
Hi, I'm having the same problem. Despite reading your comment I didn't understand exactly how you managed to fix it, if you can give me a more accurate explanation, or even with photos, I would be grateful. |
|
| Back to top |
|
|
|
|
|
You cannot post new topics in this forum
You cannot reply to topics in this forum
You cannot edit your posts in this forum
You cannot delete your posts in this forum
You cannot vote in polls in this forum
|