| View previous topic :: View next topic |
| Author |
Message |
Gatorengineer64

Joined: 26 Oct 2017
Posts: 279
|
 Posted: Sat Jun 12, 2021 12:46 am Post subject: Help - Stuck Re-assembling a canon 85 F1.9 Rangefinder Posted: Sat Jun 12, 2021 12:46 am Post subject: Help - Stuck Re-assembling a canon 85 F1.9 Rangefinder |
 |
|
Gatorengineer64 wrote:
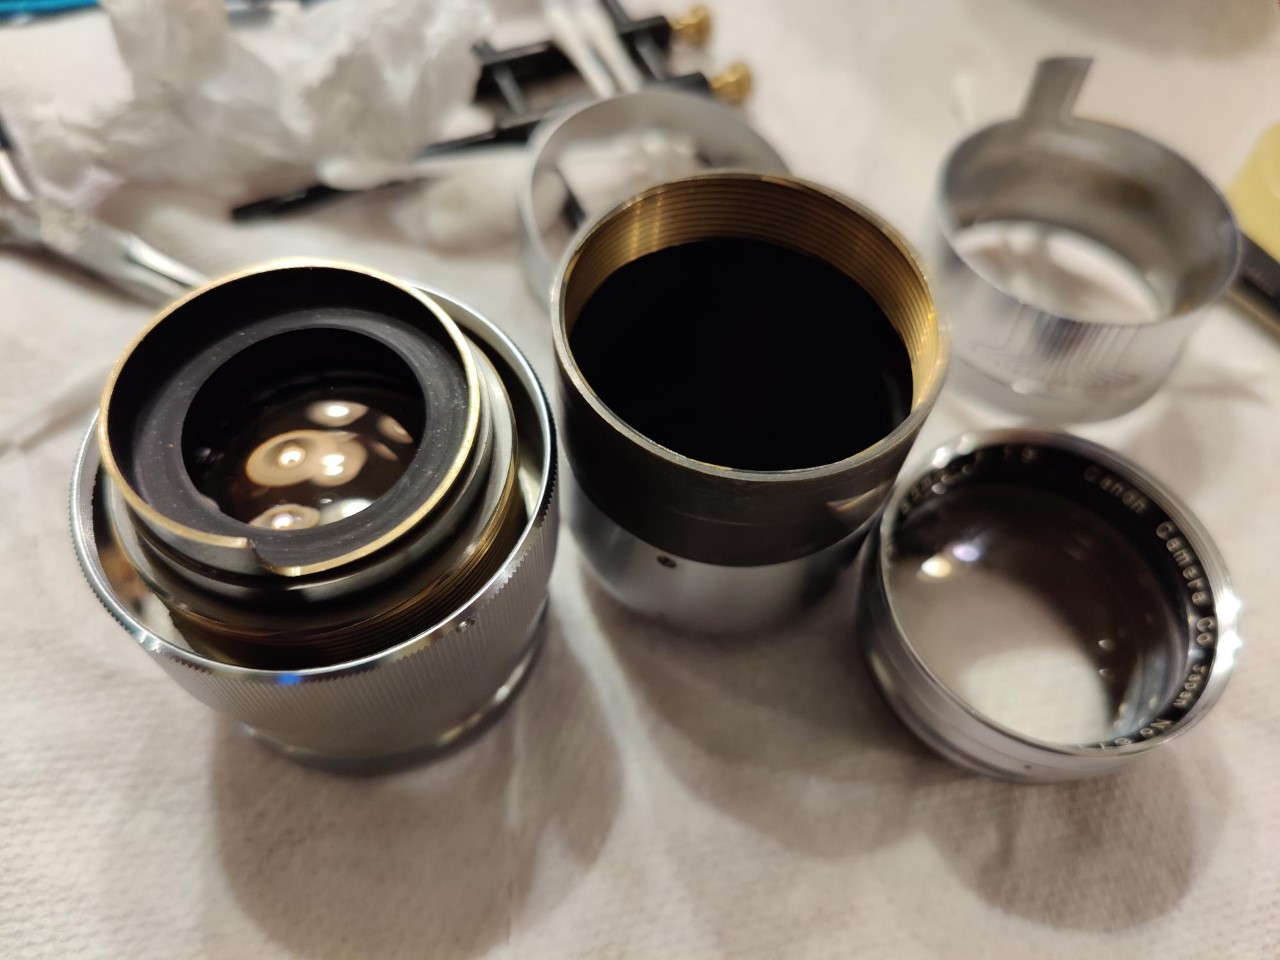
Tried to do a CLA on this lens, I am still learning. I got the front lens group out, and then barrel, but I cant get the rear lens block out, and I don't see any more grub screws. I also cant get it back together. The barrel threads to the lens block with a multiple start screw thread. I see a black dot on the barell but I don't see any index marks on the threads. Is there a trick to starting these?
How do I get the rear lens block out? It would appear it needs a special tool?
Advice would be appreciated. I did try heating the barrel in hot water, but that didn't help (hoping it would expand a bit).

_________________
A7R4, GFX50R and a bucket of mflenses |
|
| Back to top |
|
 |
Gatorengineer64
Joined: 26 Oct 2017
Posts: 279
|
| Posted: Sat Jun 12, 2021 12:47 am Post subject: |
|
|
Gatorengineer64 wrote:
#1

_________________
A7R4, GFX50R and a bucket of mflenses |
|
| Back to top |
|
|
calvin83


Joined: 12 Apr 2009
Posts: 7554
Location: Hong Kong
|
| Posted: Sat Jun 12, 2021 3:24 am Post subject: |
|
|
calvin83 wrote:
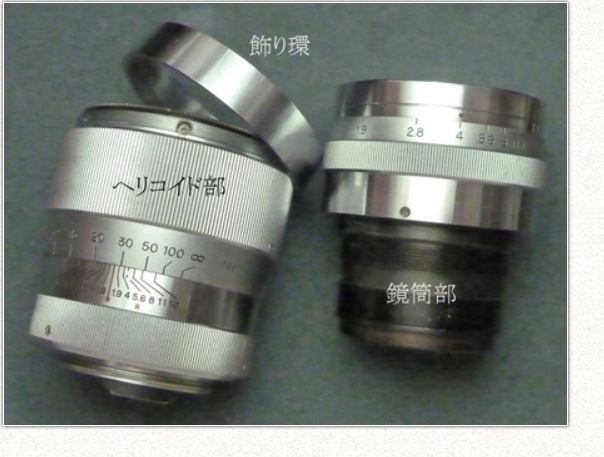
I think should be able to remove the optical block in one piece?
Take a look at this
https://www.kitamura.jp/photo/repairer/2014/re1063.html
_________________
https://lensfever.com/
https://www.instagram.com/_lens_fever/
The best lens is the one you have with you. |
|
| Back to top |
|
|
kymarto

Joined: 30 Nov 2016
Posts: 406
Location: Portland, OR and Milan, Italy
|
| Posted: Sat Jun 12, 2021 7:58 am Post subject: Re: Help - Stuck Re-assembling a canon 85 F1.9 Rangefinder |
|
|
kymarto wrote:
| Gatorengineer64 wrote: |
Tried to do a CLA on this lens, I am still learning. I got the front lens group out, and then barrel, but I cant get the rear lens block out, and I don't see any more grub screws. I also cant get it back together. The barrel threads to the lens block with a multiple start screw thread. I see a black dot on the barell but I don't see any index marks on the threads. Is there a trick to starting these?
How do I get the rear lens block out? It would appear it needs a special tool?
Advice would be appreciated. I did try heating the barrel in hot water, but that didn't help (hoping it would expand a bit).
|
Unfortunately you made the classic beginner's mistake of not marking the positions of the two parts when you took apart the helicoid. First, as you noticed, it is quite difficult to get the helicoid back together, and now you do not know at which of multiple points you should start it. The only way I know to do it is to guess at the beginning and see how it focuses. If you didn't start at the right thread you will need to take it apart (and this time mark the two parts) and reassemble in a different position. Eventually you will get the right one by the process of elimination, but it could take a while. I am not familiar with the rear block on this lens, but unless it really needs a clean I strongly recommend you do not touch it. Removing the lens elements from their mount risks chipping them when you reinsert them, as crown glass chips very easily and those mounts are made to very tight tolerances. If you do not reinsert the elements exactly straight they can easily jam, and chip when you try to then get them back out.
_________________
Vintage lens aficionado |
|
| Back to top |
|
|
Lightshow

Joined: 04 Nov 2011
Posts: 3669
Location: Calgary
|
| Posted: Sat Jun 12, 2021 8:18 am Post subject: Re: Help - Stuck Re-assembling a canon 85 F1.9 Rangefinder |
|
|
Lightshow wrote:
| Gatorengineer64 wrote: |
| Tried to do a CLA on this lens, I am still learning. I got the front lens group out, and then barrel, but I cant get the rear lens block out, and I don't see any more grub screws. |
a couple more pics if you can.
| Quote: |
| I also cant get it back together. The barrel threads to the lens block with a multiple start screw thread. I see a black dot on the barell but I don't see any index marks on the threads. Is there a trick to starting these? |
The trick is to add some witness marks to it both at the infinity position and just before you separate the two halves of the helicoid, the first confirms you got it right, the second tells you where to start, even if the second is not accurate it will give you a starting place +/- a start away which will eliminate 4-6 starts to try.
| Quote: |
How do I get the rear lens block out? It would appear it needs a special tool?
Advice would be appreciated. I did try heating the barrel in hot water, but that didn't help (hoping it would expand a bit).
|
This is why I typically recommend a Helios 44-2 as a first lens to operate on, it's not a big deal if you destroy it, which is relatively hard to do, it's not as complicated as other lenses so you get a better understanding of how a lens operates without the risk of turning a rare/desirable lens into a basket case/project lens for someone to attempt to repair.
There are many ways lens designers can solve assembly conundrums like this, grub screws radially holding a tube in place, sometimes it's threaded with a grub screw or more to keep it from unscrewing, they often use a threaded retaining ring to pull the optical block into the body, sometimes the ring attaches directly to the front optical block pulling both ends together into the aperture section.
As I mentioned above, a few more pictures would help, like most people out there, I've not worked on this lens, so I require good pics that show relationships, and other pics that peer into the shadows without blowing out highlights.
_________________
A Manual Focus Junky...
One photographers junk lens is an artists favorite tool.
My lens list
http://www.flickr.com/photos/lightshow-photography/ |
|
| Back to top |
|
|
Gatorengineer64
Joined: 26 Oct 2017
Posts: 279
|
| Posted: Sat Jun 12, 2021 12:40 pm Post subject: |
|
|
Gatorengineer64 wrote:
Thanks Calvin, that was a huge help, my googling didn't find it. Absoultely agreed that this is a dumb rookie mistake. Wasnt my first lens. Prior to this I had done a 1.5 50 zeiss sonnar Contax mount, A nikon 50 1.4 contax mount, a 35 1.8 LTM, a canon 50 f1.2 LTM, and a Nikon 35 3.5 in Contax mount. So I had a series of success and was perhaps a bit full of myself. I had on all prior occasions only taken down the optics and stayed out of the Iris and hellicoid for this very reason. I did the sonnar twice the second time after I went to lighter fluid. I have been trying to acquire cosmetically excellent but fungused optics, hoping for a mild case of fungus that hadn't had time to etc the glass so far so good. I paid $200 for the canon 1.2 which was hazy and the seller described as fungus but was actually a small scuff on the objective.... the haze cleaned nice and the lens shoots well for $200 even considering the scuff I am ahead I think.
To be honest I had actually thought that the helicoid would be the next unscrewy thing and didn't realize I was undoing it. My problem is I cant seem to figure out how the main focusing barrel is attached to the lens. On the website and below the focusing barrel is part of the lower assembly on mine, I have it as part of the upper and cant figure how to detach it. If you look he has the helicoid exposed and I cant get mine to this point.
My issues is I cant get the helicoid re-started. If I can expose the mating portion of the helicoid I think I can get it, but working with the lens barrel on is complicating things.
#1

_________________
A7R4, GFX50R and a bucket of mflenses |
|
| Back to top |
|
|
visualopsins

Joined: 05 Mar 2009
Posts: 10541
Location: California
Expire: 2025-04-11
|
| Posted: Sat Jun 12, 2021 2:21 pm Post subject: |
|
|
visualopsins wrote:
Tip -- place half on flat surface rather than trying to screw together holding both pieces.
_________________
☮☮☮☮☮☮☮☮☮☮☮☮☮☮☮☮☮☮☮☮☮☮☮☮☮☮☮☮☮☮☮☮ like attracts like! ☮☮☮☮☮☮☮☮☮☮☮☮☮☮☮☮☮☮☮☮☮☮☮☮☮☮☮☮☮☮☮☮
Cameras: Sony ILCE-7RM2, Spotmatics II, F, and ESII, Nikon P4
Lenses:
M42 Asahi Optical Co., Takumar 1:4 f=35mm, 1:2 f=58mm (Sonnar), 1:2.4 f=58mm (Heliar), 1:2.2 f=55mm (Gaussian), 1:2.8 f=105mm (Model I), 1:2.8/105 (Model II), 1:5.6/200, Tele-Takumar 1:5.6/200, 1:6.3/300, Macro-Takumar 1:4/50, Auto-Takumar 1:2.3 f=35, 1:1.8 f=55mm, 1:2.2 f=55mm, Super-TAKUMAR 1:3.5/28 (fat), 1:2/35 (Fat), 1:1.4/50 (8-element), Super-Multi-Coated Fisheye-TAKUMAR 1:4/17, Super-Multi-Coated TAKUMAR 1:4.5/20, 1:3.5/24, 1:3.5/28, 1:2/35, 1:3.5/35, 1:1.8/85, 1:1.9/85 1:2.8/105, 1:3.5/135, 1:2.5/135 (II), 1:4/150, 1:4/200, 1:4/300, 1:4.5/500, Super-Multi-Coated Macro-TAKUMAR 1:4/50, 1:4/100, Super-Multi-Coated Bellows-TAKUMAR 1:4/100, SMC TAKUMAR 1:1.4/50, 1:1.8/55
M42 Carl Zeiss Jena Flektogon 2.4/35
Contax Carl Zeiss Vario-Sonnar T* 28-70mm F3.5-4.5
Pentax K-mount SMC PENTAX ZOOM 1:3.5 35~105mm, SMC PENTAX ZOOM 1:4 45~125mm
Nikon Micro-NIKKOR-P-C Auto 1:3.5 f=55mm, NIKKOR-P Auto 105mm f/2.5 Pre-AI (Sonnar), Micro-NIKKOR 105mm 1:4 AI, NIKKOR AI-S 35-135mm f/3,5-4,5
Tamron SP 17mm f/3.5 (51B), Tamron SP 17mm f/3.5 (51BB), SP 500mm f/8 (55BB), SP 70-210mm f/3.5 (19AH)
Vivitar 100mm 1:2.8 MC 1:1 Macro Telephoto (Kiron)
|
|
| Back to top |
|
|
Lightshow
Joined: 04 Nov 2011
Posts: 3669
Location: Calgary
|
| Posted: Sat Jun 12, 2021 6:43 pm Post subject: |
|
|
Lightshow wrote:
Before taking it apart further, I'd concentrate on finding the correct start, if I was in this situation, I'd get a Sharpie marker and make some marks for the first start I'm going to try, it here's the possibility hard part, some lenses are rather simple to rejoin in that the helicoid doesn't really care about the position of the focus ring, while other lenses it's critical that the focus ring is out towards MFD, possibly half way, at some point the front cell contacts the guide rail(s) that prevent the optics from spinning, it's at this point the guide rail(s) should mate with the intended slot and then the focus ring is turned to draw the helicoid back in, if the lens stops moving inward before the focus ring reaches the infinity mark, or the optics don't reach the desired depth when the infinity mark is reached, these are signs it's the wrong start, which means you have to restart one start earlier or one start later or that the helicoid was in the wrong position when the guide rail mated to the optical block. This is much easier if there is only one guide rail, when there is two rails, there may be two starts that time it right, only that one will have the aperture numbers in the correct position at 12:00 and the other where the aperture numbers are at 6:00 or the bottom, no fear, if it ends at the bottom the correct start is 180 degrees away.
You have to be methodical in how you do this, after your 3rd or 4th attempt you should be forming a picture in your mind of where a start will end up and will be able to predict how far away the correct start is.
Hopefully you can remember if you had to turn the focus ring to unscrew the helicoid for the first part till it cleared the rail, your description leads me to believe you didn't have to do that, so you can probably ignore the part about moving the focus ring to align the rail, but I included it to cover the possibility.
Here's how I witness mark my lens, at the infinity position I will add a single scratch in a hidden spot where an easily identifiable feature on the main body or on the moving helicoid end up at when @ infinity, I usually rotate the focus ring back and fourth a few times as watch how everything moves and where everything ends up @ infinity a suitable marking location usually presents its self.
When separating the helicoid I lightly pull as I slowly turn it, when the helicoid lets go I immediately stop rotating the lens, and immediately rejoin the helicoid and stop with about 1/4" or about 5-7mm overlap and then look for a marking location, I often use the same easily identifiable feature on the body to witness mark the start of the optical block helicoid with a double witness mark
_________________
A Manual Focus Junky...
One photographers junk lens is an artists favorite tool.
My lens list
http://www.flickr.com/photos/lightshow-photography/ |
|
| Back to top |
|
|
cooltouch

Joined: 15 Jan 2009
Posts: 9097
Location: Houston, Texas
|
| Posted: Mon Jun 06, 2022 3:29 pm Post subject: |
|
|
cooltouch wrote:
Gator, I've been in your position more times than I care to admit. Even after marking the helical for the correct reassembly point, I've found that this was often of little help and ended up playing the process of elimination game. I did find that, if one of the pieces had a flat side, to lay it on the flat side to make things somewhat easier. Also, I found that, if I held perfectly vertically the part to be threaded onto the part to receive it, that I could feel it fall into place each time the helicals would engage. Then it was just a matter of process of elimination. Not fun, but oh well, what's the alternative?
If you haven't gotten that rear group out yet, you might try using one of those flat rubber "jar gripper" things. I use one whenever I need to unscrew a lens group when it doesn't have any slots for a lens spanner. Usually that'll work.
_________________
Michael
My Gear List: http://michaelmcbroom.com/photo/gear.html
My Gallery: http://michaelmcbroom.com/gallery3/index.php/
My Flickr Page: https://www.flickr.com/photos/11308754@N08/albums
My Music: https://soundcloud.com/michaelmcbroom/albums
My Blog: http://michaelmcbroom.com/blogistan/ |
|
| Back to top |
|
|
|
|
|
You cannot post new topics in this forum
You cannot reply to topics in this forum
You cannot edit your posts in this forum
You cannot delete your posts in this forum
You cannot vote in polls in this forum
|