| View previous topic :: View next topic |
| Author |
Message |
peruexplorer
Joined: 26 Jan 2021
Posts: 15
Location: Canada
|
 Posted: Tue Jan 26, 2021 2:11 am Post subject: Experimenting with vintage lenses Posted: Tue Jan 26, 2021 2:11 am Post subject: Experimenting with vintage lenses |
 |
|
peruexplorer wrote:
Hi everybody!
I am interested in experimenting with vintage lenses. My goal is to make them some changes in order to change the appearance of the photos and to have original effects..
I recently saw some videos about how to made them modifications but most of the videos are focuses in two lenses only Helios 44-2 and Mir 1B.
Do you know if it is possible to do changes to other vintage lenses?
Do you know a tutorial about this topic?
Thanks |
|
| Back to top |
|
 |
visualopsins


Joined: 05 Mar 2009
Posts: 10572
Location: California
Expire: 2025-04-11
|
| Posted: Tue Jan 26, 2021 2:30 am Post subject: |
|
|
visualopsins wrote:
Welcome peruexplorer
Can you describe those modifications in the videos? Also, what camera you'll be using will help for suggesting lenses.
_________________
☮☮☮☮☮☮☮☮☮☮☮☮☮☮☮☮☮☮☮☮☮☮☮☮☮☮☮☮☮☮☮☮ like attracts like! ☮☮☮☮☮☮☮☮☮☮☮☮☮☮☮☮☮☮☮☮☮☮☮☮☮☮☮☮☮☮☮☮
Cameras: Sony ILCE-7RM2, Spotmatics II, F, and ESII, Nikon P4
Lenses:
M42 Asahi Optical Co., Takumar 1:4 f=35mm, 1:2 f=58mm (Sonnar), 1:2.4 f=58mm (Heliar), 1:2.2 f=55mm (Gaussian), 1:2.8 f=105mm (Model I), 1:2.8/105 (Model II), 1:5.6/200, Tele-Takumar 1:5.6/200, 1:6.3/300, Macro-Takumar 1:4/50, Auto-Takumar 1:2.3 f=35, 1:1.8 f=55mm, 1:2.2 f=55mm, Super-TAKUMAR 1:3.5/28 (fat), 1:2/35 (Fat), 1:1.4/50 (8-element), Super-Multi-Coated Fisheye-TAKUMAR 1:4/17, Super-Multi-Coated TAKUMAR 1:4.5/20, 1:3.5/24, 1:3.5/28, 1:2/35, 1:3.5/35, 1:1.8/85, 1:1.9/85 1:2.8/105, 1:3.5/135, 1:2.5/135 (II), 1:4/150, 1:4/200, 1:4/300, 1:4.5/500, Super-Multi-Coated Macro-TAKUMAR 1:4/50, 1:4/100, Super-Multi-Coated Bellows-TAKUMAR 1:4/100, SMC TAKUMAR 1:1.4/50, 1:1.8/55
M42 Carl Zeiss Jena Flektogon 2.4/35
Contax Carl Zeiss Vario-Sonnar T* 28-70mm F3.5-4.5
Pentax K-mount SMC PENTAX ZOOM 1:3.5 35~105mm, SMC PENTAX ZOOM 1:4 45~125mm
Nikon Micro-NIKKOR-P-C Auto 1:3.5 f=55mm, NIKKOR-P Auto 105mm f/2.5 Pre-AI (Sonnar), Micro-NIKKOR 105mm 1:4 AI, NIKKOR AI-S 35-135mm f/3,5-4,5
Tamron SP 17mm f/3.5 (51B), Tamron SP 17mm f/3.5 (151B), SP 500mm f/8 (55BB), SP 70-210mm f/3.5 (19AH)
Vivitar 100mm 1:2.8 MC 1:1 Macro Telephoto (Kiron)
|
|
| Back to top |
|
|
peruexplorer
Joined: 26 Jan 2021
Posts: 15
Location: Canada
|
| Posted: Tue Jan 26, 2021 2:55 am Post subject: |
|
|
peruexplorer wrote:
| visualopsins wrote: |
Welcome peruexplorer
Can you describe those modifications in the videos? Also, what camera you'll be using will help for suggesting lenses. |
Actually I have a Canon 70D, I would like to do things like modifying the diaphragm or inversing lenses, I only saw that the lenses that could be inversed are some Helios 44 and Mir 1B. |
|
| Back to top |
|
|
DConvert


Joined: 12 Jun 2010
Posts: 905
Location: Essex UK
|
| Posted: Tue Jan 26, 2021 10:22 am Post subject: |
|
|
DConvert wrote:
| peruexplorer wrote: |
| visualopsins wrote: |
Welcome peruexplorer
Can you describe those modifications in the videos? Also, what camera you'll be using will help for suggesting lenses. |
Actually I have a Canon 70D, I would like to do things like modifying the diaphragm or inversing lenses, I only saw that the lenses that could be inversed are some Helios 44 and Mir 1B. |
I've seen similar modifications (involving removing the rear group rather than inverting elements) that where listed specifically for a given common lens & tried them on other lenses. Using a different 50mm prime gave similar results to the on-line article (soft focus effect wide open). When I got a telephoto with the rear group badly fogged I tried that with the offending group removed & was pleasantly surprised by the results.
I wouldn't expect anyone posting such an article to claim it can be done with any lens. Many such mods can be done on loads of lenses even if the results are not always the same. I suspect you've only found this listed for the Helios 44 & Mir 1B because both are very common, & affordable so not disastrous if the experiment goes wrong. With inverting elements there can be issues with other elements being too close to allow reassembly.
As long as care is taken it should be possible to attempt with most lenses, reversing the operation afterwards if the results are not what you want, or to see the effect of flipping another element instead. You are most likely to get similar results if the lens you decide to hack is of similar design to those seen on-line. Other Biotar design designs should give similar results to the Helios, results might be different with a Tessar but I'd certainly rather try it on a cheap Tessar than on a Zeiss Biotar... |
|
| Back to top |
|
|
KEO

Joined: 27 Sep 2018
Posts: 762
Location: USA
|
| Posted: Tue Jan 26, 2021 8:01 pm Post subject: |
|
|
KEO wrote:
You could try a Pentacon 50. Those are really nice old lenses that are among the cheapest you can get.
Personally I wouldn't alter a Biotar even if I had a dozen of them.  |
|
| Back to top |
|
|
D1N0

Joined: 07 Aug 2012
Posts: 2502
|
| Posted: Tue Jan 26, 2021 8:19 pm Post subject: |
|
|
D1N0 wrote:
Lenses are lenses. With most of them it is pretty easy to flip a front element. Experiment.
_________________
pentaxian |
|
| Back to top |
|
|
55

Joined: 13 May 2013
Posts: 709
Location: U.S.
Expire: 2022-06-15
|
| Posted: Tue Jan 26, 2021 9:35 pm Post subject: |
|
|
55 wrote:
| peruexplorer wrote: |
. . .
I would like to do things like modifying the diaphragm . . . |
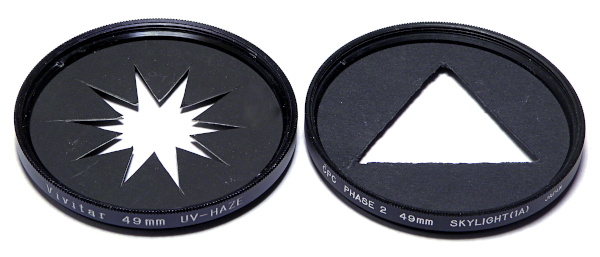
A simple way to get different out of focus highlight shapes is to place cutouts in front of the lens.
I've used de-glassed filters to hold posterboard cutouts such as these:
#1
 |
|
| Back to top |
|
|
visualopsins
Joined: 05 Mar 2009
Posts: 10572
Location: California
Expire: 2025-04-11
|
| Posted: Tue Jan 26, 2021 9:52 pm Post subject: |
|
|
visualopsins wrote:
Least expensive may be a suitable lens sold for parts only.
_________________
☮☮☮☮☮☮☮☮☮☮☮☮☮☮☮☮☮☮☮☮☮☮☮☮☮☮☮☮☮☮☮☮ like attracts like! ☮☮☮☮☮☮☮☮☮☮☮☮☮☮☮☮☮☮☮☮☮☮☮☮☮☮☮☮☮☮☮☮
Cameras: Sony ILCE-7RM2, Spotmatics II, F, and ESII, Nikon P4
Lenses:
M42 Asahi Optical Co., Takumar 1:4 f=35mm, 1:2 f=58mm (Sonnar), 1:2.4 f=58mm (Heliar), 1:2.2 f=55mm (Gaussian), 1:2.8 f=105mm (Model I), 1:2.8/105 (Model II), 1:5.6/200, Tele-Takumar 1:5.6/200, 1:6.3/300, Macro-Takumar 1:4/50, Auto-Takumar 1:2.3 f=35, 1:1.8 f=55mm, 1:2.2 f=55mm, Super-TAKUMAR 1:3.5/28 (fat), 1:2/35 (Fat), 1:1.4/50 (8-element), Super-Multi-Coated Fisheye-TAKUMAR 1:4/17, Super-Multi-Coated TAKUMAR 1:4.5/20, 1:3.5/24, 1:3.5/28, 1:2/35, 1:3.5/35, 1:1.8/85, 1:1.9/85 1:2.8/105, 1:3.5/135, 1:2.5/135 (II), 1:4/150, 1:4/200, 1:4/300, 1:4.5/500, Super-Multi-Coated Macro-TAKUMAR 1:4/50, 1:4/100, Super-Multi-Coated Bellows-TAKUMAR 1:4/100, SMC TAKUMAR 1:1.4/50, 1:1.8/55
M42 Carl Zeiss Jena Flektogon 2.4/35
Contax Carl Zeiss Vario-Sonnar T* 28-70mm F3.5-4.5
Pentax K-mount SMC PENTAX ZOOM 1:3.5 35~105mm, SMC PENTAX ZOOM 1:4 45~125mm
Nikon Micro-NIKKOR-P-C Auto 1:3.5 f=55mm, NIKKOR-P Auto 105mm f/2.5 Pre-AI (Sonnar), Micro-NIKKOR 105mm 1:4 AI, NIKKOR AI-S 35-135mm f/3,5-4,5
Tamron SP 17mm f/3.5 (51B), Tamron SP 17mm f/3.5 (151B), SP 500mm f/8 (55BB), SP 70-210mm f/3.5 (19AH)
Vivitar 100mm 1:2.8 MC 1:1 Macro Telephoto (Kiron)
|
|
| Back to top |
|
|
peruexplorer
Joined: 26 Jan 2021
Posts: 15
Location: Canada
|
| Posted: Tue Jan 26, 2021 11:15 pm Post subject: |
|
|
peruexplorer wrote:
| DConvert wrote: |
| peruexplorer wrote: |
| visualopsins wrote: |
Welcome peruexplorer
Can you describe those modifications in the videos? Also, what camera you'll be using will help for suggesting lenses. |
Actually I have a Canon 70D, I would like to do things like modifying the diaphragm or inversing lenses, I only saw that the lenses that could be inversed are some Helios 44 and Mir 1B. |
I've seen similar modifications (involving removing the rear group rather than inverting elements) that where listed specifically for a given common lens & tried them on other lenses. Using a different 50mm prime gave similar results to the on-line article (soft focus effect wide open). When I got a telephoto with the rear group badly fogged I tried that with the offending group removed & was pleasantly surprised by the results.
I wouldn't expect anyone posting such an article to claim it can be done with any lens. Many such mods can be done on loads of lenses even if the results are not always the same. I suspect you've only found this listed for the Helios 44 & Mir 1B because both are very common, & affordable so not disastrous if the experiment goes wrong. With inverting elements there can be issues with other elements being too close to allow reassembly.
As long as care is taken it should be possible to attempt with most lenses, reversing the operation afterwards if the results are not what you want, or to see the effect of flipping another element instead. You are most likely to get similar results if the lens you decide to hack is of similar design to those seen on-line. Other Biotar design designs should give similar results to the Helios, results might be different with a Tessar but I'd certainly rather try it on a cheap Tessar than on a Zeiss Biotar... |
Thank you very much for the information and the advise. I am just a beginner in this and I will start the reversing operation if the experiment goes well, later I would like to go further and to make more changes. |
|
| Back to top |
|
|
peruexplorer
Joined: 26 Jan 2021
Posts: 15
Location: Canada
|
| Posted: Tue Jan 26, 2021 11:17 pm Post subject: |
|
|
peruexplorer wrote:
| KEO wrote: |
You could try a Pentacon 50. Those are really nice old lenses that are among the cheapest you can get.
Personally I wouldn't alter a Biotar even if I had a dozen of them. |
Do you know a tutorial to check the changes that could be done to the Pentacon?
And you are right, it is better not to play with a Biotar  |
|
| Back to top |
|
|
peruexplorer
Joined: 26 Jan 2021
Posts: 15
Location: Canada
|
| Posted: Tue Jan 26, 2021 11:18 pm Post subject: |
|
|
peruexplorer wrote:
| D1N0 wrote: |
| Lenses are lenses. With most of them it is pretty easy to flip a front element. Experiment. |
Do you know if there is a site where I can order custom made glasses to replace them for those that come with the lenses? |
|
| Back to top |
|
|
peruexplorer
Joined: 26 Jan 2021
Posts: 15
Location: Canada
|
| Posted: Tue Jan 26, 2021 11:20 pm Post subject: |
|
|
peruexplorer wrote:
| 55 wrote: |
| peruexplorer wrote: |
. . .
I would like to do things like modifying the diaphragm . . . |
A simple way to get different out of focus highlight shapes is to place cutouts in front of the lens.
I've used de-glassed filters to hold posterboard cutouts such as these:
#1
|
That is a good idea, I was thinking about it.
Do you know if there is a n specific size for these shapes or actually I have to experiment till I find the ideal bokeh that I want? |
|
| Back to top |
|
|
55
Joined: 13 May 2013
Posts: 709
Location: U.S.
Expire: 2022-06-15
|
| Posted: Wed Jan 27, 2021 3:22 am Post subject: |
|
|
55 wrote:
| peruexplorer wrote: |
. . .
Do you know if there is a n specific size for these shapes or actually I have to experiment till I find the ideal bokeh that I want? |
No, I can't give you specifics. But in general, the smaller the opening in your "filter", the more visible the cut out shape will be in your images. And of course you'll also get more vignetting and need a longer exposure with a smaller opening.
That said, I've been surprised at how much light passes through the cutouts I've used. For example, take the star filter I showed in my prior post. I found if the cutout was large enough for the star points to extend to the filter rim, the effect wasn't as strong as I wanted. So I settled on the size you see in the photo. And as I recall, the loss of light with that size star is about 1 - 1.5 stops.
Most of my star filter shots have been taken with a Helios 44-2 on my Canon 5D. I love the 44-2 for its innate rendering, and adding a cutout shape makes it even more fun. And I've also played with reversing elements on my 44-2.
Here's an example from my Helios using a star cutout and with its front element reversed, wide open at f/2:
#1

I did add color and contrast in post because reversing the 44-2's front element tends to give a washed out look as well as crazy swirl.
By the way, stopping the 44-2 down to f/2.8 would give about the same image because the star cutout blocks so much light. But I usually keep my lenses wide open to get the most effect from cutouts.
And regarding star shapes, I prefer at least 10 rays / points so at least a few rays will be visible even if the whole highlight doesn't show. |
|
| Back to top |
|
|
DConvert
Joined: 12 Jun 2010
Posts: 905
Location: Essex UK
|
| Posted: Wed Jan 27, 2021 9:22 am Post subject: |
|
|
DConvert wrote:
| peruexplorer wrote: |
| D1N0 wrote: |
| Lenses are lenses. With most of them it is pretty easy to flip a front element. Experiment. |
Do you know if there is a site where I can order custom made glasses to replace them for those that come with the lenses? |
I don't think you can order lenses to the same specifications as lens manufacturers (who will specify exactly the glass used).
There are several on-line sources of simple elements where just the diameter & focal length is specified, along with a broad category (achromatic doublet, glass, plastic, silica...)
I've used UQG optics, & Greenweld in the UK as well as importing from Surplus Shed in the US. I've also looked at Edmunds optics in the US but haven't ordered from them yet. Then there's always e-bay...
I've only built up a small stock of elements and embarrassingly have yet to do anything much wit them. At some point I hope to make a crude UV transmitting lens (using silica elements) & play with some monocles etc. |
|
| Back to top |
|
|
DConvert
Joined: 12 Jun 2010
Posts: 905
Location: Essex UK
|
| Posted: Wed Jan 27, 2021 9:53 am Post subject: |
|
|
DConvert wrote:
| peruexplorer wrote: |
| 55 wrote: |
| peruexplorer wrote: |
. . .
I would like to do things like modifying the diaphragm . . . |
A simple way to get different out of focus highlight shapes is to place cutouts in front of the lens.
I've used de-glassed filters to hold posterboard cutouts such as these:
#1
|
That is a good idea, I was thinking about it.
Do you know if there is a n specific size for these shapes or actually I have to experiment till I find the ideal bokeh that I want? |
There is a maximum size that will work for a specific lens (not just the filter size). If the cut out is larger than the entrance pupil the bokeh shapes will vignette. I often use craft cutters that are sold in a wide variety of shapes, most are small enough for many regular lenses.
With them I usual just make a black paper disc with the cut out central & hold it against the lens with an old UV filter.
BTW there is a dedicated Flickr group for this technique: https://www.flickr.com/groups/custombokeh/ I used to be in another but I can't find that anymore (probably just flooded with spam shots)  |
|
| Back to top |
|
|
DConvert
Joined: 12 Jun 2010
Posts: 905
Location: Essex UK
|
| Posted: Wed Jan 27, 2021 9:58 am Post subject: |
|
|
DConvert wrote:
| 55 wrote: |
Here's an example from my Helios using a star cutout and with its front element reversed, wide open at f/2:
#1
|
I've seen that shot before & remembered it involved a flipped element, but I'd missed the bokeh mask part. The results makes more sense to me now. A very creative combination, that shows large shapes can still work very effectively!  |
|
| Back to top |
|
|
peruexplorer
Joined: 26 Jan 2021
Posts: 15
Location: Canada
|
| Posted: Thu Jan 28, 2021 2:16 am Post subject: |
|
|
peruexplorer wrote:
| D1N0 wrote: |
| Lenses are lenses. With most of them it is pretty easy to flip a front element. Experiment. |
Do you have any idea about how to change the shape of the diaphragm? |
|
| Back to top |
|
|
peruexplorer
Joined: 26 Jan 2021
Posts: 15
Location: Canada
|
| Posted: Thu Jan 28, 2021 2:18 am Post subject: |
|
|
peruexplorer wrote:
| 55 wrote: |
| peruexplorer wrote: |
. . .
Do you know if there is a n specific size for these shapes or actually I have to experiment till I find the ideal bokeh that I want? |
No, I can't give you specifics. But in general, the smaller the opening in your "filter", the more visible the cut out shape will be in your images. And of course you'll also get more vignetting and need a longer exposure with a smaller opening.
That said, I've been surprised at how much light passes through the cutouts I've used. For example, take the star filter I showed in my prior post. I found if the cutout was large enough for the star points to extend to the filter rim, the effect wasn't as strong as I wanted. So I settled on the size you see in the photo. And as I recall, the loss of light with that size star is about 1 - 1.5 stops.
Most of my star filter shots have been taken with a Helios 44-2 on my Canon 5D. I love the 44-2 for its innate rendering, and adding a cutout shape makes it even more fun. And I've also played with reversing elements on my 44-2.
Here's an example from my Helios using a star cutout and with its front element reversed, wide open at f/2:
#1
I did add color and contrast in post because reversing the 44-2's front element tends to give a washed out look as well as crazy swirl.
By the way, stopping the 44-2 down to f/2.8 would give about the same image because the star cutout blocks so much light. But I usually keep my lenses wide open to get the most effect from cutouts.
And regarding star shapes, I prefer at least 10 rays / points so at least a few rays will be visible even if the whole highlight doesn't show. |
Wouuu congratulations for the photography, it is wonderful, I would like to do photos like that, I know that with time and effort I will be able to do it.
I like the combination of modifications that you used to do this photo. Thanks for sharing that knowledge |
|
| Back to top |
|
|
peruexplorer
Joined: 26 Jan 2021
Posts: 15
Location: Canada
|
| Posted: Thu Jan 28, 2021 2:32 am Post subject: |
|
|
peruexplorer wrote:
| DConvert wrote: |
| peruexplorer wrote: |
| 55 wrote: |
| peruexplorer wrote: |
. . .
I would like to do things like modifying the diaphragm . . . |
A simple way to get different out of focus highlight shapes is to place cutouts in front of the lens.
I've used de-glassed filters to hold posterboard cutouts such as these:
#1
|
That is a good idea, I was thinking about it.
Do you know if there is a n specific size for these shapes or actually I have to experiment till I find the ideal bokeh that I want? |
Thanks for the information about the bokeh group! It is interesting what they do The group doesn't seem active but it already gave me cool ideas about how to do the bokeh
There is a maximum size that will work for a specific lens (not just the filter size). If the cut out is larger than the entrance pupil the bokeh shapes will vignette. I often use craft cutters that are sold in a wide variety of shapes, most are small enough for many regular lenses.
With them I usual just make a black paper disc with the cut out central & hold it against the lens with an old UV filter.
BTW there is a dedicated Flickr group for this technique: https://www.flickr.com/groups/custombokeh/ I used to be in another but I can't find that anymore (probably just flooded with spam shots) |
|
|
| Back to top |
|
|
55
Joined: 13 May 2013
Posts: 709
Location: U.S.
Expire: 2022-06-15
|
| Posted: Thu Jan 28, 2021 5:21 am Post subject: |
|
|
55 wrote:
| DConvert wrote: |
There is a maximum size that will work for a specific lens (not just the filter size) . . . |
Thanks for the information. I'm glad there are members here who understand the technical stuff better than I do.
| DConvert wrote: |
. . .
BTW there is a dedicated Flickr group for this technique: https://www.flickr.com/groups/custombokeh/ I used to be in another but I can't find that anymore (probably just flooded with spam shots) |
Interesting. Thank you for the link.
P.S. This is a completely off topic interjection, but I want to reference one of those Flickr custom bokeh images:
https://www.flickr.com/photos/raheslop/24685405150/in/pool-custombokeh/
Seeing those cats reminded me of another art form I enjoy. It's called pinscreen animation. Some of the pinscreen short films I've seen are fascinating. If anyone is interested, there are some video links on the Wikipedia pinscreen page:
https://en.wikipedia.org/wiki/Pinscreen_animation |
|
| Back to top |
|
|
55
Joined: 13 May 2013
Posts: 709
Location: U.S.
Expire: 2022-06-15
|
| Posted: Thu Jan 28, 2021 5:31 am Post subject: |
|
|
55 wrote:
| DConvert wrote: |
. . .
I've seen that shot before & remembered it involved a flipped element, but I'd missed the bokeh mask part. The results makes more sense to me now. A very creative combination, that shows large shapes can still work very effectively! |

| peruexplorer wrote: |
Wouuu congratulations for the photography, it is wonderful, I would like to do photos like that, I know that with time and effort I will be able to do it.
I like the combination of modifications that you used to do this photo. Thanks for sharing that knowledge |
Thank you.
And you're welcome!
I love fooling around with crazy rendering and effects. So I'm happy to hear other people enjoy such photos too.
For what it's worth, I've found that a cheap, 2X teleconverter is good for enhancing the "flaws" (bubbles and swirls) in my Helios 44-2's rendering. |
|
| Back to top |
|
|
|
|