| View previous topic :: View next topic |
| Author |
Message |
cyberjunkie


Joined: 24 Mar 2010
Posts: 282
Location: Chiang Mai, Bologna, Amsterdam
|
 Posted: Sat Jan 20, 2018 11:55 am Post subject: Adjust infinity in Helios 44 M39 Posted: Sat Jan 20, 2018 11:55 am Post subject: Adjust infinity in Helios 44 M39 |
 |
|
cyberjunkie wrote:
I have repeatedly found on the Internet the (wrong) information about the compatibility of the early M39 version of the Helios 44 with the register of standard M42 (and PK) cameras.
There is about a quarter of millimeter difference. If not adjusted, the lens can be easily fitted on a M42 camera via one of those cheap M39-to-M42 adapter rings, but it would miss infinity by a little.
If the diaphragm is stopped down enough the problem is almost gone, but we don't buy a Helios 44 to stop it down to f/16, isn't it?
Some CLA'ed lenses shipped from Russia or Ukraine are coming with the adapter ring, and already adjusted for spot-on infinity on M42 bodies (or other mounts, using an M42 adapter, as i do with my Pentax DSLR cameras), and this makes the subject even more confusing, because some buyers never encounter this problem and would report in good faith that there is no register mismatch.
This is exactly what happened when i bought a beautiful Helios 40 ("silver", made in 1961 IIRC). It came with the ring and already adjusted, and to my surprise was looking almost new (which suggests a thorough CLA).
The Helios 44 i just received is the aluminium KMZ version with 8 diaphragm blades.
It's in great conditions, and has a non-industrial adapter ring that looks and feels as it has just been removed from the lathe 
Unfortunately the infinity is a little off.
I am determined to correct the problem, cause the lens seems to be great, from my first tests.
I would like to avoid to remove some material from the mating surface of the mount, so i would like to know if there is any way to solve the problem in a non-destructive way, for example adjusting the focusing helicoid by the needed amount...
Any suggestion/link/video?
Any feedback would be greatly appreciated.
Thanks
ciao
Paolo
_________________
Pentax Bodies: 6x7, K2, MX, LX, Super A, Z-1, K-1, K-5 II, K-01, K10D, K200D
Other cameras: Leica CL, Leica M5, Rolleiflex, Mamiya Super 23, Horizont, and many bellows cameras from 4x5" to 8x10"
- Shooting only digital recently, FF and APS-C
- Collecting vintage large format lenses (plenty of them )
- Looking for Pentax-A* 200mm Macro and Pentax-A* 1.8/135mm, Sigma 150mm or 180mm Macro PK, Sigma 50-500 AF PK, Enna 1.5/85mm M42; selling Pentacon Six/Pentax 67/Mamiya Press/Leica M/Rolleiflex/4x5"/Manfrotto stuff
MY BELOVED PK, M42 LENSES
Photographica sets
On sale |
|
| Back to top |
|
 |
wolan


Joined: 30 Jun 2015
Posts: 576
Location: Zurich
|
| Posted: Sat Jan 20, 2018 1:27 pm Post subject: |
|
|
wolan wrote:
Do a search on this web site, time ago a correct answer was provided to a similar question.
_________________
https://www.flickr.com/photos/149089857@N03/ |
|
| Back to top |
|
|
Lightshow


Joined: 04 Nov 2011
Posts: 3669
Location: Calgary
|
| Posted: Sat Jan 20, 2018 1:38 pm Post subject: |
|
|
Lightshow wrote:
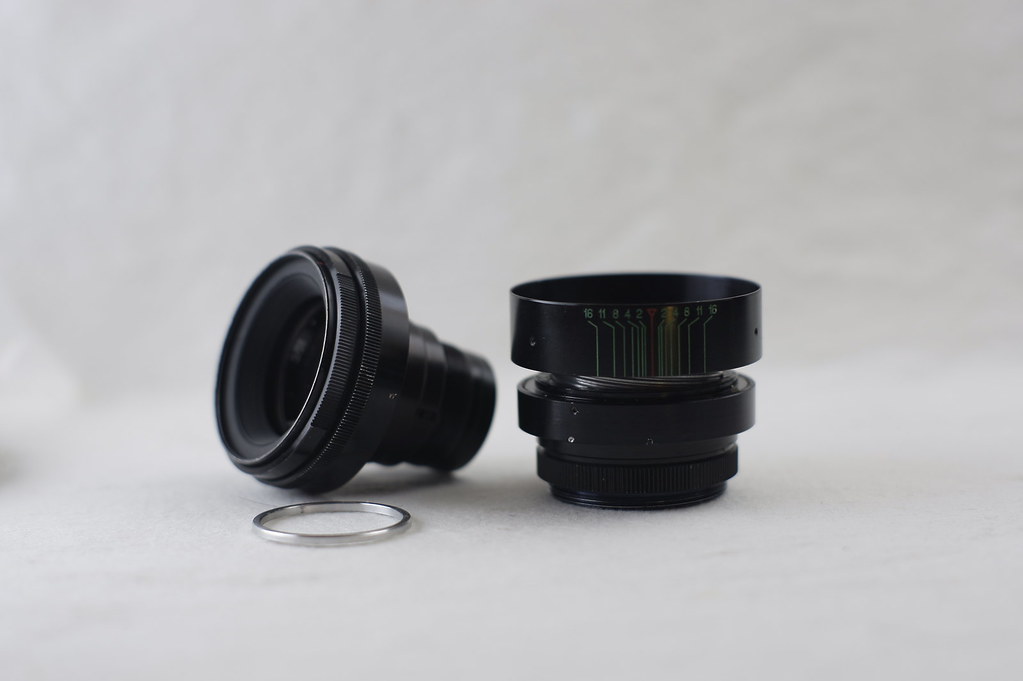
The optics unscrew from the helicoid and there are shims between the 2, add or remove as required.
_________________
A Manual Focus Junky...
One photographers junk lens is an artists favorite tool.
My lens list
http://www.flickr.com/photos/lightshow-photography/ |
|
| Back to top |
|
|
blotafton

Joined: 08 Aug 2013
Posts: 1552
Location: Sweden
|
| Posted: Sat Jan 20, 2018 3:59 pm Post subject: |
|
|
blotafton wrote:
It can be solved by a m39 adapter and a zenit macro ring. One of the rings in the set has the correct thickness.
Better than working with the lens. For mirrorless cameras only. |
|
| Back to top |
|
|
cyberjunkie
Joined: 24 Mar 2010
Posts: 282
Location: Chiang Mai, Bologna, Amsterdam
|
| Posted: Sat Jan 20, 2018 4:38 pm Post subject: |
|
|
cyberjunkie wrote:
I mentioned the PK mount in my post, but I guess it was not made clear enough...
I need to use the lens on Pentax DSLR cameras, now almost always a K-1 full frame, so I don't need tubes.
It misses infinity by a little, it needs to get closer to the focus plane, not away from it!
As I have already written, the lens came with a M39-to-M42 ring... but the problem isn't caused by the ring (btw, even away from home, I happen to have spares!)
The problem is due to a different register. These early lenses have an M39 thread with a register much longer than Leica rangefinder cameras. Almost identical to M42 Pentax screw-mount... almost!
I found the same kind of problem with Enna lenses that were made with the same mount and a very similar register. Probably they were made for the Braun Paxette, but I'm not 100% sure.
What I know is that they have the same identical problem: with the M39 ring + a PK adapter they miss infinity by a little. Of course it is more evident with longer focals.
ciao, and thanks for the feedback
Paolo
_________________
Pentax Bodies: 6x7, K2, MX, LX, Super A, Z-1, K-1, K-5 II, K-01, K10D, K200D
Other cameras: Leica CL, Leica M5, Rolleiflex, Mamiya Super 23, Horizont, and many bellows cameras from 4x5" to 8x10"
- Shooting only digital recently, FF and APS-C
- Collecting vintage large format lenses (plenty of them )
- Looking for Pentax-A* 200mm Macro and Pentax-A* 1.8/135mm, Sigma 150mm or 180mm Macro PK, Sigma 50-500 AF PK, Enna 1.5/85mm M42; selling Pentacon Six/Pentax 67/Mamiya Press/Leica M/Rolleiflex/4x5"/Manfrotto stuff
MY BELOVED PK, M42 LENSES
Photographica sets
On sale |
|
| Back to top |
|
|
tomasg
Joined: 01 Nov 2009
Posts: 1135
Expire: 2014-04-28
|
| Posted: Sat Jan 20, 2018 4:55 pm Post subject: |
|
|
tomasg wrote:
Paolo, Lightshow showed you waht you have to do....just do that, or if you are skeptical....remove the shim between the optical block and the focusing block...put it back, mount it on the camera and you ll see that now the lens focuses past infinity |
|
| Back to top |
|
|
D. P.


Joined: 26 Apr 2015
Posts: 150
|
| Posted: Sun Jan 21, 2018 11:32 am Post subject: |
|
|
D. P. wrote:
It seems to me that all problems are caused by ignorance.
In the Soviet Union, four variants of M39 threaded mounting were used.
1) M39 - almost complete analog of LTM (L39). For rangefinder cameras. Flange focal distance - 28,8 mm
2) First version of M39 for SLR cameras (until 1967). Flange focal distance - 45,2 mm
3) Second version of M39 for SLR cameras (after 1967). Flange focal distance - 45,5 mm
4) Version for half-frame cameras (18×24 mm). Flange focal distance - 27,5 mm |
|
| Back to top |
|
|
cyberjunkie
Joined: 24 Mar 2010
Posts: 282
Location: Chiang Mai, Bologna, Amsterdam
|
| Posted: Sun Jan 21, 2018 3:10 pm Post subject: |
|
|
cyberjunkie wrote:
| tomasg wrote: |
| Paolo, Lightshow showed you waht you have to do....just do that, or if you are skeptical... |
I tried but the optical block does not unscrew.
I see no grub screws, it must be stuck.
I have to find a tool that allows to apply more force. I have a couple options at home, but here I have nothing at hand.
I think i will try to find one of those collars that can be adjusted with a screwdriver, the same kind used for a water hose for example, protect the front of the lens with some plastic before clamping the collar, and then gently hammer on the screw head to free the optical block from the helicoid.
I have seen a video where the optical assembly is easily unscrewed by hand, holding the front by the preset/diaphragm rings, but if a lot of force has to be applied I am afraid I could damage the diaphragm mechanism. Maybe the right place to clamp would be the thin, black area at the front, leaving alone the two rings.
It is very thin though...
What do you think?
Thanks for the feedback, and thanks also for the interesting information about the various registers.
I knew about the half frame and the LTM, but I had no idea that after 1967 the register of other M39 cameras changed a little (which is not really so little, in this case).
cheers
Paolo
_________________
Pentax Bodies: 6x7, K2, MX, LX, Super A, Z-1, K-1, K-5 II, K-01, K10D, K200D
Other cameras: Leica CL, Leica M5, Rolleiflex, Mamiya Super 23, Horizont, and many bellows cameras from 4x5" to 8x10"
- Shooting only digital recently, FF and APS-C
- Collecting vintage large format lenses (plenty of them )
- Looking for Pentax-A* 200mm Macro and Pentax-A* 1.8/135mm, Sigma 150mm or 180mm Macro PK, Sigma 50-500 AF PK, Enna 1.5/85mm M42; selling Pentacon Six/Pentax 67/Mamiya Press/Leica M/Rolleiflex/4x5"/Manfrotto stuff
MY BELOVED PK, M42 LENSES
Photographica sets
On sale |
|
| Back to top |
|
|
tomasg
Joined: 01 Nov 2009
Posts: 1135
Expire: 2014-04-28
|
| Posted: Sun Jan 21, 2018 7:48 pm Post subject: |
|
|
tomasg wrote:
Yes try to hold only the front part of the lens avoiding the two rings. Use some kitchen rubber gloves on the front, they are miraculous sometimes And no hammering whatsoever!
Take a look at my signature for tutorials 
Tomas |
|
| Back to top |
|
|
Lightshow
Joined: 04 Nov 2011
Posts: 3669
Location: Calgary
|
| Posted: Mon Jan 22, 2018 3:19 pm Post subject: |
|
|
Lightshow wrote:
Set the preset ring, the aperture ring and the focus ring to half way positions, this will protect things from bending or breaking.
Grasp the grip around the mount, and grasp the optics section(everything above the focus ring), and turn the optics section in a CCW (counter clockwise) direction to unscrew it. There should be no grub/set screws.
_________________
A Manual Focus Junky...
One photographers junk lens is an artists favorite tool.
My lens list
http://www.flickr.com/photos/lightshow-photography/ |
|
| Back to top |
|
|
cyberjunkie
Joined: 24 Mar 2010
Posts: 282
Location: Chiang Mai, Bologna, Amsterdam
|
| Posted: Mon Jan 22, 2018 3:54 pm Post subject: |
|
|
cyberjunkie wrote:
| tomasg wrote: |
Yes try to hold only the front part of the lens avoiding the two rings. Use some kitchen rubber gloves on the front, they are miraculous sometimes And no hammering whatsoever!
|
Of couse gentle hammering, with a rubber or wooden hammer (the former is better).
I wouldn't exclude this method.
I am beginner with reflex lenses, but i am a large format lens collector and I've opened many of them.
An example of success with the clamp/hammer system.
Years ago i bought for very cheap a petzval from phtografica.de (the largest Ebay shop of its kind). They could not open the lens and it was not marked, so i bought it for very cheap. After trying can openers, the tool to remove oil filters from car engines, etc, etc, i tried with the clamp/plastic/hammer. It was a very strange (unheard of, AFAIK) reversed Petzval, and inked on two glasses i found "Voigtland & Sohn, Wien und Braunschweig". Which dates the lens (probably an experiment) before 1862!
Without the hammer it would still be a no-name Petzval of rather low collector value
I'm not encouraging anybody to do the same, just reporting personal experience...
cheers
Paolo
_________________
Pentax Bodies: 6x7, K2, MX, LX, Super A, Z-1, K-1, K-5 II, K-01, K10D, K200D
Other cameras: Leica CL, Leica M5, Rolleiflex, Mamiya Super 23, Horizont, and many bellows cameras from 4x5" to 8x10"
- Shooting only digital recently, FF and APS-C
- Collecting vintage large format lenses (plenty of them )
- Looking for Pentax-A* 200mm Macro and Pentax-A* 1.8/135mm, Sigma 150mm or 180mm Macro PK, Sigma 50-500 AF PK, Enna 1.5/85mm M42; selling Pentacon Six/Pentax 67/Mamiya Press/Leica M/Rolleiflex/4x5"/Manfrotto stuff
MY BELOVED PK, M42 LENSES
Photographica sets
On sale |
|
| Back to top |
|
|
Lightshow
Joined: 04 Nov 2011
Posts: 3669
Location: Calgary
|
| Posted: Mon Jan 29, 2018 9:26 pm Post subject: |
|
|
Lightshow wrote:
There should be no need to hammer anything in a lens.
_________________
A Manual Focus Junky...
One photographers junk lens is an artists favorite tool.
My lens list
http://www.flickr.com/photos/lightshow-photography/ |
|
| Back to top |
|
|
visualopsins

Joined: 05 Mar 2009
Posts: 10531
Location: California
Expire: 2025-04-11
|
| Posted: Mon Jan 29, 2018 10:32 pm Post subject: |
|
|
visualopsins wrote:
| D. P. wrote: |
It seems to me that all problems are caused by ignorance.
In the Soviet Union, four variants of M39 threaded mounting were used.
1) M39 - almost complete analog of LTM (L39). For rangefinder cameras. Flange focal distance - 28,8 mm
2) First version of M39 for SLR cameras (until 1967). Flange focal distance - 45,2 mm
3) Second version of M39 for SLR cameras (after 1967). Flange focal distance - 45,5 mm
4) Version for half-frame cameras (18×24 mm). Flange focal distance - 27,5 mm |

Great information!
_________________
☮☮☮☮☮☮☮☮☮☮☮☮☮☮☮☮☮☮☮☮☮☮☮☮☮☮☮☮☮☮☮☮ like attracts like! ☮☮☮☮☮☮☮☮☮☮☮☮☮☮☮☮☮☮☮☮☮☮☮☮☮☮☮☮☮☮☮☮
Cameras: Sony ILCE-7RM2, Spotmatics II, F, and ESII, Nikon P4
Lenses:
M42 Asahi Optical Co., Takumar 1:4 f=35mm, 1:2 f=58mm (Sonnar), 1:2.4 f=58mm (Heliar), 1:2.2 f=55mm (Gaussian), 1:2.8 f=105mm (Model I), 1:2.8/105 (Model II), 1:5.6/200, Tele-Takumar 1:5.6/200, 1:6.3/300, Macro-Takumar 1:4/50, Auto-Takumar 1:2.3 f=35, 1:1.8 f=55mm, 1:2.2 f=55mm, Super-TAKUMAR 1:3.5/28 (fat), 1:2/35 (Fat), 1:1.4/50 (8-element), Super-Multi-Coated Fisheye-TAKUMAR 1:4/17, Super-Multi-Coated TAKUMAR 1:4.5/20, 1:3.5/24, 1:3.5/28, 1:2/35, 1:3.5/35, 1:1.8/85, 1:1.9/85 1:2.8/105, 1:3.5/135, 1:2.5/135 (II), 1:4/150, 1:4/200, 1:4/300, 1:4.5/500, Super-Multi-Coated Macro-TAKUMAR 1:4/50, 1:4/100, Super-Multi-Coated Bellows-TAKUMAR 1:4/100, SMC TAKUMAR 1:1.4/50, 1:1.8/55
M42 Carl Zeiss Jena Flektogon 2.4/35
Contax Carl Zeiss Vario-Sonnar T* 28-70mm F3.5-4.5
Pentax K-mount SMC PENTAX ZOOM 1:3.5 35~105mm, SMC PENTAX ZOOM 1:4 45~125mm
Nikon Micro-NIKKOR-P-C Auto 1:3.5 f=55mm, NIKKOR-P Auto 105mm f/2.5 Pre-AI (Sonnar), Micro-NIKKOR 105mm 1:4 AI, NIKKOR AI-S 35-135mm f/3,5-4,5
Tamron SP 17mm f/3.5 (51B), Tamron SP 17mm f/3.5 (51BB), SP 500mm f/8 (55BB), SP 70-210mm f/3.5 (19AH)
Vivitar 100mm 1:2.8 MC 1:1 Macro Telephoto (Kiron)
|
|
| Back to top |
|
|
Gott23
Joined: 10 Dec 2018
Posts: 250
|
| Posted: Wed Oct 23, 2019 4:58 pm Post subject: |
|
|
Gott23 wrote:
| Lightshow wrote: |
The optics unscrew from the helicoid and there are shims between the 2, add or remove as required.
|
OK bit of a delayed bump on this thread but thanks for that advice! Been going through my lenses to test them on the Fuji XH-1 and my "zebra" Helios 44 in M39 mount wasn't focusing at infinity. Managed to do the fix on a train it was that quick and simple and it works great now!
Thanks!!
Purely a test shot but this shows how far the focus is going now..
 |
|
| Back to top |
|
|
tomasg
Joined: 01 Nov 2009
Posts: 1135
Expire: 2014-04-28
|
| Posted: Wed Oct 23, 2019 5:13 pm Post subject: |
|
|
tomasg wrote:
And if one day you want to CLA it click on the link in my signature |
|
| Back to top |
|
|
Gott23
Joined: 10 Dec 2018
Posts: 250
|
| Posted: Wed Oct 23, 2019 5:52 pm Post subject: |
|
|
Gott23 wrote:
| tomasg wrote: |
| And if one day you want to CLA it click on the link in my signature |
Noted. 😁
Thankfully it was only really the focus that's an issue on it. Despite looking a touch rough around the edges it's in pretty good condition optically for a lens bought cheap along with a Zenit (quelle surpise.. 😂) |
|
| Back to top |
|
|
alex_d
Joined: 19 Jan 2019
Posts: 322
|
| Posted: Mon Sep 21, 2020 4:13 pm Post subject: |
|
|
alex_d wrote:
Im (not) happy to say that if you have just 1 thick alu ring and you remove it,
then aperture ring will be (very possible) blocked.
So its necessary to have a few thin rings to adjust the infinity but also to allow aperture ring to move freely. |
|
| Back to top |
|
|
Lightshow
Joined: 04 Nov 2011
Posts: 3669
Location: Calgary
|
| Posted: Tue Sep 22, 2020 3:28 am Post subject: |
|
|
Lightshow wrote:
Ideally you would have a thick ring and a couple thin rings to get the shim thickness correct, but they may have just used a single thick ring that they would sand/file down to the required thickness.
This is my preferred way so you can use the lens on any M42 adapter alongside other M42 lenses.
The other way is to modify an M42 adapter for mirrless cameras, the ones that have a chromed brass insert that's held in by set screws, you can file/sand the rear of the insert to reduce the Registration or add shims to increase it, both will work, but you would have to Cary multiple adapters, one dedicated to the lens.
To make the shims from shim stock wouldn't be simple onless you have access to a lathe, then you can make 2 sets of dies to clamp the shim stock and turn away the excess.
Without access to a lathe, you can still make the shims relatively easy, you'll need 2 round bars with the correct diameter (or one with 2 diameters on each end, and clamp the shim stock to the end of the rod against a flat surface, use a sharp razor blade or other tool that is sharp and scratch around the circumference till you break through, then smooth off the edges with sandpaper so they won't cut you. So you would reduce the thickness of a thick shim and then add thin shims to fine tune the thickness.
Of course all this depends on if you can't reach infinity(shim is too thick) or focus past infinity(shim is too thin).
_________________
A Manual Focus Junky...
One photographers junk lens is an artists favorite tool.
My lens list
http://www.flickr.com/photos/lightshow-photography/ |
|
| Back to top |
|
|
alex_d
Joined: 19 Jan 2019
Posts: 322
|
| Posted: Mon Oct 05, 2020 10:05 am Post subject: |
|
|
alex_d wrote:
well, calculated and i need to shim 0.9mm max from this 1 think alu ring.
Have already flattening thick glass with fine sandpaper so it shouldn't be a problem.
well a bit of a mess ... |
|
| Back to top |
|
|
Lightshow
Joined: 04 Nov 2011
Posts: 3669
Location: Calgary
|
| Posted: Mon Oct 05, 2020 8:06 pm Post subject: |
|
|
Lightshow wrote:
Yes, sanding down aluminum is a bit messy, your hands get stained, latex/nitrile gloves help, so can soapy water.
_________________
A Manual Focus Junky...
One photographers junk lens is an artists favorite tool.
My lens list
http://www.flickr.com/photos/lightshow-photography/ |
|
| Back to top |
|
|
alex_d
Joined: 19 Jan 2019
Posts: 322
|
| Posted: Mon Oct 05, 2020 9:08 pm Post subject: |
|
|
alex_d wrote:
well, been sanding down the head of one of my two strokers recently - imagine the mess,
this tiny ring is a piece of the cake,
but still have to do it in the kitchen, so .. |
|
| Back to top |
|
|
|
|


