| View previous topic :: View next topic |
| Author |
Message |
fstop
Joined: 11 Apr 2010
Posts: 29
|
 Posted: Sun Apr 11, 2010 4:10 am Post subject: adjust focus of Canon fd 35-105 f/3.5 zoom lens Posted: Sun Apr 11, 2010 4:10 am Post subject: adjust focus of Canon fd 35-105 f/3.5 zoom lens |
 |
|
fstop wrote:
Hello, forum readers, first post.
I have a Canon fd 35-105 f/3.5 zoom lens that I obtained a while ago. I haven't used it much yet. I took it out for shooting a roll to test out a "new" camera recently and noticed that there are apparently two problems with the zoom lens.
First, it does not focus at infinity at the wider end (35 mm focal length). It is as if I need to turn the focus ring a tiny bit more past its limit to get the infinity in focus. The second problems is that if I focus on something and move the zoom ring, I have to adjust the focus again by a bit at the new focal length.
I have some experience in opening up and fixing my manual focus cameras. I have also opened a couple of lenses, one was a Canon fd 50mm f/1.8 lens and the other was a Canon EF zoom lens. So I have some experience in this, but I wouldn't call myself an expert by any measure.
So, other than the last resort of having to ship it to somebody for repairs (would cost too much), can somebody here share their experiences in opening this lens and fixing these problems? It would be much appreciated.
Thanks. |
|
| Back to top |
|
 |
unclemack

Joined: 21 Jun 2009
Posts: 51
Location: UK frozen north
|
| Posted: Sun Apr 11, 2010 2:02 pm Post subject: |
|
|
unclemack wrote:
If the focus ring doesn't feel slack and if the lens generally feels solid enough then one of the bushes may be breaking up or its screw may have become loose. One problem causing two apparent symptoms. Zooming usually feels "lumpy" when this happens or you may feel "backlash" as you change zoom direction.
Lens groups are moved forwards & backwards as lens is zoomed by means of these bushes and the slots in which they slide.
Straight slots fore-and-aft with bushes prevent groups rotating, bushes in slots of a generally helical(-ish) shape move the groups forwards & backwards as required.
Each bush, usually of white nylon or PTFE is held by a screw into a threaded hole in one of the alloy tubes. The tubes are often only around 1.5mm. wall thickness so if a screw becomes loose it will quickly enlarge the screw hole and this becomes a difficult repair unless you can replace the part. TIG welding, drilling & tapping the thread & re-anodising is possible but not really a DIY job.
Retapping with a slightly larger thread & an appropriately remanufactured screw is easier but still only worthwhile for an expensive lens for which parts are unobtainable.
If you catch it soon enough - and you're lucky - you can sometimes just replace the bush or tighten the screw.
The EF zooms mostly used plastic mouldings to replace this construction method very successfully IIRC. |
|
| Back to top |
|
|
fstop
Joined: 11 Apr 2010
Posts: 29
|
| Posted: Sun Apr 11, 2010 6:10 pm Post subject: |
|
|
fstop wrote:
Thanks for the overview. I don't feel any backlash or slack when I change focus or the zoom. The lens feels quite solid. In the past, the photos have turned out quite nice, including in macro mode. It is only when I explicitly checked for it that I noticed the error.
BTW, I checked the lens again last night by using another camera with a known good lens as a makeshift collimator. I noticed the small error at 35mm focal length when the lens does not go far enough to get infinity in focus. I also noticed that once I focus at maximum distance at 35 mm focal length and then zoom to 105 mm focal length, I need to turn the focusing ring *back* a bit to get infinity into focus, i.e. at the longer end, 105 mm, it focuses past infinity when the focusing ring is turned all the way. Just to give an idea, I have to turn back the focusing ring for around 5 mm from its maximum distance position to get infinity into focus at 105 mm focal length. |
|
| Back to top |
|
|
marty

Joined: 09 Apr 2009
Posts: 767
Location: Italy
|
| Posted: Sun Apr 11, 2010 7:04 pm Post subject: |
|
|
marty wrote:
Hello, there.
Maybe under the focus rubber grip there are the infinity adjust screws. Other than that cannot help. Pity not getting it fixed it's quite good lens. Try asking at kyphoto.com forum there are competent people there, I've been given good tips on repair matter.
Cheers, M.-
_________________
Canon FD
Bodies: AT-1, A-1, T-90
Lenses: nFD 20mm f2.8, 24 f2.8, 28 f2.8, 35 f2, FD 50 f1.8 S.C., 85 f1.8, 100 f2.8, 135 f2.8, 200 f4, 300 f4
|
|
| Back to top |
|
|
unclemack
Joined: 21 Jun 2009
Posts: 51
Location: UK frozen north
|
| Posted: Sun Apr 11, 2010 7:39 pm Post subject: |
|
|
unclemack wrote:
Hi, busy just now, full details in an hour. |
|
| Back to top |
|
|
unclemack
Joined: 21 Jun 2009
Posts: 51
Location: UK frozen north
|
| Posted: Sun Apr 11, 2010 8:42 pm Post subject: |
|
|
unclemack wrote:
OK. The infinity adjustment on this lens is immediately behind the distance scale part of the focus ring.
To reach it lift & slide the "rubber" cover (rearwards of course). Try not to stretch it more than absolutely necessary, it's not very elastic. You could slide it right off the back of the lens but if it stretches... it may never fit tightly again.
There's clear tape under it and under that you can see 3 screws & a join in the focus ring 1/4" from the distance scale.
You could just cut the tape at the join & pull back the scale - but you can work more easily if you remove the 3 screws you see in the focus ring & pull off the complete front assembly. This assembly has 6 holes, only relevant if you want the inscription on the lens to go back to the same place. Then the rubber ring slides easily off the front & you can see what you're doing.
The brass inf. stop has 3 locking screws & 7 possible holes.
Pretty obvious from here I think. Adjust, remove tape & retape, slide rubber ring on beyond final position, refit front lens assy., slide rubber into position.
Tape doesn't have to cover the screw heads.
If you have any Q's once you've started let me know. |
|
| Back to top |
|
|
unclemack
Joined: 21 Jun 2009
Posts: 51
Location: UK frozen north
|
| Posted: Sun Apr 11, 2010 8:52 pm Post subject: |
|
|
unclemack wrote:
Sorry, just reread your 6:10pm. post. Was in a rush.
Not reaching inf. at 35mm. yet "beyond inf." at 105mm. does strongly indicate that one internal group isn't moving correctly.
As I said in my first post, early attention may save the lens.
A description of the complete job is more than I have time for though.
Sorry again. |
|
| Back to top |
|
|
fstop
Joined: 11 Apr 2010
Posts: 29
|
| Posted: Mon Apr 12, 2010 2:15 am Post subject: |
|
|
fstop wrote:
| unclemack wrote: |
Sorry, just reread your 6:10pm. post. Was in a rush.
Not reaching inf. at 35mm. yet "beyond inf." at 105mm. does strongly indicate that one internal group isn't moving correctly..... |
When I read your first post about the instruction to correct infinity focus, I had my hopes raised. But then I read this one and had them dashed 
But seriously though, I appreciate your responses. I was more or less already thinking of when I can get some time this week to fix the infinity focus while reading your first response. But after reading this one, I am going to leave the lens alone for now, till I gain more knowledge on how to go about fixing it.
If you find some time how your hands, no hurry though, and feel like listing the steps, please do so, it would be great. And not just for me, it would be beneficial for all the readers interested in this of course.
Thanks. |
|
| Back to top |
|
|
fstop
Joined: 11 Apr 2010
Posts: 29
|
| Posted: Mon Apr 12, 2010 11:22 pm Post subject: |
|
|
fstop wrote:
| unclemack wrote: |
OK. The infinity adjustment on this lens is immediately behind the distance scale part of the focus ring.....
If you have any Q's once you've started let me know. |
I think I will give this approach a try to see if I can mitigate the problem somewhat. Meanwhile, I will wait till I find an online resource that shows how to reach middle elements to fix the problem you mentioned in your newer post.
Does somebody here have a repair manual or guide that shows how to disassemble this lens? Exploded diagrams will also be of great help.
Thanks for all your comments and instructions, Uclemack. |
|
| Back to top |
|
|
fstop
Joined: 11 Apr 2010
Posts: 29
|
| Posted: Tue Apr 13, 2010 3:26 pm Post subject: |
|
|
fstop wrote:
To give the infinity focus adjustment a shot, as described by Uclemack, I am trying to remove the rubber ring grip beside the distance scale of this lens. The grip appears to be glued to the lens body. What is the usual method to un-stick and remove it with least damage? Would a few drops of naphtha be advisable? Or should I just try to pry the grip free from the body? |
|
| Back to top |
|
|
fstop
Joined: 11 Apr 2010
Posts: 29
|
| Posted: Tue Apr 13, 2010 9:48 pm Post subject: |
|
|
fstop wrote:
I managed to slide the focus rubber grip ring rearwards. It was easier to insert a folded postit under it from the distance scale side and then to gradually slide the rubber ring rearwards and over the distance scale. The postit helped the ring to go over the scale, which otherwise was sort of blocking it.
Now at this stage, as Unlemack mentioned, I should see three screws. However, I see only two as shown in the macro photo here (the photo shows the rubber ring slid towards the front to show the screws, also, the clear tape has dislodged from the focus ring in the process):
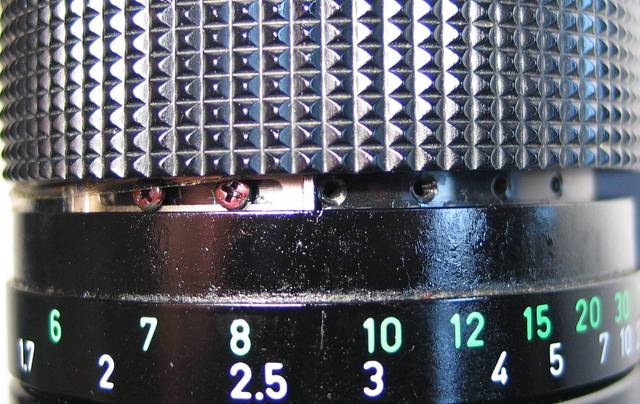 . .
There are four vacant screw holes as well. Is this what is normal in this lens? Also, these two are all the screws I see just by sliding the rubber grip back or forward. Am I missing something? And, how should I proceed next to do infinity focus adjustment?
Thanks. |
|
| Back to top |
|
|
unclemack
Joined: 21 Jun 2009
Posts: 51
Location: UK frozen north
|
| Posted: Wed Apr 14, 2010 3:01 am Post subject: |
|
|
unclemack wrote:
"The brass inf. stop has 3 locking screws & 7 possible holes."
You're right, I should have said "2 or 3" but that is the adjuster.
And when you pull the rubber back you really can't see 3 screws in the focus ring? 120 degrees apart, under the tape, 4mm. back from the front edge of the rubber ring? |
|
| Back to top |
|
|
fstop
Joined: 11 Apr 2010
Posts: 29
|
| Posted: Wed Apr 14, 2010 3:21 am Post subject: |
|
|
fstop wrote:
| unclemack wrote: |
"The brass inf. stop has 3 locking screws & 7 possible holes."
You're right, I should have said "2 or 3" but that is the adjuster.
And when you pull the rubber back you really can't see 3 screws in the focus ring? 120 degrees apart, under the tape, 4mm. back from the front edge of the rubber ring? |
When I pull the rubber ring back, I don't see any screws within the front 8 mm or so of the collar that the rubber was covering. Based on your reply, looks like I am missing something very obvious. Let me describe a bit more what I did.
1. I slid the rubber grip ring back across the focus distance markings.
2. As I did so, I could see the 1 cm or so wide transparent sticky tape. The lens collar under the rubber ring grip was also sticky (similar to the stickiness caused by electrical insulating tape).
3. Also, when I slide the rubber ring back, the distance scale also slid with it, escaping from under the transparent tape.
4. As the distance scale ring collar became free from the tape, I slide the rubber ring towards the front of the lens barrel and this showed the two screws under the original position of the distance scale (as shown in the photo in my last post).
But I did not notice any other screws spaced by 120 degrees around the collar under the rubber grip. Do I need to uncover/remove anything else as well to get view/access of those screws? The tape that you mentioned above, is that the approx 1 cm wide transparent tape under the rubber beside the distance scale I saw or is it a different one? |
|
| Back to top |
|
|
unclemack
Joined: 21 Jun 2009
Posts: 51
Location: UK frozen north
|
| Posted: Wed Apr 14, 2010 3:49 am Post subject: |
|
|
unclemack wrote:
Peering under the rubber ring isn't ideal as you've found.
Your best option may be to pull it further back & park it on the zoom ring, then you can see what you're doing.
No need to remove the front group, you can adjust inf. without. It was just to get the rubber ring out of the way.
I'm really short of time just now but:
The scale should be firmly taped to the other part of the focus ring so your lens may have been "repaired" already.
Slightly loosen the 2 screws & adjust focus, maybe it'll be an improvement, hope so. |
|
| Back to top |
|
|
fstop
Joined: 11 Apr 2010
Posts: 29
|
| Posted: Wed Apr 14, 2010 4:30 am Post subject: |
|
|
fstop wrote:
Okay, will try as you suggest, pulling the rubber ring all the way back till I see the whole collar under it. Then loosening the two screws and adjusting the collar. I will report back how it went.
Thanks for the help so far, really appreciate it. |
|
| Back to top |
|
|
fstop
Joined: 11 Apr 2010
Posts: 29
|
| Posted: Wed Apr 14, 2010 4:31 pm Post subject: |
|
|
fstop wrote:
Last night I gave it another try. Note that I am doing this sort of a thing for the first time on an fd lens am proceeding slowly. I have, however, opened and reassembled a USM zoom lens once successfully - needed to clean an inner element.
So, last night I pulled the focus rubber ring grip all the way back till it touched the zoom rubber ring grip. That revealed the collar under it, from the adjuster screws (x2) till the front end of the collar. No three screws separated by 120 degrees! The only screws I see are the two on the brass adjuster.
Also, I checked the focus carefully and I see what Unclemack meant by an inner adjustment being required if infinity focus is off in a different way at both ends of the zoom. Moving the adjuster brass clip is not going to sort the problem out, in fact, fixing it on end will make the error larger on the other end of the zoom.
So, next up is the procedure on how to do the inner element adjustment. Anybody know how to proceed?
I see two sets of screws around the lens barrel. One set is on the ring that has the mount lock button. The other set is between the aperture ring and the zoom ring, on the collar which has the orange zoom index mark. I am expecting one of these sets are the starting point. |
|
| Back to top |
|
|
balazer
Joined: 09 Sep 2012
Posts: 7
|
| Posted: Sun Sep 09, 2012 2:24 am Post subject: |
|
|
balazer wrote:
To make the Canon FD 35-105 mm f/3.5 lens be parfocal, more than likely you need to adjust the back focus (lens-to-flange distance), and nothing else.
Just in front of the aperture ring is a black plastic ring with "35-105mm" in green letters, an orange line, and a serial number in white. It has three Phillips head screws with the heads painted black. Remove the three screws. The black plastic ring can now slide forward, revealing four more Phillips head screws. With the lens pointed downwards, loosen those four screws. They'll be tight, so push in with a lot of force so that you don't strip the heads while removing them. With those four screws loosened, the lens's mount and aperture ring are free to slide up and down. If you didn't have the lens pointed downward, the mount could slide off completely, leaving you to figure out how to slide it back on. So don't remove it. You just want to be able to slide it up and down a bit, and then re-tighten the screws when you have it in the right position.
Mount the lens to your camera. Set the aperture to the widest setting and the zoom to the maximum. Focus on a distant object. Set the zoom to the minimum, and adjust the lens-to-flange distance until the picture has sharp focus. Note that with the four screws loosened, the mount can tilt, so be careful to keep the mount's axis aligned with the lens's axis while you're making your adjustments. If in doubt, check for equal focus at the four corners of the image. Repeat these steps until no further adjustment of the lens-to-flange distance is required to have sharp focus across the zoom range with the focus ring in the same position. Re-tighten the four screws that hold the mount in place. You'll want them to be quite tight, as they are supporting the lens's entire weight. |
|
| Back to top |
|
|
dualmp
Joined: 02 Jul 2011
Posts: 25
|
| Posted: Thu Jan 01, 2015 1:39 pm Post subject: |
|
|
dualmp wrote:
@fstop, did you managed to fix the focus? I am having the same issues as you and had tried balazer's suggestion but it didn't work. |
|
| Back to top |
|
|
pfogle
Joined: 03 Jul 2007
Posts: 11
|
| Posted: Sat Jan 16, 2016 3:20 am Post subject: Fixed |
|
|
pfogle wrote:
Thanks guys - I got one of these with focus shift and bad decentering. Used balazer's tip to get it near to par-focal. It still has some residual field curvature, and a slight focus shift, but is hugely improved.
One thing - my lens has 6 screws holding the mount section, not 4. Whole job took about 1 hour, max.
I'm no expert, but following the instructions above, I got a great lens from one that I was ready to junk! |
|
| Back to top |
|
|
Herbert
Joined: 07 Sep 2023
Posts: 26
|
| Posted: Thu Sep 07, 2023 10:15 am Post subject: |
|
|
Herbert wrote:
Hello to all!
I would like to change front glass of a Canon FD 35-105 /f3.5
from a scratched to a mint one (from a non working sample of course).
Will there be any alignment in the Y/Y and Z axis be needed?
Many thanks, all the best. Herbert |
|
| Back to top |
|
|
|
|


