| View previous topic :: View next topic |
| Author |
Message |
55


Joined: 13 May 2013
Posts: 709
Location: U.S.
Expire: 2022-06-15
|
 Posted: Wed Aug 12, 2020 5:35 am Post subject: Konica Hexanon AR 135mm f/2.5 disassembly Posted: Wed Aug 12, 2020 5:35 am Post subject: Konica Hexanon AR 135mm f/2.5 disassembly |
 |
|
55 wrote:
My recently acquired Konica 135 f2.5 had sand in it and needed to be cleaned. And when I searched for disassembly tips, I couldn't find any. So I thought I'd share some of what I learned by taking my 2.5 apart.
Tools used were: Small, flat blade and J.I.S. screwdrivers and a lens spanner. I kept the lens in a large cake pan while working to help keep screws and other small pieces from falling to the floor. And whenever possible, I just partially loosen screws without removing them. That makes reassembly much easier! 
Starting at the front: Extend the sliding hood. Two small, slotted screws are now visible on the barrel. Loosen the lower screw a couple turns. It doesn't need to be removed.
(The higher screw may be connected to the name ring at the front of the lens? I'm not sure.)
The upper barrel will now unscrew. If you need a better grip, try using a rubber glove.
#1

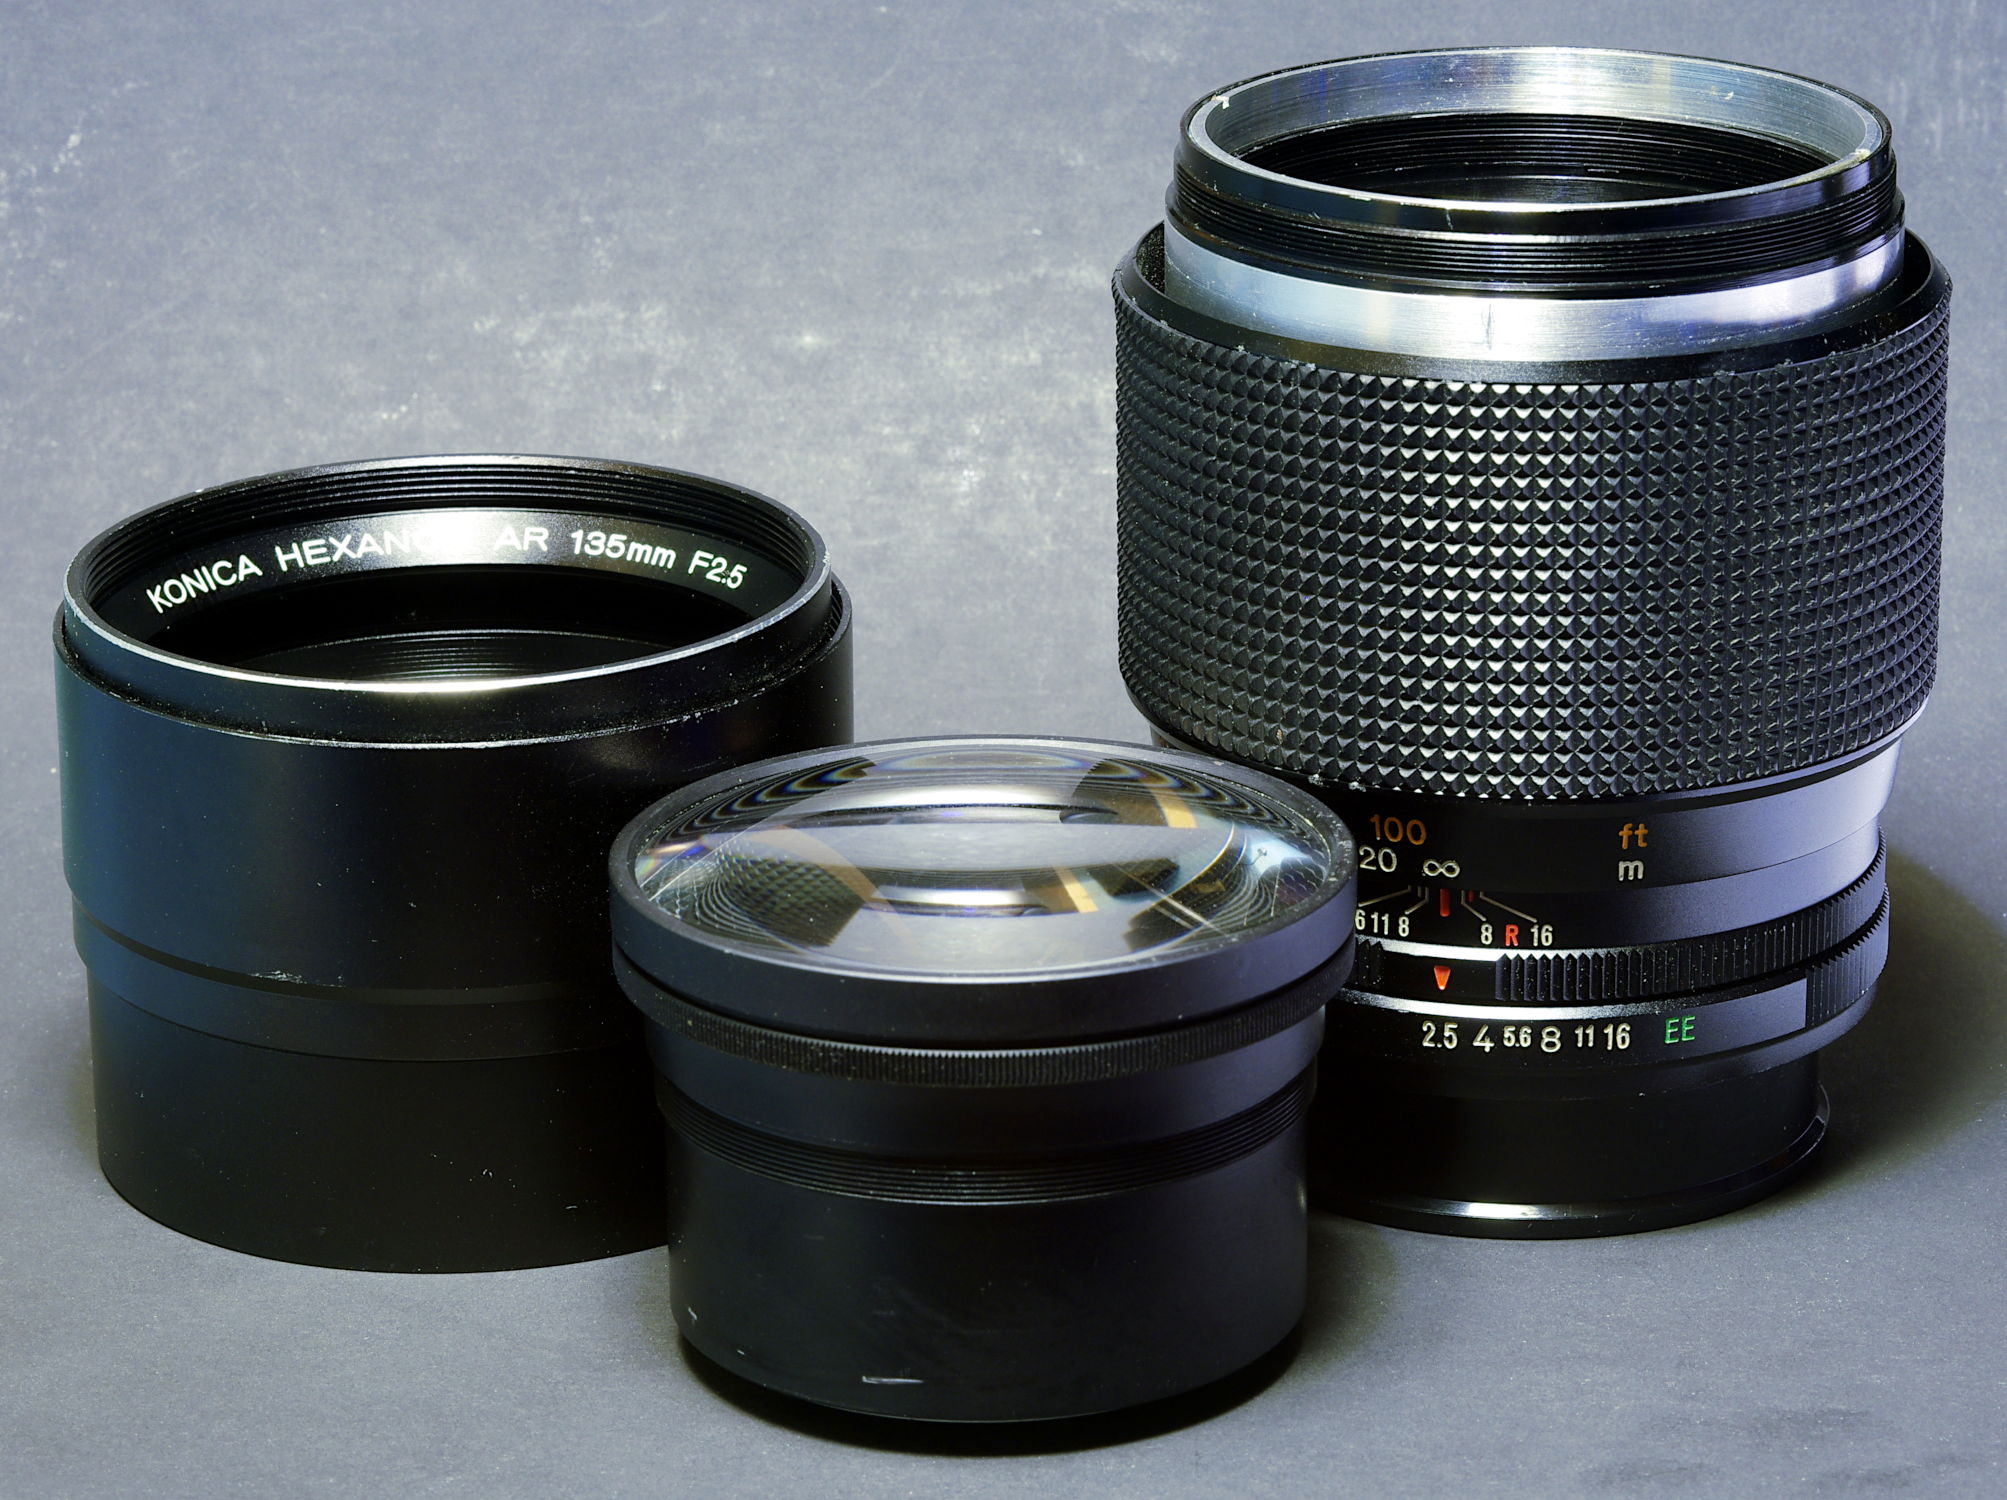
Once the upper barrel is free, the front elements cluster can also be unscrewed.
(Luckily, I didn't have to separate my elements to clean them. But their retaining rings might be glued on, so solvent may be needed for that. Try isopropyl alcohol.)
#2

Focus ring: To remove it, the lower half of the rubber grip needs to be folded back to give access to six screws. It's not necessary to remove the rubber grip completely, but my grip isn't in the next photo simply because it fell apart when I tried to get it off.
(I don't know the best technique for lifting rubber grips without damaging them... Whatever the method, be as gentle as possible. My grip was already torn and simply split apart when I tried to lift / fold it. No problem though. I glued it back on and it works fine. And the rip is noticeable only under close inspection.)
The three smaller, upper screws hold the focus ring to the helicoid. Loosen them, but leave them in place.
The three larger, lower screws hold the distance scale in place. Remove them. The focus ring will now lift off.
(When reassembling, push the focus ring and distance scale down, toward the mount, as far as they'll go. The distance scale has a focus stop bump inside which won't engage if it's too far above the depth of field scale piece.)
#3

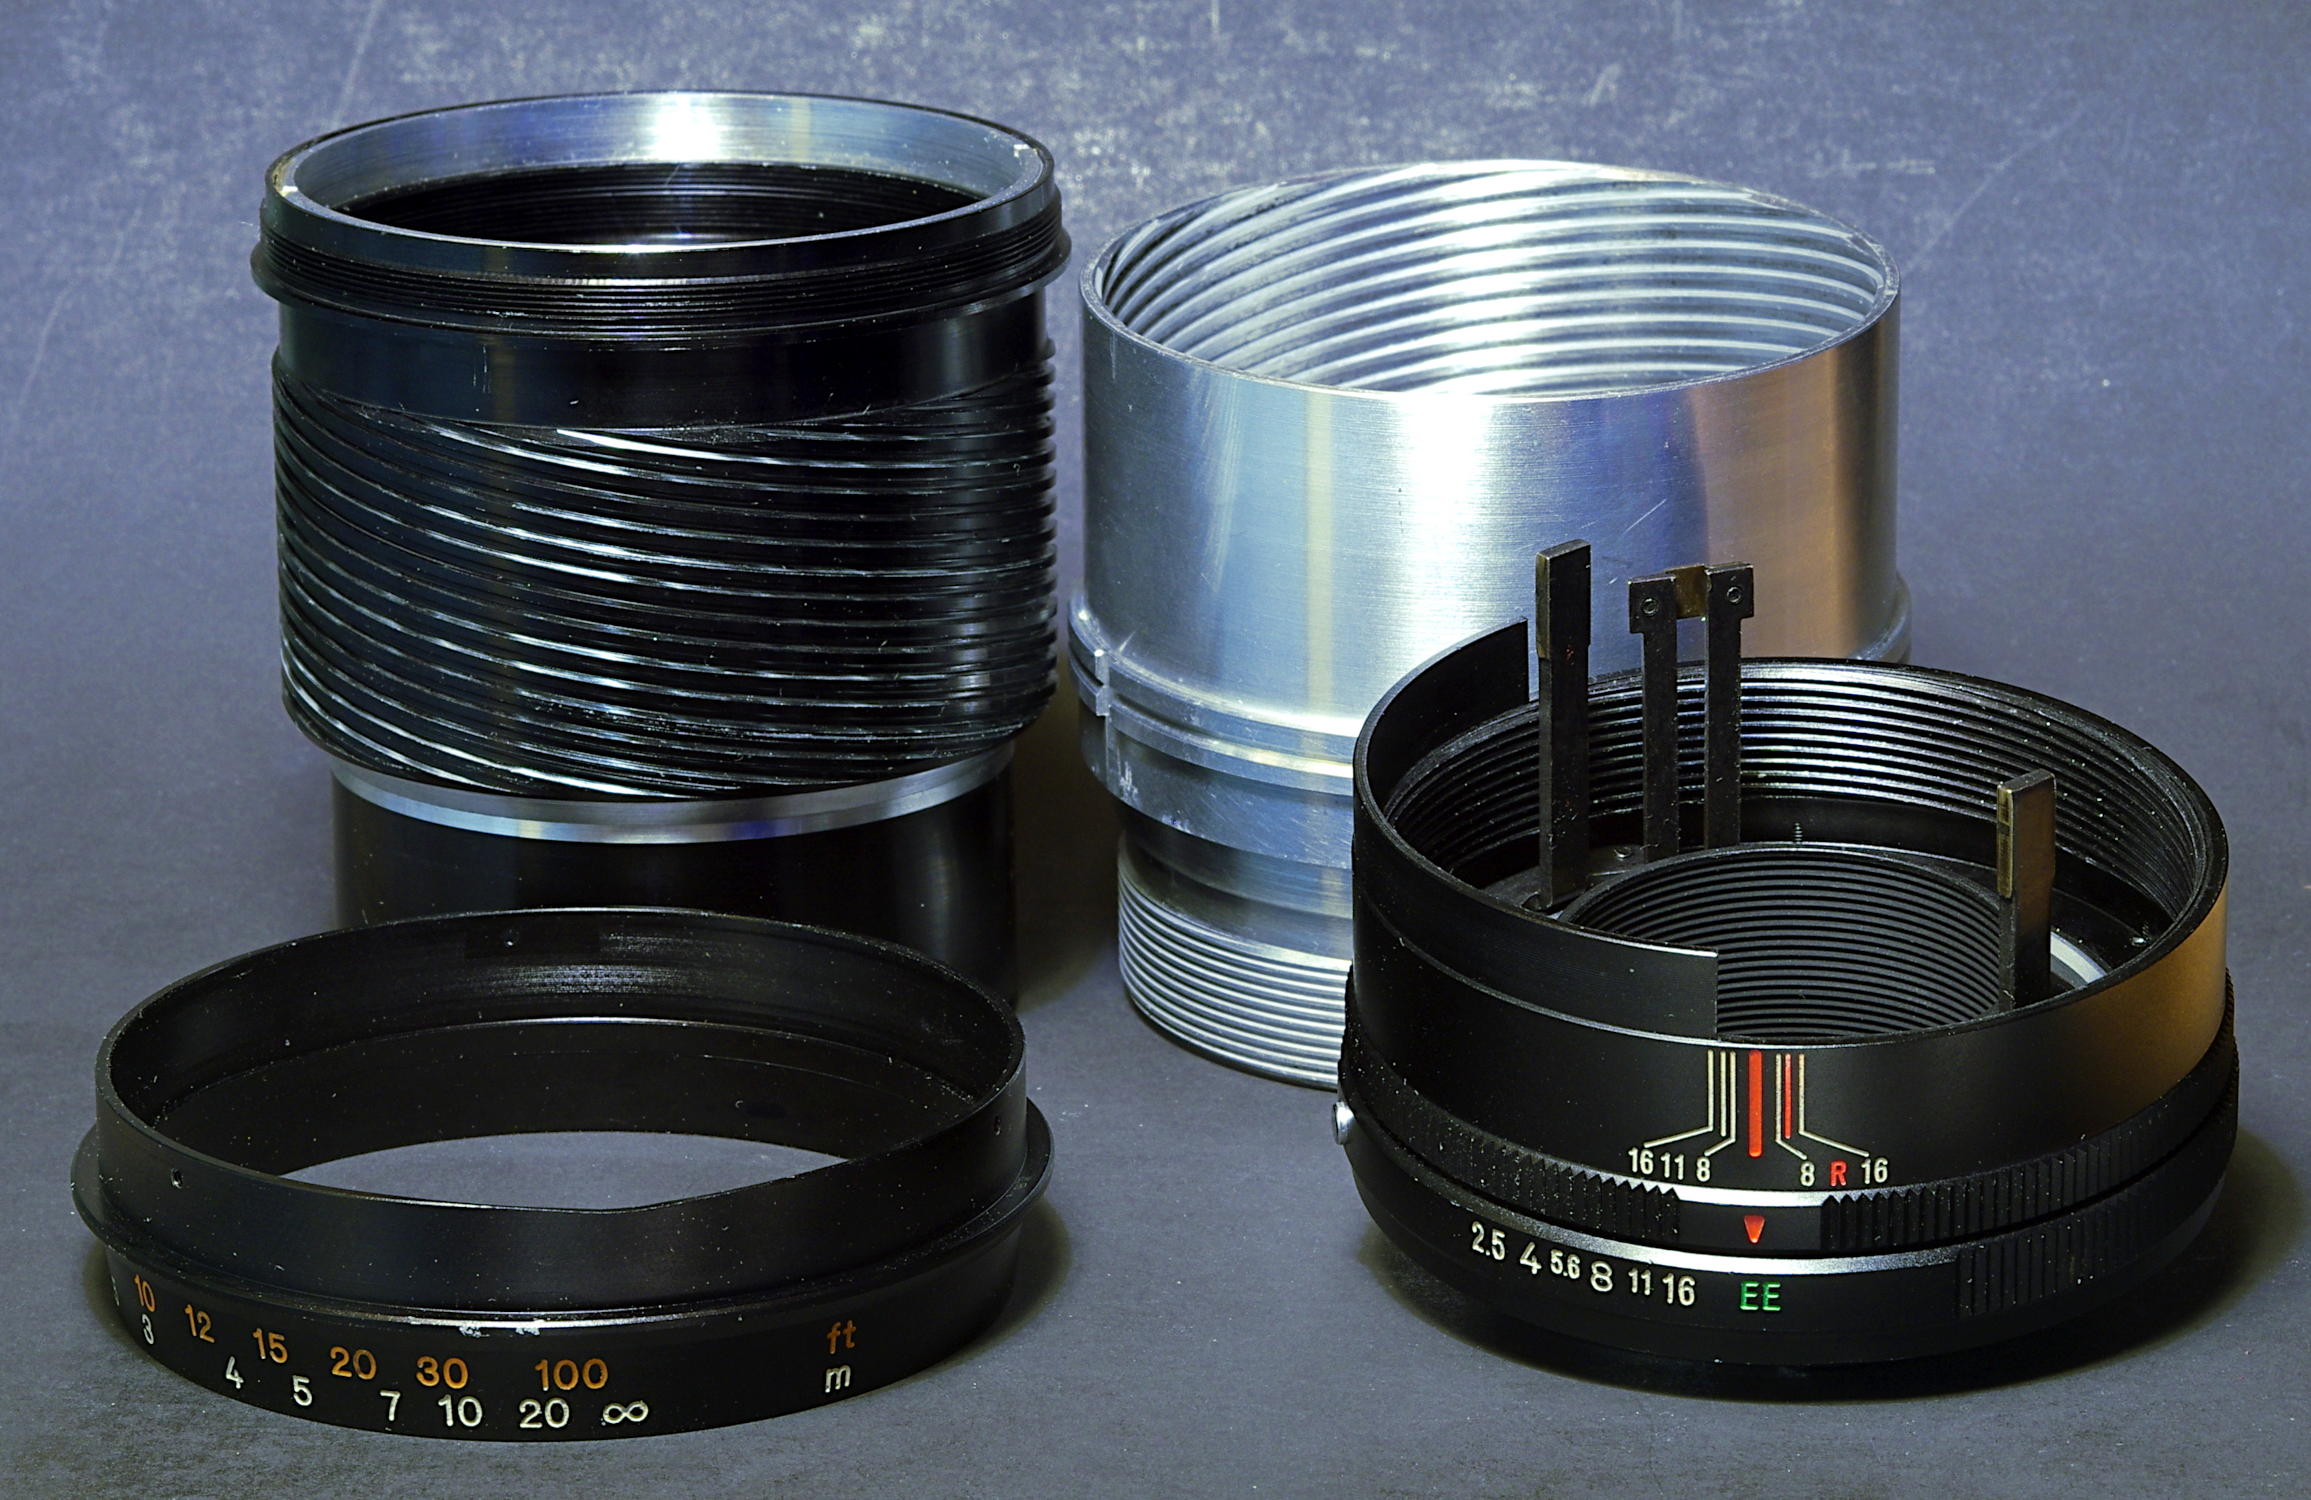
With the focus ring off, the helicoids can be separated and removed along with the distance scale.
(The iris and rear element are inside the black helicoid. I didn't take pictures of the iris hardware because I didn't need to work on mine. But I've included a diagram and parts list later in this post.)
#4

To remove the mount, or simply to gain easier access to the rear element without disassembling the front of the lens:
Remove three screws from the rear baffle and lift it off.
#5

Next remove three screws holding the inner baffle. This baffle can then be rotated and lifted out.
Then remove the four mount screws and the mount will lift off.
(Pay close attention to the orientation of the baffles and screws. I found it easy to get them mixed up!)
#6

EDIT: If you just need to get to the rear element and don't want to bother with the front of the lens, I've added a photo with mount off and the rear element & front of the lens still in place.
In this state, my lens spanner was able to reach the slots of the rear element retainer.
Removing the aperture ring would make for a shorter, easier reach, but I wouldn't recommend taking the ring off unless necessary. For me, it was a headache to get back on.
#7

Finally, to remove the aperture ring: The aperture lever stopper and EE button lock (green arrows) need to come out. Then, the aperture ring will unscrew. Yes, it's threaded on.
(When removing the aperture ring, be careful of the spring loaded, aperture click ball bearings on the top side of the ring. It might be wise to hold the ring inside a bag when separating to prevent the bearings from potentially flying away. Although, my bearings did stay in place. Also, beware of the EE lock spring. I had a tough time to get it back in place.)
The orange arrow screws are tensioners for the sprung ball bearings. I believe one end of the ring has detents for full stops and the opposite side has detents for half stops. My aperture ring's movement was stiff and notchy so I loosened the screws a bit. It did make the ring a little easier to turn, but it's still rough. 
(Don't loosen those tension screws very far or they'll rub against the mount and make the aperture ring hard to turn.)
#8

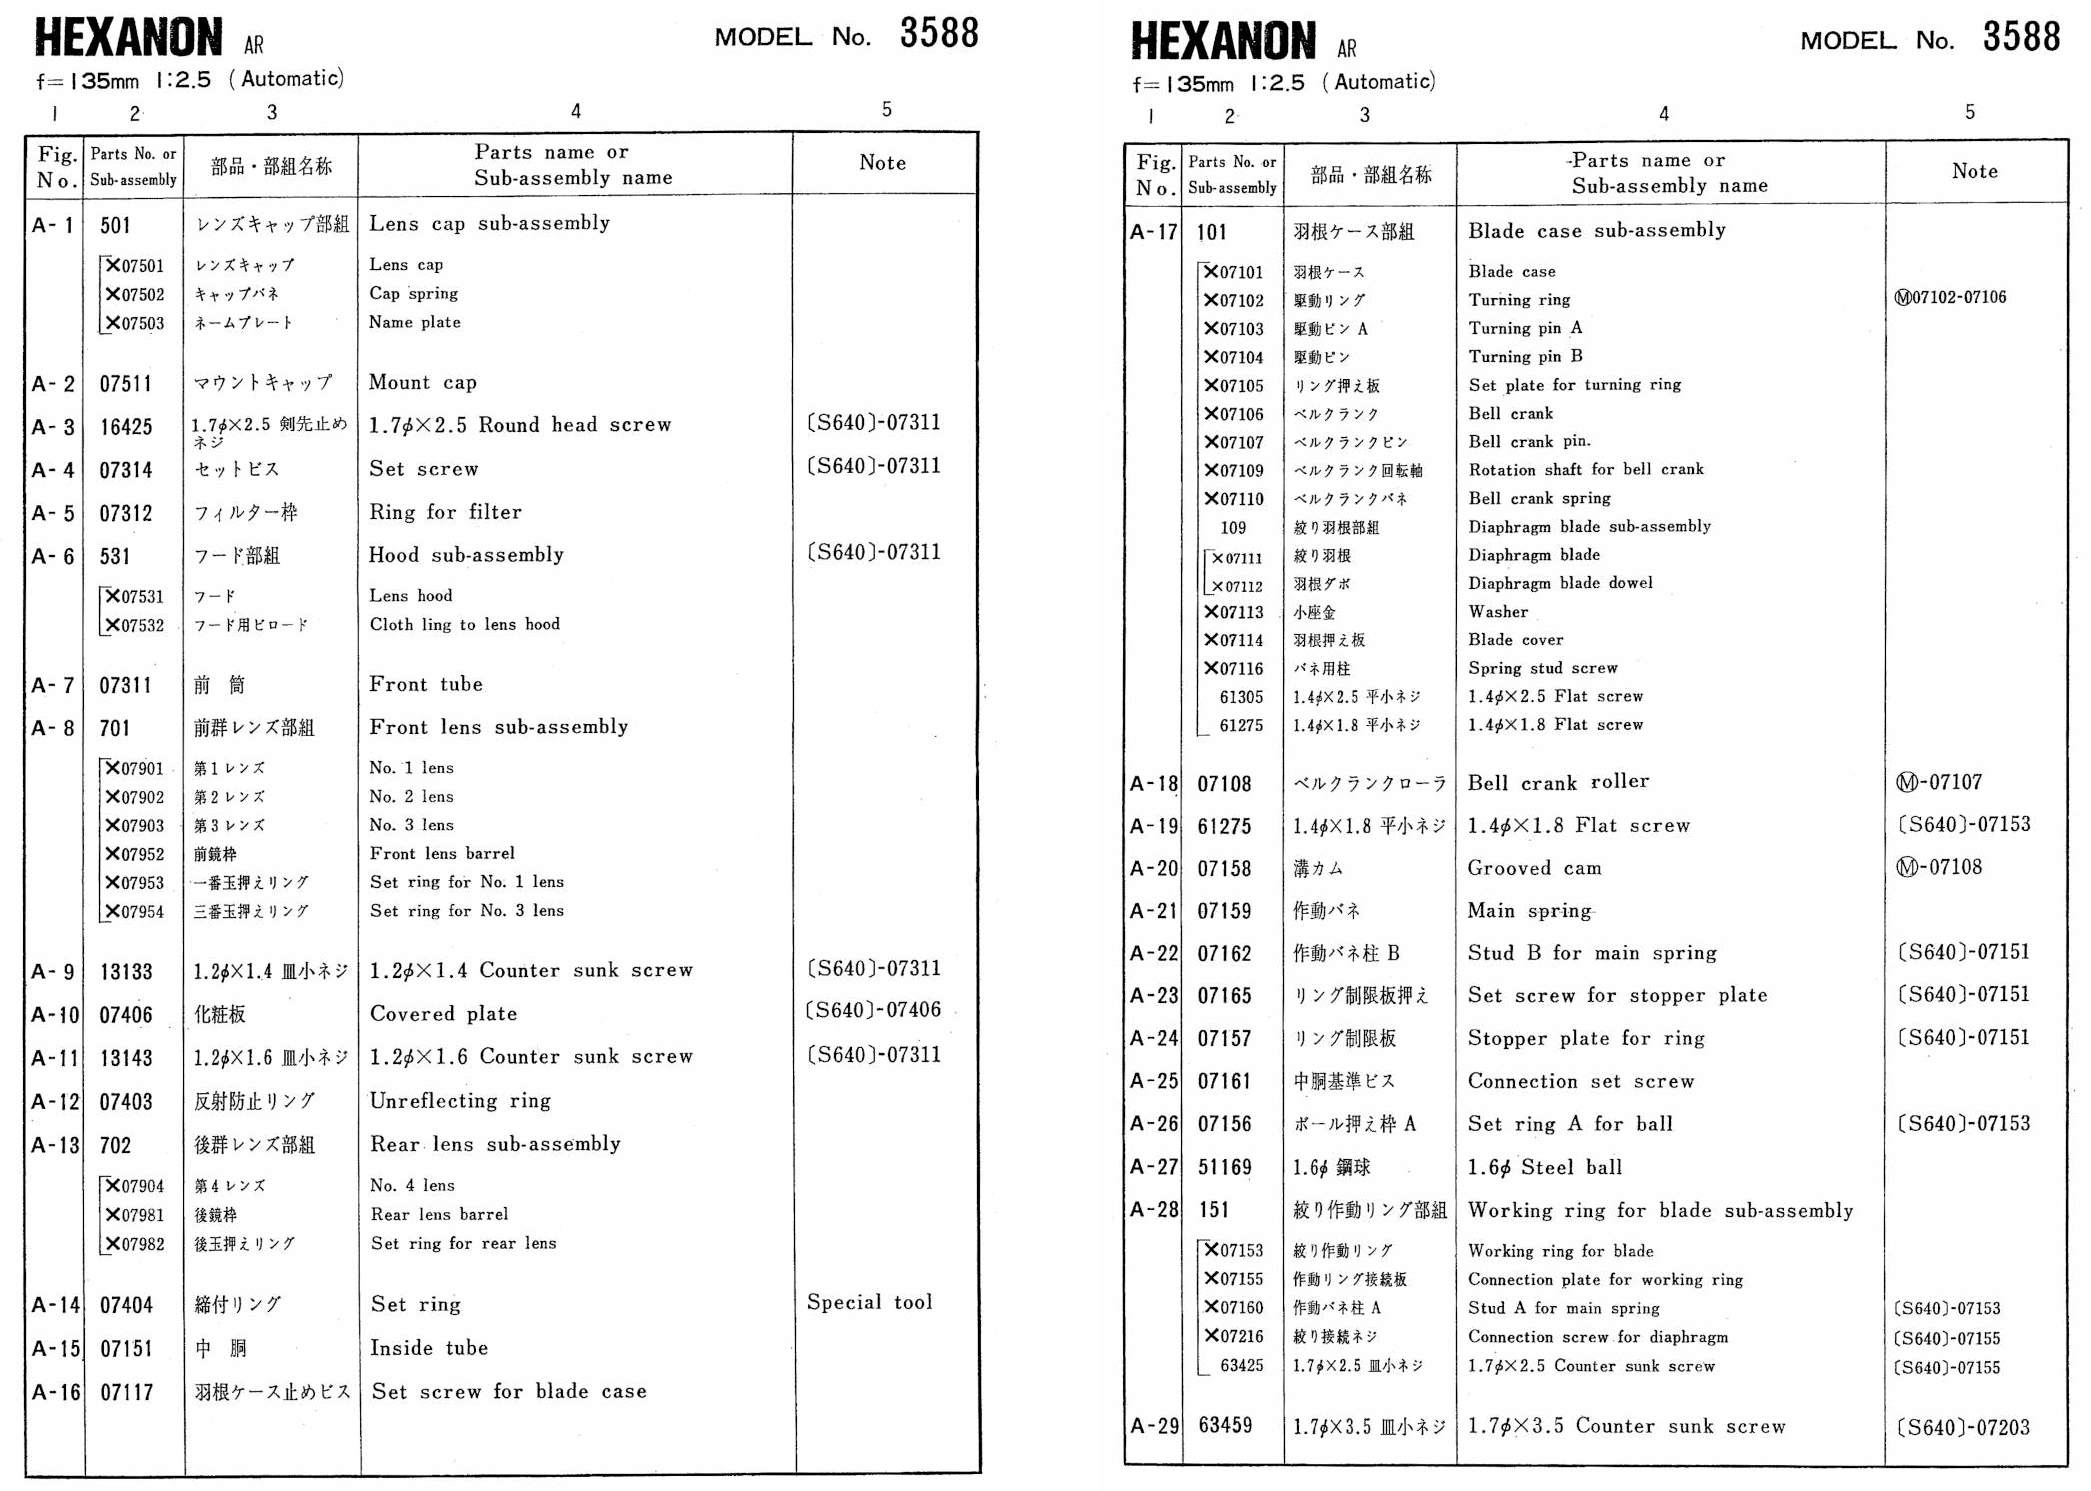
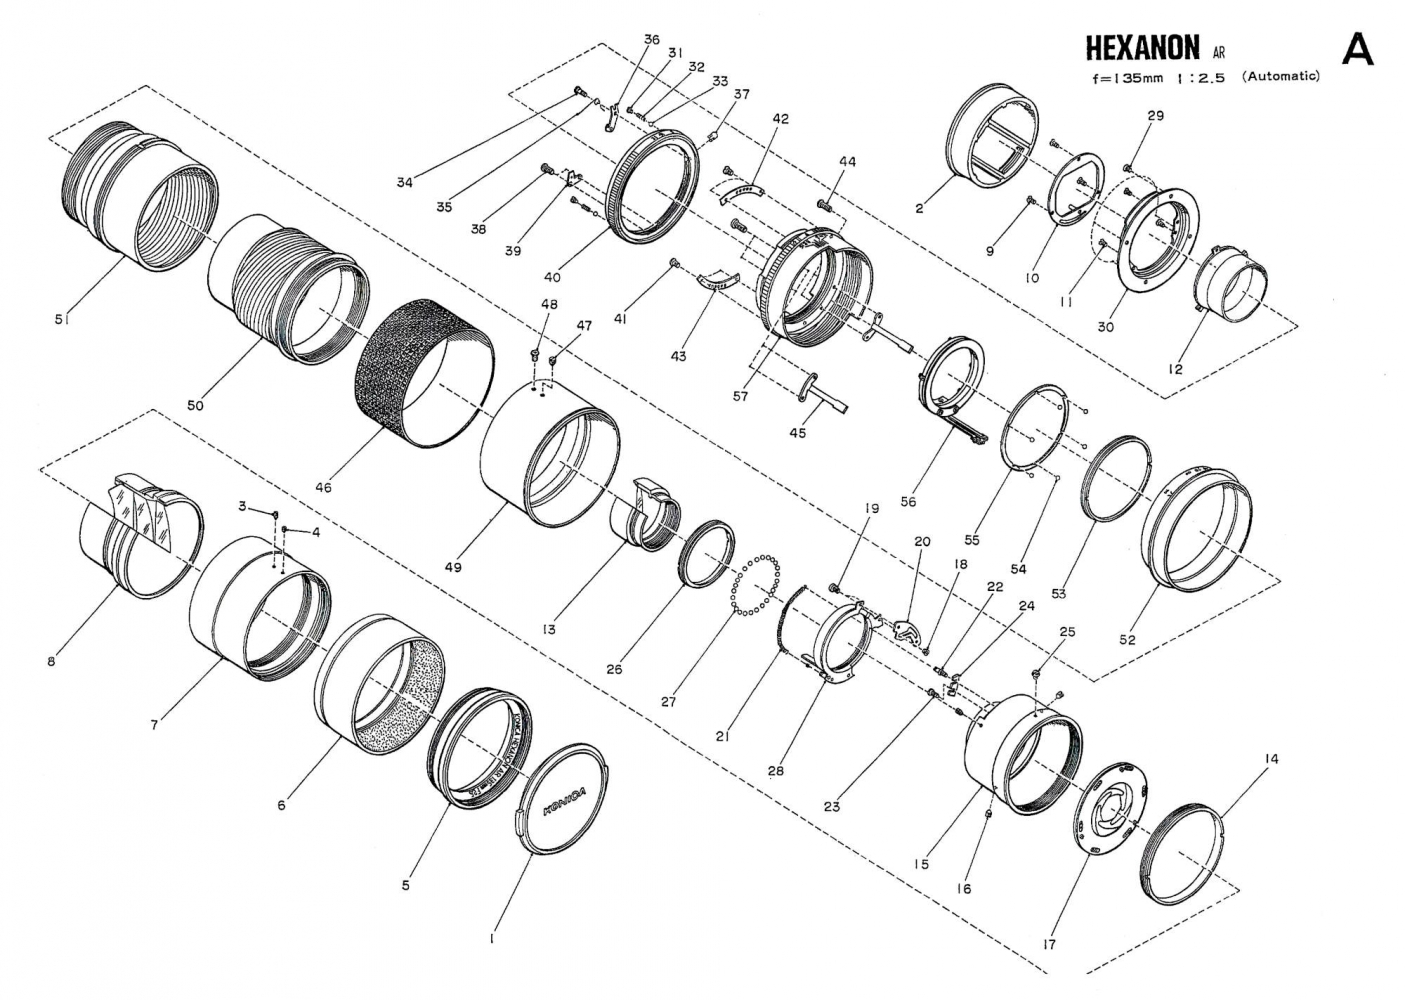
P.S. After I'd finished cleaning my lens, I received a copy of the service manual for the 135 f/2.5.
Courtesy of KONISHIROKU PHOTO IND, CO., LTD, here are scans of the relevant parts pages:
#9
#10

#10

#12

#13

Last edited by 55 on Tue Aug 18, 2020 3:58 am; edited 1 time in total |
|
| Back to top |
|
 |
Oldhand


Joined: 01 Apr 2013
Posts: 6008
Location: Mid North Coast NSW - Australia
|
| Posted: Wed Aug 12, 2020 8:00 am Post subject: |
|
|
Oldhand wrote:
Wonderful tutorial. Very clear.
Thank you
T  |
|
| Back to top |
|
|
55
Joined: 13 May 2013
Posts: 709
Location: U.S.
Expire: 2022-06-15
|
| Posted: Wed Aug 12, 2020 7:13 pm Post subject: |
|
|
55 wrote:
Thanks, Oldhand!
I know I've skipped some details - especially regarding reassembly. But I think there's enough here to help people get started.
And there are many (general) lens repair tutorials online which can help to fill in the blanks I've left.
Edit: In fact, here's a good link (albeit missing some photos):
http://forum.mflenses.com/basic-techniques-to-repair-lenses-and-cameras-t32862.html |
|
| Back to top |
|
|
Zamo

Joined: 08 Feb 2019
Posts: 163
|
| Posted: Thu Nov 26, 2020 12:58 pm Post subject: |
|
|
Zamo wrote:
Thanks a lot, very useful. I have to slightly adjust the screws under the rubber grip, the pictures will come handy to know where they are.... hopefully I do not need to take it all off. |
|
| Back to top |
|
|
55
Joined: 13 May 2013
Posts: 709
Location: U.S.
Expire: 2022-06-15
|
| Posted: Sun Nov 29, 2020 10:06 pm Post subject: |
|
|
55 wrote:
You're welcome, Zamo. Good luck! |
|
| Back to top |
|
|
ektar

Joined: 09 Oct 2019
Posts: 24
|
| Posted: Sat Jun 19, 2021 5:54 am Post subject: |
|
|
ektar wrote:
Bravo, @55! I've just gotten one of these, and it appears I'll need to access everything glass to work on a fair amount of fungus. This will be a major help.
_________________
--
Older than my lenses... |
|
| Back to top |
|
|
55
Joined: 13 May 2013
Posts: 709
Location: U.S.
Expire: 2022-06-15
|
| Posted: Wed Jun 23, 2021 4:24 pm Post subject: |
|
|
55 wrote:
I appreciate the feedback, ektar. If you have any advice about cleaning this lens, feel free to add it here. |
|
| Back to top |
|
|
ektar
Joined: 09 Oct 2019
Posts: 24
|
| Posted: Wed Jun 23, 2021 6:02 pm Post subject: |
|
|
ektar wrote:
I can add a couple little things about the glass in this lens. The front element is held into the front group by a retaining ring. I loosened it using two rubber strap wrenches. Once the ring is off, tap on the outside of the assembly and it will work its way out. The rear element is held in place by a slotted flat ring. That came loose easily with a spanner wrench. Again, tap on the housing and it will come out. Take care that the middle of the three elements doesn't plop out. To access the rear element, you'll have to remove the mount, as described earlier. Focus the lens to infinity (best to do this before disassembly), and use the spanner to loosen the element housing. You'll have to get it all the way loose, then tip the lens to get it lined up to come out. Best to wear gloves. The rear element is held in place by a circular spring in a groove in the housing. There is a hole in the housing to push a fine screwdriver or probe into to dislodge it from the groove. This will let you clean the lens on both sides. Take note of orientation before you take it out of the housing. Putting the rear element/housing back in is a matter of dropping it in and fiddling it into contact with its threads. Easier than it sounds.
HTH!
#1

#2

_________________
--
Older than my lenses... |
|
| Back to top |
|
|
55
Joined: 13 May 2013
Posts: 709
Location: U.S.
Expire: 2022-06-15
|
| Posted: Thu Jun 24, 2021 12:28 am Post subject: |
|
|
55 wrote:
Excellent! Thank you, ektar. 
HTH 
I had to LTU (look that up). 
Yes, your post is helpful. |
|
| Back to top |
|
|
|
|
|
You cannot post new topics in this forum
You cannot reply to topics in this forum
You cannot edit your posts in this forum
You cannot delete your posts in this forum
You cannot vote in polls in this forum
|