| View previous topic :: View next topic |
| Author |
Message |
eddieitman


Joined: 12 Apr 2011
Posts: 1247
Location: United Kingdom
|
 Posted: Sat Oct 22, 2011 9:28 am Post subject: The easy way to clean and re-lube a Carl Zeiss Pancolar 1.8 Posted: Sat Oct 22, 2011 9:28 am Post subject: The easy way to clean and re-lube a Carl Zeiss Pancolar 1.8 |
 |
|
eddieitman wrote:
OK so i had a Pancolar F1.8 that would hardly move, and after posting on the bargain corner that i fixed mine rather easily with just a bit of lighter fluid and no major disassembly a few people expressed interest, so here is a guide
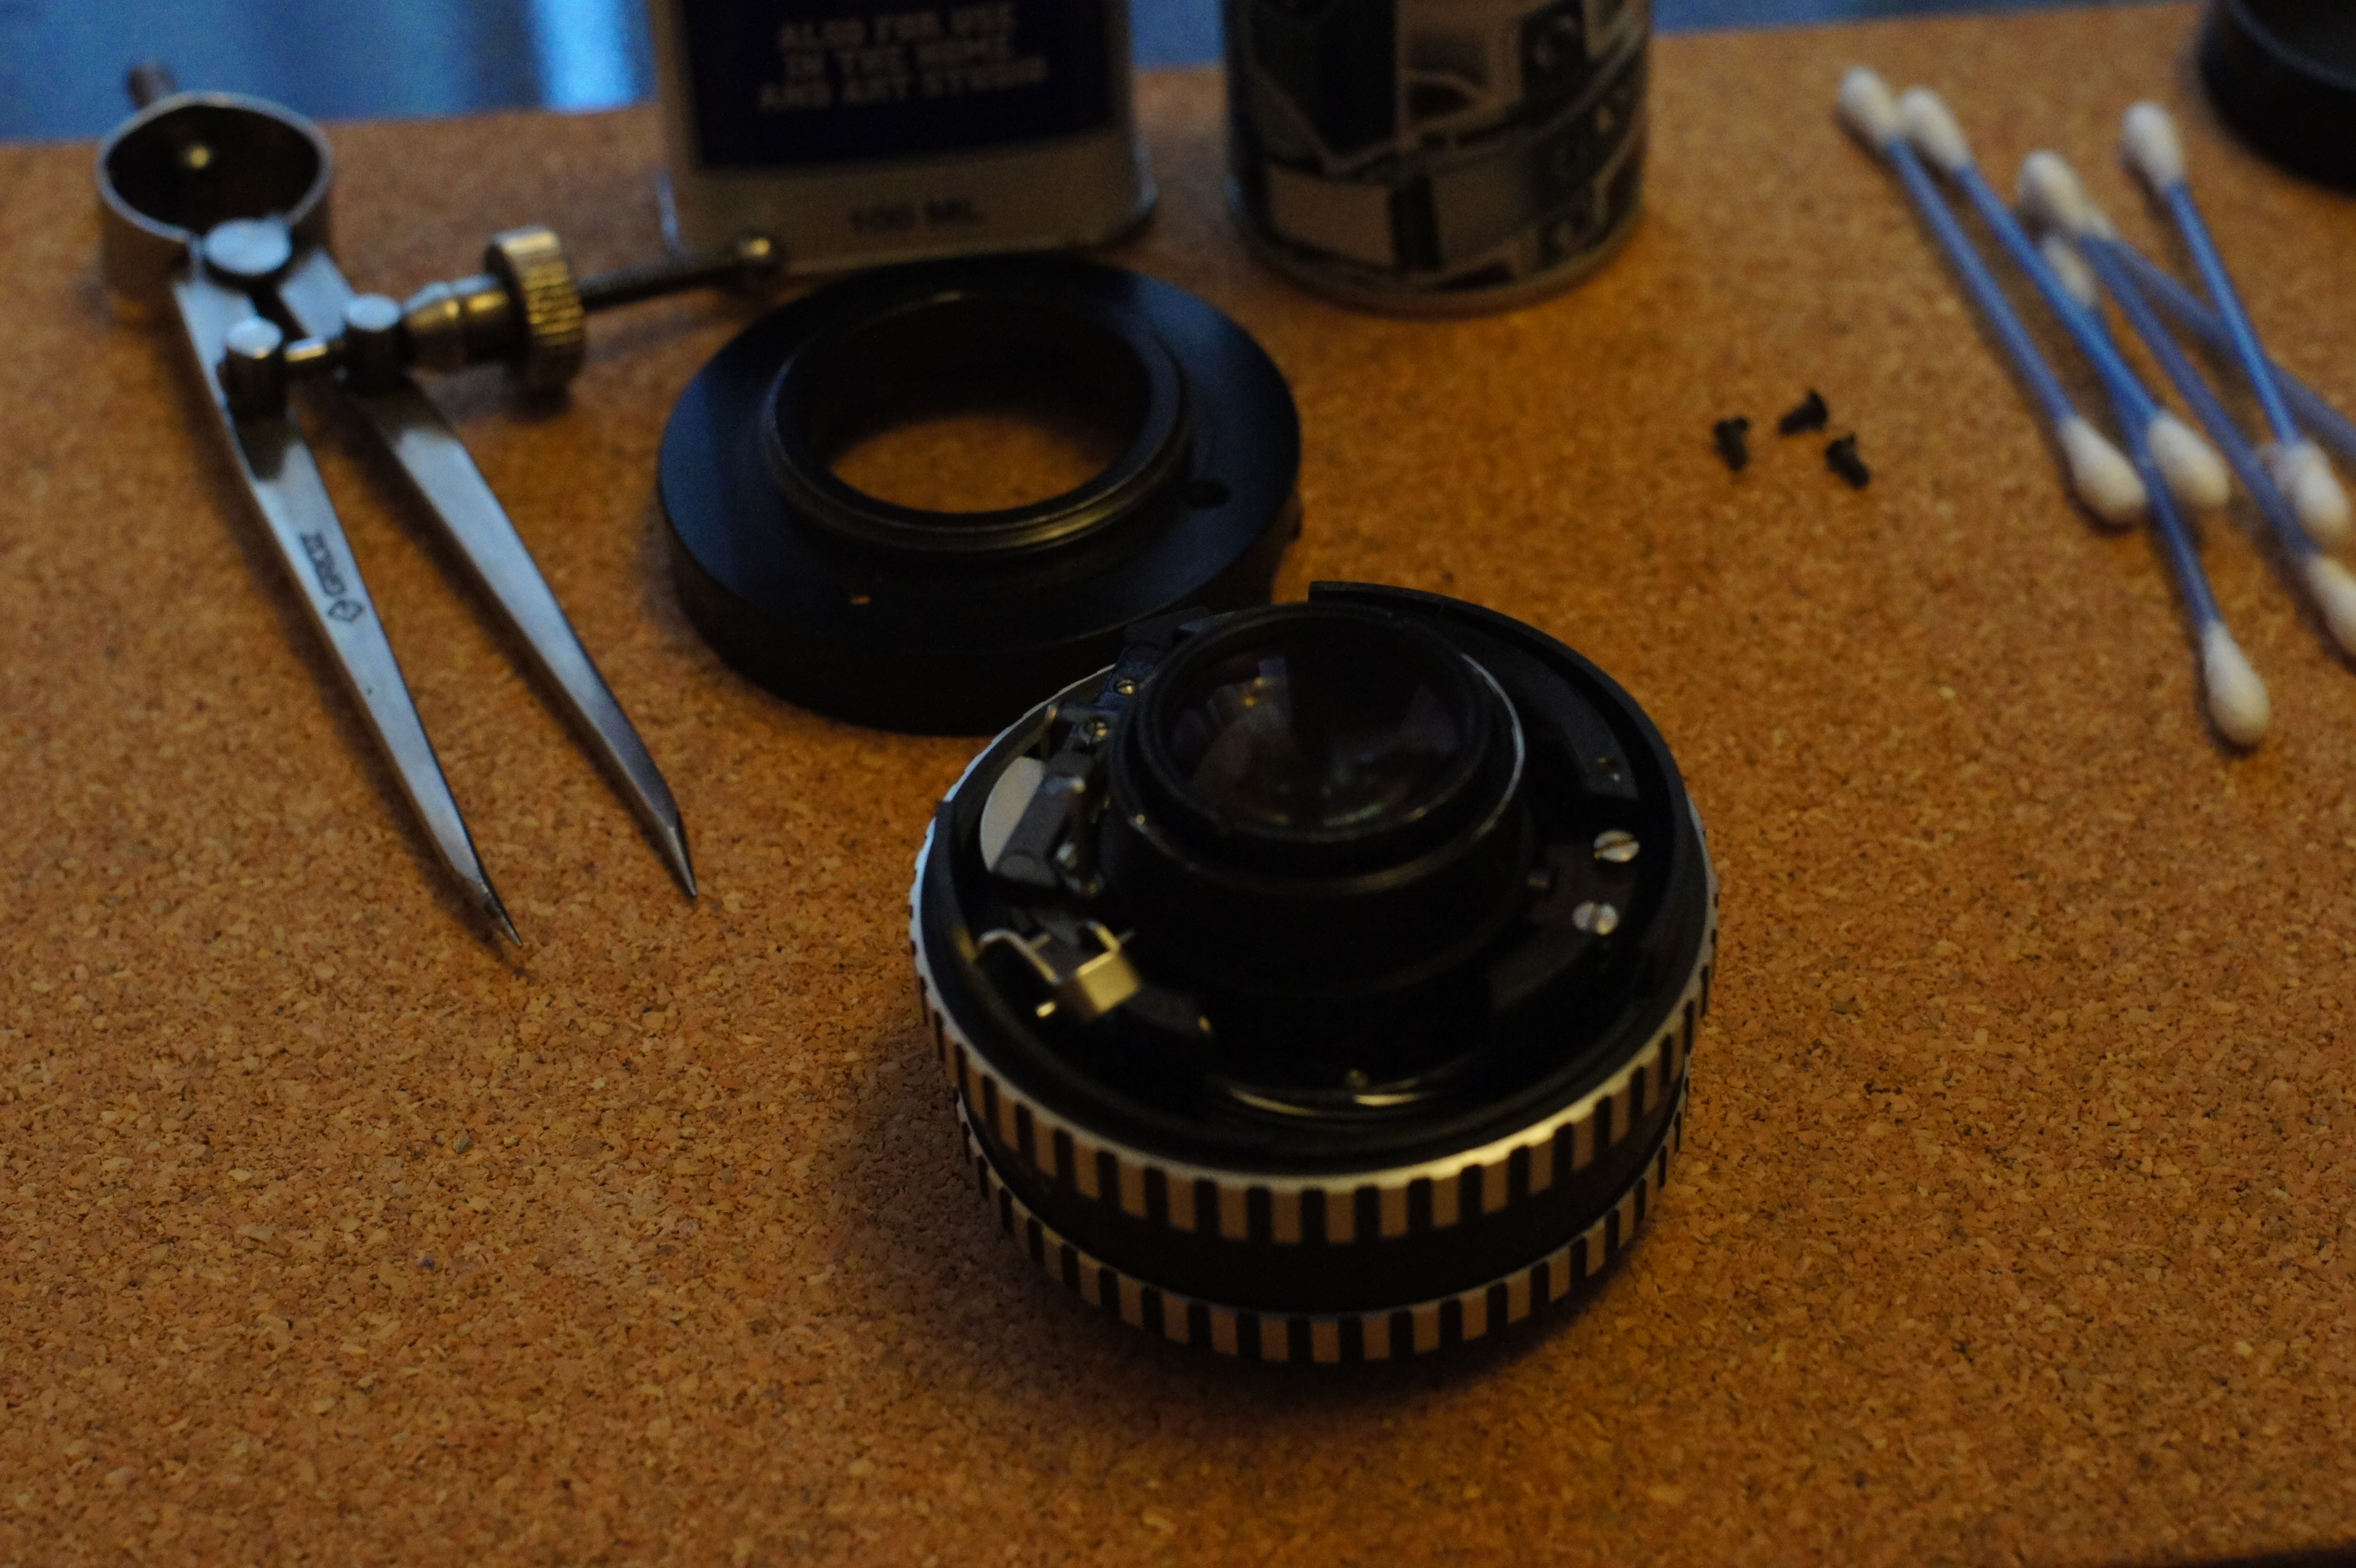
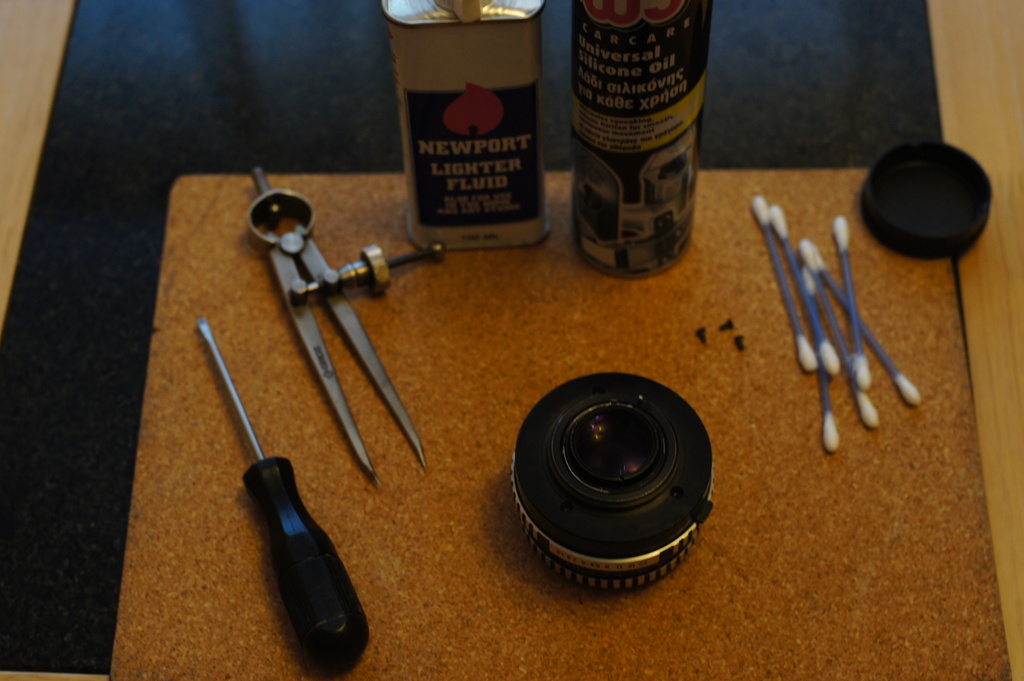
What you will need
Lighter Fluid
Silicone Grease (mine came from Lidl)
Cotton Buds.
A flat head screwdriver.
10 minutes of time.
Patience.
I take no responsibility should you damage your lens, i managed to do mine with no repercussions.
#1 What you will need for cleaning and re-lubbing
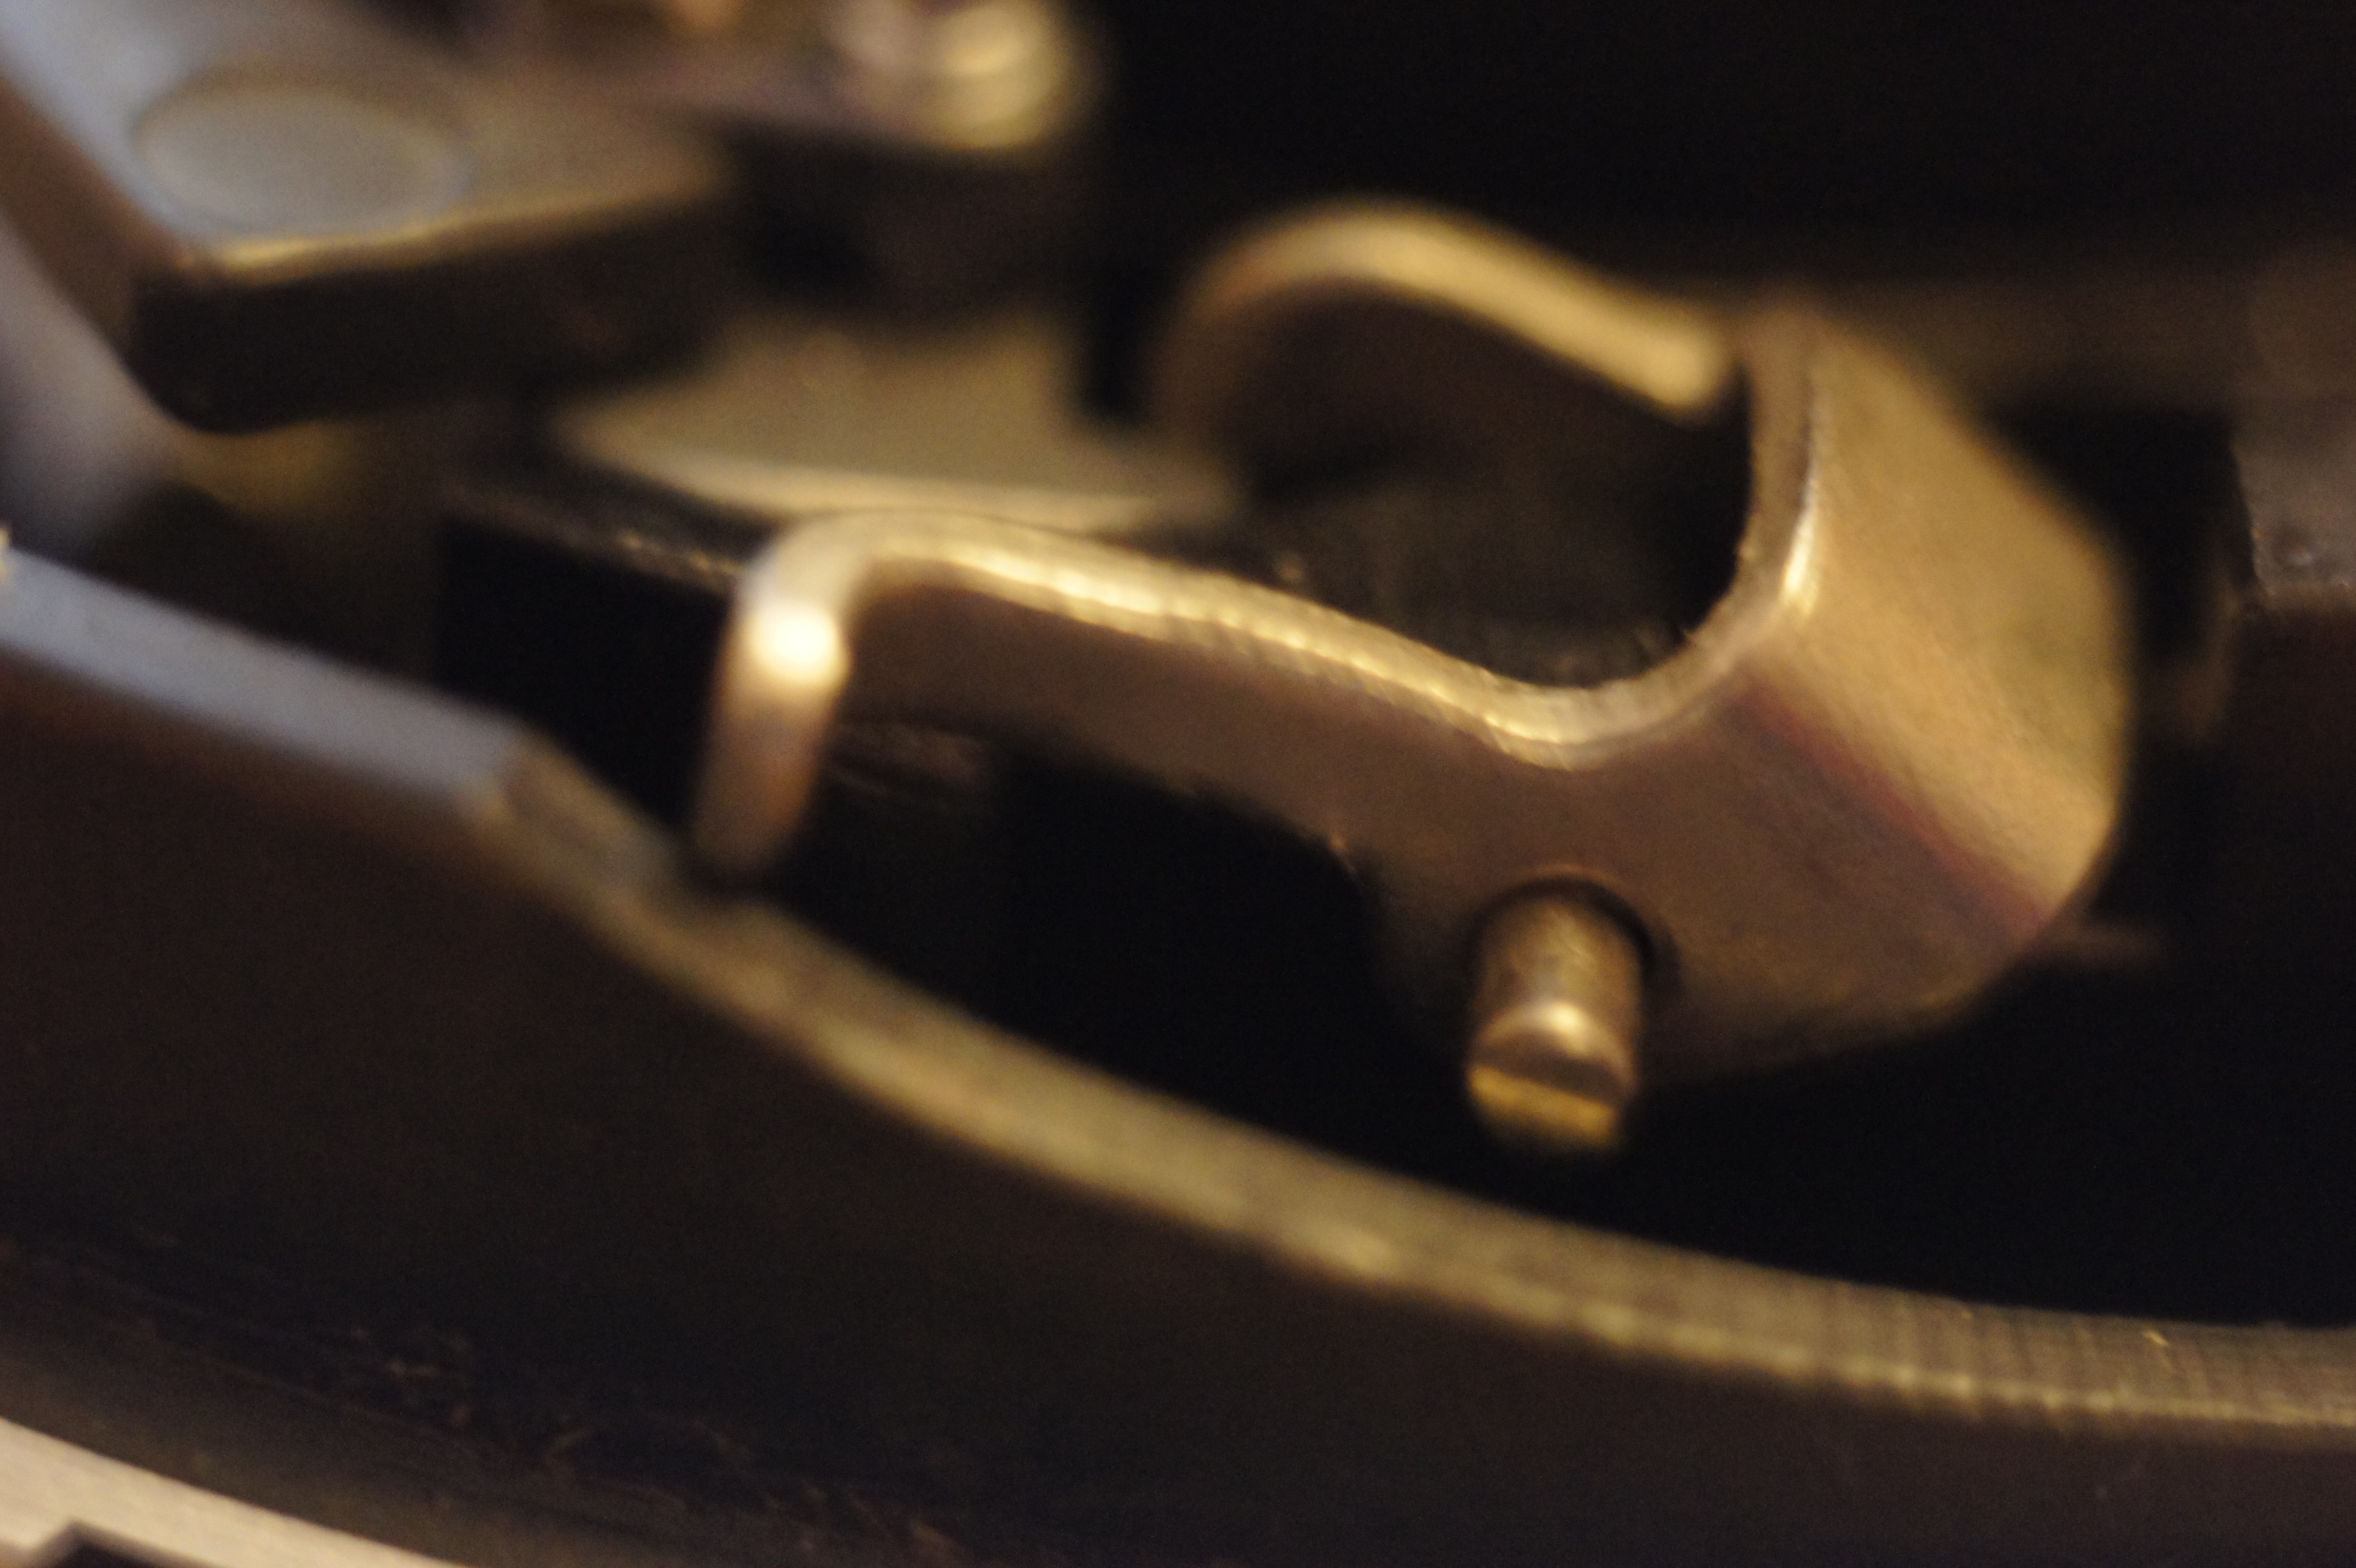
#2 after removing the rear section of the lens

#3 notice the position of the aperture at F1.8 before removing the aperture ring.

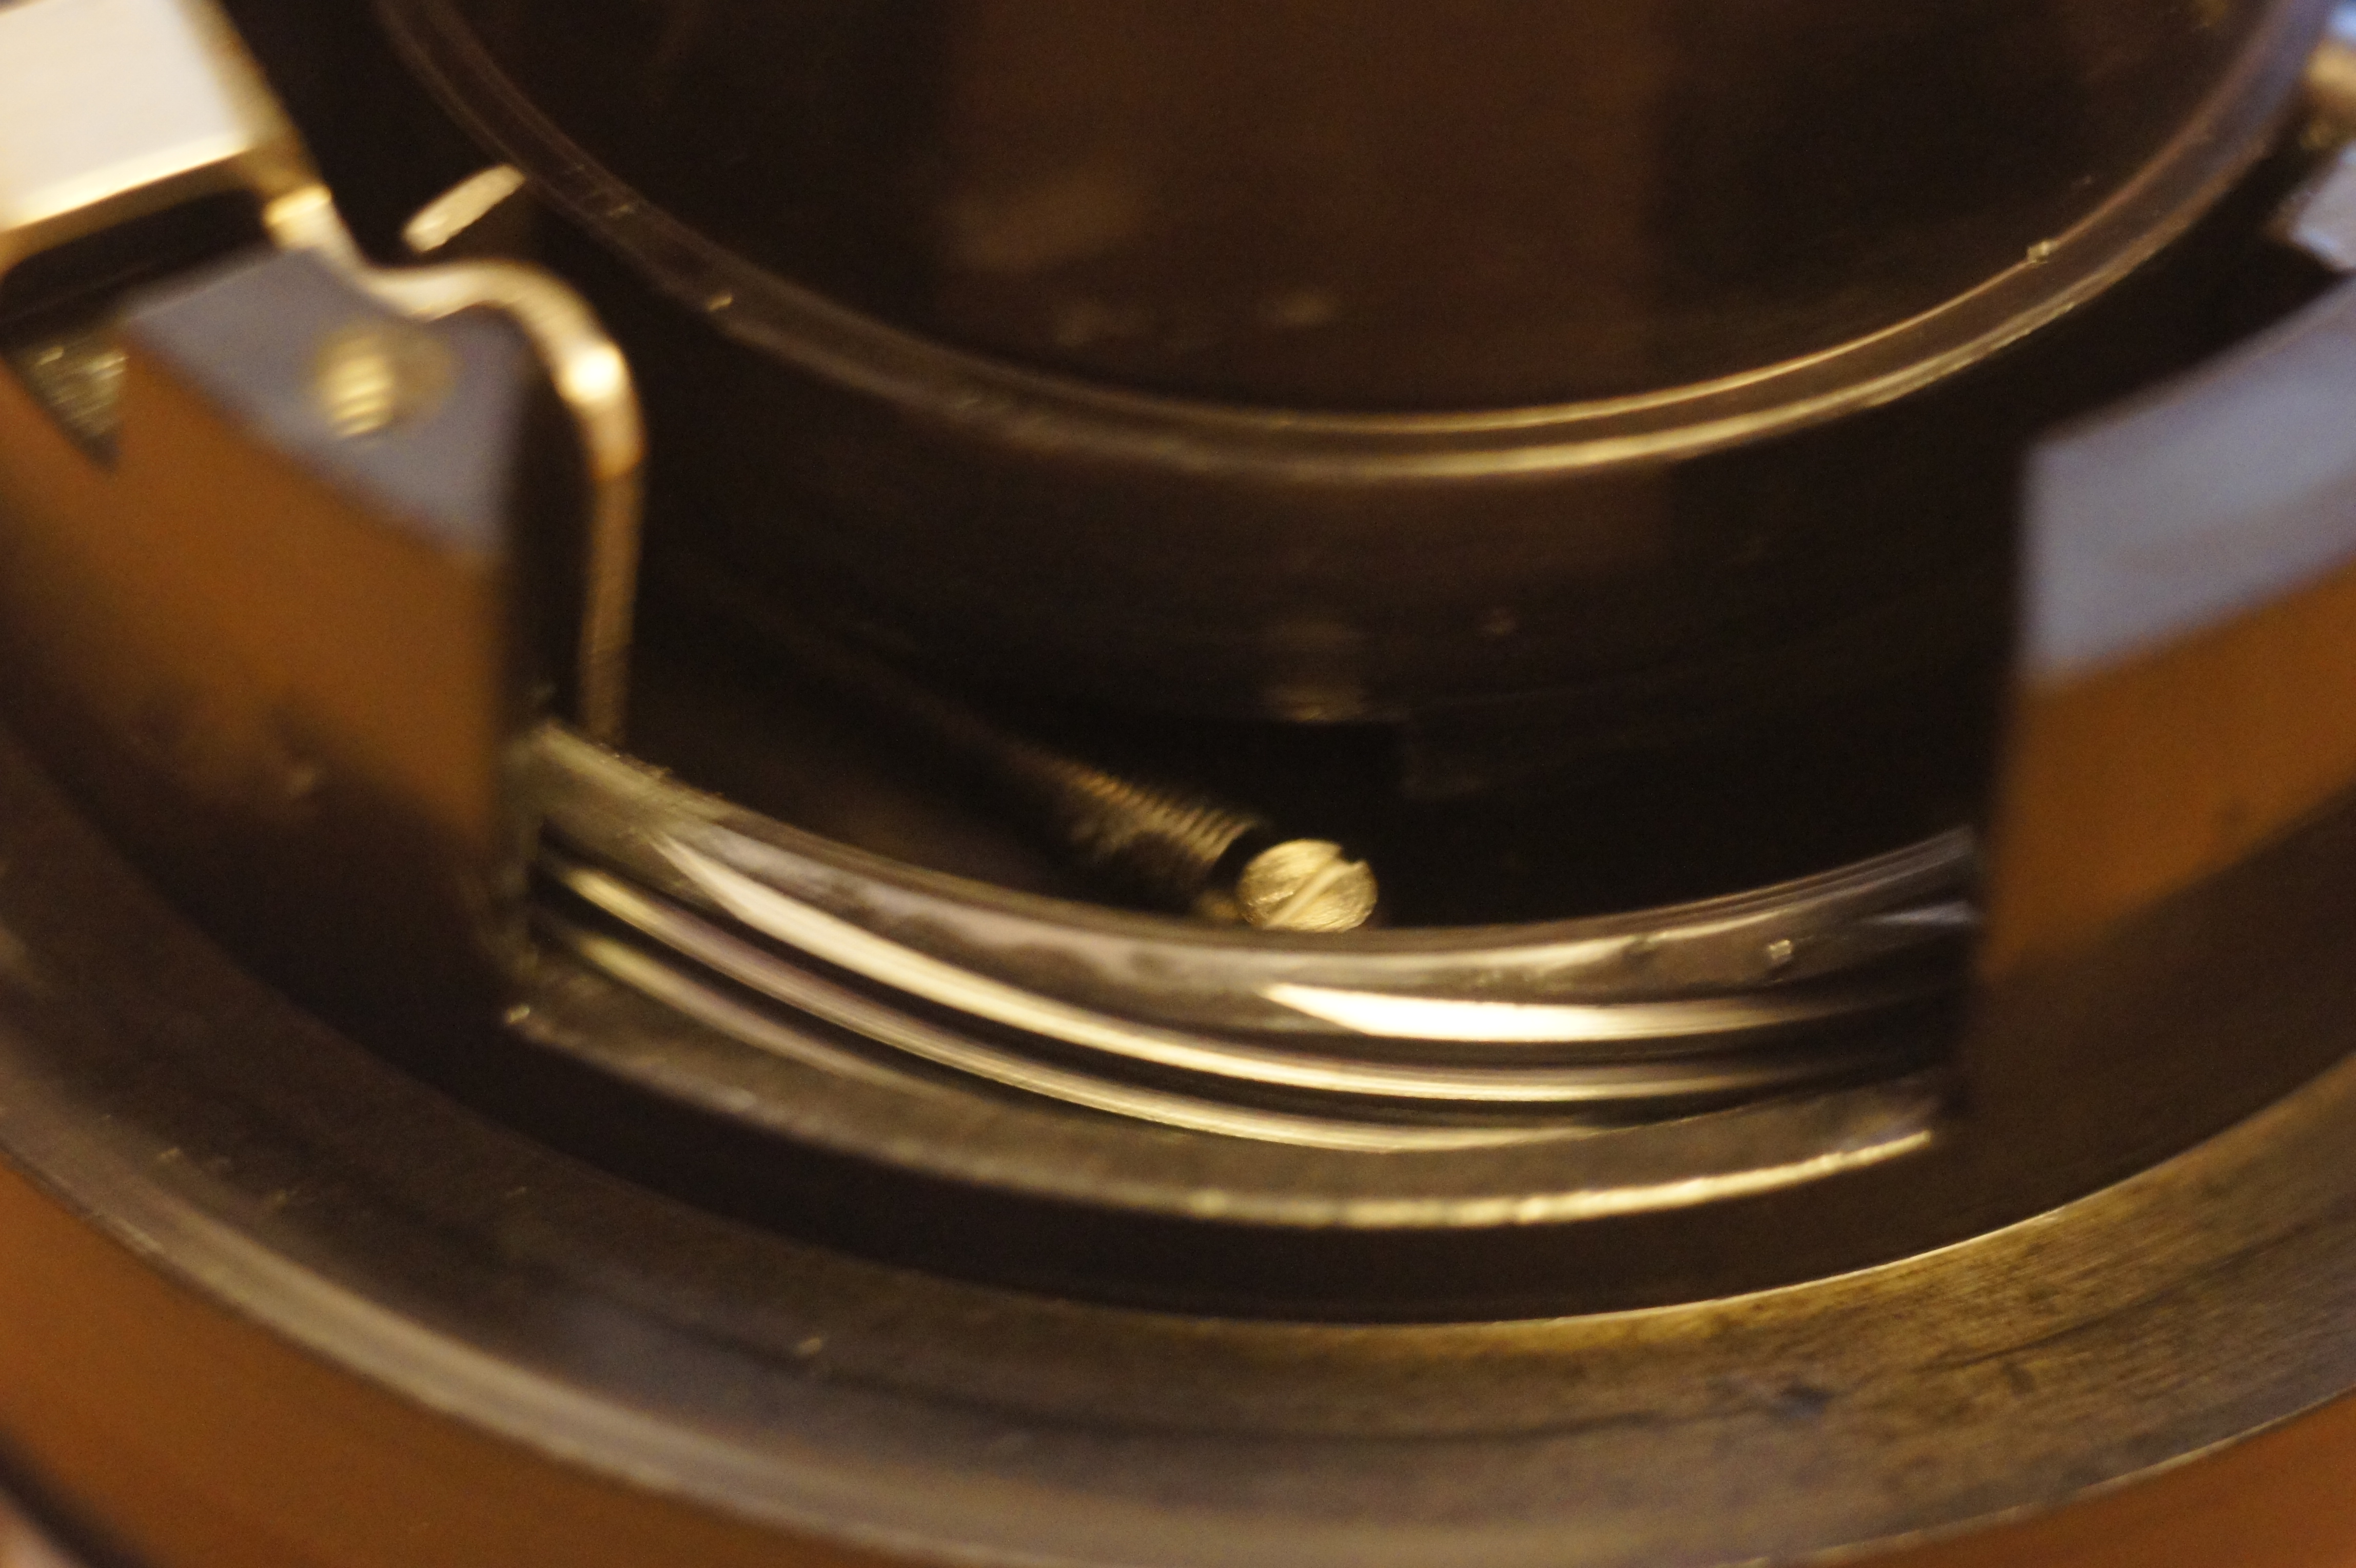
#4 With the lens at infinity make sure to remove all excess dried up grease use a dry cotton bud
#5 clean this are as well

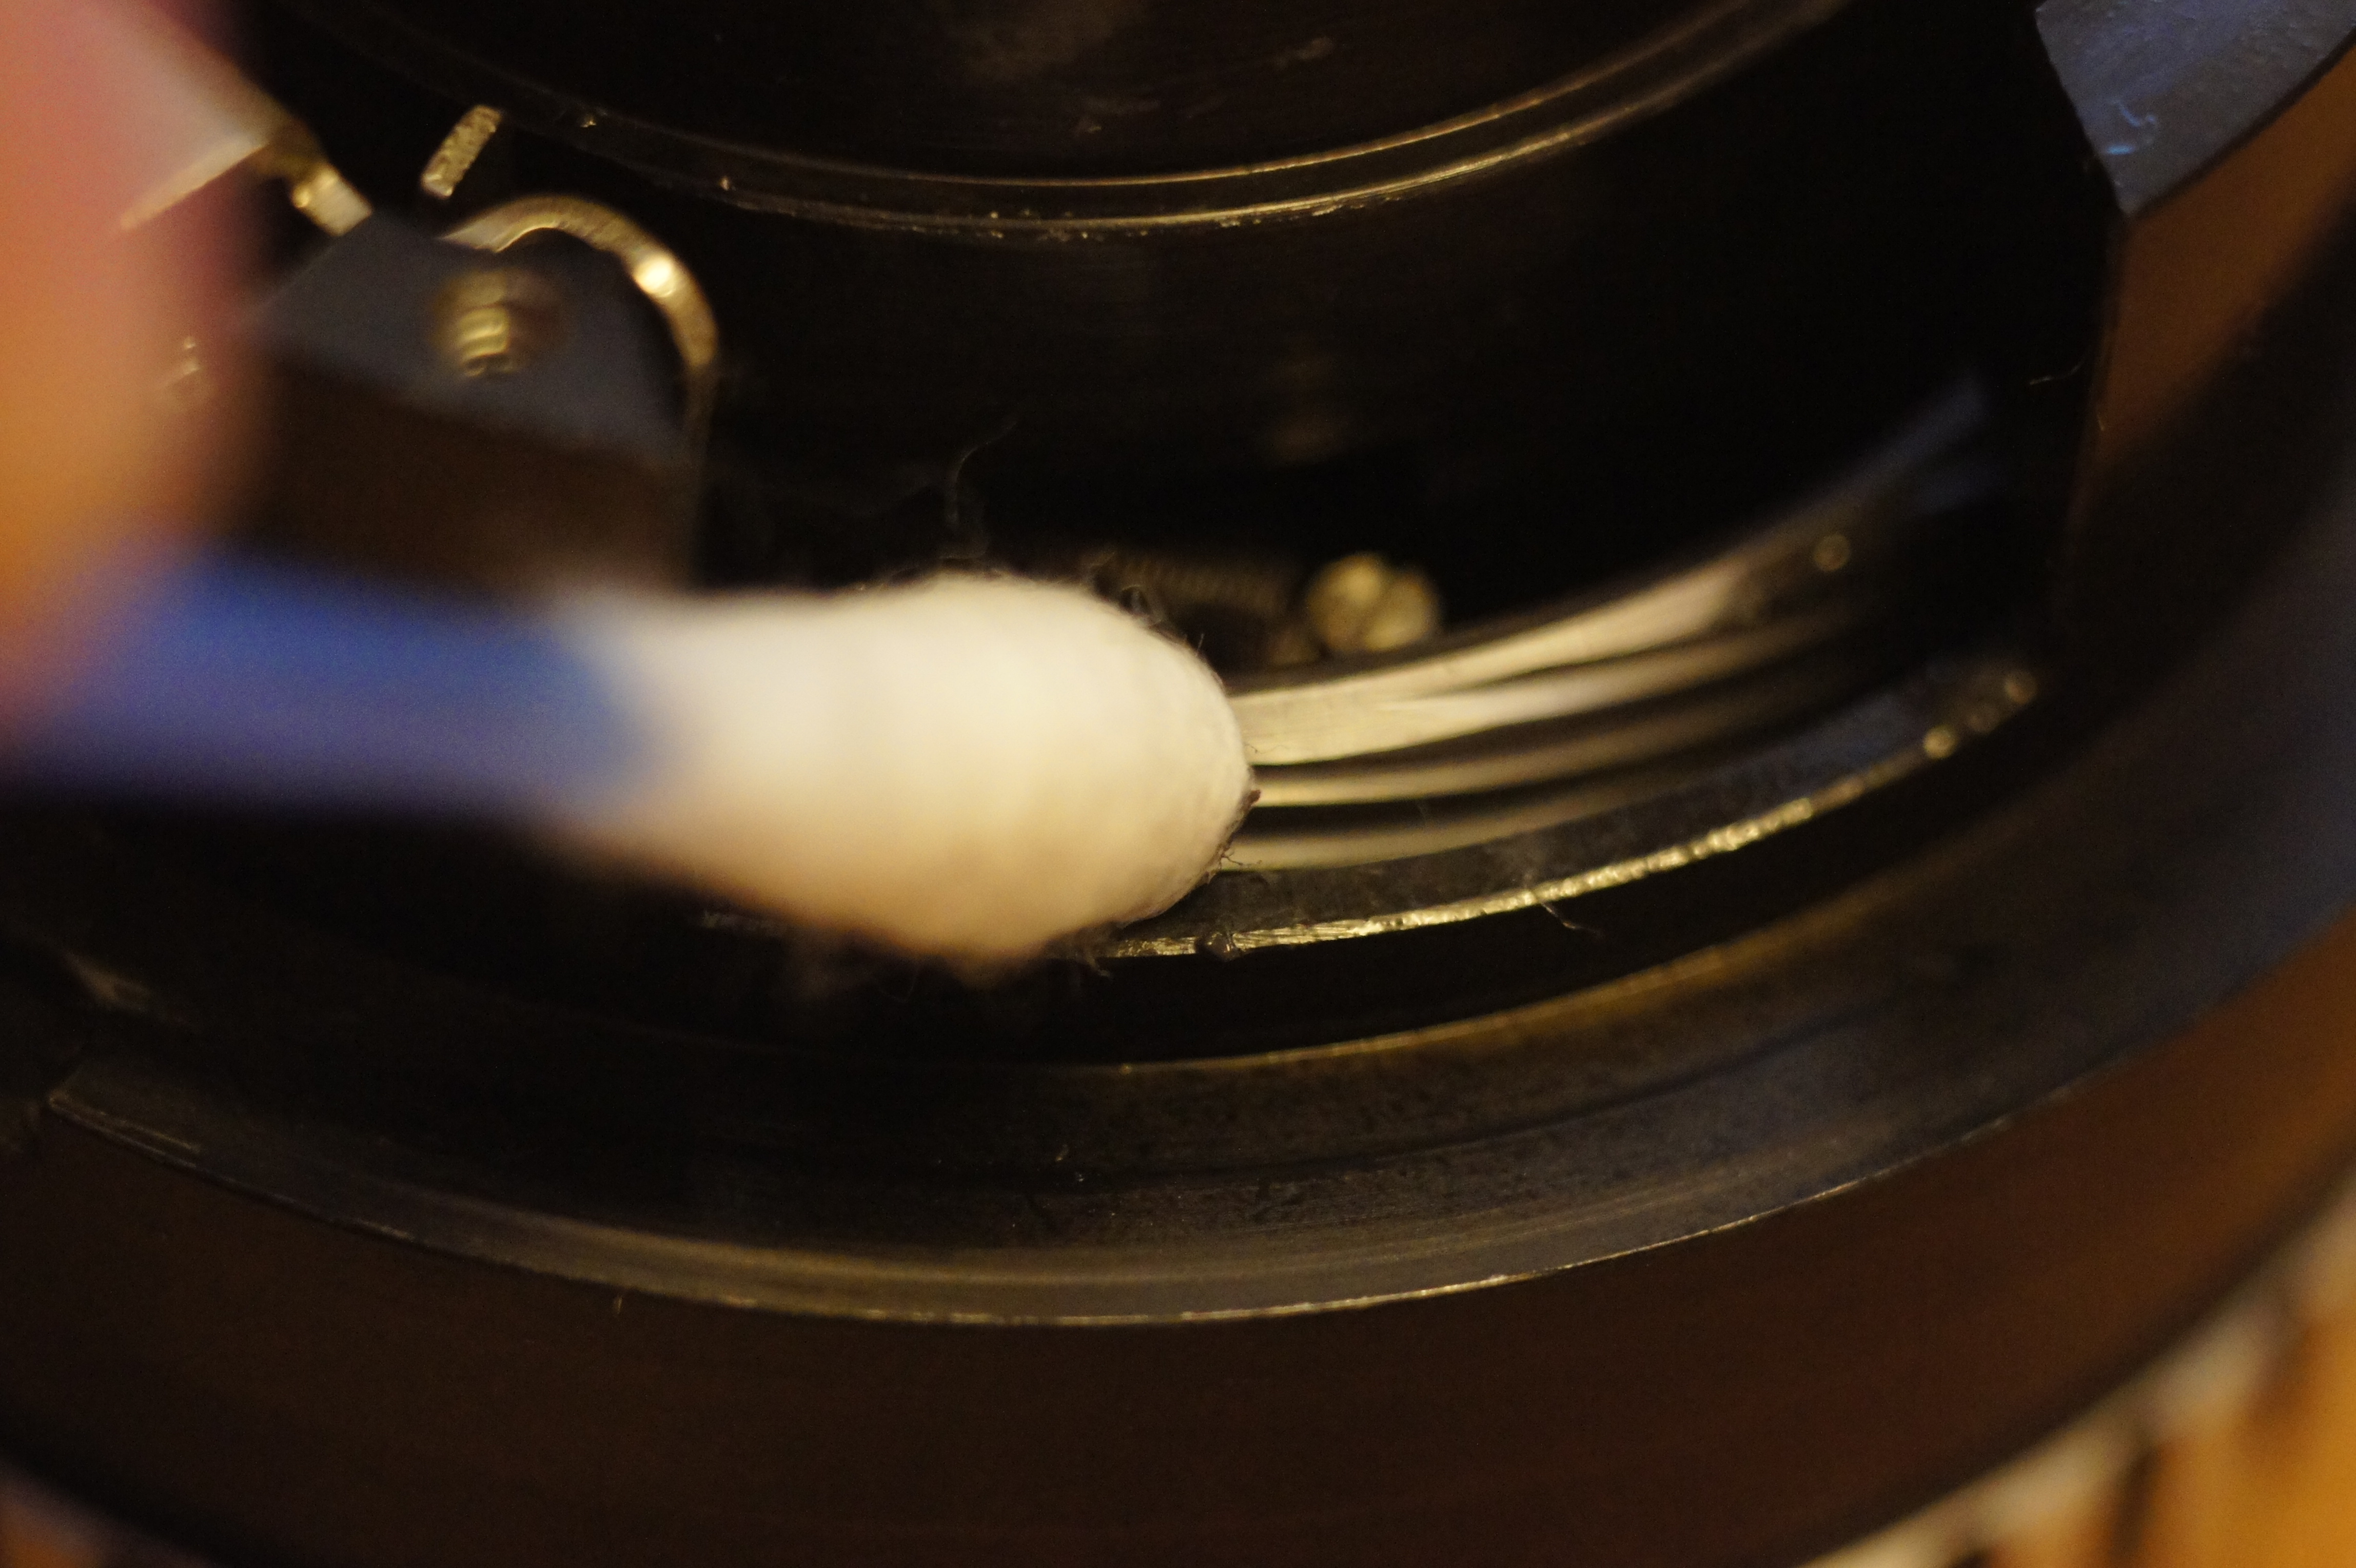
#6 notice the hellicoid being cleaned

#7 Helicoid all clean now

#8 Add a few tiny drops of lighter fluid to the hellicoid, be very sparing only one drop should do it dont soak the lens then start to twist the focus to work it in, you should notice that it will produce a lot of black gunk once it has worked in make sure to remove as much as possible

#9 Black Gunk we talked about remove this with cotton buds

#10 once cleaned apply a tiny amount of silicone lube (be careful spraying this only a half press should do) and twist and turn the focus again remove any residual black gunk and re-assemble lens
Here is a video showing the smooth focus now i hope this helps somebody
http://www.youtube.com/watch?v=QCKqqdVYyYA
So as you can see no major dismantling, or scary bits that fall off, a simple and easy way to repair the lens
P.S i have used silicone lube for years in my car door windows, and had no detriment as to it clogging or getting stiff
_________________
My web site www.digital-darkroom.weebly.com
Life is like a camera. Focus on what's important, capture the good times, develop from the negatives and if things don't work out, just take another shot. |
|
| Back to top |
|
 |
peterqd


Joined: 28 Feb 2007
Posts: 7448
Location: near High Wycombe, UK
Expire: 2014-01-04
|
| Posted: Sat Oct 22, 2011 10:00 am Post subject: |
|
|
peterqd wrote:
Very well done Eddie. Thanks for taking the time and effort to do this for us.
Could I make a small suggestion? Instead of spraying the grease directly on the helicoil thread, it would be better to spray and little into a shallow container, perhaps the lid of the can, and use a small artist's paintbrush to apply it.
My Pancolar has sticky blades. You wouldn't mind doing a similar guide to cleaning them for me, would you? 
_________________
Peter - Moderator |
|
| Back to top |
|
|
NewStuff

Joined: 31 Mar 2011
Posts: 847
Location: Wales, UK
|
| Posted: Sat Oct 22, 2011 11:14 pm Post subject: |
|
|
NewStuff wrote:
Cheers for that!
I'll be doing this to the Tessar once it arrives. I daresay the location will be slightly different, but the principle is the same.
_________________
Too many to list. |
|
| Back to top |
|
|
Jamesb101
Joined: 23 Oct 2011
Posts: 4
Location: Herts
|
| Posted: Sun Oct 23, 2011 1:29 pm Post subject: |
|
|
Jamesb101 wrote:
Hi Came across your post & thought I would have a go at re lubing the one I have all seems Ok but I have a spring left over ,can anyone point me as to where it fits.
I also presume that I have the spring for the diaphragm pin correct as well?
Thanks
James
PS help I can't seem to upload any pics  |
|
| Back to top |
|
|
eddieitman
Joined: 12 Apr 2011
Posts: 1247
Location: United Kingdom
|
| Posted: Sun Oct 23, 2011 2:45 pm Post subject: |
|
|
eddieitman wrote:
here are some pics of the springs hope you can work out where it goes, when you take it apart the way i advised there should be nothing that comes off
let me know what spring it is and i may be able to advise better
#1

#2

#3
_________________
My web site www.digital-darkroom.weebly.com
Life is like a camera. Focus on what's important, capture the good times, develop from the negatives and if things don't work out, just take another shot. |
|
| Back to top |
|
|
Jamesb101
Joined: 23 Oct 2011
Posts: 4
Location: Herts
|
| Posted: Sun Oct 23, 2011 2:58 pm Post subject: |
|
|
Jamesb101 wrote:
Thanks for the quick response I seem to be having trouble posting pics or even a flickr link as I would show the spring in question.
any tips ?
regards
James |
|
| Back to top |
|
|
Jamesb101
Joined: 23 Oct 2011
Posts: 4
Location: Herts
|
| Posted: Sun Oct 23, 2011 3:02 pm Post subject: |
|
|
Jamesb101 wrote:
You can see pics here of the 'spare' spring & the base of the lens,although it does seem to differ from yours
http://www.flickr.com/photos/jamseb101/6272138327/
http://www.flickr.com/photos/jamseb101/6272138781/
Regards
James |
|
| Back to top |
|
|
peterqd
Joined: 28 Feb 2007
Posts: 7448
Location: near High Wycombe, UK
Expire: 2014-01-04
|
| Posted: Sun Oct 23, 2011 4:06 pm Post subject: |
|
|
peterqd wrote:
| Jamesb101 wrote: |
Thanks for the quick response I seem to be having trouble posting pics or even a flickr link as I would show the spring in question.
any tips ?
regards
James |
Hello James. As a new poster, you can't post images until someone else quotes one of your posts. This is a good way of catching spam. Now that I've quoted your post below you should be able to post images OK. Please try it again when you can. Also please take care if you post a Flikr link that the width of the image does not exceed 1024 pixels, except for images in the Oversized Gallery.
_________________
Peter - Moderator |
|
| Back to top |
|
|
peterqd
Joined: 28 Feb 2007
Posts: 7448
Location: near High Wycombe, UK
Expire: 2014-01-04
|
| Posted: Sun Oct 23, 2011 4:07 pm Post subject: |
|
|
peterqd wrote:
| Jamesb101 wrote: |
You can see pics here of the 'spare' spring & the base of the lens,although it does seem to differ from yours
[img]http://www.flickr.com/photos/jamseb101/6272138327/[/img]
[img]http://www.flickr.com/photos/jamseb101/6272138781/[/img]
Regards
James |
Hmm, adding img tags to your links doesn't want to work. Please try to post an image and I'll quote it again.
_________________
Peter - Moderator |
|
| Back to top |
|
|
Jamesb101
Joined: 23 Oct 2011
Posts: 4
Location: Herts
|
| Posted: Mon Oct 24, 2011 6:07 pm Post subject: |
|
|
Jamesb101 wrote:
Thanks for the help re posting pics i'll try again here
#1

#2
as you can now see  on the second pic its the spring on the right , the other is the aperture pin & i presume the spring fits so . on the second pic its the spring on the right , the other is the aperture pin & i presume the spring fits so .
Regards
James |
|
| Back to top |
|
|
aspen


Joined: 15 Dec 2010
Posts: 307
Location: Maryland, USA
Expire: 2014-02-20
|
| Posted: Wed Oct 26, 2011 11:02 pm Post subject: |
|
|
aspen wrote:
| peterqd wrote: |
Very well done Eddie. Thanks for taking the time and effort to do this for us.
Could I make a small suggestion? Instead of spraying the grease directly on the helicoil thread, it would be better to spray and little into a shallow container, perhaps the lid of the can, and use a small artist's paintbrush to apply it.
My Pancolar has sticky blades. You wouldn't mind doing a similar guide to cleaning them for me, would you? |
Mine has sticky blades too! 
_________________
Cameras; Sony Nex5n Lenses; Konica Hexanons; 21mm f2.8, 40mm f1,8, 50mm f1.4, 50mmf1.7,57mm f1.4, 100mm f2.8, 135mm f3.2, 200mm f4, MC Helios 77M-4 50mm f1.8, Jupiter 8 50 f2, Super Takumar 85mm f1.9, Vivitar Series 1 90mm f2.5 (Macro), Steinheil Munchen Culminar 85mm f2.8, Steinheil Munchen Exagon 35mm f2.8, Jupiter 37A 135mm, Astra Berlin 135mm f3.5, Angenieux 180mm f4 , Tair 3-PhS 300mm f4.5 |
|
| Back to top |
|
|
Andreq


Joined: 30 May 2011
Posts: 184
Location: Quebec, Canada
|
| Posted: Thu Oct 27, 2011 5:39 am Post subject: |
|
|
Andreq wrote:
Hey,
I just got a Jena 50mm f2.8 too and I just did everything I could to get it unstuck without success.
Right now, the lens is almost fully disassembled on my desk, I can clean the male focusing screw and grease it properly.
I followed this http://oomz.net/tessar/ but my lens isn't the from same year make. Mine looks just like the one on this thread.
My question is : What should be movie with the focusing ring ?
The whole assembly with he aperture scale (the one with the red line, number 5 on the website)... doesn't make sens to me
or
The outer helicoil thread should rotate freely INSIDE this assembly (number 5)...because that's where mine won't move an inch!
We can see on the website part number 5 at the bottom of the page with all the parts... we see the "outer" helicoil atached to number 5.. are those 2 thing fixed together??
And since the focusing ring shouldn't move with the red line... I'm confused
I'll try soaking the focusing ring + outer helicoil in alcohol overnight.
I found a "stock" picture of my lens model : http://www.filterfantastic.co.uk/bayimages/3009%20Bags/BG5Q9352.jpg
Let me know if you have any idea, I'll try to post a picture tomorow... it should help a lot. |
|
| Back to top |
|
|
eddieitman
Joined: 12 Apr 2011
Posts: 1247
Location: United Kingdom
|
| Posted: Thu Oct 27, 2011 6:26 am Post subject: |
|
|
eddieitman wrote:
Have you tried getting to the hellicoid from the front? Use a sink plug to unscrew the name tag once removed there should be three screws to remove the front half the lens and we should then be able to see the hellicoid to remove the glass and access the blades use a tool similiar to what i have on the 1st pic its an o ring seperator purchased from any good hardware store mine cost around �5 loks like a compass one the glass is removed you can access the blades and clean with lighter fluid
_________________
My web site www.digital-darkroom.weebly.com
Life is like a camera. Focus on what's important, capture the good times, develop from the negatives and if things don't work out, just take another shot. |
|
| Back to top |
|
|
Andreq
Joined: 30 May 2011
Posts: 184
Location: Quebec, Canada
|
| Posted: Thu Oct 27, 2011 11:14 am Post subject: |
|
|
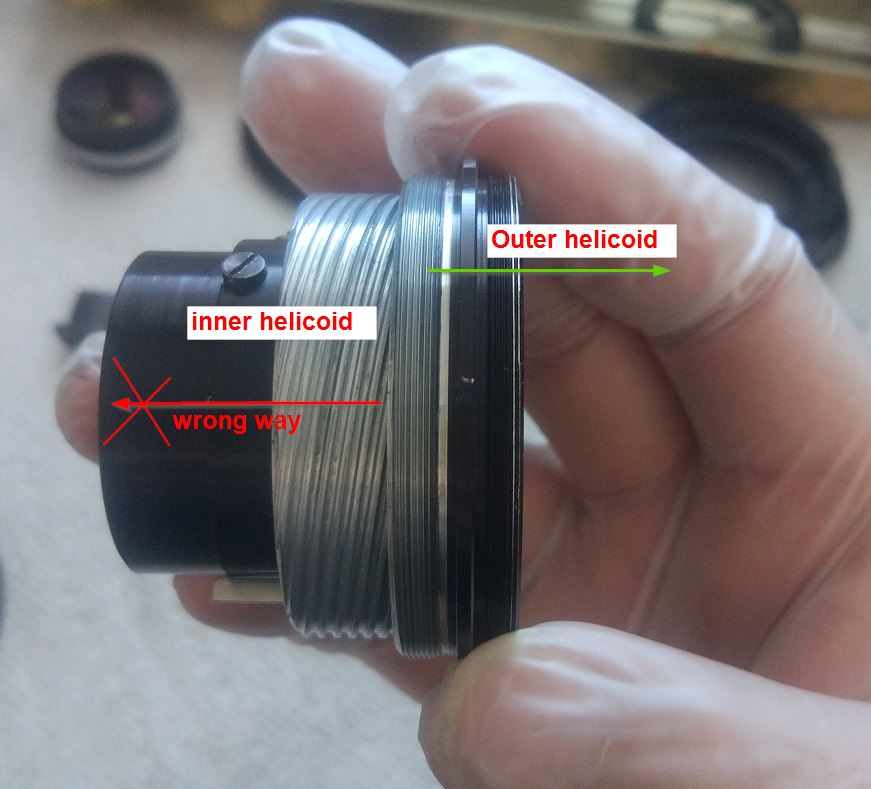
Andreq wrote:
The inner helicoil is "out", thats not my problem.
On this picture, is the Helicoil (outer) fixed to this whole assembly (part #5) ?
Mine is... and I don't see how the lens can focus that way :S
edit : Doesn't make sens at all using this picture... I'll try to mspaint something at work... go2go now -_-
edit 2 :

The blue part is out.
The red part is the "aperture assembly" (part number 5)
The green part is the focusing whell.
Is the green supposed to be stuck to the red ? The only way I can separate them is when I unscrew the focusing wheel retaining screw (a big ~1.5inch screw/ring with 2 slot for a spanner wrench). Removing this ring, the focusing wheel move freely... but doesn't move anything... thus doesn't focus :S
Had to use picasa since our proxy block the traditional upload -_- |
|
| Back to top |
|
|
Andreq
Joined: 30 May 2011
Posts: 184
Location: Quebec, Canada
|
| Posted: Thu Oct 27, 2011 8:53 pm Post subject: |
|
|
Andreq wrote:
Anyone have a diagram of how a focus wheel work? I'm really confused with this lens... the assembly doesn't make sens. It's as if the focus wheel was attached to the lens mount (when fully assembled). Doesn't make sens, the focus ring can't turn if the mount doesn't turn with it :S |
|
| Back to top |
|
|
Andreq
Joined: 30 May 2011
Posts: 184
Location: Quebec, Canada
|
| Posted: Fri Oct 28, 2011 4:33 am Post subject: |
|
|
Andreq wrote:
Eureka!
I knew it... I knew that those 2 part wasn't supposed to be frozen togeter.
I finaly bought lighter fluid tonight and I was able to loosen the focus ring from the aperture assembly.... now I'm working it in until I can rotate the ring from 0.3 to infinity (getting there!)
I'll probably have to find a way to grease rotating joint, no clue if its an helicoid or just a "bearing" of some sort. I'll keep you posted.
Edit :
I did it ! I was able to remove the whole inside helicoid from the aperture assembly (part #5 on website).

I'll clean that up and regrease, then the helicoid... than I'll have to fix the aperture blades... lots of work for that little lens, let's hope it does a great job |
|
| Back to top |
|
|
Andreq
Joined: 30 May 2011
Posts: 184
Location: Quebec, Canada
|
| Posted: Sat Oct 29, 2011 6:31 am Post subject: |
|
|
Andreq wrote:
I quit... this lens is way too much trouble. I cleaned it up, re-grease it and re-assembled it : The focus is ultra stiff on some point.. as if the lens wasn't round anymore (might have been dropped).
I lost too much hour trying to fix that thing, it's going on the bay as-is!
Just for information purpose, my lens serial number was 91xxxxx.
The easiest way to remove the helicoid is to unscrew the front part of the lens, I've figured that out WAY to late.
One must be careful as the front element will fall when this is removed.
The aperture pin (m42) is a pain it the ass to keep still when trying to screw the helicoid.
The helicoid only fit one way to get infinite focus.
Strangely enough, I didn't take any picture. If anyone is struggling with one of those lens, let me know, I'll do my best to help! |
|
| Back to top |
|
|
Andreq
Joined: 30 May 2011
Posts: 184
Location: Quebec, Canada
|
| Posted: Mon Oct 31, 2011 4:27 am Post subject: |
|
|
Andreq wrote:
Just to let you know,
I took 5 minute to rethink about this lens... it was looking at me, on my desk... waiting to be trashed.
Everything looked "ok" but the focus wasn't moving past 0.4m so I got that idea that maybe the focus ring was just not at the right place.
- I took the front of the lens apart (it unscrew and the front element fall with it).
- Unscrewed the focus-ring retaining disk/screw.
- Re-seated the focus ring to infinity (making sure to turn the helicoid to infinity first)
- Re-screwed everything back
Voila! It's working now! got focus from 0.35m to infinity. It's a bit stiff in the middle, I might need to work some more grease or something!
I found out that removing the front of the lens could be another way to relube the helicoid since it's way more exposed and easily accessible, I'll try to post picture when I have time. One would only have to set focus to 0.35m and unscrew the black/filter holder part. |
|
| Back to top |
|
|
mareinke
Joined: 14 Nov 2013
Posts: 33
Location: LA, CA
|
| Posted: Mon Nov 25, 2019 11:25 pm Post subject: How to get its aperture in use |
|
|
mareinke wrote:
Hi all,
Recently I bought a pancolar(8 blades version) in separated parts, in this post, I got the key information about how to assemble it. many thanks to eddieitman,Andreq and other guys.
I'm almost done, just a bit confused about its aperture mechanism, the aperture lever won't work unless I pull it backward manually.
is it supposed to work in this way? or use aperture pin instead?
#1
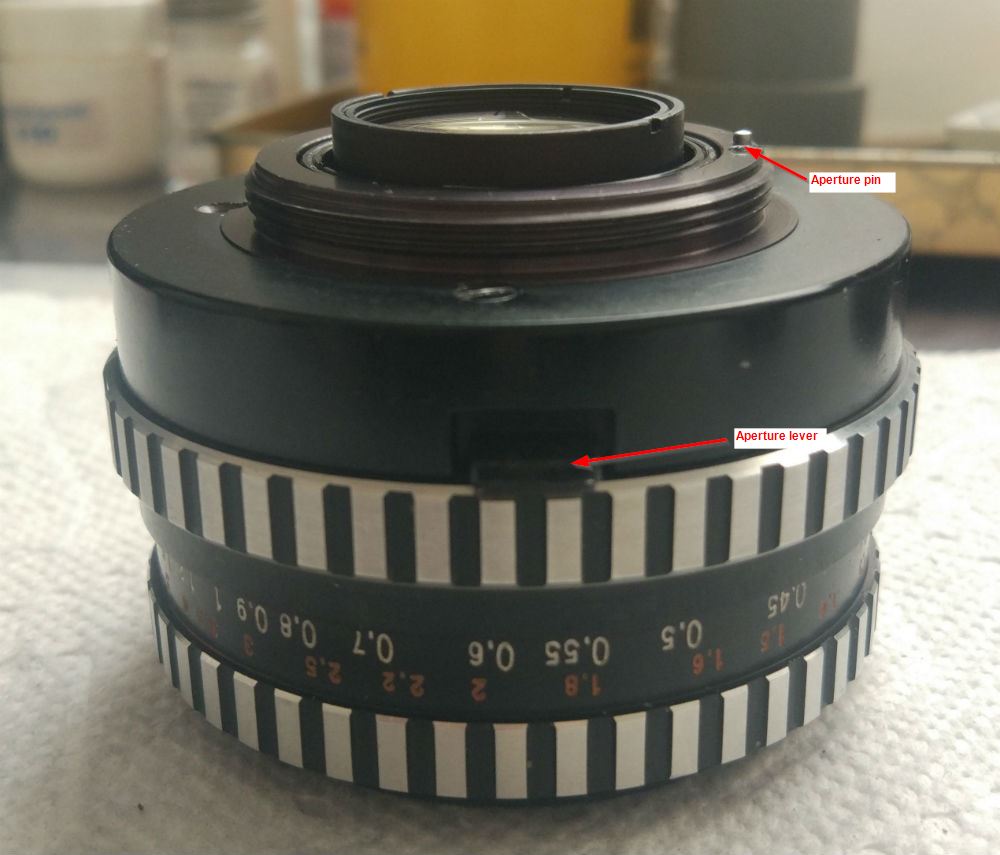
#2
 |
|
| Back to top |
|
|
y

Joined: 11 Aug 2013
Posts: 304
Location: EU
|
| Posted: Tue Nov 26, 2019 10:02 pm Post subject: |
|
|
y wrote:
Sorry, I have one with stuck aperture, so I can't help you.
Does anybody here successfully cleaned the aperture? I can't figure out how to reach the aperture mechanism itself. After disassembling everything in reach still have a single piece of the optic assembly. There is no obvious way to get into "the middle" of that and reach the aperture mechanism. |
|
| Back to top |
|
|
mareinke
Joined: 14 Nov 2013
Posts: 33
Location: LA, CA
|
| Posted: Wed Nov 27, 2019 4:07 am Post subject: |
|
|
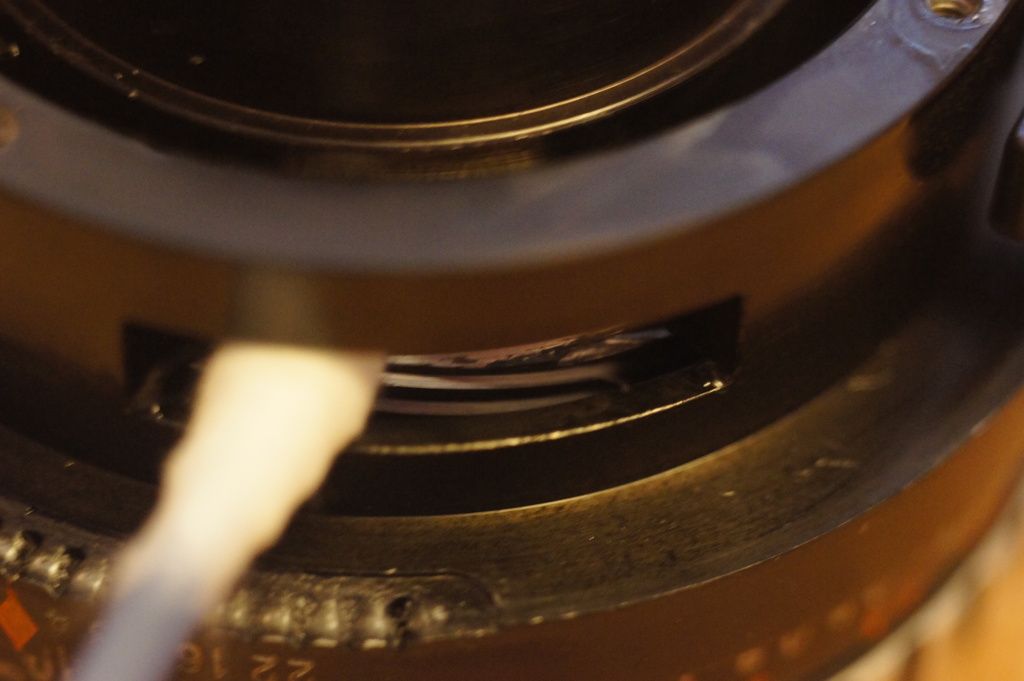
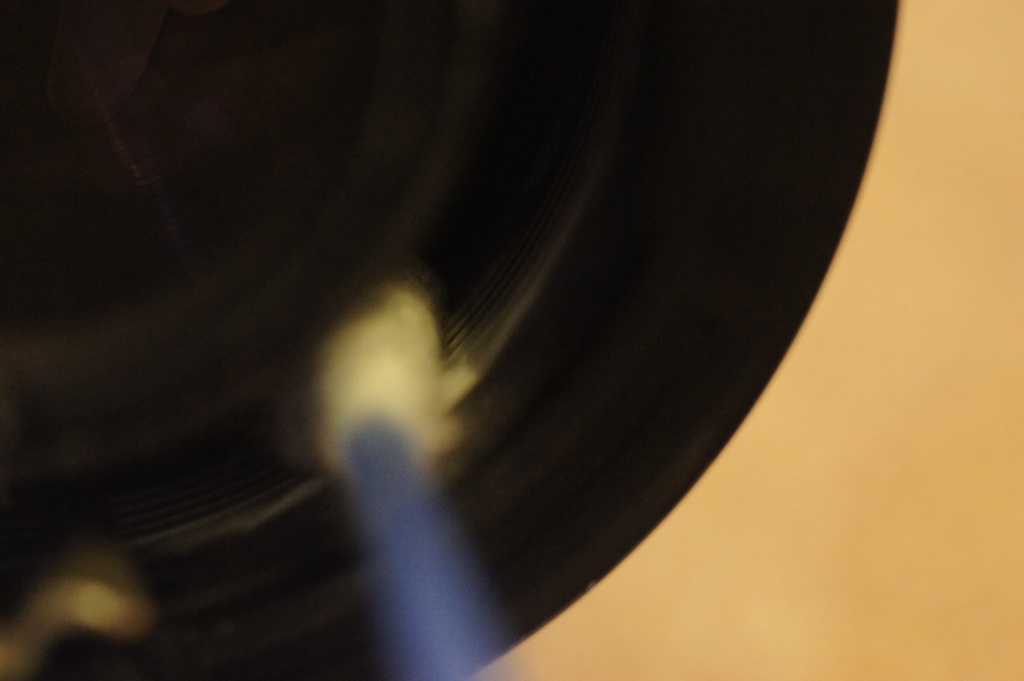
mareinke wrote:
| y wrote: |
Sorry, I have one with stuck aperture, so I can't help you.
Does anybody here successfully cleaned the aperture? I can't figure out how to reach the aperture mechanism itself. After disassembling everything in reach still have a single piece of the optic assembly. There is no obvious way to get into "the middle" of that and reach the aperture mechanism. |
i did, do you have related photo for that single piece? |
|
| Back to top |
|
|
y
Joined: 11 Aug 2013
Posts: 304
Location: EU
|
| Posted: Wed Nov 27, 2019 11:09 am Post subject: |
|
|
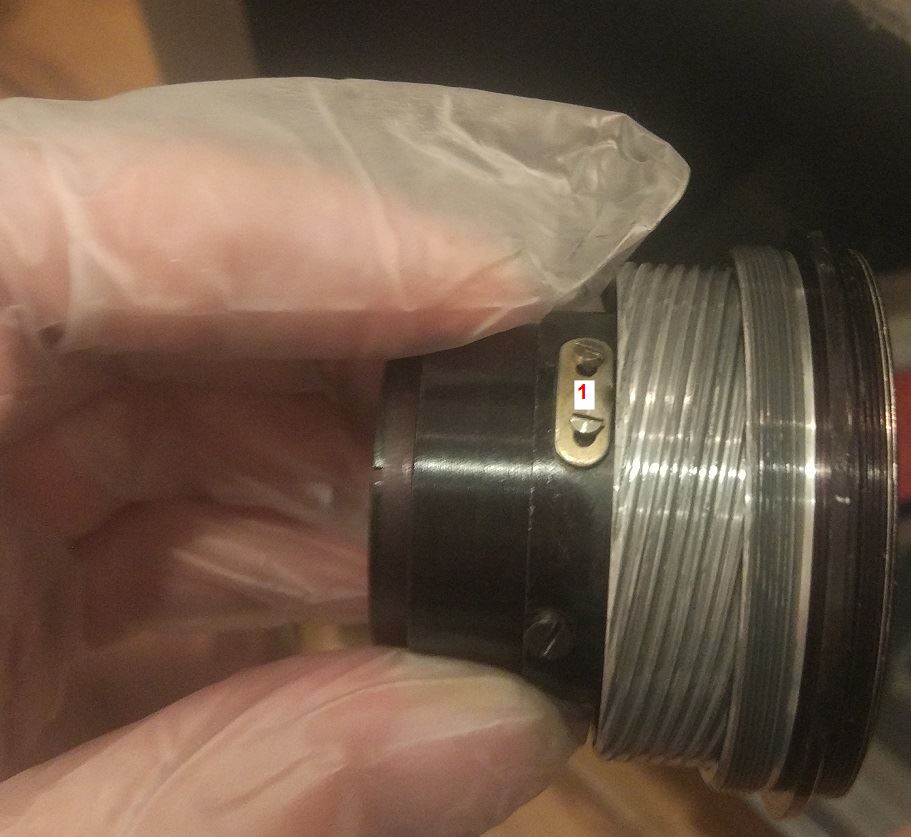
y wrote:
| mareinke wrote: |
| i did, do you have related photo for that single piece? |
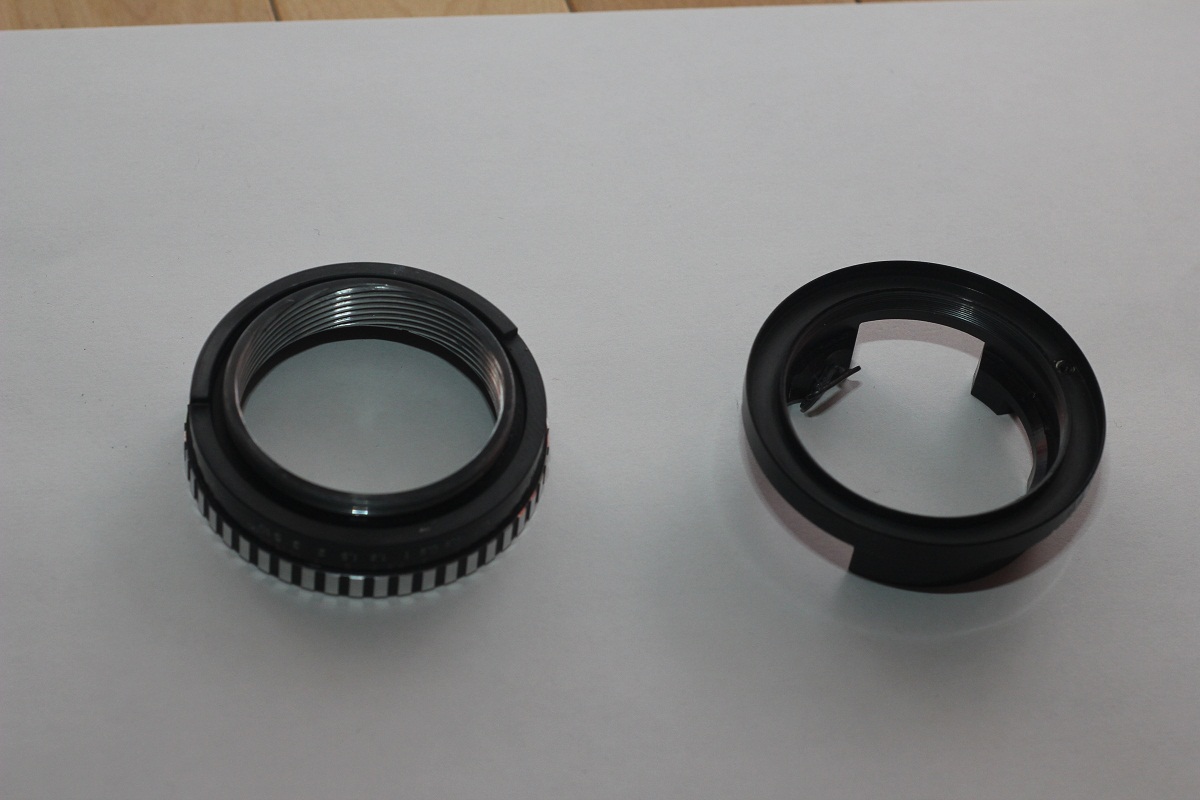
It is the optical assembly aka black tube with the glass.
It is marked blue at this picture from a few posts above: |
|
| Back to top |
|
|
mareinke
Joined: 14 Nov 2013
Posts: 33
Location: LA, CA
|
| Posted: Wed Nov 27, 2019 10:57 pm Post subject: |
|
|
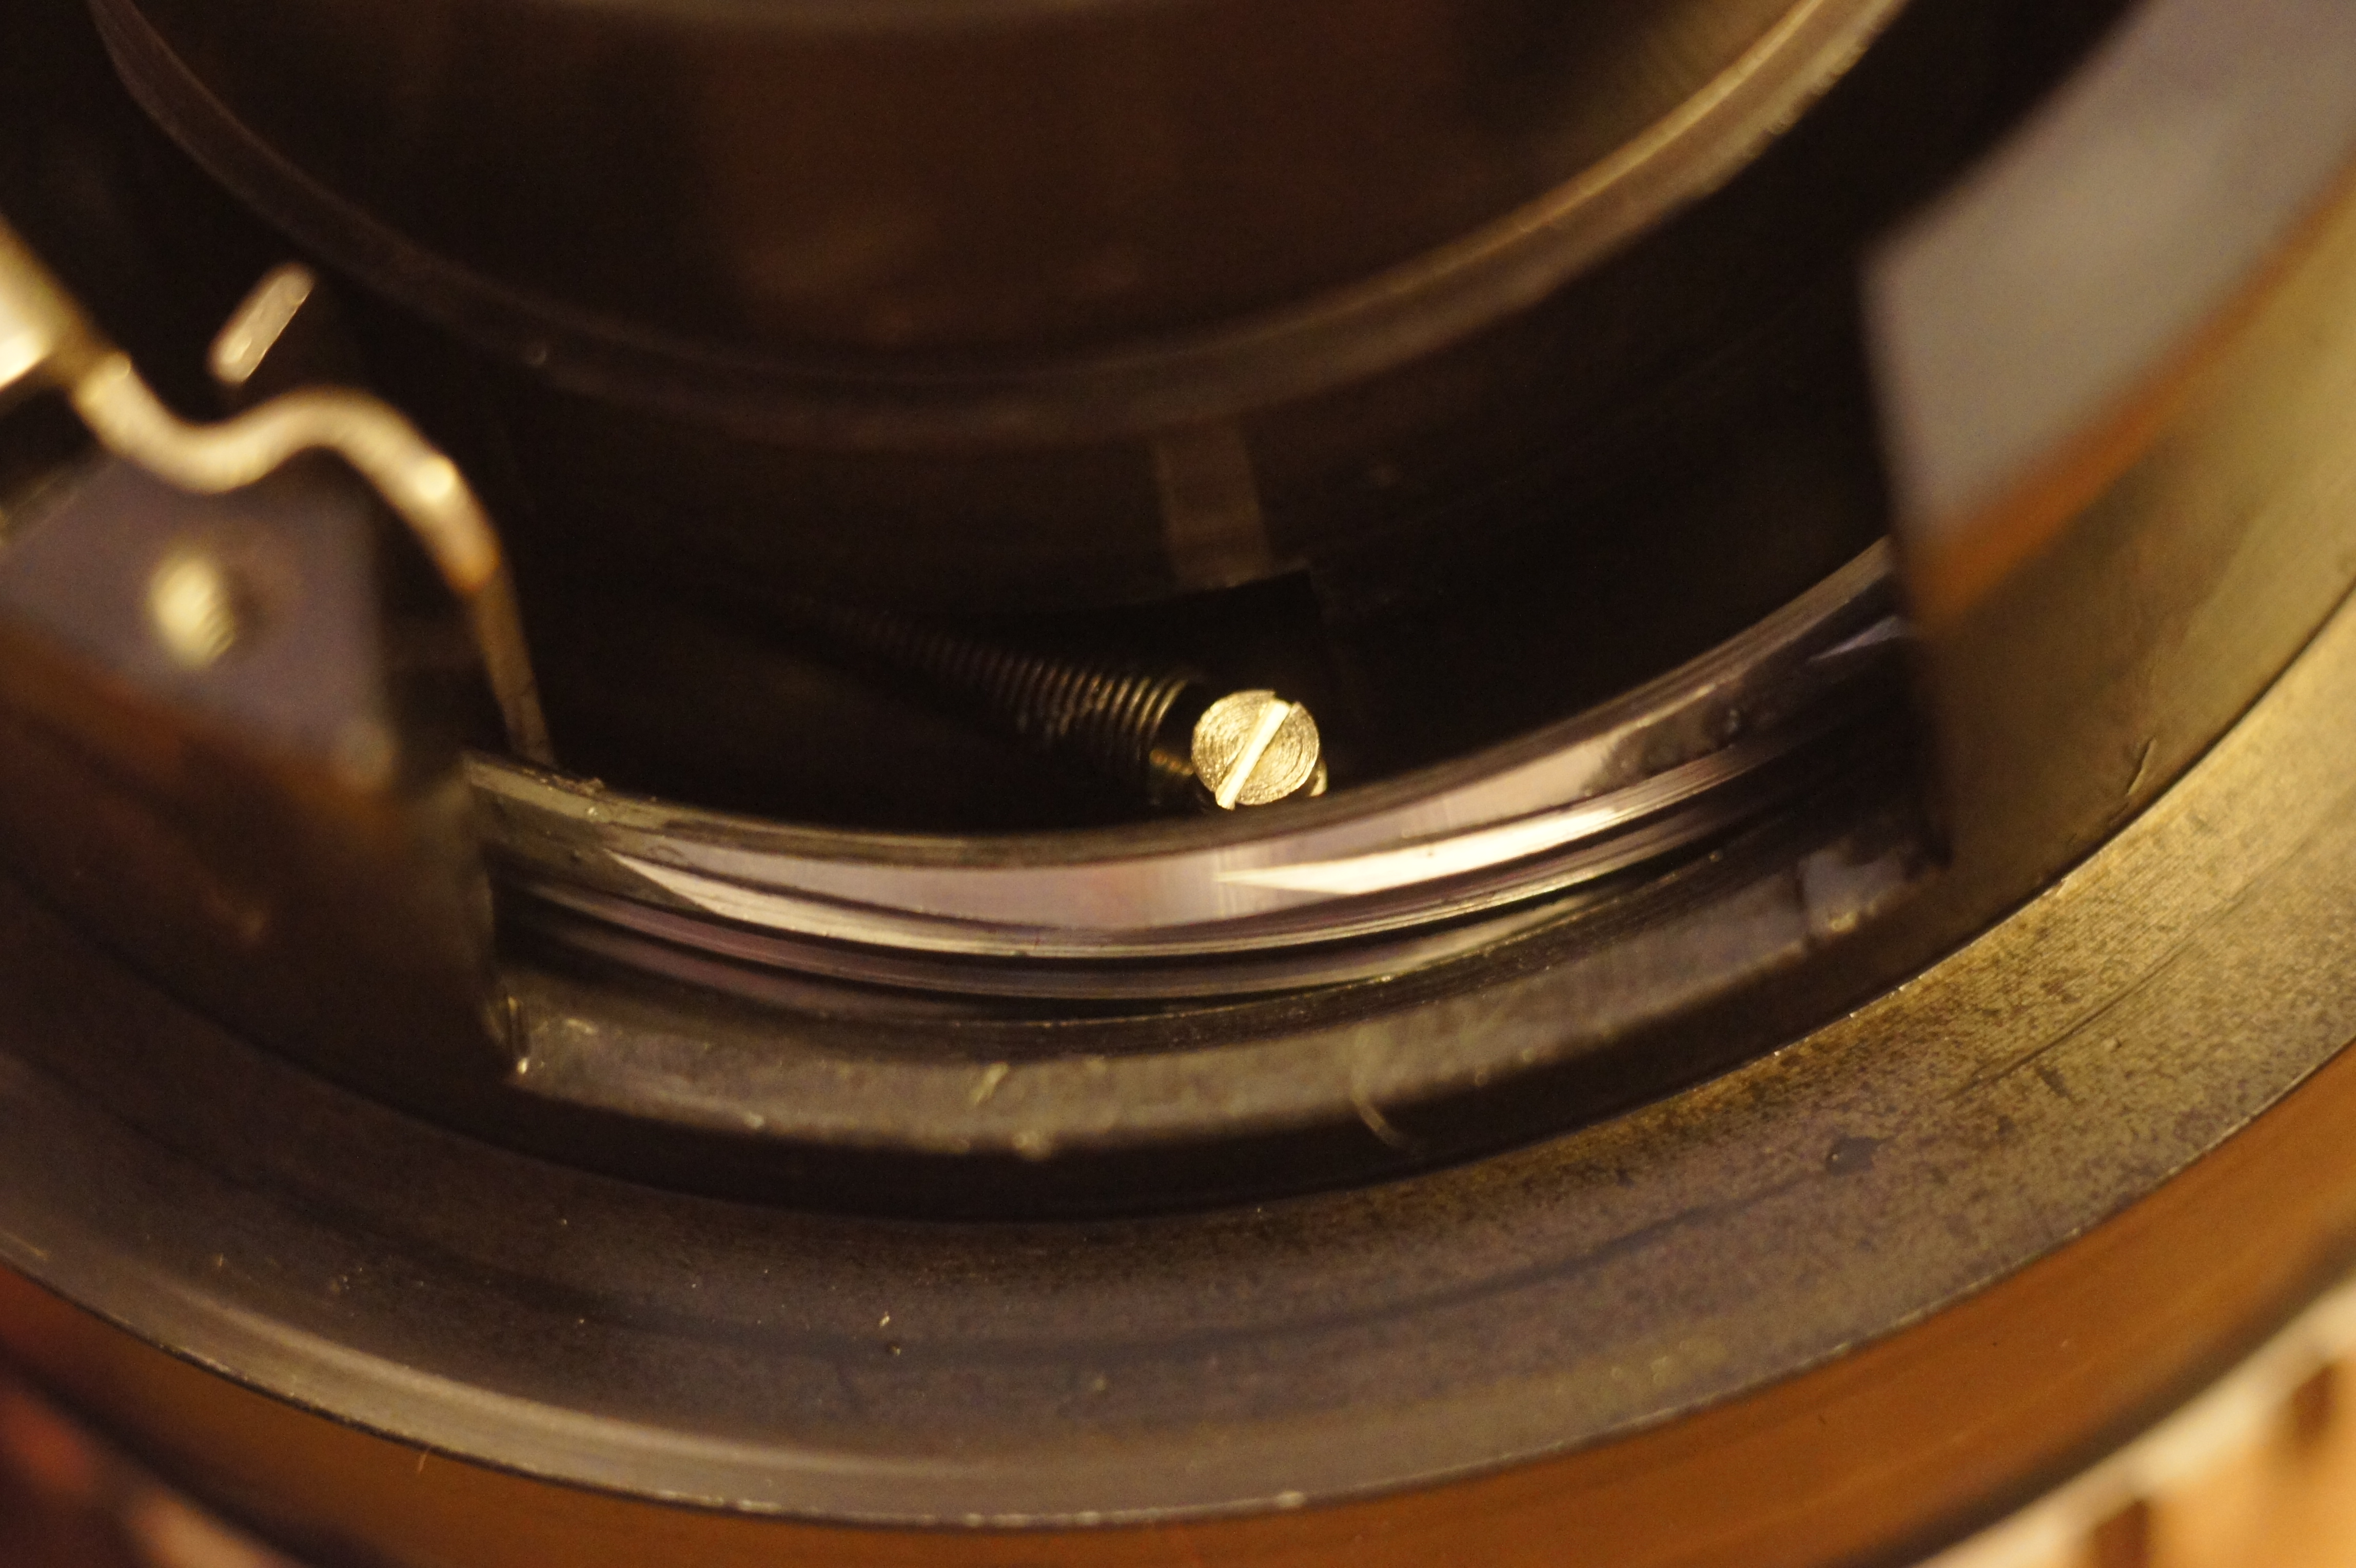
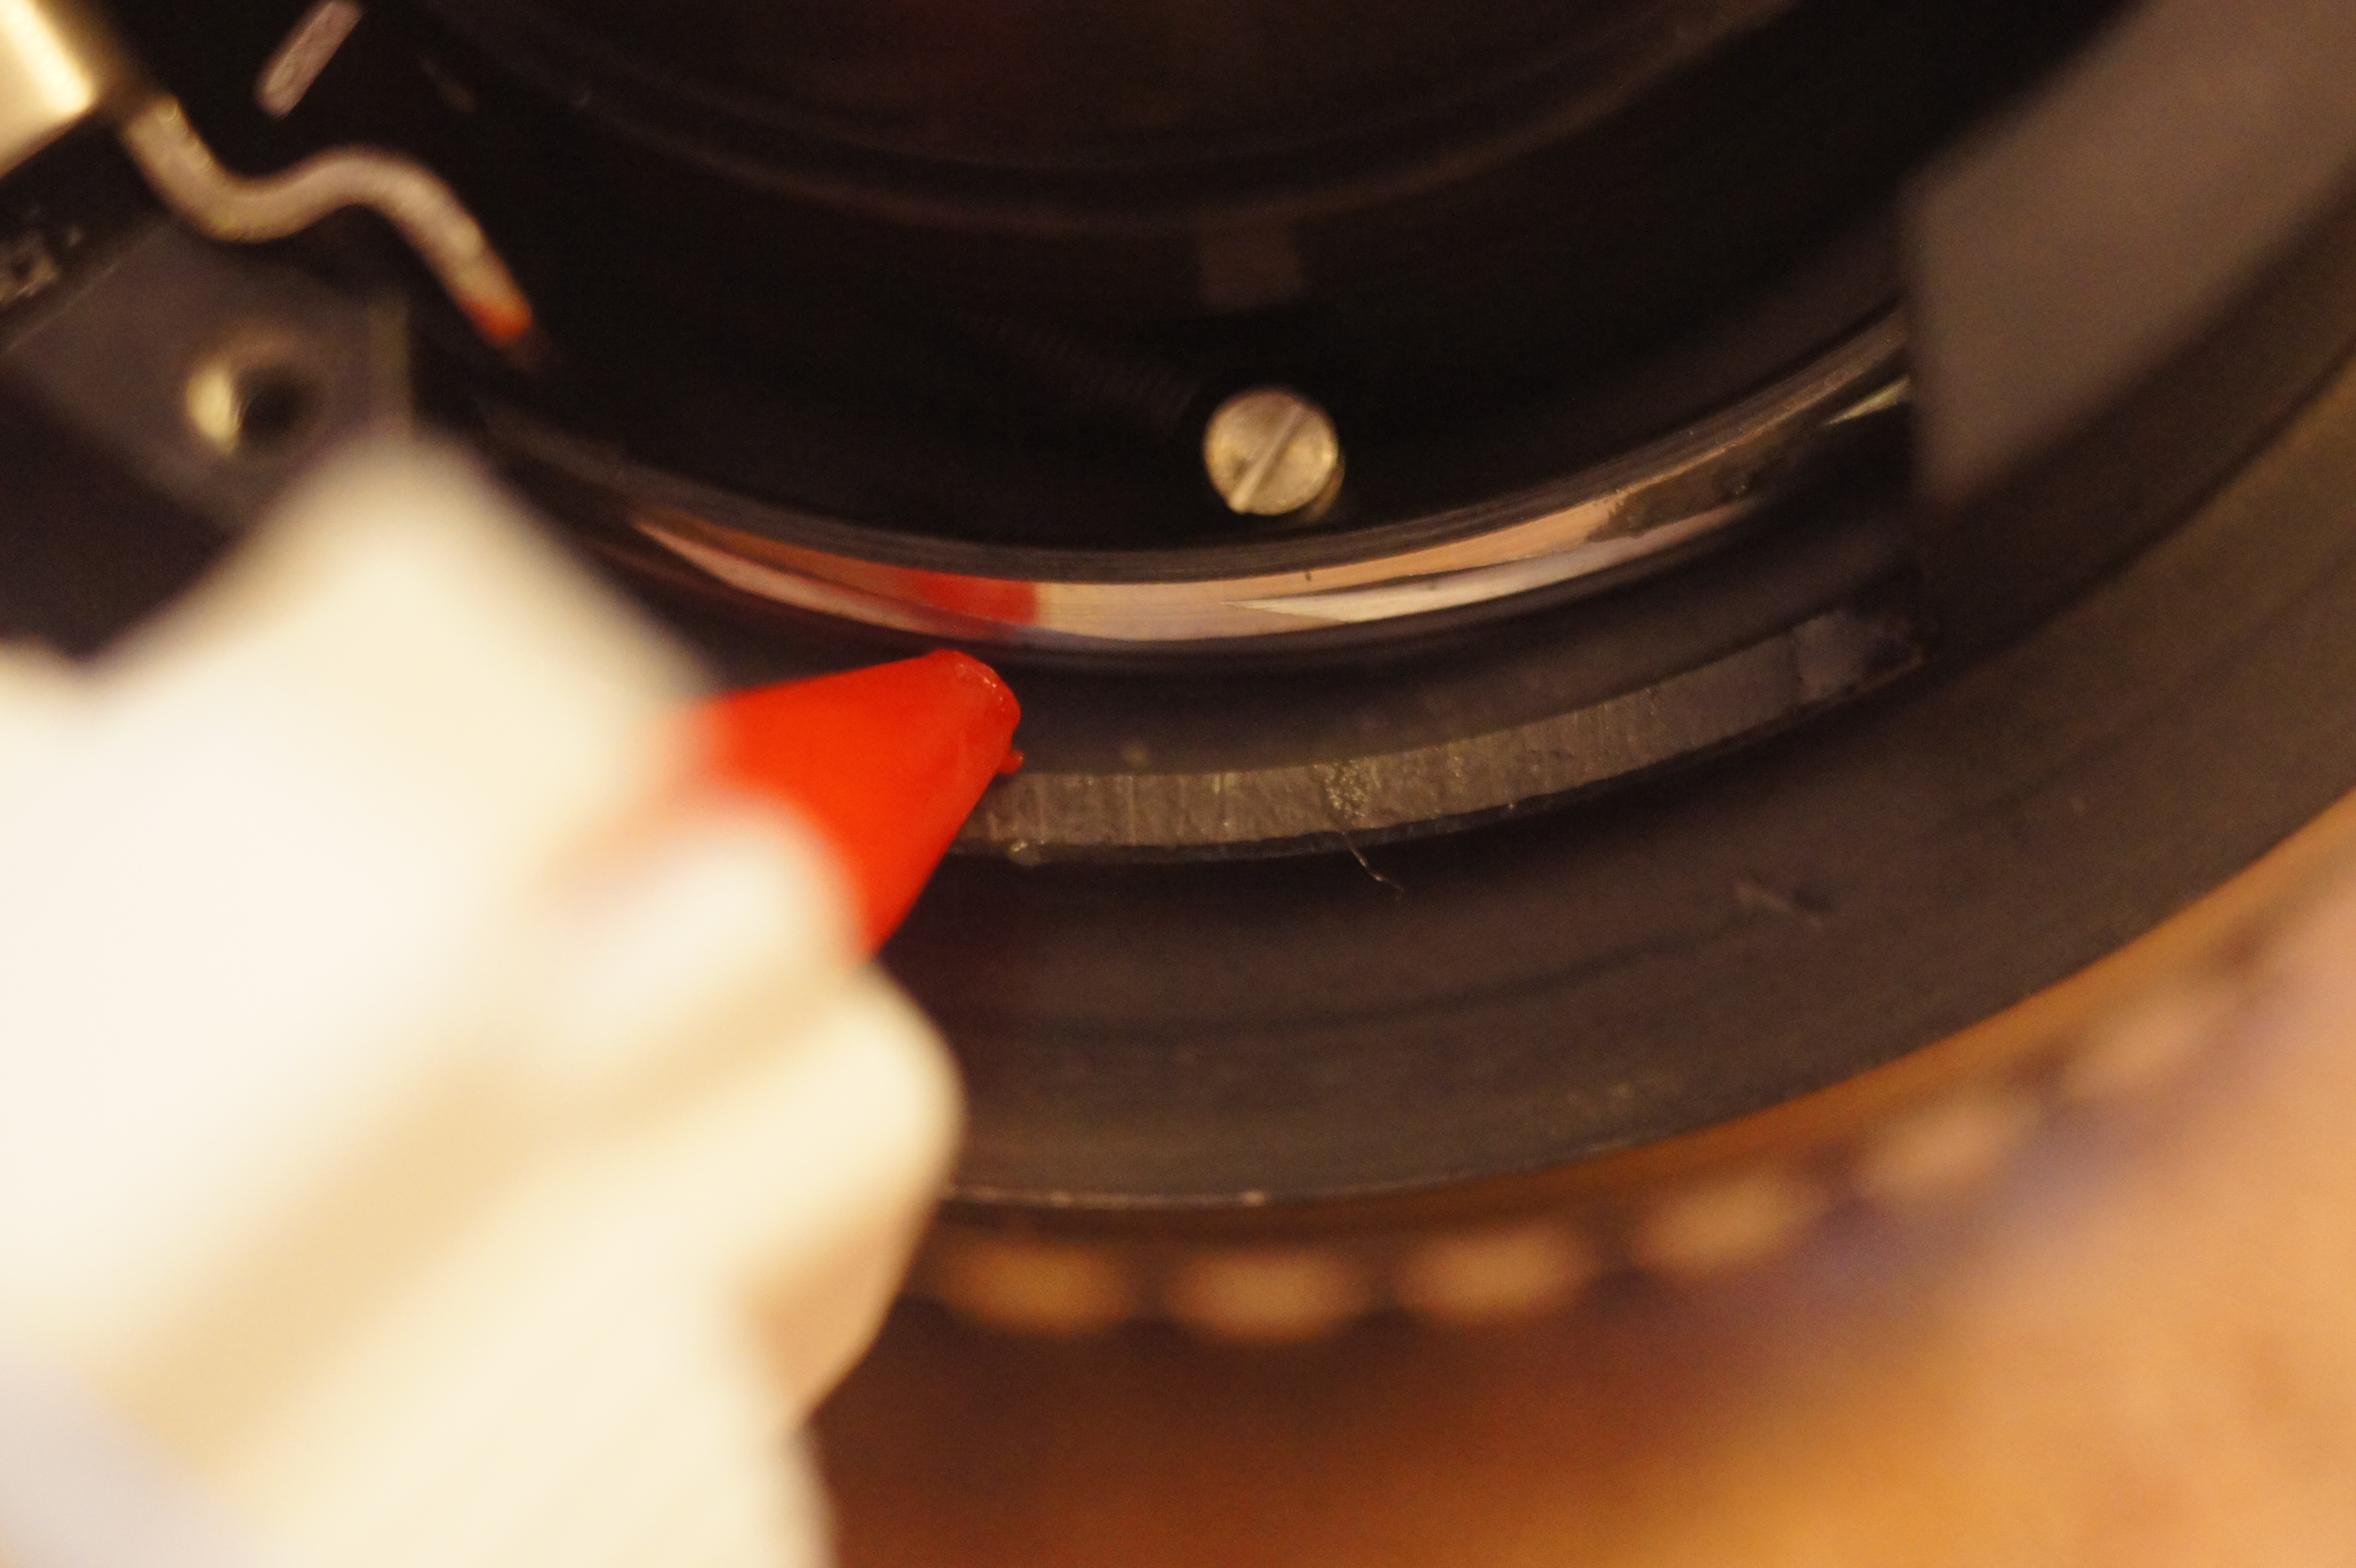
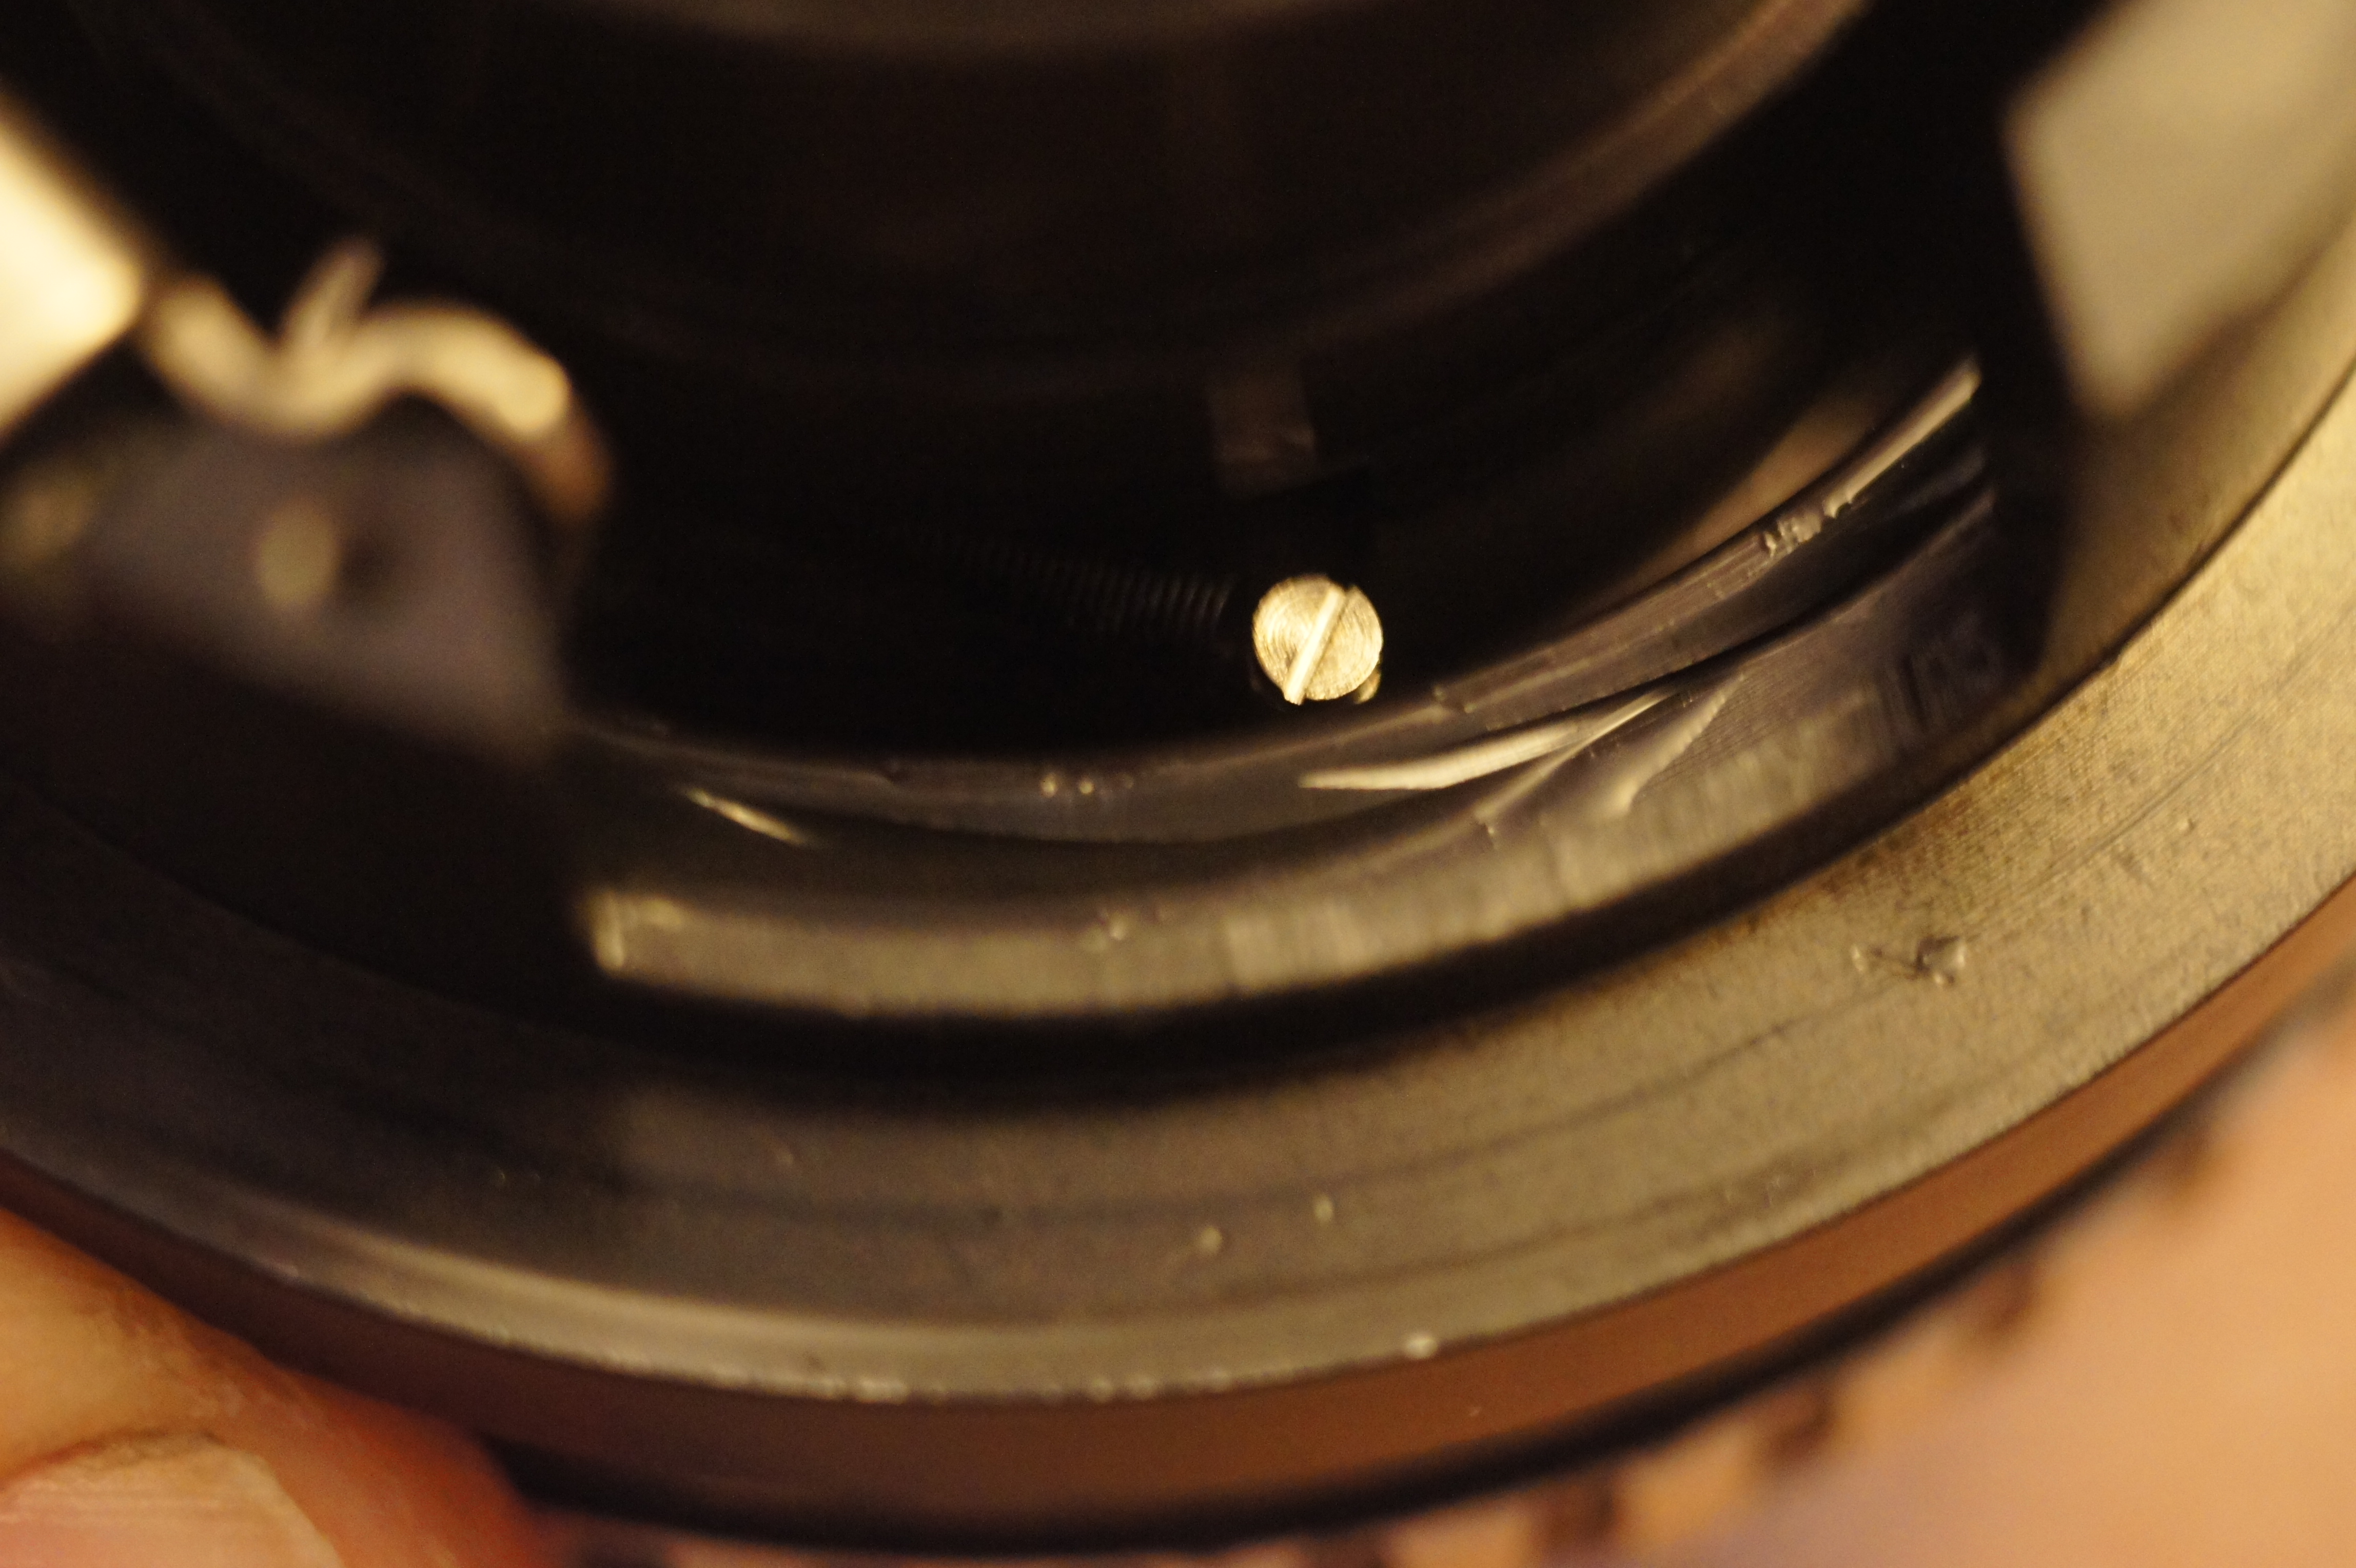
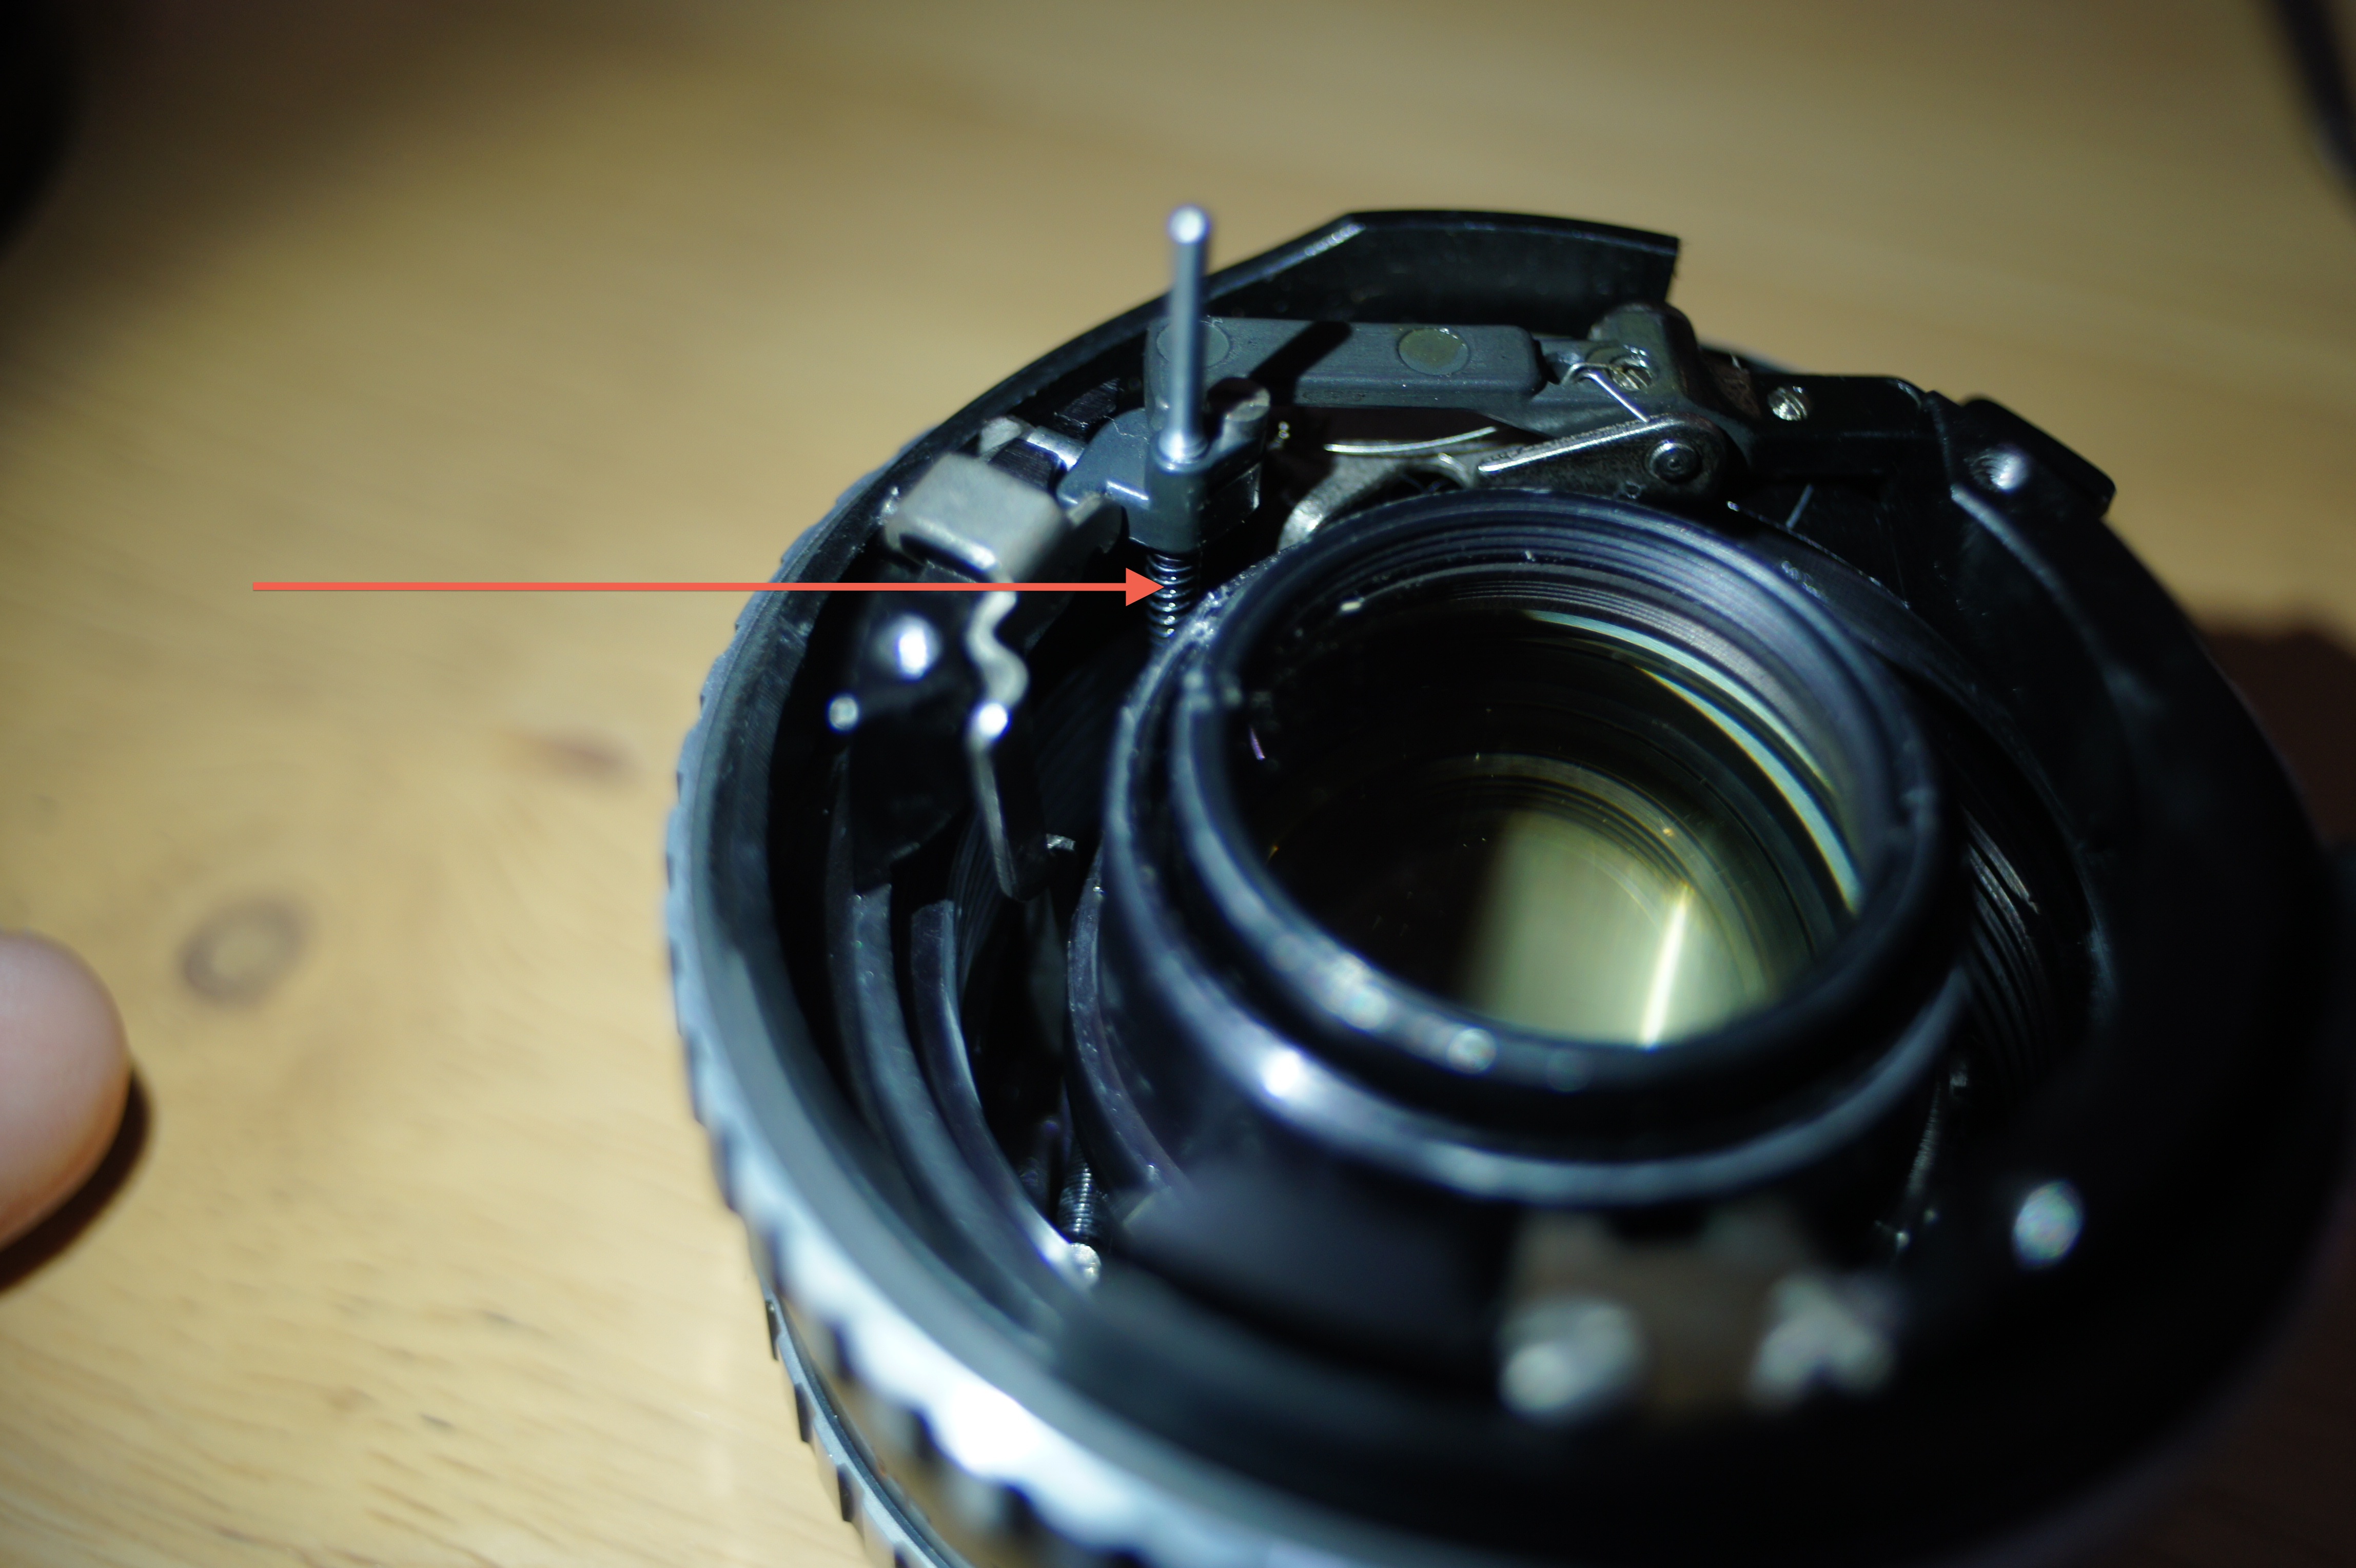
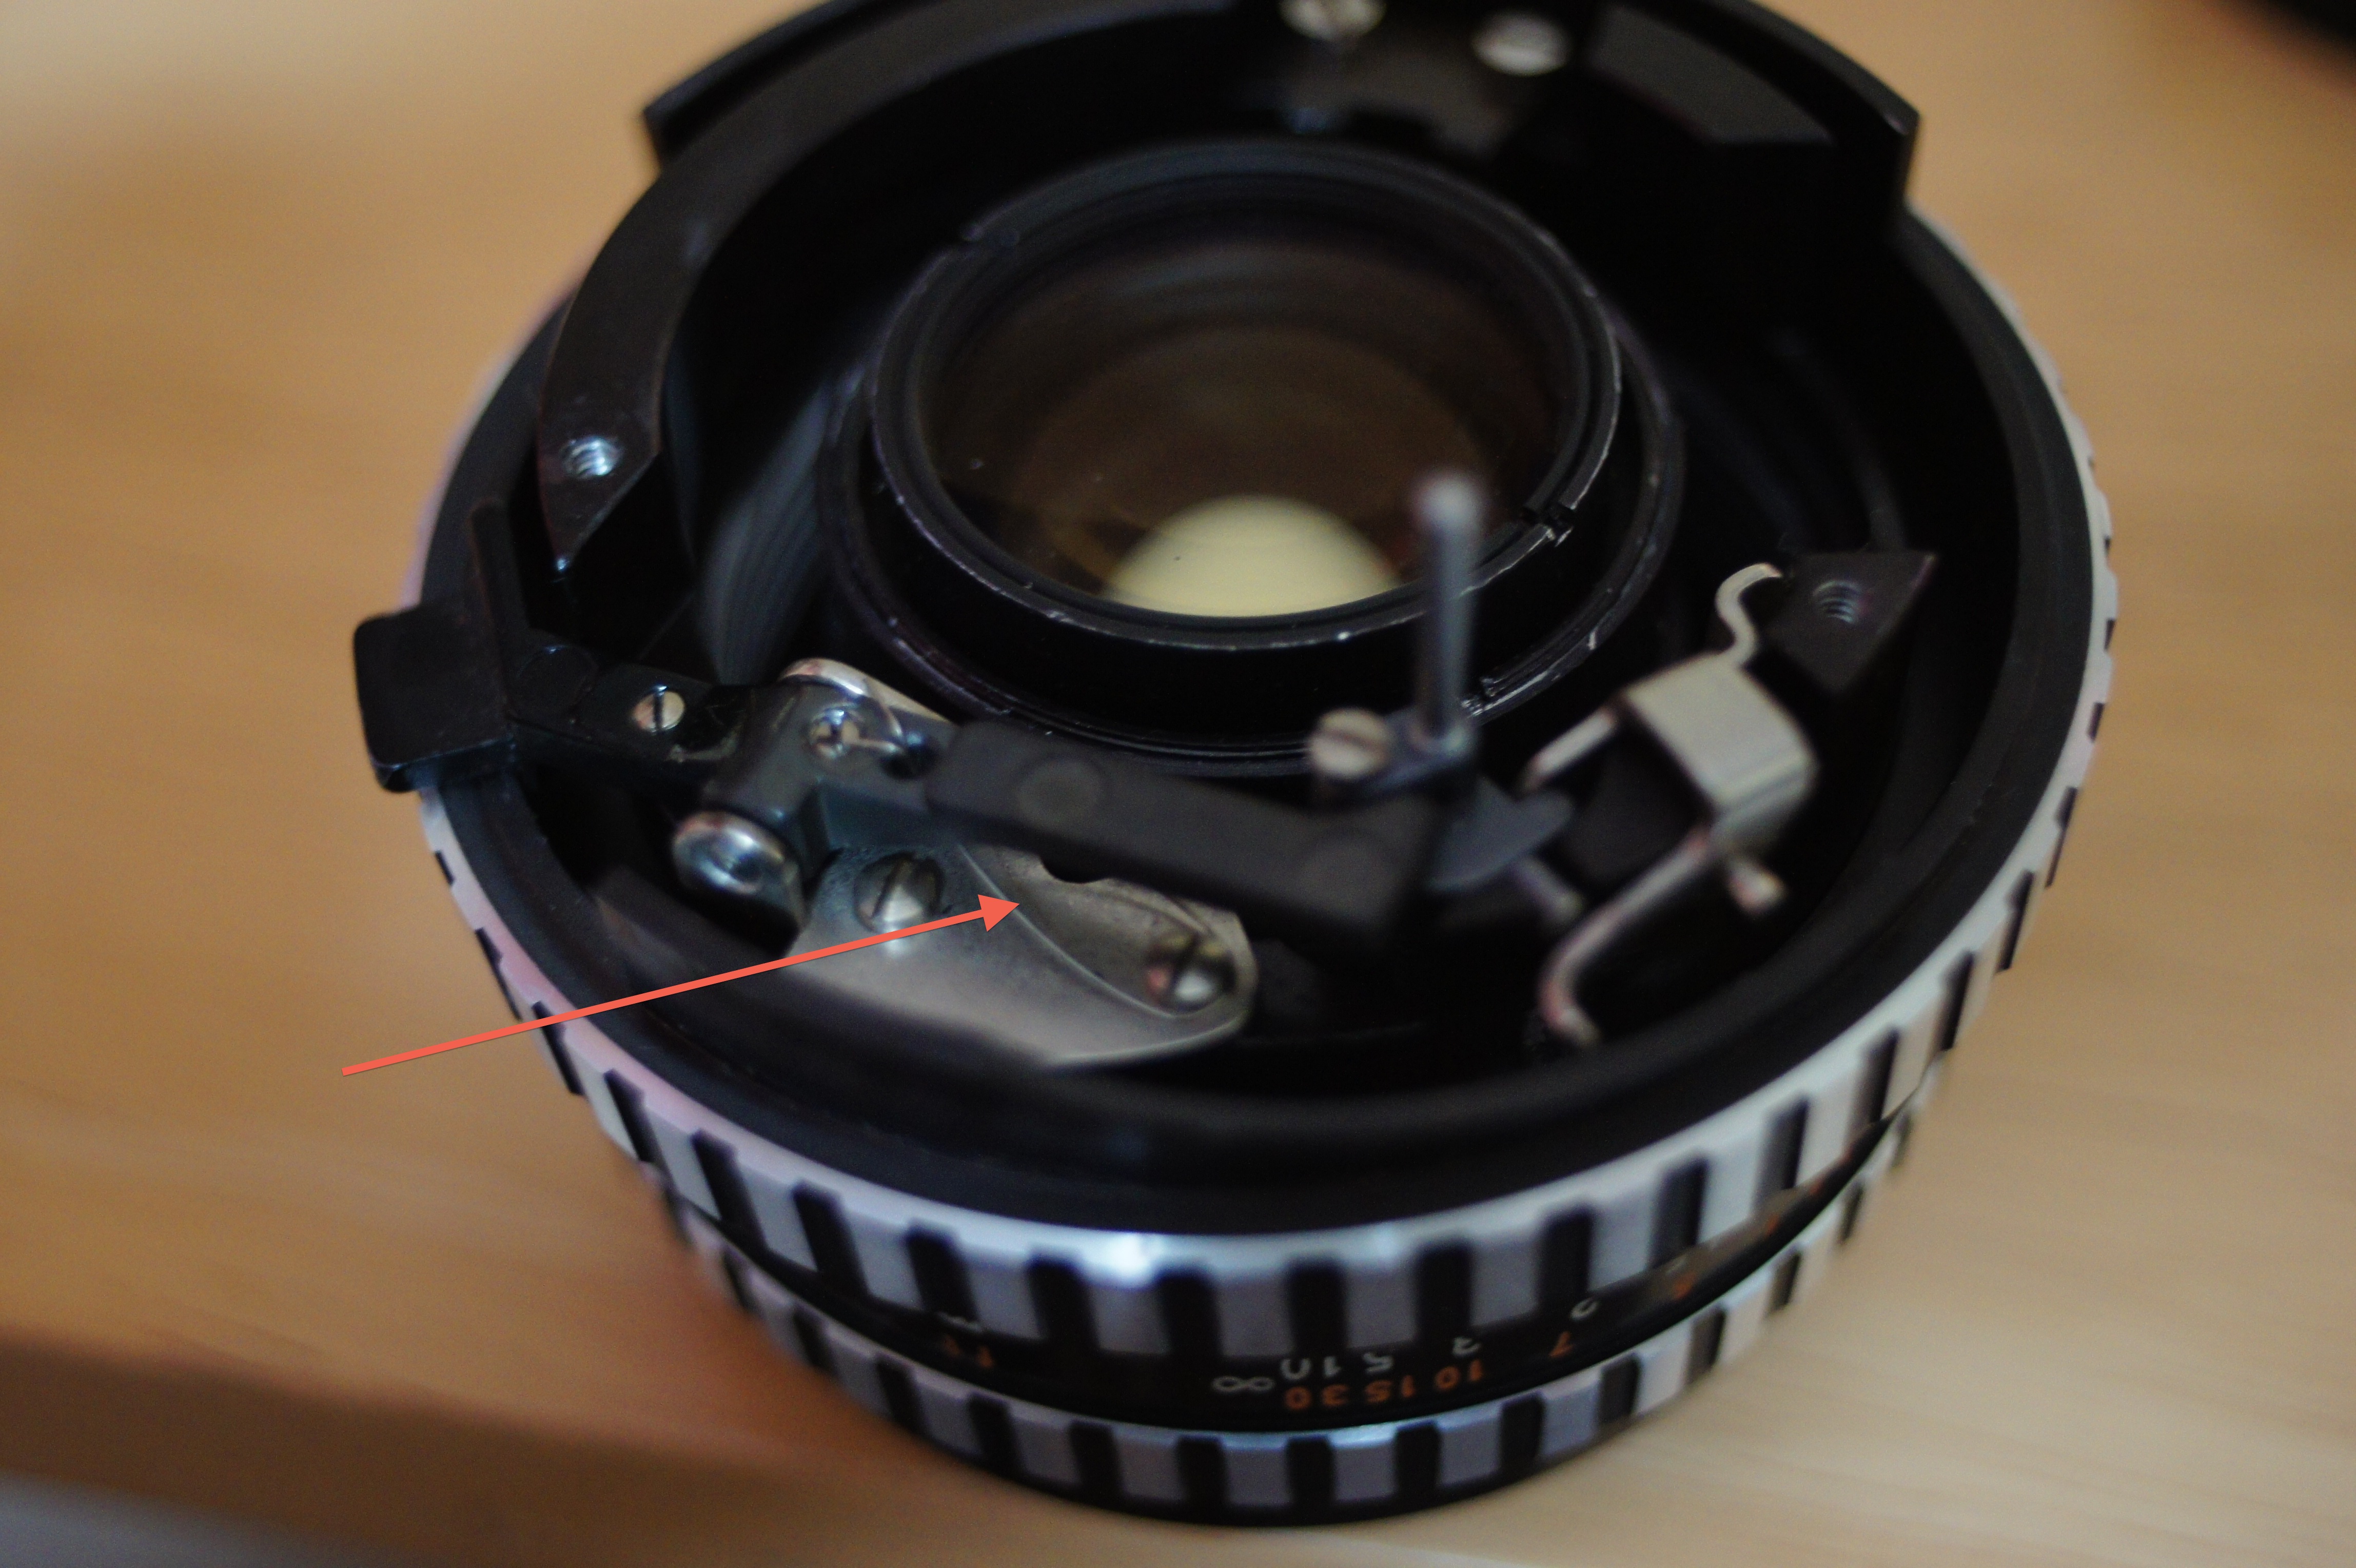
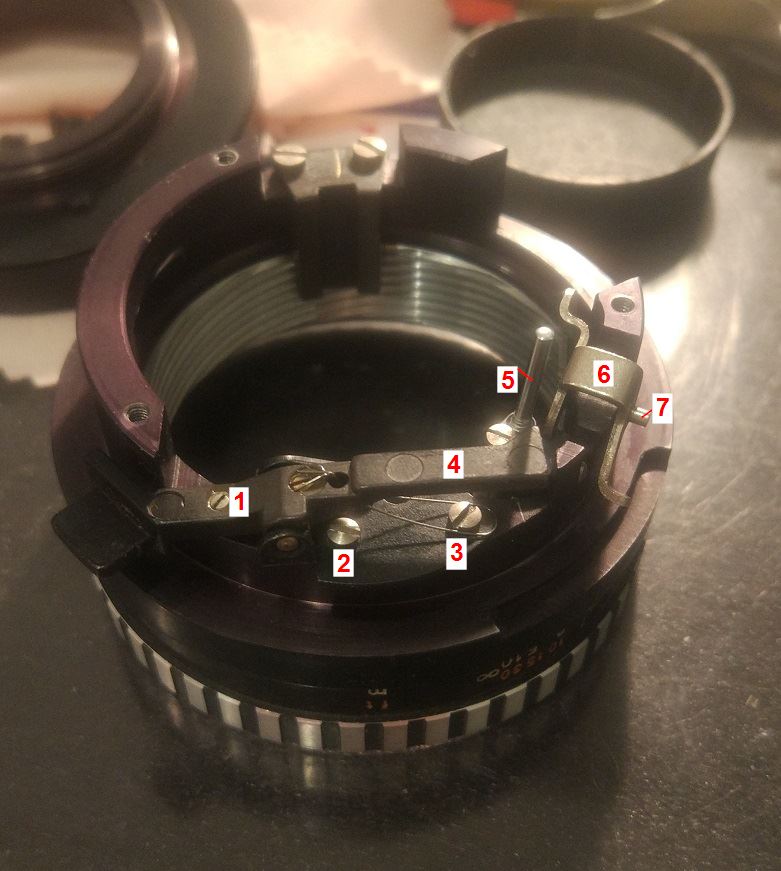
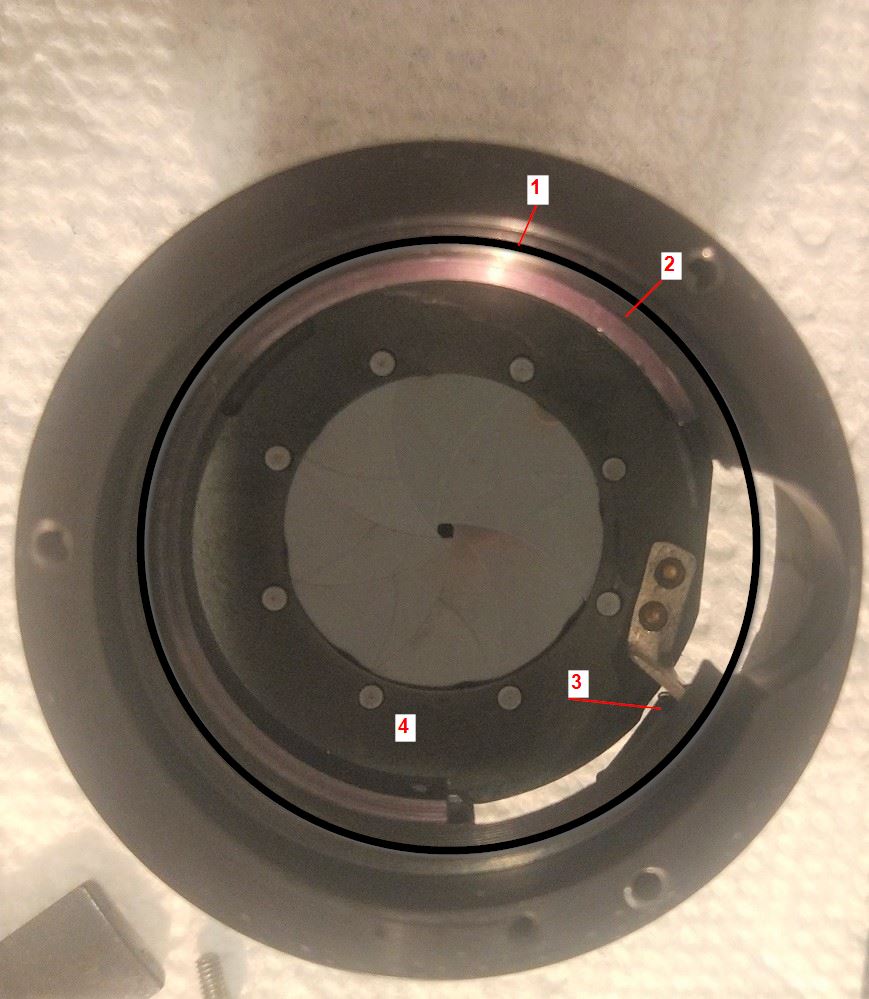
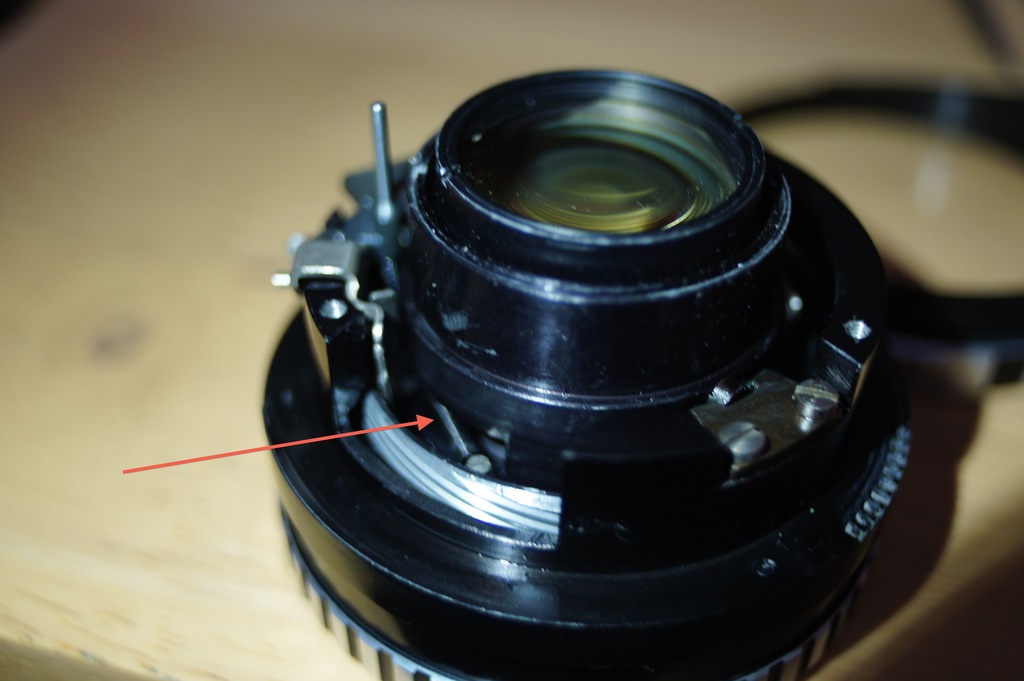
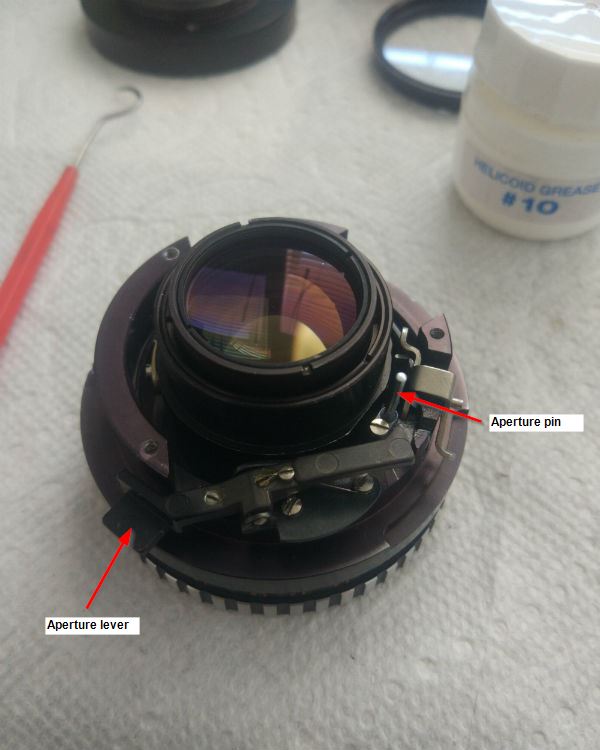
mareinke wrote:
I just followed the ideas of eddieitman and Andreq, below is how.
pic1, remove 3 small flat head screws, and pull out the Front Casing.
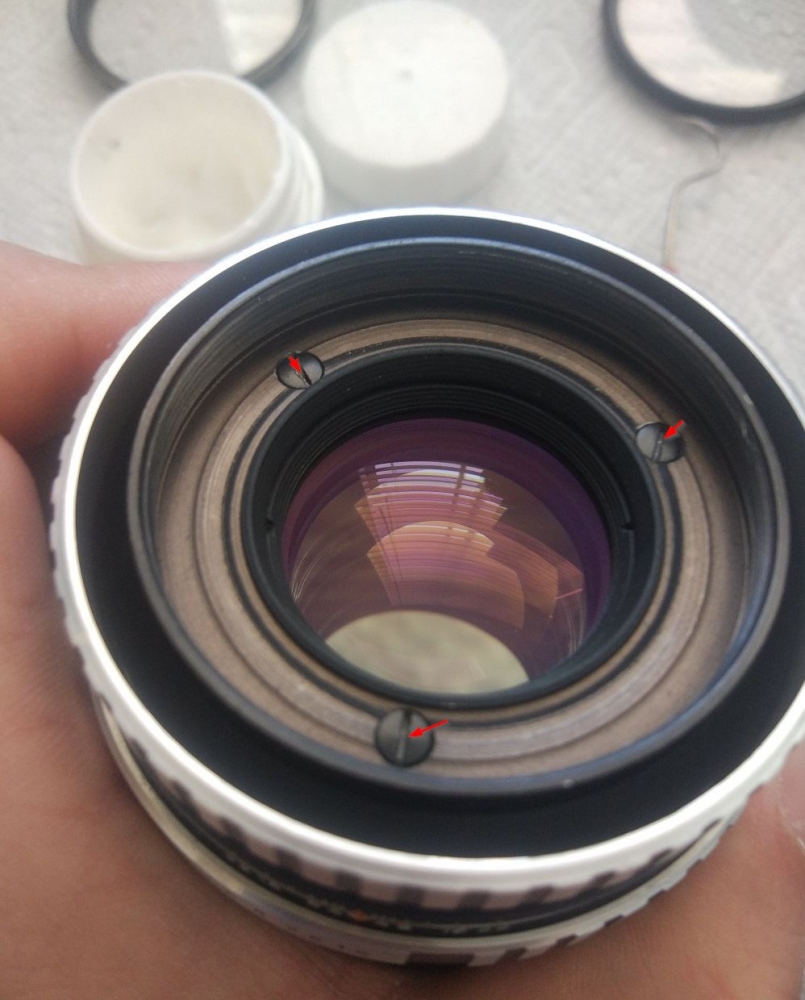
pic2, use a Lens spanner unscrew the retaining ring and then Front Element is out, now switch to the back
pic3

pic4

in pic3 and pic4, after removing screw #1, you get enough angle to unscrew #2 and #3.
push down #4(the aperture arm) and #6(inner lever), shake #5(aperture pin with bottom spring) out of its original place, now #4 and #5 are free to pull out.
if you like, simply pull out #7 and free #6
after removing #8 2 screws, take out the #9.
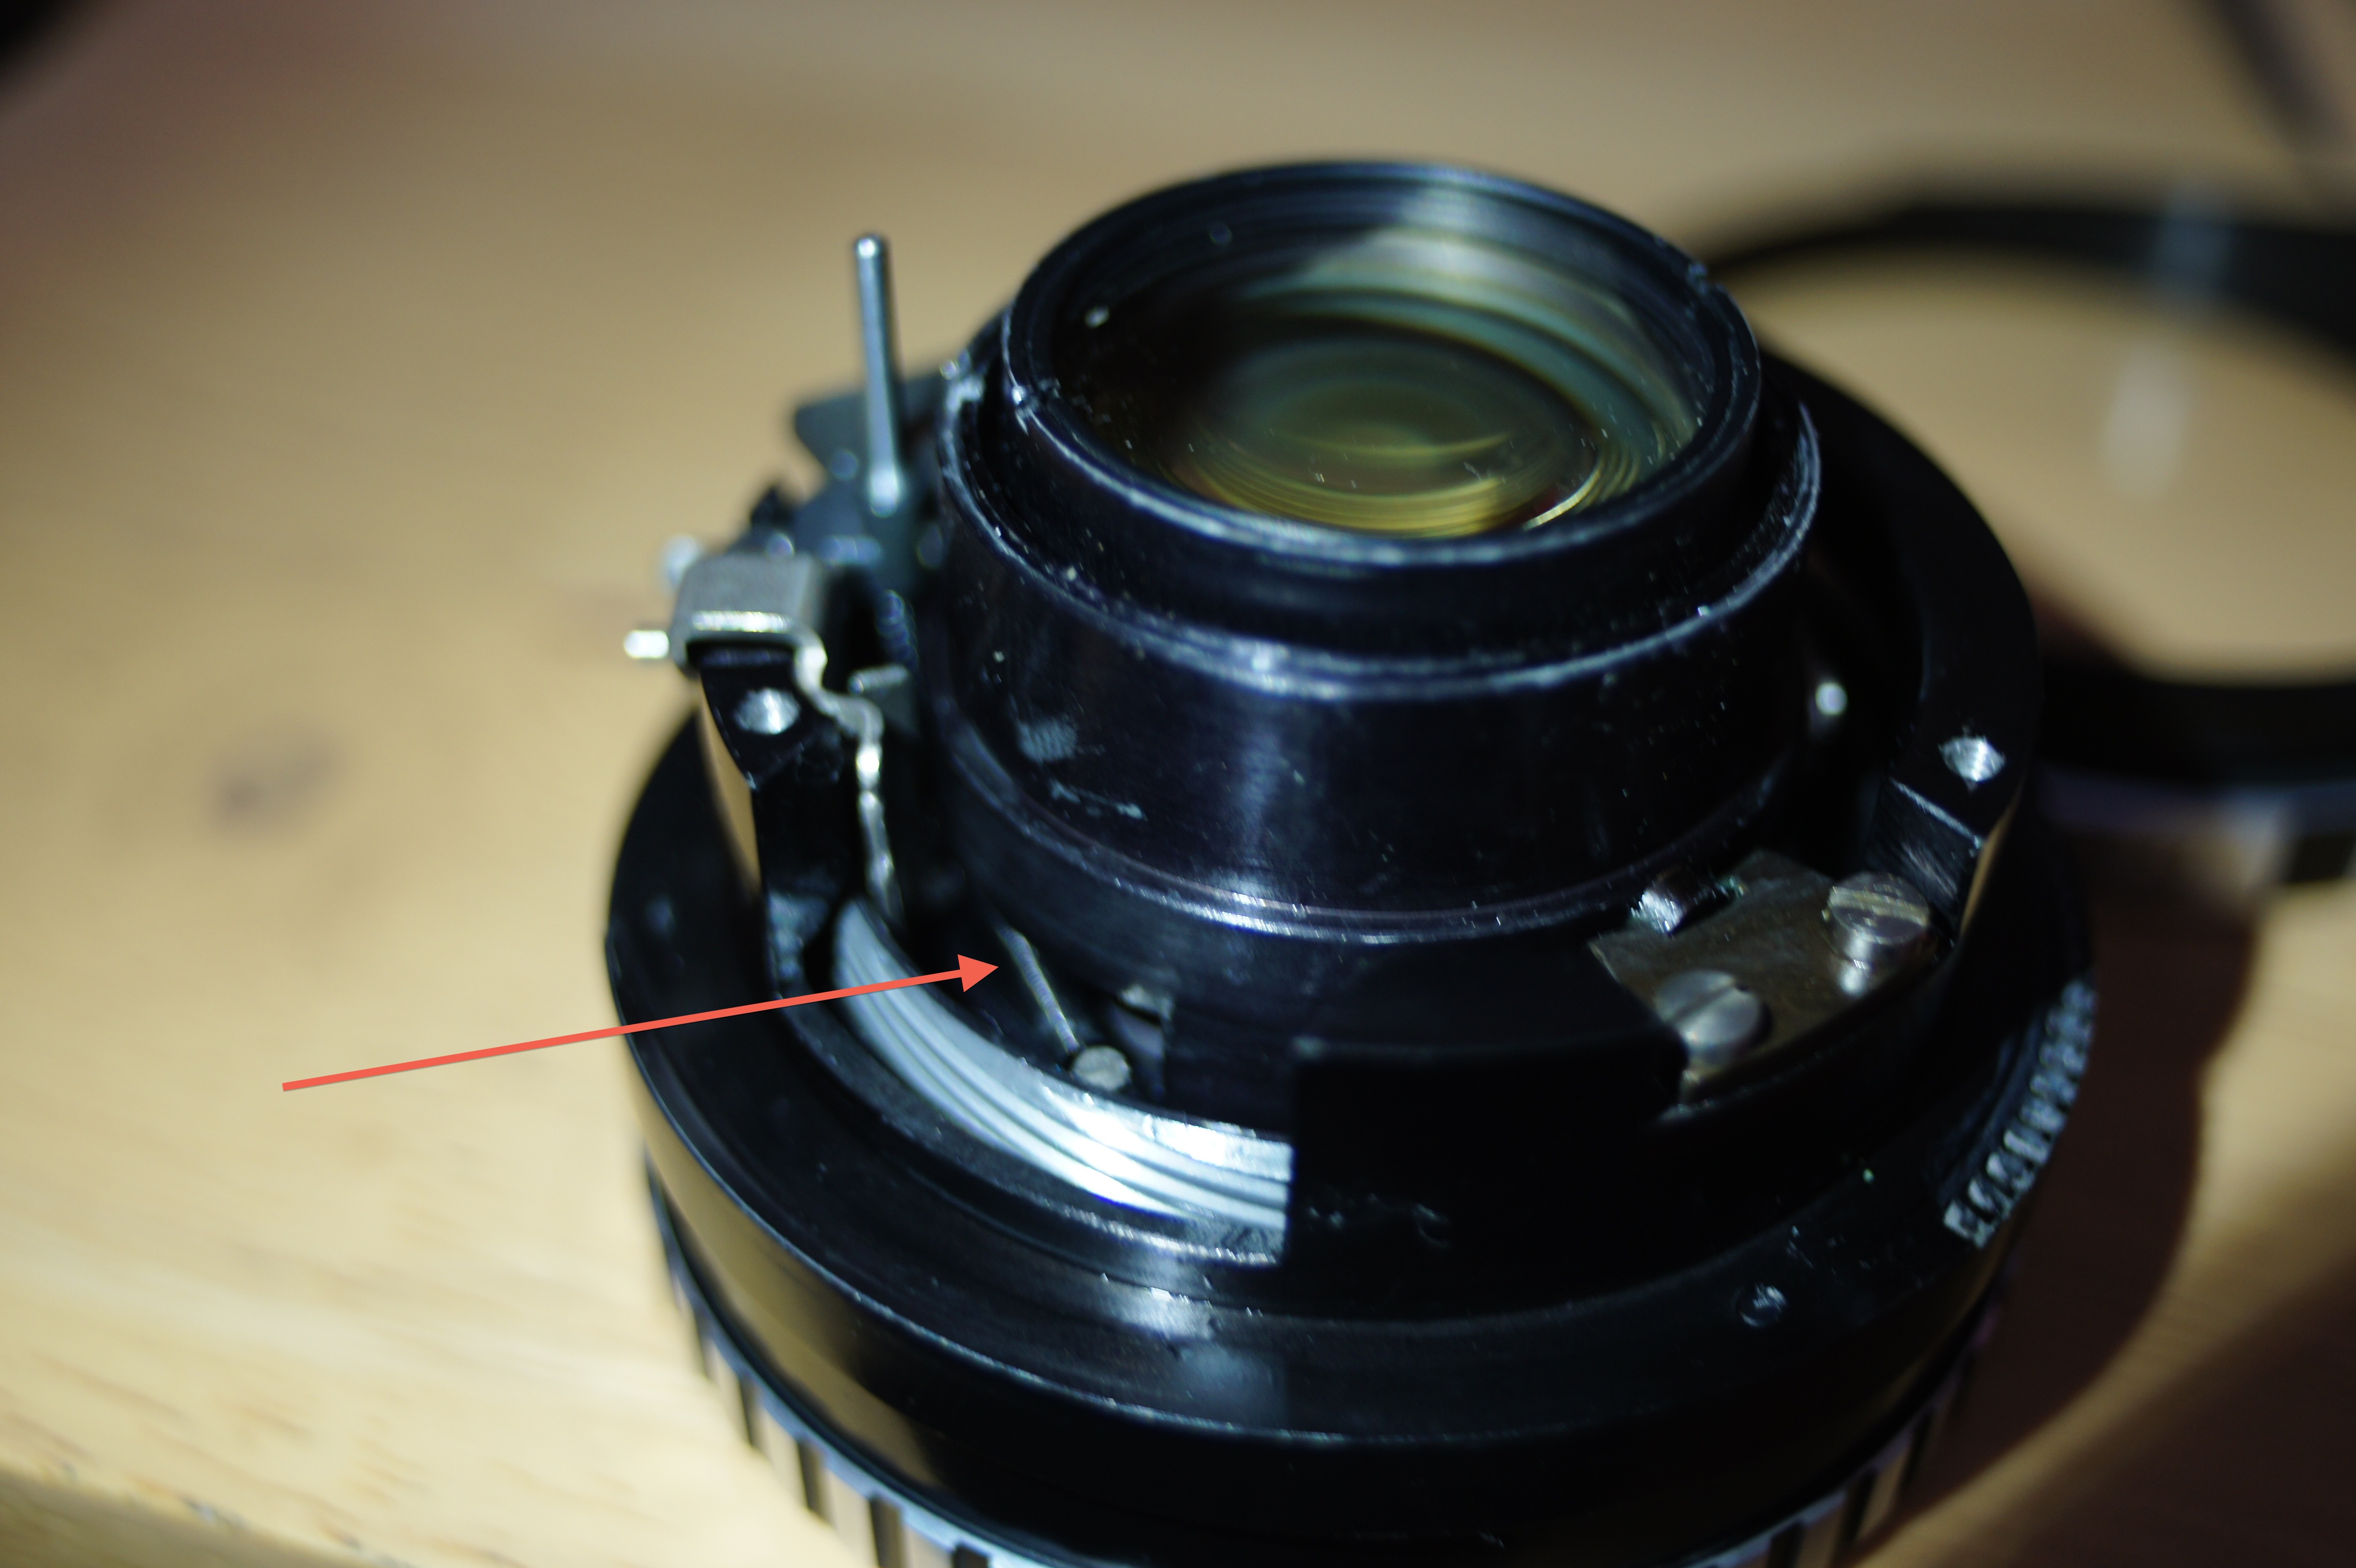
and finally the front helicoid assy can be turned out as well, mark its position for later works.
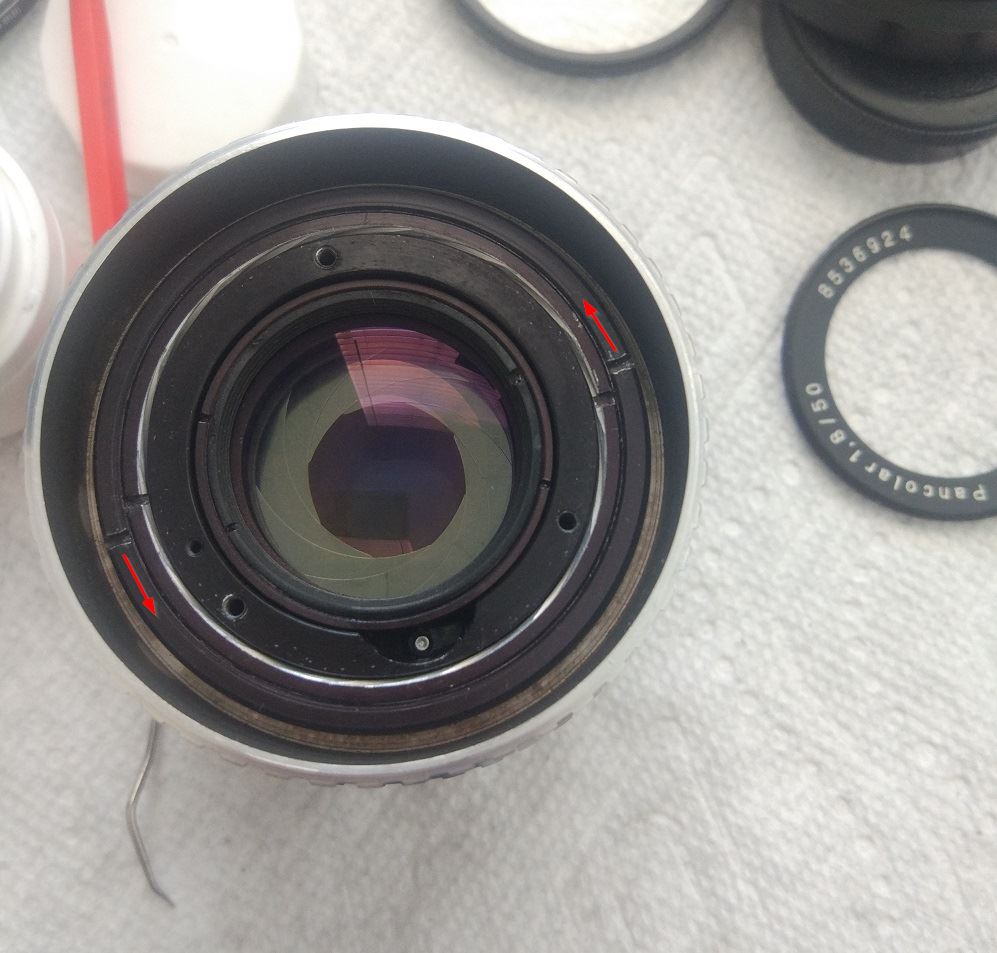
pic5, turn the outer helicoid out of inner helicoid.
pic6, remove #1 aperture plate locker

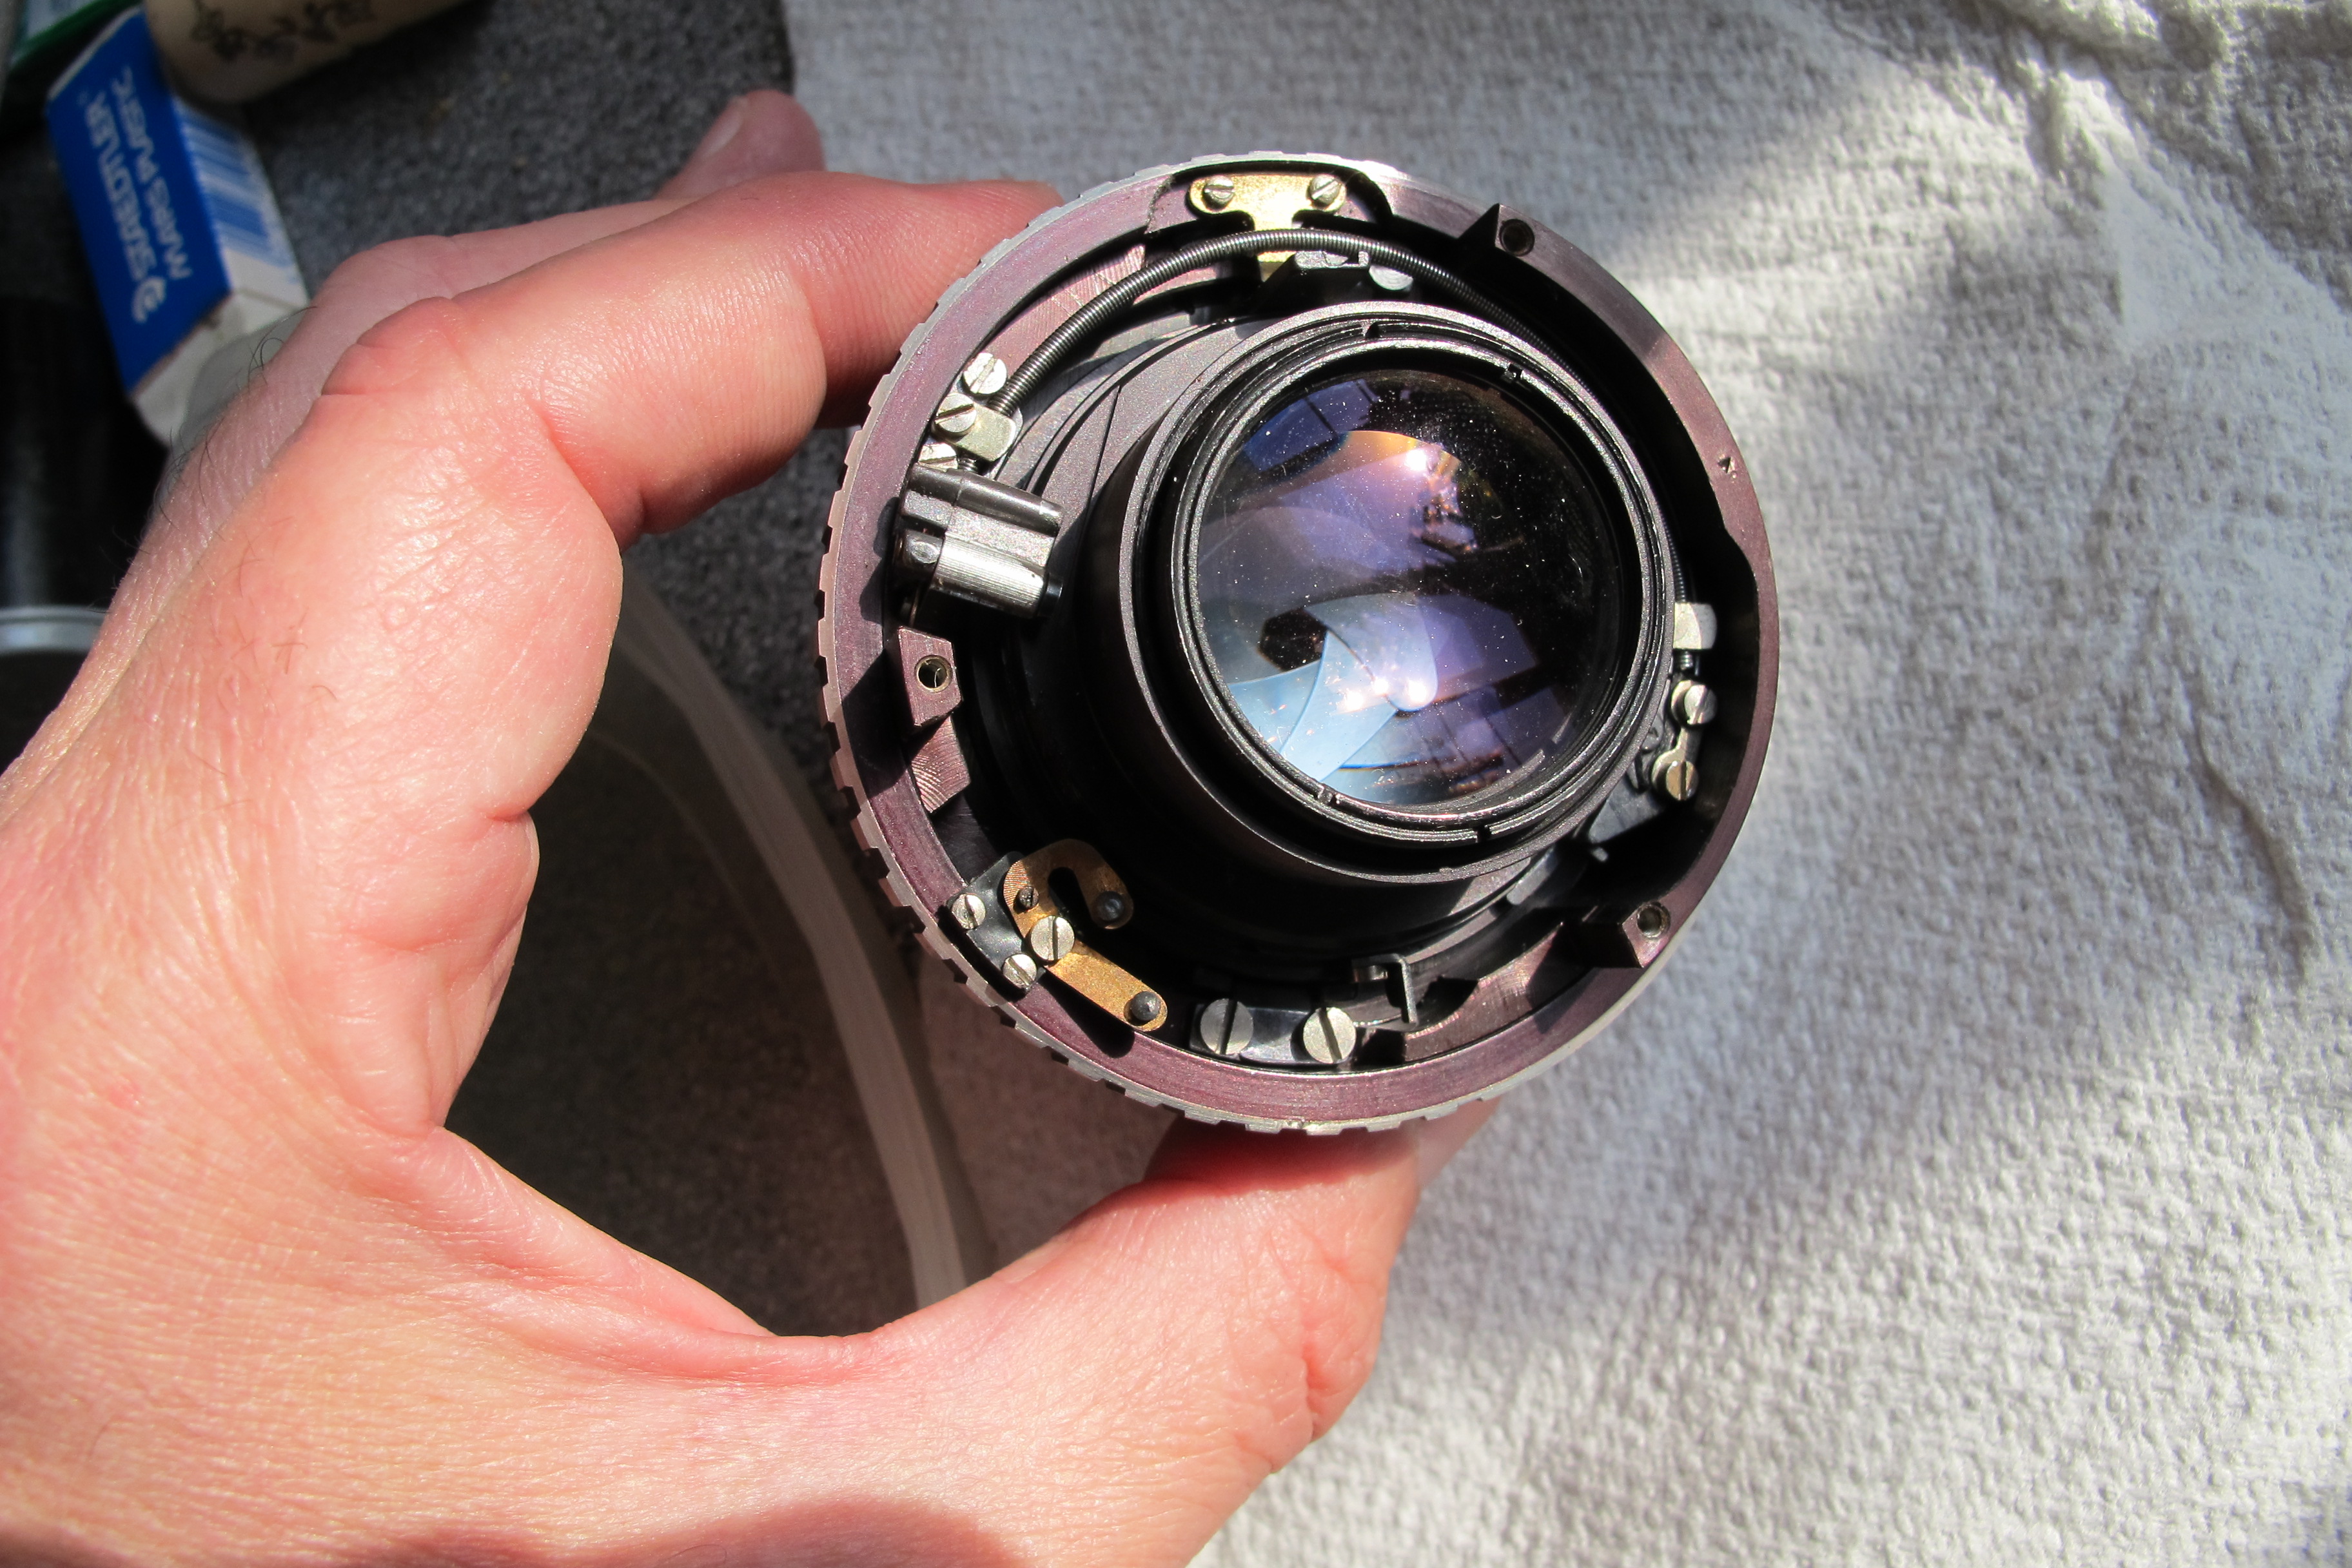
pic7, #1 inner retaining ring, take it out, pull out #2 retaining disk and #3 plate spring, and #4 aperture plate is out.

turn it upside down and get everything you want.
the rest part could be harder because of infinity adjustment.
but, anyway, I still don't know how to enable its aperture without pulling the lever, any idea? |
|
| Back to top |
|
|
y
Joined: 11 Aug 2013
Posts: 304
Location: EU
|
| Posted: Thu Nov 28, 2019 9:07 pm Post subject: |
|
|
y wrote:
Thanks a lot for the detailed guide. I'll try to get into this. |
|
| Back to top |
|
|
mareinke
Joined: 14 Nov 2013
Posts: 33
Location: LA, CA
|
| Posted: Sat Jan 11, 2020 12:33 am Post subject: |
|
|
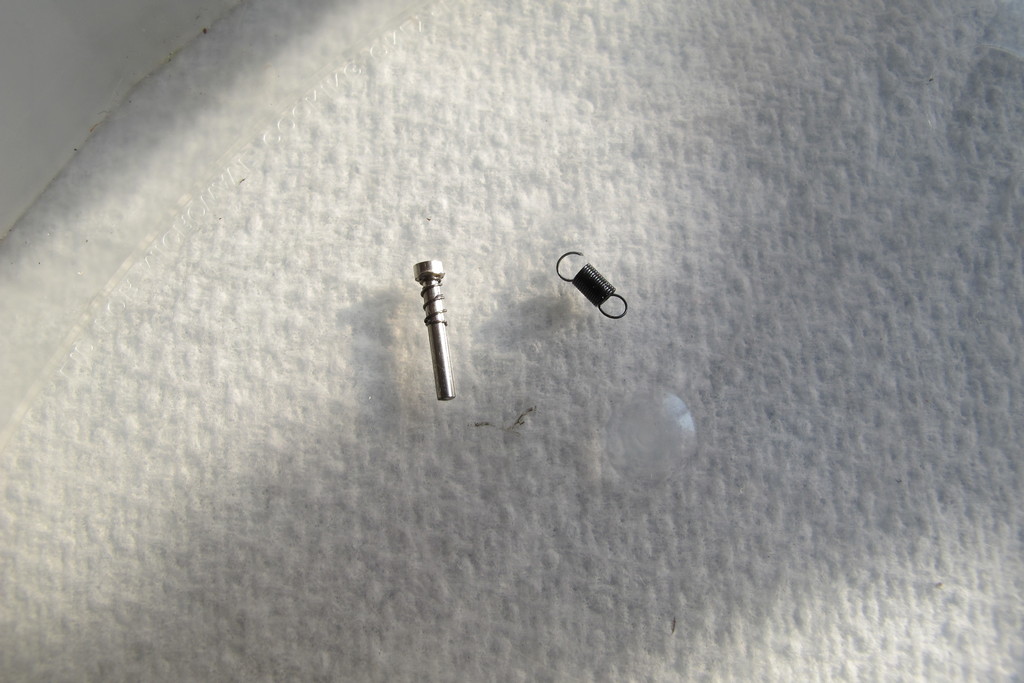
mareinke wrote:
| y wrote: |
| Thanks a lot for the detailed guide. I'll try to get into this. |
I ended up removing the spring from aperture pin. |
|
| Back to top |
|
|
|
|