| View previous topic :: View next topic |
| Author |
Message |
Jesito


Joined: 24 Aug 2007
Posts: 5745
Location: Olivella, Catalonia, (Spain)
Expire: 2015-01-07
|
 Posted: Sat Feb 09, 2008 9:37 pm Post subject: Yashicamat Lens Hood Posted: Sat Feb 09, 2008 9:37 pm Post subject: Yashicamat Lens Hood |
 |
|
Jesito wrote:
Hi colleagues,
Looking for info about my Yashicamat on the net, I've found that the lens is uncoated. I've experienced already the effect of such lenses on my FED-2 with the Industar 61 (too much glare), so I'd like to find a solution, cheap if possible.
Sometime ago I found a place where one could dowload printable hood templates, that did nice emergency hoods. But none that can be used on the Yashicamat.
http://www.lenshoods.co.uk/
Do any of you have gotten a real hood for the YM?.
I'd appreciate very much posting some pictures of such a hood, to see if I cold manage to do one by myself.
Thanks in advance.
Jes.
_________________
Jesito, Moderator 
Jesito's backsack:
Zooms Sigma 70-300, Tamron 35-135 and 70-210 short, 70-210 long, 28-70 CF Macro, 35-70, 35-80, Vivitar 70-210 KA, Tamron 70-250.
Fixed Industar-50, , Tamron 24mm, Tamron 135mm, Sands Hunter 135mm, Pancolar 50mm, Volna-3, many Exakta lenses
DSLR SIGMA SD9 & SD14, EOS 5D, Sony A700 and NEXF3, Oly E-330, E-400, E-450, E-1
TLR/6x6/645 YashicaMat, Petri 6x45, Nettar, Franka Solida, Brilliant
SLR Minolta X300, Fuji STX II, Praktica VLC3, Pentax P30t, EXA500, EXA 1A, Spotmatic(2), Chinon CM-4S, Ricoh, Contax, Konica TC-X , Minolta 5000, 7000i, 3Sxi, EOS 500 and CX
Rangefinders Chinon 35EE, Konica C35 auto, Canonet 28, Yashica Lynx, FED-2, Yashica electro 35, Argus C3 & C4, Regula Cita III, Voigtlander Vitoret (many), Welta Welti-I, Kodak Signette 35, Zorki-4, Bessa-R & L, Minolta Weathermatic, olympus XA2
Compact Film Konica C35V, Voigtlander Vitorets, Canon Prima Super 105, Olympus XA2 and XA3
Compact Digital Olympus C-5050, Aiptek Slim 3000, Canon Powershot A540, Nikon 5200, SIGMA DP1s, Polaroid X530, IXUS55, Kodak 6490, Powershot G9 and G10
CSCCanon EOS-M, Samsung NX100 and NX210, Lumix G5, NEX-F3 |
|
| Back to top |
|
 |
bob955i

Joined: 15 Apr 2007
Posts: 2495
|
| Posted: Sat Feb 09, 2008 9:42 pm Post subject: |
|
|
bob955i wrote:
Jes:
I have the hood for my 635.
They look like the one in this link (some have reported bad experiences with this seller by the way):
Click here to see on Ebay
The Yashi uses the Rollei BAY1 bayonet for fitting filters and hoods - you can either get the proper hood on Ebay, or get a BAY1-46mm adapter and use a conventional hood and/or filter/s. If you go down the adapter route, make sure that the threaded part's diameter doesn't obscure the viewing lens too much.... 
Either the Rollei or Yashica hoods will fit and look correct as they are the same size and shape - it all depends on how fussy you are about having a Rollei branded hood on a Yashica for example.
Last edited by bob955i on Sat Feb 09, 2008 10:12 pm; edited 2 times in total |
|
| Back to top |
|
|
Jesito
Joined: 24 Aug 2007
Posts: 5745
Location: Olivella, Catalonia, (Spain)
Expire: 2015-01-07
|
| Posted: Sat Feb 09, 2008 10:05 pm Post subject: |
|
|
Jesito wrote:
| bob955i wrote: |
Jes:
I have the hood for my 635.
They look like the one in this link (some have reported bad experiences with this seller by the way):
Click here to see on Ebay
The Yashi uses the Rollei BAY1 bayonet for fitting filters and hoods - you can either get the proper hood on Ebay, or get a BAY1-46mm adapter and use a conventional hood and/or filter/s. If you go down the adapter route, make sure you don't obscure the viewing lens too much....
Either the Rollei or Yashica hoods will fit and look correct as they are the same size and shape - it all depends on how fussy you are about having a Rollei branded hood on a Yashica for example. |
Thanks Bob!
No problem with showing other brands over the camera, if the hood works.
I know that seller, I did buy some thing in the past with no problems.
I'll try to get this.
Thanks again!.
Jes.
_________________
Jesito, Moderator
Jesito's backsack:
Zooms Sigma 70-300, Tamron 35-135 and 70-210 short, 70-210 long, 28-70 CF Macro, 35-70, 35-80, Vivitar 70-210 KA, Tamron 70-250.
Fixed Industar-50, , Tamron 24mm, Tamron 135mm, Sands Hunter 135mm, Pancolar 50mm, Volna-3, many Exakta lenses
DSLR SIGMA SD9 & SD14, EOS 5D, Sony A700 and NEXF3, Oly E-330, E-400, E-450, E-1
TLR/6x6/645 YashicaMat, Petri 6x45, Nettar, Franka Solida, Brilliant
SLR Minolta X300, Fuji STX II, Praktica VLC3, Pentax P30t, EXA500, EXA 1A, Spotmatic(2), Chinon CM-4S, Ricoh, Contax, Konica TC-X , Minolta 5000, 7000i, 3Sxi, EOS 500 and CX
Rangefinders Chinon 35EE, Konica C35 auto, Canonet 28, Yashica Lynx, FED-2, Yashica electro 35, Argus C3 & C4, Regula Cita III, Voigtlander Vitoret (many), Welta Welti-I, Kodak Signette 35, Zorki-4, Bessa-R & L, Minolta Weathermatic, olympus XA2
Compact Film Konica C35V, Voigtlander Vitorets, Canon Prima Super 105, Olympus XA2 and XA3
Compact Digital Olympus C-5050, Aiptek Slim 3000, Canon Powershot A540, Nikon 5200, SIGMA DP1s, Polaroid X530, IXUS55, Kodak 6490, Powershot G9 and G10
CSCCanon EOS-M, Samsung NX100 and NX210, Lumix G5, NEX-F3 |
|
| Back to top |
|
|
bob955i
Joined: 15 Apr 2007
Posts: 2495
|
| Posted: Sat Feb 09, 2008 10:14 pm Post subject: |
|
|
bob955i wrote:
No problem Jes - hope you get it, and at a reasonable price too.  |
|
| Back to top |
|
|
Farside

Joined: 01 Sep 2007
Posts: 6549
Location: Ireland
Expire: 2013-12-27
|
| Posted: Sat Feb 09, 2008 10:53 pm Post subject: |
|
|
Farside wrote:
Bloody 'ell, this bloke's taking the piss...
Click here to see on Ebay
But here's an adapter...
Click here to see on Ebay
_________________
Dave - Moderator
Camera Fiend and Biograph Operator
If I wanted soot and whitewash I'd be a chimney sweep and house painter.
The Lenses of Farside (click)
BUY FRESH FOMAPAN TO HELP KEEP THE FACTORY ALIVE ---
Foma Campaign topic -
http://forum.mflenses.com/foma-campaign-t55443.html
FOMAPAN on forum -
http://www.mflenses.com/fs.php?sw=Fomapan
Webshop EU
http://www.fomafoto.com/ |
|
| Back to top |
|
|
bob955i
Joined: 15 Apr 2007
Posts: 2495
|
| Posted: Sat Feb 09, 2008 11:10 pm Post subject: |
|
|
bob955i wrote:
Using that adapter would be like fitting an auxiliary lens to the existing fixed lens on the TLR - dunno about the impact on IQ here or whether it would be of any advantage. Best adapter is one that allows the fitting of screw filters/hoods - like a step-up ring type.
The hood is a BAY3 and won't fit Jes' Yashi - still a horrendous price though....  |
|
| Back to top |
|
|
Farside
Joined: 01 Sep 2007
Posts: 6549
Location: Ireland
Expire: 2013-12-27
|
| Posted: Sat Feb 09, 2008 11:46 pm Post subject: |
|
|
Farside wrote:
Oops, I don't know where that link came from - was listed in the wrong section entirely.
_________________
Dave - Moderator
Camera Fiend and Biograph Operator
If I wanted soot and whitewash I'd be a chimney sweep and house painter.
The Lenses of Farside (click)
BUY FRESH FOMAPAN TO HELP KEEP THE FACTORY ALIVE ---
Foma Campaign topic -
http://forum.mflenses.com/foma-campaign-t55443.html
FOMAPAN on forum -
http://www.mflenses.com/fs.php?sw=Fomapan
Webshop EU
http://www.fomafoto.com/ |
|
| Back to top |
|
|
F16SUNSHINE

Joined: 20 Aug 2007
Posts: 5486
Location: Left Coast
Expire: 2011-11-18
|
| Posted: Sun Feb 10, 2008 5:31 am Post subject: |
|
|
F16SUNSHINE wrote:
Hi All
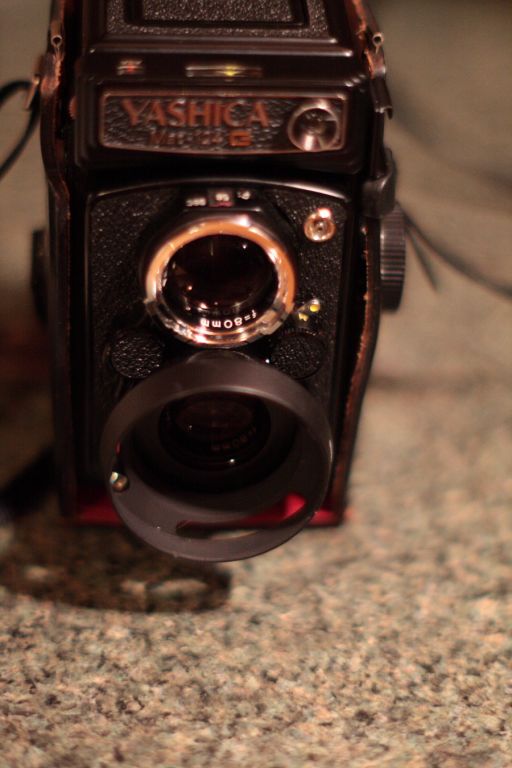
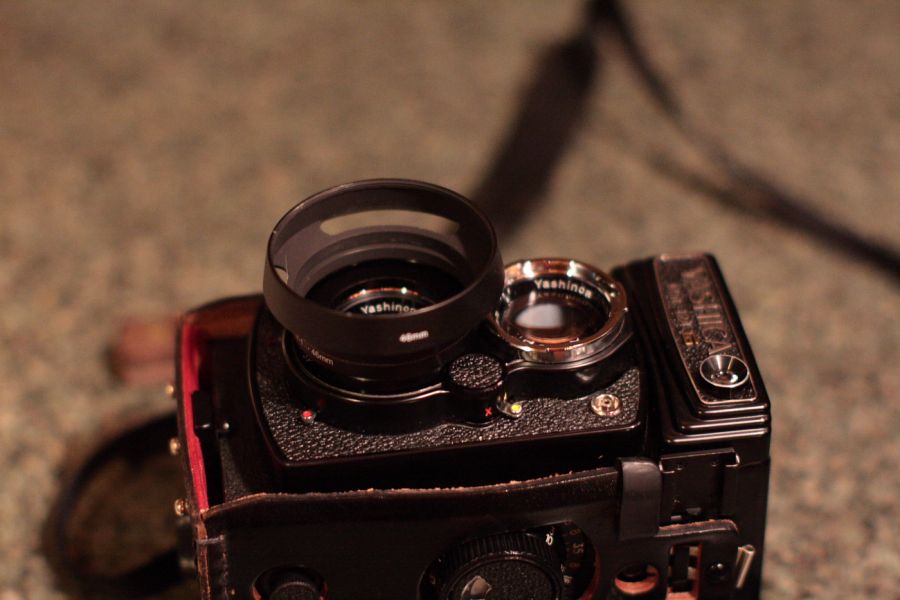
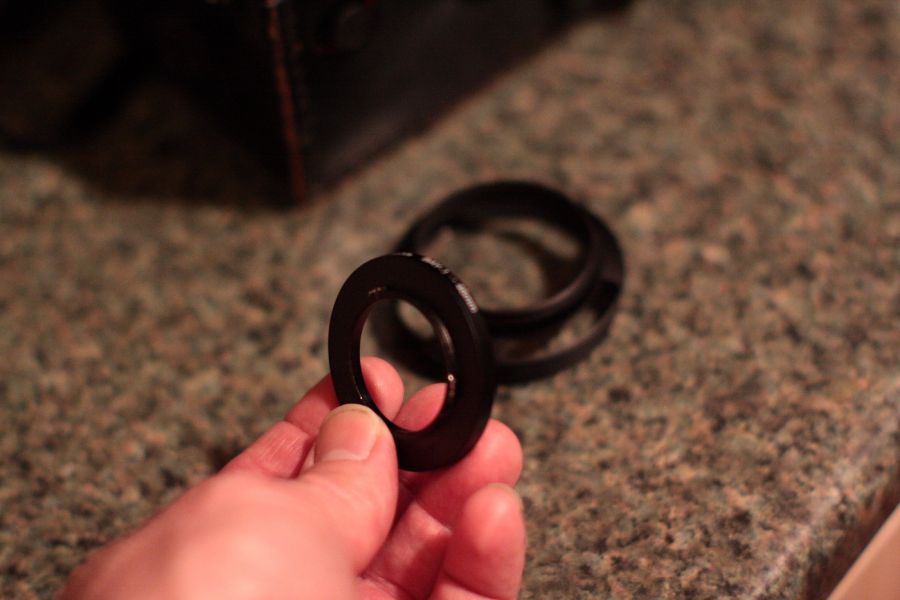
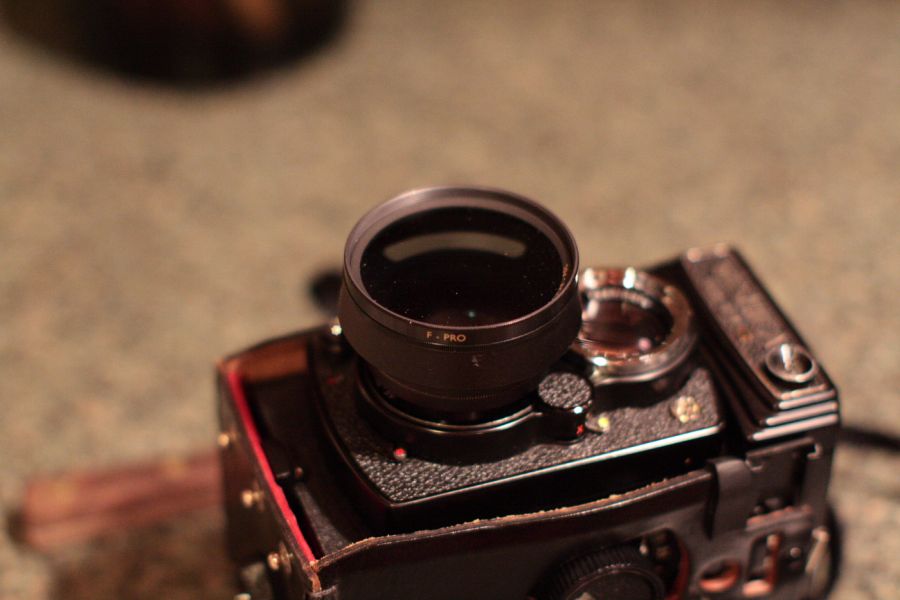
Here is my little system. I am on a trip and have the camera and one hood with me. The thing I have is an adapter from a HK seller. It is bay 1 to 46mm. The hood in the photos is a funky vented hood. The thing I like is it fits in the case I like. I also use a hood fom a Contax G system 90mm lens. What I like is, I can use a filter right on the hood. Which means I can use a cap also. This hood is threaded for 55mm filter threads. Anyway here are a few quick shots. BTW, the adapter cost $5 the vented hood $14 and it works on my other "rangefinder" cameras as well. Here are some photos. Sorry the pictures are quick and dirty.
Andy
 |
|
| Back to top |
|
|
Jesito
Joined: 24 Aug 2007
Posts: 5745
Location: Olivella, Catalonia, (Spain)
Expire: 2015-01-07
|
| Posted: Sun Feb 10, 2008 10:19 am Post subject: |
|
|
Jesito wrote:
Thanks Andy!
Very useful pictures. This seems a good approach. I'm currently bidding for one original Yashica one, but it's going too high, so probably I'll refrain.
I was thinking in building an "emergency" one by myself, and from your pictures I guesstimate the high of the hood being around 1.5 centimeters.
So knowing the lens diameter and the 46mm outer diameter, I can compute easily the hood projection over the paper...
Thanks again!.
Jes.
_________________
Jesito, Moderator
Jesito's backsack:
Zooms Sigma 70-300, Tamron 35-135 and 70-210 short, 70-210 long, 28-70 CF Macro, 35-70, 35-80, Vivitar 70-210 KA, Tamron 70-250.
Fixed Industar-50, , Tamron 24mm, Tamron 135mm, Sands Hunter 135mm, Pancolar 50mm, Volna-3, many Exakta lenses
DSLR SIGMA SD9 & SD14, EOS 5D, Sony A700 and NEXF3, Oly E-330, E-400, E-450, E-1
TLR/6x6/645 YashicaMat, Petri 6x45, Nettar, Franka Solida, Brilliant
SLR Minolta X300, Fuji STX II, Praktica VLC3, Pentax P30t, EXA500, EXA 1A, Spotmatic(2), Chinon CM-4S, Ricoh, Contax, Konica TC-X , Minolta 5000, 7000i, 3Sxi, EOS 500 and CX
Rangefinders Chinon 35EE, Konica C35 auto, Canonet 28, Yashica Lynx, FED-2, Yashica electro 35, Argus C3 & C4, Regula Cita III, Voigtlander Vitoret (many), Welta Welti-I, Kodak Signette 35, Zorki-4, Bessa-R & L, Minolta Weathermatic, olympus XA2
Compact Film Konica C35V, Voigtlander Vitorets, Canon Prima Super 105, Olympus XA2 and XA3
Compact Digital Olympus C-5050, Aiptek Slim 3000, Canon Powershot A540, Nikon 5200, SIGMA DP1s, Polaroid X530, IXUS55, Kodak 6490, Powershot G9 and G10
CSCCanon EOS-M, Samsung NX100 and NX210, Lumix G5, NEX-F3 |
|
| Back to top |
|
|
bob955i
Joined: 15 Apr 2007
Posts: 2495
|
| Posted: Sun Feb 10, 2008 10:33 am Post subject: |
|
|
bob955i wrote:
The hood in Andy's pic looks like a Leica type - the vents are there so the hood doesn't obstruct the rangefinder window.
Which would also be useful for not obstructing the viewing lens on the TLR....
My other suggestion was a BAY1-46mm adapter too as it's more flexible in use. |
|
| Back to top |
|
|
F16SUNSHINE
Joined: 20 Aug 2007
Posts: 5486
Location: Left Coast
Expire: 2011-11-18
|
| Posted: Mon Feb 11, 2008 4:01 am Post subject: |
|
|
F16SUNSHINE wrote:
Bob
Your right it is a leica type hood. The adapter is exactly as the one you describe. Both are easy to find and inexpensive. This adapter really makes the use of filters and hoods very easy. Of course with film, filters can be very important. Having the use of them is a very nice advantage. |
|
| Back to top |
|
|
Jesito
Joined: 24 Aug 2007
Posts: 5745
Location: Olivella, Catalonia, (Spain)
Expire: 2015-01-07
|
| Posted: Mon Feb 11, 2008 6:35 am Post subject: |
|
|
Jesito wrote:
I lost the two auctions that could lead me to own an original hood, and I see no further auctions for such. So I'm going to follow your track, I mean, the BAY1 to 39mm adapter and a 39mm hood with a filter screw.
I found the vented hood quickly, but for the adapter I only find BAY1 to 49mm or BAY1 to 52mm, not BAY1 to 39mm
Any clues where I could find them?.
Thanks in advance.
Jes.
BAY1 to 52mm Click here to see on Ebay
BAY1 to 49mm Click here to see on Ebay
39mm vented hood Click here to see on Ebay
_________________
Jesito, Moderator
Jesito's backsack:
Zooms Sigma 70-300, Tamron 35-135 and 70-210 short, 70-210 long, 28-70 CF Macro, 35-70, 35-80, Vivitar 70-210 KA, Tamron 70-250.
Fixed Industar-50, , Tamron 24mm, Tamron 135mm, Sands Hunter 135mm, Pancolar 50mm, Volna-3, many Exakta lenses
DSLR SIGMA SD9 & SD14, EOS 5D, Sony A700 and NEXF3, Oly E-330, E-400, E-450, E-1
TLR/6x6/645 YashicaMat, Petri 6x45, Nettar, Franka Solida, Brilliant
SLR Minolta X300, Fuji STX II, Praktica VLC3, Pentax P30t, EXA500, EXA 1A, Spotmatic(2), Chinon CM-4S, Ricoh, Contax, Konica TC-X , Minolta 5000, 7000i, 3Sxi, EOS 500 and CX
Rangefinders Chinon 35EE, Konica C35 auto, Canonet 28, Yashica Lynx, FED-2, Yashica electro 35, Argus C3 & C4, Regula Cita III, Voigtlander Vitoret (many), Welta Welti-I, Kodak Signette 35, Zorki-4, Bessa-R & L, Minolta Weathermatic, olympus XA2
Compact Film Konica C35V, Voigtlander Vitorets, Canon Prima Super 105, Olympus XA2 and XA3
Compact Digital Olympus C-5050, Aiptek Slim 3000, Canon Powershot A540, Nikon 5200, SIGMA DP1s, Polaroid X530, IXUS55, Kodak 6490, Powershot G9 and G10
CSCCanon EOS-M, Samsung NX100 and NX210, Lumix G5, NEX-F3 |
|
| Back to top |
|
|
bob955i
Joined: 15 Apr 2007
Posts: 2495
|
| Posted: Mon Feb 11, 2008 5:58 pm Post subject: |
|
|
bob955i wrote:
Jes:
I'd go for the BAY1-49mm adapter and just use a standard unvented 49mm hood - I've just tried holding a 51mm push-on lens cap (for 49mm filter rings) in front of the taking lens on my 635 and it doesn't obscure the viewing lens too much. Certainly not enough to prevent composition anyway so I'd expect the smaller 49mm filter/hood to be even better in this respect.
Quite a lot of lenses take 49mm filters and if you already have that diameter, it makes sense to stick with it.
Just remember to compensate where appropriate for whatever filter you fit....
I collated a table some time ago that you can print off - I'll repost it. |
|
| Back to top |
|
|
Jesito
Joined: 24 Aug 2007
Posts: 5745
Location: Olivella, Catalonia, (Spain)
Expire: 2015-01-07
|
| Posted: Mon Feb 11, 2008 7:51 pm Post subject: |
|
|
Jesito wrote:
(Duplicate post, sorry!)
Jes.
_________________
Jesito, Moderator
Jesito's backsack:
Zooms Sigma 70-300, Tamron 35-135 and 70-210 short, 70-210 long, 28-70 CF Macro, 35-70, 35-80, Vivitar 70-210 KA, Tamron 70-250.
Fixed Industar-50, , Tamron 24mm, Tamron 135mm, Sands Hunter 135mm, Pancolar 50mm, Volna-3, many Exakta lenses
DSLR SIGMA SD9 & SD14, EOS 5D, Sony A700 and NEXF3, Oly E-330, E-400, E-450, E-1
TLR/6x6/645 YashicaMat, Petri 6x45, Nettar, Franka Solida, Brilliant
SLR Minolta X300, Fuji STX II, Praktica VLC3, Pentax P30t, EXA500, EXA 1A, Spotmatic(2), Chinon CM-4S, Ricoh, Contax, Konica TC-X , Minolta 5000, 7000i, 3Sxi, EOS 500 and CX
Rangefinders Chinon 35EE, Konica C35 auto, Canonet 28, Yashica Lynx, FED-2, Yashica electro 35, Argus C3 & C4, Regula Cita III, Voigtlander Vitoret (many), Welta Welti-I, Kodak Signette 35, Zorki-4, Bessa-R & L, Minolta Weathermatic, olympus XA2
Compact Film Konica C35V, Voigtlander Vitorets, Canon Prima Super 105, Olympus XA2 and XA3
Compact Digital Olympus C-5050, Aiptek Slim 3000, Canon Powershot A540, Nikon 5200, SIGMA DP1s, Polaroid X530, IXUS55, Kodak 6490, Powershot G9 and G10
CSCCanon EOS-M, Samsung NX100 and NX210, Lumix G5, NEX-F3
Last edited by Jesito on Mon Feb 11, 2008 7:53 pm; edited 1 time in total |
|
| Back to top |
|
|
Jesito
Joined: 24 Aug 2007
Posts: 5745
Location: Olivella, Catalonia, (Spain)
Expire: 2015-01-07
|
| Posted: Mon Feb 11, 2008 7:52 pm Post subject: |
|
|
Jesito wrote:
| bob955i wrote: |
Jes:
I'd go for the BAY1-49mm adapter and just use a standard unvented 49mm hood - I've just tried holding a 51mm push-on lens cap (for 49mm filter rings) in front of the taking lens on my 635 and it doesn't obscure the viewing lens too much. Certainly not enough to prevent composition anyway so I'd expect the smaller 49mm filter/hood to be even better in this respect.
Quite a lot of lenses take 49mm filters and if you already have that diameter, it makes sense to stick with it.
Just remember to compensate where appropriate for whatever filter you fit....
I collated a table some time ago that you can print off - I'll repost it. |
Thanks for the info, Bob!.
However, from 39mm to 49mm... won't be too much?. The hood will open wider and then more light can come in, so more flare risk... (just a thought).
Jes.
_________________
Jesito, Moderator
Jesito's backsack:
Zooms Sigma 70-300, Tamron 35-135 and 70-210 short, 70-210 long, 28-70 CF Macro, 35-70, 35-80, Vivitar 70-210 KA, Tamron 70-250.
Fixed Industar-50, , Tamron 24mm, Tamron 135mm, Sands Hunter 135mm, Pancolar 50mm, Volna-3, many Exakta lenses
DSLR SIGMA SD9 & SD14, EOS 5D, Sony A700 and NEXF3, Oly E-330, E-400, E-450, E-1
TLR/6x6/645 YashicaMat, Petri 6x45, Nettar, Franka Solida, Brilliant
SLR Minolta X300, Fuji STX II, Praktica VLC3, Pentax P30t, EXA500, EXA 1A, Spotmatic(2), Chinon CM-4S, Ricoh, Contax, Konica TC-X , Minolta 5000, 7000i, 3Sxi, EOS 500 and CX
Rangefinders Chinon 35EE, Konica C35 auto, Canonet 28, Yashica Lynx, FED-2, Yashica electro 35, Argus C3 & C4, Regula Cita III, Voigtlander Vitoret (many), Welta Welti-I, Kodak Signette 35, Zorki-4, Bessa-R & L, Minolta Weathermatic, olympus XA2
Compact Film Konica C35V, Voigtlander Vitorets, Canon Prima Super 105, Olympus XA2 and XA3
Compact Digital Olympus C-5050, Aiptek Slim 3000, Canon Powershot A540, Nikon 5200, SIGMA DP1s, Polaroid X530, IXUS55, Kodak 6490, Powershot G9 and G10
CSCCanon EOS-M, Samsung NX100 and NX210, Lumix G5, NEX-F3 |
|
| Back to top |
|
|
bob955i
Joined: 15 Apr 2007
Posts: 2495
|
| Posted: Mon Feb 11, 2008 8:26 pm Post subject: |
|
|
bob955i wrote:
Jes:
Another reason I suggested the BAY1-49mm adapter in addition to it's being more universal, is because I think a BAY1-39mm might be more difficult to find - if you get the 49mm adapter you could always try a deeper hood to compensate for the extra diameter.
Here's that filter table I put together - print it off on 6x4 paper, laminate it and keep it in your bag:
 |
|
| Back to top |
|
|
Jesito
Joined: 24 Aug 2007
Posts: 5745
Location: Olivella, Catalonia, (Spain)
Expire: 2015-01-07
|
| Posted: Mon Feb 11, 2008 8:47 pm Post subject: |
|
|
Jesito wrote:
Thanks a lot, Bob!.
I got a nice colour printer at the office...
Jes.
_________________
Jesito, Moderator
Jesito's backsack:
Zooms Sigma 70-300, Tamron 35-135 and 70-210 short, 70-210 long, 28-70 CF Macro, 35-70, 35-80, Vivitar 70-210 KA, Tamron 70-250.
Fixed Industar-50, , Tamron 24mm, Tamron 135mm, Sands Hunter 135mm, Pancolar 50mm, Volna-3, many Exakta lenses
DSLR SIGMA SD9 & SD14, EOS 5D, Sony A700 and NEXF3, Oly E-330, E-400, E-450, E-1
TLR/6x6/645 YashicaMat, Petri 6x45, Nettar, Franka Solida, Brilliant
SLR Minolta X300, Fuji STX II, Praktica VLC3, Pentax P30t, EXA500, EXA 1A, Spotmatic(2), Chinon CM-4S, Ricoh, Contax, Konica TC-X , Minolta 5000, 7000i, 3Sxi, EOS 500 and CX
Rangefinders Chinon 35EE, Konica C35 auto, Canonet 28, Yashica Lynx, FED-2, Yashica electro 35, Argus C3 & C4, Regula Cita III, Voigtlander Vitoret (many), Welta Welti-I, Kodak Signette 35, Zorki-4, Bessa-R & L, Minolta Weathermatic, olympus XA2
Compact Film Konica C35V, Voigtlander Vitorets, Canon Prima Super 105, Olympus XA2 and XA3
Compact Digital Olympus C-5050, Aiptek Slim 3000, Canon Powershot A540, Nikon 5200, SIGMA DP1s, Polaroid X530, IXUS55, Kodak 6490, Powershot G9 and G10
CSCCanon EOS-M, Samsung NX100 and NX210, Lumix G5, NEX-F3 |
|
| Back to top |
|
|
Laurence

Joined: 26 Mar 2007
Posts: 4809
Location: Western Washington State
Expire: 2016-06-19
|
| Posted: Mon Feb 11, 2008 9:05 pm Post subject: |
|
|
Laurence wrote:
That chart is just a snapping-good reference! It is professional looking, and I appreciate that you took the time for it.
On my Yashicamat I'm afraid I do it the "clunky" way.  I use a baseball cap or my hand for a "lens shade" and I hold a Cokin 1 type of filter in front of the taking lens for shots that need polarization or some other type of filter. I use a baseball cap or my hand for a "lens shade" and I hold a Cokin 1 type of filter in front of the taking lens for shots that need polarization or some other type of filter.
Luckily, on the Yashica Mat, just my hand is very efficient, since the lens is not overly large in diameter.
However...these lens solutions shown are dynamite!
_________________
Assent, and you are sane;
Demur,�you �re straightway dangerous,
And handled with a chain.
Emily Dickinson
Cameras and Lenses in Use:
Yashica Mat 124 w/ Yashinon 80/3.5,
CV Apo-Lanthar 90/3.5SL, (Thank you Klaus),
Pentax 645,
Flek 50,
Pentax-A 150
Pentax-A 120 Macro
Voigtlander Vitomatic I w/Color Skopar 50/2.8
Konica TC and zoom lenses (thanks Carsten)
Contax AX
Yashica ML 50/2
Yashica ML 35/2.8
Carl Zeiss Contax 50/1.4
Tamron Adaptall SP 17/3.5
Tamron Adaptall 28/2.5
Tamron Adaptall SP 300/2.8 LD (IF)
|
|
| Back to top |
|
|
bob955i
Joined: 15 Apr 2007
Posts: 2495
|
| Posted: Mon Feb 11, 2008 9:39 pm Post subject: |
|
|
bob955i wrote:
@ Laurence:
I used to do the same as you with Cokin filters - if I was using a grad, I'd hold it in front of the viewing lens and move it around until I got what I wanted, take note of where the grad area was in relation to the lens and then transfer it to the taking lens.
Kenko make a somewhat expensive polariser device for RF cameras that uses a scaled polariser that you look through and turn until you get the required effect and then you read off the settings and transfer them to the lens mounted polariser.
The sighting device can be hand-held or mounted on the flash shoe so it could be used for TLRs as well should one have a mind and a wallet to. |
|
| Back to top |
|
|
Laurence
Joined: 26 Mar 2007
Posts: 4809
Location: Western Washington State
Expire: 2016-06-19
|
| Posted: Mon Feb 11, 2008 9:48 pm Post subject: |
|
|
Laurence wrote:
| bob955i wrote: |
@ Laurence:
I used to do the same as you with Cokin filters - if I was using a grad, I'd hold it in front of the viewing lens and move it around until I got what I wanted, take note of where the grad area was in relation to the lens and then transfer it to the taking lens.
Kenko make a somewhat expensive polariser device for RF cameras that uses a scaled polariser that you look through and turn until you get the required effect and then you read off the settings and transfer them to the lens mounted polariser.
The sighting device can be hand-held or mounted on the flash shoe so it could be used for TLRs as well should one have a mind and a wallet to. |
Yes, Bob...the hand holding is actually pretty quick and easy, in my mind. Regarding the polarizer, I use a large circular polarizer and rotate it until the scene is what I want, then just use the printed markings on the filter ring to correlate to correct position over the taking lens. Works fine!
Again, Bob. That chart is simply dynamite.
_________________
Assent, and you are sane;
Demur,�you �re straightway dangerous,
And handled with a chain.
Emily Dickinson
Cameras and Lenses in Use:
Yashica Mat 124 w/ Yashinon 80/3.5,
CV Apo-Lanthar 90/3.5SL, (Thank you Klaus),
Pentax 645,
Flek 50,
Pentax-A 150
Pentax-A 120 Macro
Voigtlander Vitomatic I w/Color Skopar 50/2.8
Konica TC and zoom lenses (thanks Carsten)
Contax AX
Yashica ML 50/2
Yashica ML 35/2.8
Carl Zeiss Contax 50/1.4
Tamron Adaptall SP 17/3.5
Tamron Adaptall 28/2.5
Tamron Adaptall SP 300/2.8 LD (IF)
|
|
| Back to top |
|
|
titrisol70


Joined: 14 Dec 2021
Posts: 149
Location: State of Denial
|
| Posted: Fri Apr 12, 2024 6:51 pm Post subject: |
|
|
titrisol70 wrote:
You can always 3d print or have someone 3d print one for you
BAY I (Yashicamat 124)
https://www.thingiverse.com/thing:6024422
or
https://www.thingiverse.com/thing:5000025
Yashica A
https://www.thingiverse.com/thing:3285452
Yashica D
https://www.thingiverse.com/thing:685
_________________
Pentaxian and proud
Cameras: Spotmatic, I and F, Pentax ME, MESuper, ME-F, P30t, K-x, MZ-5, Mz-7 // K100D, Kx, K5IIs, K3-iii
M42 Asahi Optical Co., Lenses:
Super Takumar 1:4.5/20, 1:3.5/28, 1:1.8/55, 1:1.4/50 (7-element), 1:3.5/135
Super-Multi-Coated Fisheye-TAKUMAR 1:4/17
Super-Multi-Coated TAKUMAR 1:3.5/28, 1:3.5/35, 1:1.8/55, 1:1.4/50, 1:2.8/105, 1:3.5/135,, 1:4/200, 1:4.5/500
Super-Multi-Coated Macro-TAKUMAR 1:4/50
Lots of M, A, F, FA, DA series lenses |
|
| Back to top |
|
|
visualopsins

Joined: 05 Mar 2009
Posts: 10540
Location: California
Expire: 2025-04-11
|
| Posted: Fri Apr 12, 2024 8:16 pm Post subject: |
|
|
visualopsins wrote:
Nice find!
_________________
☮☮☮☮☮☮☮☮☮☮☮☮☮☮☮☮☮☮☮☮☮☮☮☮☮☮☮☮☮☮☮☮ like attracts like! ☮☮☮☮☮☮☮☮☮☮☮☮☮☮☮☮☮☮☮☮☮☮☮☮☮☮☮☮☮☮☮☮
Cameras: Sony ILCE-7RM2, Spotmatics II, F, and ESII, Nikon P4
Lenses:
M42 Asahi Optical Co., Takumar 1:4 f=35mm, 1:2 f=58mm (Sonnar), 1:2.4 f=58mm (Heliar), 1:2.2 f=55mm (Gaussian), 1:2.8 f=105mm (Model I), 1:2.8/105 (Model II), 1:5.6/200, Tele-Takumar 1:5.6/200, 1:6.3/300, Macro-Takumar 1:4/50, Auto-Takumar 1:2.3 f=35, 1:1.8 f=55mm, 1:2.2 f=55mm, Super-TAKUMAR 1:3.5/28 (fat), 1:2/35 (Fat), 1:1.4/50 (8-element), Super-Multi-Coated Fisheye-TAKUMAR 1:4/17, Super-Multi-Coated TAKUMAR 1:4.5/20, 1:3.5/24, 1:3.5/28, 1:2/35, 1:3.5/35, 1:1.8/85, 1:1.9/85 1:2.8/105, 1:3.5/135, 1:2.5/135 (II), 1:4/150, 1:4/200, 1:4/300, 1:4.5/500, Super-Multi-Coated Macro-TAKUMAR 1:4/50, 1:4/100, Super-Multi-Coated Bellows-TAKUMAR 1:4/100, SMC TAKUMAR 1:1.4/50, 1:1.8/55
M42 Carl Zeiss Jena Flektogon 2.4/35
Contax Carl Zeiss Vario-Sonnar T* 28-70mm F3.5-4.5
Pentax K-mount SMC PENTAX ZOOM 1:3.5 35~105mm, SMC PENTAX ZOOM 1:4 45~125mm
Nikon Micro-NIKKOR-P-C Auto 1:3.5 f=55mm, NIKKOR-P Auto 105mm f/2.5 Pre-AI (Sonnar), Micro-NIKKOR 105mm 1:4 AI, NIKKOR AI-S 35-135mm f/3,5-4,5
Tamron SP 17mm f/3.5 (51B), Tamron SP 17mm f/3.5 (51BB), SP 500mm f/8 (55BB), SP 70-210mm f/3.5 (19AH)
Vivitar 100mm 1:2.8 MC 1:1 Macro Telephoto (Kiron)
|
|
| Back to top |
|
|
|
|


