| View previous topic :: View next topic |
| Author |
Message |
j.lukow


Joined: 03 Oct 2007
Posts: 856
Location: Lindsay Ontario, Canada
Expire: 2021-11-25
|
 Posted: Wed Jul 06, 2016 1:59 am Post subject: Some technical advice for neg scanning please . . . Posted: Wed Jul 06, 2016 1:59 am Post subject: Some technical advice for neg scanning please . . . |
 |
|
j.lukow wrote:
I find myself having to scan my negatives which I haven't done in ages. . . 
Especially having to deal with some scratches etc, and having lost past scans . . .
As I have said I am needing to do some larger prints of past pictures for Lana, family and others.
Using an Epson Perfection 2400 photo scanner to scan a negative with an output image of 5x7 at 600 dpi generated the following image . . .

Printed at the size of 5x7 it looks good but when you blow it up to 8x10 the result is poor.
Doing my research I just came away confused in regards to resolution for good prints.
I know that I will need as large of a print as I can get to do retouching, dust removal etc . . .
I think I came away with the following . . .
Working in digital I need to stop thinking of it still as a negative but instead as a graphic image, so in my head this means that I need to scan them to as large of an image at the best resolution with the knowledge that when you reduce the image it becomes clearer.
Any advice would be greatly appreciated and applied.
Thanks in advance . . .
Jim
_________________
EMPLOYMENT: That which funded photography and my new woodworking business.j.lukow
Jim's Kit:
Minolta Kit: Minolta X570 & Autowinder G, Minolta SRT200
LENSES:Minolta - 45mm & 50mm F1:2, PF 58mm F1:1.4, Tamron 28mm f1:2.5, Tamron SP 35-80mm f1:2.8/3.8 & CF TeleMacro zoom 80-210 f1:3.8, Vivitar f3.0~4.5 35-200mm macro focusing zoom, f 2.8 28mm CF Wide angle, 2x macro focus teleconverter,Sigma F4 25-250, f 2.8~4 35-70mm zoom master,Tokina SD f4-5.6 70-210 zoom, f4.5 80-200 "Ultra" Zoom,AutoImage 135mm F1:2.8, Spiratone 400mm f1:6.3, Magicon f3.5-4.8 35-70mm macro zoom,Quantary f8-500 Mirror/macro lens, Accura MD mount Macro bellows
M42 Kit:Praktica PLC2,Yashica TL Electro X
LENSES:Meyer Goerlitz Oreston 50mm f1:1.8 , Auto Yashinon DX 1:1.7 50mm,Steinheil Munchen Culminar 135mm f4.5, Adaptall-2 M42 adapter
Zeiss . . . Zeiss Contaflex 126 system, Zeiss Contaflex Super
Medium Format: Pentacon sixTL
Hasselblad 500c/m - CZ 2.8-80mm planar, CZ 4-150mm sonnarCF |
|
| Back to top |
|
 |
miran

Joined: 01 Aug 2012
Posts: 1364
Location: Slovenia
|
| Posted: Wed Jul 06, 2016 5:12 am Post subject: |
|
|
miran wrote:
Well, if you want big prints, I assume there won't be that many of them. In that case I think it would be best to give the job to a lab with professional equipment rather than trying to do it with a home scanner that can never be as good.
_________________
my flickr stream |
|
| Back to top |
|
|
cooltouch


Joined: 15 Jan 2009
Posts: 9097
Location: Houston, Texas
|
| Posted: Wed Jul 06, 2016 9:45 am Post subject: |
|
|
cooltouch wrote:
The Epson 2400 is an older scanner, but from what I've read, is a good one. My recommendation would be to scan at its max output of 2400 ppi and see if that doesn't get you where you need to be. 600 ppi isn't anywhere near the resolution you'll need.
I have an Epson 4990, which supposedly will produce scans up to 4800 ppi, but actually it's mostly file bloat. So usually I scan at 2400 ppi and I get decent results. Not great, but acceptable. These days, I use my digital cameras to duplicate my slides and negatives and I get much better results than I do from a flatbed scanner.
_________________
Michael
My Gear List: http://michaelmcbroom.com/photo/gear.html
My Gallery: http://michaelmcbroom.com/gallery3/index.php/
My Flickr Page: https://www.flickr.com/photos/11308754@N08/albums
My Music: https://soundcloud.com/michaelmcbroom/albums
My Blog: http://michaelmcbroom.com/blogistan/ |
|
| Back to top |
|
|
miran
Joined: 01 Aug 2012
Posts: 1364
Location: Slovenia
|
| Posted: Wed Jul 06, 2016 2:08 pm Post subject: |
|
|
miran wrote:
| cooltouch wrote: |
| These days, I use my digital cameras to duplicate my slides and negatives and I get much better results than I do from a flatbed scanner. |
I do that too and it works really well for black&white but colour negatives are a completely different story. A pain in the ass and you never get the colours just right. I've almost given up on colour negative film.
_________________
my flickr stream |
|
| Back to top |
|
|
j.lukow
Joined: 03 Oct 2007
Posts: 856
Location: Lindsay Ontario, Canada
Expire: 2021-11-25
|
| Posted: Wed Jul 06, 2016 4:57 pm Post subject: |
|
|
j.lukow wrote:
| cooltouch wrote: |
| The Epson 2400 is an older scanner, but from what I've read, is a good one. My recommendation would be to scan at its max output of 2400 ppi and see if that doesn't get you where you need to be. 600 ppi isn't anywhere near the resolution you'll need. . . |
Thanks, that reinforces some of my own ideas . . .
The confusion was from what I was reading . . . scanning we're talking ppi but for printing its dpi. The Epson software had you setting the output which was size plus dpi - yes. . . I even went back and double checked.
As well every thing I was reading suggested the 600 because on enlargement the dpi number would come down and still be good, but it wasn't.
Jim
_________________
EMPLOYMENT: That which funded photography and my new woodworking business.j.lukow
Jim's Kit:
Minolta Kit: Minolta X570 & Autowinder G, Minolta SRT200
LENSES:Minolta - 45mm & 50mm F1:2, PF 58mm F1:1.4, Tamron 28mm f1:2.5, Tamron SP 35-80mm f1:2.8/3.8 & CF TeleMacro zoom 80-210 f1:3.8, Vivitar f3.0~4.5 35-200mm macro focusing zoom, f 2.8 28mm CF Wide angle, 2x macro focus teleconverter,Sigma F4 25-250, f 2.8~4 35-70mm zoom master,Tokina SD f4-5.6 70-210 zoom, f4.5 80-200 "Ultra" Zoom,AutoImage 135mm F1:2.8, Spiratone 400mm f1:6.3, Magicon f3.5-4.8 35-70mm macro zoom,Quantary f8-500 Mirror/macro lens, Accura MD mount Macro bellows
M42 Kit:Praktica PLC2,Yashica TL Electro X
LENSES:Meyer Goerlitz Oreston 50mm f1:1.8 , Auto Yashinon DX 1:1.7 50mm,Steinheil Munchen Culminar 135mm f4.5, Adaptall-2 M42 adapter
Zeiss . . . Zeiss Contaflex 126 system, Zeiss Contaflex Super
Medium Format: Pentacon sixTL
Hasselblad 500c/m - CZ 2.8-80mm planar, CZ 4-150mm sonnarCF |
|
| Back to top |
|
|
j.lukow
Joined: 03 Oct 2007
Posts: 856
Location: Lindsay Ontario, Canada
Expire: 2021-11-25
|
| Posted: Wed Jul 06, 2016 5:41 pm Post subject: |
|
|
j.lukow wrote:
| miran wrote: |
| Well, if you want big prints, I assume there won't be that many of them. In that case I think it would be best to give the job to a lab with professional equipment rather than trying to do it with a home scanner that can never be as good. |
Thanks for the suggestion - locally this is not a good or economical option.
Though I am not sure of how many prints I need and how big they will need to be, I want to be able to scan and work with these images myself. I invested in the Photo scanner because of the reviews - much of what I am doing now revolves more around my knowledge base . . .
Like wise as I don't own a digital camera - my wife's point and shoot gets pressed into service when I need a digital image.
Jim
_________________
EMPLOYMENT: That which funded photography and my new woodworking business.j.lukow
Jim's Kit:
Minolta Kit: Minolta X570 & Autowinder G, Minolta SRT200
LENSES:Minolta - 45mm & 50mm F1:2, PF 58mm F1:1.4, Tamron 28mm f1:2.5, Tamron SP 35-80mm f1:2.8/3.8 & CF TeleMacro zoom 80-210 f1:3.8, Vivitar f3.0~4.5 35-200mm macro focusing zoom, f 2.8 28mm CF Wide angle, 2x macro focus teleconverter,Sigma F4 25-250, f 2.8~4 35-70mm zoom master,Tokina SD f4-5.6 70-210 zoom, f4.5 80-200 "Ultra" Zoom,AutoImage 135mm F1:2.8, Spiratone 400mm f1:6.3, Magicon f3.5-4.8 35-70mm macro zoom,Quantary f8-500 Mirror/macro lens, Accura MD mount Macro bellows
M42 Kit:Praktica PLC2,Yashica TL Electro X
LENSES:Meyer Goerlitz Oreston 50mm f1:1.8 , Auto Yashinon DX 1:1.7 50mm,Steinheil Munchen Culminar 135mm f4.5, Adaptall-2 M42 adapter
Zeiss . . . Zeiss Contaflex 126 system, Zeiss Contaflex Super
Medium Format: Pentacon sixTL
Hasselblad 500c/m - CZ 2.8-80mm planar, CZ 4-150mm sonnarCF |
|
| Back to top |
|
|
cooltouch
Joined: 15 Jan 2009
Posts: 9097
Location: Houston, Texas
|
| Posted: Thu Jul 07, 2016 1:31 am Post subject: |
|
|
cooltouch wrote:
| miran wrote: |
| cooltouch wrote: |
| These days, I use my digital cameras to duplicate my slides and negatives and I get much better results than I do from a flatbed scanner. |
I do that too and it works really well for black&white but colour negatives are a completely different story. A pain in the ass and you never get the colours just right. I've almost given up on colour negative film. |
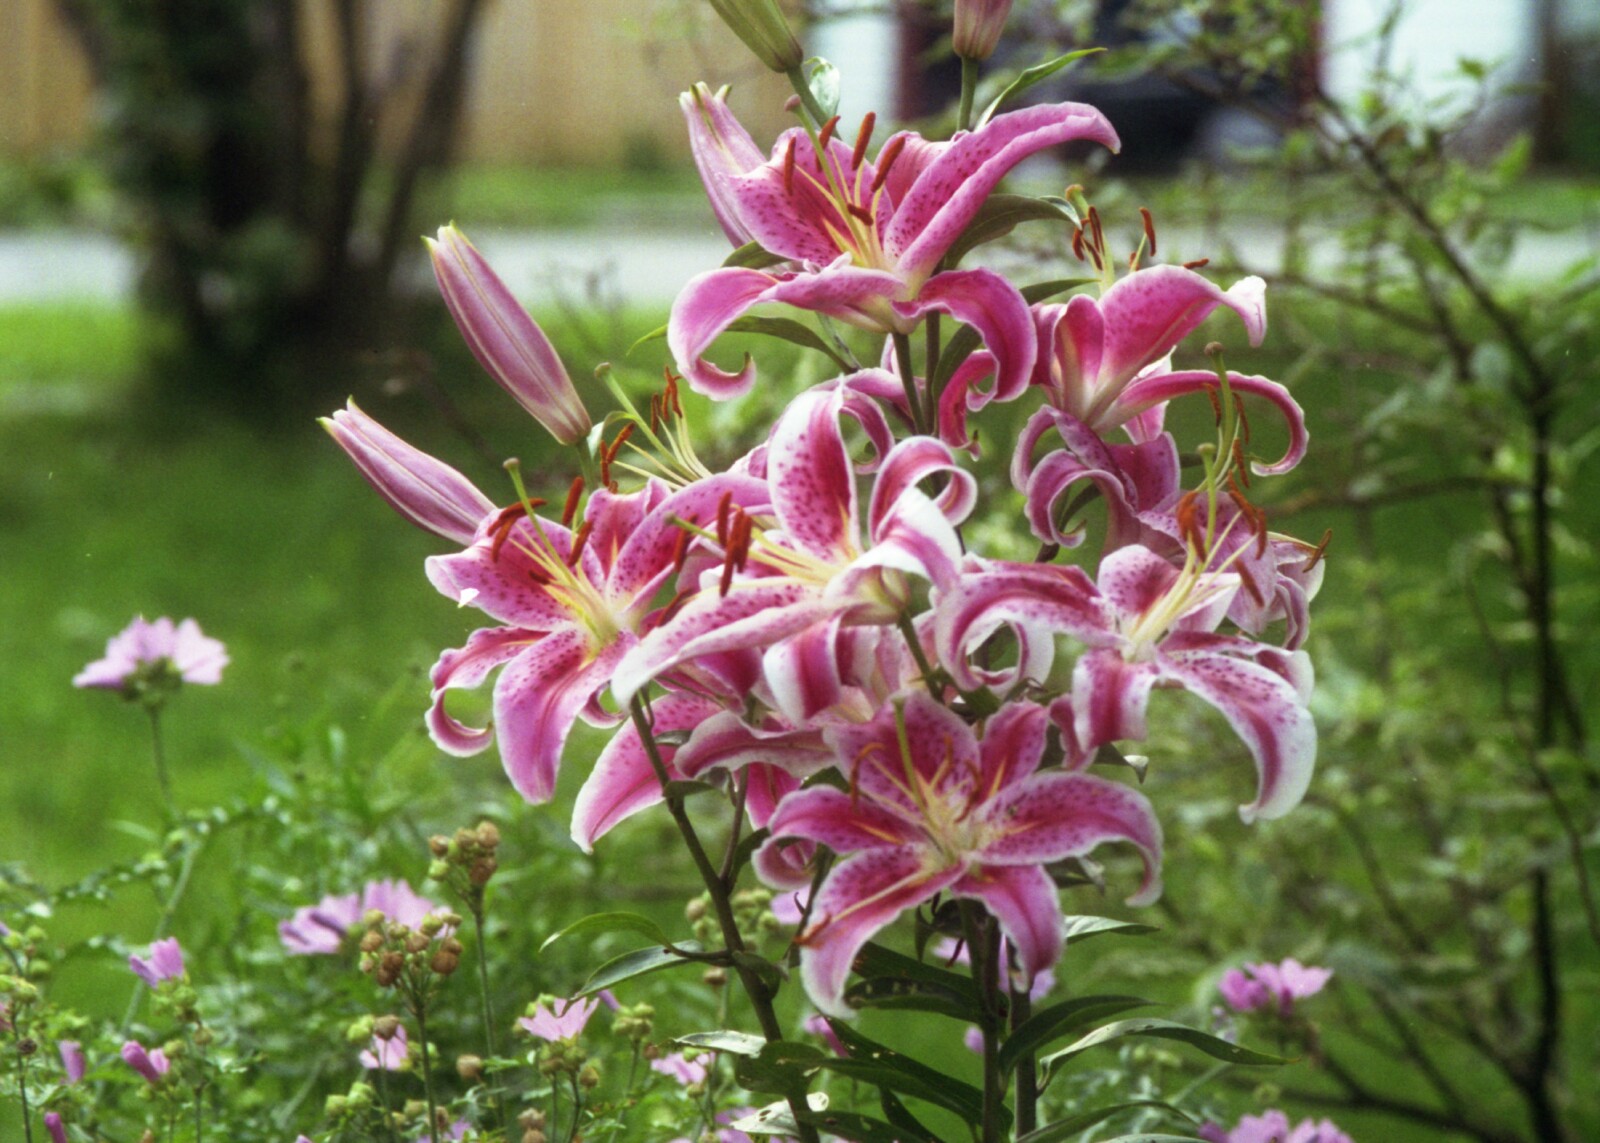
I can agree with you with regards to one emulsion in particular: Ektar. Not only does it scan funny (earth tones come out as lavenders and purples with my Epson), but it produces way too much cyan in the reversed image and, try as I might, I can never get rid of all of it.
But all other emulsions I've tried, which have been Kodak and Fuji, I've been able to reverse and preserve color quite well. I use two image processing software packages for this: Photoshop and Paint Shop Pro. Both have a setting you can select for reversing a color negative image, both have easy color correction, and both do an equally effective job. I have found, though, that often a bit of additional tweaking is required. Usually it's pretty light stuff, so it's not difficult.
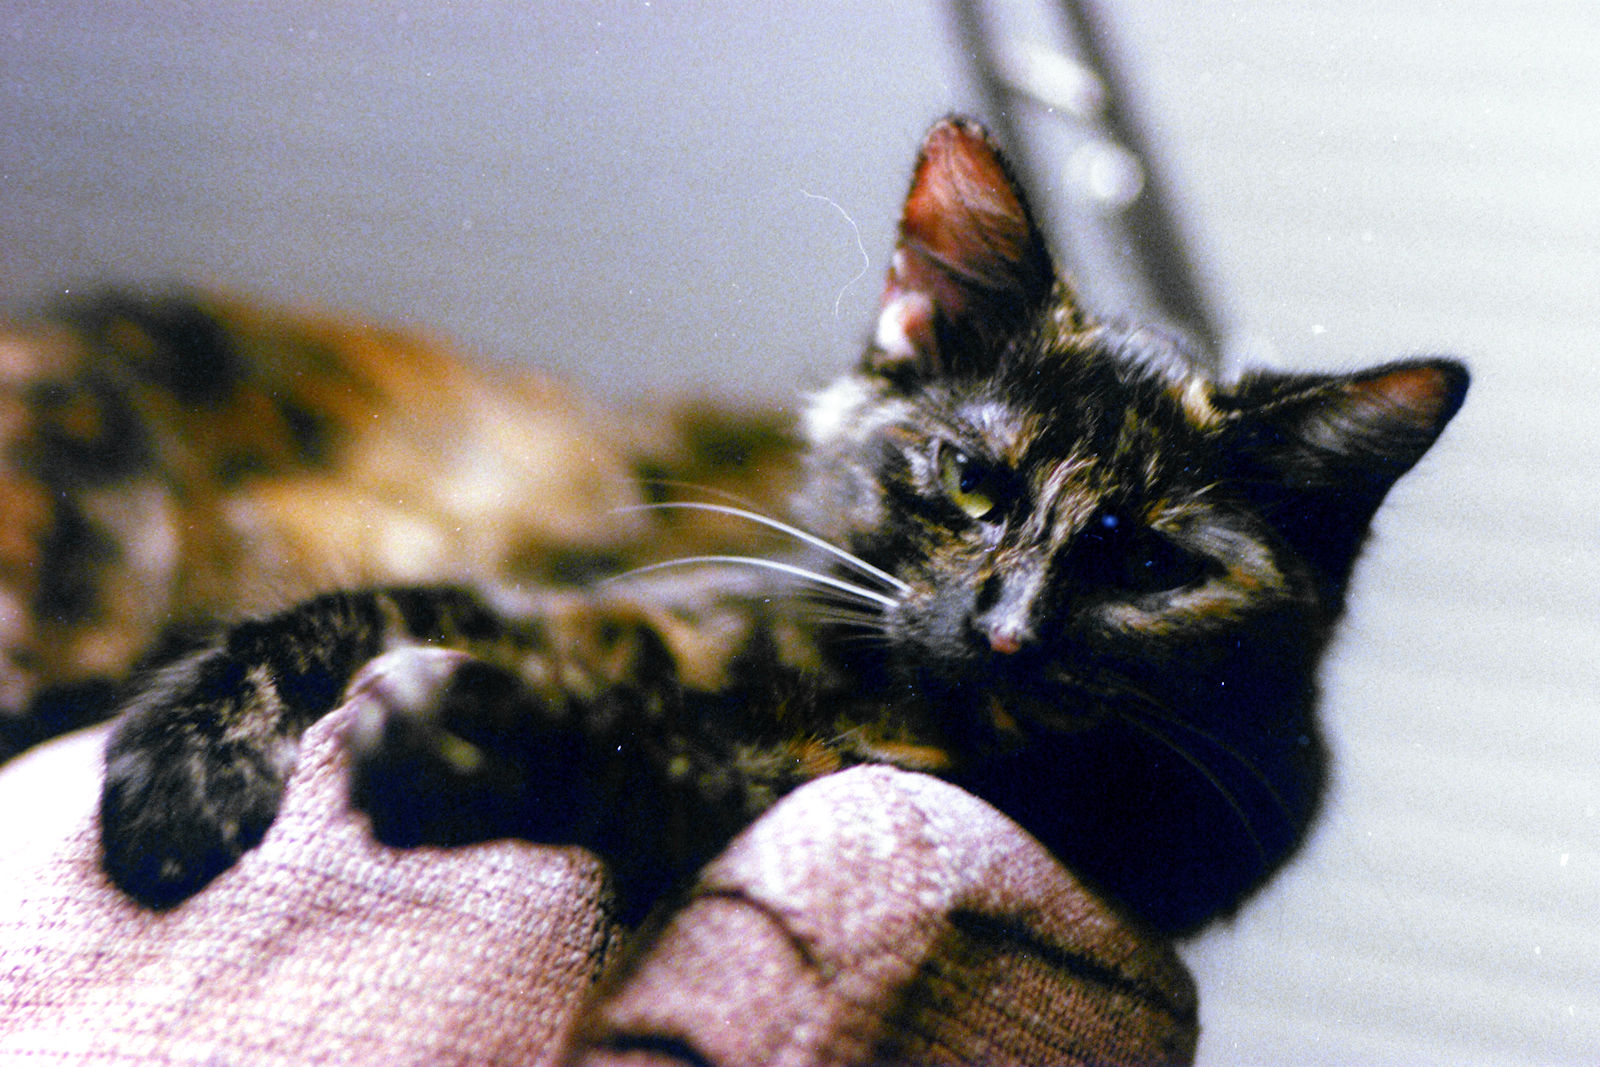
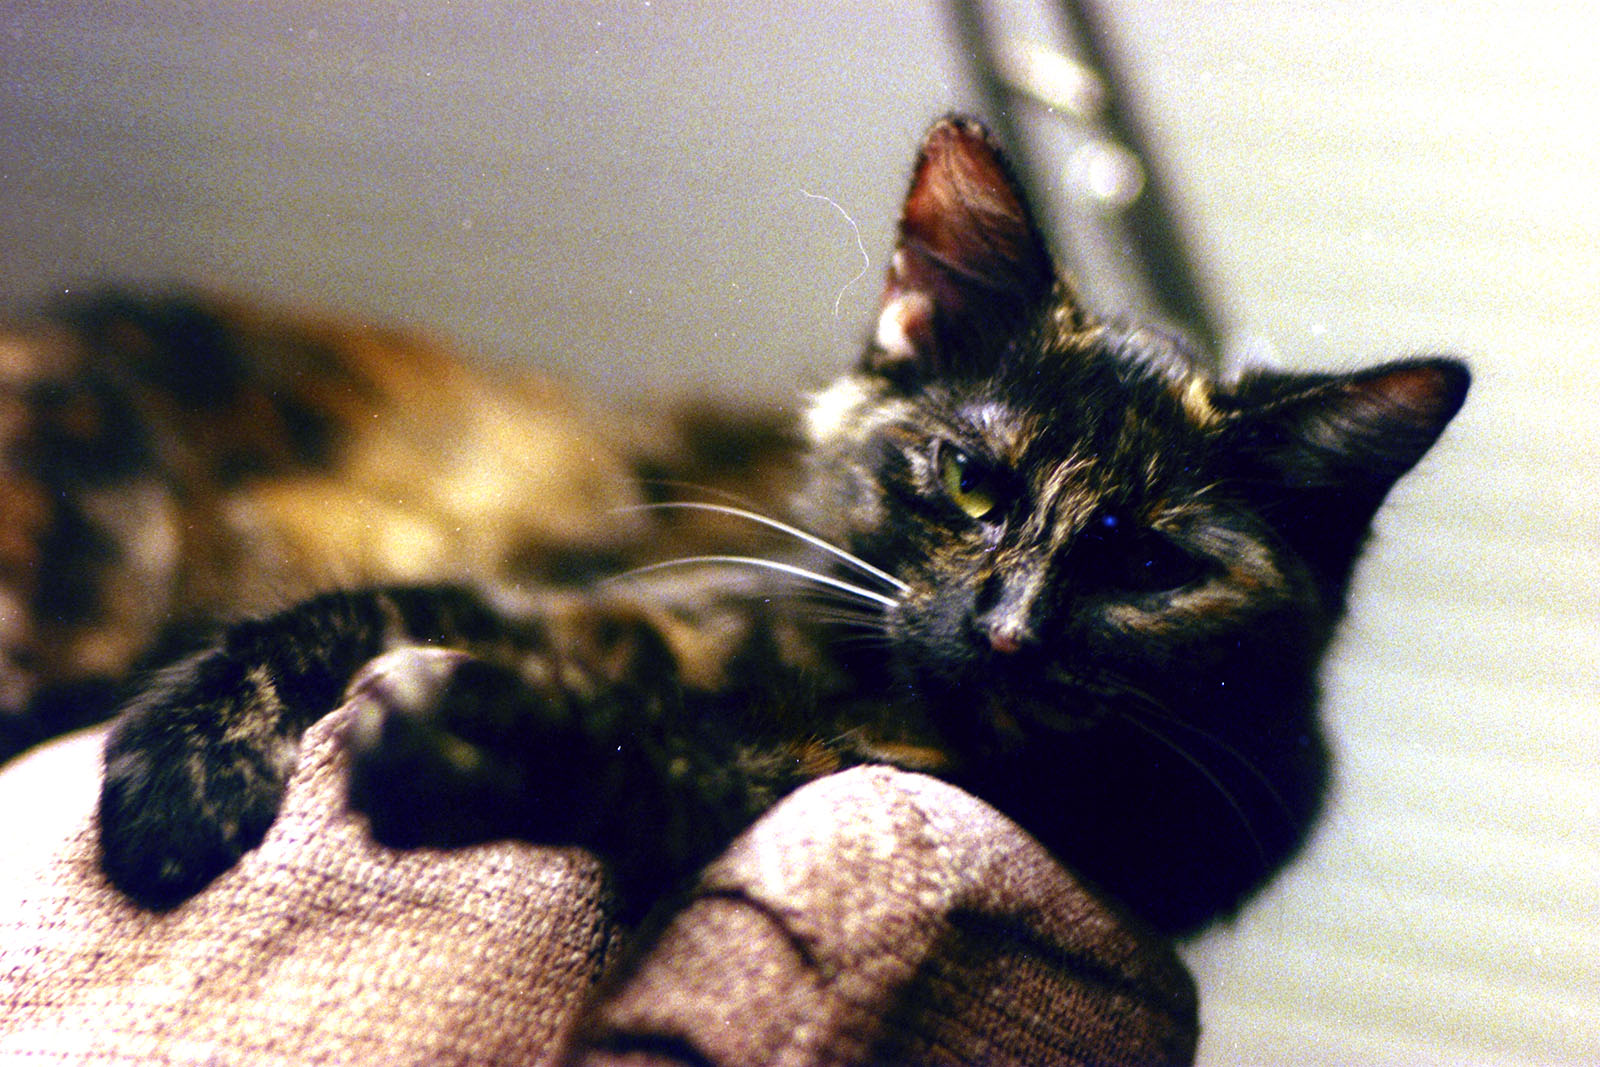
Here are a couple of examples. A pic I took of my daughter's cat. Shot with a Canon F-1 and FD 85mm f/1.2 @ f/1.2 on Fuji Superia 400. Focus is a bit off -- apologies. I'd owned the 85/1.2 for maybe a day when I took that shot and I was still getting used to the challenge of shooting with it wide open.
Paint Shop Pro:

PhotoShop:

As you can see, there are some minor color differences, but to me they are negligible.
_________________
Michael
My Gear List: http://michaelmcbroom.com/photo/gear.html
My Gallery: http://michaelmcbroom.com/gallery3/index.php/
My Flickr Page: https://www.flickr.com/photos/11308754@N08/albums
My Music: https://soundcloud.com/michaelmcbroom/albums
My Blog: http://michaelmcbroom.com/blogistan/
Last edited by cooltouch on Thu Jul 07, 2016 8:45 am; edited 1 time in total |
|
| Back to top |
|
|
cooltouch
Joined: 15 Jan 2009
Posts: 9097
Location: Houston, Texas
|
| Posted: Thu Jul 07, 2016 1:38 am Post subject: |
|
|
cooltouch wrote:
| j.lukow wrote: |
| cooltouch wrote: |
| The Epson 2400 is an older scanner, but from what I've read, is a good one. My recommendation would be to scan at its max output of 2400 ppi and see if that doesn't get you where you need to be. 600 ppi isn't anywhere near the resolution you'll need. . . |
Thanks, that reinforces some of my own ideas . . .
The confusion was from what I was reading . . . scanning we're talking ppi but for printing its dpi. The Epson software had you setting the output which was size plus dpi - yes. . . I even went back and double checked.
As well every thing I was reading suggested the 600 because on enlargement the dpi number would come down and still be good, but it wasn't.
Jim |
I usually don't pay attention to that print dpi number that Epson shows. When it comes time to have a print made, I know how to calculate what a max image size can be -- which is usually around 300 dpi, not 600. An enlargement at 300 dpi will still look just fine if viewed from more than a couple of feet away. Using the 300 dpi figure on an image scanned at 2400 ppi, you can print a file from a 35mm image at 8" x 12" and have a decent print.
_________________
Michael
My Gear List: http://michaelmcbroom.com/photo/gear.html
My Gallery: http://michaelmcbroom.com/gallery3/index.php/
My Flickr Page: https://www.flickr.com/photos/11308754@N08/albums
My Music: https://soundcloud.com/michaelmcbroom/albums
My Blog: http://michaelmcbroom.com/blogistan/ |
|
| Back to top |
|
|
miran
Joined: 01 Aug 2012
Posts: 1364
Location: Slovenia
|
| Posted: Thu Jul 07, 2016 5:16 pm Post subject: |
|
|
miran wrote:
| cooltouch wrote: |
I can agree with you with regards to one emulsion in particular: Ektar. Not only does it scan funny (earth tones come out as lavenders and purples with my Epson), but it produces way too much cyan in the reversed image and, try as I might, I can never get rid of all of it.
But all other emulsions I've tried, which have been Kodak and Fuji, I've been able to reverse and preserve color quite well. I use two image processing software packages for this: Photoshop and Paint Shop Pro. Both have a setting you can select for reversing a color negative image, both have easy color correction, and both do an equally effective job. I have found, though, that often a bit of additional tweaking is required. Usually it's pretty light stuff, so it's not difficult. |
My experience is exactly the opposite. Ektar was the only film that I found reasonably ok to work with (though I wouldn't go as far as to say easy or straightforward). Perhaps also Portra 160 and 400 to a lesser degree. All affordable film I've tried so far was downright horrible to scan and colour reverse.
But in any case there's always a lot of tweaking and moving of sliders and curves in tiny increments. My biggest problem is lack of consistency. I will have two similar shots next to each other on the film, shot in the same conditions in the the same place and time with almost the same camera settings and they scan completely differently. I was never able to come up with a set of negative reversal curves that would work for the whole film or even just a few consecutive frames. It's always a frame by frame process. It takes ages and even then the results are often not satisfactory. I don't have Photoshop or Paint Shop Pro though.
Here's a sample of Ektar 100 that was quite easy to scan and looks good to me (as do all the other frames from that film):
 0055_X700_21 by Miran Amon, on Flickr 0055_X700_21 by Miran Amon, on Flickr
On the other hand, Agfa Vista 200 that took endless fiddling with and isn't half as nice:
 0057_X700_20 by Miran Amon, on Flickr 0057_X700_20 by Miran Amon, on Flickr
_________________
my flickr stream |
|
| Back to top |
|
|
cooltouch
Joined: 15 Jan 2009
Posts: 9097
Location: Houston, Texas
|
| Posted: Fri Jul 08, 2016 9:01 am Post subject: |
|
|
cooltouch wrote:
Just so we're discussing the same thing, let me be clear about my experiences. When it comes to scanning negatives with my Epson flatbed, using the Epson Scan software that came with it, scanning has always been a pretty straightforward process. Most emulsions scanned well, requiring only a minimal amount of post processing. Of all the emulsions I've scanned, I've found Portra 160 (I've never used 400) to be the easiest to work with. Ektar was annoying because I had to color correct the scanned images to get rid of the purples and lavenders. But even then, all it took was using a tool that let me select 18% gray in the image to get rid of the odd colors. When I use Epson Scan, mostly I have it set to its auto exposure settings and it does a good job.
But when I use my digital camera to dupe a negative, then it gets somewhat trickier -- but not all that difficult, as my two images above illustrate. However, it is when I dupe an Ektar image that I have the problems reversing it. Scanning Ektar works with only a minor amount of work, but duping has just been problematic. Here is a dupe of an Ektar negative that I've reversed with both Paint Shop Pro and PhotoShop. To me, neither are acceptable, although the PhotoShop conversion is the closest.
Paint Shop Pro:

PhotoShop:
Now, here's a similar image that I scanned with my Epson. Not the same one, but I cropped it so that it looks the same. This scan is just okay, but still it's better than the dupe conversions. It just isn't possible getting the above dupe to look like this scan, and it's mostly too much cyan that's the culprit.
_________________
Michael
My Gear List: http://michaelmcbroom.com/photo/gear.html
My Gallery: http://michaelmcbroom.com/gallery3/index.php/
My Flickr Page: https://www.flickr.com/photos/11308754@N08/albums
My Music: https://soundcloud.com/michaelmcbroom/albums
My Blog: http://michaelmcbroom.com/blogistan/ |
|
| Back to top |
|
|
j.lukow
Joined: 03 Oct 2007
Posts: 856
Location: Lindsay Ontario, Canada
Expire: 2021-11-25
|
| Posted: Fri Jul 08, 2016 10:10 pm Post subject: |
|
|
j.lukow wrote:
Good images, strangely enough colour is not something I have had huge issues with.
The thing I find is that the initial commercial prints are much more washed out than the initial scans of the negatives. What I find is the area I tend to work on is contrast and brightness - which in the old days was easy enough to deal with through the enlarger.
A discussion I remember having with our son a number of years ago - film vs digital - he used Ansell Adams as an example in that he would never let some one else print his photos to maintain his artistic integrity - tonal adjustments, cropping, saturation etc. and that you were giving this artistic integrity up by using commercial processing. What he had forgotten was that the way negatives turned out isn't really impacted by who does it and that with a negative scanner the end result is the same as old fashion darkroom work. I have even found I could produce an image from a negative that the commercial folk would ignore.
My biggest concern has always been in the area of resolution and trying to keep final images free of graininess or visible dots. Therefore I hope to have scanned images that are good enough that I don't have to worry about what the end image would be like if I wanted to enlarge it.
Jim
_________________
EMPLOYMENT: That which funded photography and my new woodworking business.j.lukow
Jim's Kit:
Minolta Kit: Minolta X570 & Autowinder G, Minolta SRT200
LENSES:Minolta - 45mm & 50mm F1:2, PF 58mm F1:1.4, Tamron 28mm f1:2.5, Tamron SP 35-80mm f1:2.8/3.8 & CF TeleMacro zoom 80-210 f1:3.8, Vivitar f3.0~4.5 35-200mm macro focusing zoom, f 2.8 28mm CF Wide angle, 2x macro focus teleconverter,Sigma F4 25-250, f 2.8~4 35-70mm zoom master,Tokina SD f4-5.6 70-210 zoom, f4.5 80-200 "Ultra" Zoom,AutoImage 135mm F1:2.8, Spiratone 400mm f1:6.3, Magicon f3.5-4.8 35-70mm macro zoom,Quantary f8-500 Mirror/macro lens, Accura MD mount Macro bellows
M42 Kit:Praktica PLC2,Yashica TL Electro X
LENSES:Meyer Goerlitz Oreston 50mm f1:1.8 , Auto Yashinon DX 1:1.7 50mm,Steinheil Munchen Culminar 135mm f4.5, Adaptall-2 M42 adapter
Zeiss . . . Zeiss Contaflex 126 system, Zeiss Contaflex Super
Medium Format: Pentacon sixTL
Hasselblad 500c/m - CZ 2.8-80mm planar, CZ 4-150mm sonnarCF |
|
| Back to top |
|
|
Excalibur

Joined: 19 Jul 2009
Posts: 5019
Location: UK
Expire: 2014-04-21
|
| Posted: Sat Jul 09, 2016 5:55 am Post subject: |
|
|
Excalibur wrote:
Even the most expensive Epson flat bed scanners have the same resolution (i.e. showing detail) as about a 3mp digital camera. So what you have to do is "cheat" using Epson software (or Vuescan) and that is to scan to at least 3200 dpi so you pack in more pixels per sq inch\cm (software cheat) so when you enlarge to over 10" X8" (e.g. 20" X16") it looks quite good\sharp at the correct viewing distance compared to say a low scan of 1200 dpi.
_________________
Canon A1, AV1, T70 & T90, EOS 300 and EOS300v, Chinon CE and CP-7M. Contax 139, Fuji STX-2, Konica Autoreflex TC, FS-1, FT-1, Minolta X-700, X-300, XD-11, SRT101b, Nikon EM, FM, F4, F90X, Olympus OM2, Pentax S3, Spotmatic, Pentax ME super, Praktica TL 5B, & BC1, , Ricoh KR10super, Yashica T5D, Bronica Etrs, Mamiya RB67 pro AND drum roll:- a Sony Nex 3
.........past gear Tele Rolleiflex and Rollei SL66.
Many lenses from good to excellent. |
|
| Back to top |
|
|
j.lukow
Joined: 03 Oct 2007
Posts: 856
Location: Lindsay Ontario, Canada
Expire: 2021-11-25
|
| Posted: Sat Jul 09, 2016 2:53 pm Post subject: |
|
|
j.lukow wrote:
| Excalibur wrote: |
| Even the most expensive Epson flat bed scanners have the same resolution (i.e. showing detail) as about a 3mp digital camera. So what you have to do is "cheat" using Epson software (or Vuescan) and that is to scan to at least 3200 dpi so you pack in more pixels per sq inch\cm (software cheat) so when you enlarge to over 10" X8" (e.g. 20" X16") it looks quite good\sharp at the correct viewing distance compared to say a low scan of 1200 dpi. |
Its funny you should mention Vuescan as Vueprint is my go to for basic image manipulation - resize, contrast etc. (Need to check if I have a copy of Vuescan . . . does it mesh well with Epson's scanners?)
I will definitely give this a try - now if you pull this cheat what size of image am I working with?
Thanks for the info so far . . .
Jim
_________________
EMPLOYMENT: That which funded photography and my new woodworking business.j.lukow
Jim's Kit:
Minolta Kit: Minolta X570 & Autowinder G, Minolta SRT200
LENSES:Minolta - 45mm & 50mm F1:2, PF 58mm F1:1.4, Tamron 28mm f1:2.5, Tamron SP 35-80mm f1:2.8/3.8 & CF TeleMacro zoom 80-210 f1:3.8, Vivitar f3.0~4.5 35-200mm macro focusing zoom, f 2.8 28mm CF Wide angle, 2x macro focus teleconverter,Sigma F4 25-250, f 2.8~4 35-70mm zoom master,Tokina SD f4-5.6 70-210 zoom, f4.5 80-200 "Ultra" Zoom,AutoImage 135mm F1:2.8, Spiratone 400mm f1:6.3, Magicon f3.5-4.8 35-70mm macro zoom,Quantary f8-500 Mirror/macro lens, Accura MD mount Macro bellows
M42 Kit:Praktica PLC2,Yashica TL Electro X
LENSES:Meyer Goerlitz Oreston 50mm f1:1.8 , Auto Yashinon DX 1:1.7 50mm,Steinheil Munchen Culminar 135mm f4.5, Adaptall-2 M42 adapter
Zeiss . . . Zeiss Contaflex 126 system, Zeiss Contaflex Super
Medium Format: Pentacon sixTL
Hasselblad 500c/m - CZ 2.8-80mm planar, CZ 4-150mm sonnarCF |
|
| Back to top |
|
|
Excalibur
Joined: 19 Jul 2009
Posts: 5019
Location: UK
Expire: 2014-04-21
|
| Posted: Sat Jul 09, 2016 4:51 pm Post subject: |
|
|
Excalibur wrote:
| j.lukow wrote: |
| Excalibur wrote: |
| Even the most expensive Epson flat bed scanners have the same resolution (i.e. showing detail) as about a 3mp digital camera. So what you have to do is "cheat" using Epson software (or Vuescan) and that is to scan to at least 3200 dpi so you pack in more pixels per sq inch\cm (software cheat) so when you enlarge to over 10" X8" (e.g. 20" X16") it looks quite good\sharp at the correct viewing distance compared to say a low scan of 1200 dpi. |
Its funny you should mention Vuescan as Vueprint is my go to for basic image manipulation - resize, contrast etc. (Need to check if I have a copy of Vuescan . . . does it mesh well with Epson's scanners?)
I will definitely give this a try - now if you pull this cheat what size of image am I working with?
Thanks for the info so far . . .
Jim |
Vuescan works with Epson also different older makes, but Epson software is still good and only change if Epson is not giving what you want. I don't understand your last question, but as you increase the dpi scan the file size goes up and esp with 120 film, and you save as *.tiff, it can be massive. Also saving as tiff it's better doing alterations in Photoshop then you can save as jpg for a smaller size...jpg scans do not like alterations i.e continual alterations and hitting the save button although still VG as a file format if not messed about.
Anyway if you have your own printer (or use a supermarket)..scan at 1200 dpi and then 3200 (or even 6400 dpi) and then get a print done 10X8" or 8X6 or whatever and see if you like the difference, if you can't see any, then it's a question on google ;(......as a lab scan of say 3200 would show the difference compared to a low supermarket scan even though the supermarket is using a £20,000 scanner (usually Fuji Frontier).
Well to sum up:- if you are only going to do 6X4" prints yourself (or supermarket) then you can scan lower (even the supermarket's low scan gives you an acceptable A4 print) but if you want a 20 X16" print you just can't get away with a low scan....erm well you could increasing the viewing distance 
My home high scan using Epson V750 and OK I didn't get the eyes in focus  but the lab used my 35mm neg to produce a very good 16" X 12" print..Canon 28mm f2.8 but the lab used my 35mm neg to produce a very good 16" X 12" print..Canon 28mm f2.8

_________________
Canon A1, AV1, T70 & T90, EOS 300 and EOS300v, Chinon CE and CP-7M. Contax 139, Fuji STX-2, Konica Autoreflex TC, FS-1, FT-1, Minolta X-700, X-300, XD-11, SRT101b, Nikon EM, FM, F4, F90X, Olympus OM2, Pentax S3, Spotmatic, Pentax ME super, Praktica TL 5B, & BC1, , Ricoh KR10super, Yashica T5D, Bronica Etrs, Mamiya RB67 pro AND drum roll:- a Sony Nex 3
.........past gear Tele Rolleiflex and Rollei SL66.
Many lenses from good to excellent. |
|
| Back to top |
|
|
j.lukow
Joined: 03 Oct 2007
Posts: 856
Location: Lindsay Ontario, Canada
Expire: 2021-11-25
|
| Posted: Sat Jul 09, 2016 11:04 pm Post subject: |
|
|
j.lukow wrote:
You've answered many of my questions . . .
The last one is that in the Epson software you set a dimension for the scan to have . . .
So that said I have notice that the higher you set the resolution the smaller the image has to be - or program will let you produce.
So am I trying to emulate a negative with a small super dense image that allows you to enlarge or are we doing a very large image ( like my wife's digital camera does ) at as high a resolution as the program allows and then reduce it to produce dense high resolution images (most common in graphics practices - my experience from college). . .
Jim
_________________
EMPLOYMENT: That which funded photography and my new woodworking business.j.lukow
Jim's Kit:
Minolta Kit: Minolta X570 & Autowinder G, Minolta SRT200
LENSES:Minolta - 45mm & 50mm F1:2, PF 58mm F1:1.4, Tamron 28mm f1:2.5, Tamron SP 35-80mm f1:2.8/3.8 & CF TeleMacro zoom 80-210 f1:3.8, Vivitar f3.0~4.5 35-200mm macro focusing zoom, f 2.8 28mm CF Wide angle, 2x macro focus teleconverter,Sigma F4 25-250, f 2.8~4 35-70mm zoom master,Tokina SD f4-5.6 70-210 zoom, f4.5 80-200 "Ultra" Zoom,AutoImage 135mm F1:2.8, Spiratone 400mm f1:6.3, Magicon f3.5-4.8 35-70mm macro zoom,Quantary f8-500 Mirror/macro lens, Accura MD mount Macro bellows
M42 Kit:Praktica PLC2,Yashica TL Electro X
LENSES:Meyer Goerlitz Oreston 50mm f1:1.8 , Auto Yashinon DX 1:1.7 50mm,Steinheil Munchen Culminar 135mm f4.5, Adaptall-2 M42 adapter
Zeiss . . . Zeiss Contaflex 126 system, Zeiss Contaflex Super
Medium Format: Pentacon sixTL
Hasselblad 500c/m - CZ 2.8-80mm planar, CZ 4-150mm sonnarCF |
|
| Back to top |
|
|
j.lukow
Joined: 03 Oct 2007
Posts: 856
Location: Lindsay Ontario, Canada
Expire: 2021-11-25
|
| Posted: Sun Jul 10, 2016 12:17 am Post subject: |
|
|
j.lukow wrote:
What I didn't realize was that part of my frustration came from the fact that home printers can have issues in giving you an accurate representation of the final image. This undermined my confidence in the process.
I was writing my last post before this while waiting on a couple prints from a digital kiosk . . .
These images were based on my original scans resolution (as a 5x7 ) this print was quite sharp when it was enlarged to 8x10. Now when a sample was enlarged to be the equivalent of a 16x20 - the result showed a distinct unacceptable fuzziness.
These prints have given me some clarity in regard to this process so that I now have much more confidence to move forward.
Jim
_________________
EMPLOYMENT: That which funded photography and my new woodworking business.j.lukow
Jim's Kit:
Minolta Kit: Minolta X570 & Autowinder G, Minolta SRT200
LENSES:Minolta - 45mm & 50mm F1:2, PF 58mm F1:1.4, Tamron 28mm f1:2.5, Tamron SP 35-80mm f1:2.8/3.8 & CF TeleMacro zoom 80-210 f1:3.8, Vivitar f3.0~4.5 35-200mm macro focusing zoom, f 2.8 28mm CF Wide angle, 2x macro focus teleconverter,Sigma F4 25-250, f 2.8~4 35-70mm zoom master,Tokina SD f4-5.6 70-210 zoom, f4.5 80-200 "Ultra" Zoom,AutoImage 135mm F1:2.8, Spiratone 400mm f1:6.3, Magicon f3.5-4.8 35-70mm macro zoom,Quantary f8-500 Mirror/macro lens, Accura MD mount Macro bellows
M42 Kit:Praktica PLC2,Yashica TL Electro X
LENSES:Meyer Goerlitz Oreston 50mm f1:1.8 , Auto Yashinon DX 1:1.7 50mm,Steinheil Munchen Culminar 135mm f4.5, Adaptall-2 M42 adapter
Zeiss . . . Zeiss Contaflex 126 system, Zeiss Contaflex Super
Medium Format: Pentacon sixTL
Hasselblad 500c/m - CZ 2.8-80mm planar, CZ 4-150mm sonnarCF |
|
| Back to top |
|
|
Excalibur
Joined: 19 Jul 2009
Posts: 5019
Location: UK
Expire: 2014-04-21
|
| Posted: Sun Jul 10, 2016 7:48 am Post subject: |
|
|
Excalibur wrote:
| j.lukow wrote: |
What I didn't realize was that part of my frustration came from the fact that home printers can have issues in giving you an accurate representation of the final image. This undermined my confidence in the process.
I was writing my last post before this while waiting on a couple prints from a digital kiosk . . .
These images were based on my original scans resolution (as a 5x7 ) this print was quite sharp when it was enlarged to 8x10. Now when a sample was enlarged to be the equivalent of a 16x20 - the result showed a distinct unacceptable fuzziness.
These prints have given me some clarity in regard to this process so that I now have much more confidence to move forward.
Jim |
Well with digi or scanned film you are supposed to have a calibrated monitor and printer as what you see on the screen is not what you always get in a print...for me I can't be bothered with all that and if I have a winning shot, would let a lab do say a 12X10 print.....my VG Epson Stylus Photo 2100 has just stopped working and I used to do some A4 prints of\for the family who wouldn't care as the subject was more important than a slight colour cast or whatever erm well as long as the faces weren't green....Anyway these days you can just email your shot and they can all look at it on their computer screens....but then you might have a £700 pro calibrated monitor and they see you shot on a cheap laptop javascript:emoticon(' ')..but the problem with just jpgs is where will they be in say 50 years time. ')..but the problem with just jpgs is where will they be in say 50 years time.
Your fuzziness @ 16X20 is probably because of the limitations of your scanner (assuming the shot was taken with a VG lens)...I don't know the Epson 2400 but I would say it's equivalent to a 2mp digi camera, so you are trying to get the best out of 35mm film camera with your scanner when a digi can now do it with ease (e.g. 8mp mobile)....anyone here had a 2mp digi and had a 16X20 print done? Or I'm guessing in that you could set your digi camera to 2mp and see what the shot is like at 16X20?
When you think a neg can have up to 21mp of detail in it, the only way to get it all off is to use a drum scanner but it's very expensive for a lab to do it and then I don't know if the most expensive monitor or printing paper can show all the slight variations in colour etc as what's on the neg....maybe someone here knows.
Well many guys realise the limitation of 35mm film and scanning, so use MF (120 film) cameras and even a cheap scanner can give good results as you don't have to enlarge as much for a print.
Anyway over the years always thought it was a challenge to equal or get close to digi shots with a 35mm film camera, but with digi cameras out now like the full frame A7's , just can't compete but then I can still get VG results with the versatility of a SLR film camera and lens for even under £10 
_________________
Canon A1, AV1, T70 & T90, EOS 300 and EOS300v, Chinon CE and CP-7M. Contax 139, Fuji STX-2, Konica Autoreflex TC, FS-1, FT-1, Minolta X-700, X-300, XD-11, SRT101b, Nikon EM, FM, F4, F90X, Olympus OM2, Pentax S3, Spotmatic, Pentax ME super, Praktica TL 5B, & BC1, , Ricoh KR10super, Yashica T5D, Bronica Etrs, Mamiya RB67 pro AND drum roll:- a Sony Nex 3
.........past gear Tele Rolleiflex and Rollei SL66.
Many lenses from good to excellent. |
|
| Back to top |
|
|
cooltouch
Joined: 15 Jan 2009
Posts: 9097
Location: Houston, Texas
|
| Posted: Mon Jul 11, 2016 2:34 am Post subject: |
|
|
cooltouch wrote:
| Excalibur wrote: |
When you think a neg can have up to 21mp of detail in it, the only way to get it all off is to use a drum scanner but it's very expensive for a lab to do it and then I don't know if the most expensive monitor or printing paper can show all the slight variations in colour etc as what's on the neg....maybe someone here knows. |
First of all, I think that some negatives can hold more than 21mp of information, and secondly, I don't believe you need a drum scanner as the only way to retrieve this information. What about the Plustek slide scanners that are alledged to have like 7200 ppi resolution? I've never used one, so I don't know what their true abilities are, but I've heard they do a pretty decent job. And then there are the Nikon Coolscans, the more higher-end ones capable of 4000 ppi, which, when assuming a 2:3 ratio as is found in 35mm film, this equates to 4000 x 6000 pixels or 24.3 megapixels, which coincidentally is the resolution of my NEX 7 and a number of other digital cameras. As it so happens, since I can't afford a Coolscan, I use my NEX 7 to duplicate slides and negatives and it does a great job of capturing most all the information my slides and negs have. I can resolve Kodachrome 64 grain -- which is saying a lot -- but I can't quite resolve Velvia 50 grain. Velvia being the tiny grain king and all.
I calibrate my monitors, so I'm satisfied that what I see on them is very close to the true colors in the image. My printer also does a good job of printing the colors accurately. I don't have any scientific way of measuring this -- I just hold the print up alongside the slide or image on my screen and compare. Good enough for me.
| Excalibur wrote: |
| Well many guys realise the limitation of 35mm film and scanning, so use MF (120 film) cameras and even a cheap scanner can give good results as you don't have to enlarge as much for a print. |
I've found this to be true pretty much. When I scan medium format film on my Epson 4990, I don't bother scanning at anything higher than 2400 ppi. Because of the negative size, I can still get good prints even at that supposely low resolution.
| Excalibur wrote: |
| Anyway over the years always thought it was a challenge to equal or get close to digi shots with a 35mm film camera, but with digi cameras out now like the full frame A7's , just can't compete but then I can still get VG results with the versatility of a SLR film camera and lens for even under £10 |
I've found that it really depends on the film and the lens -- no surprise there, I guess. But I can show you slides I've shot using fine grained film and a great lens, and I honestly don't think a digital camera could have done any better -- or at least not by much.
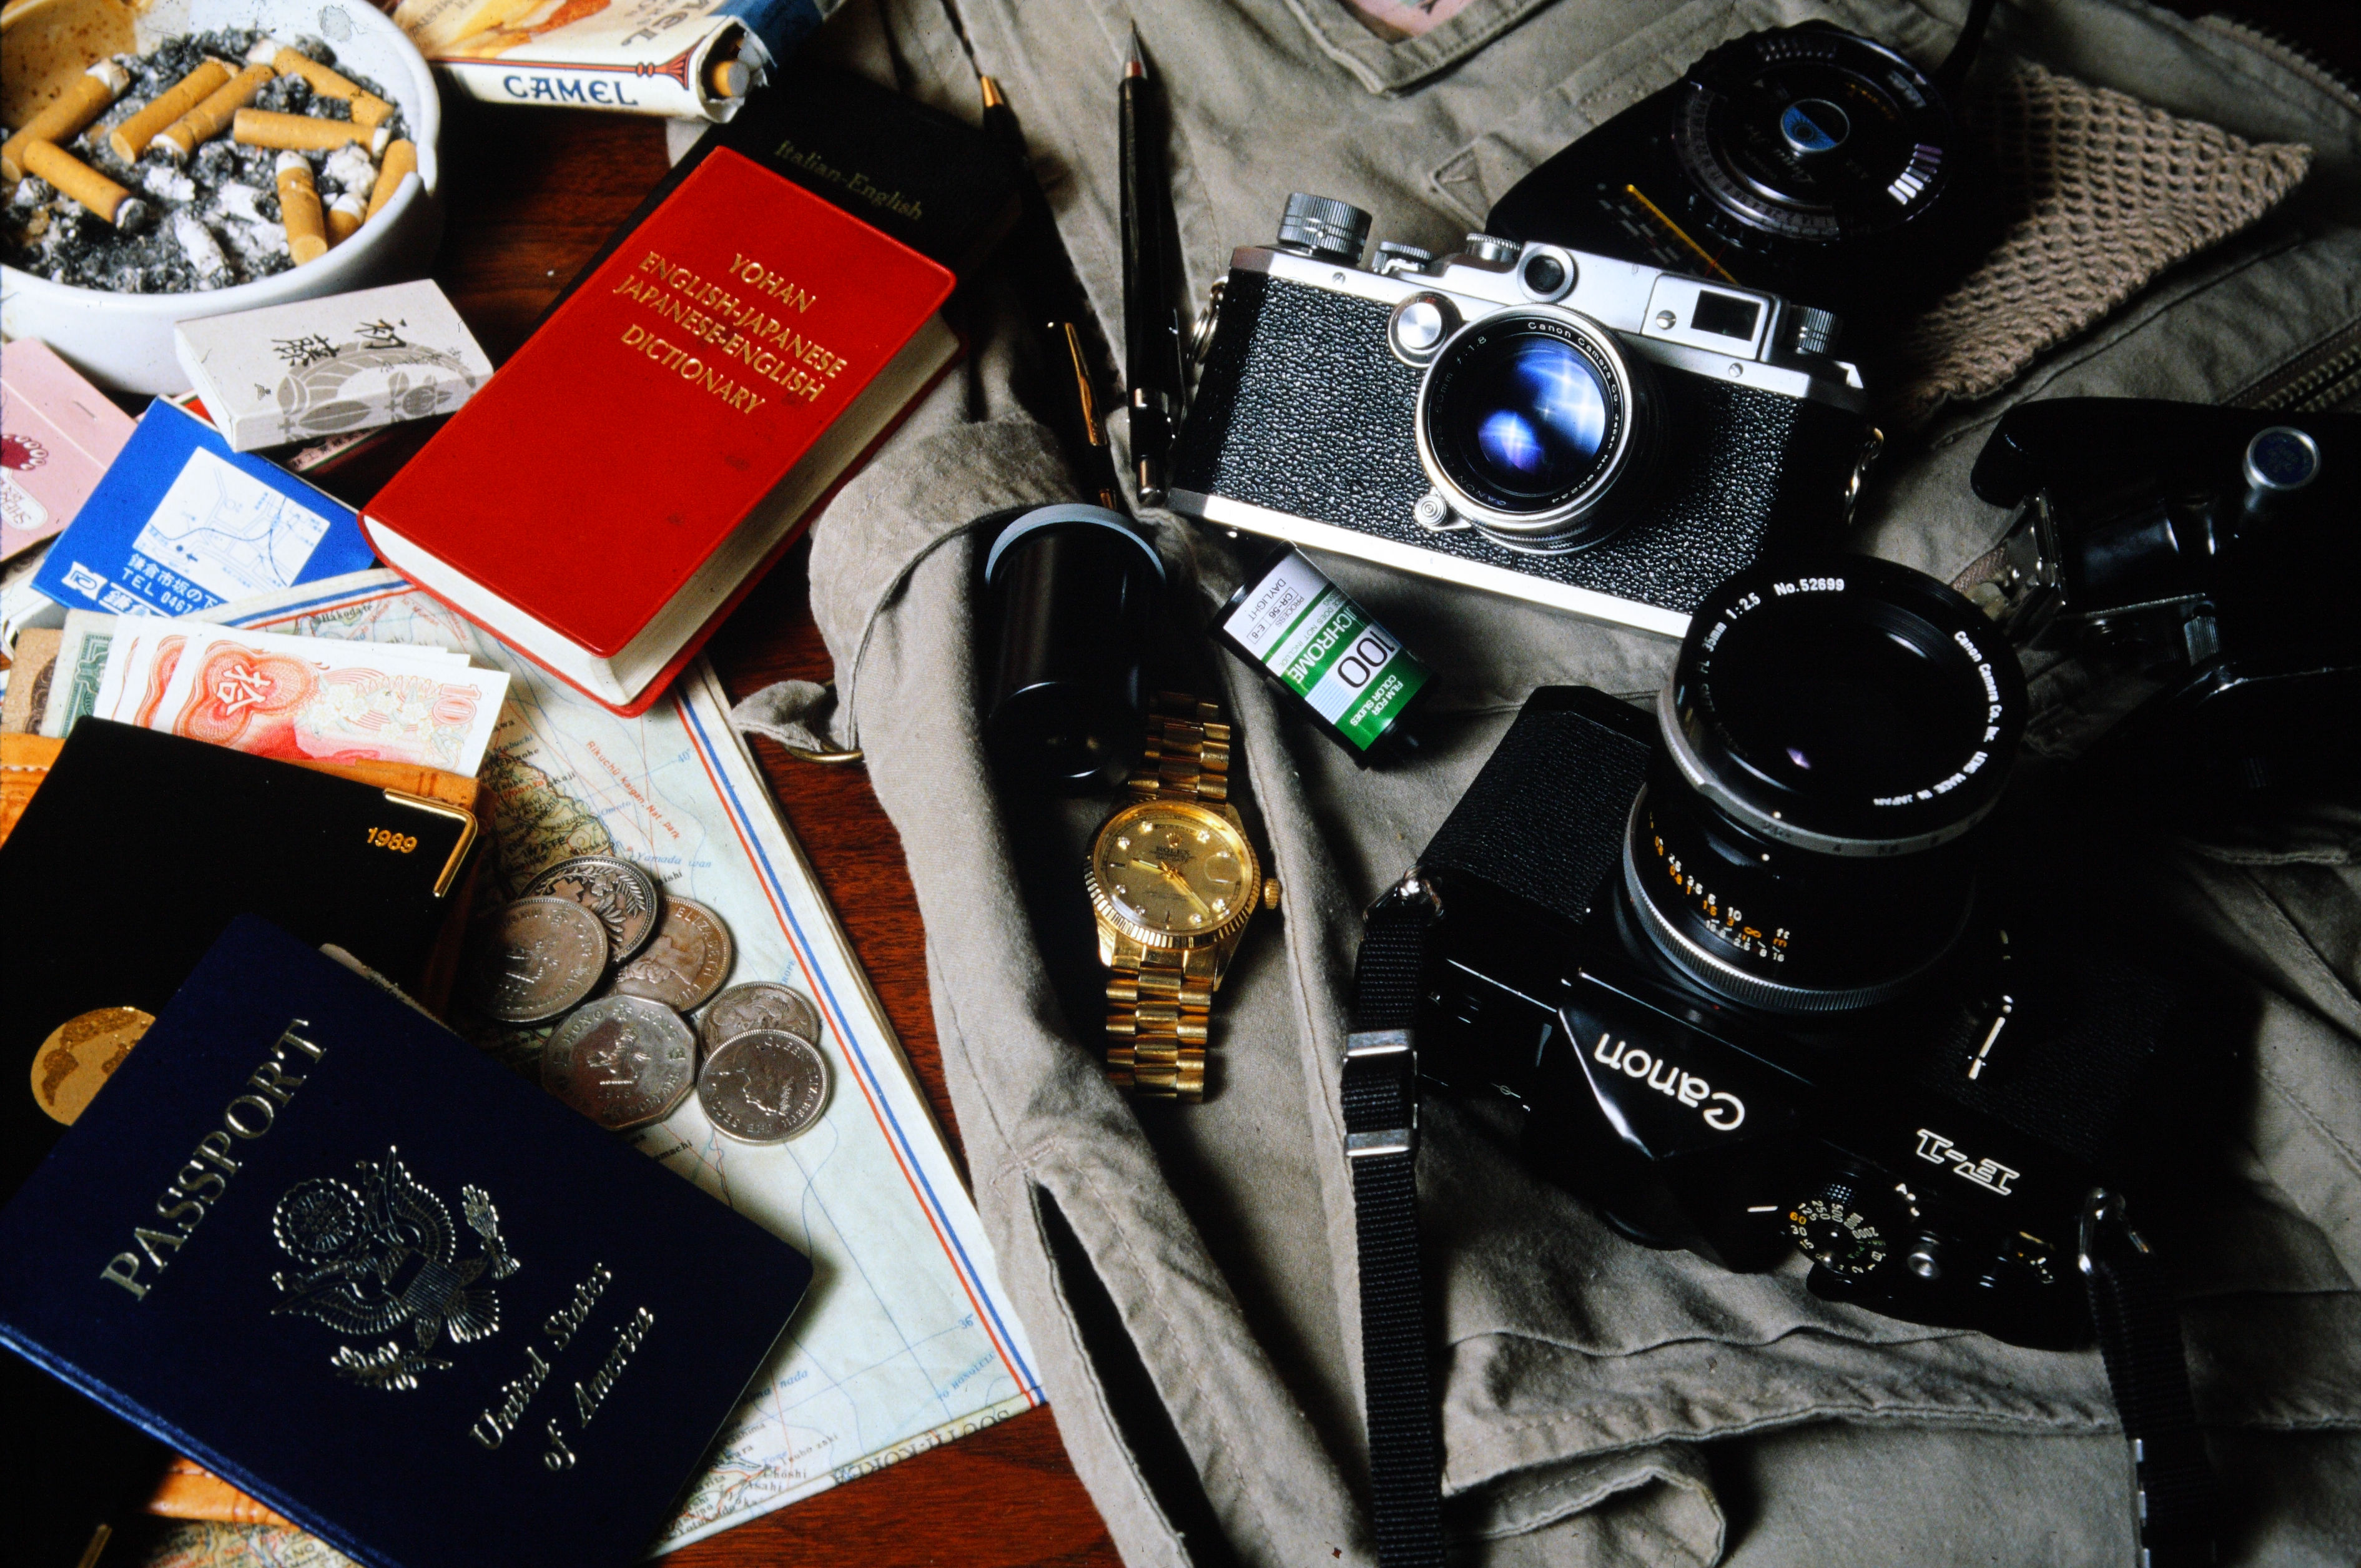
But in other cases the difference can be dramatic. Here's a slide I've posted here more than once, but it was also the subject of a resolution test I conducted. I wanted to compare a sharp film image to a digital shot of the same subject. The slide is Fujichrome 100 and the lens was a Canon nFD 50mm f/3.5 macro. I took the photo way back in 1989. The point of focus was the (fake) Rolex watch.

Okay, so here is a 100% crop of the watch. No PP was done to the image of any sort, other than cropping. Not too bad, eh?

As it so happens, I still have that watch. It's been broken for years, but for some stupid reason I still have it. So, I went to a bit of trouble lining things up so the camera and the watch were close to the same distance apart. I also assumed that I was shooting the original image at f/8 -- a pretty safe assumption for me. The camera was a 10.1mp Canon XS (1000D) set to ISO 100, and, since I didn't own the Canon nFD 50/3.5 anymore, I used a Micro-Nikkor 55mm f/3.5 pre-AI lens set to f/8. I used a flash with the digital shot because I had used one for the original photo. Here is the digital shot. As you can see, the difference between the two is dramatic. I was blown away that a lowly 10.1mp camera could out-resolve an image that I had always thought of as "sharp." Being a hard-core dedicated film user, I was somewhat depressed about just how well that Canon/Nikon combination worked.

I'm still a hard-core film user, but this test sure did put things into perspective for me.
_________________
Michael
My Gear List: http://michaelmcbroom.com/photo/gear.html
My Gallery: http://michaelmcbroom.com/gallery3/index.php/
My Flickr Page: https://www.flickr.com/photos/11308754@N08/albums
My Music: https://soundcloud.com/michaelmcbroom/albums
My Blog: http://michaelmcbroom.com/blogistan/ |
|
| Back to top |
|
|
Excalibur
Joined: 19 Jul 2009
Posts: 5019
Location: UK
Expire: 2014-04-21
|
| Posted: Mon Jul 11, 2016 8:25 am Post subject: |
|
|
Excalibur wrote:
Well Cooltouch I'm not knowledgeable on all scanners that are available (old and new), but know the basics for any scanner that sorts the top end from the cheaper ones and it is the combo of:- resolution on the lens assemby to get the detail out of the neg and the accuracy\smoothness of the drive when scanning.....packing in the pixels per sq inch\cm just makes the picture nicer esp for enlargements or crops.
Epson V700\V750, Nikon coolscan (if you can get one as they don't make them anymore), Plustek and so on... might be good enough for an amateur if you don't do large crops and only do A4 prints from an ordinary Joe public printer, but the good labs don't use them and use Noritsu, Frontier, drum scanners and so on for a reason.....BUT then I suppose there could be a debate to whether you would see much difference on just a 10X8"\A4 print from a VG print\printer using any of the scanners above?
If you have the space\money and are a film fanboy then this is nice:-
http://jacandheath.com/self-scanning-fuji-frontier-sp-3000/
The supermarket not far from me uses this one and will scan a 35mm neg at 1800 X 1200 pixels which gives a good picture (not large) on a computer screen and a reasonable A4 print.....so as it's only £3 for dev and scan to CD with an index, I use them for my shots and any winners would get a lab to scan and print.
Also could you set yor Digi to 2mp and take the same pic of your watch to show the result?
_________________
Canon A1, AV1, T70 & T90, EOS 300 and EOS300v, Chinon CE and CP-7M. Contax 139, Fuji STX-2, Konica Autoreflex TC, FS-1, FT-1, Minolta X-700, X-300, XD-11, SRT101b, Nikon EM, FM, F4, F90X, Olympus OM2, Pentax S3, Spotmatic, Pentax ME super, Praktica TL 5B, & BC1, , Ricoh KR10super, Yashica T5D, Bronica Etrs, Mamiya RB67 pro AND drum roll:- a Sony Nex 3
.........past gear Tele Rolleiflex and Rollei SL66.
Many lenses from good to excellent. |
|
| Back to top |
|
|
j.lukow
Joined: 03 Oct 2007
Posts: 856
Location: Lindsay Ontario, Canada
Expire: 2021-11-25
|
| Posted: Wed Jul 13, 2016 4:39 pm Post subject: |
|
|
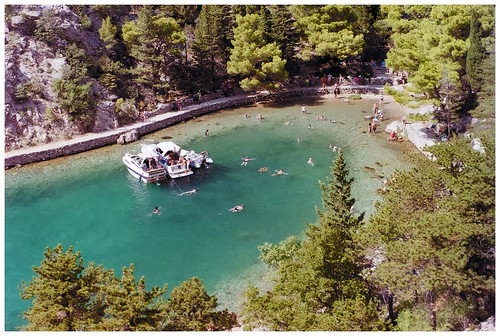
j.lukow wrote:
Thanks for the advice everyone has supplied, much appreciated and I believe successfully applied.
My scanner allowed me to set the resolution for 9600 and my output was tif files so that I could deal with dust, scratches, etc...
I converted to jpeg same resolution and the had the enlargements done . . . very satisfied with the result.
Below is a sample . . .
Now at least I have the confidence to continue on. My next thing is to figure out how to scan my 120 negs - my scanner didn't come with a holder for 120 and I have searched for one for as long as I have had the scanner with no luck.
Thanks again,
Jim
_________________
EMPLOYMENT: That which funded photography and my new woodworking business.j.lukow
Jim's Kit:
Minolta Kit: Minolta X570 & Autowinder G, Minolta SRT200
LENSES:Minolta - 45mm & 50mm F1:2, PF 58mm F1:1.4, Tamron 28mm f1:2.5, Tamron SP 35-80mm f1:2.8/3.8 & CF TeleMacro zoom 80-210 f1:3.8, Vivitar f3.0~4.5 35-200mm macro focusing zoom, f 2.8 28mm CF Wide angle, 2x macro focus teleconverter,Sigma F4 25-250, f 2.8~4 35-70mm zoom master,Tokina SD f4-5.6 70-210 zoom, f4.5 80-200 "Ultra" Zoom,AutoImage 135mm F1:2.8, Spiratone 400mm f1:6.3, Magicon f3.5-4.8 35-70mm macro zoom,Quantary f8-500 Mirror/macro lens, Accura MD mount Macro bellows
M42 Kit:Praktica PLC2,Yashica TL Electro X
LENSES:Meyer Goerlitz Oreston 50mm f1:1.8 , Auto Yashinon DX 1:1.7 50mm,Steinheil Munchen Culminar 135mm f4.5, Adaptall-2 M42 adapter
Zeiss . . . Zeiss Contaflex 126 system, Zeiss Contaflex Super
Medium Format: Pentacon sixTL
Hasselblad 500c/m - CZ 2.8-80mm planar, CZ 4-150mm sonnarCF |
|
| Back to top |
|
|
miran
Joined: 01 Aug 2012
Posts: 1364
Location: Slovenia
|
| Posted: Wed Jul 13, 2016 5:31 pm Post subject: |
|
|
miran wrote:
That's a very good scan! I find that before you print you can get away with quite aggressive sharpening as well. Depends on the intended print size but generally you can use relatively strong sharpening every time.
_________________
my flickr stream |
|
| Back to top |
|
|
Excalibur
Joined: 19 Jul 2009
Posts: 5019
Location: UK
Expire: 2014-04-21
|
| Posted: Wed Jul 13, 2016 5:57 pm Post subject: |
|
|
Excalibur wrote:
| j.lukow wrote: |
Thanks for the advice everyone has supplied, much appreciated and I believe successfully applied.
My scanner allowed me to set the resolution for 9600 and my output was tif files so that I could deal with dust, scratches, etc...
I converted to jpeg same resolution and the had the enlargements done . . . very satisfied with the result.
Below is a sample . . .
Now at least I have the confidence to continue on. My next thing is to figure out how to scan my 120 negs - my scanner didn't come with a holder for 120 and I have searched for one for as long as I have had the scanner with no luck.
Thanks again,
Jim |
That's very good, remember you don't have to scan that high for just posting on the net (well if not cropping) this was a low scan from a supermarket at 1980 X 1272pixels reduced to 1000 X 667.....I find scanning at home very boring after scanning 1000's of old negs going back 50 years but do dust the cobwebs off the V750 for old slides  Another thing I forgot to mention is the better\pro scanners can get detail out of the shadows more if you are interested you can look up Dmax. Another thing I forgot to mention is the better\pro scanners can get detail out of the shadows more if you are interested you can look up Dmax.
Good luck getting a 120 holder as the quality of results shoots up with medium format.

_________________
Canon A1, AV1, T70 & T90, EOS 300 and EOS300v, Chinon CE and CP-7M. Contax 139, Fuji STX-2, Konica Autoreflex TC, FS-1, FT-1, Minolta X-700, X-300, XD-11, SRT101b, Nikon EM, FM, F4, F90X, Olympus OM2, Pentax S3, Spotmatic, Pentax ME super, Praktica TL 5B, & BC1, , Ricoh KR10super, Yashica T5D, Bronica Etrs, Mamiya RB67 pro AND drum roll:- a Sony Nex 3
.........past gear Tele Rolleiflex and Rollei SL66.
Many lenses from good to excellent. |
|
| Back to top |
|
|
j.lukow
Joined: 03 Oct 2007
Posts: 856
Location: Lindsay Ontario, Canada
Expire: 2021-11-25
|
| Posted: Wed Jul 13, 2016 10:24 pm Post subject: |
|
|
j.lukow wrote:
| Excalibur wrote: |
...That's very good, remember you don't have to scan that high for just posting on the net (well if not cropping) this was a low scan from a supermarket at 1980 X 1272pixels reduced to 1000 X 667.....I find scanning at home very boring after scanning 1000's of old negs going back 50 years but do dust the cobwebs off the V750 for old slides Another thing I forgot to mention is the better\pro scanners can get detail out of the shadows more if you are interested you can look up Dmax.
Good luck getting a 120 holder as the quality of results shoots up with medium format. |
Thanks for the compliments
That was one of the scans I did for an 8x10 print so it was convenient to resize.
I did find that even doing the numbers I did having to wait an average of 6 or 7 minutes during scans at my desktop- I figure I will have to somehow multitask. I am hoping to buckle down and get as many pics as I can scanned from years of taking pics with the gear I acquired.
The quality of pics taken with my medium format gear has always driven my desire to get the holder or find an alternate method. At least the standard holder can also be used to scan my 126 negs (126 is believe the same width as 35mm just different sprocket holes).
Jim
_________________
EMPLOYMENT: That which funded photography and my new woodworking business.j.lukow
Jim's Kit:
Minolta Kit: Minolta X570 & Autowinder G, Minolta SRT200
LENSES:Minolta - 45mm & 50mm F1:2, PF 58mm F1:1.4, Tamron 28mm f1:2.5, Tamron SP 35-80mm f1:2.8/3.8 & CF TeleMacro zoom 80-210 f1:3.8, Vivitar f3.0~4.5 35-200mm macro focusing zoom, f 2.8 28mm CF Wide angle, 2x macro focus teleconverter,Sigma F4 25-250, f 2.8~4 35-70mm zoom master,Tokina SD f4-5.6 70-210 zoom, f4.5 80-200 "Ultra" Zoom,AutoImage 135mm F1:2.8, Spiratone 400mm f1:6.3, Magicon f3.5-4.8 35-70mm macro zoom,Quantary f8-500 Mirror/macro lens, Accura MD mount Macro bellows
M42 Kit:Praktica PLC2,Yashica TL Electro X
LENSES:Meyer Goerlitz Oreston 50mm f1:1.8 , Auto Yashinon DX 1:1.7 50mm,Steinheil Munchen Culminar 135mm f4.5, Adaptall-2 M42 adapter
Zeiss . . . Zeiss Contaflex 126 system, Zeiss Contaflex Super
Medium Format: Pentacon sixTL
Hasselblad 500c/m - CZ 2.8-80mm planar, CZ 4-150mm sonnarCF |
|
| Back to top |
|
|
Excalibur
Joined: 19 Jul 2009
Posts: 5019
Location: UK
Expire: 2014-04-21
|
| Posted: Thu Jul 14, 2016 7:48 am Post subject: |
|
|
Excalibur wrote:
You definately have to pack in the pixels per sq cm when doing crops as I wanted to see how good the common Hexanon 28mm lens was and this was the best a V750 could do....it would be interesting to see the result from a drum scanner, but then the weak link might be the lens.

_________________
Canon A1, AV1, T70 & T90, EOS 300 and EOS300v, Chinon CE and CP-7M. Contax 139, Fuji STX-2, Konica Autoreflex TC, FS-1, FT-1, Minolta X-700, X-300, XD-11, SRT101b, Nikon EM, FM, F4, F90X, Olympus OM2, Pentax S3, Spotmatic, Pentax ME super, Praktica TL 5B, & BC1, , Ricoh KR10super, Yashica T5D, Bronica Etrs, Mamiya RB67 pro AND drum roll:- a Sony Nex 3
.........past gear Tele Rolleiflex and Rollei SL66.
Many lenses from good to excellent. |
|
| Back to top |
|
|
|
|