| View previous topic :: View next topic |
| Author |
Message |
VssOutlet
Joined: 11 Apr 2016
Posts: 9
|
 Posted: Mon Apr 11, 2016 5:24 am Post subject: Lester A. Dine/Kiron 105mm Macro Lens Front Element Removal Posted: Mon Apr 11, 2016 5:24 am Post subject: Lester A. Dine/Kiron 105mm Macro Lens Front Element Removal |
 |
|
VssOutlet wrote:
Hi,
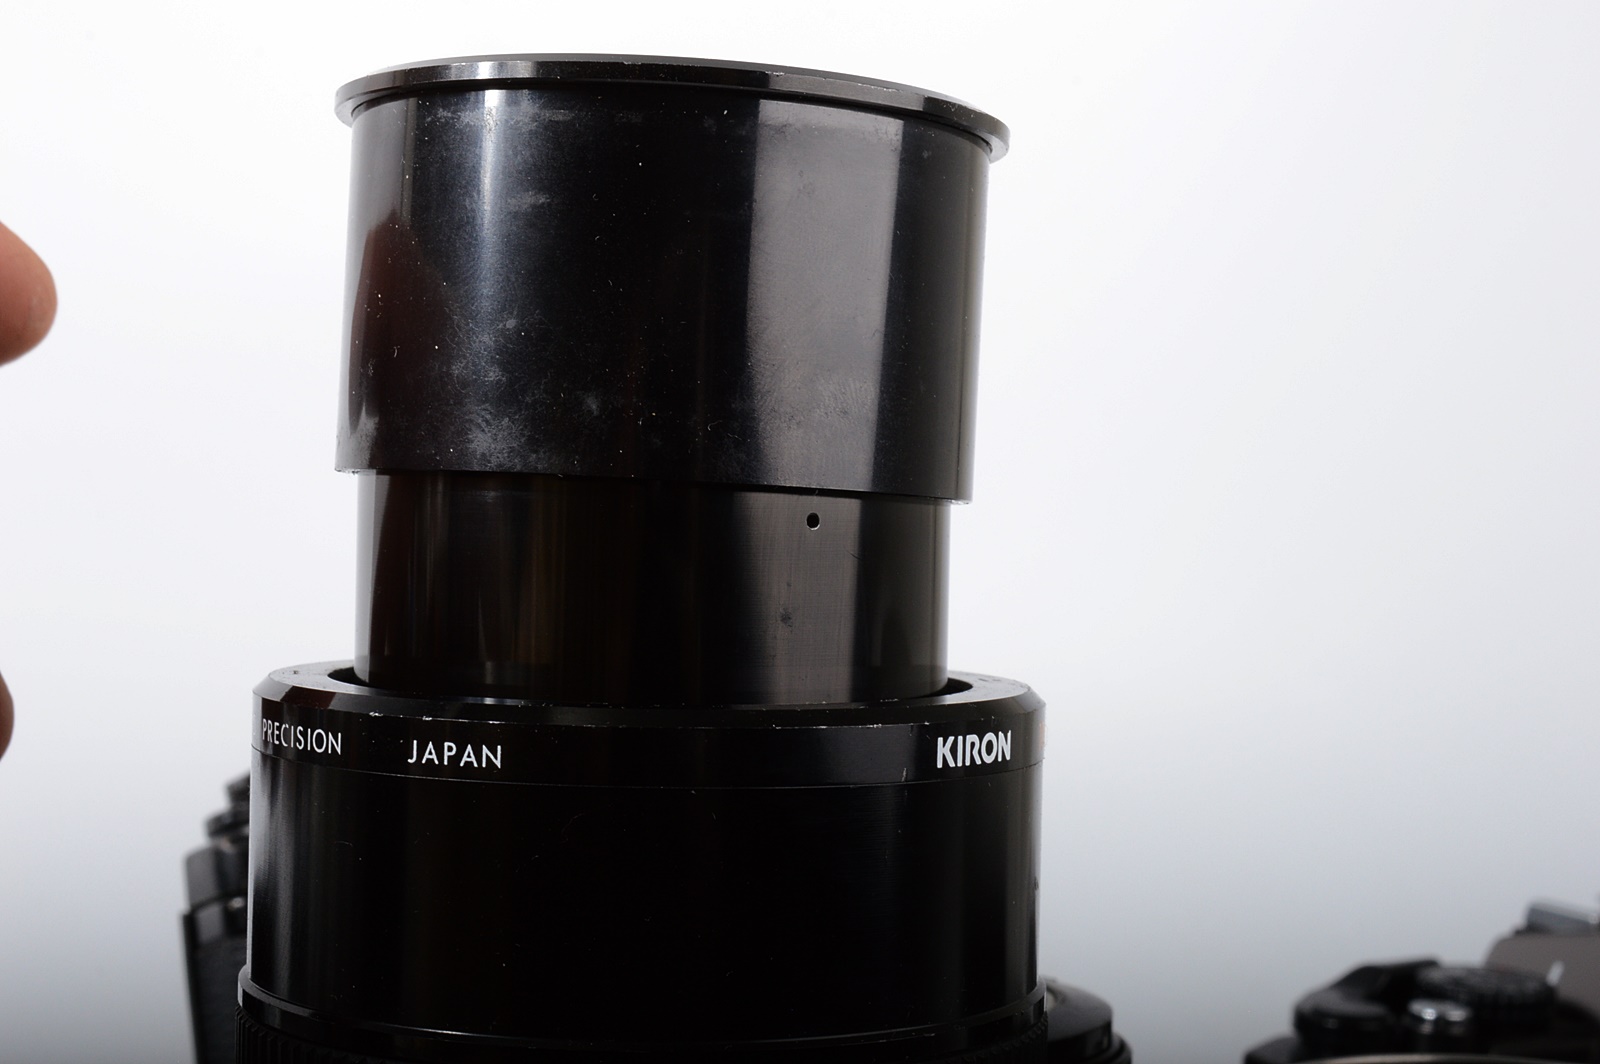
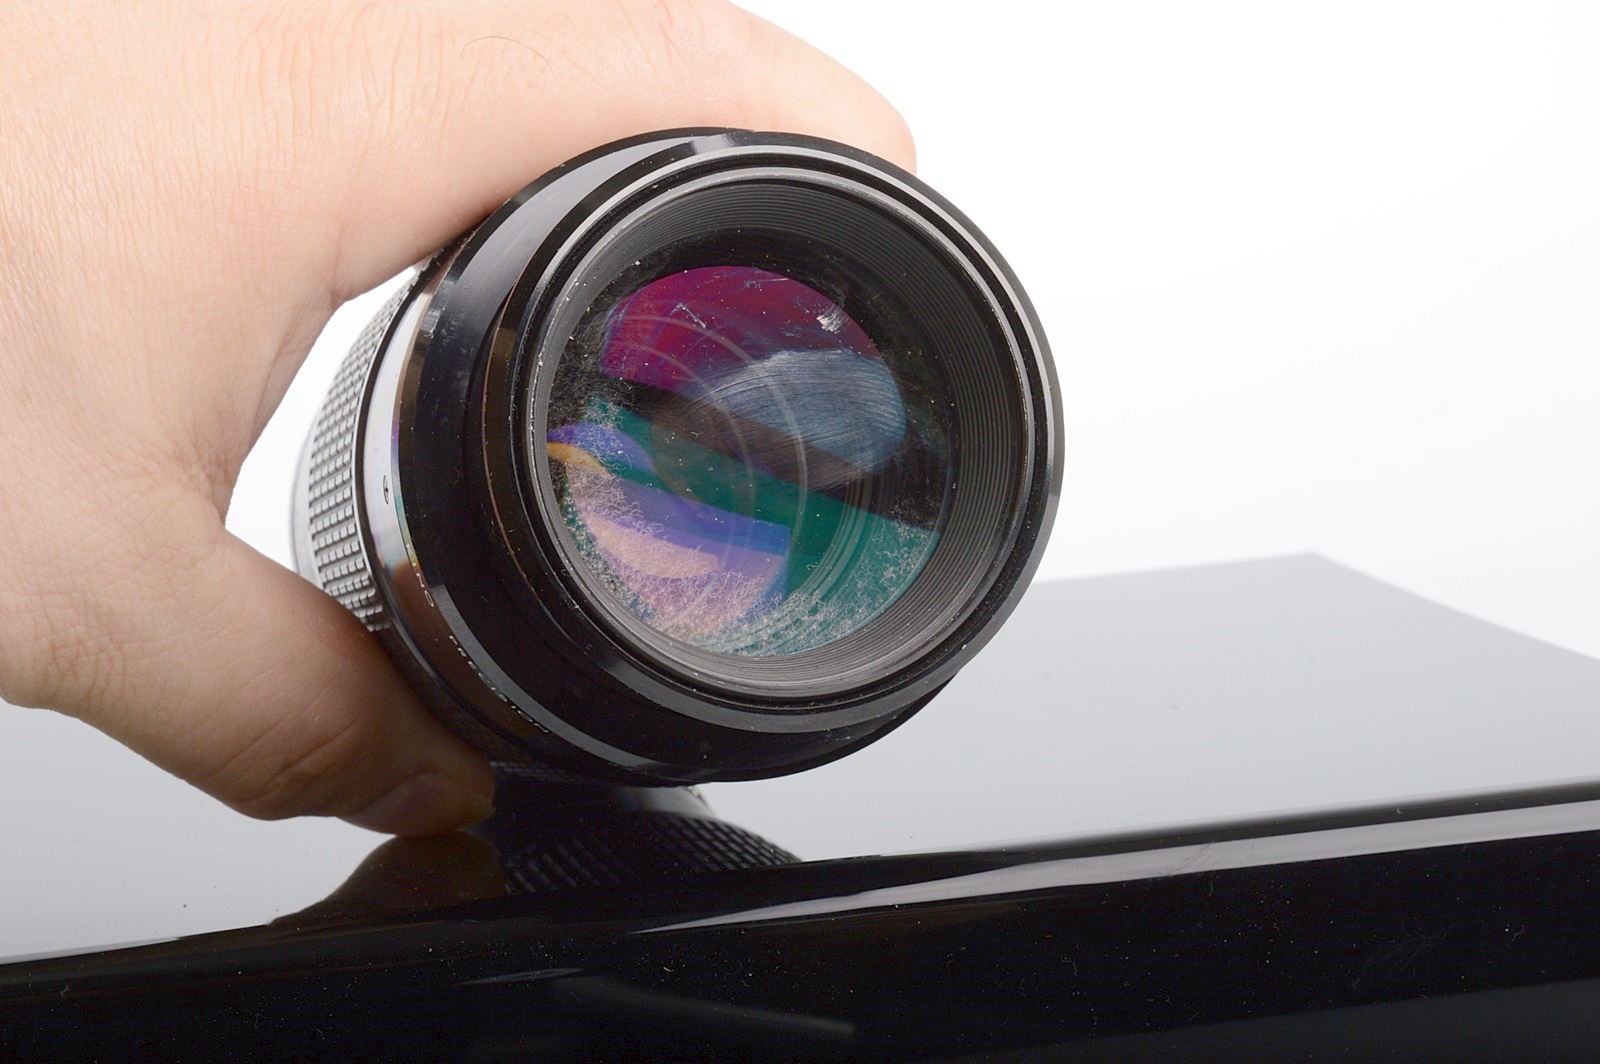
I got a great Kiron 105mm macro lens today. The only problem is that there is fungus on the inside of the front element. I can't figure out how to get at it. I've inserted two pictures below. If you extend the lens, there are three tiny screws that look like they might hold the front ring in place. I removed them. But I still can't figure out how to remove the element.
Any suggestions?

 |
|
| Back to top |
|
 |
kansalliskalaCafe


Joined: 23 Jul 2015
Posts: 602
Location: South Finland, countryside
|
| Posted: Mon Apr 11, 2016 5:55 am Post subject: Re: Lester A. Dine/Kiron 105mm Macro Lens Front Element Remo |
|
|
kansalliskalaCafe wrote:
the pics, you're welcome 
| VssOutlet wrote: |
Hi,
I got a great Kiron 105mm macro lens today. The only problem is that there is fungus on the inside of the front element. I can't figure out how to get at it. I've inserted two pictures below. If you extend the lens, there are three tiny screws that look like they might hold the front ring in place. I removed them. But I still can't figure out how to remove the element.
Any suggestions?
|
_________________
(my normal account password still on another computer) |
|
| Back to top |
|
|
WNG555

Joined: 18 Dec 2014
Posts: 784
Location: Arrid-Zone-A, USA
|
| Posted: Mon Apr 11, 2016 7:36 am Post subject: |
|
|
WNG555 wrote:
Since the lens has a built-in hood, most of these designs have the hood slide onto the front rim/tube, then it's threaded onto the body.
Once you've removed the 3 set screws, try to grasp the the tube and unscrew it counterclockwise. It and the lens hood should come off revealing a threaded retaining ring securing the front element. Or sometimes, the threaded tube is the retainer. So be careful as the front element could drop free.
_________________
"The eyes are useless when the mind is blind."
Sony ILCE-6000, SELP1650, SEL1855, SEL55210, SEL5018. Sigma 19/30/60mm f2.8 EX DN Art.
Rokinon 8mm f3.5 Fish-Eye, 14mm f2.8 IF ED UMC. Samyang 12mm f2.8 ED AS NCS Fish-Eye.
And a bunch of Manual-Focus Lenses
My Flickr |
|
| Back to top |
|
|
VssOutlet
Joined: 11 Apr 2016
Posts: 9
|
| Posted: Mon Apr 11, 2016 4:09 pm Post subject: |
|
|
VssOutlet wrote:
| WNG555 wrote: |
Since the lens has a built-in hood, most of these designs have the hood slide onto the front rim/tube, then it's threaded onto the body.
Once you've removed the 3 set screws, try to grasp the the tube and unscrew it counterclockwise. It and the lens hood should come off revealing a threaded retaining ring securing the front element. Or sometimes, the threaded tube is the retainer. So be careful as the front element could drop free. |
I tried that with all my strength (which is considerable) and it doesn't budge when I try to twist it. |
|
| Back to top |
|
|
marcusBMG
Joined: 07 Dec 2012
Posts: 1304
Location: Conwy N Wales
|
| Posted: Mon Apr 11, 2016 4:23 pm Post subject: |
|
|
marcusBMG wrote:
uh uh. My first option would be to try to unscrew the conical "nameplate" (no name on it in this case) holding the front element in. I use a piece of pipe, its end rounded off a bit, with double sided sticky tape on. I use both standard DSSS and also the spongy draught proofing stuff, depending on the fit and what seems to suit the circumstance best.
_________________
pentax ME super (retired)
Pentax K3-ii; pentax K-S2; Samsung NX 20; Lumix G1 + adapters;
Adaptall collection (proliferating!) inc 200-500mm 31A, 300mm f2.8, 400mm f4.
Primes: takumar 55mm; smc 28mm, 50mm; kino/komine 28mm f2's, helios 58mm, Tamron Nestar 400mm, novoflex 400mm, Vivitar 135mm close focus, 105mm macro; Jupiter 11A; CZJ 135mm.
A classic zoom or two: VS1 (komine), Kiron Zoomlock... |
|
| Back to top |
|
|
visualopsins


Joined: 05 Mar 2009
Posts: 10531
Location: California
Expire: 2025-04-11
|
| Posted: Mon Apr 11, 2016 7:20 pm Post subject: |
|
|
visualopsins wrote:
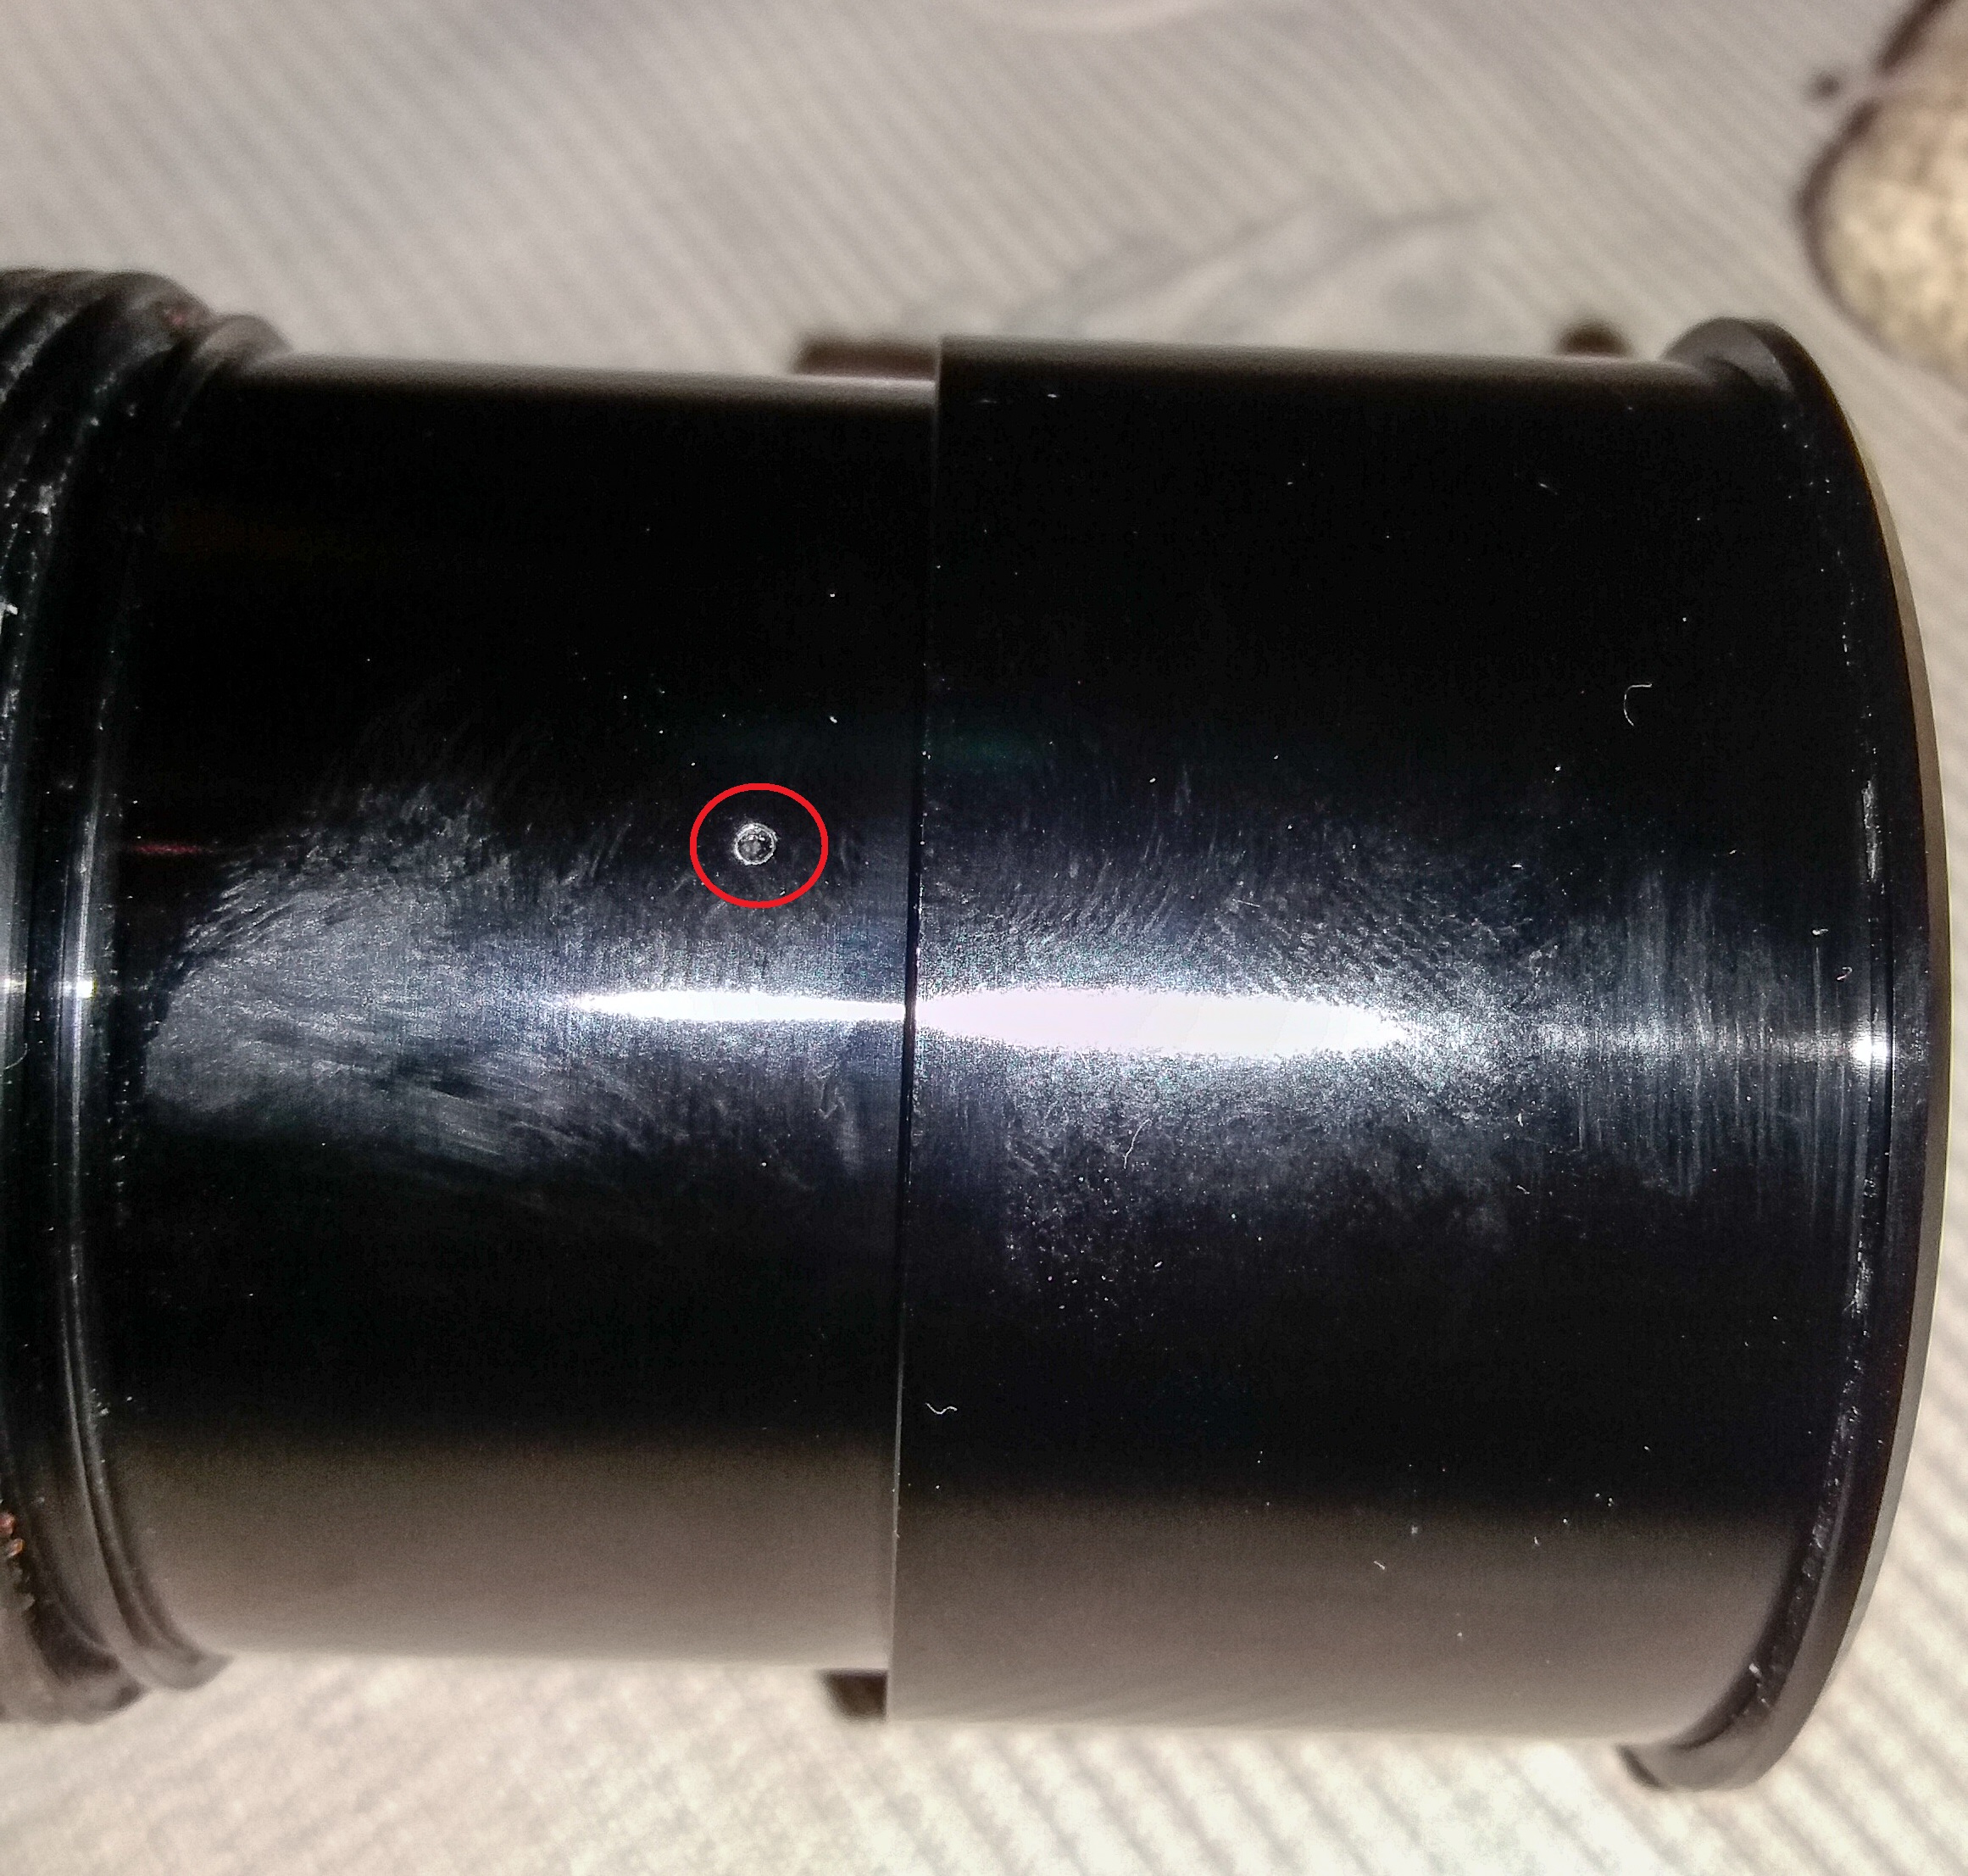
+1 marcusBMG -- "name ring" shown in first photo...sometimes finger pressure can untwist it from inside the lens barrel. HOWEVER, I do see in second photo a hole revealed while hood is entended -- are there 3 of these holes around the barrel of lens? If so there may be tiny grub screws that need remove before "name ring" can be unscrewed.
Twisting off the barrel does work on some lenses, maybe not here. (also there is possibility of reverse threading.)
_________________
☮☮☮☮☮☮☮☮☮☮☮☮☮☮☮☮☮☮☮☮☮☮☮☮☮☮☮☮☮☮☮☮ like attracts like! ☮☮☮☮☮☮☮☮☮☮☮☮☮☮☮☮☮☮☮☮☮☮☮☮☮☮☮☮☮☮☮☮
Cameras: Sony ILCE-7RM2, Spotmatics II, F, and ESII, Nikon P4
Lenses:
M42 Asahi Optical Co., Takumar 1:4 f=35mm, 1:2 f=58mm (Sonnar), 1:2.4 f=58mm (Heliar), 1:2.2 f=55mm (Gaussian), 1:2.8 f=105mm (Model I), 1:2.8/105 (Model II), 1:5.6/200, Tele-Takumar 1:5.6/200, 1:6.3/300, Macro-Takumar 1:4/50, Auto-Takumar 1:2.3 f=35, 1:1.8 f=55mm, 1:2.2 f=55mm, Super-TAKUMAR 1:3.5/28 (fat), 1:2/35 (Fat), 1:1.4/50 (8-element), Super-Multi-Coated Fisheye-TAKUMAR 1:4/17, Super-Multi-Coated TAKUMAR 1:4.5/20, 1:3.5/24, 1:3.5/28, 1:2/35, 1:3.5/35, 1:1.8/85, 1:1.9/85 1:2.8/105, 1:3.5/135, 1:2.5/135 (II), 1:4/150, 1:4/200, 1:4/300, 1:4.5/500, Super-Multi-Coated Macro-TAKUMAR 1:4/50, 1:4/100, Super-Multi-Coated Bellows-TAKUMAR 1:4/100, SMC TAKUMAR 1:1.4/50, 1:1.8/55
M42 Carl Zeiss Jena Flektogon 2.4/35
Contax Carl Zeiss Vario-Sonnar T* 28-70mm F3.5-4.5
Pentax K-mount SMC PENTAX ZOOM 1:3.5 35~105mm, SMC PENTAX ZOOM 1:4 45~125mm
Nikon Micro-NIKKOR-P-C Auto 1:3.5 f=55mm, NIKKOR-P Auto 105mm f/2.5 Pre-AI (Sonnar), Micro-NIKKOR 105mm 1:4 AI, NIKKOR AI-S 35-135mm f/3,5-4,5
Tamron SP 17mm f/3.5 (51B), Tamron SP 17mm f/3.5 (51BB), SP 500mm f/8 (55BB), SP 70-210mm f/3.5 (19AH)
Vivitar 100mm 1:2.8 MC 1:1 Macro Telephoto (Kiron)
|
|
| Back to top |
|
|
WNG555
Joined: 18 Dec 2014
Posts: 784
Location: Arrid-Zone-A, USA
|
| Posted: Mon Apr 11, 2016 7:39 pm Post subject: |
|
|
WNG555 wrote:
Those 3 recessed holes are the set screws that need to be removed.
_________________
"The eyes are useless when the mind is blind."
Sony ILCE-6000, SELP1650, SEL1855, SEL55210, SEL5018. Sigma 19/30/60mm f2.8 EX DN Art.
Rokinon 8mm f3.5 Fish-Eye, 14mm f2.8 IF ED UMC. Samyang 12mm f2.8 ED AS NCS Fish-Eye.
And a bunch of Manual-Focus Lenses
My Flickr |
|
| Back to top |
|
|
VssOutlet
Joined: 11 Apr 2016
Posts: 9
|
| Posted: Tue Apr 12, 2016 12:00 am Post subject: |
|
|
VssOutlet wrote:
| visualopsins wrote: |
+1 marcusBMG -- "name ring" shown in first photo...sometimes finger pressure can untwist it from inside the lens barrel. HOWEVER, I do see in second photo a hole revealed while hood is entended -- are there 3 of these holes around the barrel of lens? If so there may be tiny grub screws that need remove before "name ring" can be unscrewed.
Twisting off the barrel does work on some lenses, maybe not here. (also there is possibility of reverse threading.) |
I've removed all three set screws. I don't think the name ring has anything to do with the problem (mentioned by someone else), as the front element extends way beyond it when the barrel is fully extended. Has anyone here had this lens apart before? |
|
| Back to top |
|
|
Lightshow

Joined: 04 Nov 2011
Posts: 3669
Location: Calgary
|
| Posted: Tue Apr 12, 2016 3:15 am Post subject: |
|
|
Lightshow wrote:
Need better pics without deep dark shadows and enough DOF to see details.
I do advise not to use large forces to unscrew parts, especially if you are not positive that's how it comes apart, damage can be done.
_________________
A Manual Focus Junky...
One photographers junk lens is an artists favorite tool.
My lens list
http://www.flickr.com/photos/lightshow-photography/ |
|
| Back to top |
|
|
VssOutlet
Joined: 11 Apr 2016
Posts: 9
|
| Posted: Tue Apr 12, 2016 4:01 am Post subject: |
|
|
VssOutlet wrote:
| Lightshow wrote: |
Need better pics without deep dark shadows and enough DOF to see details.
I do advise not to use large forces to unscrew parts, especially if you are not positive that's how it comes apart, damage can be done. |
#1

#2
#3
 |
|
| Back to top |
|
|
visualopsins
Joined: 05 Mar 2009
Posts: 10531
Location: California
Expire: 2025-04-11
|
| Posted: Tue Apr 12, 2016 3:13 pm Post subject: |
|
|
visualopsins wrote:
| VssOutlet wrote: |
...
I've removed all three set screws. I don't think the name ring has anything to do with the problem (mentioned by someone else), as the front element extends way beyond it when the barrel is fully extended. Has anyone here had this lens apart before? |
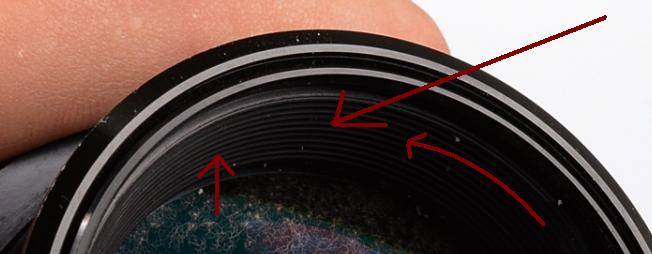
I think maybe confusion with what is "Name Ring". "Name Ring" is here:
#1

Unscrew it (rightmost arrow shows direction) using fingertips or as Marcus suggested a piece of plastic drain pipe the correct diameter, with double-stick tape around the edge...
_________________
☮☮☮☮☮☮☮☮☮☮☮☮☮☮☮☮☮☮☮☮☮☮☮☮☮☮☮☮☮☮☮☮ like attracts like! ☮☮☮☮☮☮☮☮☮☮☮☮☮☮☮☮☮☮☮☮☮☮☮☮☮☮☮☮☮☮☮☮
Cameras: Sony ILCE-7RM2, Spotmatics II, F, and ESII, Nikon P4
Lenses:
M42 Asahi Optical Co., Takumar 1:4 f=35mm, 1:2 f=58mm (Sonnar), 1:2.4 f=58mm (Heliar), 1:2.2 f=55mm (Gaussian), 1:2.8 f=105mm (Model I), 1:2.8/105 (Model II), 1:5.6/200, Tele-Takumar 1:5.6/200, 1:6.3/300, Macro-Takumar 1:4/50, Auto-Takumar 1:2.3 f=35, 1:1.8 f=55mm, 1:2.2 f=55mm, Super-TAKUMAR 1:3.5/28 (fat), 1:2/35 (Fat), 1:1.4/50 (8-element), Super-Multi-Coated Fisheye-TAKUMAR 1:4/17, Super-Multi-Coated TAKUMAR 1:4.5/20, 1:3.5/24, 1:3.5/28, 1:2/35, 1:3.5/35, 1:1.8/85, 1:1.9/85 1:2.8/105, 1:3.5/135, 1:2.5/135 (II), 1:4/150, 1:4/200, 1:4/300, 1:4.5/500, Super-Multi-Coated Macro-TAKUMAR 1:4/50, 1:4/100, Super-Multi-Coated Bellows-TAKUMAR 1:4/100, SMC TAKUMAR 1:1.4/50, 1:1.8/55
M42 Carl Zeiss Jena Flektogon 2.4/35
Contax Carl Zeiss Vario-Sonnar T* 28-70mm F3.5-4.5
Pentax K-mount SMC PENTAX ZOOM 1:3.5 35~105mm, SMC PENTAX ZOOM 1:4 45~125mm
Nikon Micro-NIKKOR-P-C Auto 1:3.5 f=55mm, NIKKOR-P Auto 105mm f/2.5 Pre-AI (Sonnar), Micro-NIKKOR 105mm 1:4 AI, NIKKOR AI-S 35-135mm f/3,5-4,5
Tamron SP 17mm f/3.5 (51B), Tamron SP 17mm f/3.5 (51BB), SP 500mm f/8 (55BB), SP 70-210mm f/3.5 (19AH)
Vivitar 100mm 1:2.8 MC 1:1 Macro Telephoto (Kiron)
|
|
| Back to top |
|
|
jamaeolus

Joined: 19 Mar 2014
Posts: 2927
Location: Eugene
Expire: 2015-08-20
|
| Posted: Tue Apr 12, 2016 4:06 pm Post subject: |
|
|
jamaeolus wrote:
I have had good success with this type of thing using "BluTack". Its available in most office supply stores and is a sticky putty like substance that comes off clean and won't damage the surface of the lens.
_________________
photos are moments frozen in time |
|
| Back to top |
|
|
VssOutlet
Joined: 11 Apr 2016
Posts: 9
|
| Posted: Wed Apr 13, 2016 12:34 am Post subject: |
|
|
VssOutlet wrote:
| visualopsins wrote: |
| VssOutlet wrote: |
...
I've removed all three set screws. I don't think the name ring has anything to do with the problem (mentioned by someone else), as the front element extends way beyond it when the barrel is fully extended. Has anyone here had this lens apart before? |
I think maybe confusion with what is "Name Ring". "Name Ring" is here:
#1
Unscrew it (rightmost arrow shows direction) using fingertips or as Marcus suggested a piece of plastic drain pipe the correct diameter, with double-stick tape around the edge... |
Attempted to unscrew the ring with a pipe and death grip double sided tape. It doesn't budge. If I look at the edges very closely, it seems like the ring is molded onto the barrel as opposed to a separate piece that can be unscrewed, so the trick might be in removing the barrel to access the front element rather than unscrewing a ring. Does anyone think it's necesarry to uscrew the beauty ring? If so, how would you go about doing it? There are no screws in it that I can see. |
|
| Back to top |
|
|
WNG555
Joined: 18 Dec 2014
Posts: 784
Location: Arrid-Zone-A, USA
|
| Posted: Wed Apr 13, 2016 5:18 am Post subject: |
|
|
WNG555 wrote:
I still believe the front rim unscrews once the 3 screws are removed. Most built-in lens hood design follow this.
But it shouldn't be so tight. Perhaps some thread locker was also used.
_________________
"The eyes are useless when the mind is blind."
Sony ILCE-6000, SELP1650, SEL1855, SEL55210, SEL5018. Sigma 19/30/60mm f2.8 EX DN Art.
Rokinon 8mm f3.5 Fish-Eye, 14mm f2.8 IF ED UMC. Samyang 12mm f2.8 ED AS NCS Fish-Eye.
And a bunch of Manual-Focus Lenses
My Flickr |
|
| Back to top |
|
|
VssOutlet
Joined: 11 Apr 2016
Posts: 9
|
| Posted: Wed Apr 13, 2016 9:36 pm Post subject: |
|
|
VssOutlet wrote:
| WNG555 wrote: |
I still believe the front rim unscrews once the 3 screws are removed. Most built-in lens hood design follow this.
But it shouldn't be so tight. Perhaps some thread locker was also used. |
Another thing that leads me to suspect that it's not that piece that comes out is that the filter threads do not go all the way down to the piece that would unscrew. |
|
| Back to top |
|
|
Gardener
Joined: 22 Sep 2013
Posts: 950
Location: USA
|
| Posted: Wed Apr 13, 2016 9:39 pm Post subject: |
|
|
Gardener wrote:
| WNG555 wrote: |
| Perhaps some thread locker was also used. |
What do you mean some? Threadlocker was like 50% of Kino's materials budget. |
|
| Back to top |
|
|
marcusBMG
Joined: 07 Dec 2012
Posts: 1304
Location: Conwy N Wales
|
| Posted: Wed Apr 13, 2016 10:30 pm Post subject: |
|
|
marcusBMG wrote:
| VssOutlet wrote: |
| Another thing that leads me to suspect that it's not that piece that comes out is that the filter threads do not go all the way down to the piece that would unscrew. |
Are you sure about that? As best as I can see from your pics, the thread looks continuous, and this is the way to proceed - persevere. But if it isn't, then you're right and there must be some other way.
_________________
pentax ME super (retired)
Pentax K3-ii; pentax K-S2; Samsung NX 20; Lumix G1 + adapters;
Adaptall collection (proliferating!) inc 200-500mm 31A, 300mm f2.8, 400mm f4.
Primes: takumar 55mm; smc 28mm, 50mm; kino/komine 28mm f2's, helios 58mm, Tamron Nestar 400mm, novoflex 400mm, Vivitar 135mm close focus, 105mm macro; Jupiter 11A; CZJ 135mm.
A classic zoom or two: VS1 (komine), Kiron Zoomlock... |
|
| Back to top |
|
|
lucca1x

Joined: 09 Feb 2014
Posts: 93
Location: Romania
|
| Posted: Thu Apr 14, 2016 12:07 pm Post subject: |
|
|
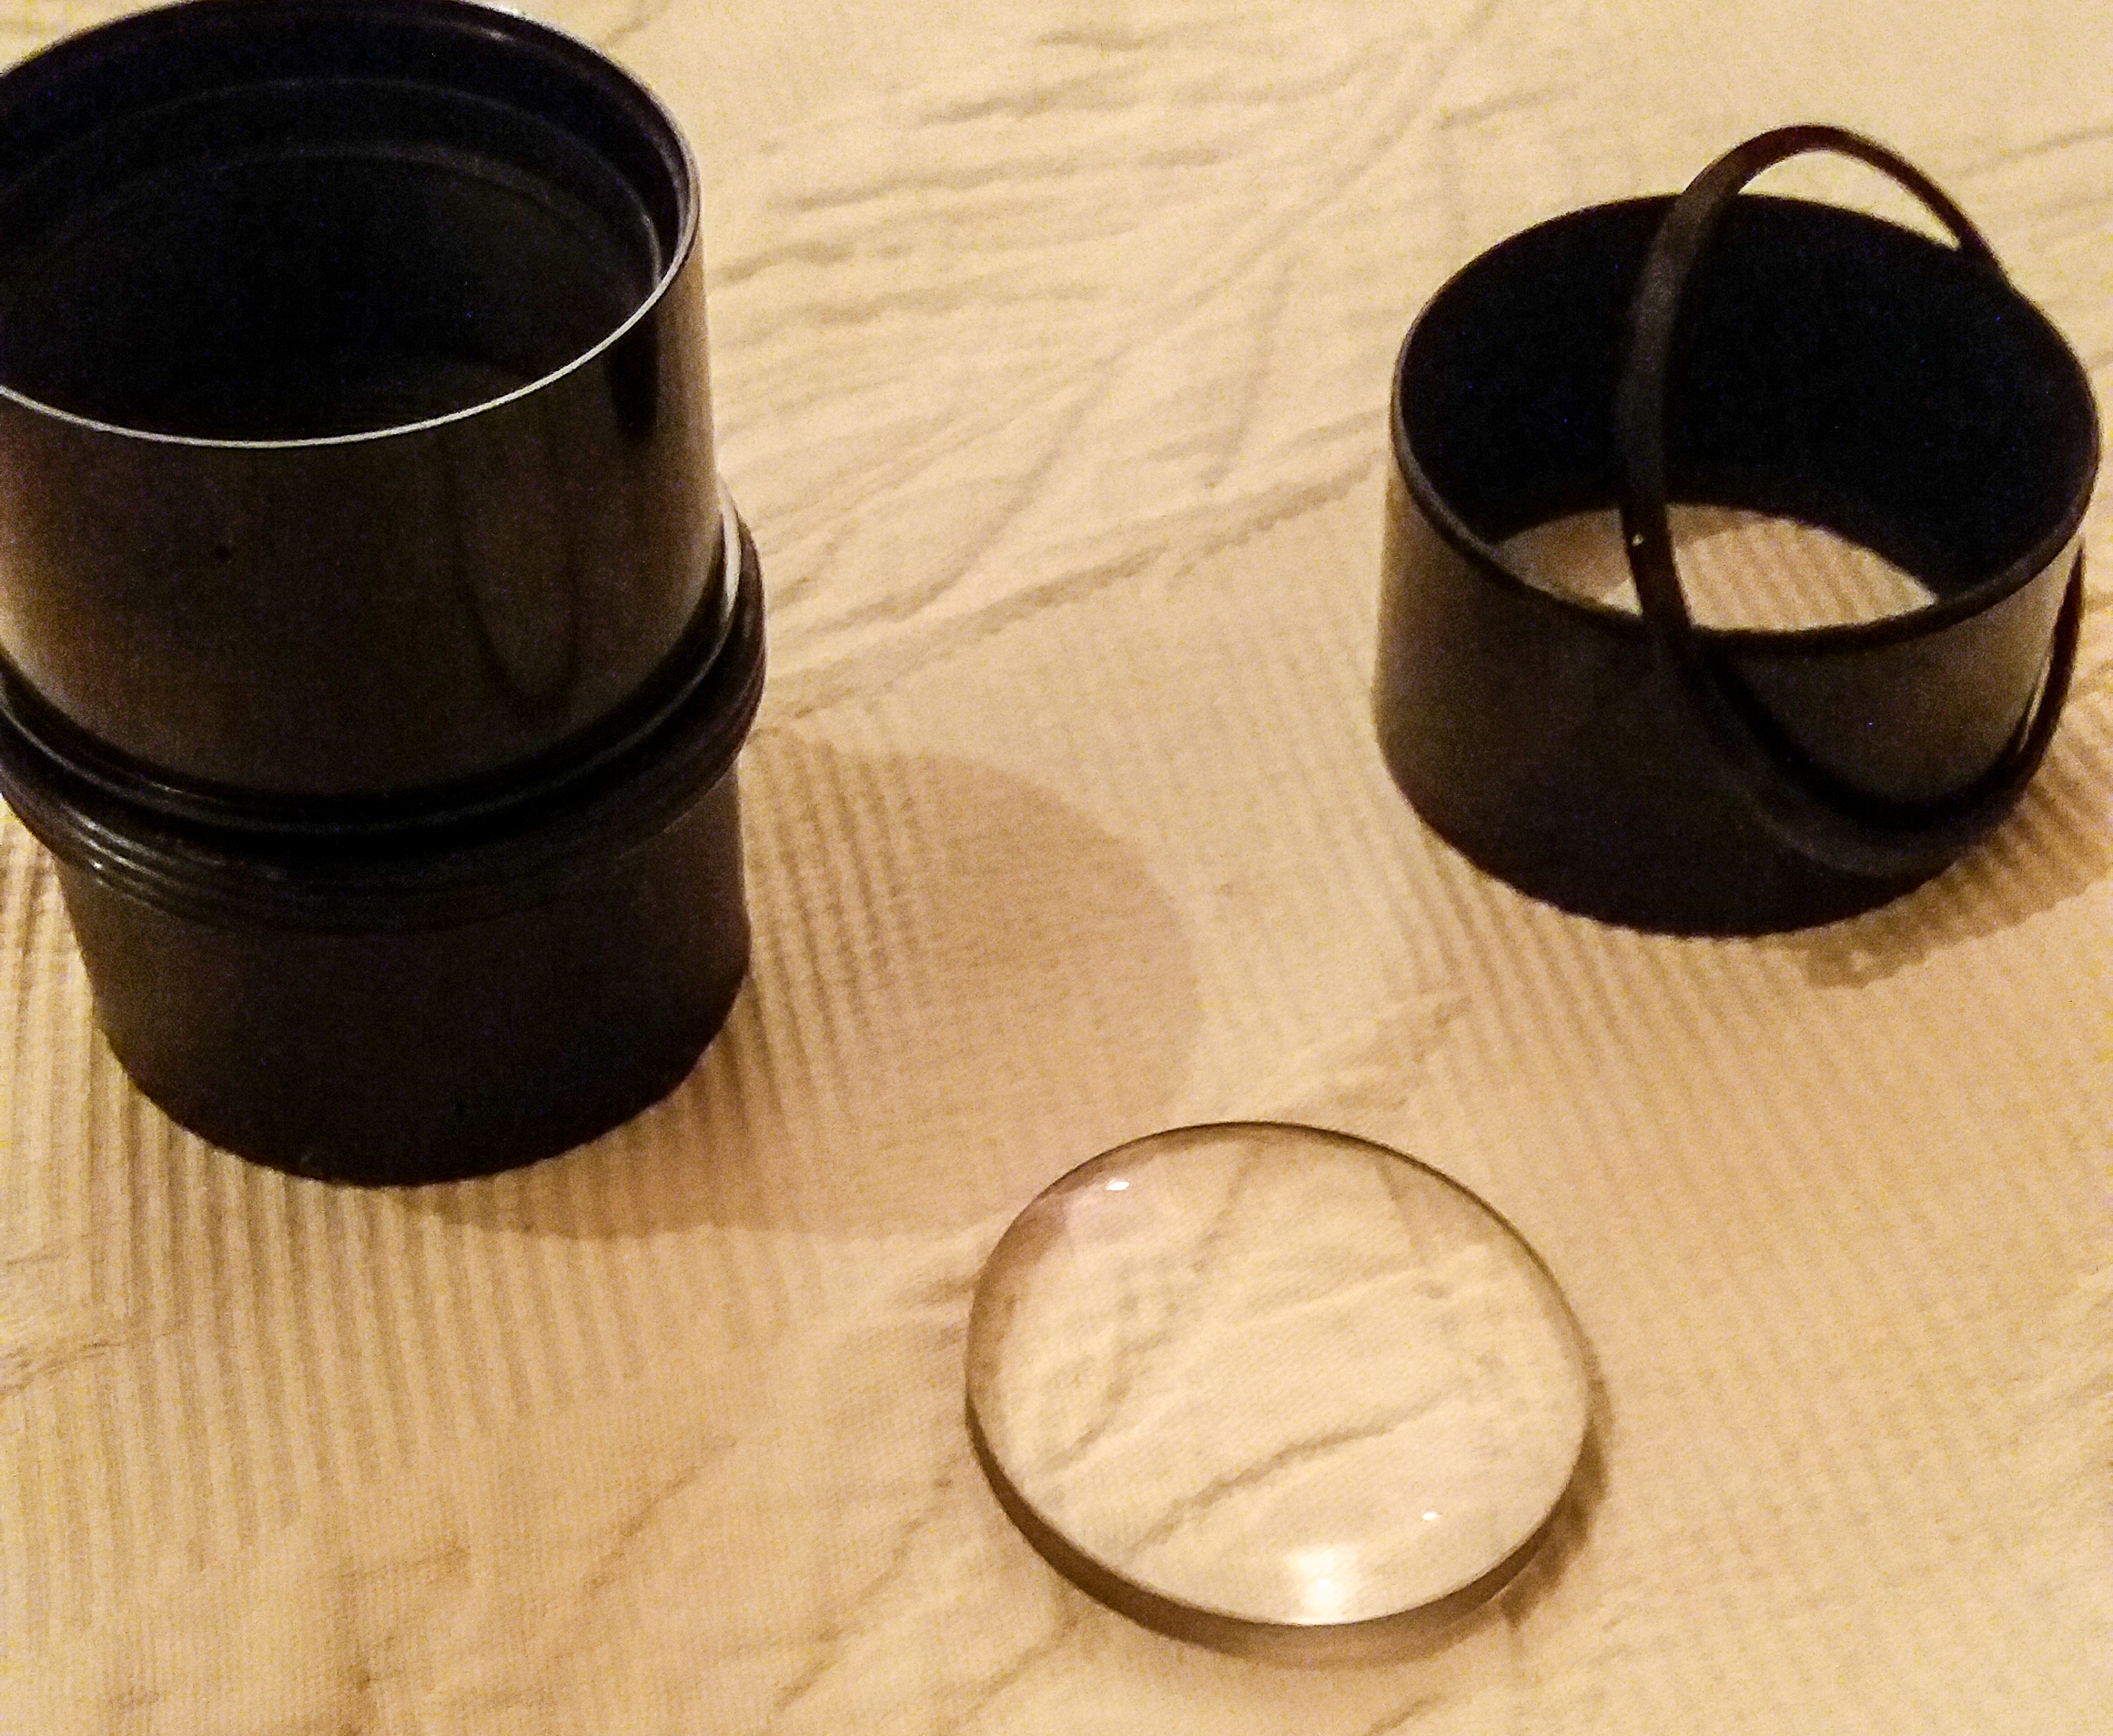
lucca1x wrote:
I don't know if you solved it or not, but I can tell how I've dismantled the front element (two different Kiron's 105-same method worked).
First you have to remove the 3 little screws under the lens hood (fully extended of course):

Then I've unscrewed the thin hood collar (it isn't mandatory, but I felt I have a better grip for next step):
Get a good grip to lens so called "name plate" toghether with the hood (not extended) and unscrew. The hood is not screwed, it rotates freely, but for me this grip worked better. The whole "name ring" will unscrew, not just the interior part:

If you''ll succeed, pay attention to the front lens. It is quite thick and you'll have to press it into the right position upon reassembly.

I hope it helps.
In my photos you can see only the front groups and not the entire lens, because the lens had other issues . I've managed to put everything toghether, but I don't encourage you to disassembly more then is really necessary because , if I remember correctly, it is a double helicoid-very difficult to put back in the right position. I know I will never, ever again fully dismantle this kind of lens ...
Sorry for the quality of the pictures. I've used a phone camera in low light. |
|
| Back to top |
|
|
argoyle
Joined: 01 Nov 2020
Posts: 1
|
| Posted: Sun Nov 01, 2020 6:08 am Post subject: |
|
|
argoyle wrote:
| lucca1x wrote: |
I don't know if you solved it or not, but I can tell how I've dismantled the front element (two different Kiron's 105-same method worked)....
In my photos you can see only the front groups and not the entire lens, because the lens had other issues. I've managed to put everything together, but I don't encourage you to disassemble more than is really necessary because, if I remember correctly, it is a double helicoid—very difficult to put back in the right position. I know I will never, ever again fully dismantle this kind of lens ... |
Hi lucca1x,
I hope you still read this forum, because I think you can help me. I am trying to disassemble my copy of this lens enough to redo the lubrication of the focus helicoids, because the focus action is stiffer than I like. I am stuck because I have not been able to unscrew the branding ring—this is what I'm calling the ring on which the name and specs of the lens are engraved at the top of the focusing barrel. Can you please tell me how you succeeded in removing it? |
|
| Back to top |
|
|
lucca1x
Joined: 09 Feb 2014
Posts: 93
Location: Romania
|
| Posted: Sat Nov 07, 2020 9:11 am Post subject: |
|
|
lucca1x wrote:
Hi,
Sorry for the late reply .
On my copy of the lens, on the name ring, there are 3 tiny screws. One between "f/2.8" and "MACRO" inscriptions, one between "MC" and "KINO" and one between " JAPAN" and 'KIRON". After unscrewing those, the name ring can be easily unscrewed with no extra force used.
That's how it is on the Kiron version I own.
Hope it helps.
PS: I sent you 2 PMs, but today I found both of them in outbox. It seems they were never delivered. They are not in sent box....Sorry. I have no ideea why it didn't work. |
|
| Back to top |
|
|
|
|