| View previous topic :: View next topic |
| Author |
Message |
WolverineX


Joined: 19 Apr 2009
Posts: 1694
Location: Zagreb , Croatia , Europe
|
 Posted: Tue Apr 21, 2009 1:25 pm Post subject: TOKINA RMC 80-200mm for Olympus OM - "how to" guid Posted: Tue Apr 21, 2009 1:25 pm Post subject: TOKINA RMC 80-200mm for Olympus OM - "how to" guid |
 |
|
WolverineX wrote:
Can anybody tell me how to disassemble this lens? I need to clean it's front lens from the inside.
Is there any website that has schematics of this lens?
_________________
my tools:Oly E-M5 + 45mm/1.8 + Oly E-520 + 12-60 + 14-42 + 70-300 + Sigma 105mm + FL-50R + EC20 + SRF-11 ring flash
http://forum.mflenses.com/wolverinex-testing-my-lenses-series-link-list-t39524.html
Last edited by WolverineX on Thu Apr 30, 2009 8:24 am; edited 1 time in total |
|
| Back to top |
|
 |
WolverineX
Joined: 19 Apr 2009
Posts: 1694
Location: Zagreb , Croatia , Europe
|
| Posted: Sun Apr 26, 2009 2:57 pm Post subject: |
|
|
WolverineX wrote:
because no one seemed to be able to help me with my problem i was left to my own devices and i was able to figure out what to do to gain access to inner side of lens front element. And i was able to fix it.
i'll write what to do , so it might help someone else in the future
so here it goes:
there are 4 sets of screws on this lens:
1. screws on the mount - when you take them out you can remove the mount and aperture ring (be careful not to lose a ball bearing that is inside the aperture ring)
2. set of screws is on the barrel -those i didn't touch - i believe you get access to aperture blades
3. set is on top of the lens - i believe is for removing glass from the top element - but no use for my purpose
and finally 4. set is under the rubber grip that you need to remove first
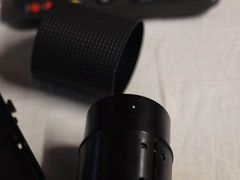
when you remove the grip you'll find 2 pairs of screws
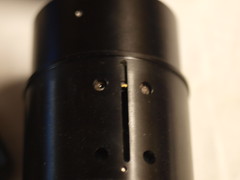
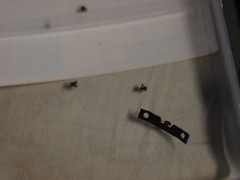
unscrew all 4 screws (be careful not to lose them and the 2 small metal plates that will come loose)
then unscrew the front element
now you can clean inside of the front element, and also inner element
now you have to reassemble the lens
first set the two small metal plates into the grooves on both sides of the zoom barrel and position the lens so that those grooves are to the left and to the right so that the plates don't fall off when screwing back the top element of the lens
now screw back on the top element and as it slowly comes into it's place it will start to push two metal plates into position to screw 4 screws back on

now put the rubber grip back on and your lens is ready to use
_________________
my tools:Oly E-M5 + 45mm/1.8 + Oly E-520 + 12-60 + 14-42 + 70-300 + Sigma 105mm + FL-50R + EC20 + SRF-11 ring flash
http://forum.mflenses.com/wolverinex-testing-my-lenses-series-link-list-t39524.html
Last edited by WolverineX on Sat May 02, 2009 3:13 pm; edited 2 times in total |
|
| Back to top |
|
|
WolverineX
Joined: 19 Apr 2009
Posts: 1694
Location: Zagreb , Croatia , Europe
|
| Posted: Sun Apr 26, 2009 3:00 pm Post subject: |
|
|
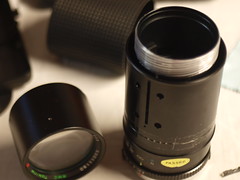
WolverineX wrote:
here are some photos with this lens now that i've cleaned it


_________________
my tools:Oly E-M5 + 45mm/1.8 + Oly E-520 + 12-60 + 14-42 + 70-300 + Sigma 105mm + FL-50R + EC20 + SRF-11 ring flash
http://forum.mflenses.com/wolverinex-testing-my-lenses-series-link-list-t39524.html |
|
| Back to top |
|
|
SkedAddled

Joined: 19 Oct 2008
Posts: 1427
Location: Michigan, USA
Expire: 2021-08-12
|
| Posted: Sat May 02, 2009 4:56 am Post subject: |
|
|
SkedAddled wrote:
Well done, Wolverine.
I'd suggest that this sort of thread become a sticky, collecting these
photo-essays of instruction into one place. Great information here,
for regulars and newcomers.
_________________
Craig
Of course I'm all right! Why? What have you heard!?
Canon Digital EOS 5D Mk IV, EOS 50D, Powershot S3 iS
Vivitar 28 f/2.8 OM - Zuiko 50 f/1.8 OM - Tamron SP 28-80 f/3.5 AD2[Favorite!] - Hanimar 135 f/3.5 M42 - Soligor 135 f/2.8 T4 - Tamron SP 60-300 f/3.8 AD2 - Soligor 75-260 f/4.5 M42 - Soligor 400 f/6.3 T4 - Soligor 500 f/8 T2 Cat + Matched 2X TC - Addiction Growing!
This is us -- We drive these -- We're named these |
|
| Back to top |
|
|
joepster
Joined: 25 Apr 2010
Posts: 1
|
| Posted: Sun Apr 25, 2010 12:17 am Post subject: |
|
|
joepster wrote:
Just wanted to post to say thanks, this was really useful for me!
I've had this lense collecting (more) dust, but now it's clean inside and out it's working a treat! |
|
| Back to top |
|
|
WolverineX
Joined: 19 Apr 2009
Posts: 1694
Location: Zagreb , Croatia , Europe
|
| Posted: Sun Apr 25, 2010 11:33 am Post subject: |
|
|
WolverineX wrote:
| joepster wrote: |
Just wanted to post to say thanks, this was really useful for me!
I've had this lense collecting (more) dust, but now it's clean inside and out it's working a treat! |
you're welcome  ) )
glad it helped you
_________________
my tools:Oly E-M5 + 45mm/1.8 + Oly E-520 + 12-60 + 14-42 + 70-300 + Sigma 105mm + FL-50R + EC20 + SRF-11 ring flash
http://forum.mflenses.com/wolverinex-testing-my-lenses-series-link-list-t39524.html |
|
| Back to top |
|
|
Attila


Joined: 24 Feb 2007
Posts: 57849
Location: Hungary
Expire: 2025-11-18
|
| Posted: Sun Apr 25, 2010 12:49 pm Post subject: |
|
|
Attila wrote:
Many thanks for this guide!
_________________
-------------------------------
Items on sale on Ebay
Sony NEX-7 Carl Zeiss Planar 85mm f1.4, Minolta MD 35mm f1.8, Konica 135mm f2.5, Minolta MD 50mm f1.2, Minolta MD 250mm f5.6, Carl Zeiss Sonnar 180mm f2.8
|
|
| Back to top |
|
|
Tesselator


Joined: 25 Jan 2010
Posts: 235
Location: Japan
|
| Posted: Fri Jun 11, 2010 8:25 am Post subject: |
|
|
Tesselator wrote:
(I know this is an old thread but I just repaired my 3rd Tokina RMS 80-200 lens this morning and though I would interject a note or two)
You ended up doing it the hard way.
The flash-plate ring unscrews, then the front lens seat-ring unscrews and the front lens can be removed for cleaning or whatever.
The way you did it you exposed the internal elements to dust from a multitude of entry points. |
|
| Back to top |
|
|
WolverineX
Joined: 19 Apr 2009
Posts: 1694
Location: Zagreb , Croatia , Europe
|
| Posted: Tue Jun 15, 2010 6:20 am Post subject: |
|
|
WolverineX wrote:
@tesselator
i had to clean both frontlens from the inside and also moving glass element inside the lens, so this way i got better access to it
@attila - looking at your signature with Olympus OM lenses i see listed 55mm 3.5 macro...there is Olympus 50mm 3.5 macro ... did you make an error or is it some other manufacturer
_________________
my tools:Oly E-M5 + 45mm/1.8 + Oly E-520 + 12-60 + 14-42 + 70-300 + Sigma 105mm + FL-50R + EC20 + SRF-11 ring flash
http://forum.mflenses.com/wolverinex-testing-my-lenses-series-link-list-t39524.html |
|
| Back to top |
|
|
Excalibur

Joined: 19 Jul 2009
Posts: 5019
Location: UK
Expire: 2014-04-21
|
| Posted: Tue Jun 15, 2010 7:13 am Post subject: |
|
|
Excalibur wrote:
| Tesselator wrote: |
(I know this is an old thread but I just repaired my 3rd Tokina RMS 80-200 lens this morning and though I would interject a note or two)
You ended up doing it the hard way.
The flash-plate ring unscrews, then the front lens seat-ring unscrews and the front lens can be removed for cleaning or whatever.
The way you did it you exposed the internal elements to dust from a multitude of entry points. |
But it doesn't work for me as the front lens might be an assembly as I've cleaned the inner and outer lens (of the front lens that unscrews) but can still see a haze, which would suggest there are two elements that need to be seperated (of the front lens that unscrews).
_________________
Canon A1, AV1, T70 & T90, EOS 300 and EOS300v, Chinon CE and CP-7M. Contax 139, Fuji STX-2, Konica Autoreflex TC, FS-1, FT-1, Minolta X-700, X-300, XD-11, SRT101b, Nikon EM, FM, F4, F90X, Olympus OM2, Pentax S3, Spotmatic, Pentax ME super, Praktica TL 5B, & BC1, , Ricoh KR10super, Yashica T5D, Bronica Etrs, Mamiya RB67 pro AND drum roll:- a Sony Nex 3
.........past gear Tele Rolleiflex and Rollei SL66.
Many lenses from good to excellent. |
|
| Back to top |
|
|
NikonD

Joined: 29 Jul 2008
Posts: 1922
Location: Slovenija
|
| Posted: Tue Jul 12, 2011 7:02 am Post subject: |
|
|
NikonD wrote:
| Tesselator wrote: |
(I know this is an old thread but I just repaired my 3rd Tokina RMS 80-200 lens this morning and though I would interject a note or two)
You ended up doing it the hard way.
The flash-plate ring unscrews, then the front lens seat-ring unscrews and the front lens can be removed for cleaning or whatever.
The way you did it you exposed the internal elements to dust from a multitude of entry points. |
yeeeeeey..... I've just cleaned it, my friend is going to be so pleased  |
|
| Back to top |
|
|
shellbee272
Joined: 21 Jul 2013
Posts: 1
|
| Posted: Sun Jul 21, 2013 11:31 pm Post subject: Any help please |
|
|
shellbee272 wrote:
Can anyone help I am a complete newbie, I have this lens but the blades are stuck open and I need to go in from the mount end I'm guessing. If I move the 3 screws on the mount I don't seem to go in far enough, do I need to remove the 3 smaller screws an inch or so down the barrel? I really don't want to make things impossible to put back together. Any ideas please.
Update: Ok no help needed think I was being a little silly, removed mount, unscrewed lens and could see the blades. Feel quite silly  for asking now! for asking now! |
|
| Back to top |
|
|
roglebk
Joined: 13 Mar 2018
Posts: 60
|
| Posted: Mon Jul 02, 2018 10:31 am Post subject: |
|
|
roglebk wrote:
Really old thread but have the same problem as Excalibur, haze inside front elements that can't be separated. It's been soaking in Acetone for a while but still no luck.
_________________
Underwater and land macro fanatic.
For trade
Konica Hexanon 21mm 2.8 AR
Kiron 105mm 2.8 macro Nikon AI-s
Isco: Two Tele-Westanar 135mm 3.5, Westagon 50mm 1.9 M42
Tokina AT-X 300mm 2.8 Pro Minolta/Sony A |
|
| Back to top |
|
|
ektar

Joined: 09 Oct 2019
Posts: 24
|
| Posted: Fri Apr 24, 2020 1:26 pm Post subject: |
|
|
ektar wrote:
| roglebk wrote: |
| Really old thread but have the same problem as Excalibur, haze inside front elements that can't be separated. It's been soaking in Acetone for a while but still no luck. |
And revisiting an old thread that keeps on being of service. I have the same issue as @roglebk; The front element complex appears to be a sealed pair; there are no scanner slots or holes, and I can’t identify where a thread might be. It appears that the lens was stored front-down, got warm, and had some lubricant migrate in between the two elements. Other than that, the lens appears to be in good shape. Guidance appreciated as to how to separate that pair.
EDIT: While waiting for wisdom, I tried some more tricks. The pair in question unscrews from the front under the trim ring. Looking at the back of the pair, there’s a recessed ring. I dribbled a little lighter fluid (naphthalene) into the groove next to that, hoping it was threaded. After just a few minutes, using the wide side of a rubber stopper, that retaining ring unscrewed! The pair popped out (in their own ring), and the front element separated from the ring and the rear element, letting me clean them both. It was migrated lube, BTW. Now it looks great!
HTH!
_________________
--
Older than my lenses... |
|
| Back to top |
|
|
McMac70
Joined: 17 Feb 2022
Posts: 1
|
| Posted: Thu Feb 17, 2022 8:32 pm Post subject: |
|
|
McMac70 wrote:
| ektar wrote: |
| roglebk wrote: |
| Really old thread but have the same problem as Excalibur, haze inside front elements that can't be separated. It's been soaking in Acetone for a while but still no luck. |
And revisiting an old thread that keeps on being of service. I have the same issue as @roglebk; The front element complex appears to be a sealed pair; there are no scanner slots or holes, and I can’t identify where a thread might be. It appears that the lens was stored front-down, got warm, and had some lubricant migrate in between the two elements. Other than that, the lens appears to be in good shape. Guidance appreciated as to how to separate that pair.
EDIT: While waiting for wisdom, I tried some more tricks. The pair in question unscrews from the front under the trim ring. Looking at the back of the pair, there’s a recessed ring. I dribbled a little lighter fluid (naphthalene) into the groove next to that, hoping it was threaded. After just a few minutes, using the wide side of a rubber stopper, that retaining ring unscrewed! The pair popped out (in their own ring), and the front element separated from the ring and the rear element, letting me clean them both. It was migrated lube, BTW. Now it looks great!
HTH! |
First: Thanks for this thread - it helped me a lot!  To add my two cents: lighter fluid did not work for me for loosening the threads. Nail polish remover (with acetone), however did: a few drops into the grooves, some waiting and I could easily unscrew the retaining ring. To add my two cents: lighter fluid did not work for me for loosening the threads. Nail polish remover (with acetone), however did: a few drops into the grooves, some waiting and I could easily unscrew the retaining ring.
One more thing: the set screws didn't do anything to hold the front group in in my case - which was better because they didn't turn a bit - the front group came out just by using a rubber stopper. |
|
| Back to top |
|
|
|
|
|
You cannot post new topics in this forum
You cannot reply to topics in this forum
You cannot edit your posts in this forum
You cannot delete your posts in this forum
You cannot vote in polls in this forum
|


