| View previous topic :: View next topic |
| Author |
Message |
SXR_Mark


Joined: 12 Jun 2010
Posts: 506
Location: England
|
 Posted: Sun Sep 18, 2011 10:01 pm Post subject: Minolta 45mm f1.8 lens from Hi-Matic 7 on Oly EPL1 Posted: Sun Sep 18, 2011 10:01 pm Post subject: Minolta 45mm f1.8 lens from Hi-Matic 7 on Oly EPL1 |
 |
|
SXR_Mark wrote:
This project started after I read this thread . As I noted there, I picked up a broken Hi-Matic 7 for �6. The Hi-Matic is a fixed lens camera with a leaf shutter so conversion is non-trivial. I didn't record the process of disabling the shutter, but have pictures of my mount conversion. This is a very DIY job, largely hand made.
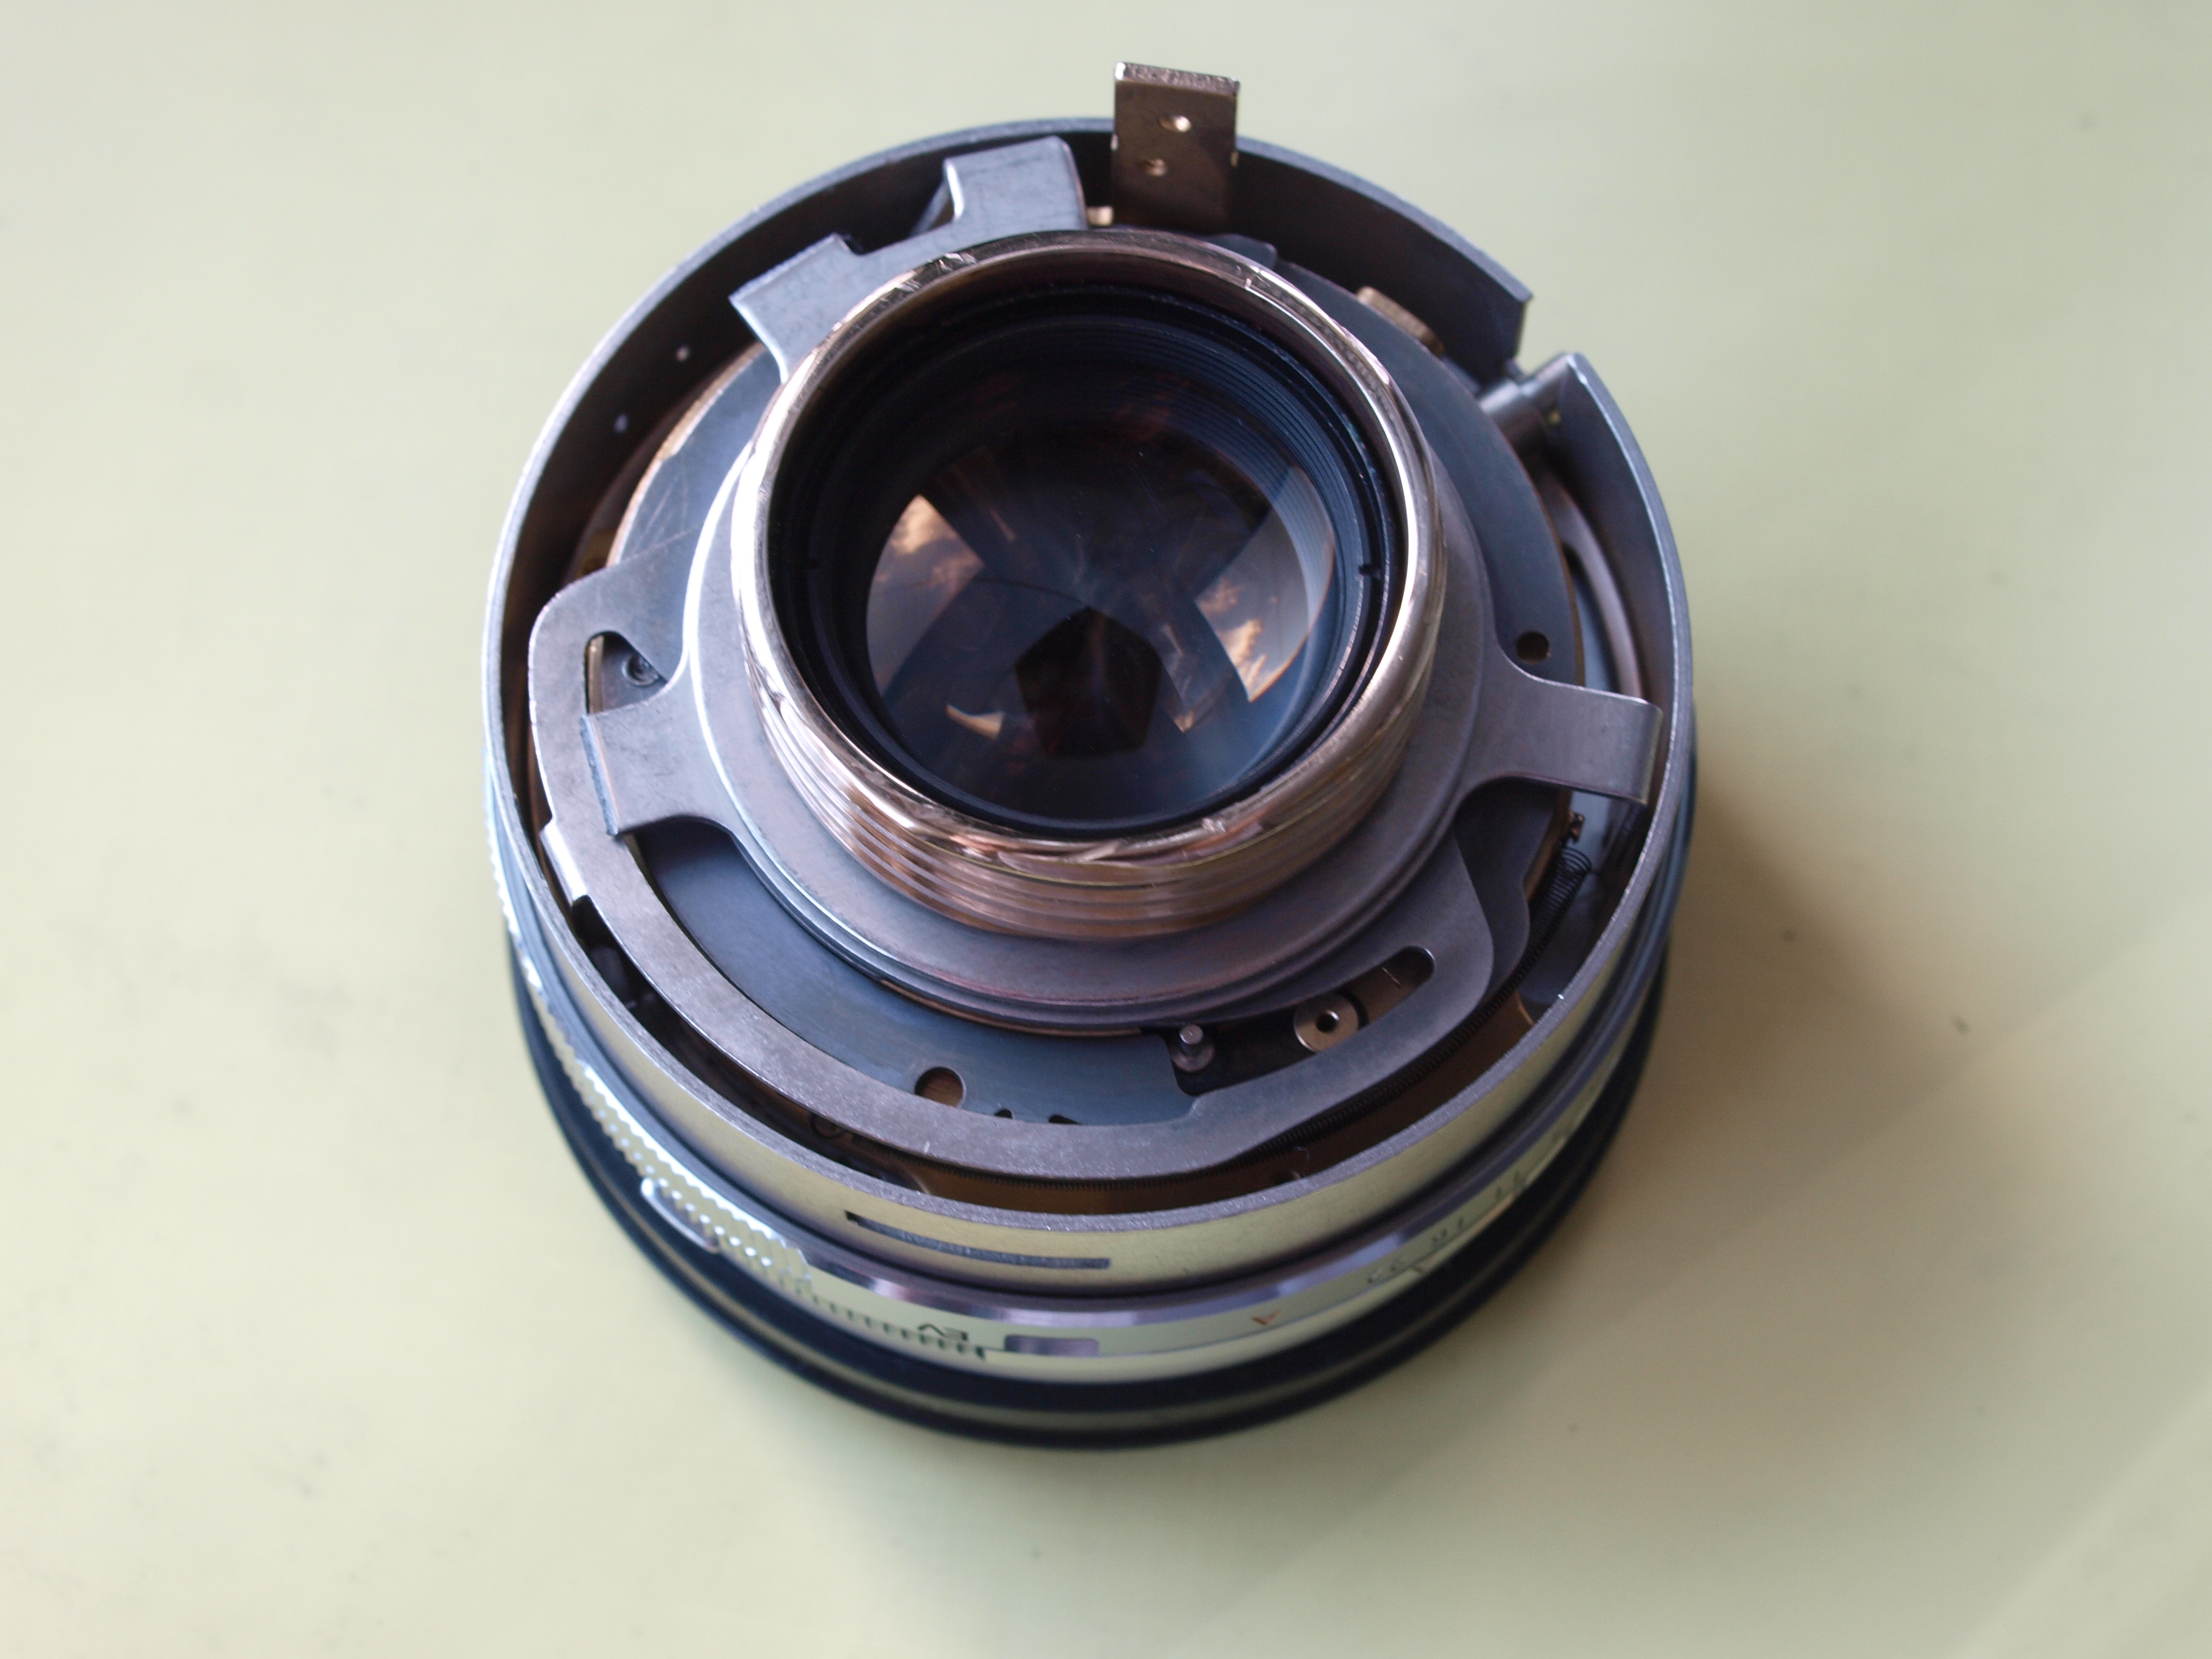
This shows the back of the lens after removal from the fixed mount. Initially, there were 4 prongs protruding from the back. Only one is needed after conversion, the guide that forces the lens to linearly when the focus ring is rotated (the brass prong just after the 12 o'clock position. The other 3 were forcibly removed - you can see the broken tabs at 9 and 11 o'clock. The rear of the inner helical also had large lugs on it. One acted as the rangefinder coupling and they both supported a light box. These were removed with a hacksaw.

The inner helical is attached to the lens and the outer helical runs in a plane bush in the die-cast front plate of the camera. I sawed and filed away all unnecessary parts of the mounting plate, see upper right below. The lug I've left with the two holes holds the clawed tab that the guide prong mentioned earlier runs in. This must be left of course! The bit shown upper left clamps onto the back of the outer helical. The focus ring clamps to the outer rim of this bit and thus turns the outer helical (shown at bottom).

The way I decided to mount the lens was a bit more complicated than necessary. Because the original plate was a die casting (and hence not particularly strong, especially in its cut-down form) I decided to fasten an intermediate aluminium plate (3mm thick) to the back of the original plate, screwing through the die-casting. Thus. the new plate takes the load of the screws. I would then screw the micro-four-thirds mount onto the back of the aluminium plate to mount it on the camera. I used a thin c-mount to m4/3 adapter, adding shims to get the correct mounting distance. This approach made the assembly more difficult because the new bits had to be fitted before mounting on the lens and fitting the clawed tab for the guide prong.
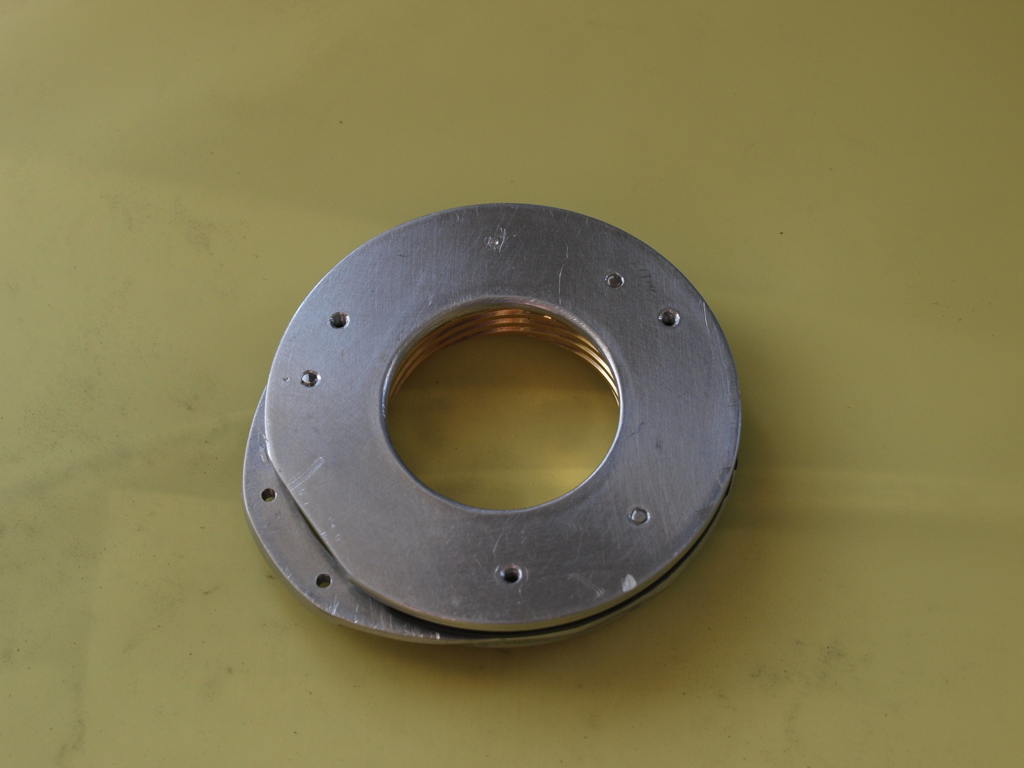
Below is the aluminium plate. The gouged out notch is to make clearance for the clawed tab that locates the guide prong. The six holes are M2 tapped, three to fasten it to the die cast plate and three to fasten the m4/3 mount to it.

This plate cannot fit straight on the back of the die cast plate even with this notch (the guide prong is too long, but I didn't want to shorten that as this would reduce the focus range), so I made a 1.5mm spacer from plasticard, see below. Notch for the guide prong and locating claw is at 1 o'clock. The bit glued to the bottom fills a gap in the die cast plate.

Below shows the aluminium and plastic bits fastened to the die-cast plate with the outer helical in place. Two of the M2 screws are in existing holes, which is why one looks very precarious. Only the hole near the number 2 is new. as you can see, there is not much space to add mounting points.

This shows the camera side of the aluminium plate. The inner hole is a bit smaller than ideal, but I made the plate with hole cutters so could not choose the diameters. I had to chamfer the inner edge (see earlier pic) to ensure the helical would screw fully down onto the lens (the helical is short so every bit of travel is important).

Finally, we see the whole thing mounted on the back of the lens. The clawed tab for the guide prong is now in place at 5 o'clock. All that is required is the camera flange and spacers to be added (but I forgot to take a picture of that fitted)

The lens as originally intended will only focus down to 0.9m. I decided I wanted to get a bit closer than that. Thus, I made sure that the outer helical would screw fully down onto the back of the lens. The limiting factor then is the length of the guide prong - it will disengage from the clawed tab before the helicals unscrew completely. I worked out I could increase the angular travel of the focus ring by about 50% without the prong disengaging. Thus, I modified the focus ring by filing away the rim that limits its travel. The filed bit is on the right in the picture below. The lens will now focus to about 0.5m (I haven't measured it exactly).

This is how it looks on the EPL1.


Sample pictures to follow.........be patient!
Mark
_________________
Olympus OM-D E-M1 for everything |
|
| Back to top |
|
 |
SXR_Mark
Joined: 12 Jun 2010
Posts: 506
Location: England
|
| Posted: Sun Sep 18, 2011 10:34 pm Post subject: |
|
|
SXR_Mark wrote:
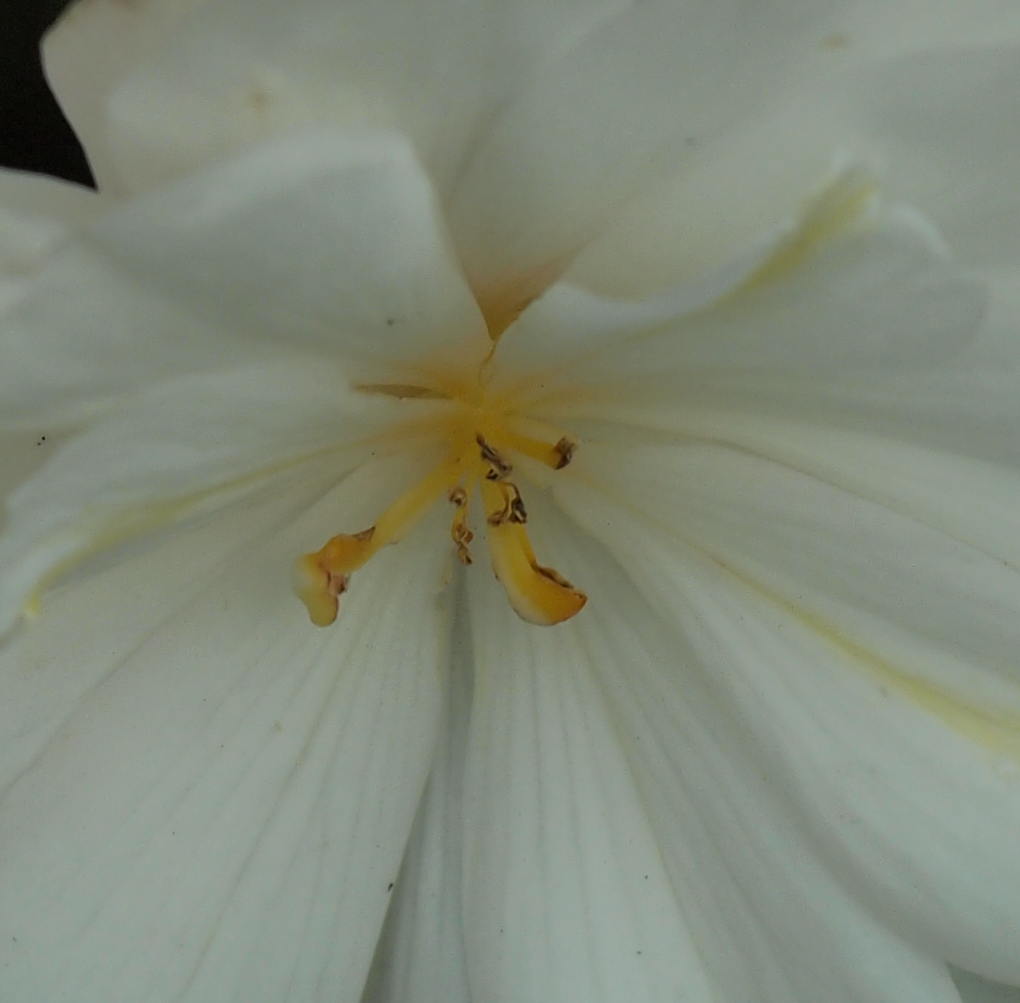
Here are some sample pictures taken today. All were taken at the new minimum focus distance (which is about half the min distance the lens was originally intended to work with).
These are all jpegs straight from the camera. No PP at all (except resize). The light was getting a bit dull. In all cases the shots are in order f1.8, f2.8 and f4, full picture followed by crop at the focused area.
I like the colours. The lens is gently soft at f1.8. It sharpens up noticeably at f2.8. The closer than intended focus distance may be affecting the sharpness, but I've not had time to explore further.
I know these are not the greatest pictures n the world, but comments are still welcome.
Mark


_________________
Olympus OM-D E-M1 for everything |
|
| Back to top |
|
|
iangreenhalgh1


Joined: 18 Mar 2011
Posts: 15685
Expire: 2014-01-07
|
| Posted: Mon Sep 19, 2011 12:05 am Post subject: |
|
|
iangreenhalgh1 wrote:
Amazing work on the conversion!
Looks like it's beyond my level of ability, ah well, it was a good idea, glad someone made it work.
I like the bokeh and overall rendering, looks like a good lens with a vintage look.
_________________
I don't care who designed it, who made it or what country it comes from - I just enjoy using it! |
|
| Back to top |
|
|
SXR_Mark
Joined: 12 Jun 2010
Posts: 506
Location: England
|
| Posted: Mon Sep 26, 2011 10:11 pm Post subject: |
|
|
SXR_Mark wrote:
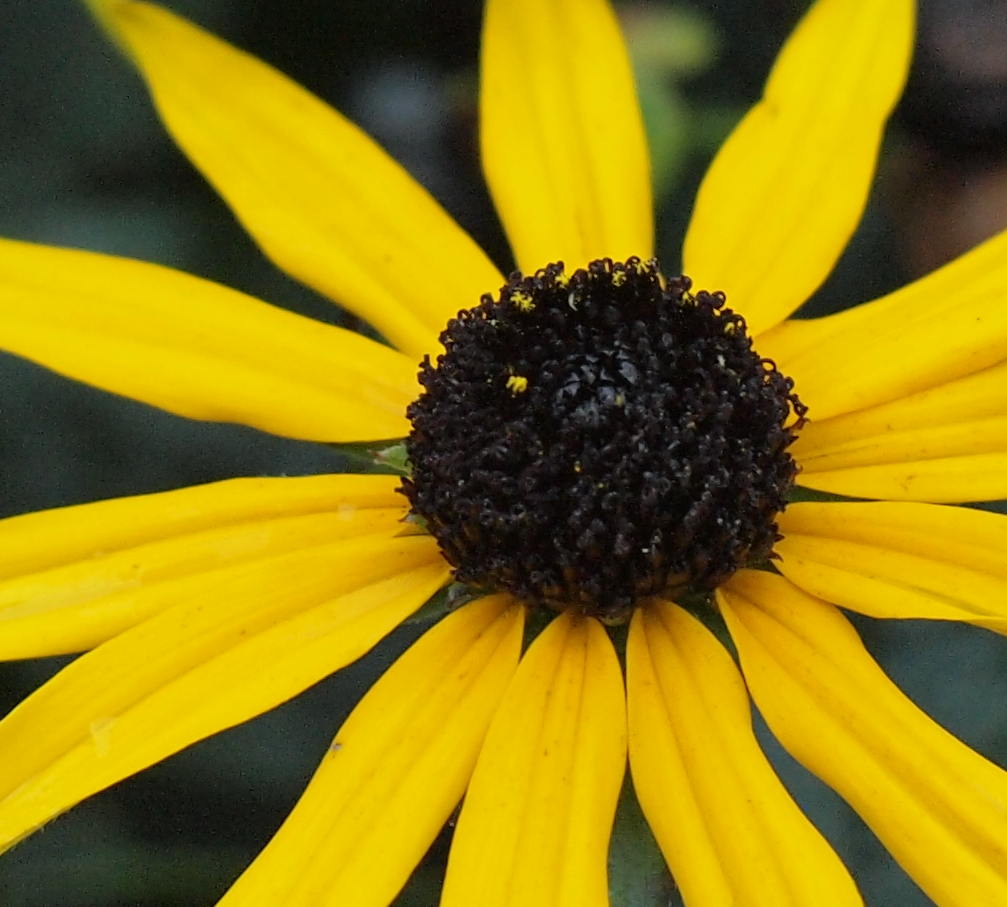
Some more samples taken in a brief spell of late afternoon sunshine.
These are mostly at f4. I had to apply a bit of levels as I underexposed. Otherwise, the lens takes pictures with good contrast and saturation. The lens is also razor sharp at f4.


_________________
Olympus OM-D E-M1 for everything |
|
| Back to top |
|
|
declan


Joined: 17 Dec 2009
Posts: 162
Location: Indonesia
|
| Posted: Thu Oct 27, 2011 12:56 pm Post subject: |
|
|
declan wrote:
Awesome,amazingly sharp
_________________
Owning a DSLR does not make you a photographer. It makes you a DSLR owner." - Anonymous
Evolt E-3|ZD 50-200 MK I|OM 65-200/f4|Tamron SP 90/f2.5|Tamron 2xtcon 18F|01F|OM 50/1.4
EP-L 2+EVF2|MMF-2|ZD 14-54 MK2|OM 50/1.8|Mal-1|Metz 44-af1
NX300|nx18-55|sef-8a
Mono-TriPod|Slingshot200AW|Compuday150|Mini Trekker AW|sling
Ebay : declan_79 |
|
| Back to top |
|
|
RTI

Joined: 15 Jul 2011
Posts: 282
Location: Moldova, Chisinau
|
| Posted: Thu Jan 05, 2012 1:59 pm Post subject: |
|
|
RTI wrote:
Amazing, good work on that conversion. I like the colors, E-PL1 is a superb camera, and looks like a good combo.
I was ignoring m4/3 as I had a nex-5, but I got an offer of 125$ to get a EPL1 body only  . .
Might sound strange, but I like it more then the nex-5, superior colors, better AWB, IBIS is a great feature too , noise is well controlled till ISO 1600.
_________________
Cameras: Canon 5DIII, Zorki-4, Canon AE-1
MF:Rokkor 58/1.2, Rokkor MC 58/1.4, Yashica ML 50/1.7, M39 Jupiter-9 (silver 1955), Zuiko 35-70/3.6
AF: Sigma Art 35/1.4, Tamron 24-70/2.8 VC, |
|
| Back to top |
|
|
dragom
Joined: 01 Nov 2008
Posts: 177
Location: Porto - Portugal
Expire: 2013-12-24
|
| Posted: Thu Jan 05, 2012 2:13 pm Post subject: |
|
|
dragom wrote:
Very good work. |
|
| Back to top |
|
|
Jesito

Joined: 24 Aug 2007
Posts: 5745
Location: Olivella, Catalonia, (Spain)
Expire: 2015-01-07
|
| Posted: Thu Jan 05, 2012 5:01 pm Post subject: |
|
|
Jesito wrote:
Well done, both the conversion and the samples.
Pictures at F4 are remarkably sharp.
You did a great job, sincere congratulations!
Jes.
_________________
Jesito, Moderator 
Jesito's backsack:
Zooms Sigma 70-300, Tamron 35-135 and 70-210 short, 70-210 long, 28-70 CF Macro, 35-70, 35-80, Vivitar 70-210 KA, Tamron 70-250.
Fixed Industar-50, , Tamron 24mm, Tamron 135mm, Sands Hunter 135mm, Pancolar 50mm, Volna-3, many Exakta lenses
DSLR SIGMA SD9 & SD14, EOS 5D, Sony A700 and NEXF3, Oly E-330, E-400, E-450, E-1
TLR/6x6/645 YashicaMat, Petri 6x45, Nettar, Franka Solida, Brilliant
SLR Minolta X300, Fuji STX II, Praktica VLC3, Pentax P30t, EXA500, EXA 1A, Spotmatic(2), Chinon CM-4S, Ricoh, Contax, Konica TC-X , Minolta 5000, 7000i, 3Sxi, EOS 500 and CX
Rangefinders Chinon 35EE, Konica C35 auto, Canonet 28, Yashica Lynx, FED-2, Yashica electro 35, Argus C3 & C4, Regula Cita III, Voigtlander Vitoret (many), Welta Welti-I, Kodak Signette 35, Zorki-4, Bessa-R & L, Minolta Weathermatic, olympus XA2
Compact Film Konica C35V, Voigtlander Vitorets, Canon Prima Super 105, Olympus XA2 and XA3
Compact Digital Olympus C-5050, Aiptek Slim 3000, Canon Powershot A540, Nikon 5200, SIGMA DP1s, Polaroid X530, IXUS55, Kodak 6490, Powershot G9 and G10
CSCCanon EOS-M, Samsung NX100 and NX210, Lumix G5, NEX-F3 |
|
| Back to top |
|
|
SXR_Mark
Joined: 12 Jun 2010
Posts: 506
Location: England
|
| Posted: Sat Jan 28, 2012 11:57 am Post subject: |
|
|
SXR_Mark wrote:
| Jesito wrote: |
Well done, both the conversion and the samples.
Pictures at F4 are remarkably sharp.
You did a great job, sincere congratulations!
Jes. |
Thank you for the appreciative comments. This conversion was certainly a labour of love.
Mark
_________________
Olympus OM-D E-M1 for everything |
|
| Back to top |
|
|
|
|
|
You cannot post new topics in this forum
You cannot reply to topics in this forum
You cannot edit your posts in this forum
You cannot delete your posts in this forum
You cannot vote in polls in this forum
|