| View previous topic :: View next topic |
| Author |
Message |
caerwall

Joined: 11 Nov 2010
Posts: 51
|
 Posted: Mon Jun 06, 2011 12:10 pm Post subject: Mir 10A - Flektogon Posted: Mon Jun 06, 2011 12:10 pm Post subject: Mir 10A - Flektogon |
 |
|
caerwall wrote:
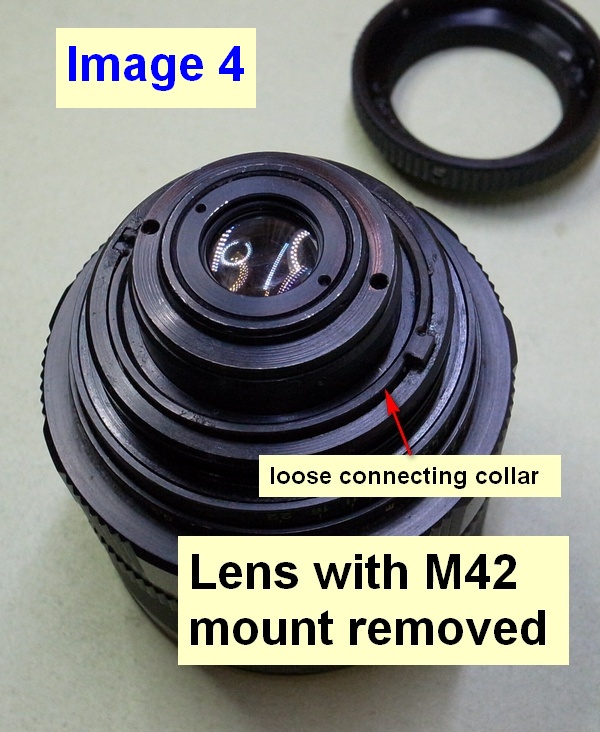
Bought a Mir 10A with a fair bit of use but in reasonable condition. The focus worked for a little while but it had a slack take up which felt that it was slipping on the mount (it wasn't). However the focus gave up soon thereafter.
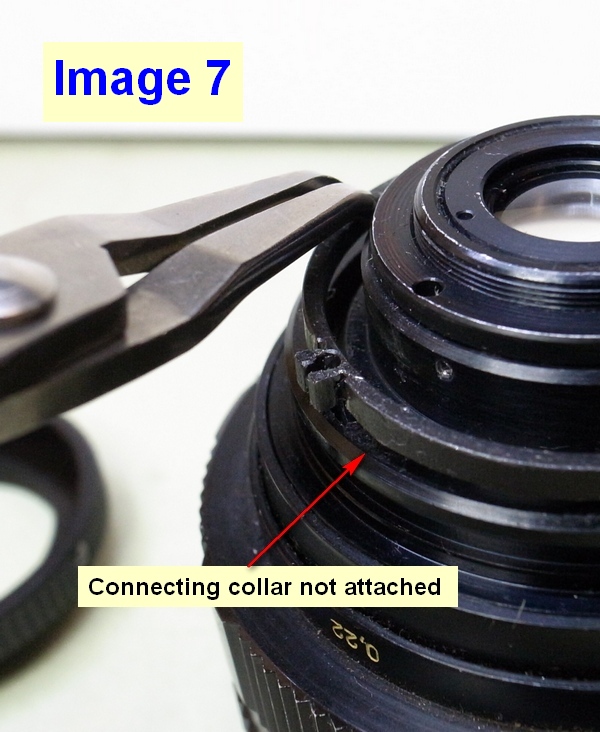
On removing the M42 fitting it is easily seen that the connecting collar between the optical unit drive and the guide slots has come loose.
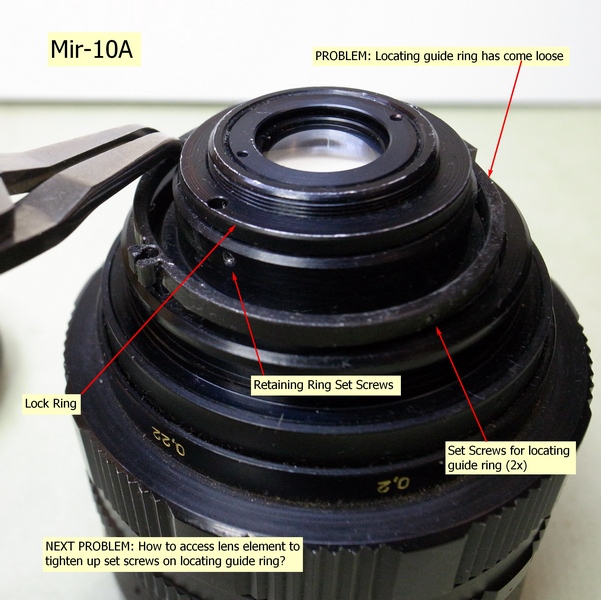
It is not obvious how I can remove the optical unit to re-attach the grub (set) screws.
Fairly simple repair but I don't want to put my foot in a cow pat.
There are many useful guides on the web put up by most helpful people but I cannot find any for the fairly rare 10A. As the Mir 1V(B) is also a Flektogon design the disassembly should be similar but I cannot find a guide for that more common lens either.
Seems if I master this then I perhaps I can repay my debt to others with a photo-illustrated disassembly guide for the Mir 10A
Any words of wisdom appreciated.
Tom |
|
| Back to top |
|
 |
sichko


Joined: 20 Jun 2008
Posts: 2475
Location: South West UK
|
| Posted: Mon Jun 06, 2011 12:28 pm Post subject: |
|
|
sichko wrote:
I'm not familiar with the Mir 10A but you mention guide slots. The Mir 1 has only one slot. I suspect that the mechanical constructions of the two lenses are different.
Edit. Can you show us some pictures ?
_________________
John |
|
| Back to top |
|
|
caerwall
Joined: 11 Nov 2010
Posts: 51
|
| Posted: Tue Jun 07, 2011 12:05 pm Post subject: |
|
|
caerwall wrote:
John Thanks for your offer - sorry for the delay - I will try and upload some images (first time lucky?)
Tom

[url=http://forum.mflenses.com/userpix/20116/big_3608_R0025180_cr_1.jpg]
Last edited by caerwall on Wed Jun 08, 2011 3:39 am; edited 1 time in total |
|
| Back to top |
|
|
caerwall
Joined: 11 Nov 2010
Posts: 51
|
| Posted: Tue Jun 07, 2011 12:10 pm Post subject: |
|
|
caerwall wrote:
I have others as you might guess but did not wish to overload.
Tom |
|
| Back to top |
|
|
sichko
Joined: 20 Jun 2008
Posts: 2475
Location: South West UK
|
| Posted: Wed Jun 08, 2011 9:22 am Post subject: |
|
|
sichko wrote:
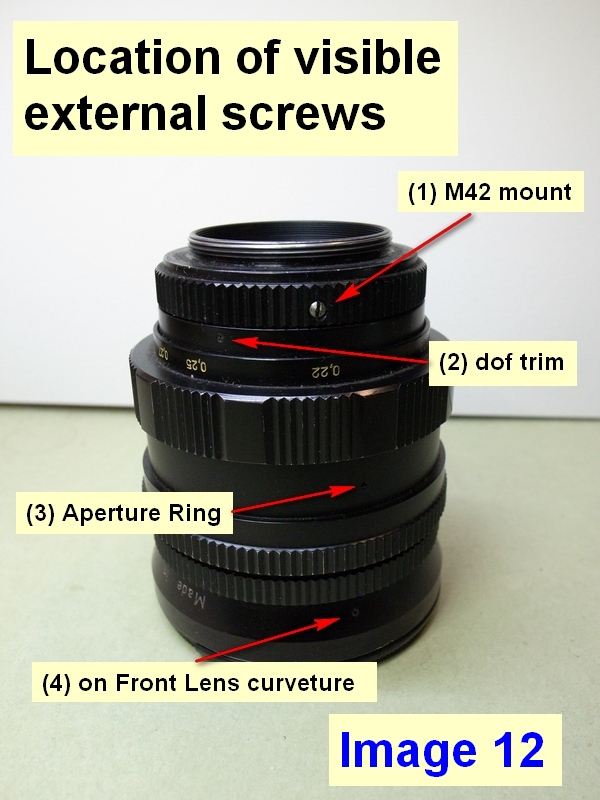
Hi Tom. Thanks for the pics. In the first pic (Image 12) you note 3 screws holding the aperture ring. Are you sure that it's the aperture ring and not the focus ring ? If it is the focus ring my instinct would be to remove the screws and the ring. However please note that, although I have serviced many different Russian lenses, I have not dismantled the 10A.
_________________
John |
|
| Back to top |
|
|
caerwall
Joined: 11 Nov 2010
Posts: 51
|
| Posted: Wed Jun 08, 2011 10:58 am Post subject: |
|
|
caerwall wrote:
Thanks John - no, that part moves with the aperture ring which is the middle ring below it. The very bottom ring is the focus preset limiter which has click stops and most likely a sprung ball bearing mechanism of some description.
The focus ring is the thicker knobbly ring with flats above. In operation the focus ring moves the body over this middle screwed part (attached to aperture ring below) and covers the area including the screws here shown exposed.
I can't help thinking that the body might unscrew into two parts but when I try and do this is it meets with a determined resistance and I do not want to apply undue force unless it is the proper way to do this. Maybe there is a locating stop screw preventing further movement? It certainly feels like it as it moves to the end of it's travel with a definite click-it's-stopped feel. If my theory is right I cannot see how or where access to this screw could be had.
Perhaps even with the locating collar demounted the lens needs it firmly fixed to allow it to be screwed apart? Catch 22?
Looking down from the back of the lens you can see inner and outer lugs that must turn the rear lens element in its mount. On the collar there are some set screws that would probably lock this rear element in place. Therefore it would be possible to remove the rear lens element but would be no closer to removing the driven part that should be attached to the ring with the locating lugs. (seen in Image 7) At present rotating the focus ring will take the lens body up and down the outer (?) helical but not being fixed to the inner part the locating ring just freewheels around it and no focus action is achieved.
I think the solution is relatively simple once the key to finding it has been understood.
Tom |
|
| Back to top |
|
|
caerwall
Joined: 11 Nov 2010
Posts: 51
|
| Posted: Wed Jun 08, 2011 11:14 am Post subject: |
|
|
caerwall wrote:
Ah hah!
Maybe the end lens element unscrews and then the set screws are loosened and the inner helical might then screw out?
I don't want to blunder too far until the correct working method is understood as to do the job in the wrong order might make resetting it all quite an exercise.
I surely want to bring out that inner part just a tad so that the locating screws can be tightened and the drive re-inserted - obvious when working normally the locating collar is always within it's enclosing element and the fixing grub screws are always covered and inaccessible.
I have tried turning the inner part by finger pressure from the rear but it feels lock solid and immovable. Presumably even if it were meant to screw out this way the end set screws under the M42 mount would prevent this happening.
Tom |
|
| Back to top |
|
|
caerwall
Joined: 11 Nov 2010
Posts: 51
|
| Posted: Mon Jul 04, 2011 11:08 am Post subject: Opening up a MIR-10A |
|
|
caerwall wrote:
Well in the end there is only one way to do a thing - do it yourself ...
The locating collar has come loose.
The mount comes off simply by loosening three screws and then the dof ring should be removed by loosening the tiny flea-sized screws that hold it in place.
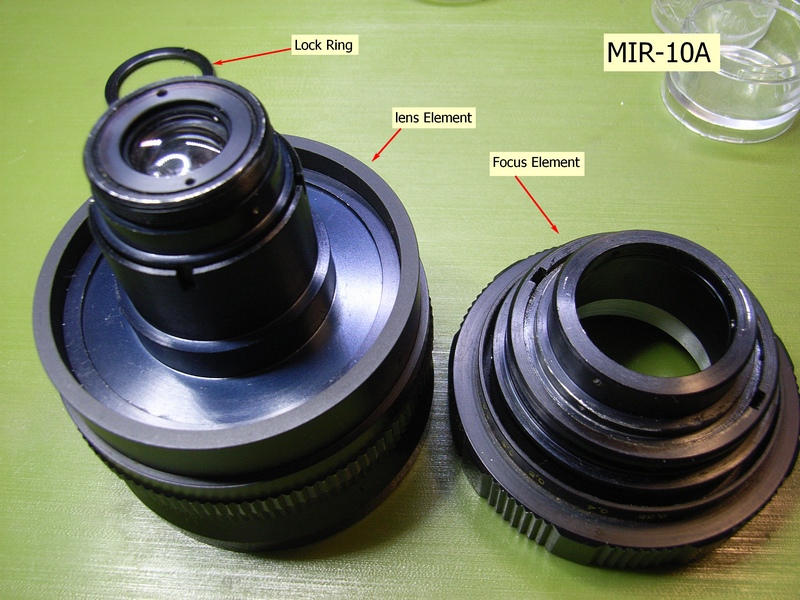
Then you need to remove the lock ring and loosen the retaining ring set screws.

With a jiggle the lens element part and the focus part will come apart.
I could not re-fix the locating collar until the helix is wound out - with a bit of luck you might be able to get it out far enough to fix the collar without it all coming apart but I didn't if you need to re-lube the helical drives then this is when it can be done. This one had obviously had some grease-attention and it wasn't the problem - whoever did it had not screwed the collar set screws in properly.
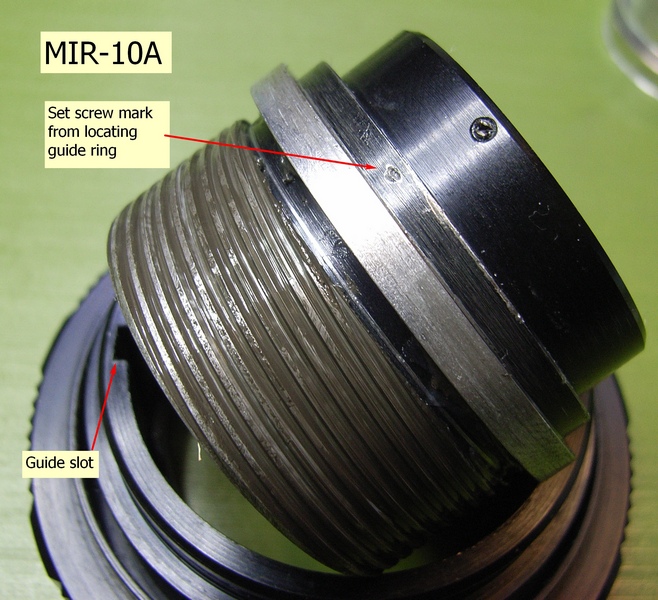
Inner helix, outer helix not removed at this stage, the impression of the original set screw fitting for the guide collar can be seen.
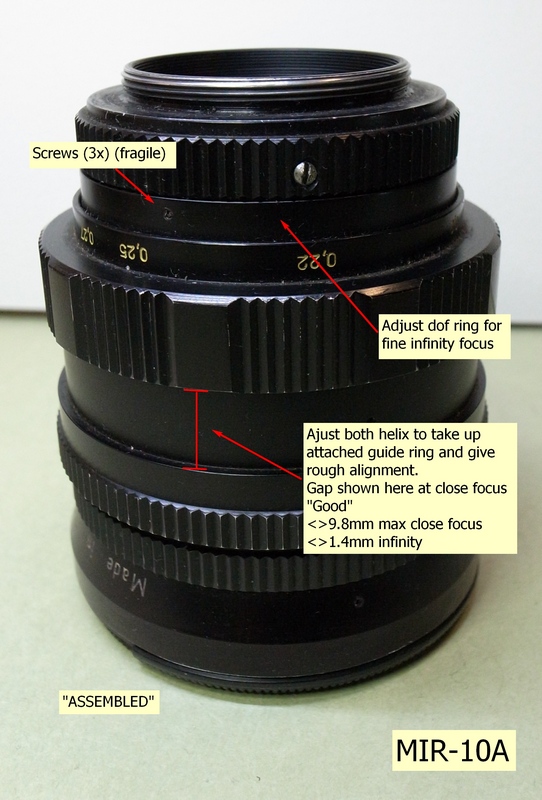
Getting it back together is a bit tricky. the outer helical drive has a much finer thread than the inner one. The outer one needs to be started first and then the inner one however you have to feed the fixed collar into the slots as the drive takes up - mine was reluctant to start and when it did it needed a slight extra persuasion with a strap wrench. In the end it came together nicely. But it seems there may be more than one start position and more than one might work. In any case when everything seemed ok the outer helical thread was not quite fully wound down when the inner thread reached the end of it's travel.
The rest of the assembly is just replacing the lens element into the focus element - replace and tighten the lock ring and set the lock screws.
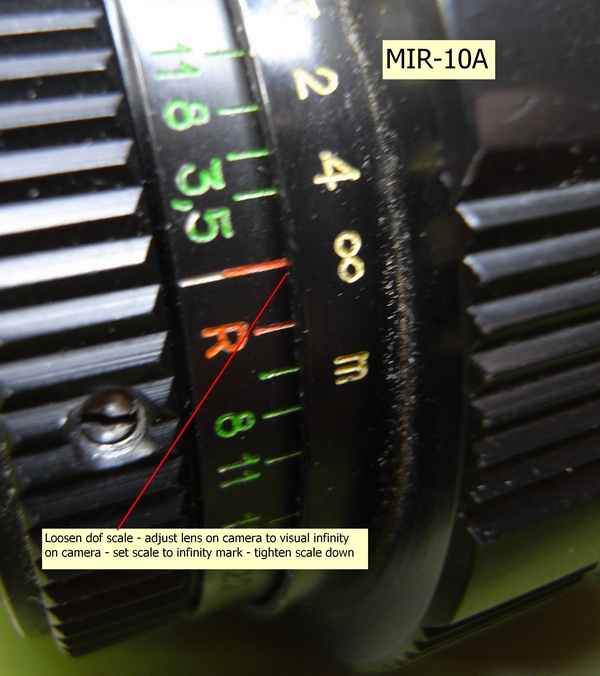
Before you fit the mount you re-attach the dof ring. Leave it moveable in approximately the correct position. There is a cutout that acts against a retaining pin in the bowels of the focus mount. Once the lens is together you can find infinity (hopefully) with the lens on a camera - easy with digital. Then set the infinity on the scale to suit and screw it in position - careful as the screws are quite delicate as I found out.
I had some woe here. The next daylight I found that 500cm = infinity. Obviously I needed to do something. Moving the dof scale helped but not nearly enough, by loosening the lens element retaining collar and doing some jiggling I managed to get the outer helical to screw in a bit tighter.
Putting it back together I was able to get a perfect sharp infinity with the lens movement butting the focus and aperture pre-selection rings together. Guess it works but I would have thought that there should be a gap here of maybe 2mm at infinity. So it works and I am happy but perhaps there is a better threading of the helicals.
By finding infinity focus manually and setting this mark you can fine tune infinity focus.

I did not need to touch the lens elements nor did the lens need further lubrication but I hope that this information might help anyone else needing to get inside a MIR-10A for whatever purpose.
Tom |
|
| Back to top |
|
|
SXR_Mark

Joined: 12 Jun 2010
Posts: 506
Location: England
|
| Posted: Tue Jul 05, 2011 2:01 pm Post subject: |
|
|
SXR_Mark wrote:
Thank you for taking the time to post such a comprehensive repair guide. 
Mark
_________________
Olympus OM-D E-M1 for everything |
|
| Back to top |
|
|
OM
Joined: 15 Jan 2010
Posts: 166
Location: Southern England
|
| Posted: Tue Jul 05, 2011 2:19 pm Post subject: |
|
|
OM wrote:
| SXR_Mark wrote: |
Thank you for taking the time to post such a comprehensive repair guide.
Mark |
+1 |
|
| Back to top |
|
|
caerwall
Joined: 11 Nov 2010
Posts: 51
|
| Posted: Tue Jul 05, 2011 11:21 pm Post subject: Thanks |
|
|
caerwall wrote:
Thanks for the replies
I must confess that I am not so sure that it is a Flektogon design either. Must check.
I thought I might post up my travails as a sort of return contribution as I have been pleased to learn by following the contributions of others who have shown how to repair other lenses. It is very good to get this help.
I noted nothing on the web for this particular lens and a few others that I have and my contribution is mainly on just how to get into the lens I had no real need to touch the lens element or aperture.
With all these things it is best to hasten slowly. I want to improve my skills in this area.
I would rather not have to repair or re-lubricate lenses but it seems to be a hazard of acquiring them. What I have found is that most of the vendors are just vendors and know very little about what they are selling. The all like to say that what they are selling has been checked over by a "repair man" first. However this seems to translate back into their original language as the English equivalent of "I have had a quick look, cleaned the glass, the aperture opens and shuts and the focus drive actually turns". As repair man in my company I pronounce it "fine".
Real repair men are as scarce as hen's teeth the world over.
Some vendors are very precise and careful in their description and only sell genuine gear, others seem to use a form of "purple" texta or ink to gloss over scratches so that they are not so obvious in their ebay images. This particular Mir-10A had a serious dent in the filter ring that had been repaired enough to take the broken edged screw-in lens cover (probably broken when the filter ring was bent). But the vendor had somehow not noticed this when I asked. Despite listing the lens as having been serviced by a "repair man" the guide collar quickly became detached when used.
On electing to fix the lens rather than ship it all they way back to the Ukraine from Australia the vendor was unable to find anyone to give me the very basic instructions on opening up the lens. However like all good salesmen here was a great show over going to get expert advice from here and there that never turned up from one excuse or another.
I guess his repair man had gone on an extended overseas holiday.
I am not unhappy as it has become an educational thing and the lens now seems to work fine. But I am short-listing my reputable sources for the supply of lenses. Life is always a learning experience and sometimes the only way to get experience is to get out there and do it.
Lest I impinge completely on this anonymous person's reputation I note that he supplied me with four lenses in one shipment. Two lenses were in very good order. One was rougher that his description suggested and the Mir10-A had been well used, damaged, repaired and came apart internally as soon as I tried to use it. I doubt if the vendor had anything to do with the repair but whomever had actually repaired it had forgotten to properly tighten the set screws on the guide collar.
I would say it was sold in (sort of) good faith but the lack of notice of the bent filter ring and description of a well used lens as "excellent" followed by lack of supplying practical help is not very re-assuring.
Tom |
|
| Back to top |
|
|
|
|
|
You cannot post new topics in this forum
You cannot reply to topics in this forum
You cannot edit your posts in this forum
You cannot delete your posts in this forum
You cannot vote in polls in this forum
|