| View previous topic :: View next topic |
| Author |
Message |
caerwall

Joined: 11 Nov 2010
Posts: 51
|
 Posted: Fri Jul 01, 2011 7:44 am Post subject: Adjust Infinity Focus - Mir-24N 35mm f2.0 Posted: Fri Jul 01, 2011 7:44 am Post subject: Adjust Infinity Focus - Mir-24N 35mm f2.0 |
 |
|
caerwall wrote:
Bought a Mir-24H which was in good order but would not focus beyond 2/3 metres.
Did not know how to adjust infinity focus and in fact it was so far out that I thought the helical tracks were not lined up properly.
No manuals or instructions on the web so I thought I had better teach myself.
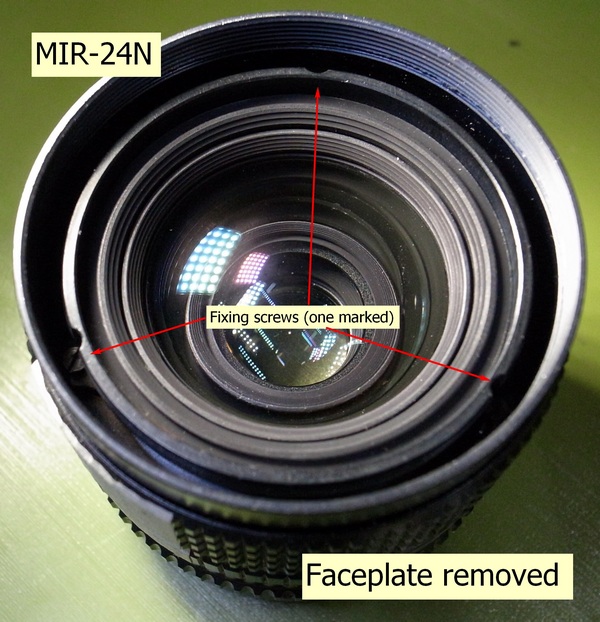
The way into the lens is via the front plate. Screw out the faceplate with a rubber tool or something grippy that will not damage the front lens element. Take care - this holds the first front lens element in place in this particular lens and it will fall out once the cover is removed.
Underneath are three screws one of them having a location scratch conveniently left for me to show alignment. But before you go any further it is best to take off the back plate as well to help reassemble the lens afterwards. Underneath is a house of horrors and I am glad that I did not need to go any further in that direction.
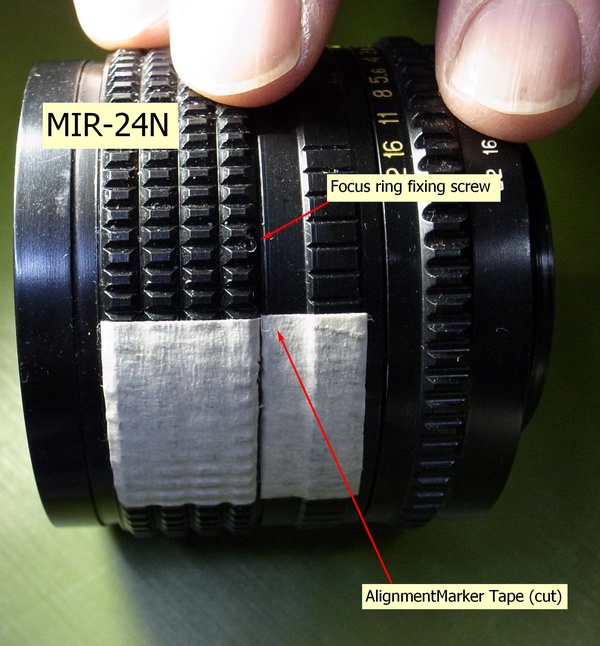
Back to the front of the lens. I put a piece of masking tape across the focus ring to focusing scale and carefully cut it so that the focus ring could move. This was to allow subsequent re-alignment but in fact I did not really need it but it helps to be safe rather than sorry. If you only need to make a small infinity focus adjustment you can skip all the palaver and just do the following which is probably necessary also as a last item after a more detailed pull down and lubrication.
I will get the final infinity focus adjustment out of the way:
First visually find infinity focus - I am talking digital cameras here and it is easy to do - if the adjustment is out then the scale is wrong and wherever your eyes tell you is right is when infinity is. My original problem was too close so the focus ring was not ever going to find infinity - I would have to loosen, adjust tighten, etc until the camera found infinity focus somewhere. Then I might get it right.
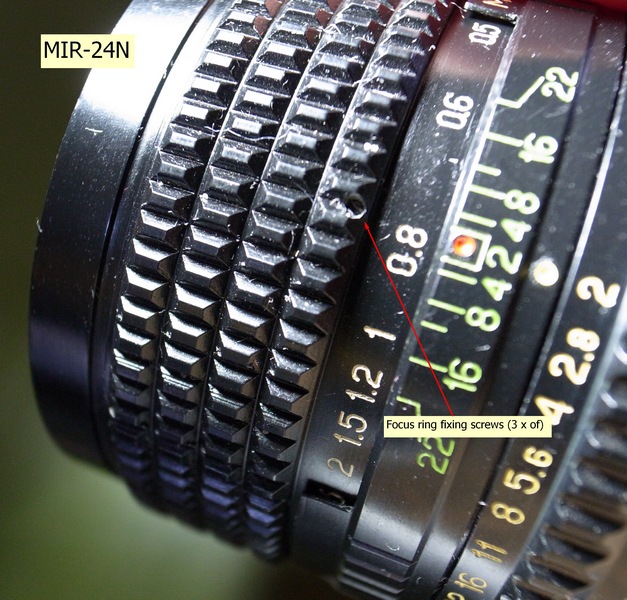
Around the grip are three tiny screws I found that if I backed these out right until they were about parallel to the grip surface they did not fall out and the focus ring was loose enough to turn without turning the lens body underneath. If the lens was on infinity focus then it is simply necessary to turn the indicator to the infinity mark and re-tighten the focus ring. Job done. Note: that if you think there is any danger of the screws falling right out it is best that you remove them completely as they are so small as to be easily lost - better have the fiddle of getting them back in than losing any. I took a chance and the screws stayed put.
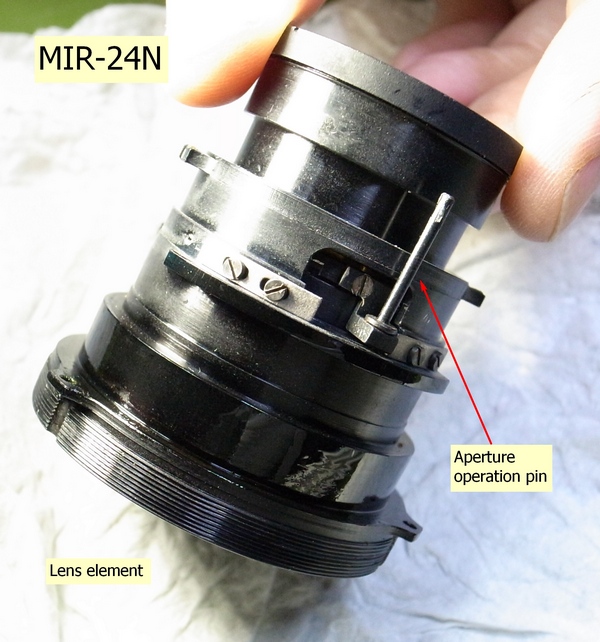
However I was not up to this at the time and I thought that the helical settings were out - maybe they were not but just as soon as you remove the three screws at the front of the lens the front component wants to come out - there is a pin-lever at the very end that fits in a slot in the aperture mechanism and as you have taken the back of the lens off you will of course wish to observe were this pin fits as it comes out as it is harder to figure out afterwards as I had to do. The front component fits in rails and is not over complicated to remove or replace except that it will not go back properly until you get that aperture operating pin right.
If your helicals are wrongly set or you need to re-lubricate then screw the helicals out. Otherwise best left alone - I had a few happy hours and about 16 attempts to get the combination right. There are internal and outer helical tracks and a free double sided one in-between. You will have had to back out the focus ring screws to get the ring off and separate the helical rings. If you are in there for lubricating purposes - do it now.
Getting the right setting for the helix is hard - I found out by trial and error - it seems that the free ring should be screwed almost in first and then the front ring screwed in so that the front of the lens left about a gap of 2mm with the lens setting at infinity. Not sure exactly what worked in the end it just did and I was happy but if someone can establish a scientific method we will all be happy.
Putting it back together is fairly straight forward - if you know where the aperture operation pin goes - easy. If you have marked one of the three screws at the front easier still. Once one screw goes in test the focus movement - if it is completely locked up - try again. If the focus is "nearly right" then it can be adjusted. If it seriously binds at infinity then you need to try again as well.
Presuming that you are either naturally gifted, or have done this before the lens will be within a reasonable range of being right and you can replace the other two screws. Otherwise summon some reserves of patience and have another go at getting the helicals right. Repeat until you have it right - hopefully you have not become mad.
Once the lens is back together I found my "infinity" was 15 metres. Loosen the grip screws as above and so very carefully inch the detached focus ring around without moving your carefully set helical underneath until the infinity mark is correctly placed. Once I did this the lens focuses perfectly.
Another one down.
Tom |
|
| Back to top |
|
 |
Orio

Joined: 24 Feb 2007
Posts: 29545
Location: West Emilia
Expire: 2012-12-04
|
| Posted: Fri Jul 01, 2011 9:04 am Post subject: |
|
|
Orio wrote:
hi, I corrected the thread name, because the correct name of the lens is MIR-24N
(where the N stands for "Nikkor")
_________________
Orio, Administrator
T*
NE CEDE MALIS AUDENTIOR ITO
Ferrania film is reborn! http://www.filmferrania.it/
Support the Ornano film chemicals company and help them survive!
http://forum.mflenses.com/ornano-chemical-products-t55525.html |
|
| Back to top |
|
|
caerwall
Joined: 11 Nov 2010
Posts: 51
|
| Posted: Fri Jul 01, 2011 10:25 am Post subject: |
|
|
caerwall wrote:
Thanks Orio
I am aware that the Latin "N" translates to the Cyrillic "H" and vice versa. This lens is a "Latin script" Mir-24N but in one of the crazy quirks of the Russian lens naming system is no "Nikkor" but very much a M42 mount.
Mir-24N or Mir-24H it is the same lens.
Tom |
|
| Back to top |
|
|
LucisPictor


Joined: 26 Feb 2007
Posts: 17633
Location: Oberhessen, Germany / Maidstone ('95-'96)
Expire: 2013-12-03
|
| Posted: Fri Jul 01, 2011 1:59 pm Post subject: |
|
|
LucisPictor wrote:
Thanks for the description. Might come in useful one day...
_________________
Personal forum activity on pause every now and again (due to job obligations)!
Carsten, former Moderator 
Things ON SALE
Carsten = "KAPCTEH" = "Karusutenu" | T-shirt?.........................My photos from Emilia: http://www.schouler.net/emilia/emilia2011.html
My gear: http://retrocameracs.wordpress.com/ausrustung/
Old list: http://forum.mflenses.com/viewtopic.php?t=65 (Not up-to-date, sorry!) | http://www.lucispictor.de | http://www.alensaweek.wordpress.com |
http://www.retrocamera.de |
|
| Back to top |
|
|
Attila

Joined: 24 Feb 2007
Posts: 57849
Location: Hungary
Expire: 2025-11-18
|
| Posted: Fri Jul 01, 2011 2:15 pm Post subject: |
|
|
Attila wrote:
Many thanks!!!
_________________
-------------------------------
Items on sale on Ebay
Sony NEX-7 Carl Zeiss Planar 85mm f1.4, Minolta MD 35mm f1.8, Konica 135mm f2.5, Minolta MD 50mm f1.2, Minolta MD 250mm f5.6, Carl Zeiss Sonnar 180mm f2.8
|
|
| Back to top |
|
|
indianadinos


Joined: 06 Jul 2008
Posts: 1310
Location: Toulouse, France
Expire: 2011-12-05
|
| Posted: Fri Jul 01, 2011 7:42 pm Post subject: |
|
|
indianadinos wrote:
Thanks for sharing your tips ...
_________________
Please visit my blogs Shooting with a Pentax K10D / FF Visions
Takumar: 24/3.5, 28/3.5, 35/2, 35/3.5, 50/1.4, 55/1.8, 85/1.8, 105/2.8, 120/2.8, 135/3.5, 150/4, 200/4
Pentax-K: M28/2.8, K28/3.5, M50/1.4, A50/1.7, M50/4 Macro, K85/1.8, K105/2.8, K135/2.5, M200/4, M70-150/4
Zeiss: Flektogon 20/2.8, 20/4, 35/2.4, 35/2.8, Tessar 50/2.8, Pancolar 50/1.8, Biotar 58/2, Sonnar 135/3.5, Sonnar 180/2.8
Meyer: Primagon 35/4.5, Domiplan 50/2.8, Oreston 50/1.8, Primoplan 58/1.9, Trioplan 100/2.8, Orestor 100/2.8, Orestor 135/2.8
Schacht/Steinheil: Travenar 90/2.8, Travenon 135/4.5, Quinar 135/2.8, Quinar 135/3.5
Russian: MIR 37B, Industar 50/3.5, Helios 44M & 44M-2, Jupiter 37A
P6: Flektogon 50/4, Biometar 80/2.8, Orestor 300/4
Nikkor: Nikkor-O 35/2, Micro 55/3.5, Nikkor-S 50/1.4, Nikkor-Q 135/2.8
Fuji: EBC 28/3.5, EBC 55/3.5 Macro, EBC 135/2.5
Misc Lenses: Kiron 105/2.8 Macro, Tamron SP90/2.5
... and a few other Vivitar, Tamron, Sigma and Soligor lenses ...
|
|
| Back to top |
|
|
Orio
Joined: 24 Feb 2007
Posts: 29545
Location: West Emilia
Expire: 2012-12-04
|
| Posted: Fri Jul 01, 2011 9:54 pm Post subject: |
|
|
Orio wrote:
| caerwall wrote: |
Thanks Orio
I am aware that the Latin "N" translates to the Cyrillic "H" and vice versa. This lens is a "Latin script" Mir-24N but in one of the crazy quirks of the Russian lens naming system is no "Nikkor" but very much a M42 mount.
Mir-24N or Mir-24H it is the same lens.
Tom |
I am not understanding your explanation, Tom.
As far as I know only two versions of this lens were made, one in Arsenal factory, in Kiev, Ukraine, and that's the MIR-24N, where the N stands for Nikkor or Nikon mount, and the other version was made in the KMZ factory of Krasnogorsk, Russia, and that's the MIR-24M, where the M stands for M42 mount.
By the way, I own both.
The N and M initials were used with the same meaning in other soviet lenses names, such as the Kaleinar-5N or the Jupiter-21M, so they are quite a universal coding in Soviet lenses.
I am not aware of any H coded lens. I only know of N lenses written in Cyrillic alphabet (H). Of course they are the same lens, but because H=N in Cyrillic, not because there are two lines N and H which are identical.
_________________
Orio, Administrator
T*
NE CEDE MALIS AUDENTIOR ITO
Ferrania film is reborn! http://www.filmferrania.it/
Support the Ornano film chemicals company and help them survive!
http://forum.mflenses.com/ornano-chemical-products-t55525.html |
|
| Back to top |
|
|
caerwall
Joined: 11 Nov 2010
Posts: 51
|
| Posted: Sat Jul 02, 2011 2:57 am Post subject: |
|
|
caerwall wrote:
Orio,
It is certainly an oddity, this lens has the Zavod Arsenal logo on it and distinctly 24H (cyrillic) and it is M42 mount. I agree that if you check ebay listings the Mir-24N is almost always Nikon mount.
There is another Mir-24N (cyrillic H) M42 mount currently listed on ebay and it looks exactly like the one I own. (Mine is 1987 build)
http://www.ebay.com.au/itm/MC-Mir-24-2-35mm-lens-M42-Zenit-Pentax-Praktica-V-GOOD-/390326510187?pt=Camera_Lenses&hash=item5ae145e26b#ht_1204wt_1137
Perhaps the Zavod Arsenal retro-fitted some M42 mounts on the Nikon mount production but did not change the front plates?
One of life's curiosities - does it make mine "valuable"? (grin).
Tom |
|
| Back to top |
|
|
caerwall
Joined: 11 Nov 2010
Posts: 51
|
| Posted: Sat Jul 02, 2011 6:57 am Post subject: |
|
|
caerwall wrote:
Some images - sorry I did not take any with the helical drives removed
 [/url] [/url]


 |
|
| Back to top |
|
|
yattiaman
Joined: 21 Aug 2013
Posts: 1
|
| Posted: Wed Aug 21, 2013 4:21 am Post subject: DESPERATELY IN NEED OF HELP FOR MIR 24N |
|
|
yattiaman wrote:
Hello guys,
sorry to resume such an old post, but I just registered to the forum because I have a big problem. The positive side is that I found this interesting forum on manual lenses, will be useful in the future.
I have a mir 24N just bought from ebay, it was pristine, in smooth working condition and aesthetically perfect.
It only had a problem: a big particle of dust inside, I didn't realize it was near the front group.
So first mistake, I opened the lens from the back. Second mistake: it looked so logical at the time, that I didn't take a picture of the location of the components. I cleaned the first 3 lenses and tried to reassemble it.
Needless to say it's a pain in the ankle...A big issue even finding the right combination to screw back the barrel group onto the external case. Now, I am not sure I did it right, but this is not the worst part: I have no idea how to reattach the spring, it really looked such a smart mechanism at the beginning, that I thought it would be very simple to put it back. Now, I extended the spring a few times in the wrong direction and it's bent, longer and almost broken.
That's why I need your help: could some of you who own a similar lens do me the favour to open the alu back plate and take and post a picture to show the right position of its parts? I have trouble even with the diaphragm black metal connector, the long flat part which protrudes from the back of the lens to actuate the diaphragm. It should fit in the related slot on the alu backplate once assembled, but it's in the opposite position, sounds weird, but if I screw it back on the barrel it seems it's in the right place on the barrel but it doesn't match the opening on the back plate.
And the other part I am not sure about is the L shape grey metal stopper. I don't remember where it goes. I put back the guides and the aperture pin, but I really forgot how to reassemble the aperture mechanism, I only need a few steps to finish, but I have been stuck for days. And I'd like to avoid buying a new one...
I really hope some of you can help me. I don't need you to disassemble the lens, but just open the back and show me where each part goes...There are no photos on google, I have been searching for 2 days...
THANKS IN ADVANCE! |
|
| Back to top |
|
|
xslavic
Joined: 21 Feb 2016
Posts: 1
|
| Posted: Sun Feb 21, 2016 3:53 pm Post subject: Mir 24n Alignment |
|
|
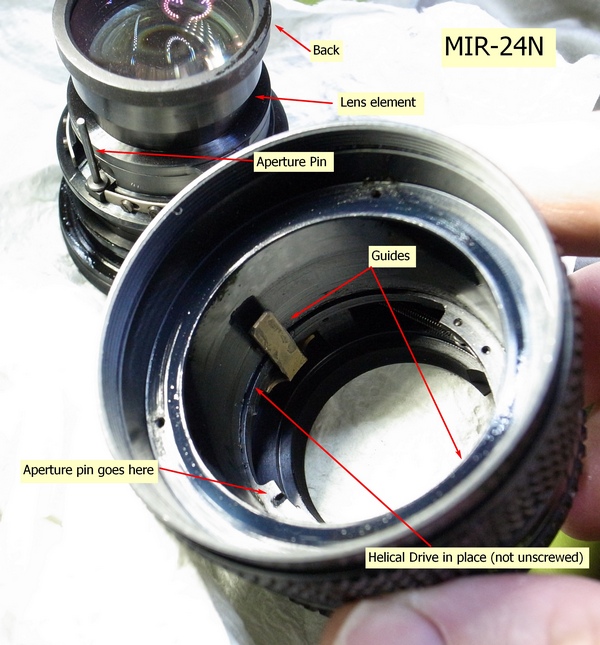
xslavic wrote:
I myself had problems realigning this lens ,so i uploaded this picture to help.
 |
|
| Back to top |
|
|
Lloydy

Joined: 02 Sep 2009
Posts: 7785
Location: Ironbridge. UK.
Expire: 2022-01-01
|
| Posted: Sun Feb 21, 2016 8:40 pm Post subject: Re: Mir 24n Alignment |
|
|
Lloydy wrote:
| xslavic wrote: |
I myself had problems realigning this lens ,so i uploaded this picture to help.
 |
Reposted to show picture, it's just an anti spam measure for first time users.
_________________
LENSES & CAMERAS FOR SALE.....
I have loads of stuff that I have to get rid of, if you see me commenting about something I have got and you want one, ask me.
My Flickr https://www.flickr.com/photos/mudplugga/
My ipernity -
http://www.ipernity.com/home/294337 |
|
| Back to top |
|
|
MMouse
Joined: 18 Apr 2018
Posts: 58
|
| Posted: Sun Jun 24, 2018 9:27 am Post subject: |
|
|
MMouse wrote:
Interested into this topic... |
|
| Back to top |
|
|
Jonk
Joined: 30 Nov 2019
Posts: 13
|
| Posted: Fri Aug 07, 2020 1:24 pm Post subject: |
|
|
Jonk wrote:
caerwall is right about the optics wanting to come out once the name ring is unscrewed. I wanted to sort the aperture out on my lens last night and went into to lens from the front using caerwall's instructions. As advised the front element was loose once the name ring was removed. I removed it with a plunger and placed it on a pec pad.
What I didn't realise is the optics below also aren't held in by a retaining ring. They look like they are secure because there is a retaining ring at the front, but that is only holding them inside a silver assembly that is loose in the lens. This is just a word of warning as they unexpectedly came out while I was working on the lens. Luckily the optical block fell into my hand and I quickly placed it back in the lens without any damage or contamination. I once had an optic from another lens get a nasty chip when it fell out unexpectedly and landed on my spanning wrench. That was a cheap lens with fungus thankfully.
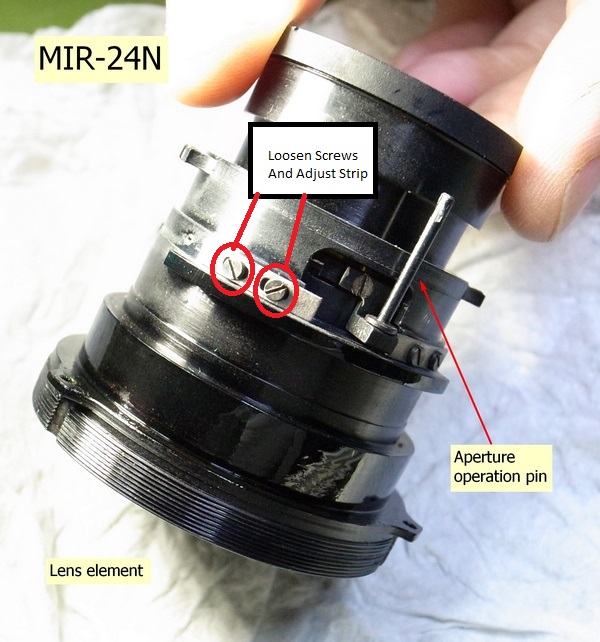
I opened the lens to sort out the aperture which wouldn’t open fully. I wasn’t losing much light but it was still annoying. I realised I could fix it when I saw the construction of the inner barrel in caerwall’s photos. You can adjust the aperture range by loosening the screws holding either of the silver strips next to the aperture lever on the inner barrel. You then move the strip to the side so the aperture lever can move further. I loosened the screws and adjusted the wrong strip at first which in hindsight was good because my lens didn’t use to stop down to f22. I sorted out the other side and now the lens opens fully. I would only recommend moving the strip as much as needed as we have no idea what happens if the aperture lever moves too far.
#1
I’ve labelled the screws on one of caerwall’s images. I hope it’s ok to use the image. I would have taken my own but my hands were shaking from anxiety when working on the lens. I just wanted to get the job done without causing any damage. I’m used to working on cheap spares repairs lenses. This is the most nerve-wracking repair I’ve done. I re-lubed a Jupiter 3 using Retro Foto House’s YouTube video a while ago and that was less nerve-racking.

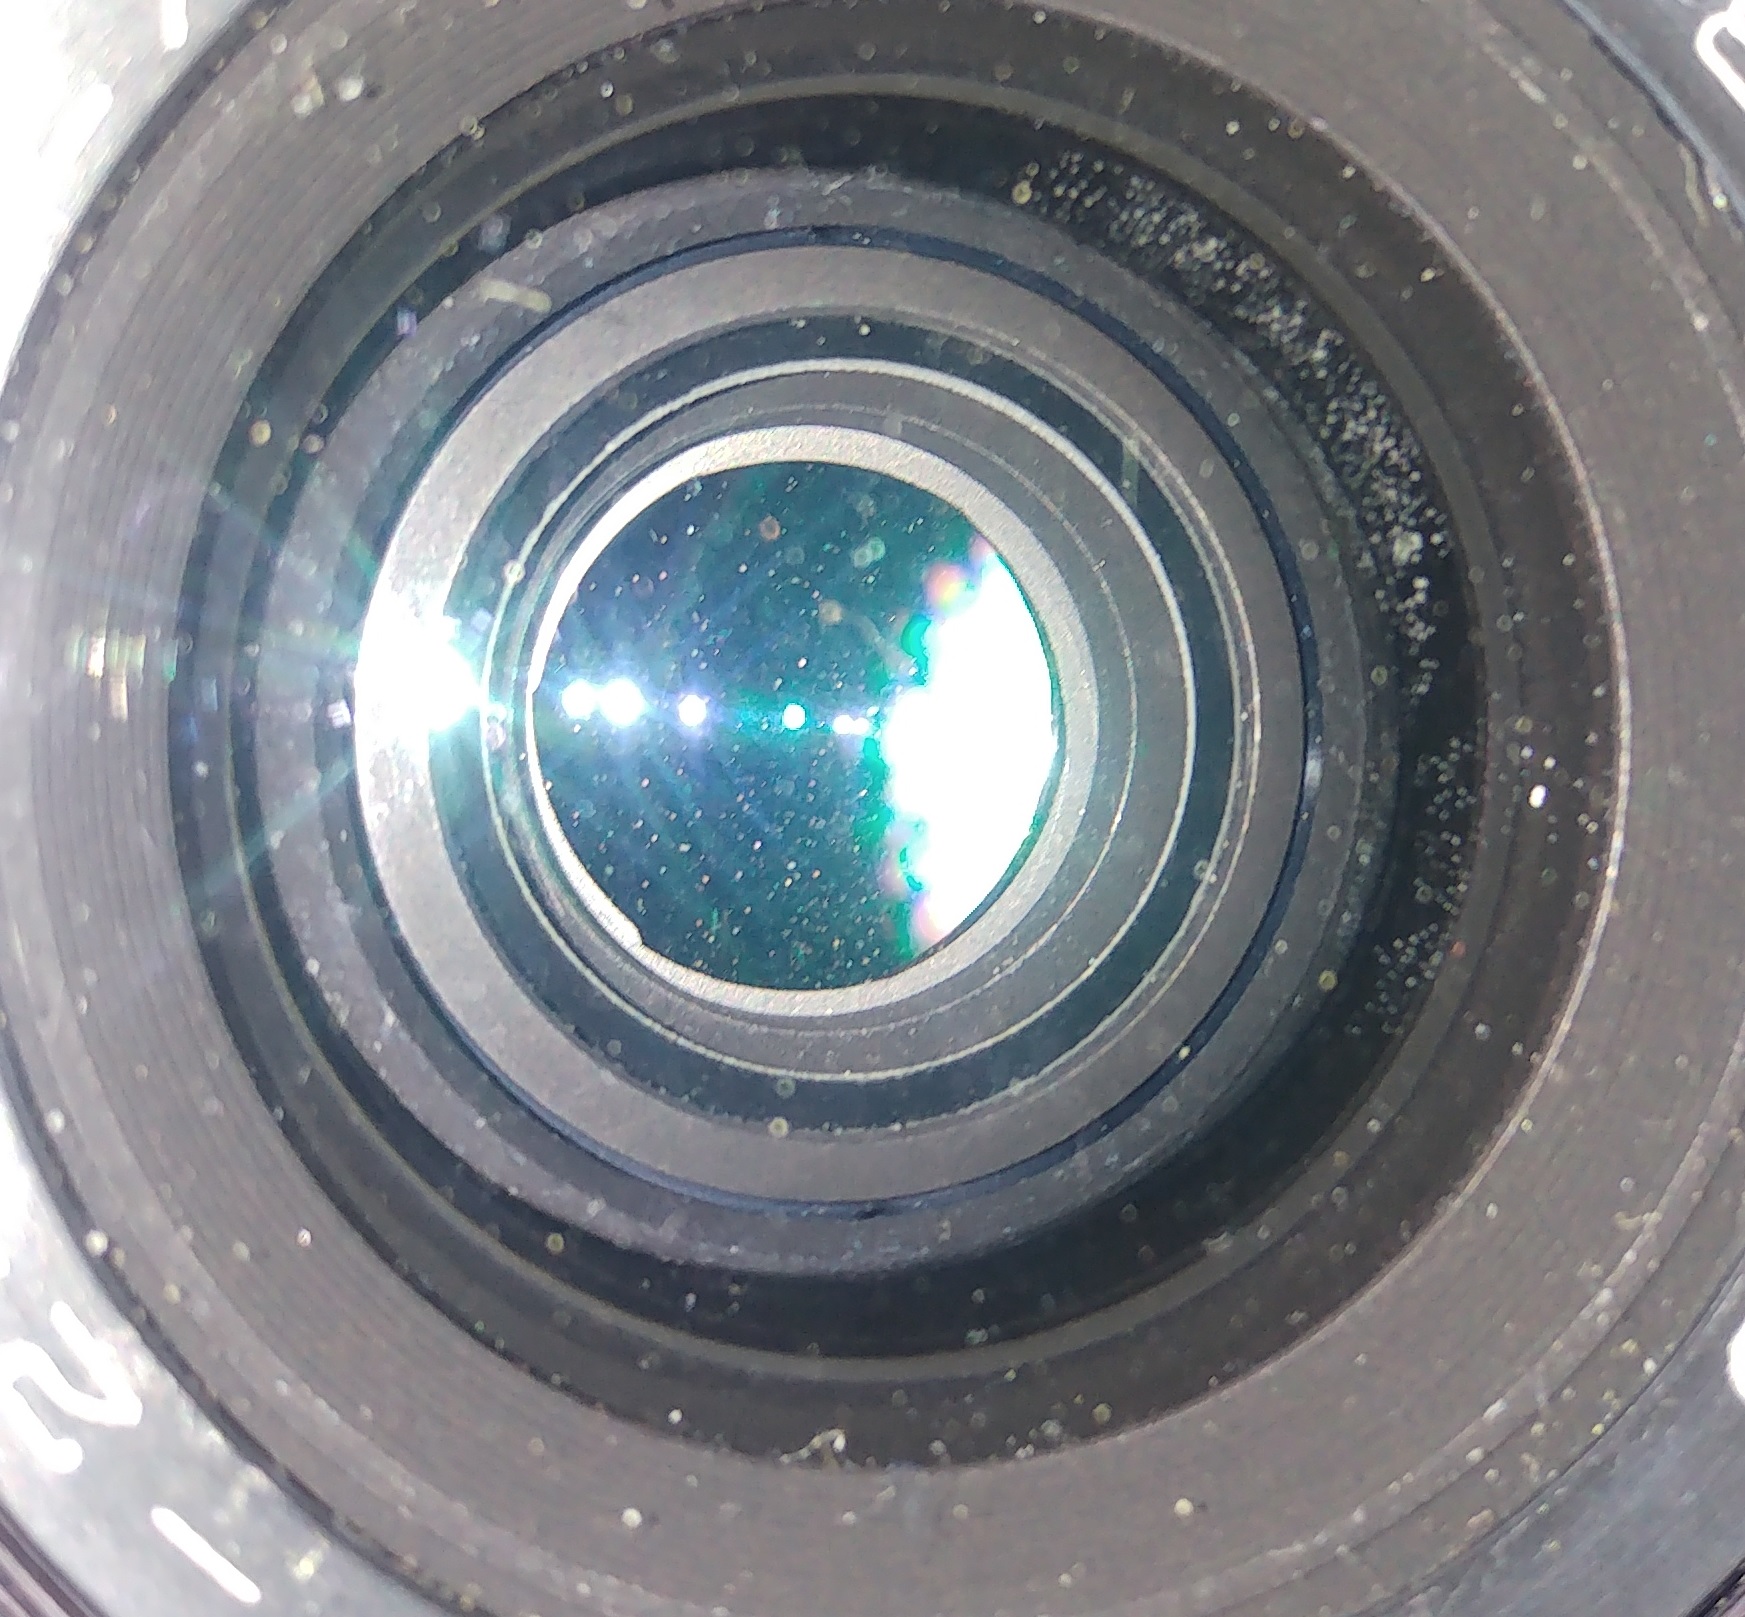
This is my lens before the repair.
#2
 |
|
| Back to top |
|
|
|
|
|
You cannot post new topics in this forum
You cannot reply to topics in this forum
You cannot edit your posts in this forum
You cannot delete your posts in this forum
You cannot vote in polls in this forum
|