| View previous topic :: View next topic |
| Author |
Message |
Kathmandu


Joined: 09 Dec 2009
Posts: 1479
Location: (Kathmandu,Nepal. Currently)Pacific Northwest, USA
Expire: 2012-04-08
|
 Posted: Thu Oct 20, 2011 1:57 am Post subject: EBC Fujinon 50mm f1.4 Fungus cleaning. Posted: Thu Oct 20, 2011 1:57 am Post subject: EBC Fujinon 50mm f1.4 Fungus cleaning. |
 |
|
Kathmandu wrote:
I bought this lens a few months back and was hoping to clean it as it was infested with fungus.

After scouring the web-I found nothing on opening this lens to access the necessary elements. I put the lens in a UV box for 2 weeks and then out in the summer sun for a few days-to no avail. Iwas able to open the filter ring by unscrewing the three screws on the side and that was the extent of it. I could see no way of unscrewing the front cell or the back cell. I used the lens with the fungus , and I was getting beautiful images with it even with the infestation. I put the lens away in a ziplock bag , and away from other lenses, in hopes of one day opening and cleaning.
Well that day has come and I managed to open to open it up through the front and dissassemble the front cell and clean it.
Heres what I did:
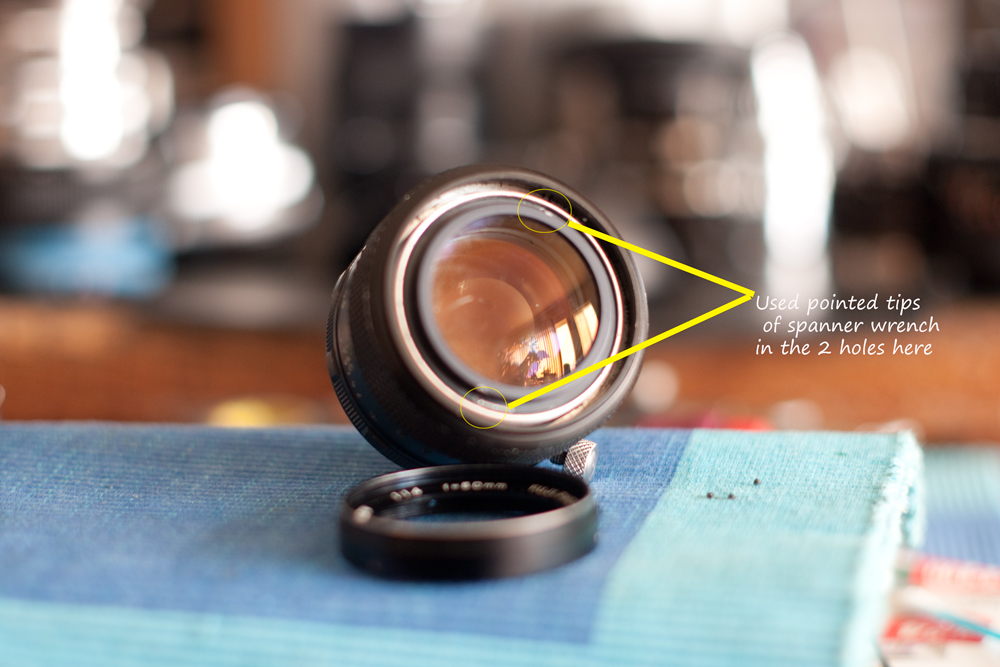
Took the name ring off by unscrewing the front ring, which was held down by three tiny screws.

I could see the front cell with 2 holes on the side. This is threaded and glued down. I applied a couple of swaps of acetone and painted in between the cracks with a pointed Q-tip soaked in acetone. I firmly placed the tips of my spanner tool(the pointed tips-mine has a sloted one and a ponted one )into the two holes amd turned the spanner tool anti-clockwise firmly pushing down at the same time- and est voila it turned .I was never able to do that previously.

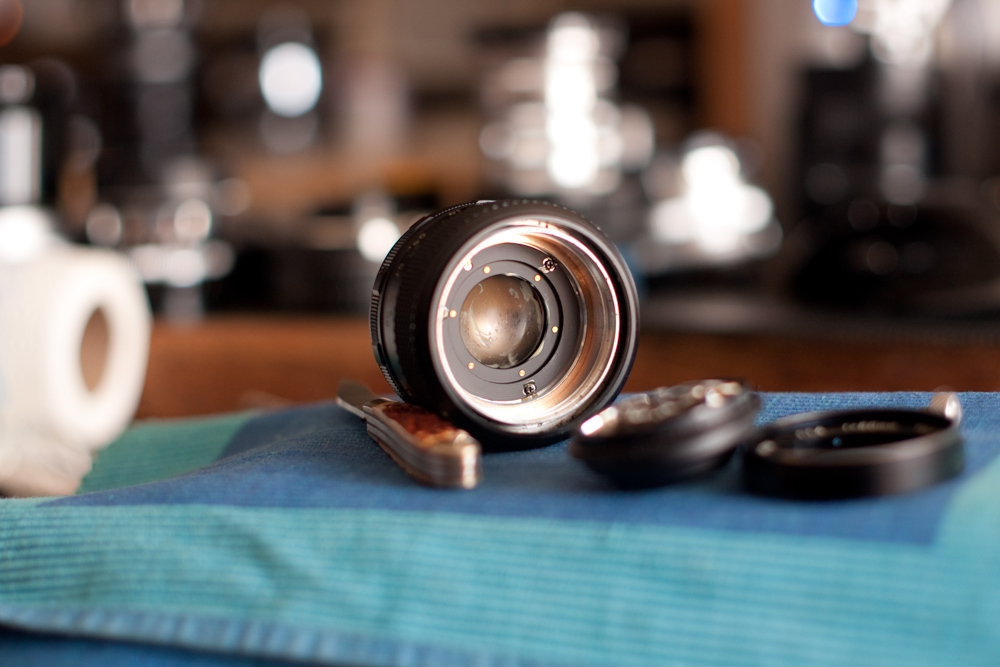
I unscrewed the front cell and could now see that the fungus was behind the front element, and on the face of the element underneath the iris. I blew the dust off the opened parts and used a lens brush on the open parts gently cleaning loose particles off-and then using the blower again.
I opened the iris wide open and applied an antifungal cream on the element under the iris without disassembling that portion further. I dont even know if the back cell can be disassembled. I left it with the cream on for 20 minutes or so and later cleaned it off with a q-tip soaked in denatured alchohol, and a clean lint free lens cleaning cloth. I used vapor from my breath on the element and wiped it clean.

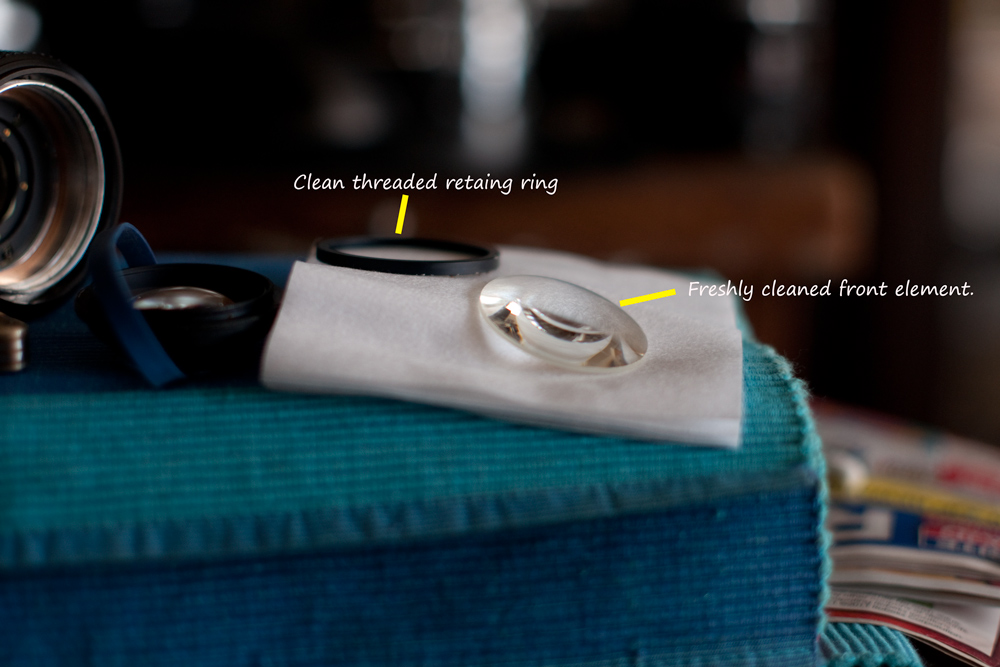
The front element was held down by a threaded and glued retaing ring. I applied acetone in the previously mentioned method, and used a knife blade tip to scratch ,break apart and clean some of the glue in the cracks. I used a rubber band to aid in gripping the lower part of the front cell and a latex gloved hand to twist the retaining ring (anti-clockwise) . I tried a few times , making sure I wasn't touching any part of the element, and managed to unscrew the retaining ring.
I used the same method in cleaning the fungus from the back of the front element.When the fungus was cleaned off ,I cleaned the threads of the retaining ring with de-natured alchohol ,and applied some naptha on the threads-before putting the newly cleaned lens elements back on the front cell.


I then applied some naptha on the front cell threads and used the blower one last time inside the lens to blow away any dust particles.
The lens was then put back and reassembled.
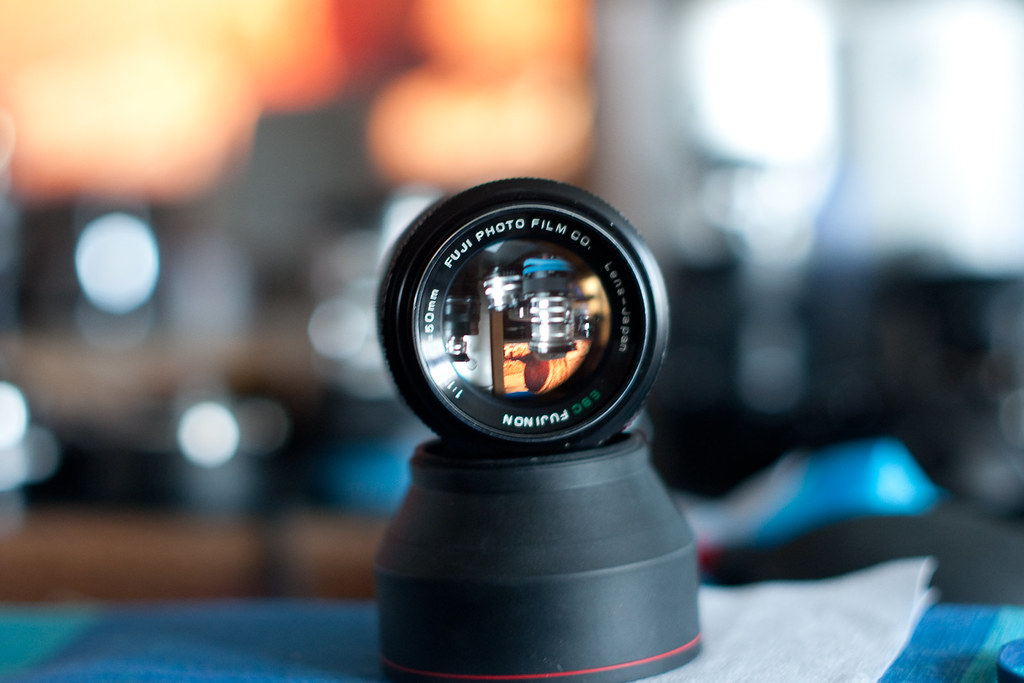
lens mounted on a sony alpha adapter .

I hope someone finds this useful-as I could on find anything on the wild wild web.
Regards
_________________
kathmandu
Sony α 700 DSLR
 |
|
| Back to top |
|
 |
Excalibur


Joined: 19 Jul 2009
Posts: 5019
Location: UK
Expire: 2014-04-21
|
| Posted: Thu Oct 20, 2011 7:44 am Post subject: |
|
|
Excalibur wrote:
Excellent report even though I don't have a Fuji 50mm f1.4.
_________________
Canon A1, AV1, T70 & T90, EOS 300 and EOS300v, Chinon CE and CP-7M. Contax 139, Fuji STX-2, Konica Autoreflex TC, FS-1, FT-1, Minolta X-700, X-300, XD-11, SRT101b, Nikon EM, FM, F4, F90X, Olympus OM2, Pentax S3, Spotmatic, Pentax ME super, Praktica TL 5B, & BC1, , Ricoh KR10super, Yashica T5D, Bronica Etrs, Mamiya RB67 pro AND drum roll:- a Sony Nex 3
.........past gear Tele Rolleiflex and Rollei SL66.
Many lenses from good to excellent. |
|
| Back to top |
|
|
tomasg
Joined: 01 Nov 2009
Posts: 1135
Expire: 2014-04-28
|
| Posted: Thu Oct 20, 2011 7:57 am Post subject: |
|
|
tomasg wrote:
Excellent, makes me want to buy lenses that i don t need, just to fix them... 
Tomas |
|
| Back to top |
|
|
indianadinos

Joined: 06 Jul 2008
Posts: 1310
Location: Toulouse, France
Expire: 2011-12-05
|
| Posted: Thu Oct 20, 2011 6:34 pm Post subject: |
|
|
indianadinos wrote:
Great, thanks for sharing the tutorial ...
_________________
Please visit my blogs Shooting with a Pentax K10D / FF Visions
Takumar: 24/3.5, 28/3.5, 35/2, 35/3.5, 50/1.4, 55/1.8, 85/1.8, 105/2.8, 120/2.8, 135/3.5, 150/4, 200/4
Pentax-K: M28/2.8, K28/3.5, M50/1.4, A50/1.7, M50/4 Macro, K85/1.8, K105/2.8, K135/2.5, M200/4, M70-150/4
Zeiss: Flektogon 20/2.8, 20/4, 35/2.4, 35/2.8, Tessar 50/2.8, Pancolar 50/1.8, Biotar 58/2, Sonnar 135/3.5, Sonnar 180/2.8
Meyer: Primagon 35/4.5, Domiplan 50/2.8, Oreston 50/1.8, Primoplan 58/1.9, Trioplan 100/2.8, Orestor 100/2.8, Orestor 135/2.8
Schacht/Steinheil: Travenar 90/2.8, Travenon 135/4.5, Quinar 135/2.8, Quinar 135/3.5
Russian: MIR 37B, Industar 50/3.5, Helios 44M & 44M-2, Jupiter 37A
P6: Flektogon 50/4, Biometar 80/2.8, Orestor 300/4
Nikkor: Nikkor-O 35/2, Micro 55/3.5, Nikkor-S 50/1.4, Nikkor-Q 135/2.8
Fuji: EBC 28/3.5, EBC 55/3.5 Macro, EBC 135/2.5
Misc Lenses: Kiron 105/2.8 Macro, Tamron SP90/2.5
... and a few other Vivitar, Tamron, Sigma and Soligor lenses ...
|
|
| Back to top |
|
|
Kathmandu
Joined: 09 Dec 2009
Posts: 1479
Location: (Kathmandu,Nepal. Currently)Pacific Northwest, USA
Expire: 2012-04-08
|
| Posted: Thu Oct 20, 2011 10:34 pm Post subject: |
|
|
Kathmandu wrote:
| Excalibur wrote: |
| Excellent report even though I don't have a Fuji 50mm f1.4. |
Thanks
| tomasg wrote: |
Excellent, makes me want to buy lenses that i don t need, just to fix them...
Tomas |
Its the only cure for LBA
| indianadinos wrote: |
| Great, thanks for sharing the tutorial ... |
I looked everywhere on information on opening this lens-only found people who were looking for information. I am glad to be able to share, although I did not have to disassemble the back cell block-in my case. Maybe another time, I can attempt to open the back.
_________________
kathmandu
Sony α 700 DSLR
|
|
| Back to top |
|
|
polarhei

Joined: 29 Dec 2011
Posts: 29
Location: Hong Kong,PRC
|
| Posted: Thu Dec 29, 2011 1:45 pm Post subject: |
|
|
polarhei wrote:
Your guide is very noticeable,although I have not the material needed, after a little cleaning internally, Improved a little.
The remain may need some liquid to do.
Although Some people seldom know what we are exactly doing(thinking I am destroying a len). Fixed focus length lens like fujinon 50mm may be the most simple to fix (as there are not more than 3 pieces of glass). Now I have some problem to fix my standard 80-200 M42 Tokina Lens.
P.S: I used to face similar thing before, a Model of Double-len camera,35mm format so Fixed focus len (Fujinon?) in M42 should be easy to maintain. |
|
| Back to top |
|
|
my_photography
Joined: 03 Nov 2008
Posts: 2772
Location: Pearl of the Orient
Expire: 2016-12-25
|
| Posted: Sat Jan 26, 2013 5:14 am Post subject: |
|
|
my_photography wrote:
Some of the photos are no longer available. I am tring to 'jam' the auto pin on the lens but having difficulty to start since I don't see any screw at the rear of the lens. There are 1 screw on the aperture ring and 3 on the distance ring. Any suggestion?
_________________
Zeiss: CJZ Flektogon 20/2.8, CJZ Flektogon 20/4, , CJZ Pentacon 29/2.8, CJZ Flektogon 35/2.4, CJZ Pancolar 50/1.8, Tessar 50/2.8, Biotar 7.5cm/1.5, CJZ Pancolar 80/1.8, CJZ Sonnar 135/3.5, CJZ Pentacon 135/2.8 CJZ Sonnar 200/2.8
Other Germany: Meyer Primoplan 50/1.8, Meyer Trioplan 100/2.8
Takumar: SMC 50/1.4 Super Tak 55/2, Super Tak 85/1.9, S-M-C 135/3.5, Super Tak 150/4
Russian: Zenith 16/2.8, Mir-24M 2/35, Volna-9 50/2.8, Helios 44M (58/2), Helios 44M-3 MC (58/2), Helios 40 (85/1.5), Tair 11A (135/2.8 )
Others: Sears 28/2.8, Sankor 35/2.8, Enna M�nchen Tele-Ennalyt 135/3.5
Zoom Sigma Zoom 28-85/3.5-4.5
|
|
| Back to top |
|
|
Jesito

Joined: 24 Aug 2007
Posts: 5745
Location: Olivella, Catalonia, (Spain)
Expire: 2015-01-07
|
| Posted: Sat Jan 26, 2013 9:21 am Post subject: |
|
|
Jesito wrote:
Thanks for the report! Nice to see the inside of that lens.
(BTW I notice some of the pictures not being properly loaded with the page, I suggest better to store them at MFLenses directly, just to avoid third party picture repositories losing them.)
_________________
Jesito, Moderator 
Jesito's backsack:
Zooms Sigma 70-300, Tamron 35-135 and 70-210 short, 70-210 long, 28-70 CF Macro, 35-70, 35-80, Vivitar 70-210 KA, Tamron 70-250.
Fixed Industar-50, , Tamron 24mm, Tamron 135mm, Sands Hunter 135mm, Pancolar 50mm, Volna-3, many Exakta lenses
DSLR SIGMA SD9 & SD14, EOS 5D, Sony A700 and NEXF3, Oly E-330, E-400, E-450, E-1
TLR/6x6/645 YashicaMat, Petri 6x45, Nettar, Franka Solida, Brilliant
SLR Minolta X300, Fuji STX II, Praktica VLC3, Pentax P30t, EXA500, EXA 1A, Spotmatic(2), Chinon CM-4S, Ricoh, Contax, Konica TC-X , Minolta 5000, 7000i, 3Sxi, EOS 500 and CX
Rangefinders Chinon 35EE, Konica C35 auto, Canonet 28, Yashica Lynx, FED-2, Yashica electro 35, Argus C3 & C4, Regula Cita III, Voigtlander Vitoret (many), Welta Welti-I, Kodak Signette 35, Zorki-4, Bessa-R & L, Minolta Weathermatic, olympus XA2
Compact Film Konica C35V, Voigtlander Vitorets, Canon Prima Super 105, Olympus XA2 and XA3
Compact Digital Olympus C-5050, Aiptek Slim 3000, Canon Powershot A540, Nikon 5200, SIGMA DP1s, Polaroid X530, IXUS55, Kodak 6490, Powershot G9 and G10
CSCCanon EOS-M, Samsung NX100 and NX210, Lumix G5, NEX-F3 |
|
| Back to top |
|
|
Arkku

Joined: 28 Feb 2007
Posts: 1416
Location: Helsinki, Finland
|
| Posted: Sat Jan 26, 2013 4:25 pm Post subject: |
|
|
Arkku wrote:
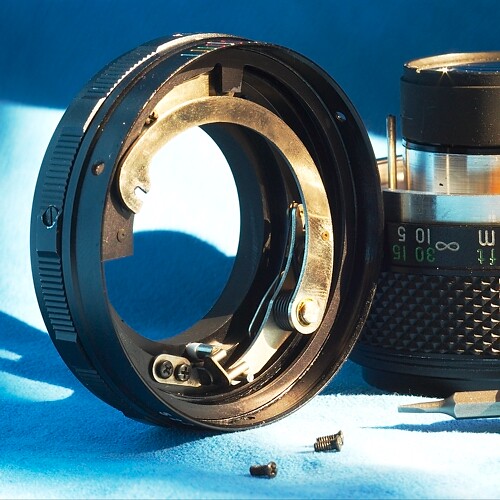
The Fujinon 50mm f/1.4 is one of the easiest lenses to modify for manual aperture: simply open three screws near rear of the lens (above aperture ring) and the whole rear part comes off. Take out aperture pin (open two screws holding it, but leave one still slightly attached so easier to reassemble), cut a ~1.5mm piece of hollow plastic tube from, e.g., �q-tip� aka cotton swab, insert over aperture pin, and reassemble. When reassembling, there is one �fork� on the mount side which needs to go grab a pin on the lens side (controls aperture).
Also, re. cleaning, unless there is fungus between the front elements, easiest way is to screw off entire rear element group, this gets you easy access to all elements below the aperture blades and the one surface above aperture blades without having to undo name ring (which is hard without scratching the ring). |
|
| Back to top |
|
|
my_photography
Joined: 03 Nov 2008
Posts: 2772
Location: Pearl of the Orient
Expire: 2016-12-25
|
| Posted: Tue Jan 29, 2013 5:14 am Post subject: |
|
|
my_photography wrote:
I am in trouble now, this black ring came off and I have no idea where exactly I should put it. The aperture no longer move when I changed the aperture ring.

I think the white fork tab - "A" should be put in "C".

but it does not really fit, this is how it looks when I reassembly it back. The black tab is now on top of the silver ring

By the way, did I put back "D" correctly to jam the pin?
_________________
Zeiss: CJZ Flektogon 20/2.8, CJZ Flektogon 20/4, , CJZ Pentacon 29/2.8, CJZ Flektogon 35/2.4, CJZ Pancolar 50/1.8, Tessar 50/2.8, Biotar 7.5cm/1.5, CJZ Pancolar 80/1.8, CJZ Sonnar 135/3.5, CJZ Pentacon 135/2.8 CJZ Sonnar 200/2.8
Other Germany: Meyer Primoplan 50/1.8, Meyer Trioplan 100/2.8
Takumar: SMC 50/1.4 Super Tak 55/2, Super Tak 85/1.9, S-M-C 135/3.5, Super Tak 150/4
Russian: Zenith 16/2.8, Mir-24M 2/35, Volna-9 50/2.8, Helios 44M (58/2), Helios 44M-3 MC (58/2), Helios 40 (85/1.5), Tair 11A (135/2.8 )
Others: Sears 28/2.8, Sankor 35/2.8, Enna M�nchen Tele-Ennalyt 135/3.5
Zoom Sigma Zoom 28-85/3.5-4.5
|
|
| Back to top |
|
|
Arkku
Joined: 28 Feb 2007
Posts: 1416
Location: Helsinki, Finland
|
| Posted: Tue Jan 29, 2013 7:43 am Post subject: |
|
|
Arkku wrote:
| my_photography wrote: |
but it does not really fit, this is how it looks when I reassembly it back. The black tab is now on top of the silver ring
|
I think it's upside down, see here how it should look assembled:
Notice how the ring is very deep inside the mount, not at the top.
| my_photography wrote: |
By the way, did I put back "D" correctly to jam the pin? |
Yes, looks right. |
|
| Back to top |
|
|
my_photography
Joined: 03 Nov 2008
Posts: 2772
Location: Pearl of the Orient
Expire: 2016-12-25
|
| Posted: Sat Feb 02, 2013 2:38 am Post subject: |
|
|
my_photography wrote:
I managed to put the black ring in, but the small white pin (picture below - cycled area) does not move with the ring. What should be moving that area and is it possible to show me how it looks like at f16 and @1.4? Sorry I am new at this lens fixing thing and obviously I am no good at it.
@f16

_________________
Zeiss: CJZ Flektogon 20/2.8, CJZ Flektogon 20/4, , CJZ Pentacon 29/2.8, CJZ Flektogon 35/2.4, CJZ Pancolar 50/1.8, Tessar 50/2.8, Biotar 7.5cm/1.5, CJZ Pancolar 80/1.8, CJZ Sonnar 135/3.5, CJZ Pentacon 135/2.8 CJZ Sonnar 200/2.8
Other Germany: Meyer Primoplan 50/1.8, Meyer Trioplan 100/2.8
Takumar: SMC 50/1.4 Super Tak 55/2, Super Tak 85/1.9, S-M-C 135/3.5, Super Tak 150/4
Russian: Zenith 16/2.8, Mir-24M 2/35, Volna-9 50/2.8, Helios 44M (58/2), Helios 44M-3 MC (58/2), Helios 40 (85/1.5), Tair 11A (135/2.8 )
Others: Sears 28/2.8, Sankor 35/2.8, Enna M�nchen Tele-Ennalyt 135/3.5
Zoom Sigma Zoom 28-85/3.5-4.5
|
|
| Back to top |
|
|
Arkku
Joined: 28 Feb 2007
Posts: 1416
Location: Helsinki, Finland
|
| Posted: Wed Feb 06, 2013 6:34 pm Post subject: |
|
|
Arkku wrote:
| my_photography wrote: |
| I managed to put the black ring in, but the small white pin (picture below - cycled area) does not move with the ring. What should be moving that area and is it possible to show me how it looks like at f16 and @1.4? |
It looks right now for f/16, at f/1.4 the ring should have rotated clockwise so that the pin is near the two bronze-coloured dots. It does not move if the mount part is separated, but once you hook up the pin on the lens side into the fork it will. |
|
| Back to top |
|
|
my_photography
Joined: 03 Nov 2008
Posts: 2772
Location: Pearl of the Orient
Expire: 2016-12-25
|
| Posted: Fri Feb 08, 2013 2:20 am Post subject: |
|
|
my_photography wrote:
After mounting the lens back, the aperture will only response from f1.4 to f4 after that no change in aperture even if I change the aperture ring. What did I still do wrong? Any suggestion?
_________________
Zeiss: CJZ Flektogon 20/2.8, CJZ Flektogon 20/4, , CJZ Pentacon 29/2.8, CJZ Flektogon 35/2.4, CJZ Pancolar 50/1.8, Tessar 50/2.8, Biotar 7.5cm/1.5, CJZ Pancolar 80/1.8, CJZ Sonnar 135/3.5, CJZ Pentacon 135/2.8 CJZ Sonnar 200/2.8
Other Germany: Meyer Primoplan 50/1.8, Meyer Trioplan 100/2.8
Takumar: SMC 50/1.4 Super Tak 55/2, Super Tak 85/1.9, S-M-C 135/3.5, Super Tak 150/4
Russian: Zenith 16/2.8, Mir-24M 2/35, Volna-9 50/2.8, Helios 44M (58/2), Helios 44M-3 MC (58/2), Helios 40 (85/1.5), Tair 11A (135/2.8 )
Others: Sears 28/2.8, Sankor 35/2.8, Enna M�nchen Tele-Ennalyt 135/3.5
Zoom Sigma Zoom 28-85/3.5-4.5
|
|
| Back to top |
|
|
my_photography
Joined: 03 Nov 2008
Posts: 2772
Location: Pearl of the Orient
Expire: 2016-12-25
|
| Posted: Fri Feb 08, 2013 3:56 pm Post subject: |
|
|
my_photography wrote:
| my_photography wrote: |
| After mounting the lens back, the aperture will only response from f1.4 to f4 after that no change in aperture even if I change the aperture ring. What did I still do wrong? Any suggestion? |
Let me answer my own question as I finally got it done after various attempt.
Make sure the two screws at "D" are both tighten back after putting the plastic tube in. If either of the screws are too loose, the aperture will not turn at all stops when the lens is reassemble back. Do also make sure the plastic tube are long enough. Best done my measuring the length needed when the pin is pressed in.
_________________
Zeiss: CJZ Flektogon 20/2.8, CJZ Flektogon 20/4, , CJZ Pentacon 29/2.8, CJZ Flektogon 35/2.4, CJZ Pancolar 50/1.8, Tessar 50/2.8, Biotar 7.5cm/1.5, CJZ Pancolar 80/1.8, CJZ Sonnar 135/3.5, CJZ Pentacon 135/2.8 CJZ Sonnar 200/2.8
Other Germany: Meyer Primoplan 50/1.8, Meyer Trioplan 100/2.8
Takumar: SMC 50/1.4 Super Tak 55/2, Super Tak 85/1.9, S-M-C 135/3.5, Super Tak 150/4
Russian: Zenith 16/2.8, Mir-24M 2/35, Volna-9 50/2.8, Helios 44M (58/2), Helios 44M-3 MC (58/2), Helios 40 (85/1.5), Tair 11A (135/2.8 )
Others: Sears 28/2.8, Sankor 35/2.8, Enna M�nchen Tele-Ennalyt 135/3.5
Zoom Sigma Zoom 28-85/3.5-4.5
|
|
| Back to top |
|
|
spiridon
Joined: 14 Apr 2014
Posts: 3
|
| Posted: Mon Apr 14, 2014 4:00 pm Post subject: |
|
|
spiridon wrote:
Hi All!
Does anyone have an idea of how to open old-style EBC Fujinon 50/1.4 ? It doesn't contain these tiny screws..
My lens also has yellow tint and this leads to pictures warming. So can someone who faced this problem share with the experience of UV treatment or smth like this ? |
|
| Back to top |
|
|
Arkku
Joined: 28 Feb 2007
Posts: 1416
Location: Helsinki, Finland
|
| Posted: Mon Apr 14, 2014 7:32 pm Post subject: |
|
|
Arkku wrote:
UV treatment in sunlight, or with certain white LED lights works for the yellowing.
I have opened mine, I don't remember there being anything strange about the process; there are three rings on the barrel of the lens just above the knurled aperture ring. |
|
| Back to top |
|
|
spiridon
Joined: 14 Apr 2014
Posts: 3
|
| Posted: Thu May 08, 2014 4:41 pm Post subject: |
|
|
spiridon wrote:
Thanks for the answers, UV really works. But after measuring the radiation decided not to bother |
|
| Back to top |
|
|
|
|