| View previous topic :: View next topic |
| Author |
Message |
Marlon Managi
Joined: 11 Mar 2014
Posts: 12
Location: Bali, Indonesia
|
 Posted: Sun Dec 21, 2014 9:20 am Post subject: How to Fix Asahi Camera Light Meter Posted: Sun Dec 21, 2014 9:20 am Post subject: How to Fix Asahi Camera Light Meter |
 |
|
Marlon Managi wrote:
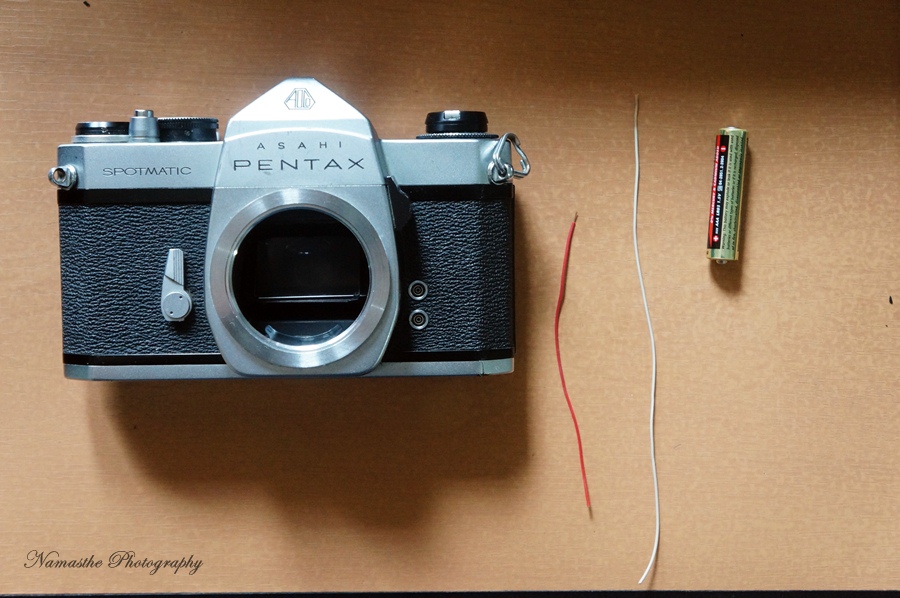
Asahi Pentax is one of the famous brand camera from Japan beside Nikon, Canon, and Minolta. Great built in body and its looks like samurai warrior from Japan. But nowadays I often found Asahi Pentax camera in junk store or second hand camera store in dead light meter condition. Several conditions might be caused the light meter doesn�t work such as : due its age, copper wire inside light meter is coated by rush, broken copper wire etc. If you are analog lover is so sad to facing this condition. After several experiments I found some way to fix and bring the light meter back to normal. This method Couldn't fix your light meter if the copper wire inside the light meter is broken.

What equipment you may need?
1. Single battery which has capacity 1.5Volt
2. wires
3. Tape
4. Scissor
Step by step
1.Open battery cap chamber in bottom plate of you camera.

2.After that you will find 2 contact surfaces. One is for negative pole, and second one is for positive pole.
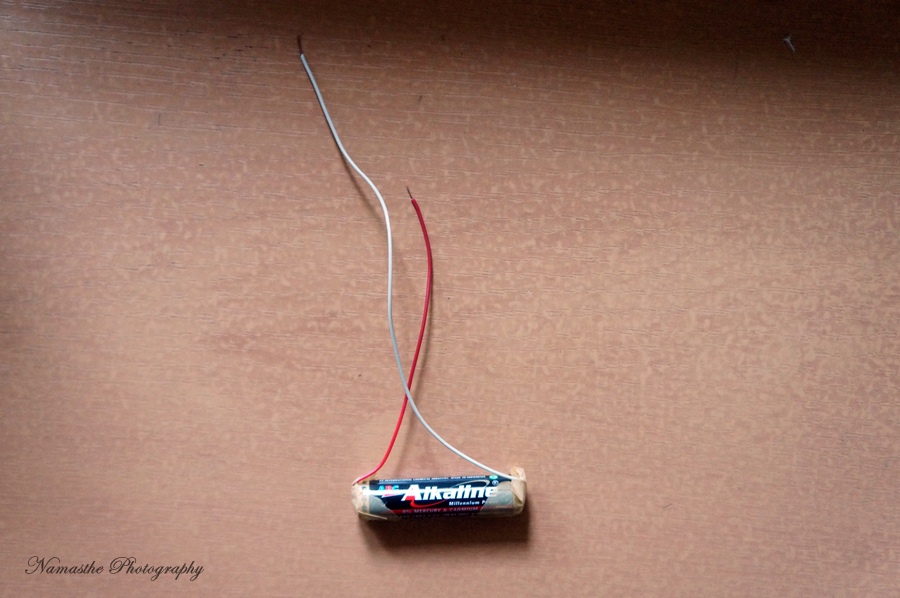
3. Take your battery and install the wire in both side pole of you battery using tape.
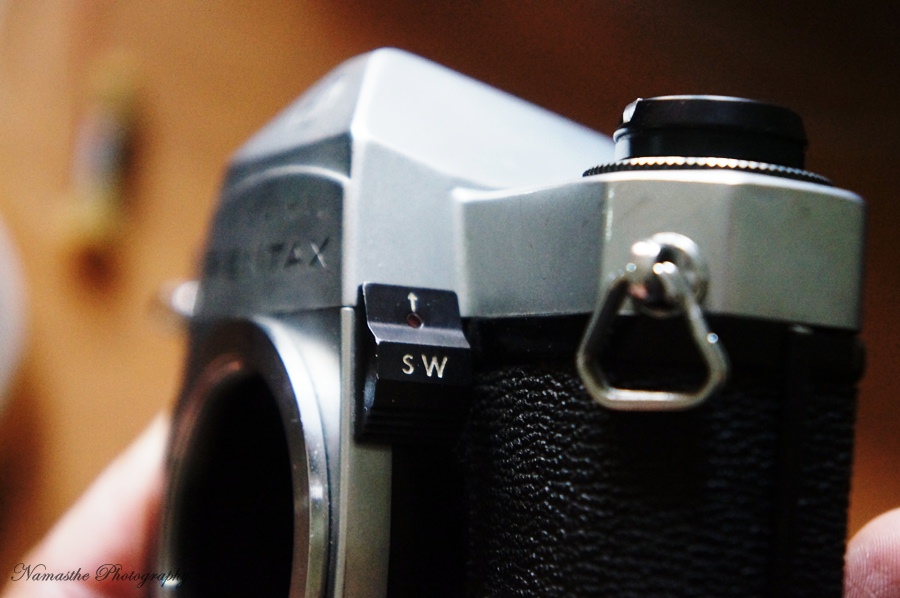
4. Before you apply to using battery and wire please make sure you light meter switch is on position.

5.This is the IMPORTANT step you should pay attention. After you install the wire with battery now get ready for this part. Take the wire from positive pole from you battery put it on bottom plate(near by the hole) and take the wire form negative pole and RUBBING in surface area inside battery chamber, DO NOT Allowed the wire contact for long time to avoid overload circuit.
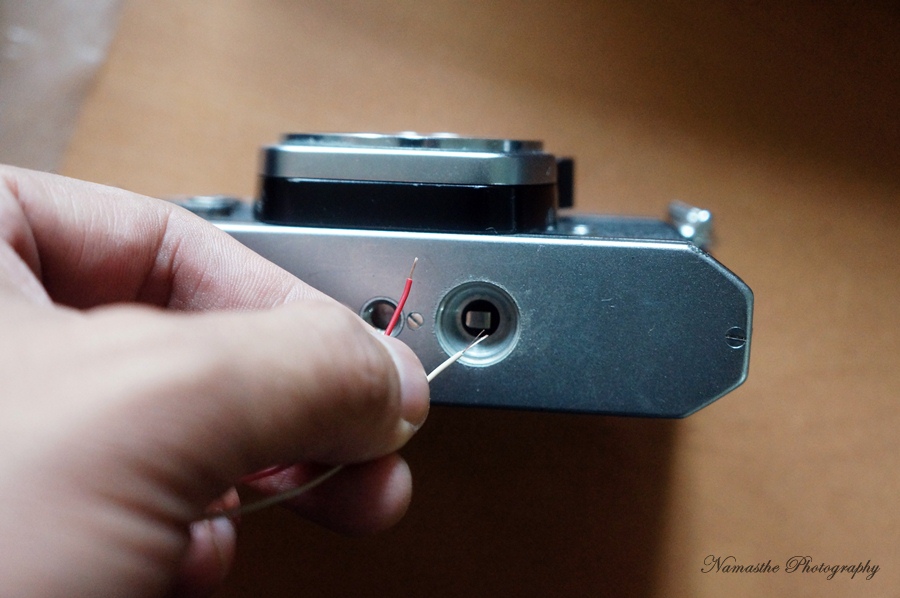
6. Be careful do not MISPLACED between positive pole and negative pole. Because this camera using DC circuit, to avoid short circuit.
7. And after those steps are applied install small battery (watch battery or LR44 battery) and check your light meter. Hope it becoming normal and work properly.
Best Regards, Marlon
NOTE : You applied this method with your OWN RISK.
_________________
Very nice to find this website. Hope Admin can accept me to join in this website. By the way, I love manual lenses. Hahhaha. LOL
Last edited by Marlon Managi on Tue Dec 30, 2014 7:55 am; edited 1 time in total |
|
| Back to top |
|
 |
DigiChromeEd


Joined: 29 Dec 2009
Posts: 3462
Location: Northern Ireland
|
| Posted: Sun Dec 21, 2014 9:34 am Post subject: Re: How to Fix Asahi Camera Light Meter |
|
|
DigiChromeEd wrote:
Hi Marlon Managi, welcome to the forum!
You can't post photos or links in your first post - an antispam measure. You'll be ok from now on.
| Marlon Managi wrote: |
Asahi Pentax is one of the famous brand camera from Japan beside Nikon, Canon, and Minolta. Great built in body and its looks like samurai warrior from Japan. But nowadays I often found Asahi Pentax camera in junk store or second hand camera store in dead light meter condition. Several conditions might be caused the light meter doesn�t work such as : due its age, copper wire inside light meter is coated by rush, broken copper wire etc. If you are analog lover is so sad to facing this condition. After several experiments I found some way to fix and bring the light meter back to normal. This method Couldn't fix your light meter if the copper wire inside the light meter is broken.
What equipment you may need?
1. Single battery which has capacity 1.5Volt
2. wires
3. Tape
4. Scissor
Step by step
1.Open battery cap chamber in bottom plate of you camera.
2.After that you will find 2 contact surfaces. One is for negative pole, and second one is for positive pole.
3. Take your battery and install the wire in both side pole of you battery using tape.
4. Before you apply to using battery and wire please make sure you light meter switch is on position.
5.This is the IMPORTANT step you should pay attention. After you install the wire with battery now get ready for this part. Take the wire from positive pole from you battery put it on bottom plate(near by the hole) and take the wire form negative pole and RUBBING in surface area inside battery chamber, DO NOT Allowed the wire contact for long time to avoid overload circuit.
6. Be careful do not MISPLACED between positive pole and negate pole. Because this camera using DC circuit, to avoid short circuit.
7. And after those steps are applied install small battery (watch battery or LR44 battery) and check your light meter. Hope it becoming normal and work properly.
Best Regards, Marlon
NOTE : You applied this method with your OWN RISK.
|
_________________
"I've got a Nikon camera, I like to take a photograph" - Paul Simon |
|
| Back to top |
|
|
kuuan

Joined: 14 Jan 2008
Posts: 4572
Location: right now: Austria
Expire: 2014-12-26
|
| Posted: Sun Dec 21, 2014 2:39 pm Post subject: |
|
|
kuuan wrote:
welcome here Marlon, and thank you very much for your very interesting and helpful post!
may many Spoty lightmeters be kicked to life!
_________________
my photos on flickr: https://www.flickr.com/photos/kuuan/collections |
|
| Back to top |
|
|
Marlon Managi
Joined: 11 Mar 2014
Posts: 12
Location: Bali, Indonesia
|
| Posted: Tue Dec 30, 2014 6:47 am Post subject: Re: How to Fix Asahi Camera Light Meter |
|
|
Marlon Managi wrote:
| DigiChromeEd wrote: |
Hi Marlon Managi, welcome to the forum!
You can't post photos or links in your first post - an antispam measure. You'll be ok from now on.
| Marlon Managi wrote: |
Asahi Pentax is one of the famous brand camera from Japan beside Nikon, Canon, and Minolta. Great built in body and its looks like samurai warrior from Japan. But nowadays I often found Asahi Pentax camera in junk store or second hand camera store in dead light meter condition. Several conditions might be caused the light meter doesn�t work such as : due its age, copper wire inside light meter is coated by rush, broken copper wire etc. If you are analog lover is so sad to facing this condition. After several experiments I found some way to fix and bring the light meter back to normal. This method Couldn't fix your light meter if the copper wire inside the light meter is broken.
What equipment you may need?
1. Single battery which has capacity 1.5Volt
2. wires
3. Tape
4. Scissor
Step by step
1.Open battery cap chamber in bottom plate of you camera.
2.After that you will find 2 contact surfaces. One is for negative pole, and second one is for positive pole.
3. Take your battery and install the wire in both side pole of you battery using tape.
4. Before you apply to using battery and wire please make sure you light meter switch is on position.
5.This is the IMPORTANT step you should pay attention. After you install the wire with battery now get ready for this part. Take the wire from positive pole from you battery put it on bottom plate(near by the hole) and take the wire form negative pole and RUBBING in surface area inside battery chamber, DO NOT Allowed the wire contact for long time to avoid overload circuit.
6. Be careful do not MISPLACED between positive pole and negate pole. Because this camera using DC circuit, to avoid short circuit.
7. And after those steps are applied install small battery (watch battery or LR44 battery) and check your light meter. Hope it becoming normal and work properly.
Best Regards, Marlon
NOTE : You applied this method with your OWN RISK.
|
|
Wow many thx buddy glad to hear that.  thx for appreciated my thread thx for appreciated my thread
_________________
Very nice to find this website. Hope Admin can accept me to join in this website. By the way, I love manual lenses. Hahhaha. LOL |
|
| Back to top |
|
|
Marlon Managi
Joined: 11 Mar 2014
Posts: 12
Location: Bali, Indonesia
|
| Posted: Tue Dec 30, 2014 6:49 am Post subject: |
|
|
Marlon Managi wrote:
| kuuan wrote: |
welcome here Marlon, and thank you very much for your very interesting and helpful post!
may many Spoty lightmeters be kicked to life! |
Thx buddy. I tried this trick for several times and its work bring my asahi takumar light meter back to work. Thx for visiting my thread
_________________
Very nice to find this website. Hope Admin can accept me to join in this website. By the way, I love manual lenses. Hahhaha. LOL |
|
| Back to top |
|
|
philslizzy

Joined: 07 Aug 2012
Posts: 4748
Location: Cheshire, England
|
| Posted: Tue Dec 30, 2014 7:12 am Post subject: |
|
|
philslizzy wrote:
Interesting idea. I wonder how it works and if it would work with other cameras.
_________________
Hero in the 'messin-with-cameras-for-the-hell-of-it department'. Official. |
|
| Back to top |
|
|
Marlon Managi
Joined: 11 Mar 2014
Posts: 12
Location: Bali, Indonesia
|
| Posted: Tue Dec 30, 2014 7:49 am Post subject: |
|
|
Marlon Managi wrote:
| philslizzy wrote: |
| Interesting idea. I wonder how it works and if it would work with other cameras. |
I had tried it on Minolta SRT 101 which is the light meter isn't work and when i use this technique for "electric shocking"
and the metering is work now
_________________
Very nice to find this website. Hope Admin can accept me to join in this website. By the way, I love manual lenses. Hahhaha. LOL |
|
| Back to top |
|
|
philslizzy
Joined: 07 Aug 2012
Posts: 4748
Location: Cheshire, England
|
| Posted: Tue Dec 30, 2014 9:49 pm Post subject: |
|
|
philslizzy wrote:
| Marlon Managi wrote: |
| philslizzy wrote: |
| Interesting idea. I wonder how it works and if it would work with other cameras. |
I had tried it on Minolta SRT 101 which is the light meter isn't work and when i use this technique for "electric shocking"
and the metering is work now |
Minolta SRT101 was the very camera I had in mind!
_________________
Hero in the 'messin-with-cameras-for-the-hell-of-it department'. Official. |
|
| Back to top |
|
|
Marlon Managi
Joined: 11 Mar 2014
Posts: 12
Location: Bali, Indonesia
|
| Posted: Wed Dec 31, 2014 1:07 am Post subject: |
|
|
Marlon Managi wrote:
| philslizzy wrote: |
| Marlon Managi wrote: |
| philslizzy wrote: |
| Interesting idea. I wonder how it works and if it would work with other cameras. |
I had tried it on Minolta SRT 101 which is the light meter isn't work and when i use this technique for "electric shocking"
and the metering is work now |
Minolta SRT101 was the very camera I had in mind! |
This is my minolta SRT buddy
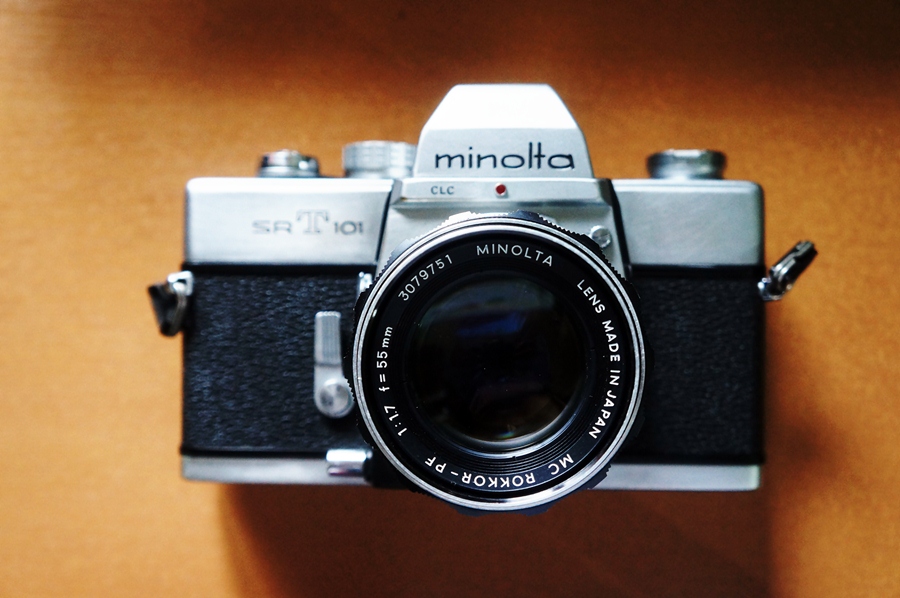
Great camera also
_________________
Very nice to find this website. Hope Admin can accept me to join in this website. By the way, I love manual lenses. Hahhaha. LOL |
|
| Back to top |
|
|
inombrable


Joined: 20 Mar 2012
Posts: 545
Location: Salamanca, Mexico
|
| Posted: Sat Jan 03, 2015 6:12 am Post subject: |
|
|
inombrable wrote:
Awesome !!
Just to let you know it worked on my alpa 9D, now the meter is back to life and to my surprise seems to be very accurate.
Thanks a lot.
_________________
-----------------------------------------------------------------------------------------------------------------------------------------------------------------------------------------------------------------------------------------------------------------------------------
DSLR: Canon 5D, Nikon D200
SLR: Alpa 9d, Voigtlander VSL3E, Contax D
Medium Format: Hasselblad 500 EL/M, Praktisix, Rolleiflex standar 621
Rangefinder: Contax II, Contax III, Leica M2, Leica M4, Leica IIC, Nikon S2
M42:CZJ Flektogon 20 f/2.8, CZJ Flektogon 25 f/4, CZJ Flektogon 35 f/2.4, Color Skoparex 35 f/2.8, CZJ Pancolar 50 f/1.8, Super takumar 50 f/1.4, Meyer Primoplan 58 f/1.9, CZJ Tessar 50 f/2.8 alu, Jupiter 9 MC, Super Takumar 105 f/2.5, SMC Takumar 135 f/2.5, CZJ Sonnar 135 f/3.5 MC, CZJ Sonnar 135 f/3.5 Zebra, Super takumar 200 f/3.5
Nikon mount: Nippon kogaku Nikkor-N Auto 24 f/2.8, Nikon micro Nikkor 55 f/2.8, Kiron 105 f/2.8 macro.
C/Y: Planar 50 f/1.4, Yashica ML 50 f/1.4, Planar 85 f/1.4.
M39: Mir-1 Grand Prix Brussels, Helios 44 13 blades, Jupiter 11
Rangefinder: CZJ Biogon 3.5cm f/2.8, Sonnar 50 f/1.5, Sonnar 50 f/2, Nikkor-S 5 cm f/1.4, Summicron 50 f/2 DR, Summicron 50 f/2 collapsible, Summicron 35 f/2 V3. Jupiter 12, Jupiter 8, Jupiter 9, Elmar 90 f/4.
Canon EF: Voigtlander APO-Lanthar 90 f/3.5 SL-II
Exakta: Biotar 58 f/2
Adaptall: 103A, 46A, 19AH, 55B
|
|
| Back to top |
|
|
tromboads

Joined: 29 May 2012
Posts: 1782
Location: Melbourne AU
Expire: 2015-10-01
|
| Posted: Sat Jan 03, 2015 8:40 am Post subject: |
|
|
tromboads wrote:
I'm a bit confused here.. you are just passing a broken current to the meter in effort to "re-boot it" ?? |
|
| Back to top |
|
|
Lloydy

Joined: 02 Sep 2009
Posts: 7785
Location: Ironbridge. UK.
Expire: 2022-01-01
|
| Posted: Sat Jan 03, 2015 11:39 am Post subject: |
|
|
Lloydy wrote:
I've heard about flashing a higher voltage across some electrical / electronic devices to resurrect them before. My guess is - it's a kill or cure technique.
_________________
LENSES & CAMERAS FOR SALE.....
I have loads of stuff that I have to get rid of, if you see me commenting about something I have got and you want one, ask me.
My Flickr https://www.flickr.com/photos/mudplugga/
My ipernity -
http://www.ipernity.com/home/294337 |
|
| Back to top |
|
|
philslizzy
Joined: 07 Aug 2012
Posts: 4748
Location: Cheshire, England
|
| Posted: Sun Jan 04, 2015 10:55 pm Post subject: |
|
|
philslizzy wrote:
Perhaps its the higher amperage, The circuit in the camera can deal with 1.5 volts easy enough. I've got to give it a go!
_________________
Hero in the 'messin-with-cameras-for-the-hell-of-it department'. Official. |
|
| Back to top |
|
|
Marlon Managi
Joined: 11 Mar 2014
Posts: 12
Location: Bali, Indonesia
|
| Posted: Tue Jan 06, 2015 5:38 am Post subject: |
|
|
Marlon Managi wrote:
| inombrable wrote: |
Awesome !!
Just to let you know it worked on my alpa 9D, now the meter is back to life and to my surprise seems to be very accurate.
Thanks a lot. |
Wow glad to hear that. you made it congrats. then now play around with your analog camera
_________________
Very nice to find this website. Hope Admin can accept me to join in this website. By the way, I love manual lenses. Hahhaha. LOL |
|
| Back to top |
|
|
Marlon Managi
Joined: 11 Mar 2014
Posts: 12
Location: Bali, Indonesia
|
| Posted: Tue Jan 06, 2015 5:41 am Post subject: |
|
|
Marlon Managi wrote:
| tromboads wrote: |
| I'm a bit confused here.. you are just passing a broken current to the meter in effort to "re-boot it" ?? |
Definitely yes bro. That's what i mean "Electrical shocking"
_________________
Very nice to find this website. Hope Admin can accept me to join in this website. By the way, I love manual lenses. Hahhaha. LOL |
|
| Back to top |
|
|
philslizzy
Joined: 07 Aug 2012
Posts: 4748
Location: Cheshire, England
|
| Posted: Tue Jan 06, 2015 10:00 am Post subject: |
|
|
philslizzy wrote:
| Marlon Managi wrote: |
| ...then now play around with your analog camera |
'analog' grrr...
_________________
Hero in the 'messin-with-cameras-for-the-hell-of-it department'. Official. |
|
| Back to top |
|
|
Marlon Managi
Joined: 11 Mar 2014
Posts: 12
Location: Bali, Indonesia
|
| Posted: Wed Jan 07, 2015 12:31 pm Post subject: |
|
|
Marlon Managi wrote:
| philslizzy wrote: |
| Perhaps its the higher amperage, The circuit in the camera can deal with 1.5 volts easy enough. I've got to give it a go! |
Okay then let me know if you already fix it
_________________
Very nice to find this website. Hope Admin can accept me to join in this website. By the way, I love manual lenses. Hahhaha. LOL |
|
| Back to top |
|
|
|
|
|
You cannot post new topics in this forum
You cannot reply to topics in this forum
You cannot edit your posts in this forum
You cannot delete your posts in this forum
You cannot vote in polls in this forum
|