| View previous topic :: View next topic |
| Author |
Message |
Jesito


Joined: 24 Aug 2007
Posts: 5745
Location: Olivella, Catalonia, (Spain)
Expire: 2015-01-07
|
 Posted: Tue May 18, 2010 2:22 pm Post subject: Posted: Tue May 18, 2010 2:22 pm Post subject: |
 |
|
Jesito wrote:
Thanks so much for all these clear and understandable instructions.
Some time ago I got a 50mm 2.8 Tessar Exakta mount from Carsten, as a part of a Exakta deal. It was unassembled.
Since then it has been my favourite puzzle.
Unfortunately I've been unable to set it up again. The parts of my Tessar seem to be slightly different:
What do you think about it?.
I'd be really happy if I could make it work again.
Thanks in advance.
Jes.
_________________
Jesito, Moderator 
Jesito's backsack:
Zooms Sigma 70-300, Tamron 35-135 and 70-210 short, 70-210 long, 28-70 CF Macro, 35-70, 35-80, Vivitar 70-210 KA, Tamron 70-250.
Fixed Industar-50, , Tamron 24mm, Tamron 135mm, Sands Hunter 135mm, Pancolar 50mm, Volna-3, many Exakta lenses
DSLR SIGMA SD9 & SD14, EOS 5D, Sony A700 and NEXF3, Oly E-330, E-400, E-450, E-1
TLR/6x6/645 YashicaMat, Petri 6x45, Nettar, Franka Solida, Brilliant
SLR Minolta X300, Fuji STX II, Praktica VLC3, Pentax P30t, EXA500, EXA 1A, Spotmatic(2), Chinon CM-4S, Ricoh, Contax, Konica TC-X , Minolta 5000, 7000i, 3Sxi, EOS 500 and CX
Rangefinders Chinon 35EE, Konica C35 auto, Canonet 28, Yashica Lynx, FED-2, Yashica electro 35, Argus C3 & C4, Regula Cita III, Voigtlander Vitoret (many), Welta Welti-I, Kodak Signette 35, Zorki-4, Bessa-R & L, Minolta Weathermatic, olympus XA2
Compact Film Konica C35V, Voigtlander Vitorets, Canon Prima Super 105, Olympus XA2 and XA3
Compact Digital Olympus C-5050, Aiptek Slim 3000, Canon Powershot A540, Nikon 5200, SIGMA DP1s, Polaroid X530, IXUS55, Kodak 6490, Powershot G9 and G10
CSCCanon EOS-M, Samsung NX100 and NX210, Lumix G5, NEX-F3 |
|
| Back to top |
|
 |
Arkku


Joined: 28 Feb 2007
Posts: 1416
Location: Helsinki, Finland
|
| Posted: Tue May 18, 2010 3:35 pm Post subject: |
|
|
Arkku wrote:
| Jesito wrote: |
|
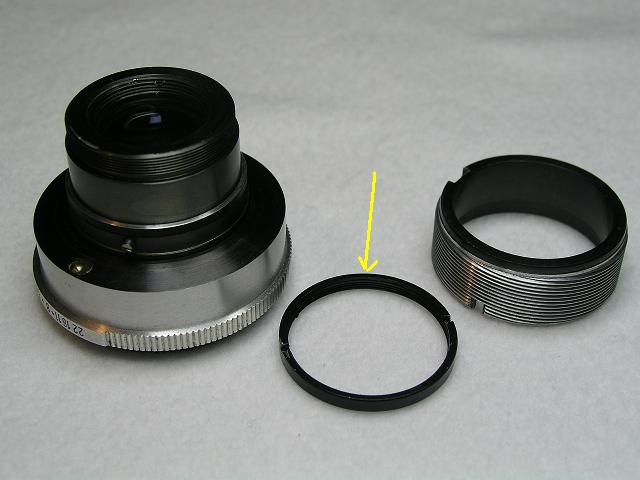
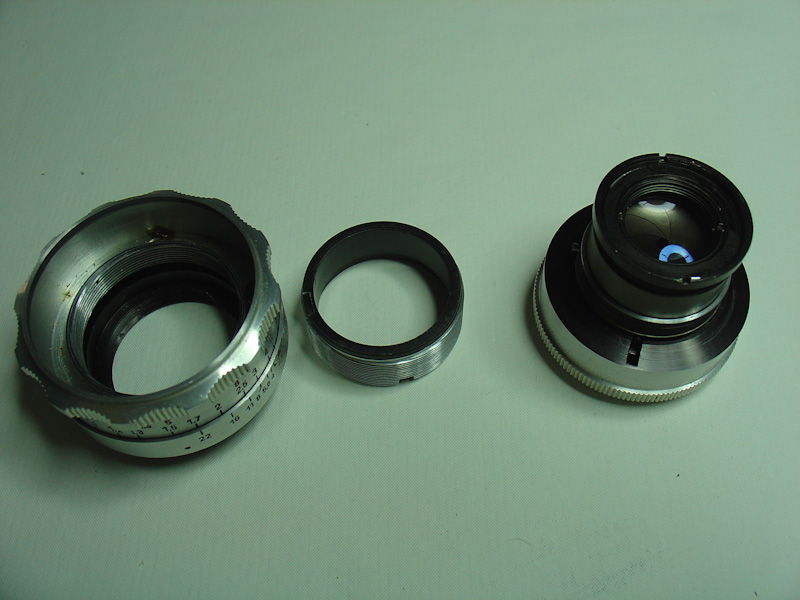
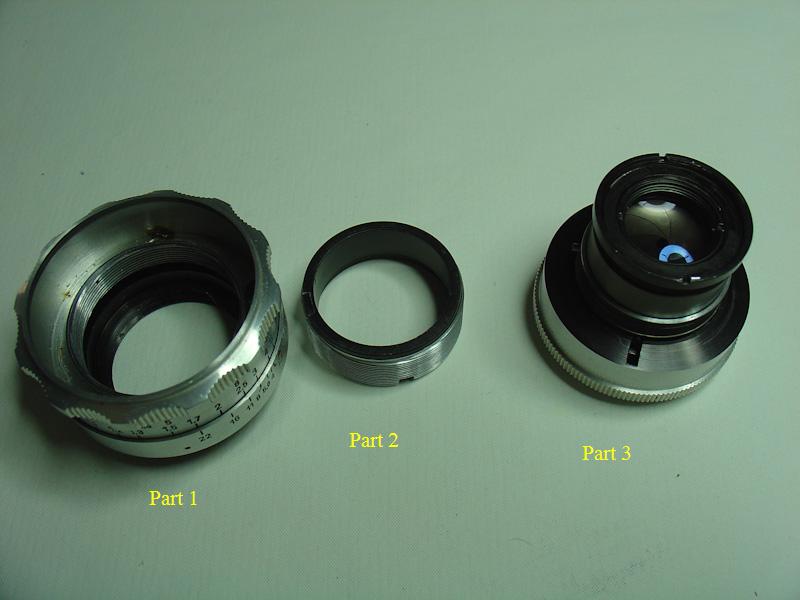
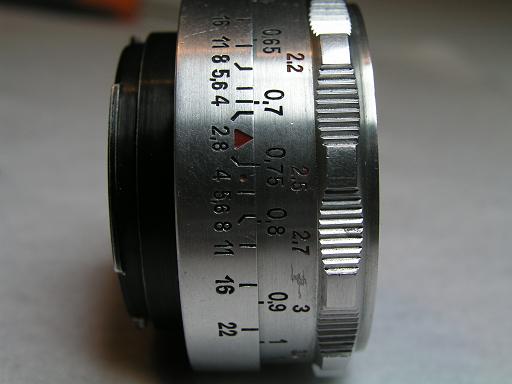
Let's call those three separate parts in the picture from left to right 1, 2 and 3.
It seems to me that the reassembly procedure would be:
� Remove the largest of the rings around the rear element (in part 3); it should simply screw off.
� Put part 2 on part 3 (there should be some peg or such to indicate the correct position where it cannot rotate).
� Remove the focus limiter from part 1 (it should be a large screw on the outside).
� Turn the focusing ring clockwise as deep as it will go (it will eventually get stuck; don't try to force it to continue!). Then turn it back so that you pass infinity focus once, and keep turning back until the focus mark is at the minimum focus distance.
� Put the parts 2 & 3 (combined earlier) on the table with the front element down. Now aim part 1 so that when you look through the mount hole, the peg inside part 1 is a just a bit clockwise of the slot in part 2 (the focusing helicoid) into which it must go. Hold on to the focusing ring to maintain the focus position we set earlier and turn the entire part 1 counter-clockwise to get it onto a thread in the helicoid. This may take a couple of attempts; if it goes too far counter-clockwise, try again from a more clockwise position�the idea is that the peg should be clockwise of the slot when the threads engage. Once you get it right, you should be able to exactly align the peg with target slot by only a very slight turn of the entire part 1 (don't allow the focus ring to move separately!).
� Now press down slightly to hold part 3 firm against the table to keep it from rotating, and use your off-hand to hold still the rearmost part (lower half of part 1, i.e. where the mount is). With your other hand turn the focusing ring to screw the lens all the way in�the peg should sink right into the target slot if you aligned it right in the previous step. If not, you need to go back to the previous step and try again (this may take a couple of attempts).
Now be very careful not to unscrew accidentally by focusing closer than the minimum focus distance!
� Once you get this far, test infinity focus on the camera by positioning the focus mark at infinity (it will probably go past infinity if you try, but don't let it). If you focus beyond infinity, you may want to go back three steps and when you turn back the focusing ring, go past the infinity focus mark one more time than on the previous attempt, and then reassemble again. (After the first attempt this may sound daunting enough to leave it as it is, but once you get the idea it's actually quite easy.)
� Once you have sufficient infinity focus accuracy, put the focus somewhere inside the normally allowed range and restore the focus limiter screw.
� Restore the ring around the rear element.
� Verify that you can focus to the minimum focus distance. If the lens falls off the focusing helicoid when you try, disassemble everything and try to find a different thread when you align the focusing helicoid.
Last edited by Arkku on Tue May 18, 2010 10:58 pm; edited 4 times in total |
|
| Back to top |
|
|
Jesito
Joined: 24 Aug 2007
Posts: 5745
Location: Olivella, Catalonia, (Spain)
Expire: 2015-01-07
|
| Posted: Tue May 18, 2010 8:55 pm Post subject: |
|
|
Jesito wrote:
Thanks a lot!.
I'll try it and take pictures during the process... 
Regards.
Jes.
_________________
Jesito, Moderator
Jesito's backsack:
Zooms Sigma 70-300, Tamron 35-135 and 70-210 short, 70-210 long, 28-70 CF Macro, 35-70, 35-80, Vivitar 70-210 KA, Tamron 70-250.
Fixed Industar-50, , Tamron 24mm, Tamron 135mm, Sands Hunter 135mm, Pancolar 50mm, Volna-3, many Exakta lenses
DSLR SIGMA SD9 & SD14, EOS 5D, Sony A700 and NEXF3, Oly E-330, E-400, E-450, E-1
TLR/6x6/645 YashicaMat, Petri 6x45, Nettar, Franka Solida, Brilliant
SLR Minolta X300, Fuji STX II, Praktica VLC3, Pentax P30t, EXA500, EXA 1A, Spotmatic(2), Chinon CM-4S, Ricoh, Contax, Konica TC-X , Minolta 5000, 7000i, 3Sxi, EOS 500 and CX
Rangefinders Chinon 35EE, Konica C35 auto, Canonet 28, Yashica Lynx, FED-2, Yashica electro 35, Argus C3 & C4, Regula Cita III, Voigtlander Vitoret (many), Welta Welti-I, Kodak Signette 35, Zorki-4, Bessa-R & L, Minolta Weathermatic, olympus XA2
Compact Film Konica C35V, Voigtlander Vitorets, Canon Prima Super 105, Olympus XA2 and XA3
Compact Digital Olympus C-5050, Aiptek Slim 3000, Canon Powershot A540, Nikon 5200, SIGMA DP1s, Polaroid X530, IXUS55, Kodak 6490, Powershot G9 and G10
CSCCanon EOS-M, Samsung NX100 and NX210, Lumix G5, NEX-F3 |
|
| Back to top |
|
|
peterqd

Joined: 28 Feb 2007
Posts: 7448
Location: near High Wycombe, UK
Expire: 2014-01-04
|
| Posted: Tue May 18, 2010 9:12 pm Post subject: |
|
|
peterqd wrote:
Did you leave your green filter on Jes? 
Good luck with the lens.
_________________
Peter - Moderator |
|
| Back to top |
|
|
Jesito
Joined: 24 Aug 2007
Posts: 5745
Location: Olivella, Catalonia, (Spain)
Expire: 2015-01-07
|
| Posted: Tue May 18, 2010 11:11 pm Post subject: |
|
|
Jesito wrote:
Let's go step by step:
Let's call those three separate parts in the picture from left to right 1, 2 and 3.
It seems to me that the reassembly procedure would be:
� Remove the largest of the rings around the rear element (in part 3); it should simply screw off.

� Put part 2 on part 3 (there should be some peg or such to indicate the correct position where it cannot rotate).
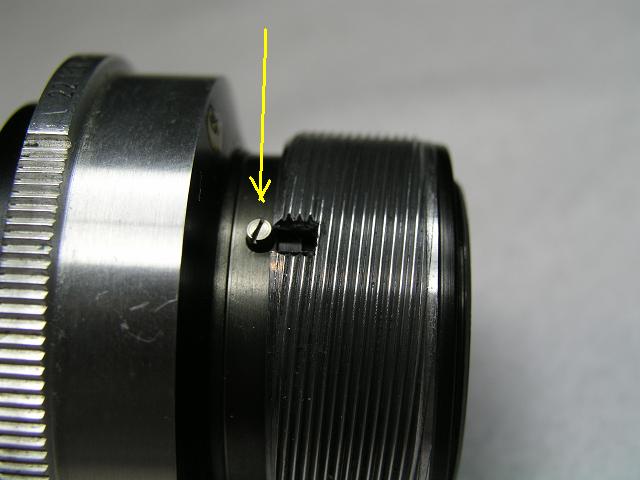

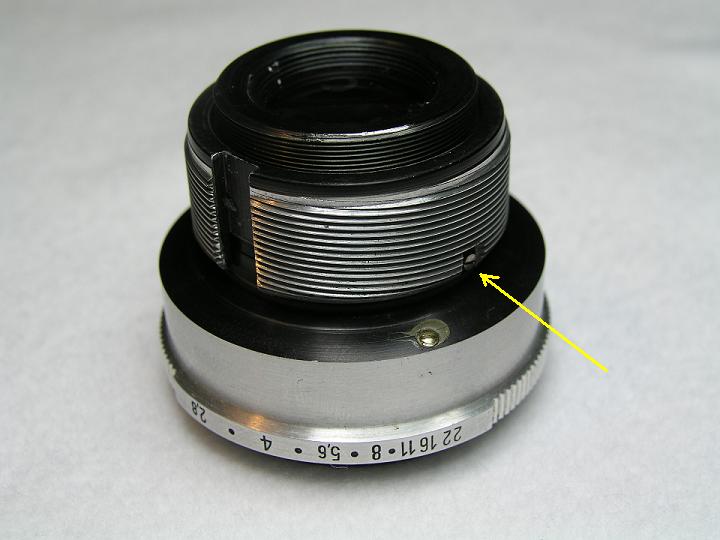
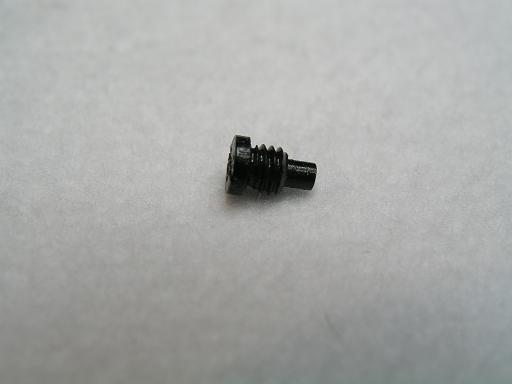
� Remove the focus limiter from part 1 (it should be a large screw on the outside).
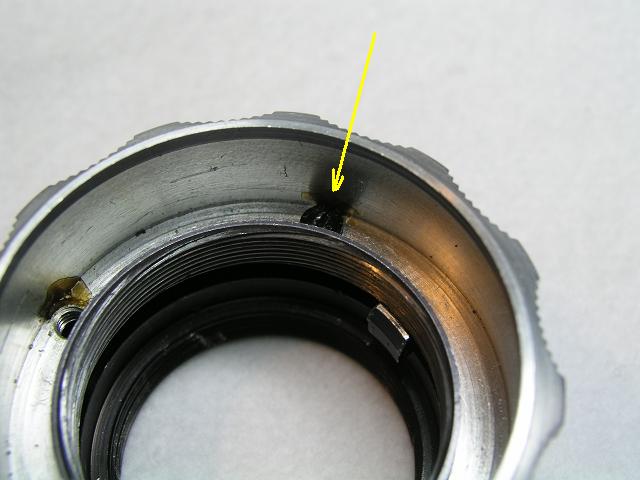
I see no outside screws. Inside there are two holes, one of them holds a screw that once removed allows for turning the base:
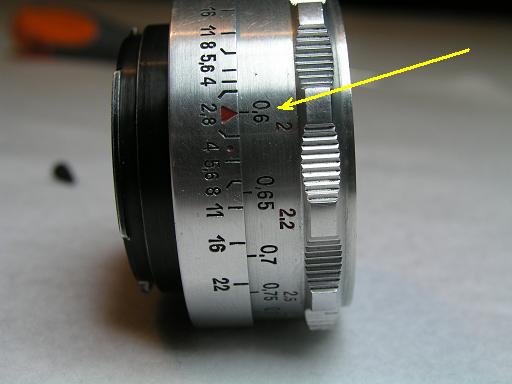
� Turn the focusing ring clockwise as deep as it will go (it will eventually get stuck; don't try to force it to continue!).
� Then turn it back so that you pass infinity focus once, and keep turning back the focus mark is at the minimum focus distance.

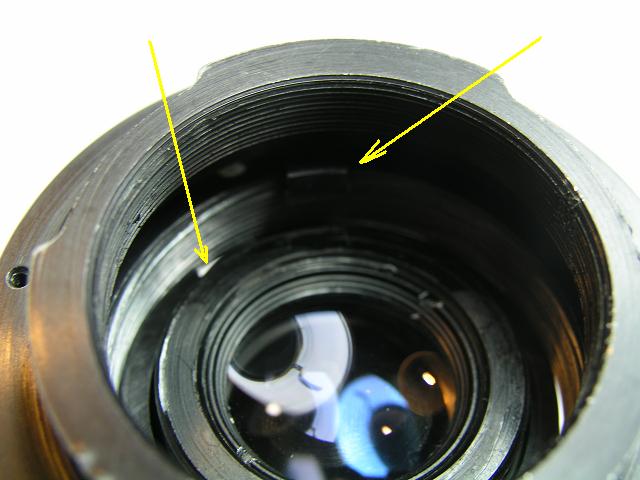
� Put the parts 2 & 3 (combined earlier) on the table with the front element down. Now aim part 1 so that when you look through the mount hole, the peg inside part 1 is a just a bit clockwise of the slot in part 3 (the focusing helicoid) into which it must go. Hold on to the focusing ring to maintain the focus position we set earlier and turn the entire part 1 counter-clockwise to get it onto a thread in part 2 (the focusing helicoid). This may take a couple of attempts; if it goes too far counter-clockwise, try again from a more clockwise position�the idea is that the peg should be clockwise of the slot when the threads engage. Once you get it right, you should be able to exactly align the peg with target slot by only a very slight turn of the entire part 1 (don't allow the focus ring to move separately!).
That's where I'm stuck now. I get to put the peg just clockwise but no progress from here is possible, it gets somewhat locked. To make the peg fit the thread I have to move only the focusing ring, not the whole ensemble...

Well, too tired today. I'll keep trying tomorrow.
Thanks again,
Regards.
Jes.
_________________
Jesito, Moderator
Jesito's backsack:
Zooms Sigma 70-300, Tamron 35-135 and 70-210 short, 70-210 long, 28-70 CF Macro, 35-70, 35-80, Vivitar 70-210 KA, Tamron 70-250.
Fixed Industar-50, , Tamron 24mm, Tamron 135mm, Sands Hunter 135mm, Pancolar 50mm, Volna-3, many Exakta lenses
DSLR SIGMA SD9 & SD14, EOS 5D, Sony A700 and NEXF3, Oly E-330, E-400, E-450, E-1
TLR/6x6/645 YashicaMat, Petri 6x45, Nettar, Franka Solida, Brilliant
SLR Minolta X300, Fuji STX II, Praktica VLC3, Pentax P30t, EXA500, EXA 1A, Spotmatic(2), Chinon CM-4S, Ricoh, Contax, Konica TC-X , Minolta 5000, 7000i, 3Sxi, EOS 500 and CX
Rangefinders Chinon 35EE, Konica C35 auto, Canonet 28, Yashica Lynx, FED-2, Yashica electro 35, Argus C3 & C4, Regula Cita III, Voigtlander Vitoret (many), Welta Welti-I, Kodak Signette 35, Zorki-4, Bessa-R & L, Minolta Weathermatic, olympus XA2
Compact Film Konica C35V, Voigtlander Vitorets, Canon Prima Super 105, Olympus XA2 and XA3
Compact Digital Olympus C-5050, Aiptek Slim 3000, Canon Powershot A540, Nikon 5200, SIGMA DP1s, Polaroid X530, IXUS55, Kodak 6490, Powershot G9 and G10
CSCCanon EOS-M, Samsung NX100 and NX210, Lumix G5, NEX-F3
Last edited by Jesito on Tue May 18, 2010 11:13 pm; edited 1 time in total |
|
| Back to top |
|
|
Jesito
Joined: 24 Aug 2007
Posts: 5745
Location: Olivella, Catalonia, (Spain)
Expire: 2015-01-07
|
| Posted: Tue May 18, 2010 11:12 pm Post subject: |
|
|
Jesito wrote:
| peterqd wrote: |
Did you leave your green filter on Jes?
Good luck with the lens. |
No, I'm afraid it was the wrong white balance... Or should I say the ri�ght green balance?
Thanks, Peter. A difficult quest by now
Regards,
Jes.
_________________
Jesito, Moderator
Jesito's backsack:
Zooms Sigma 70-300, Tamron 35-135 and 70-210 short, 70-210 long, 28-70 CF Macro, 35-70, 35-80, Vivitar 70-210 KA, Tamron 70-250.
Fixed Industar-50, , Tamron 24mm, Tamron 135mm, Sands Hunter 135mm, Pancolar 50mm, Volna-3, many Exakta lenses
DSLR SIGMA SD9 & SD14, EOS 5D, Sony A700 and NEXF3, Oly E-330, E-400, E-450, E-1
TLR/6x6/645 YashicaMat, Petri 6x45, Nettar, Franka Solida, Brilliant
SLR Minolta X300, Fuji STX II, Praktica VLC3, Pentax P30t, EXA500, EXA 1A, Spotmatic(2), Chinon CM-4S, Ricoh, Contax, Konica TC-X , Minolta 5000, 7000i, 3Sxi, EOS 500 and CX
Rangefinders Chinon 35EE, Konica C35 auto, Canonet 28, Yashica Lynx, FED-2, Yashica electro 35, Argus C3 & C4, Regula Cita III, Voigtlander Vitoret (many), Welta Welti-I, Kodak Signette 35, Zorki-4, Bessa-R & L, Minolta Weathermatic, olympus XA2
Compact Film Konica C35V, Voigtlander Vitorets, Canon Prima Super 105, Olympus XA2 and XA3
Compact Digital Olympus C-5050, Aiptek Slim 3000, Canon Powershot A540, Nikon 5200, SIGMA DP1s, Polaroid X530, IXUS55, Kodak 6490, Powershot G9 and G10
CSCCanon EOS-M, Samsung NX100 and NX210, Lumix G5, NEX-F3 |
|
| Back to top |
|
|
Arkku
Joined: 28 Feb 2007
Posts: 1416
Location: Helsinki, Finland
|
| Posted: Wed May 19, 2010 12:11 am Post subject: |
|
|
Arkku wrote:
| Jesito wrote: |
� Remove the focus limiter from part 1 (it should be a large screw on the outside).
I see no outside screws. Inside there are two holes, one of them holds a screw that once removed allows for turning the base:
|
Looks like it does the right thing; it's on the outside in the M42 version that I have. However, as you will not be able to put it back from the outside, this means that you need to replace it before you continue assembly:
| Jesito wrote: |
Once you get it right, you should be able to exactly align the peg with target slot by only a very slight turn of the entire part 1 (don't allow the focus ring to move separately!).
That's where I'm stuck now. I get to put the peg just clockwise but no progress from here is possible, it gets somewhat locked. To make the peg fit the thread I have to move only the focusing ring, not the whole ensemble...
|
Try to do a slight adjustment with the focusing ring to align the peg, maybe it will work.
Could also be that this part of the process differs, as the focus limiter is on the inside of the lens. |
|
| Back to top |
|
|
euphilein
Joined: 24 May 2010
Posts: 1
|
| Posted: Mon May 24, 2010 10:18 am Post subject: |
|
|
euphilein wrote:
Well, thanks to all of you guys!
With some help of the postings here, i was able to reassemble my All Tessar.
After some tries i was able to reassemble the 3 big parts within seconds.
Then i needed some more tries to adjust the focus on infinity.
Some hints:
- Screw the focus ring into the mount ring
- Screw back passing the infinity mark just one time
- Continue with screwing back and align the focus mark on infinity (not passing it second time)
- Follow the instructions in this thread to assemble the focus ring+mount ring with the remaining third part of the lens, aligning the peg with the help of the mount ring
- When you got it, turn the focus ring towards infinity, the focus will be correct if the focus mark stops just a bit beyond infinity mark
- Screw in the focus limiter while having the focus mark somewhere between infinity and shortest focusing distance
Maybe this helps |
|
| Back to top |
|
|
user
Joined: 27 Jun 2010
Posts: 3
|
| Posted: Sun Jun 27, 2010 8:11 am Post subject: |
|
|
user wrote:
Thank you very much to the helpful people here. With your help I managed to put my Contax F M42 version of the Tessar back together perfectly.
At first it seemed more difficult than Rubick's cube, but with these instructions and some practice I can confirm that it's actually just a matter of seconds once you get the hang of it.
So don't get discouraged if you don't manage to solve the puzzle instantly. It will take some trial and error, but with some patience you will eventually get there.
Here are a few additional hints:
After screwing the focus ring all the way into the mount ring, screw back almost one full turn - past the minimum focusing, but not past the feet/m or infinity mark the second time - about 1cm right to the feet/m worked best for me. Yours may be slightly different, so you will need to choose a different starting point if your infinity focus is off.
I set a small aperture like f/16 before assembly to get the aperture lever out of the way. I then aligned the big latch to the big hole in the other part.
When putting all the pieces together I wrapped my right hand around it and used the index and ring finger to fix the upper and lower part while turning the focus ring in the middle with your left hand. Some nodding is necessary to get a perfect fit.
Good luck! |
|
| Back to top |
|
|
Volunteer


Joined: 16 Mar 2011
Posts: 74
Location: Zagreb, Croatia
|
| Posted: Wed Jun 22, 2011 6:17 am Post subject: |
|
|
Volunteer wrote:
When A is put on C and B screwed on A+C, how does that hold in place as C isn't screwed on A?
I suddenly can't screw B1 and B1 together all the way. It was working well till an hour ago and now it just stops at one point and is very hard to turn. Should I lubricate it? 
_________________
This lens is good for portraits = This lens is as soft as Oprah's butt. |
|
| Back to top |
|
|
NikonD

Joined: 29 Jul 2008
Posts: 1922
Location: Slovenija
|
| Posted: Tue May 22, 2012 8:40 am Post subject: |
|
|
NikonD wrote:
one question: is that screw also responsible for holding the lens together or is it just to prevent to go "beyond" focusing
I have one of these tessars and successfully reassembled it but it keeps falling apart, and the screw is missing... |
|
| Back to top |
|
|
tromboads

Joined: 29 May 2012
Posts: 1782
Location: Melbourne AU
Expire: 2015-10-01
|
| Posted: Tue May 29, 2012 4:05 pm Post subject: |
|
|
tromboads wrote:
Hasan and Jieffe
A Big Thank You!!!!
literally just registered here so I could shout your praises to the high heavens!  My little tasser is all happy chappy together again! My little tasser is all happy chappy together again!
Just for the record, I re-lubed it with "Tri-Flow" yes, its a bicycle chain lube... It didn't work. The grease needs to be thinker. Everyone else has been warned  |
|
| Back to top |
|
|
tromboads
Joined: 29 May 2012
Posts: 1782
Location: Melbourne AU
Expire: 2015-10-01
|
| Posted: Sun Jun 17, 2012 10:33 pm Post subject: |
|
|
tromboads wrote:
| NikonD wrote: |
one question: is that screw also responsible for holding the lens together or is it just to prevent to go "beyond" focusing
I have one of these tessars and successfully reassembled it but it keeps falling apart, and the screw is missing... |
Get on the carpet and mind yourself that screw! It indeed stops the whole lens from screwing itself apart. |
|
| Back to top |
|
|
uddhava

Joined: 22 Aug 2012
Posts: 3073
Location: Hungary
Expire: 2021-06-21
|
| Posted: Mon Apr 21, 2014 5:17 pm Post subject: |
|
|
uddhava wrote:
Thank you Hassan and others who contributed to this post I was able to lubricate and reassemble my Tessar
with your help.
Last edited by uddhava on Thu Oct 30, 2014 12:13 pm; edited 1 time in total |
|
| Back to top |
|
|
Cheffalo
Joined: 30 Oct 2014
Posts: 2
Location: Gothenburg Sweden
|
| Posted: Thu Oct 30, 2014 12:07 pm Post subject: |
|
|
Cheffalo wrote:
I tried this maneuver today, with my lens exactly the same as yours above here. Finally I managed to re-assemble it but the part C keeps falling off, it isn't attached to anything. I don't have a clue to how to fix this and I'd appreciate some input here!
Thank you! |
|
| Back to top |
|
|
hasan


Joined: 12 Mar 2007
Posts: 313
|
| Posted: Wed Jan 07, 2015 11:15 am Post subject: |
|
|
hasan wrote:
| Cheffalo wrote: |
I tried this maneuver today, with my lens exactly the same as yours above here. Finally I managed to re-assemble it but the part C keeps falling off, it isn't attached to anything. I don't have a clue to how to fix this and I'd appreciate some input here!
Thank you! |
Dear Cheffalo,
sorry, noticed your request only just.
If you have already followed my steps, at the beginning of this thread,
plus the very good description by JESITO, and still can't put them together,
please share some photos of the parts for us, to see at which point/status you got caught.
Thanks!
Kind regards
Hasan |
|
| Back to top |
|
|
Cheffalo
Joined: 30 Oct 2014
Posts: 2
Location: Gothenburg Sweden
|
| Posted: Wed Jan 07, 2015 12:52 pm Post subject: |
|
|
Cheffalo wrote:
| hasan wrote: |
| Cheffalo wrote: |
I tried this maneuver today, with my lens exactly the same as yours above here. Finally I managed to re-assemble it but the part C keeps falling off, it isn't attached to anything. I don't have a clue to how to fix this and I'd appreciate some input here!
Thank you! |
Dear Cheffalo,
sorry, noticed your request only just.
If you have already followed my steps, at the beginning of this thread,
plus the very good description by JESITO, and still can't put them together,
please share some photos of the parts for us, to see at which point/status you got caught.
Thanks!
Kind regards
Hasan |
Thank you, Hasan!
Mine looks more like the one in the first example, rather than the one from Jesito.
I've tried your maneuver many many times but there's nothing to keep the part C in the assembled (which the procedure will lead to) AB. Sometimes the assembly will be correct, as in the focus and aperture will work as it should, but the C part always fall out of the AB. Even if I mount the stop screw.
I've had my product developing engineer brother in law to take a look at it but he's as puzzled as I am. |
|
| Back to top |
|
|
|
|